Windows 11 has a lot of new features compared to Windows 10. While you’ll eventually get the chance to use most of these features, some features might not grab your attention until you’re specifically looking for them. Here are some hidden Windows 11 features that you should start using right away.
Adjust the Volume Using Your Mouse Wheel
Whenever you want to control the volume on your Windows computer, you need to either use the volume keys on your keyboard or access the Quick Settings menu and then adjust the volume slider. While both these methods are quick, what if I tell you there’s an even quicker method to adjust the volume on Windows 11?
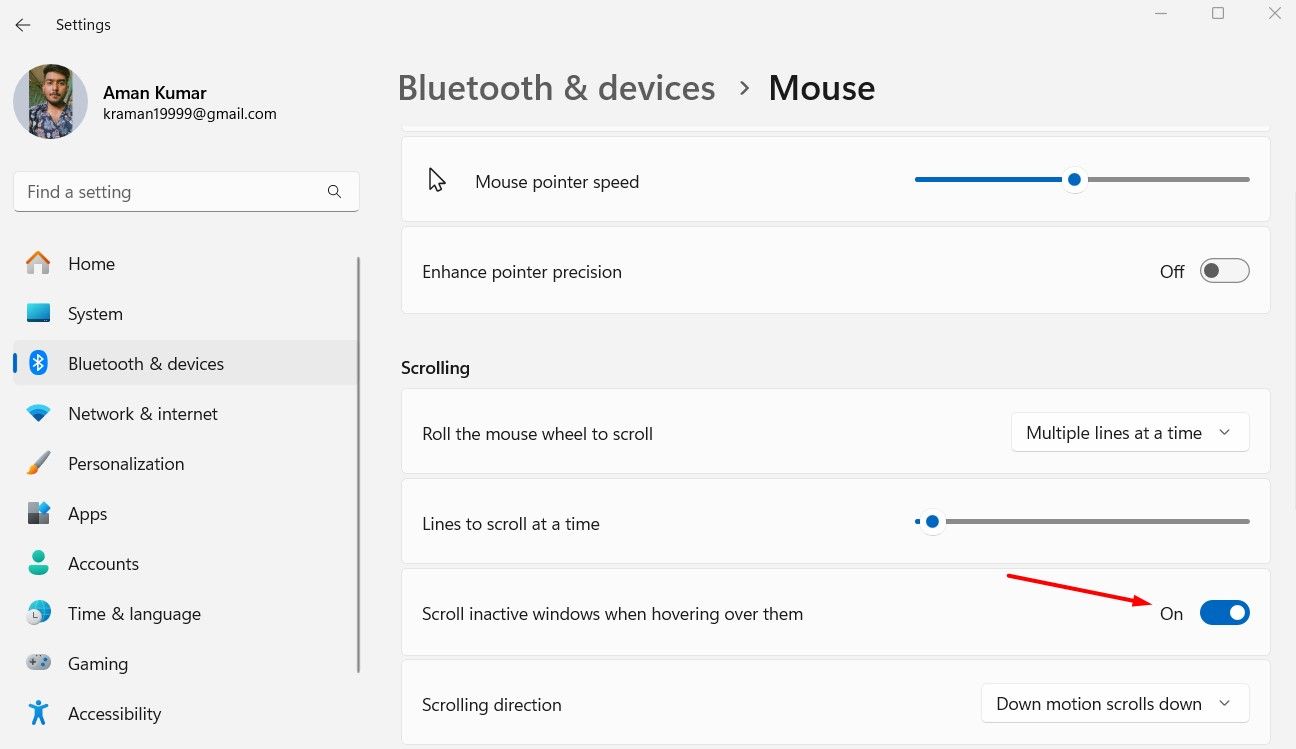
You need to put your mouse cursor on the volume icon on the taskbar, and then use the scroll wheel to increase or decrease the volume. In case you notice that this feature is not working, go to the Settings menu, choose “Bluetooth & Devices,” and then “Mouse.” Next, enable the “Scroll Inactive Windows When Hovering Over Them” toggle.
Once you have enabled the toggle, you will be able to adjust the volume using the mouse slider.
Activate God Mode to Find All Window Settings in One Place
The number of settings in Windows 11 can feel overwhelming. Sometimes, it might be difficult to find a specific setting, especially if you’re not sure exactly where to look. You can save yourself from facing such situations by activating God mode on Windows 11.
Once you have activated God mode, you’ll have a folder on your device containing all Windows 11 settings and administrative tools. This will ensure that you don’t have to memorize the exact location where a particular setting is situated on Windows.
Ctrl+Shift+Enter Shortcut in the Run Dialog Box
There may be times when you need to open an application with administrative privileges on Windows 11. This could be because the application only functions with admin rights or because you need to execute a command that requires elevated permissions. In either case, it’s important to know how to launch an application with administrative rights on Windows 11.
Undoubtedly, the quickest way to do this is to search for the application in the Start menu search bar and select “Run as Administrator” from the results. However, it’s always a good idea to know alternative methods for performing tasks on Windows. For example, if the Start menu stops working for any reason, having another way to open an app with admin rights can be useful.
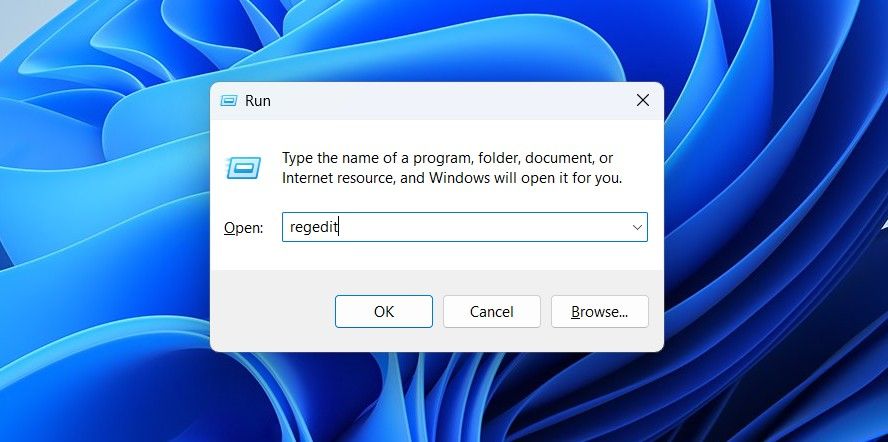
That said, to launch an application with admin privileges, open the Run dialogue box and type the name of the app’s executable file that you want to launch. For instance, if you want to open the registry editor, type regedit and click “OK.”
Minimize Windows By Shaking Your Mouse
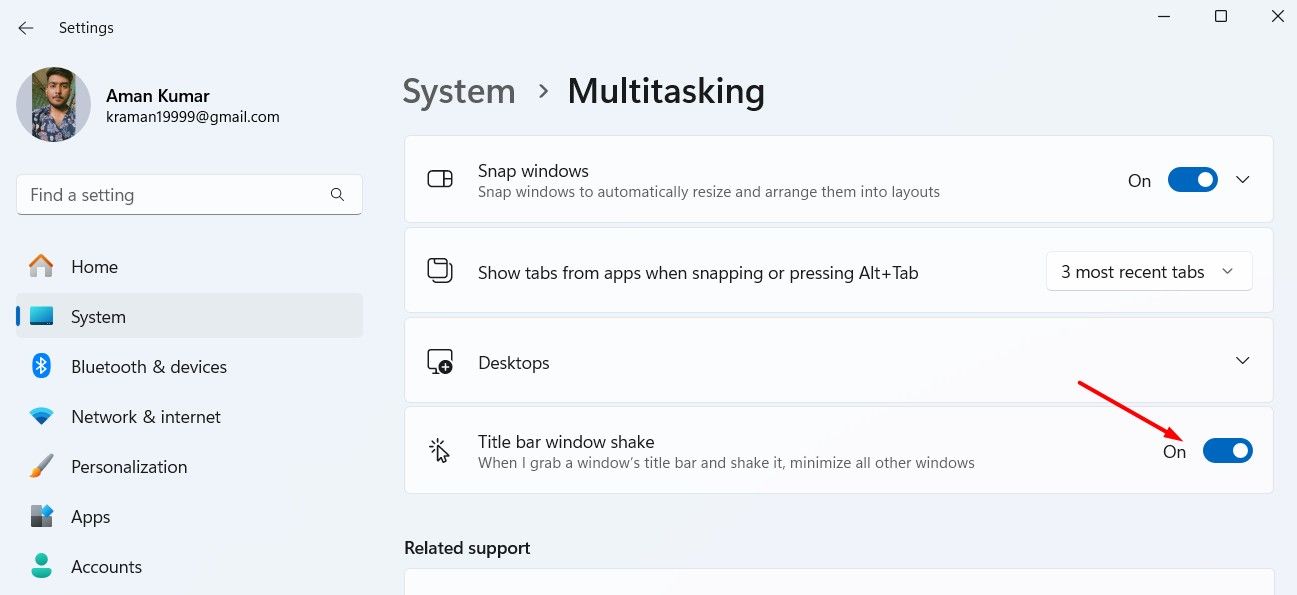
If you’ve been a Microsoft customer since the Windows 7 days, you must be familiar with the Aero Shake feature. When this feature is enabled, you can minimize all background apps by left-clicking on the title bar of the app you want to keep open and shaking your mouse. In Windows 11, Microsoft has renamed this feature to Title Bar Window Shake. To enable it, navigate to the Settings app > System > Multitasking. Then, enable the “Title Bar Window Shake” toggle.
Built-In OCR Feature
Previously, if you needed to extract text from an image, you had to install a third-party application. But now, the OCR feature comes built into the Snipping Tool. The only thing you need to make sure is that you are using the Snipping tool version 11.2308.33.0 or newer. You can update the app if needed by visiting the Microsoft Store.
Add Borders to Your Screenshots
Whenever you need to upload multiple screenshots side-by-side, it’s better to add borders to each screenshot to make it easier for the viewer to differentiate between each screenshot. Fortunately, you don’t need to install any third-party application to do this. Instead, you can take the help of the Snipping tool.
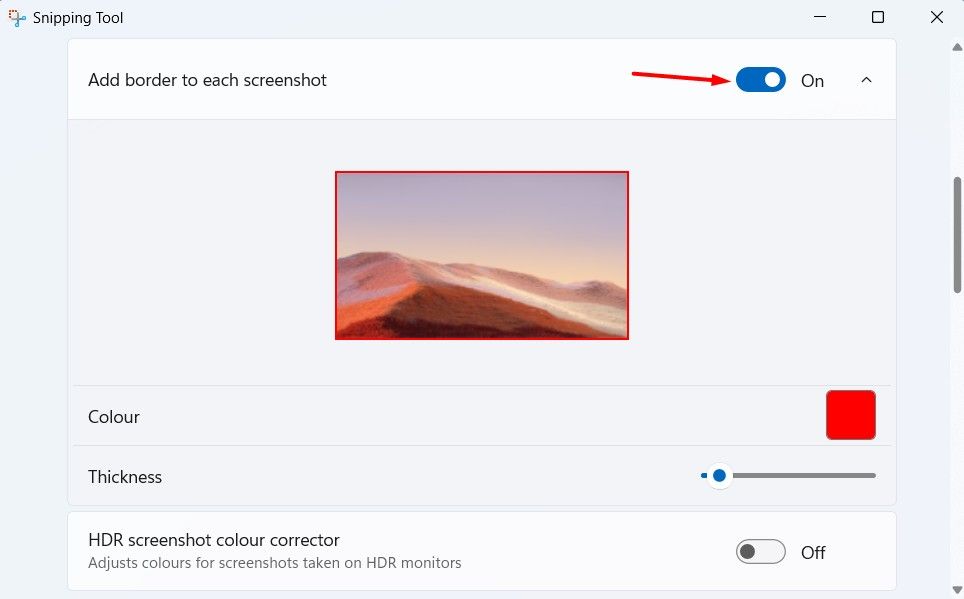
To do this, open the Snipping tool, click the three dots in the top-right corner, and choose “Settings.” Then, turn on the “Add Border to Each Screenshot” toggle. You can click the drop-down icon and choose the border color and its thickness.
If you have a large screen monitor, then you must enable the inactive scrolling feature on Windows 11. This feature allows you to scroll up and down an inactive window using your mouse wheel. Since this feature allows you to have control over multiple windows, you can open a website on Chrome on one side of your screen and have a note-taking app opened on the other side. Now, while you’re typing on the note-taking app, you can also scroll through the website to collect information.
This feature also ensures that you can control your system volume using your mouse scroll wheel, as mentioned above. To enable this feature, enable the “Scroll Inactive Windows When Hovering Over Them” toggle.
Configure Where Your PC Will Search for Files
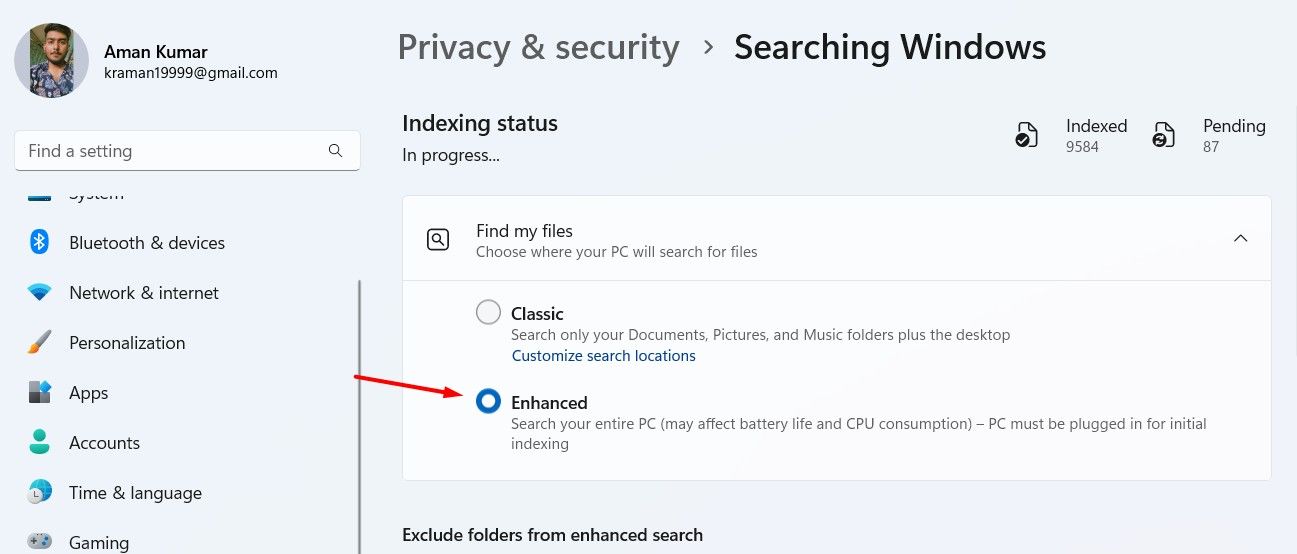
Windows 11 offers two search indexing options—classic and enhanced. By default, Windows has this option configured to classic, which allows your computer to search items only in the desktop, documents, pictures, and music folders. However, if you have a habit of storing files in various locations across your device, then you must select the enhanced search indexing option.
This mode will allow your computer to search for items on your entire computer. That said, to configure the research indexing option in Windows 11, navigate to Settings > Privacy & Security > Searching Windows. Then, choose “Enhanced.”
Increase Comfort By Blocking Blue Light
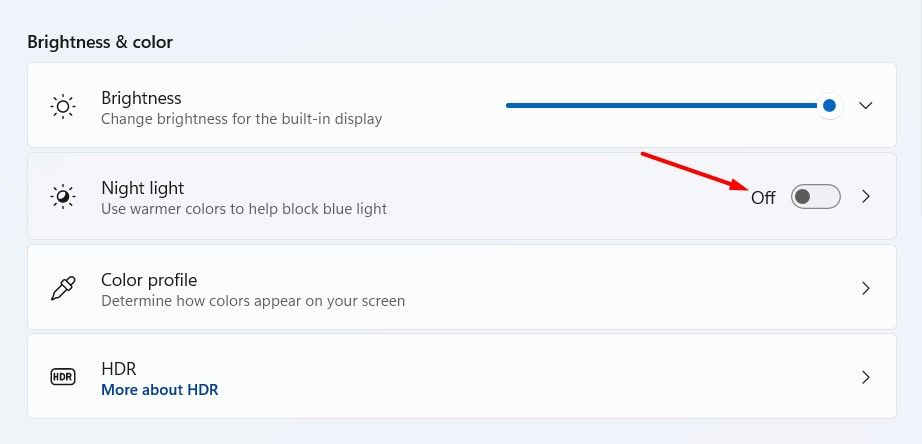
Just like most smartphones, Windows 11 also comes with a night light feature that blocks the blue light. While this feature may not help in reducing eye strain, the warmer screen tone is definitely more comfortable to watch than a normal white light on the screen. You can enable the blue light feature by navigating to Settings > System > Display, and then enabling the “Night Light” toggle.
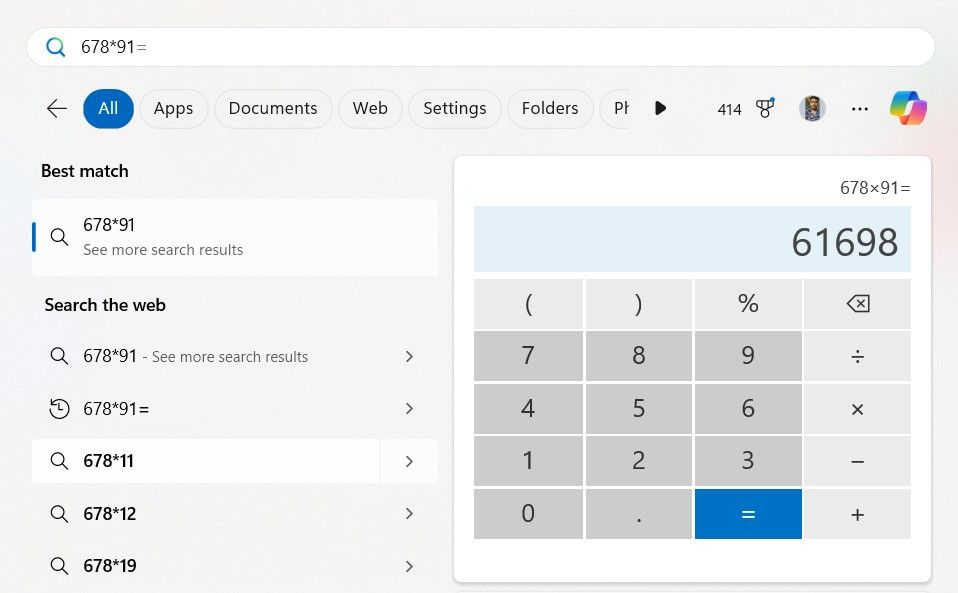
Along with using the Windows Start menu to search for different apps installed on your computer, you can also use it to solve basic math problems. For instance, if you want the product of 678 and 91, then access the Start menu and type 678 x 91. In the right panel of the Start menu, you’ll see the product of both numbers.
No Need to Install a Third-Party Spell Checker
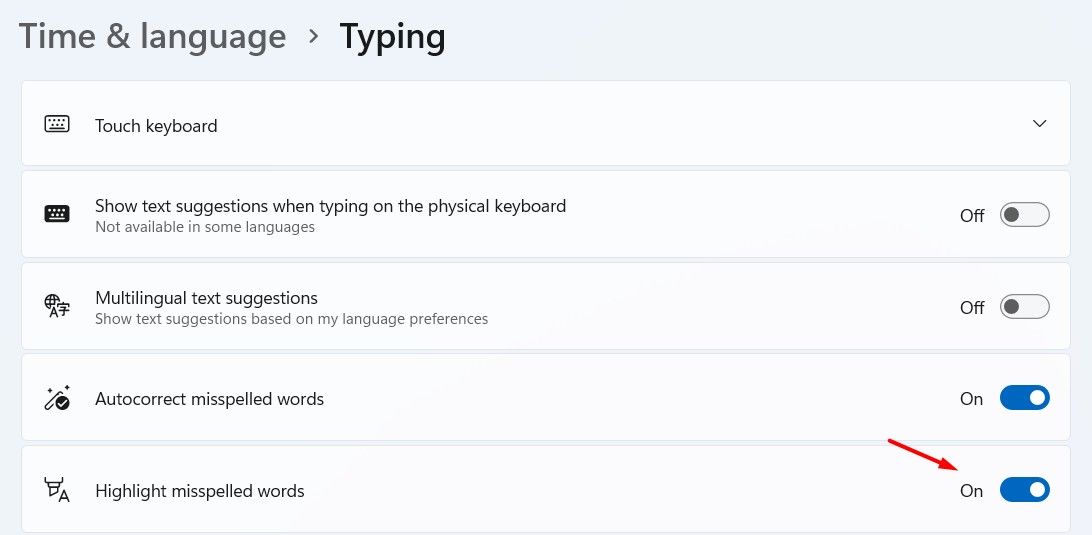
There are multiple spell checkers present online that you can install to quickly detect spelling errors in your text document. But if you don’t want to invest in a third-party tool, you can use the Windows 11 built-in spell checker.
To enable Windows 11 spell checker, open the Settings app and head towards Time & Language > Typing. Then, enable the “Highlight Misspelled Words.” You should also turn on the “Autocorrect Misspelled Words” toggle if you want Windows to automatically correct the misspelled word.
Windows is full of surprises—the more you explore it, the more features you’ll discover. The best part is that Microsoft constantly releases new updates for Windows, and almost every update brings new features. That means you have an endless supply of features to explore. So, keep using Windows 11 to discover everything it has to offer!


