Want to take your Vim game to the next level? From my time using Vim, I’ve learned many neat tips and tricks that have saved me tons of time and headaches while editing with Vim. I’m sharing some of my top tips in this guide so you can incorporate them into your workflow.
1 Quickly Moving the Cursor
Vim is designed for efficient navigation without relying on the mouse or arrow keys. Knowing Vim’s cursor movement commands can save you a lot of time and sanity when dealing with large files. Vim provides several ways to move the cursor quickly from moving by characters, words, and paragraphs to jumping to specific locations.
Besides the arrow keys, you can use H (left), J (down), K (up), and L (right) to move by characters. You can also add a number before the character to jump that number of characters. So, pressing 5j will move the cursor by five rows. For moving bigger distances, you have:
- w: Jump to the beginning of the next word.
- W: Jump to the beginning of the next word after whitespace
- b: Jump to the beginning of the previous word.
- B: Jump to the beginning of the previous word before whitespace.
- e: Jump to the end of the current word.
- E: Jump to the end of the word before whitespace.
- 0: Jump to the beginning of the line
- $: Jump to the end of the line
Moreover, if you want to jump to a specific line, type that line number and then use G to go to that line. So if you want to go to line 500, type 500G and press to jump to that line.
2 Convert Tabs to Spaces and Spaces to Tabs
A common issue developers and content creators face is inconsistency in indentation. Some teams or projects may prefer tabs for indentation, while others prefer spaces. In Vim, you can convert tabs to spaces and vice versa, depending on the specific requirements of your project.
If you want to convert all spaces back to tabs in an existing file, run these two commands:
:set noexpandtab
:retab!
The first command ensures that tabs will be used instead of spaces. The second one enforces converting spaces back into tab characters based on the tabstop setting.
If you prefer spaces and want to convert the tabs in an existing file, then run:
:set expandtab
:set tabstop=4
:set shiftwidth=4
:retab
These commands tell Vim about the details of the indentation block when converting tabs to spaces.
3 Indent Multiple Lines
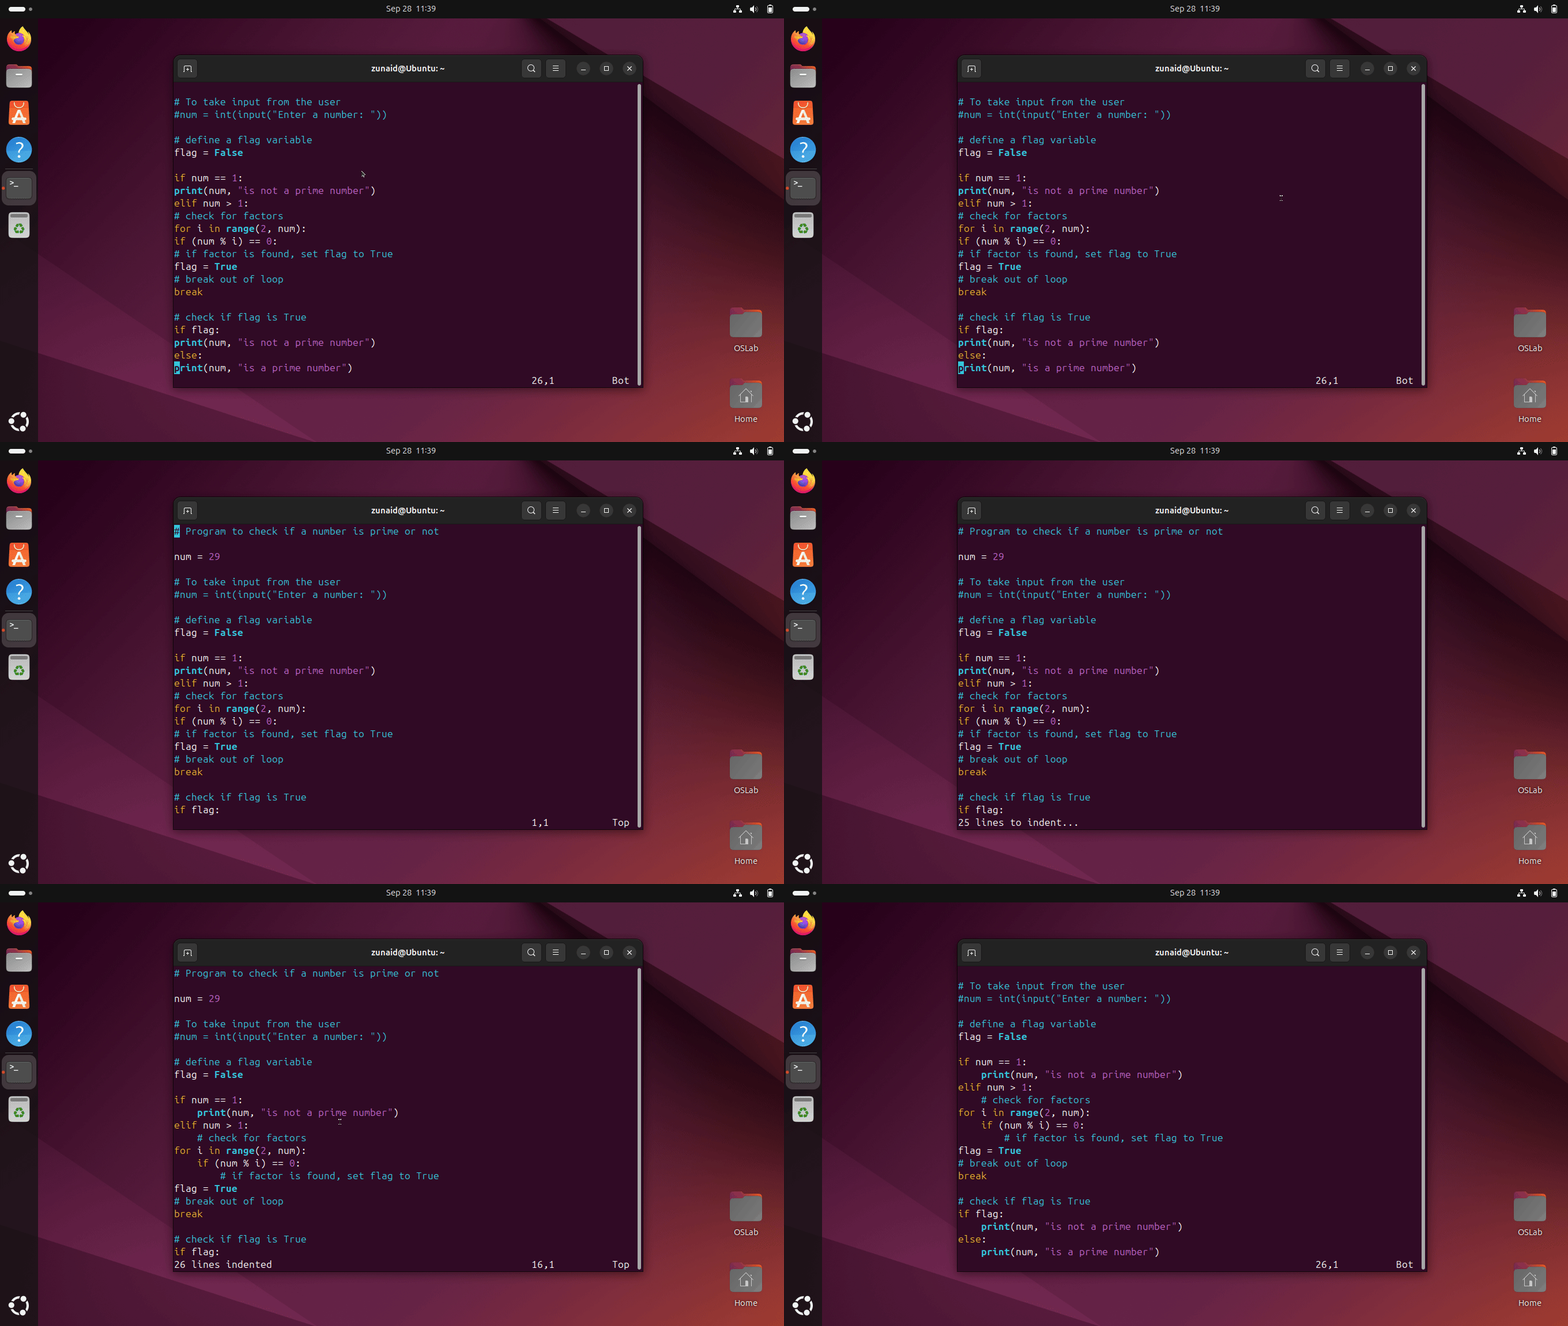
Indentation is good practice for keeping your file clean and organized. If you’re working with a language like Python, then correct indentation becomes more crucial. With a single command, you can indent all lines in a file. First, type gg to jump to the first line of the file (that could just be another useful tip.) Then type =G to indent the lines. So the final command is:
gg=G
4 Highlight Spelling Mistakes
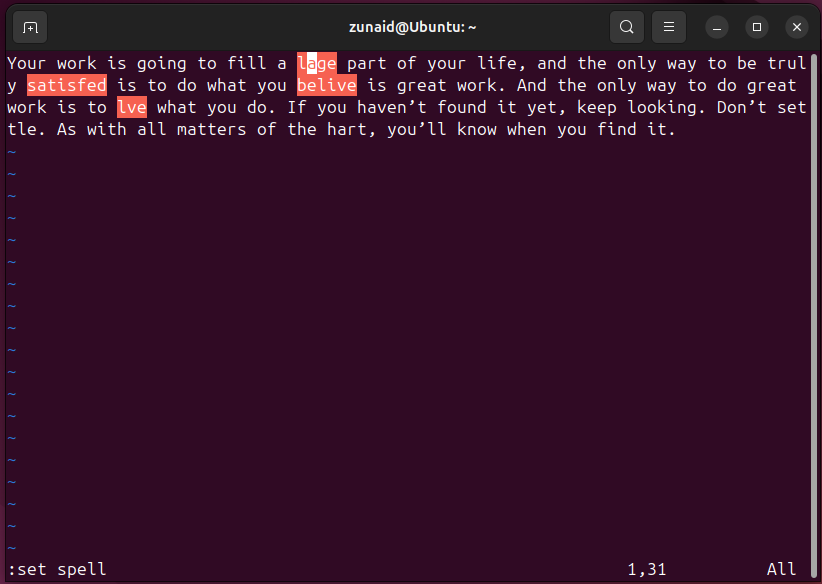
I make a lot of typos and mistakes when typing fast. In modern word processors like Microsoft Word and Google Docs, you have a spell checker that suggests the correctly spelled word. Vim also has a built-in spell checker. It will highlight the words it thinks have been misspelled. To turn on the spell checker, use this command:
:set spell
5 Change Visual Select Direction
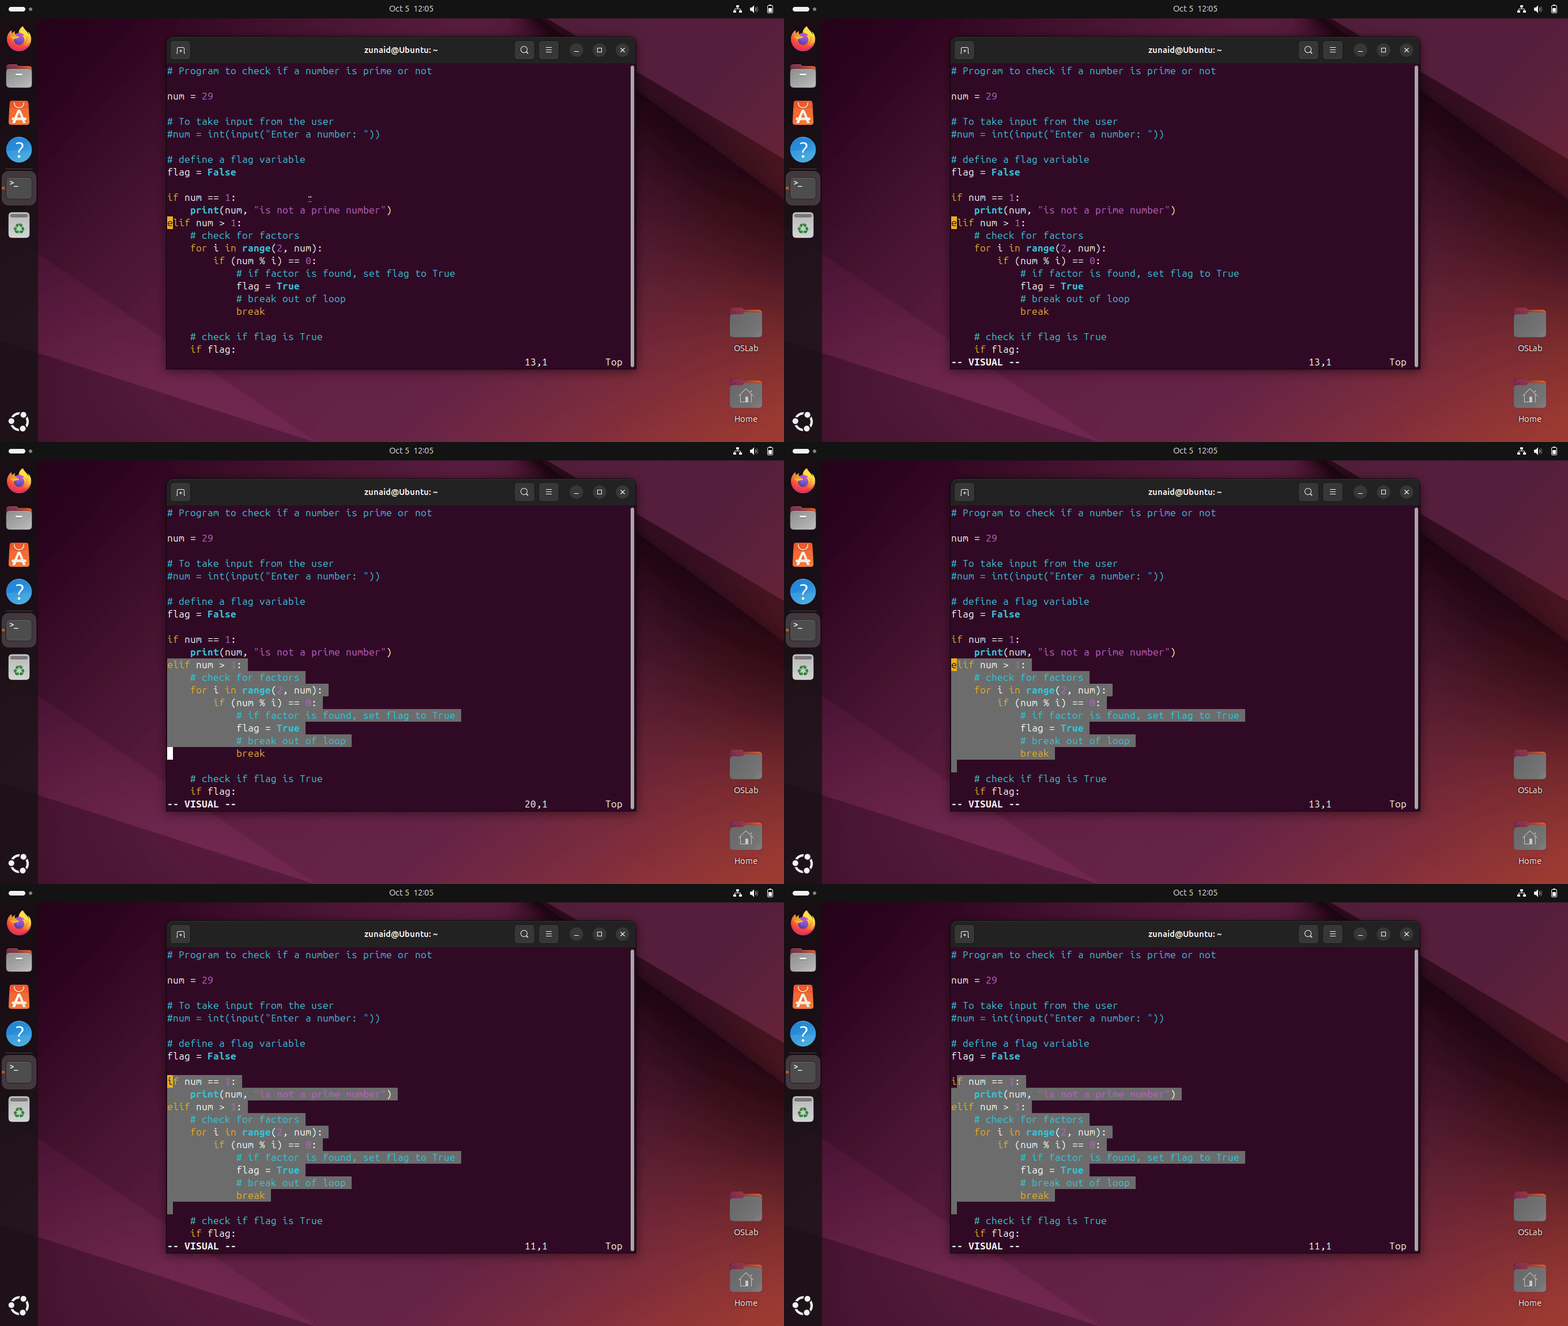
When you’re working in Visual Mode, you can select text by character, line, or block. Once you’ve started selecting text in any direction, you might realize that you need to expand or change the selection in the opposite direction. Instead of exiting the Visual Mode and starting the selection again, you can change the selection direction by pressing the o button.
6 Jump to the Matching Bracket
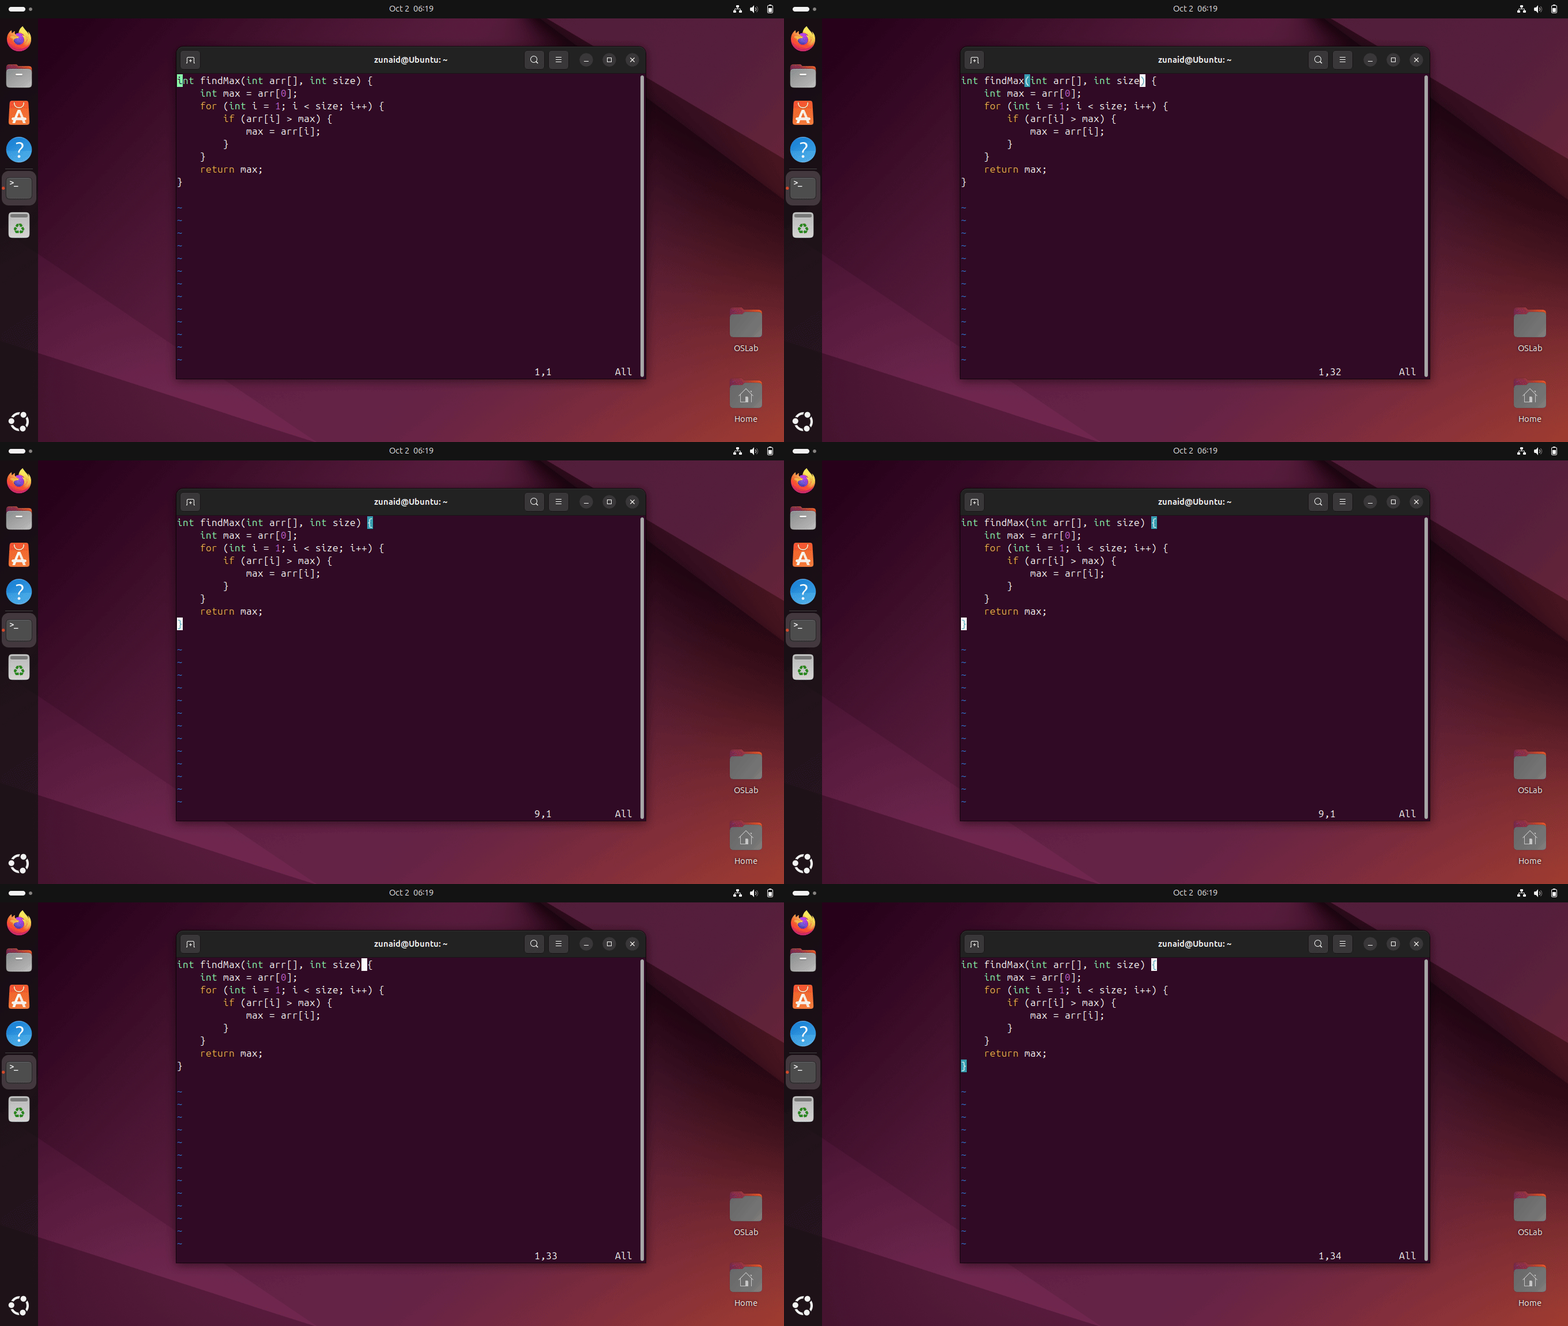
When working on a large codebase, you often need to find the end of a code block. Unless the code is well formatted and indented, that’s difficult. In Vim, you can easily find the beginning or end of a code block by jumping to the matching bracket. Pressing the percent sign (%) does exactly that. If you’re on the opening bracket and press %, you’ll jump to the end bracket and vice versa.
This works for parentheses, curly braces, and square brackets.
7 Display Line Numbers
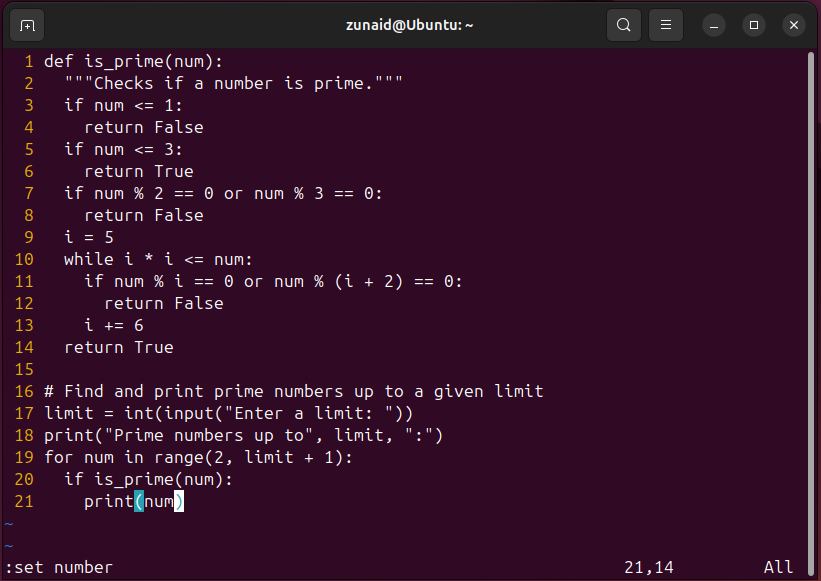
This one is fairly easy. By default, Vim shows no line numbers, only tilde signs. You can turn on line numbers on Vim in different modes. In the absolute line number mode, you see line numbers starting from one to the last line. To set that up, run this command:
:set number
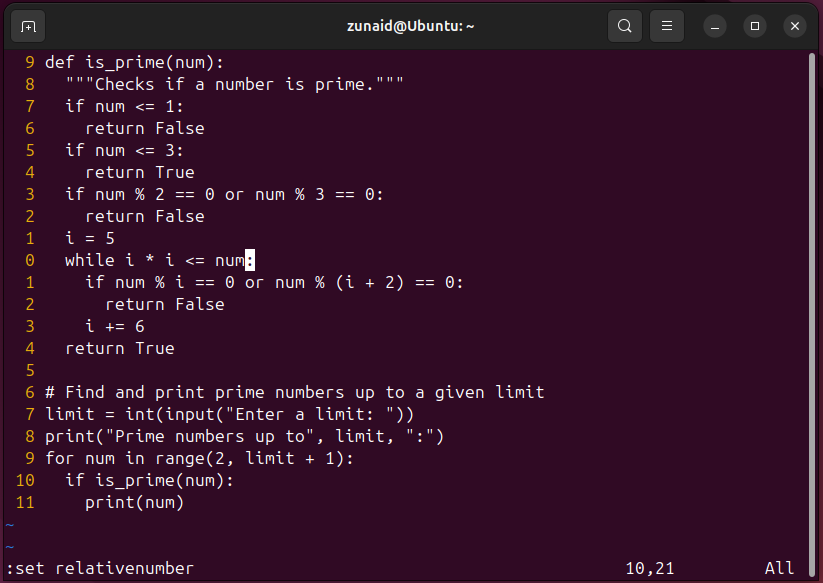
In relative number mode, the line that your cursor is on is the zeroth line. The rest of the lines are numbered relative to the line your cursor is on. So, lines above and below your cursor start from one and continue. To enable relative numbering, run:
:set relativenumber
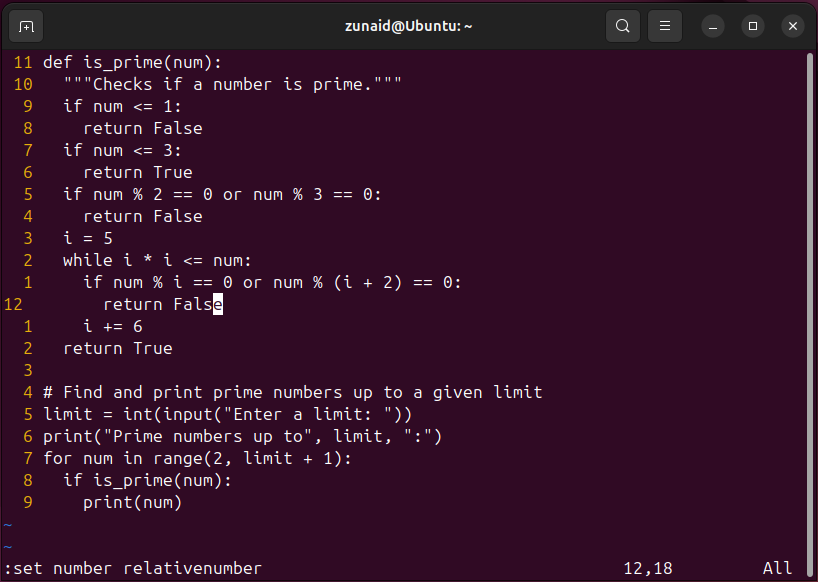
What if you need both? There’s another mode called hybrid mode, where you can use both. By enabling the hybrid mode, the line your cursor is on shows its absolute line number. But the lines above and below show their relative numbers. Enable this mode by running:
:set number relativenumber
8 Normal Mode
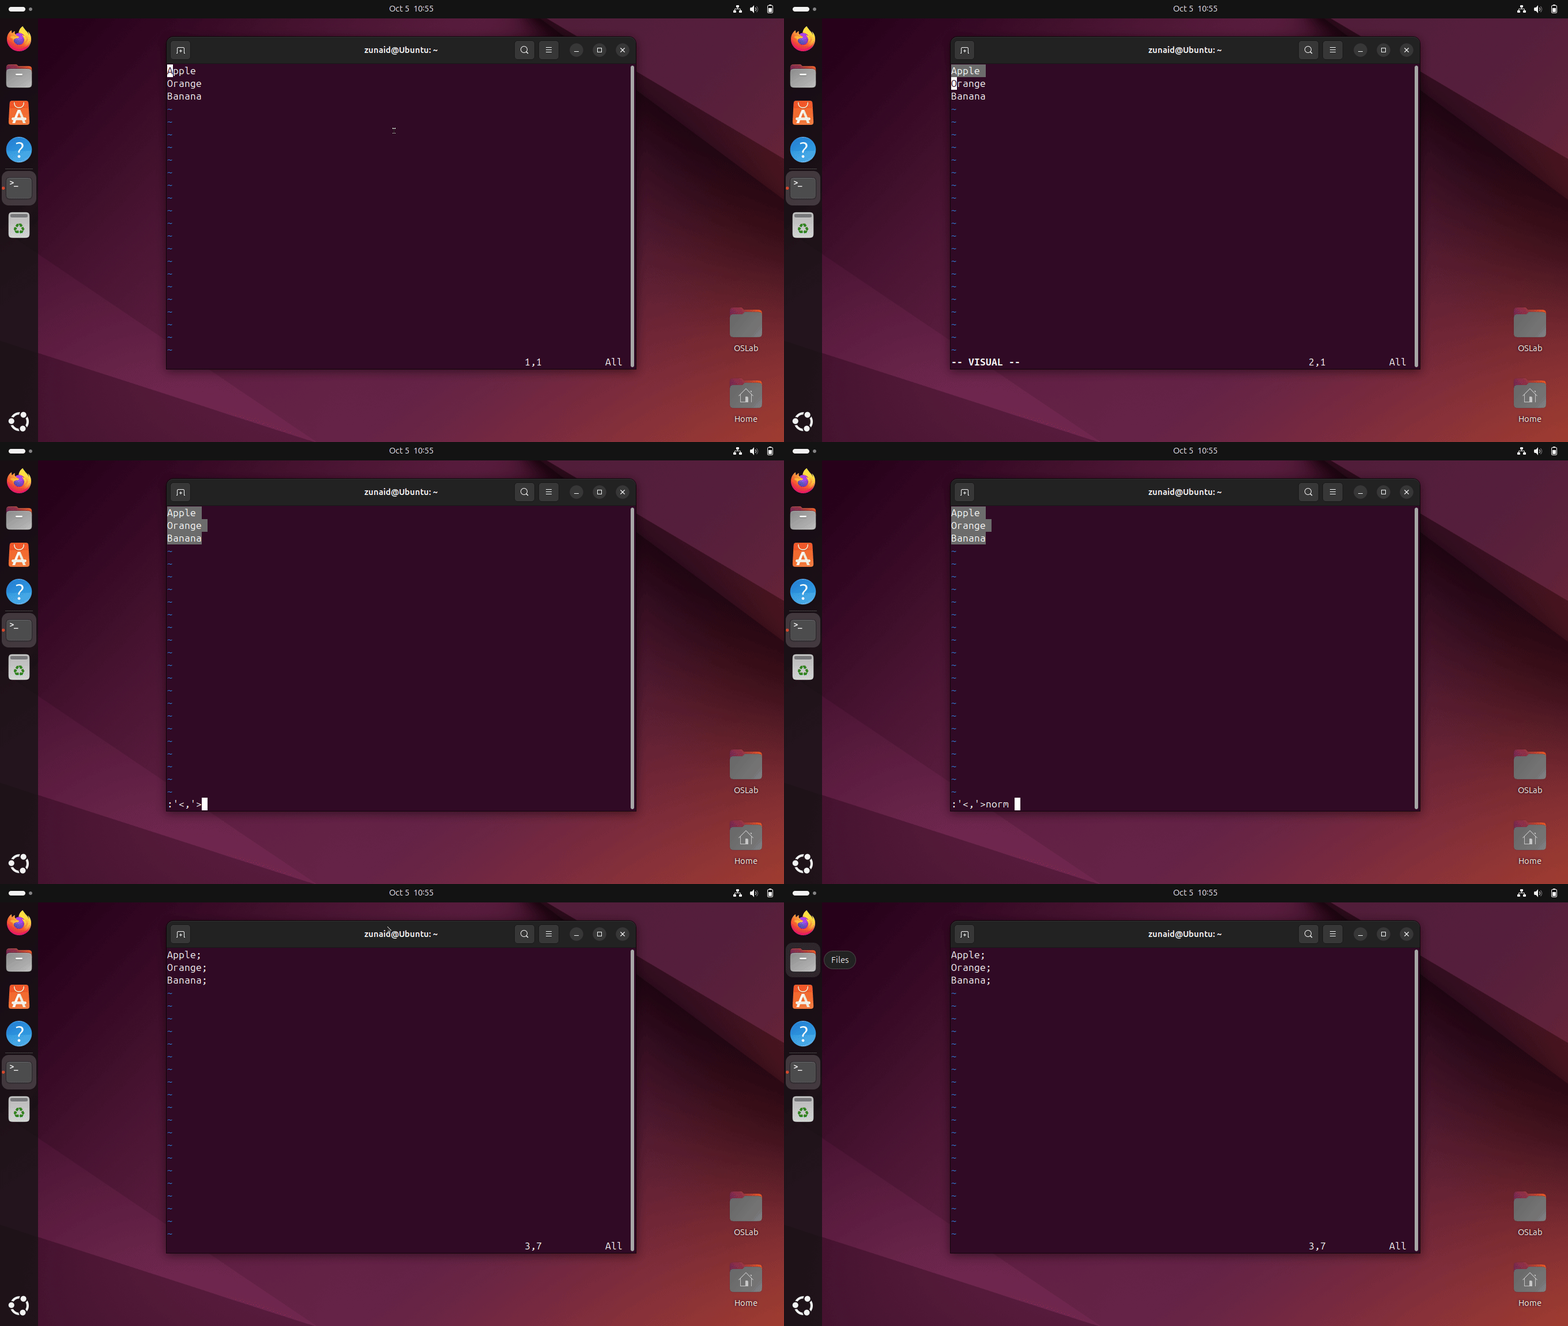
The :norm command in Vim allows you to run normal mode commands from command-line mode. This is useful for repetitive tasks and batch editing. When you need to apply the same normal mode commands to multiple lines simultaneously, you can do that by writing a single line instead of repeating the same thing for each line.
For example, I want to add a semicolon (;) at the end of a few lines. First, I need to select all the lines. Then run these commands:
:norm
A;
Once I press Enter, all selected lines will have a semicolon at the end.
Similarly, you can insert text, change case, or indent multiple lines at once.
9 Delete Text in Insert Mode
In traditional text editors, there are many keyboard shortcuts for deleting characters and words. Vim has its own set of shortcuts to quickly delete pieces of text. You can delete characters, words, and whole lines. You can delete either from the backward or forward direction of the cursor. Here are a few useful shortcuts:
- Ctrl+H: Deletes one character backward (same as backspace).
- Ctrl+W: Deletes one word backward.
- Ctrl+U: Deletes everything from the cursor to the beginning of the line.
- Ctrl+K: Deletes everything from the cursor to the end of the line.
10 Dynamic Snippets
Snippets are like pre-defined pieces of text that you can quickly insert to speed up workflow. Instead of repeatedly typing the same boilerplate code or text, you can use snippets to quickly expand into a longer text block, saving time and reducing typos. Dynamic snippets take this a step further by allowing snippets to include dynamic content, such as the current time, date, or other variable information.
Using plugins like UltiSnips or vim-snippets, you can define dynamic snippets that adjust based on the current context. For example, let’s create a snippet to expand ‘jd’ into John Doe. If you’re using UltiSnips, add the following to your UltiSnips file (usually ~/.vim/UltiSnips/snippet_file_name.snippets:)
snippet jd
John Doe
endsnippet
For dynamic snippets like time and date, you can format it like this:
snippet time
`!v strftime("%H:%M:%S")`
endsnippet
Now, if you type ‘time’ and press the Tab button, you should get the current time inserted automatically.
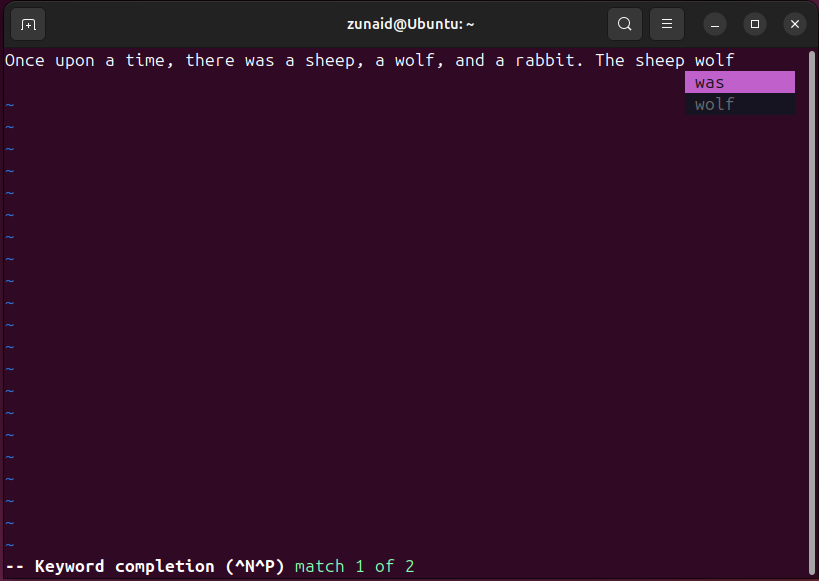
11 Autocomplete Words
Vim has a built-in word completion feature. This can be useful when writing something where a word comes up often (such as variables in a program). To autocomplete a word, start typing in the word and press Ctrl+N. You can also type Ctrl+P. The difference is that the latter searches the list from the bottom (the last word) while the former searches from the top.
With these new tips in your knowledge, you should be able to use Vim with more confidence. We also have other guides that show you how to exit Vim and define a Vim profile.


