When it comes to emergencies, you can never be too careful. The good news is that your Apple Watch can help you in many possible emergencies you may have.
Let’s hope you never have to use these features, but here are some ways you can prepare your Apple Watch to help you in case of an emergency.
1. Share Your Medical ID on Your Apple Watch
Your Apple Watch’s Medical ID is one of your Apple Watch’s hidden features you need to try. With your Medical ID, if you’re in an emergency, people can take a look at important health information about you, including your blood type, allergies, and any medical notes or conditions you may need to share.
Moreover, you can let anyone access your Medical ID from your Apple Watch in case you can’t talk at that moment. This is what you need to do:
How to Give Emergency Access to Your Medical ID on iPhone
- Open the Watch app.
- Scroll down and go to Health.
- Select Medical ID.
- Tap Edit in the top right corner of your screen.
- Scroll down to the bottom and, under Emergency Access, toggle Show When Locked on.
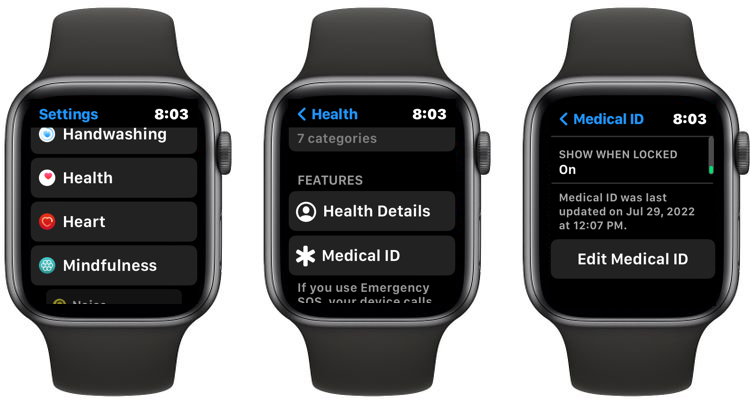
How to Give Emergency Access to Your Medical ID on Apple Watch
- Press the Digital Crown on your Apple Watch.
- Go to Settings.
- Scroll down and select Health.
- Tap Medical ID.
- Scroll down to the bottom and tap Edit Medical ID.
- Scroll down to the bottom one more time and tap Show When Locked.
- Toggle Show When Locked on.
And that’s it. Now you or anyone else will be able to access your Medical ID simply by pressing and holding the side button on your Apple Watch and then swiping Medical ID to the left.
2. Use Your Apple Watch’s Fall Detection Feature
One of the best health features on your Apple Watch is Fall Detection. Fall Detection is a really useful feature if you’re into extreme sports or just fall quite often. With this feature, as you can probably guess by its name, your Apple Watch can recognize if you fell down.
If that happens, your Apple Watch will ask you if you’re okay. If you don’t answer after some time, your Apple Watch will call emergency. Additionally, it’ll let your emergency contacts know you might have suffered an accident with a message, and it’ll share your location.
In case you aren’t using it already, this is how you can enable Fall Detection on your Apple Watch:
How to Enable Fall Detection on iPhone
- Open the Watch app.
- Scroll down and select Emergency SOS.
- Toggle Fall Detection on.
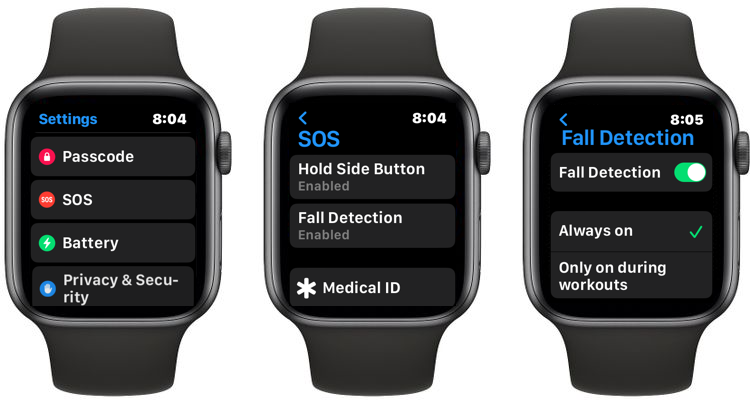
How to Enable Fall Detection on Apple Watch
- Press the Digital Crown to go to your Home Screen.
- Go to Settings.
- Scroll down and select SOS.
- Tap Fall Detection.
- Toggle Fall Detection on
Whether you use your iPhone or Apple Watch, you’ll see you have two options for when you want your Apple Watch to detect your falls.
If you choose Always On, your Apple Watch will constantly try to detect falls. If you choose Only on during workouts, your Apple Watch will only try to detect falls when it knows you’re doing physical activity.
It’s worth noting that Fall Detection might not detect every time you fall, so it’s best not to trust your Apple Watch if you fall. Likewise, if you’re a very active person, you’re more likely to trigger Fall Detection due to the impacts you make.
One of the best Apple Watch tips for beginners you should know is how to add your emergency contacts. Whether it’s a friend, family, or loved one, you can add people as your emergency contacts so your Apple Watch—and other people—know who to call in case of an emergency. To add contacts, you’ll need to edit your Medical ID like this:
How to Add Your Emergency Contacts on iPhone
- Open the Watch app.
- Scroll down and go to Health.
- Tap Medical ID.
- Tap Edit in the top right corner of your screen.
- Scroll to the bottom and select add emergency contact.
- Select the contact you want to add.
- Select the Relationship you have with that person.
- When you add all your emergency contacts, tap Done in the top right corner.
If you want to get rid of any emergency contact, just tap the minus button on the left side of the contact, and tap Delete.
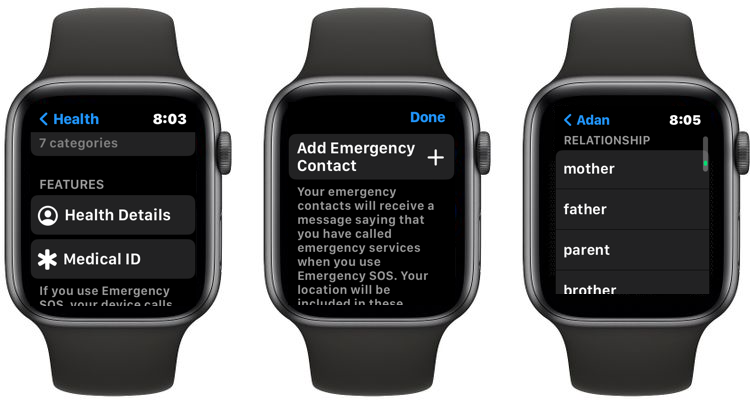
How to Add Your Emergency Contacts on Apple Watch
- Press the Digital Crown and go to Settings.
- Scroll down and select Health.
- Tap Medical ID.
- Scroll to the bottom and tap Edit Medical ID.
- Scroll down one more time and, under Emergency Contacts, tap Add Emergency Contact.
- Choose the contact you want.
- Select the Relationship you have with that person.
- Once you finish adding your emergency contacts, tap Done in the top right corner of your screen.
To delete emergency contacts using your Apple Watch, you need to swipe the emergency contact to the left and tap the red X button on the right side.
4. Update Your Health Details in Your Medical ID
Setting up your Apple ID on your iPhone is one thing. But if you want people to help you during an emergency, you should consider keeping your health details up to date. That includes adding new medicine or medical notes you think other people would need. This is how you can do it:
How to Change Your Health Details on iPhone
- Open the Watch app.
- Scroll down and go to Health.
- Select Medical ID.
- Tap Edit in the top right corner.
- Make all the changes to update your medical details.
- Tap Done in the top right corner of your screen.
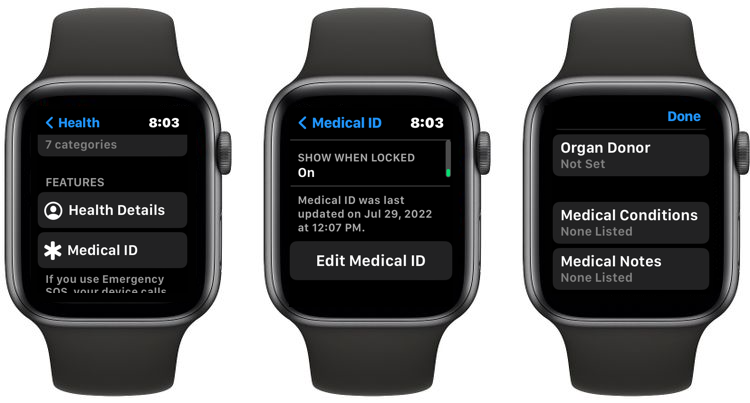
How to Change Your Health Details on Apple Watch
While we would recommend you update your Medical ID on your iPhone, as it’s way easier that way, you can also update your health details with your Apple Watch like this:
- Press the Digital Crown and go to Settings.
- Scroll down and select Health.
- Tap Medical ID.
- Scroll to the bottom and tap Edit Medical ID.
- Make all the changes you want to update your Medical ID.
- Tap Done in the top right corner.
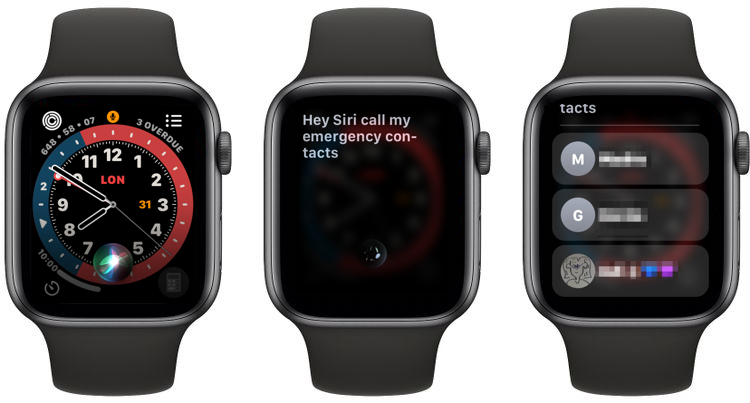
Siri can help you call your emergency contacts right from your Apple Watch. You can just say: “Hey, Siri, call my emergency contact,” and your Apple Watch will do the rest.
If you have more than one emergency contact, which is always recommended, you’ll also need to choose which contact you want to call by saying their name or tapping it on your Apple Watch.
Use Your Apple Watch for Emergencies
There are many ways your Apple Watch can make your life easier, but it’s also a powerful tool to keep you safe in emergencies. Hopefully, you’ll never have to use these tips, but, as they say, it’s better to be safe than sorry.


