Microsoft Edge, the Windows 11 default browser, has many tools and features that can easily go unnoticed as you surf the net. In this guide, I’ll share six Microsoft Edge tips that improve my browsing experience and make my life easier.
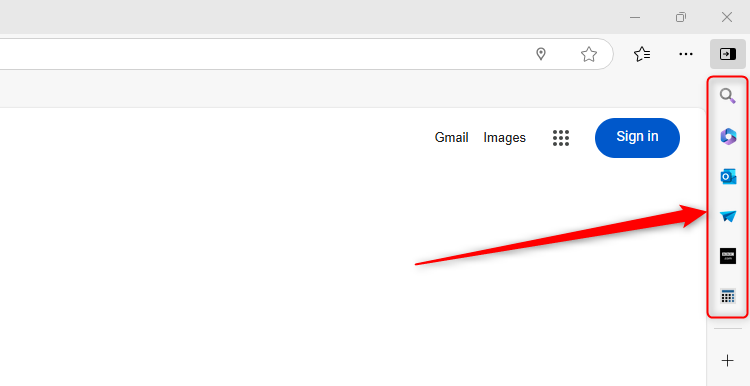
Microsoft Edge’s sidebar is endlessly useful if you’re a multitasker, as it lets you access the tools and apps you use the most without breaking your workflow.

Related
Don’t Sleep on the Edge Sidebar: 5 Ways I Use It Every Day
The Edge sidebar is the perfect sidekick.
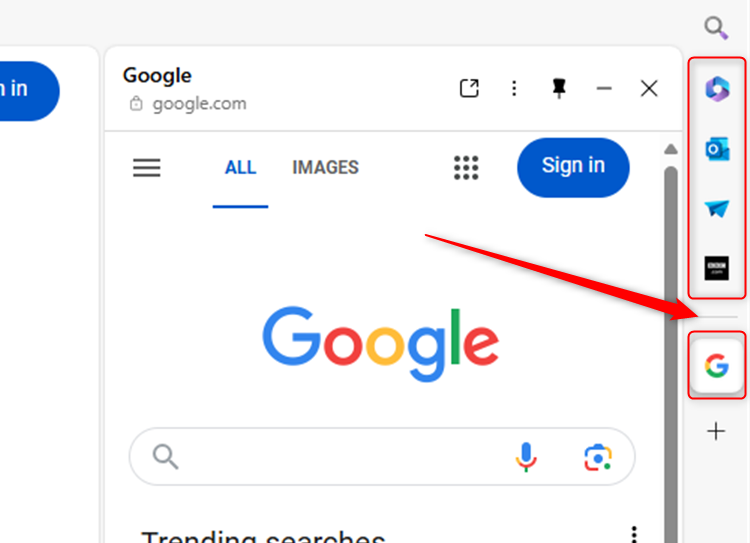
As its name suggests, anything you add to the Microsoft Edge sidebar opens as an extra pane on the right-hand side of your window, meaning you don’t have to leave whatever website you’re on or open a new tab to do two things at once. You can add websites and apps to your sidebar, as well as tools (like a calculator), your Outlook inbox, and Microsoft Drop.
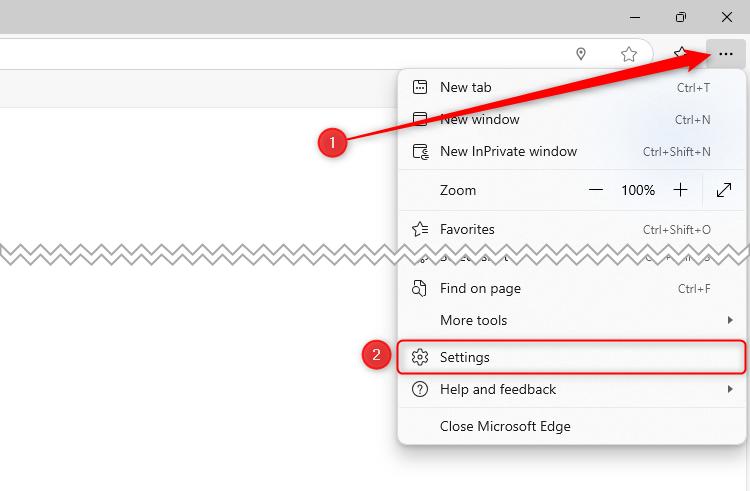
If you don’t see the sidebar when you open Microsoft Edge, click the three dots in the top-right corner of your window, and choose “Settings.”
Then, in the Copilot And Sidebar tab of the Settings menu, switch the Always Show Sidebar toggle to “On.”
If you want the option to show or hide the sidebar pane via a single click, also activate the Show Sidebar Button toggle switch.
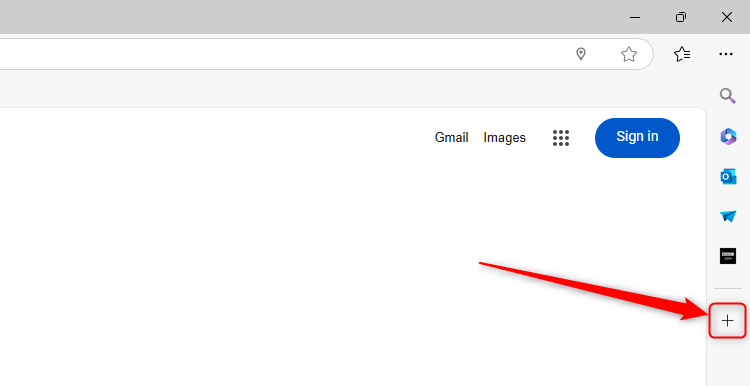
To add apps and tools to the sidebar, first click “+.”
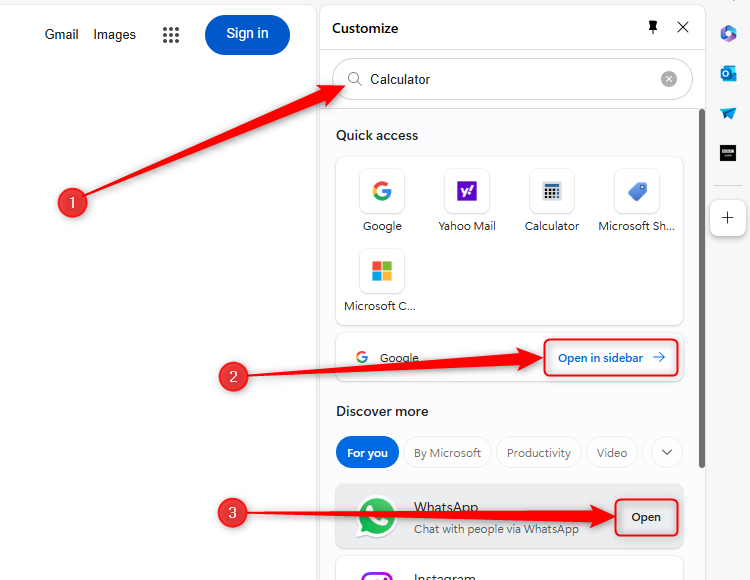
Now, use the search field to find an app or tool you want to open in the sidebar pane, pressing Enter when you’ve found what you want. Alternatively, you can open the website you’re currently viewing in the sidebar pane by clicking “Open In Sidebar,” or click “Open” next to one of the suggested apps or websites.
Note that, at this stage, the website or app you select will only open in the sidebar pane temporarily. Only the websites or apps above the divider line in the sidebar sit there permanently; those below this line will disappear when you next close the sidebar pane.
So, to move a website or app from the temporary list to the permanent list, right-click it, and choose “Pin To Sidebar.”
Now, even when you close the sidebar pane, the website or app you just added will stay, ready for you to quickly access at any time as you browse the web.
2
Show the Favorites Bar and Add Websites to It
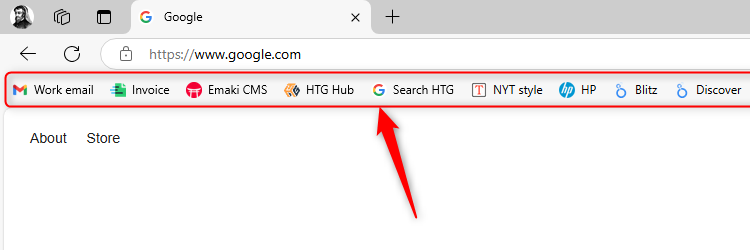
The Favorites bar in Microsoft Edge lets you create quick links to websites you often visit, sitting just beneath the address bar.
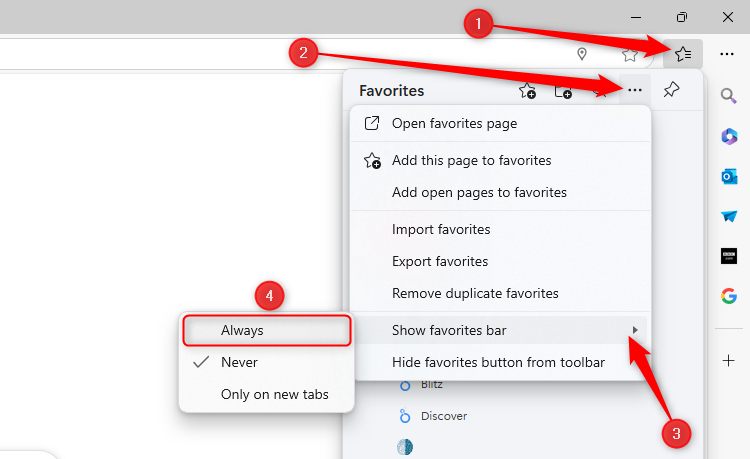
If you don’t see this when you open Microsoft Edge, make sure you have it activated. To do this, click the “Favorites” icon in the top-right corner of your window (or pressing Ctrl+Shift+O), select the three dots, and then click Show Favorites Bar > Always.
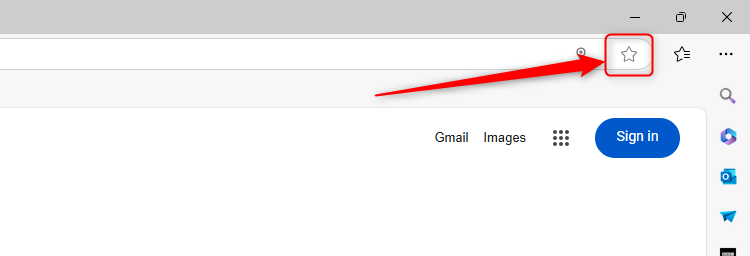
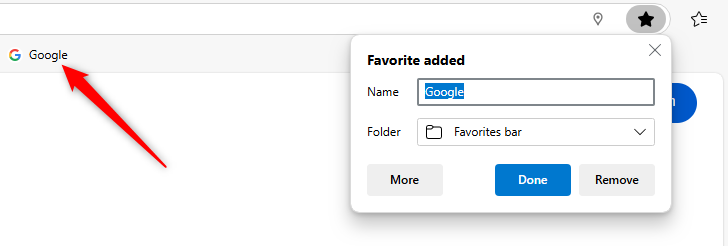
To add a website to your favorites bar, go to the website and click the “Favorites” star at the end of the URL field (or press Ctrl+D).
And before you know it, the website or page title and logo will be added to the Favorites bar, and a pop-up window will give you the options to edit its name, add it to a Favorites folder, or delete it from the Favorites bar.
To save space (and if you recognize a website by its logo alone), remove the text from the Name field. To do this on a website you added previously, right-click the relevant icon on your Favorites bar, click “Edit,” delete the name, and click “Save.”
Now, when you click that website on your Favorites bar, it opens in the active tab. Alternatively, to open a favorited website in a new tab, hold Ctrl when you click it.
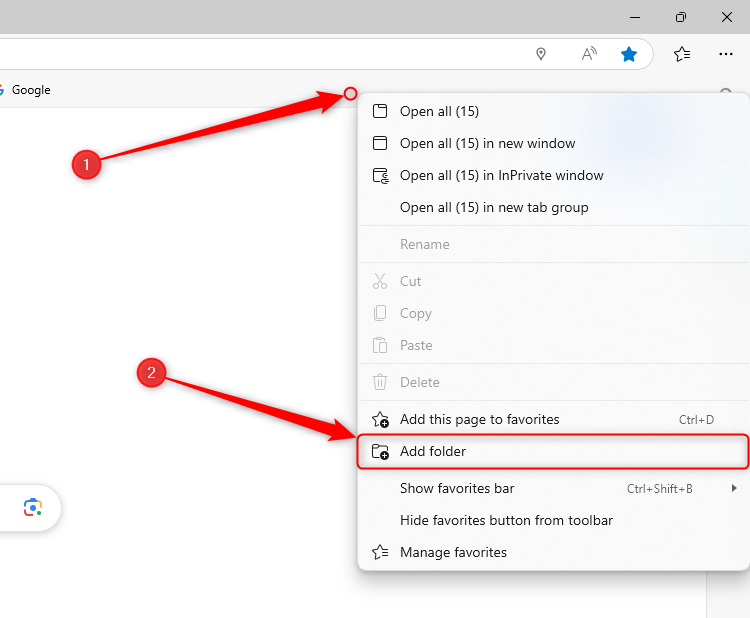
To create a Favorites folder, right-click the Favorites bar, click “Add Folder,” rename the folder, and click “Save.”
Then, click and drag a website already on your Favorites bar into the folder, or choose the option to add the website to a Favorites folder when you first add it to your Favorites bar.
3
Store Useful Information in Collections
Microsoft Edge’s Collections feature lets you hoard URLs, images, links, and text from the web that you can categorize, revisit, and use whenever you want.
You can access Collections by clicking the plus icon in a rounded box in the top-right corner of your Microsoft Edge window.
If you can’t see this icon, right-click the three dots, and click “Customize Toolbar.”
In the Settings window, scroll down to the Collections Button, and switch its toggle to “On.”
Now that you can see the Collections icon, click it to open the Collections sidebar.
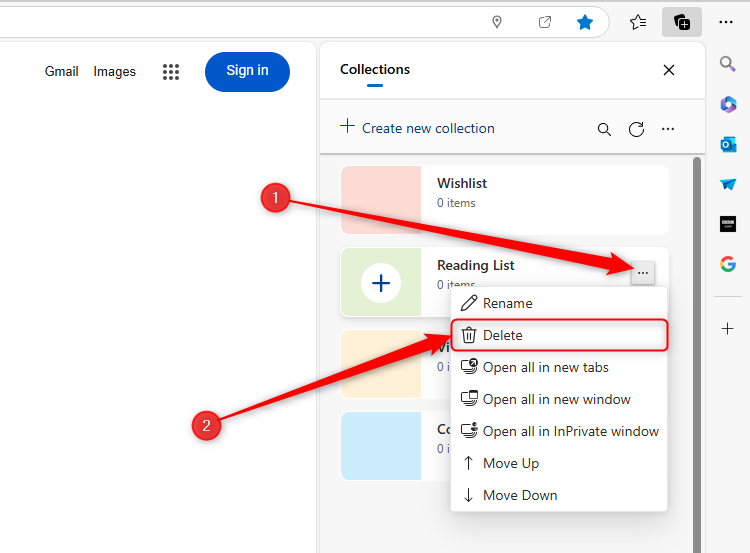
You’ll see some suggested Collections, such as Wishlist, Reading List, and Video Playlist. To delete one of these (if you’d prefer to create your own), hover over the relevant card, click the three-dot menu, and click “Delete.”
Related
Collections vs. Bookmarks in Microsoft Edge: What’s the Difference?
Collections? Bookmarks? How should you save things with Microsoft Edge?
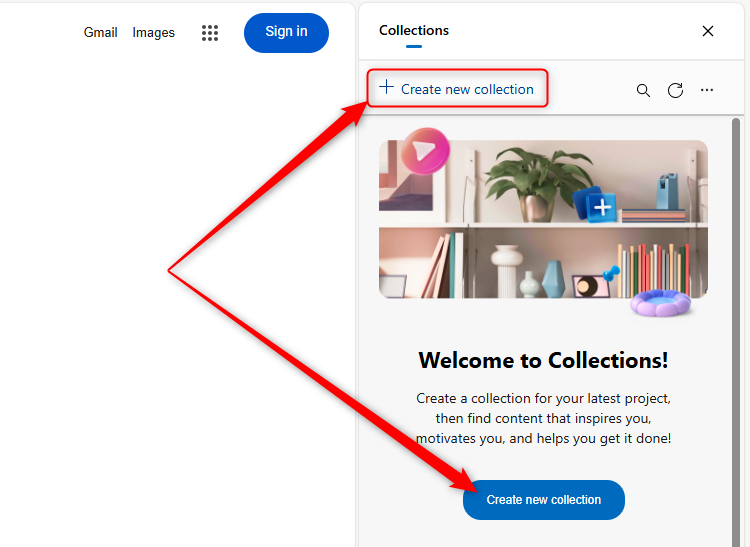
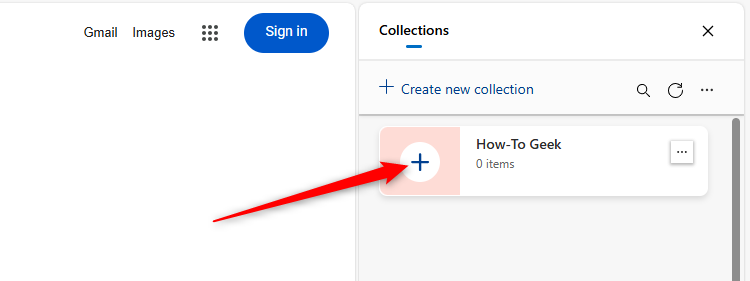
To add a new, personalized card, click “Create New Collection” and, when prompted, give your new Collection a name and click “Save.”
To add a website you’re currently viewing to a Collection, simply click the “+” icon that appears when you hover over a collection.
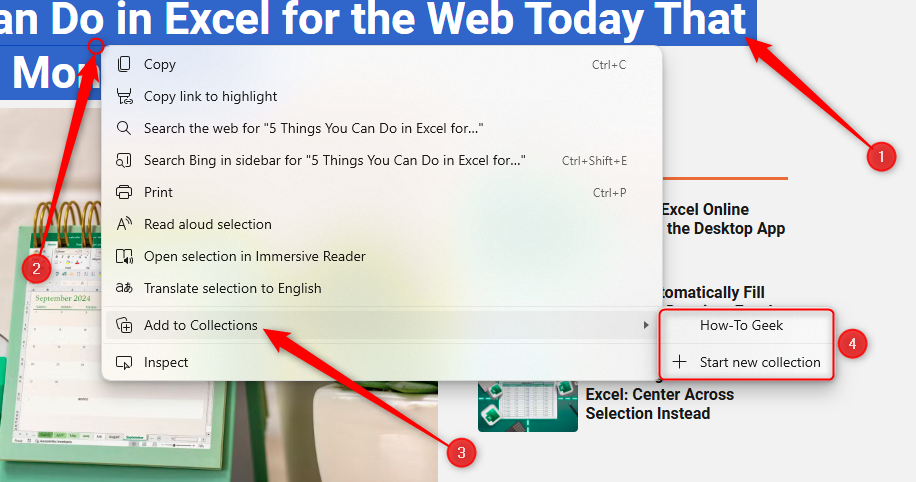
To add text from a website to a Collection, highlight and right-click the relevant text, hover over “Add To Collections,” and select a Collection you have already created or start a new one.
The method for adding an image or a link is similarly straightforward—right-click it, select “Add To Collections,” and choose one of the Collections options that appear.
Another way to keep hold of useful information and access it via any device with Microsoft Edge installed is through Microsoft Drop, a cloud storage program linked to your OneDrive account.
Any items you add to a Collection remain there until you delete them manually, meaning you can access them whenever you need to. To do so, click the “Collections” icon, select a Collections card to open it, and click the item to launch it in a new tab.
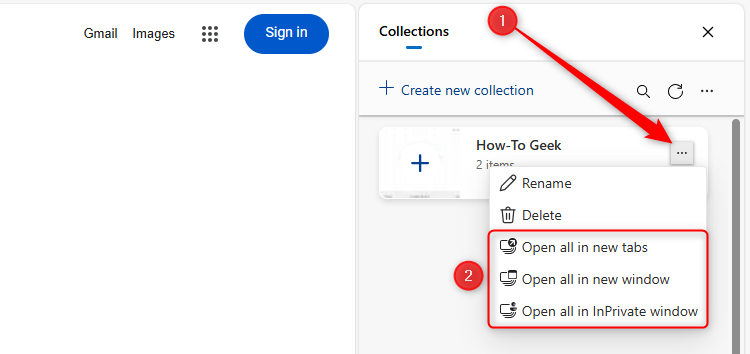
Alternatively, if you want to open all items in a Collection, click the three dots on a Collection card, and choose how and where you’d like the items to open.
4
Get Edge to Read a Web Page Aloud
Whether you’re too tired to stare at your screen for any longer, you want to consume content on a web page at the same time as completing another task away from your computer, or you need help with understanding a web page for any other reason, Microsoft Edge’s Read Aloud tool has got your back.
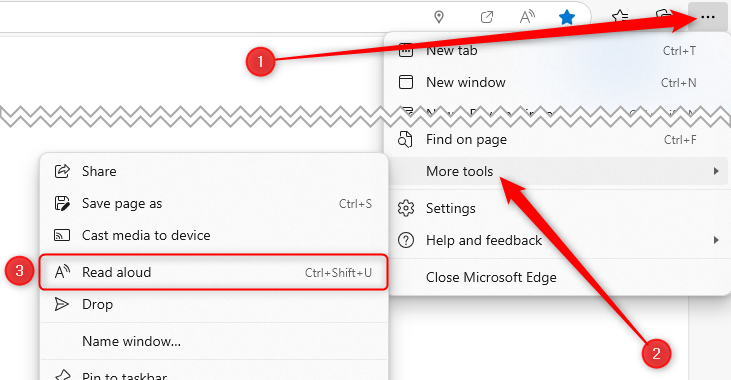
To get Microsoft Edge to read a whole page to you from start to finish, click the three dots in the top-right corner of your window, hover over “More Tools,” and click “Read Aloud.” If you prefer using keyboard shortcuts, press Ctrl+Shift+U. Either way, Read Aloud will start straight away.
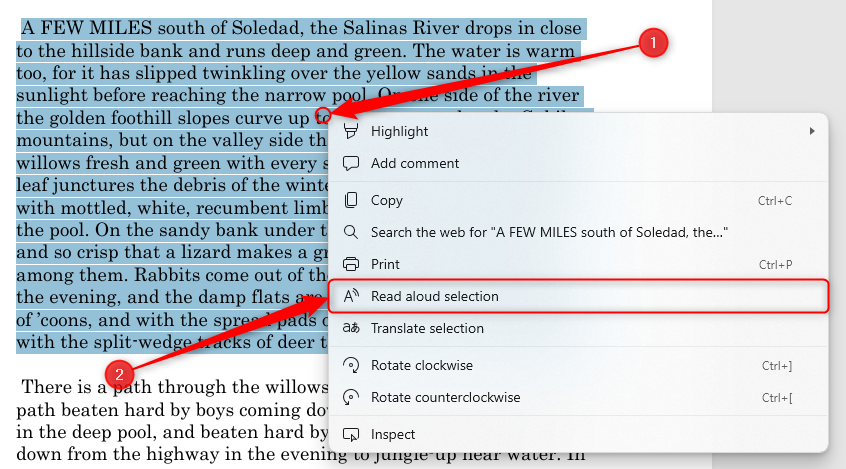
On the other hand, you can highlight and right-click some text on a website or Microsoft Edge PDF, and select “Read Aloud Selection.”
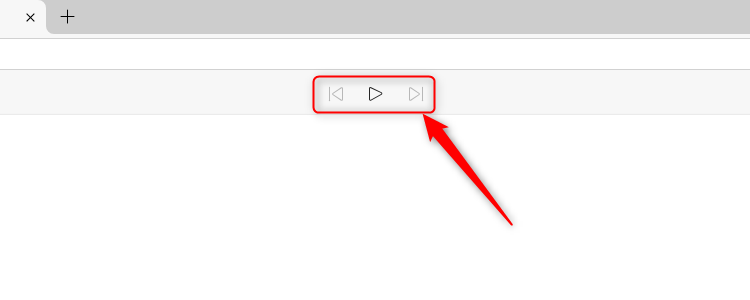
You can control the reading using the controls at the top of the Microsoft Edge window. The left icon jumps back to the start of the previous paragraph, the right icon moves to the next paragraph, and the play-pause icon lets you take a break and carry on when you’re ready.
Also, click any part of a website as the text is being read to jump to that section.
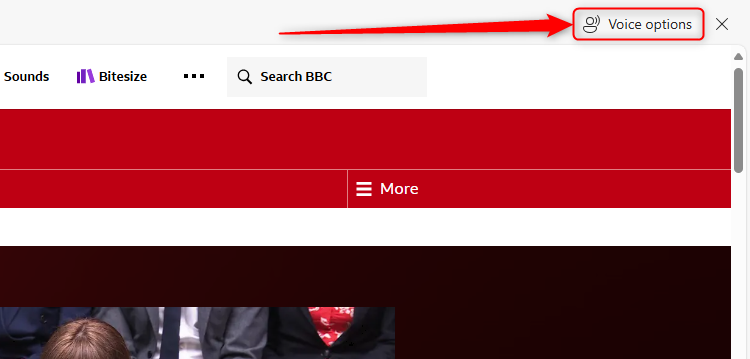
To change the voice, language, and reading speed, click “Voice Options” on the right-hand side of the Read Aloud bar.
5
Turn a Website Into a Makeshift App
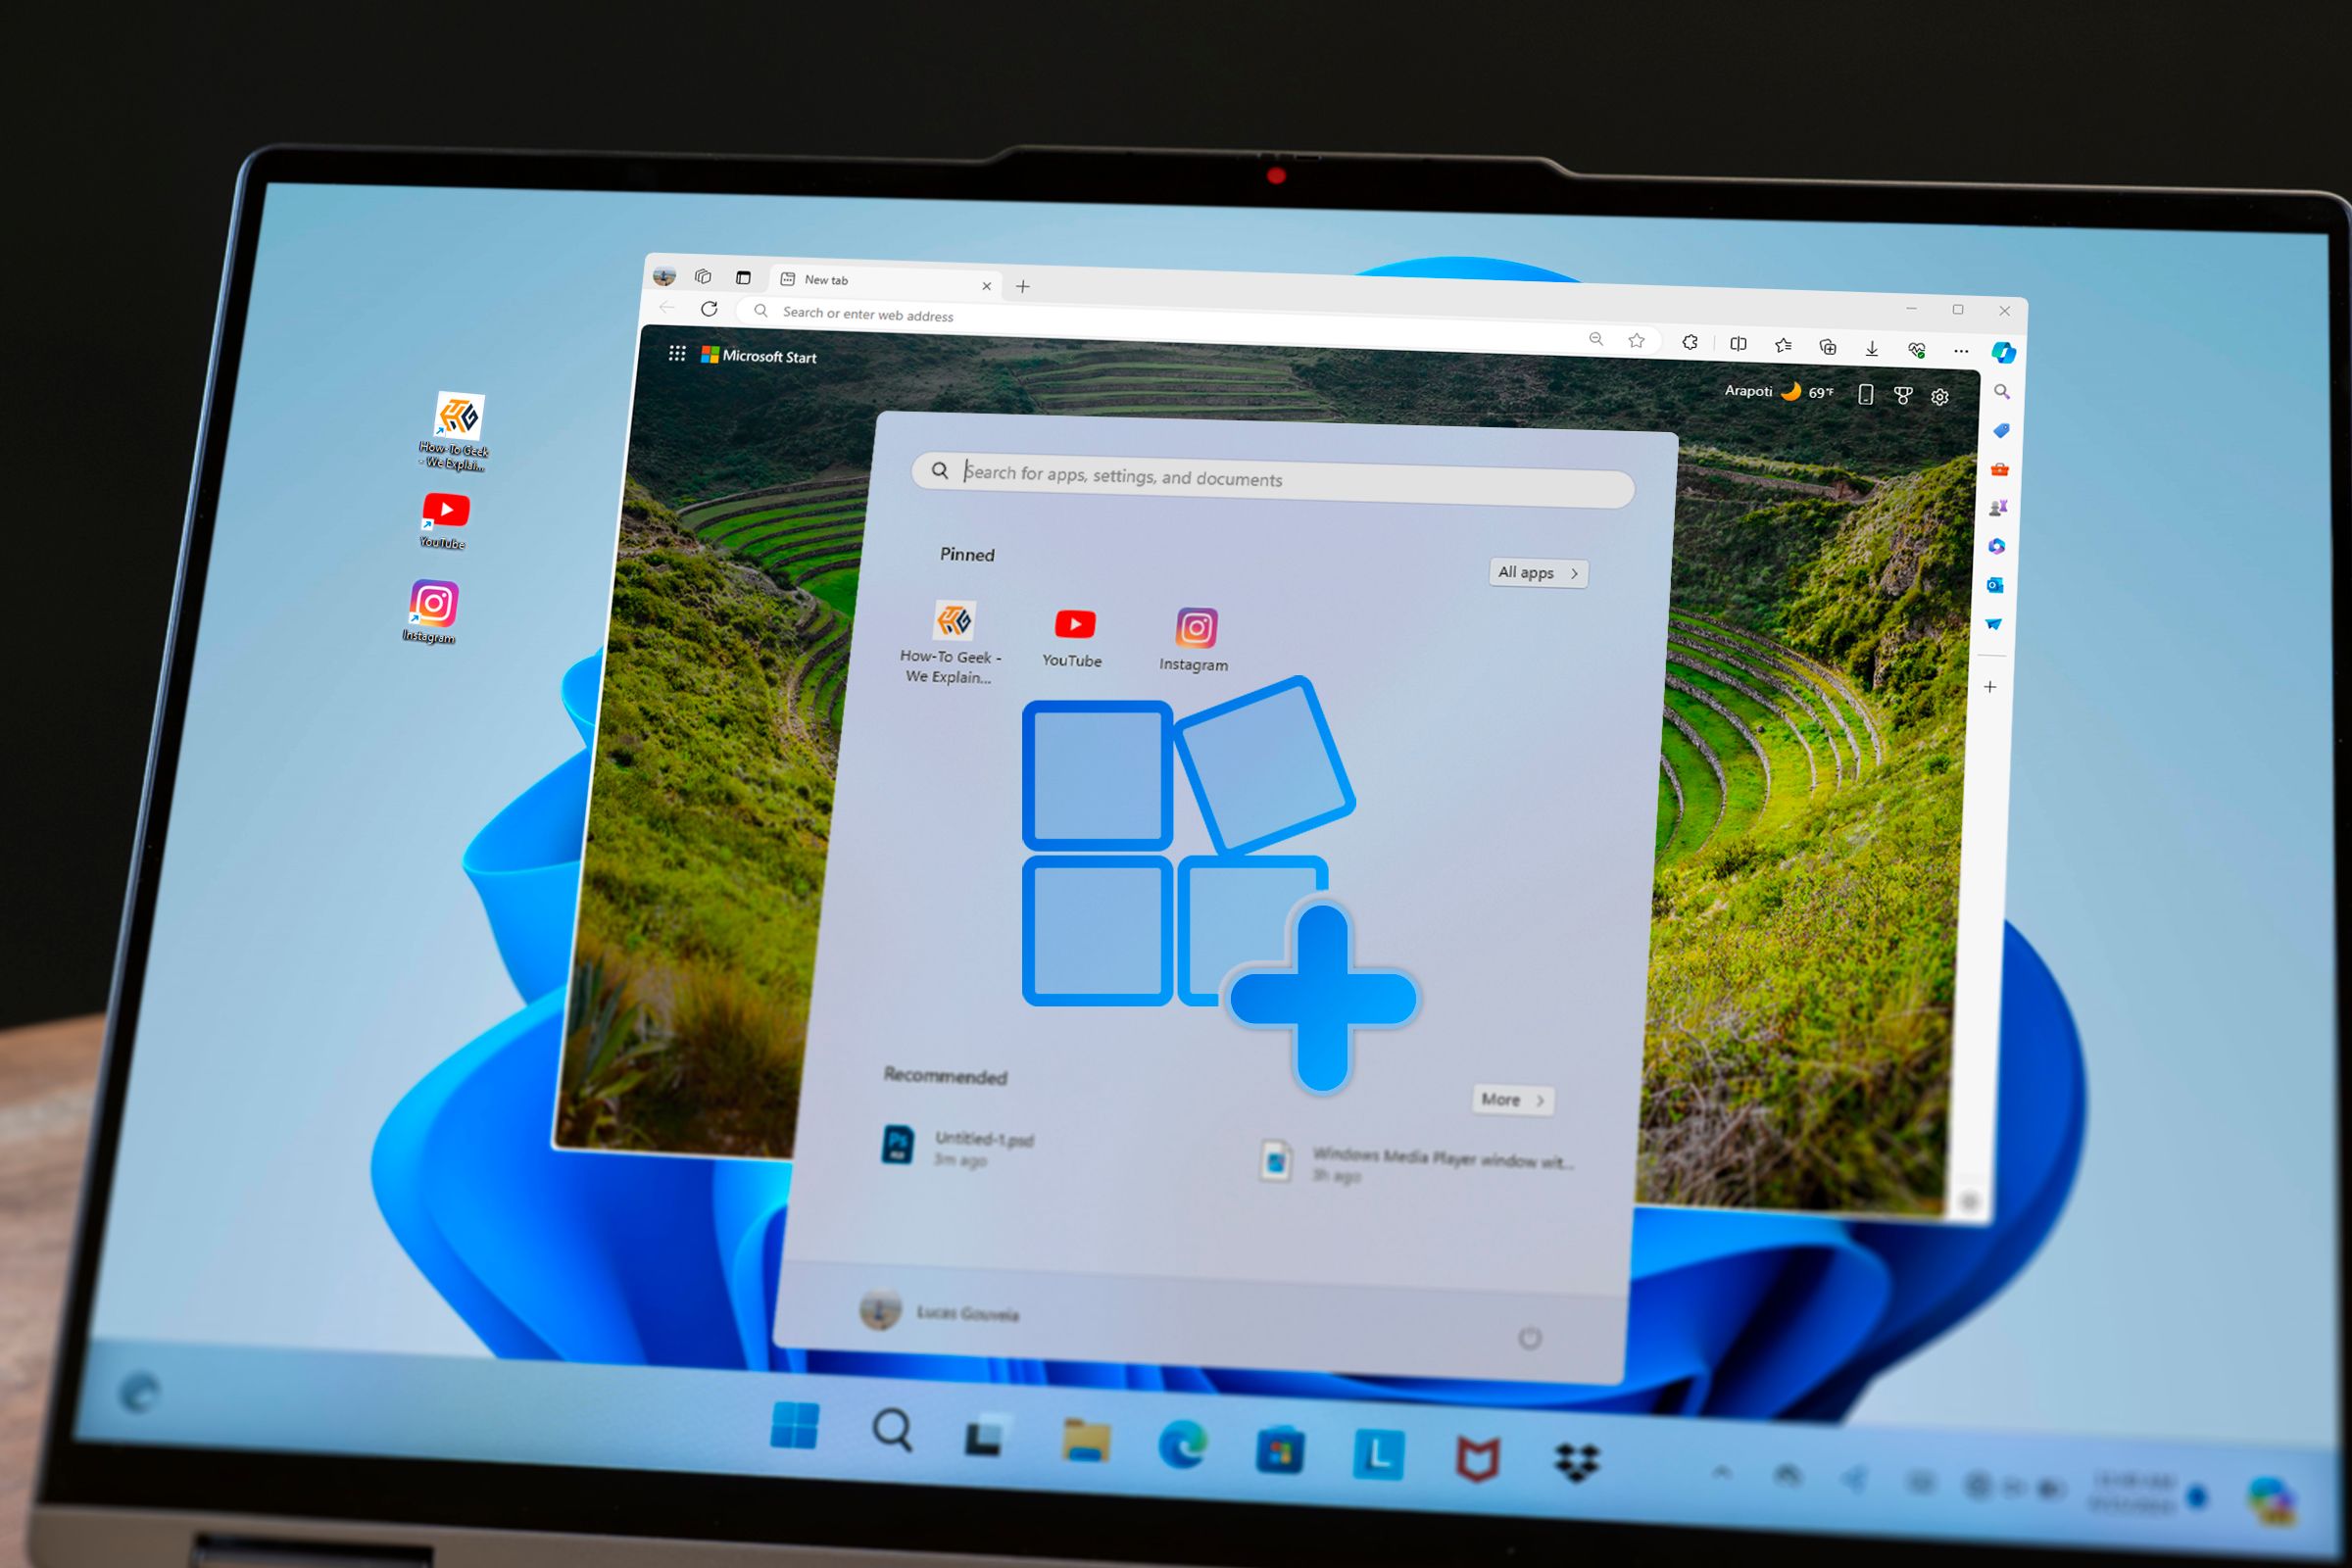
Microsoft Edge lets you install an app-like version of a website onto your computer. This is particularly useful if you visit a site often, as you can add these website apps to your taskbar, desktop, and Start menu, meaning you can launch them with a single click.
Related
Turn Websites into Desktop Apps Yourself Instead of Waiting for an App
Convert your go-to websites into Windows 11 apps for quicker access.
What’s more, these app-type installations don’t take up much of your computer’s memory, and they’re easy and quick to install. Here’s how.
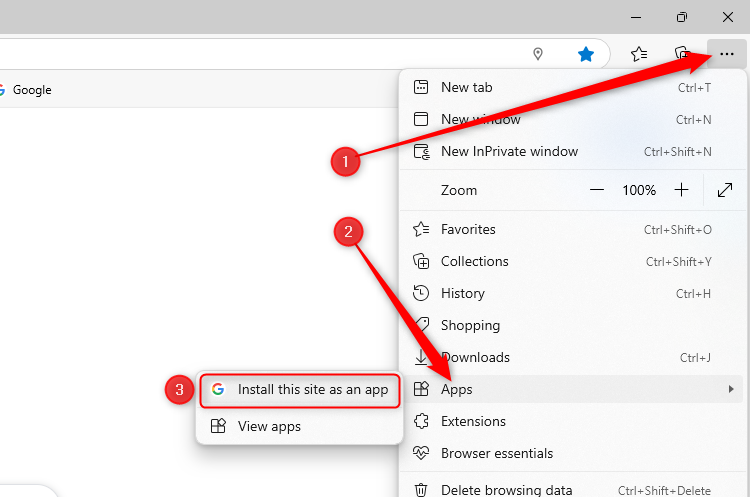
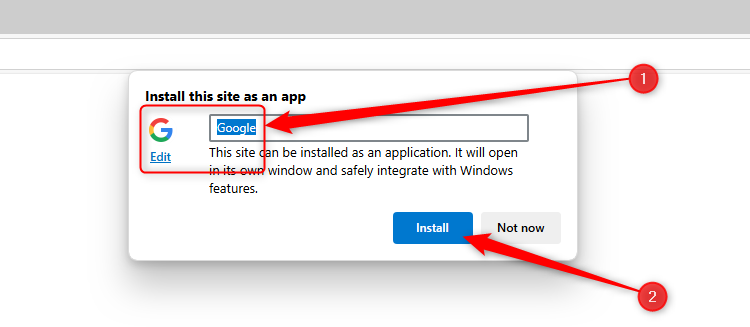
Go to the website you want to install as an app, and click the three-dot menu in the top-right corner of your Microsoft Edge window. Then hover over “Apps,” and click “Install This Site As An App.” You may see the alternative option of the word “Install” followed by the website name.
Next, in the pop-up dialog box, check you’re happy with the name the app will be given, and change the logo if necessary. Then, click “Install.”
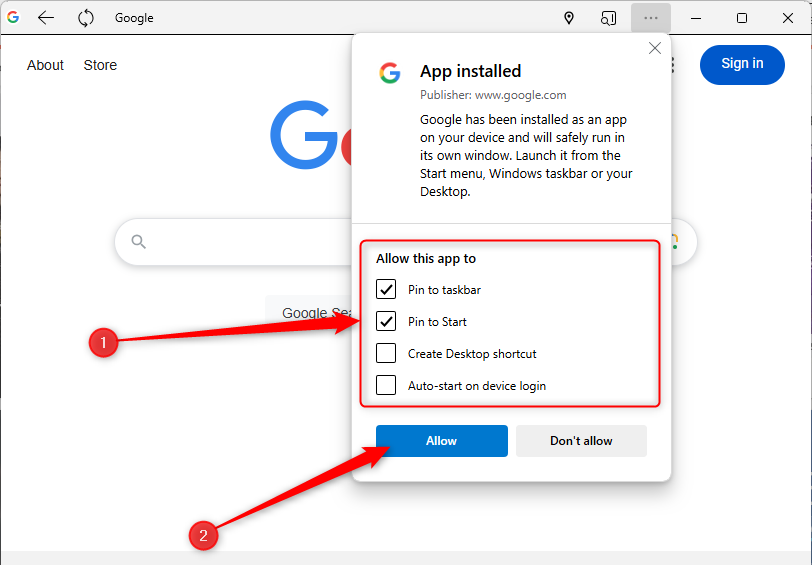
Once the installation is complete (it should only take a few seconds), the website will open in a dedicated window. At this point, you’ll see another pop-up window that lets you pin the app to the taskbar, add it to the Start menu, create a desktop shortcut, or automatically launch the app when you power up your device. Once you’ve chosen which options to activate, click “Allow.”
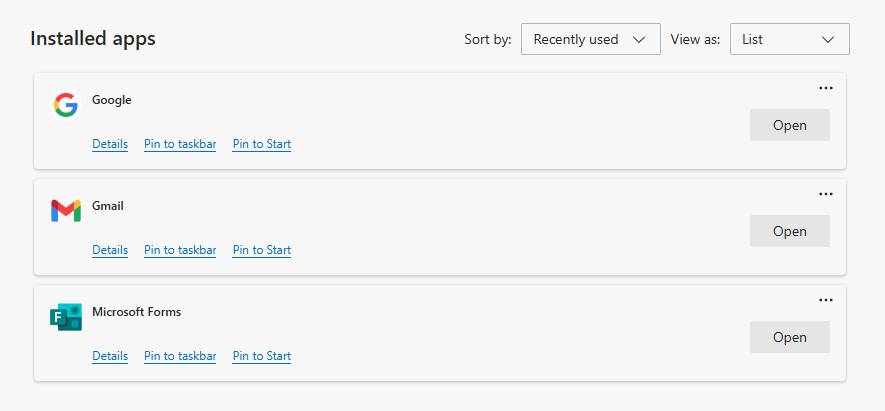
In my example, I’ve added the makeshift Google app to my taskbar, meaning it remains visible even after I close the dedicated window.
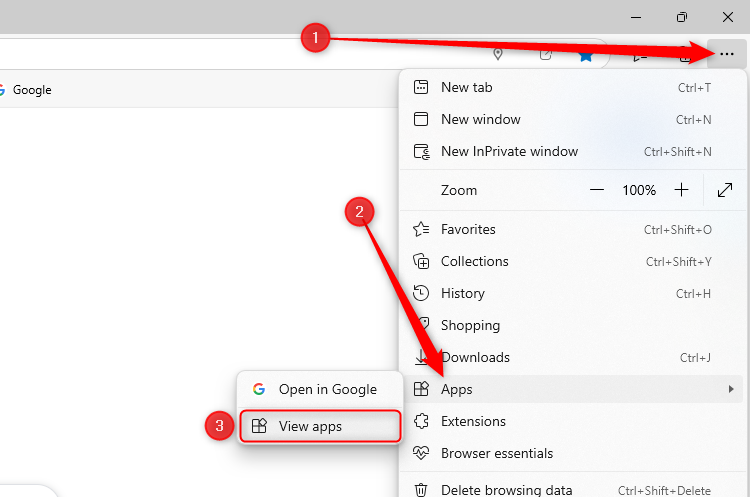
To view all the websites you’ve downloaded as apps, click the Microsoft Edge three-dot menu, hover over “Apps,” and click “View Apps.”
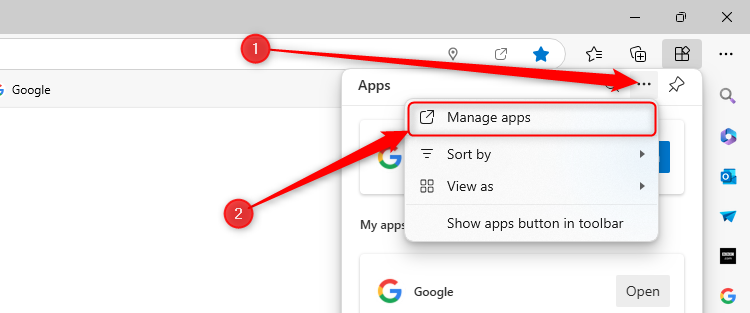
Then, click the three-dot menu in the Apps pane, and click “Manage Apps.”
From there, you can see each app’s details, pin it to the taskbar or Start menu, or uninstall it by clicking the three dots on the right-hand side of the respective app card.
Some websites have dedicated apps—known as progressive web apps or PWAs—designed specifically for optimal performance on Windows and Mac computers. Make sure you check this option out in the relevant app store first before using the Microsoft Edge app installation route.
6
Use Vertical Tabs for Easier Website Organization
While most of us are used to web tabs sitting horizontally across the top of the Microsoft Edge window, you might find it more useful and less chaotic to have them positioned vertically down the left-hand side.
If you have lots of tabs open in Microsoft Edge, having them displayed horizontally means it doesn’t take much for them to become unmanageable and difficult to distinguish. On the other hand, a vertical menu affords much more space for more tabs.t
What’s more, if you use a wide or ultrawide screen, much of the space at the side of your display when you’re browsing the internet is often wasted, so moving your tabs to this otherwise redundant area is a better way to optimize those extra inches.
For some, vertical tabs feel uncomfortable and unnatural, with many people having used horizontal tabs for decades. The only way to find out whether this alternative display suits you is to give it a try—and doing so is easy.
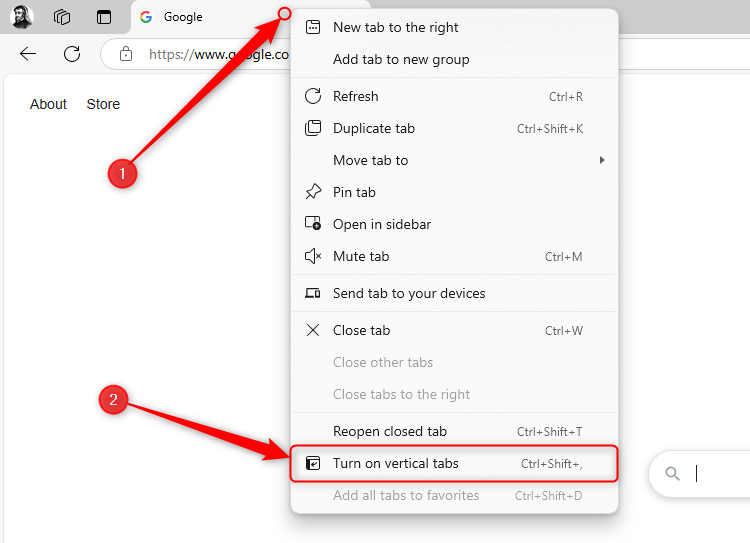
Right-click any tab you already have open, and click “Turn On Vertical Tabs.” To get there more quickly, use the keyboard shortcut Ctrl+Shift+Comma.
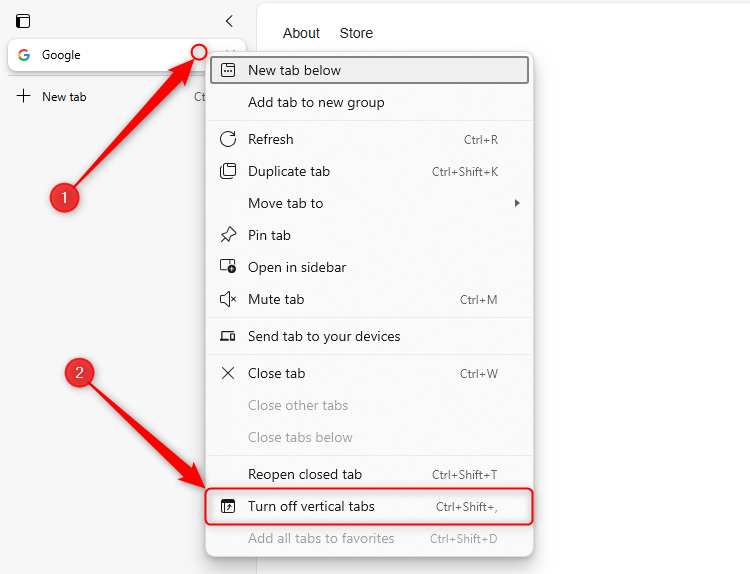
If you decide that vertical tabs aren’t for you, follow the same process, but this time, click “Turn Off Vertical Tabs.”
The quirks described in this guide aren’t the only reasons I use Microsoft Edge as my browser of choice. For example, I enjoy using the screenshot tool, making the most of the automatic shopping discounts and coupons, and using the browser’s built-in PDF reader.


