Key Takeaways
- Add frequently used commands to the Quick Access Toolbar. Go to File > Options > Quick Access Toolbar. Choose the command, click “Add >>,” then “OK.”
- Add shortcut entries for long words or lines to the AutoCorrect list. Word will replace the shortcut with the full text as you type.
- To move lots of text around, try Word’s Spike tool. Cut or copy multiple blocks of text, then paste them wherever you need.
No matter how long you’ve been using Microsoft Word, there might still be some features you haven’t explored yet. Here’s a look at a few lesser-known features in Microsoft Word that can improve your efficiency and help you save time.
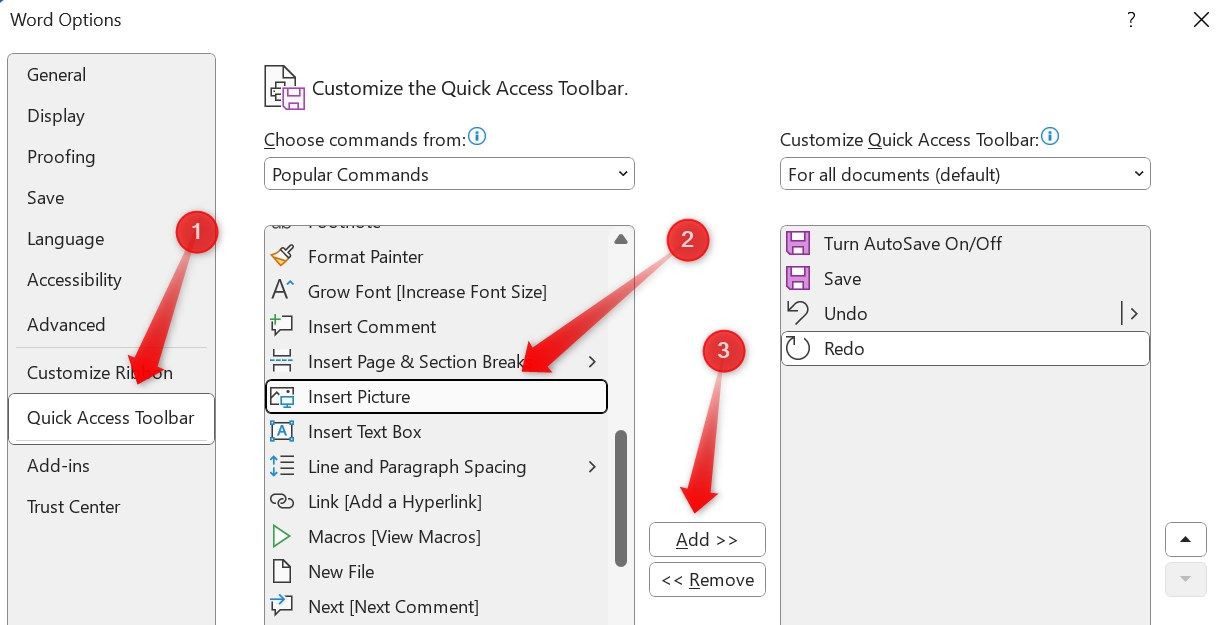
The Quick Access Toolbar, found at the top-left of your screen and featuring commands like Save, Undo, and Redo, allows you to perform common tasks quickly. You can add more commands to this toolbar to make your workflow even more efficient. For example, if you frequently insert images into documents, you can add an “Insert Picture” command.
To add a command to the Quick Access Toolbar, open the “File” menu in the top-left corner and select “Options.” Go to the “Quick Access Toolbar” section, choose the command you want to add from the list on the left, click the “Add >>” button, and then confirm by clicking “OK.” This will add your chosen command to the toolbar.
Add Your Desired Shortcut in the AutoCorrect List
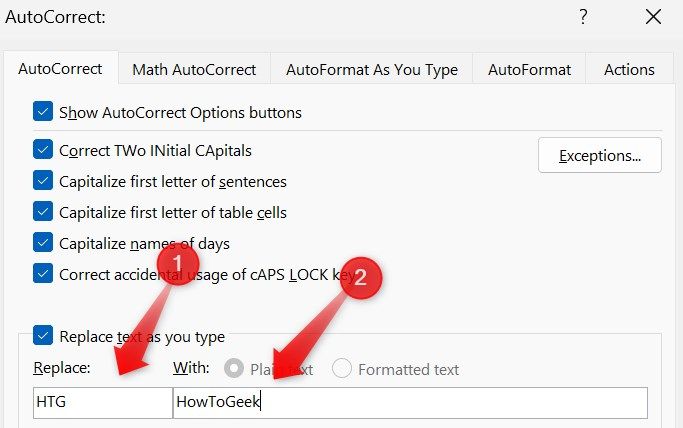
The auto-correct feature automatically corrects any spelling mistake you make in Microsoft Word. But did you know you can also add a custom correction for a shortcut in the AutoCorrect list? For example, if you frequently type a lengthy business name, you can add an entry for it. Then, whenever you type that shortcut, AutoCorrect will replace it with the assigned text.
To add a custom shortcut to the autocorrect list, go to the “File” menu at the top-left and select “Options.” Then, navigate to the “Proofing” tab on the left and click the “AutoCorrect Options” button on the right.
Then, type your desired shortcut in the “Replace” box and enter the full word or line in the “With” box. Finally, click “OK” to save your changes.
Now, whenever you type the shortcut you’ve assigned, Microsoft Word will automatically replace it with the longer word you’ve added.
Translate Text Right Within Microsoft Word
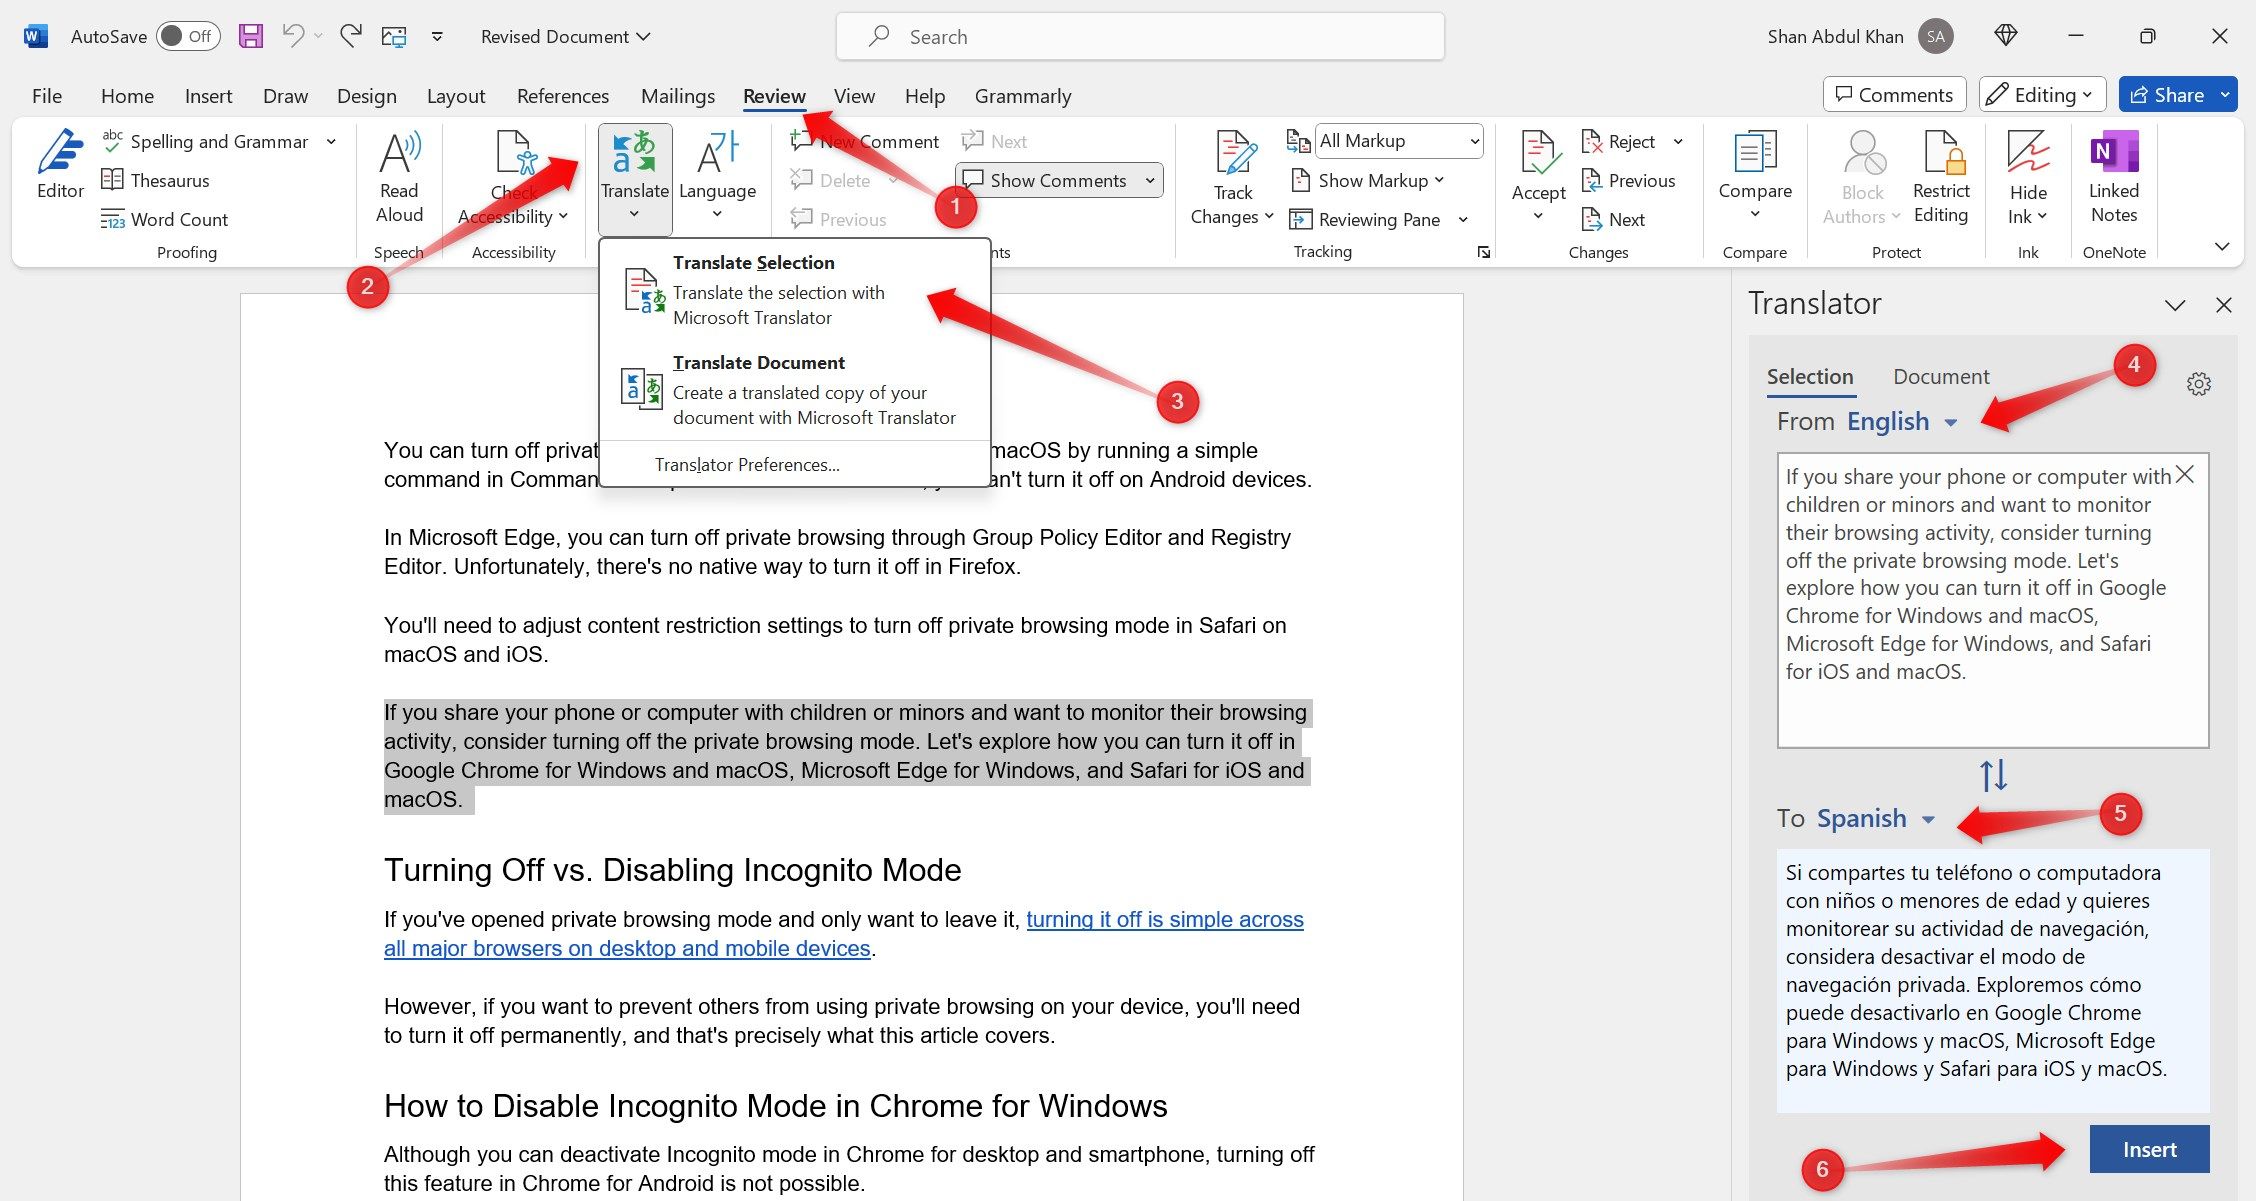
Microsoft Word comes with a convenient translator tool. It enables you to translate a document from a foreign language to your native language or convert it to the language of the person you’re sharing the document with. You can also translate specific sections within a Word document and replace the text with the translated version with a single click.
To use the translator tool, open your document in Microsoft Word, navigate to the “Review” tab, and click Translate > Translate Selection. Choose the languages you want to translate from and to, and Word will handle the rest automatically. If you want to replace the original text with the translated version, click “Insert.”
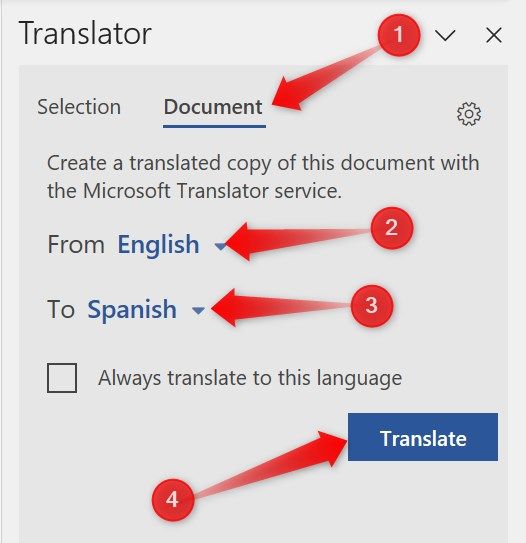
To translate an entire document, head to the “Document” tab, select the current language of the document, choose the language you want to translate it to, and then click “Translate.”
Spike, an extended clipboard feature, enables you to cut or copy multiple blocks of text or content from a document and paste them elsewhere, whether within the same document or into another Word document. This feature is particularly handy for extracting specific information from a Word document, as it allows you to cut or copy chunks and paste them in one go.
To relocate content using the Spike tool, select the first part of the text you want to cut or copy, and then press CTRL+F3 (or CMD+F3 on Mac). Repeat this process for each additional part of the text you want to cut or copy. Once you’ve copied (or cut) all the desired content, navigate to where you want to paste it and press CTRL+Shift+F3 (or CMD+Shift+F3 on Mac).
Compare Two Versions of a Document
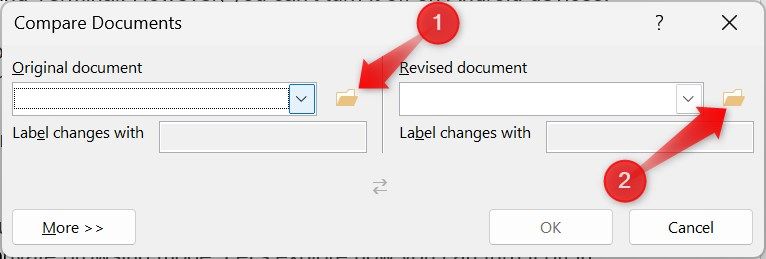
Microsoft Word offers a convenient Compare tool, which allows you to compare two versions of a document and review the changes made in the revised version compared to the original. It highlights changes by assigning different colors to different authors, and if authors have added their names, you can easily identify who made which change.
To use this feature, navigate to the “Review” tab, click on the “Compare” dropdown, and select “Compare….”
Then, click on the browse icon to choose the original and revised documents, and click “OK.”
Word will display the changes made by authors in the left sidebar, the alterations in the middle pane, and the original document without any changes on the right-hand side. You can easily see both the original and revised versions of the document, along with all the changes made by different authors, in one view.
Convert Text to Table and Vice Versa
Microsoft Word simplifies the process of converting text into tables and vice versa. If you have content that you want presented in a tabular format but prefer not to input each item manually into individual fields, the text-to-table feature allows you to convert the data into a table with a single click.
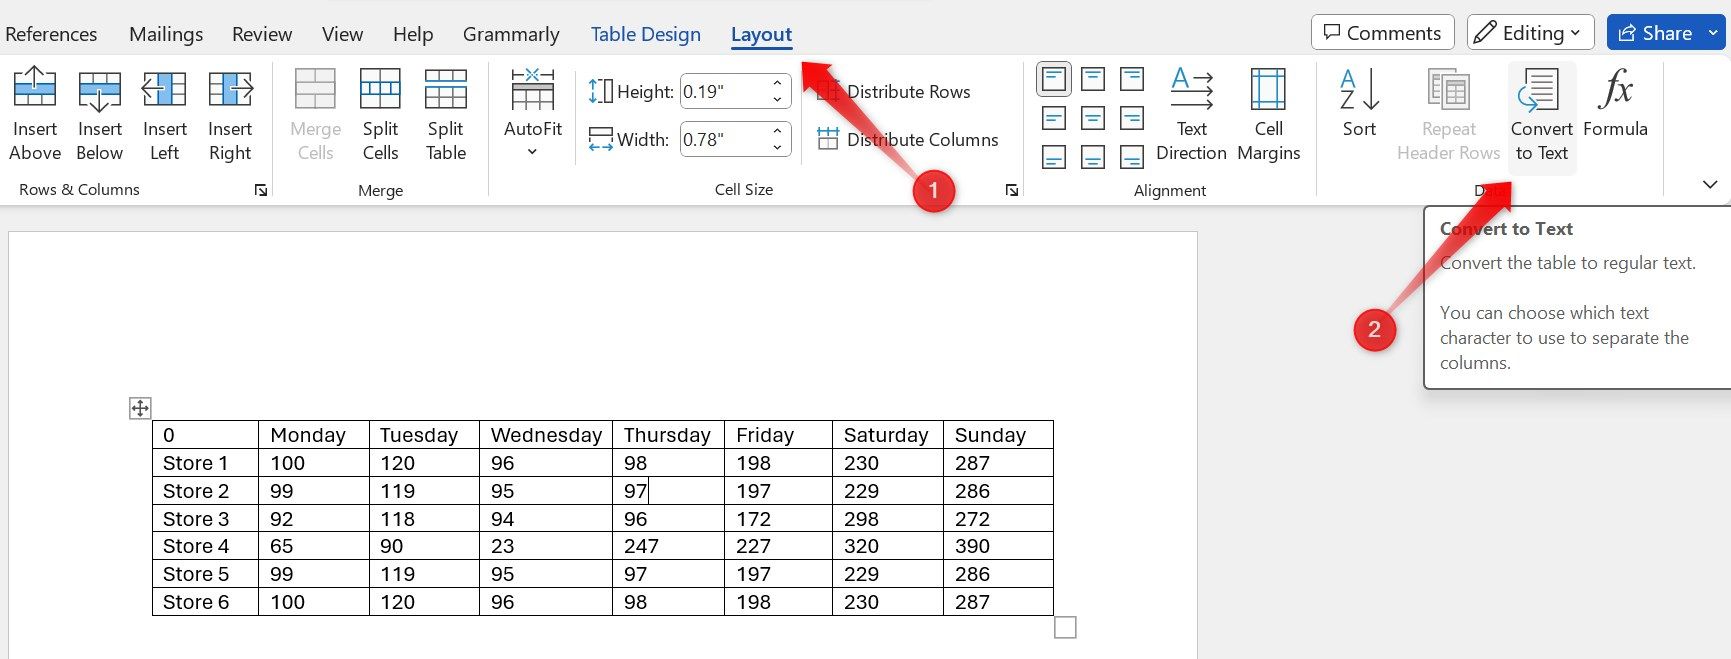
Likewise, if you have data organized in a table and wish to convert it into text without manually copying and pasting each entry, the table-to-text conversion feature is at your service.
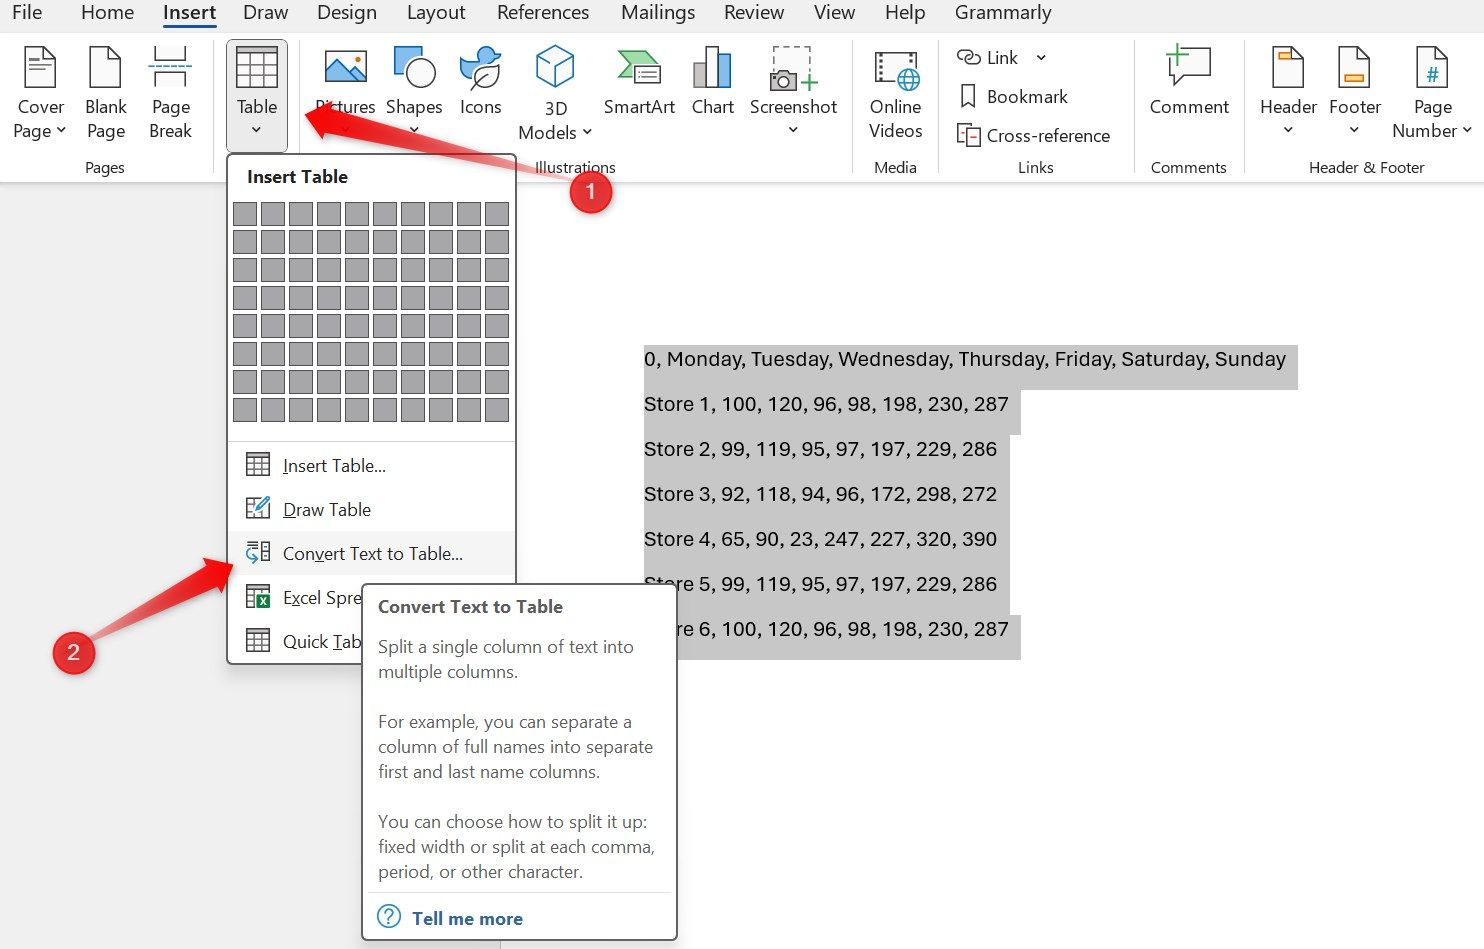
To transform text into a table, highlight the text you wish to convert and then head to the “Insert” tab.
From there, click on the “Table” drop-down menu and select “Convert Text to Table.”
To convert text to a table, each entry needs to be separated by a comma; if not, the conversion won’t work properly.
To convert a table into text, go to any cell within the table, go to the “Layout” tab, locate the “Convert to Text” option, and click on it. Finally, confirm your choice by clicking “OK.”
These are a few Microsoft Word features that can improve your productivity and simplify complex tasks. If you haven’t experimented with these features yet, it’s worth giving them a try. If you’re already familiar with most of them, explore other Microsoft Word tips and tricks to streamline your workflow further and save time in the office.


