Are you worried your sensitive files will land in the wrong hands? If you share your files securely, can reduce the risk of that happening. Here are some measures you can take to share your confidential files securely on your Windows 11 PC.
When you create a file, the app that makes the file saves various metadata items with the file. This often includes the author’s name, the device the file was created with, and so on. You should consider removing this data from your file to preserve your privacy.
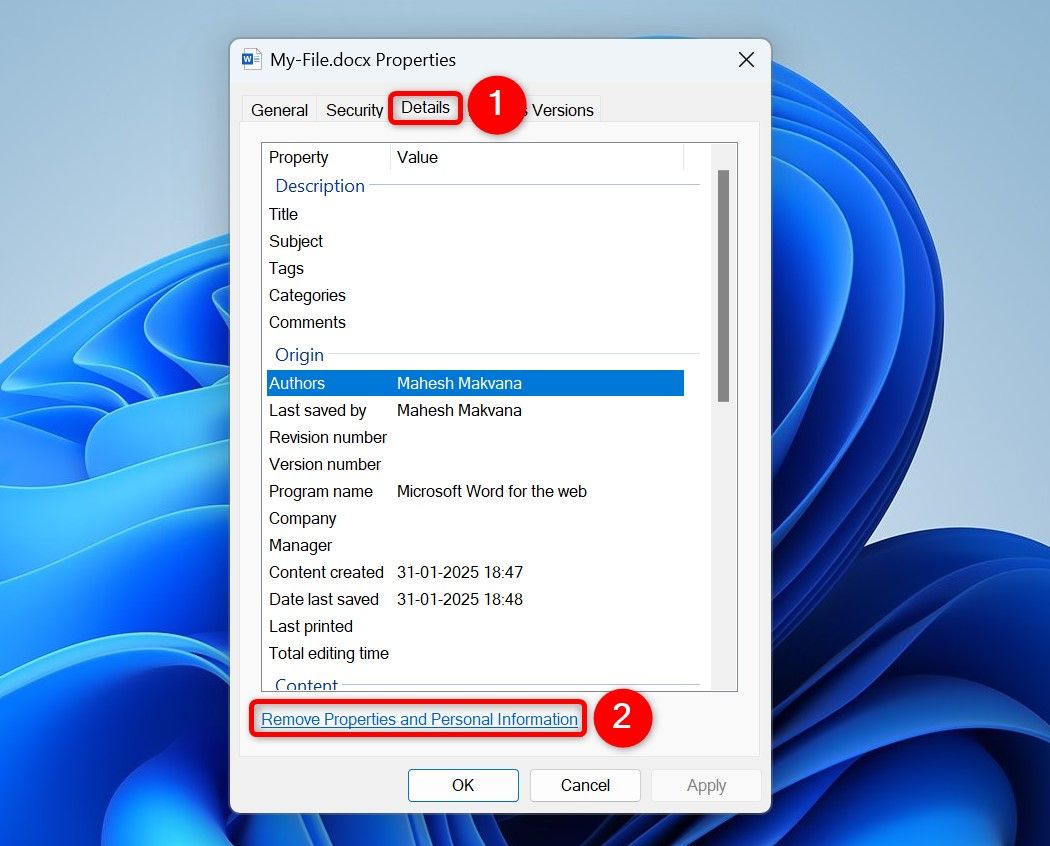
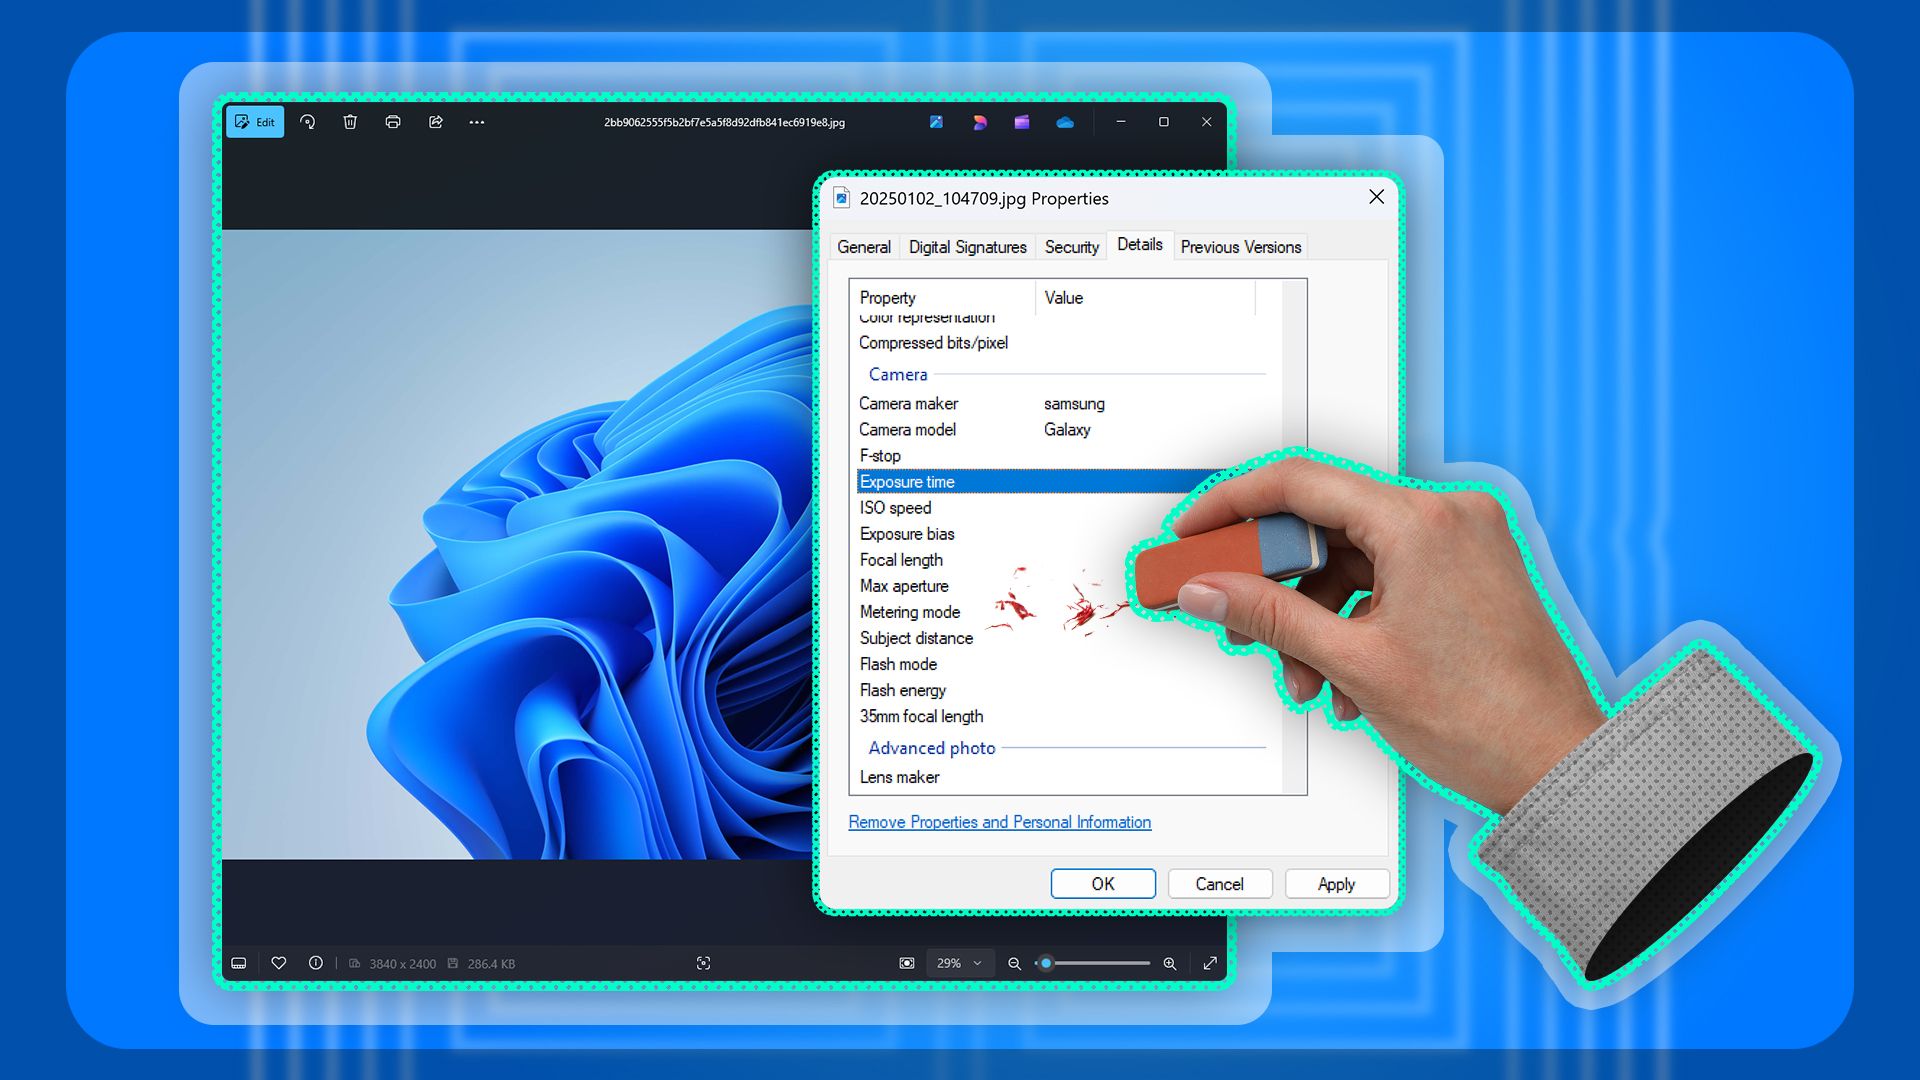
On Windows 11, you have an easy way to strip off metadata from your files. To use it, launch File Explorer (press Windows+E) and locate your file. Right-click the file and choose “Properties.” Access the “Details” tab, and at the bottom, click “Remove Properties and Personal Information.”
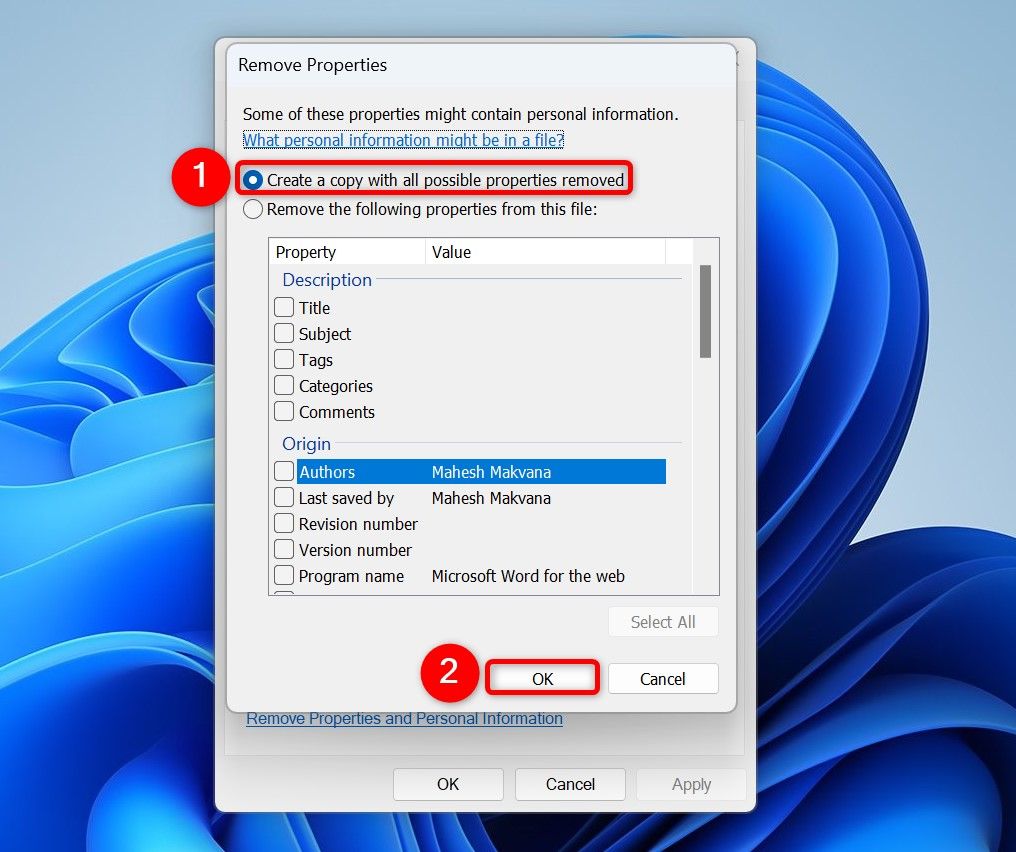
On the window that opens, to remove all metadata from your file, choose “Create a Copy With All Possible Properties Removed” and choose “OK.”
Make sure you share the copy of the file that File Explorer has created. The original file still contains metadata.
Related
How to Stay Private By Stripping EXIF Data From Images on Windows 11
Share only the photos, not any extra information.
2
Encrypt Your Files Before Sharing Them
When you apply encryption to your files, they remain unreadable even if someone manages to access them. All someone will see is some garbage text instead of the actual file content. To encrypt your files with a password, use a free app like 7-Zip or WinRAR. To use the former, launch the 7-Zip site, download and install the app, and restart your Windows 11 PC.
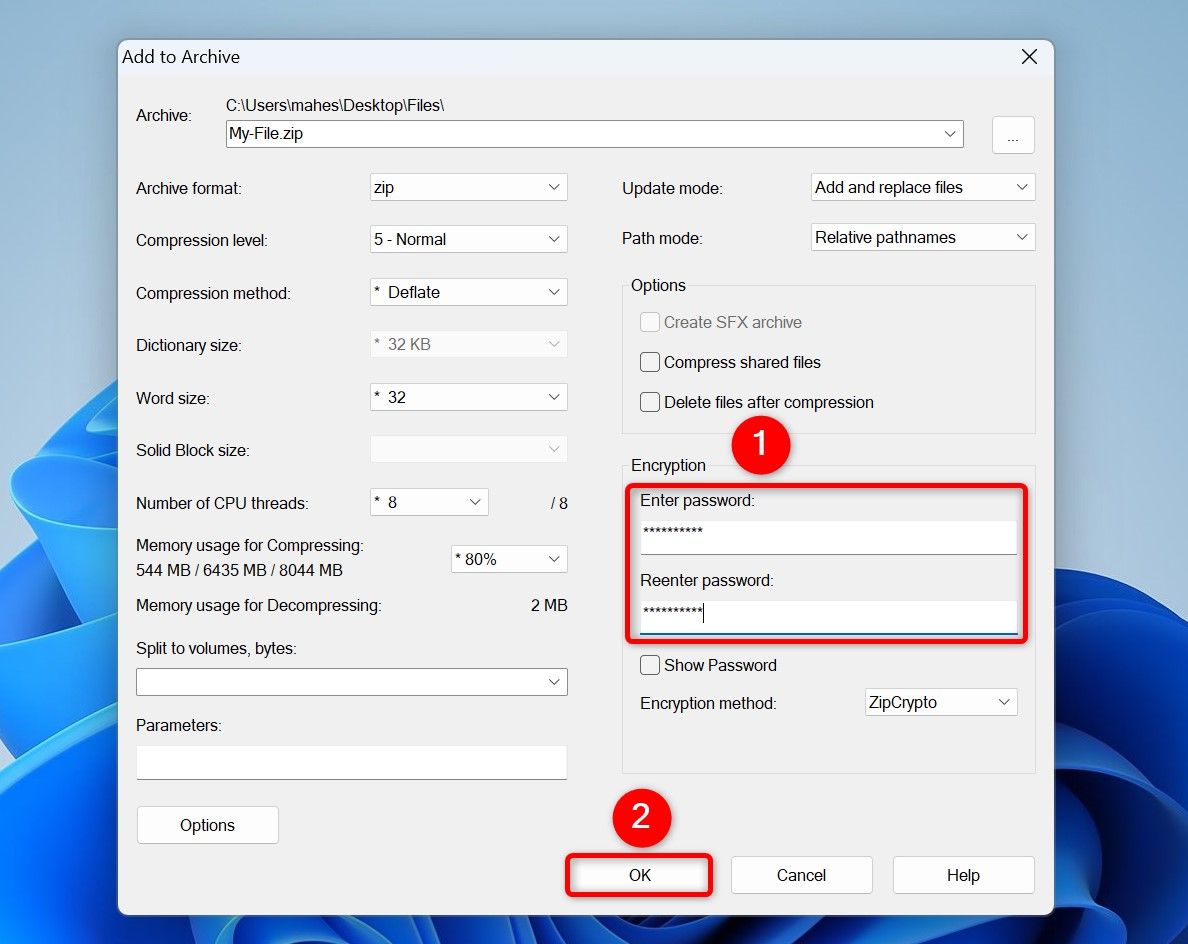
Open File Explorer, find your file, right-click it, and choose Show More Options > 7-Zip > Add to Archive. On the open window, click the “Enter Password” field and type a password of your choice. Click the “Reenter Password” field and type the same password. Then, choose “OK.”
Your file is now encrypted in an archive. Share the archive with whoever you want, and your file will only be decrypted upon entering the correct password.
3
Use a Peer-to-Peer File Sharing Provider
Regular file sharing providers store your file on their servers and give you a shareable link that you can share with people for them to download your file. A peer-to-peer file-sharing provider transfers your file directly from your device to the recipient’s device. This is a better approach to use when sharing sensitive files.
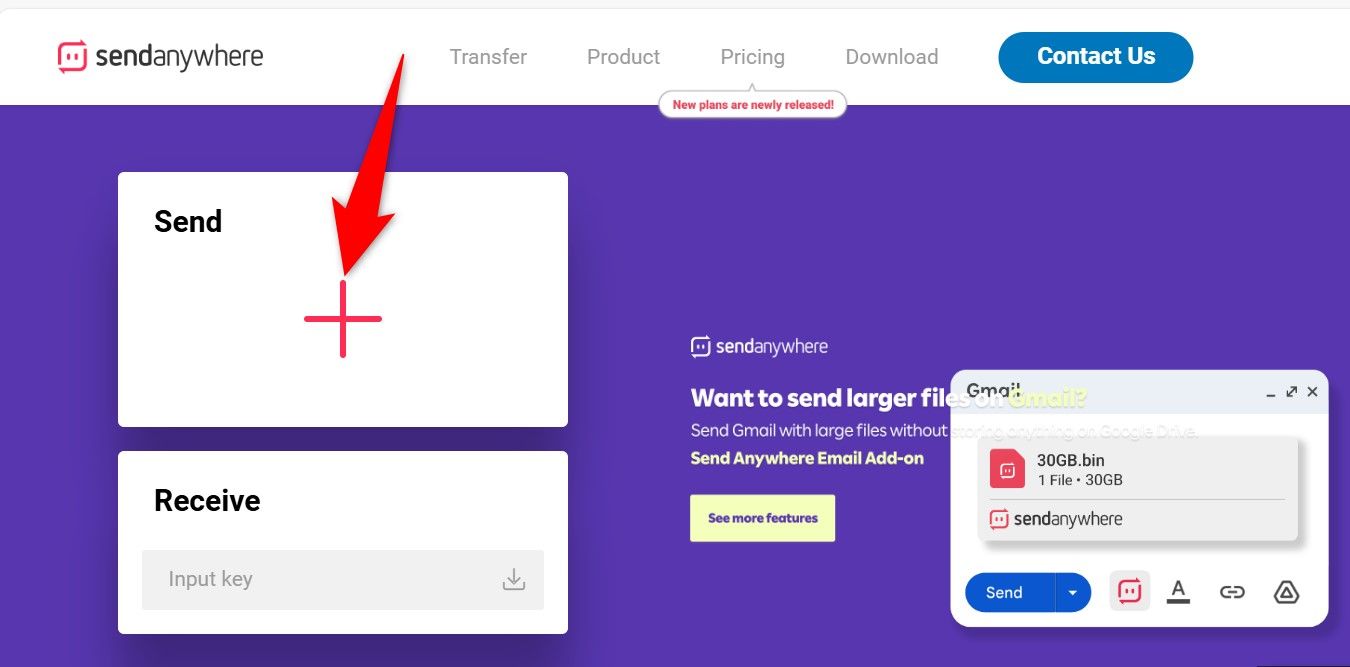
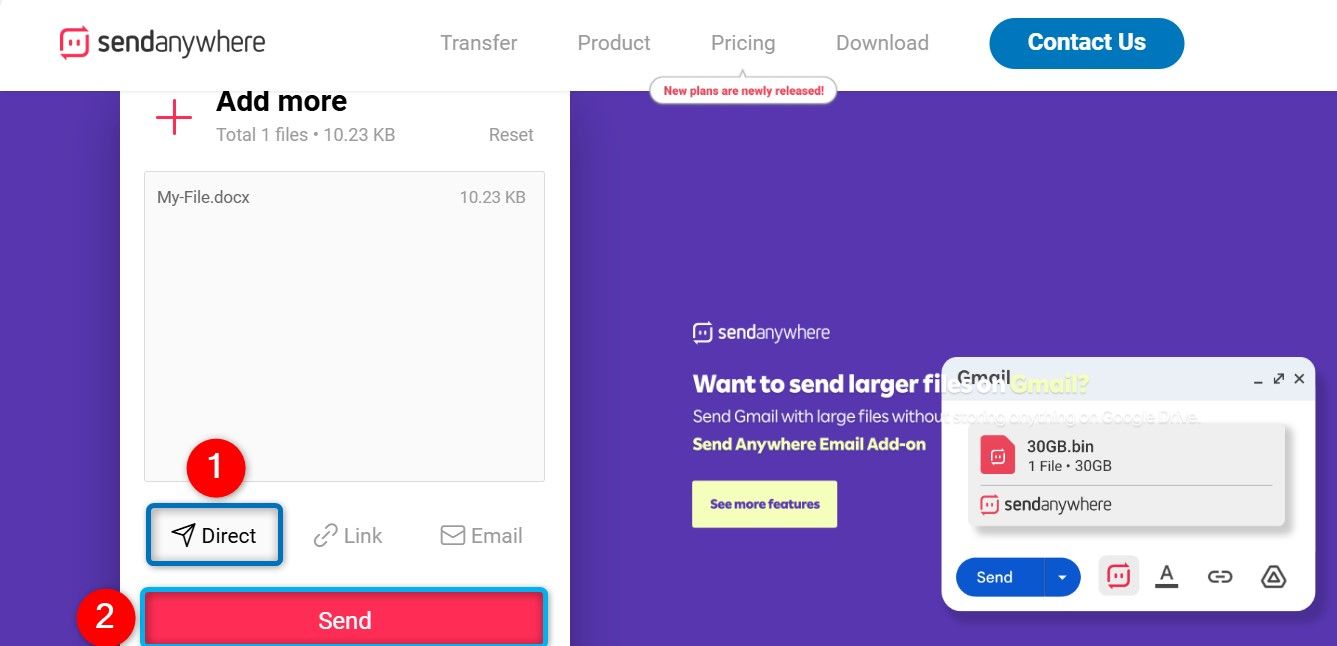
One such service you can use is Send Anywhere. Launch the Send Anywhere site, click the plus sign in the Send section, and select the file to share.
At the bottom of the file list, click “Direct” and choose “Send.” You’ll see a download code on your screen.
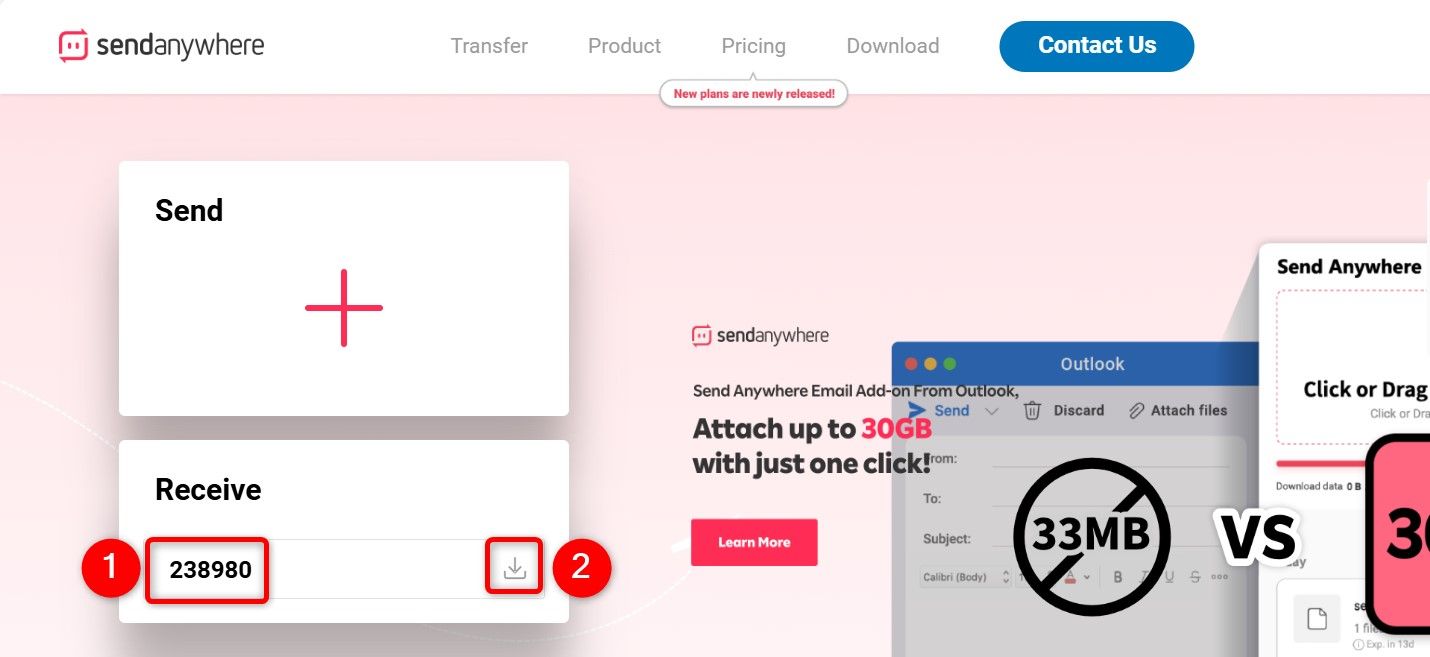
Ask your recipient to open the Send Anywhere site, click the “Input Key” field, and type the code shown on your screen. Then, click the download icon to begin receiving the file.
Your recipient’s device will start downloading the file from your PC.
4
Use an End-to-End Encrypted Email Service
If you’re looking to share your sensitive file via email, use an email provider that offers end-to-end encryption. This ensures only the sender and the recipient of the file can access the file.
Proton Mail is a nice option, as it lets you exchange emails using end-to-end encryption, even in its free plan.
5
Use Secure Instant Messaging Apps
If you want to share your file via an instant messaging app, use an app that offers end-to-end encryption. Apps like Signal, Telegram, and WhatsApp offer that feature and let you securely transfer your files.
Signal’s file size limit is 100MB. Telegram caps the limit at 2GB, but note that you must use the app’s Secure Chat feature to enable end-to-end encryption. WhatsApp lets you transfer files up to 2GB. However, WhatsApp’s Google Drive and iCloud backups aren’t encrypted by default, so definitely enable encryption for that if you use those backup options.

Related
The Best Free Ways to Send Encrypted Email and Secure Messages
E2EE? Isn’t that a robot from Star Wars, or something?
6
Split Files for Better Security
One uncommon tip you can use while sharing sensitive files is to split your file into multiple smaller files. Then, send each file chunk to the recipient separately. This way, even if someone manages to get access to your files, they won’t be able to turn a chunk into the actual, original file.
You can use a free and open-source app like 7-Zip to do that. After installing this app and rebooting your computer, open File Explorer and find your file. Right-click your file and choose Show More Options > 7-Zip > Add to Archive.
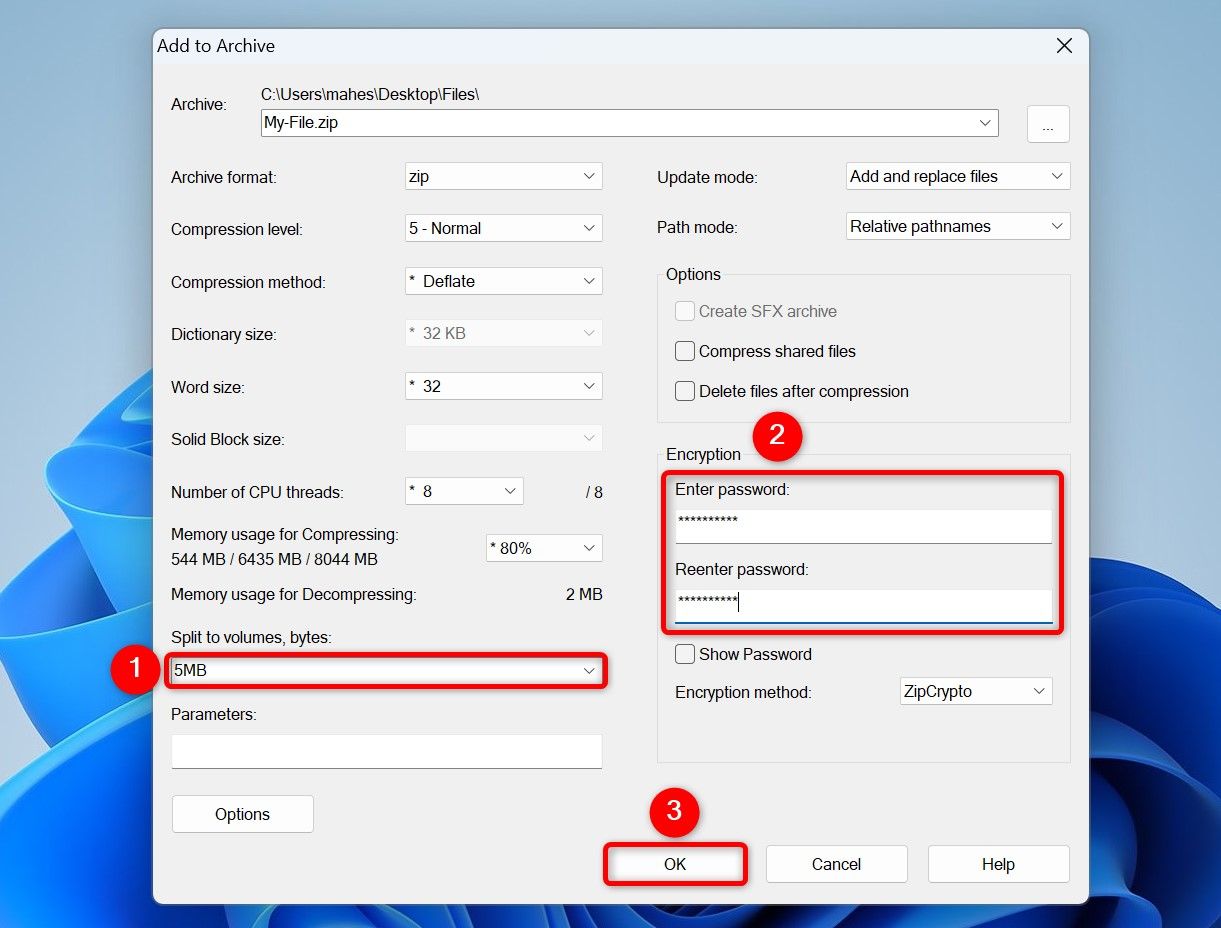
On the window that opens, click the “Split to Volume, Bytes” field and type the size you want each file chunk to have. For example, if your original file is 10MB in size, entering “5MB” in this field will create two file chunks, each 5MB. I recommend entering a password in the “Enter Password” and “Reenter Password” fields. Then, click “OK.”
Send each file chunk separately to your recipient. Once they’ve gotten all the chunks, they can right-click the first chunk and choose Show More Options > 7-Zip > Extract Here to turn those multiple chunks into the actual file.
Related
How to Split Large Files Into Multiple Smaller Files on Windows 11
Get around file size restrictions with these methods.
7
Limit File Access on Cloud Storage Sites
While sharing sensitive files via cloud storage providers like Google Drive and OneDrive, you can limit people’s access to your files. For example, you can only give them viewing access and not edit access.
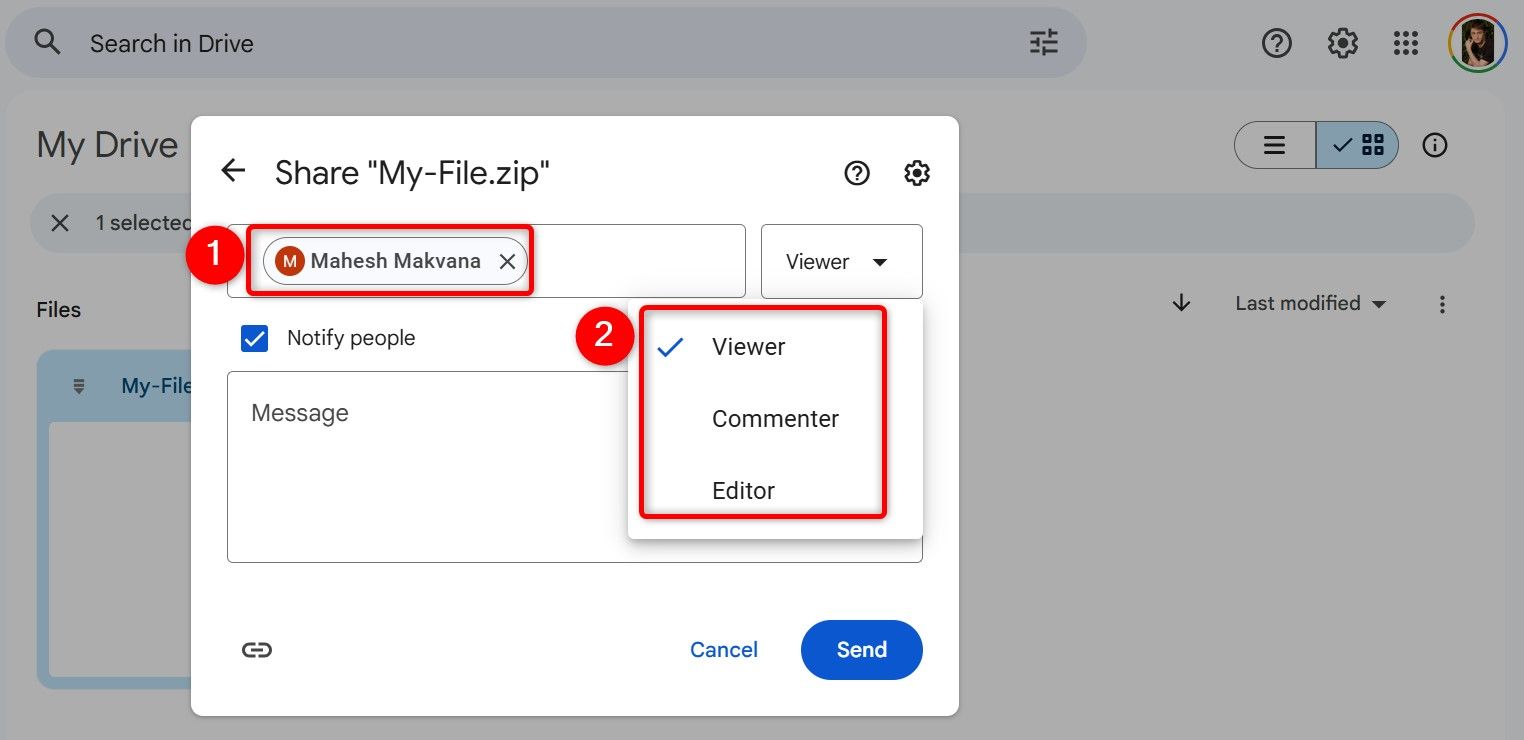
To do that on Google Drive, right-click your uploaded file and select Share > Share. In the text field, type the recipient’s email address. Then, choose whether you want to give them “Viewer,” “Commenter,” or “Editor” access.
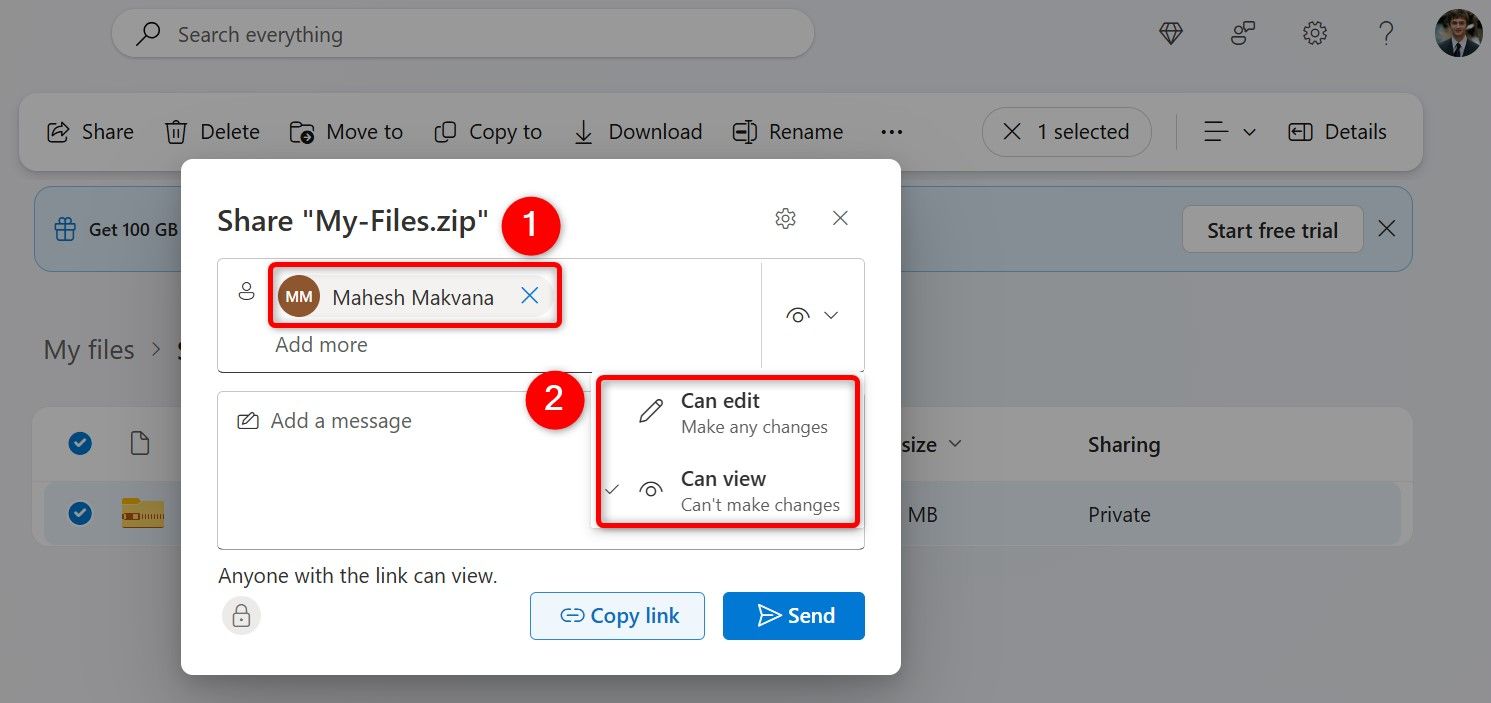
On OneDrive, right-click your file and choose “Share.” Select the text field and type your recipient’s email address. Then, click the pencil icon and choose “Can Edit” or “Can View.”
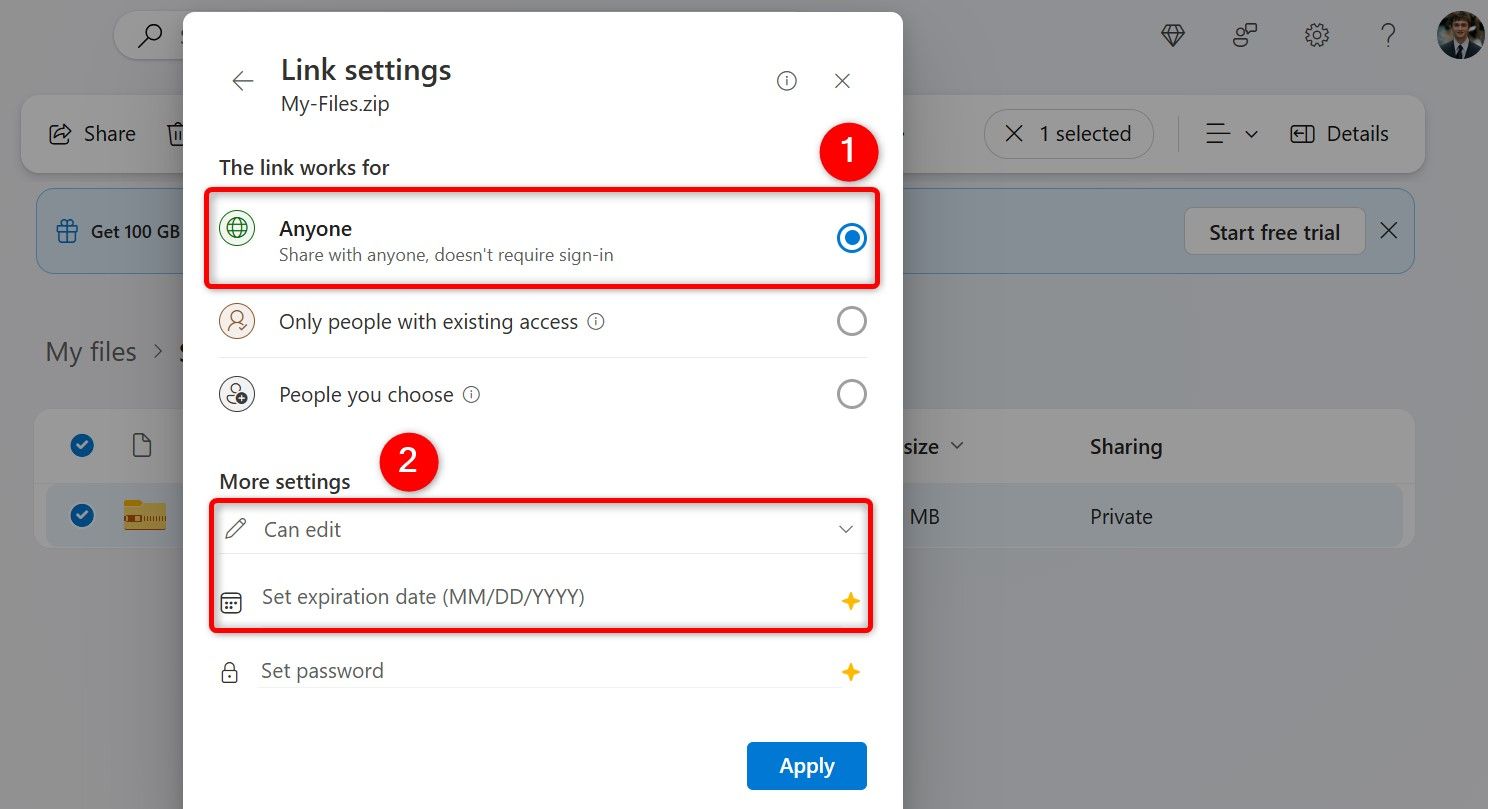
On OneDrive, you can also generate a shareable file link that expires after the specified time (a premium feature for Microsoft 365 subscribers only, unfortunately). To make that, click “Anyone With the Link Can Edit.” In the More Settings section, click “Set Expiration Date” and select a date.
And those are some tips to follow while sharing confidential files online on Windows 11. There are other online safety tips you should follow to better protect yourself and your content online.


