Microsoft Word is surprisingly flexible in letting you position your words, lines, and paragraphs exactly how you want. The issue, however, is that different tools are in various places across the program’s interface. So, we’ve compiled some of the handiest tips into one handy article!
Some of the screenshots in this article contain symbols such as •, °, and ¶ (these are called non-printing characters because they don’t show when you print your document). They’re activated and deactivated by pressing Ctrl+Shift+8, and they help you see how your text is structured and organized.
Non-breaking Spaces
As its name suggests, a non-breaking space between words ensures they don’t break up over two lines. There are sometimes situations when you want to keep certain strings of text together—such as a person’s first name and surname, a date’s month and day, or a phone number’s area code, prefix, and subscriber number.
For example, in the text below, it looks odd to have April and 22nd split up.
To rectify this, delete the space between the words you want to keep together, and with your cursor in the place where you want to add the non-breaking space, press Ctrl+Shift+Space. You will then see these two parts pulled together on the same line.
Get into the habit of using this shortcut key between any elements you want to keep together, even if they don’t currently appear near the end of the line. Then, if you change your typeface or font size, you can rest assured that they’ll not split across two lines.
Having said that, don’t overuse non-breaking spaces—especially if you’re using justified alignment—as doing so disrupts Word’s efforts to space your lines evenly and forces words to squeeze together onto a single line. So, while they’re a useful tool, use them sparingly and only where absolutely necessary.
Automatic Hyphenation
Useful if you’re writing a complex academic paper with dozens of long words, or narrow columns, such as in a newspaper article, automatic hyphenation is Word’s way of spacing your words out more evenly.
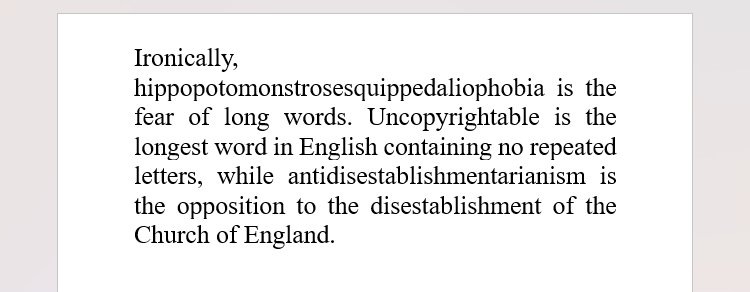
In the example below, because the paragraph has many long words, its spacing is untidy and inconsistent, leaving unsightly gaps.
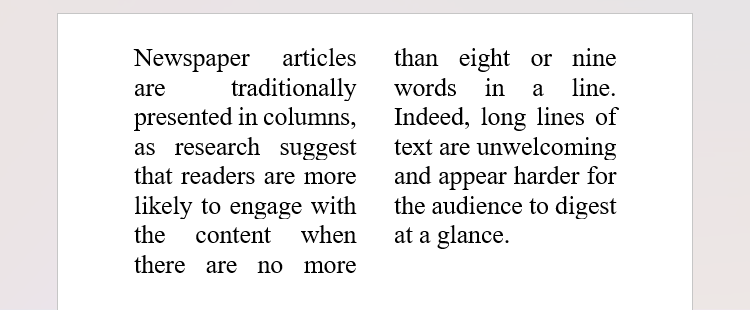
Similarly, if you are using narrow columns in your document, Word will struggle to keep the spacing consistent as it tries to work out how to navigate the limited width. Notice the large gap between the words are and traditionally.
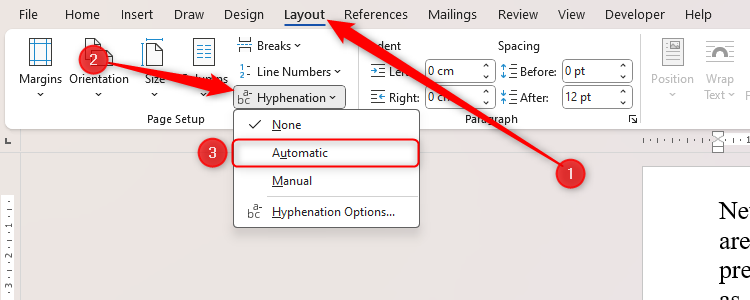
Enabling automatic hyphenation will resolve this issue. With your cursor anywhere in your Word document, open the “Layout” tab, and click “Hyphenation.” In the drop-down menu, click “Automatic.”
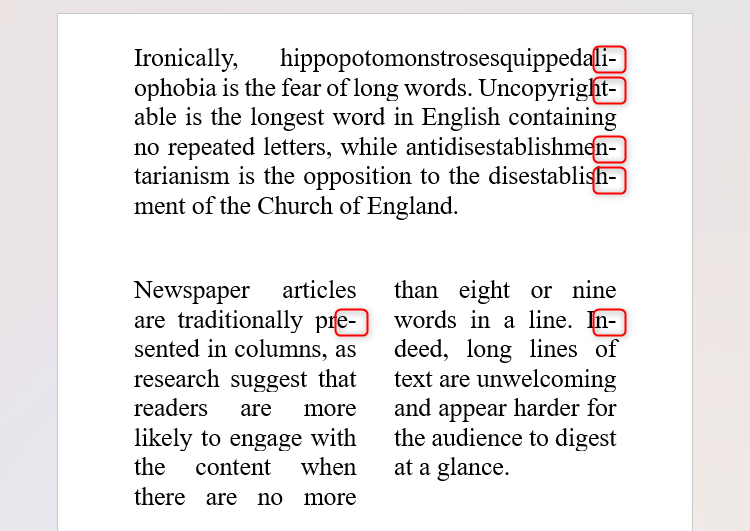
You will then see certain words break up across two lines, resulting in more consistent spacing and a more aesthetically presented document.
If you’re still not happy with the spacing and layout of your words, click “Manual” in the Hyphenation menu to position the hyphens manually.
Page and Section Breaks
As an academic proofreader, I’ve lost count of the number of times I’ve seen people start a new page by repeatedly hitting Enter. Likewise, if people want to divide a paragraph into two columns while retaining the original layout in the rest of the document, they might use a two-columned table. Both of these methods are structurally insecure—in other words, if they later change the font size, or add or delete content to earlier parts of their work, it will disrupt the document’s layout.
Once you get your head around how they work, Word’s Breaks are an invaluable tool for controlling your document layout, adding a barrier between different sections of your work.
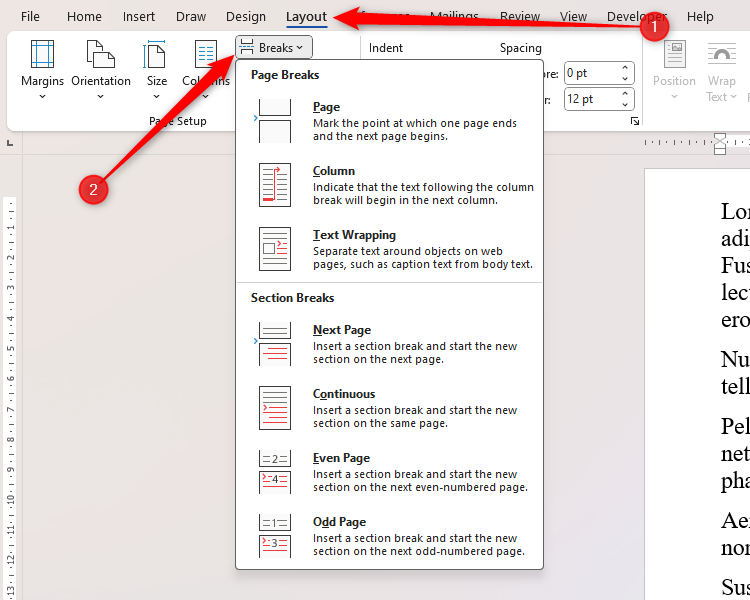
Start by activating Word’s non-printing characters (the ¶ icon in the Home tab on the ribbon). Then, head to the “Layout” tab, and click “Breaks.”
Let’s explore each of these options in more detail.
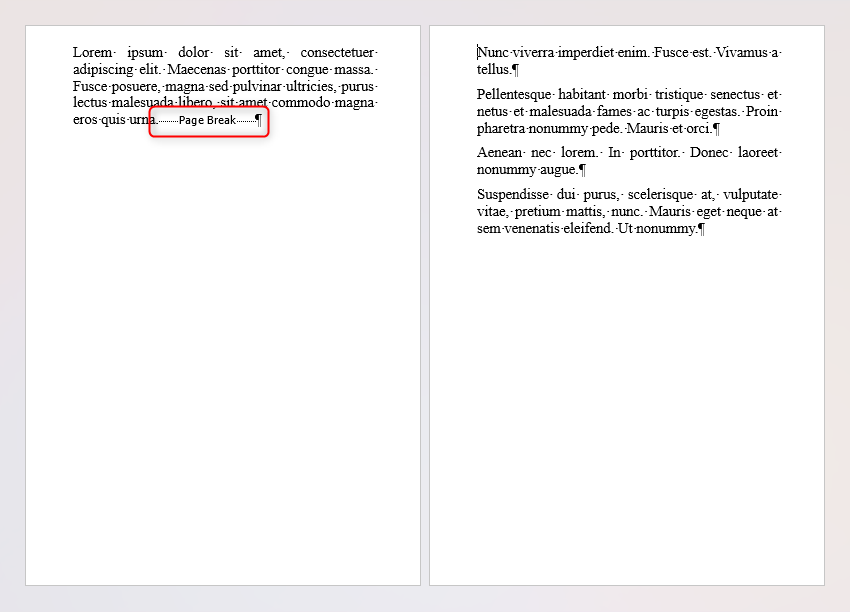
Page Break
Adding a Page Break moves you to the next page of the document, even though you haven’t necessarily reached the end of the previous one. This is useful if, for example, you have a contents page at the start of your work and want to begin the main body on the next page, or if you have a bibliography at the end of the document that you want to separate from the pages before.
If you have page numbers activated, they will continue as usual, and any general formatting you make to the page layout on one side of the Page Break (such as page orientation or paper size) will apply to the other.
Column Break
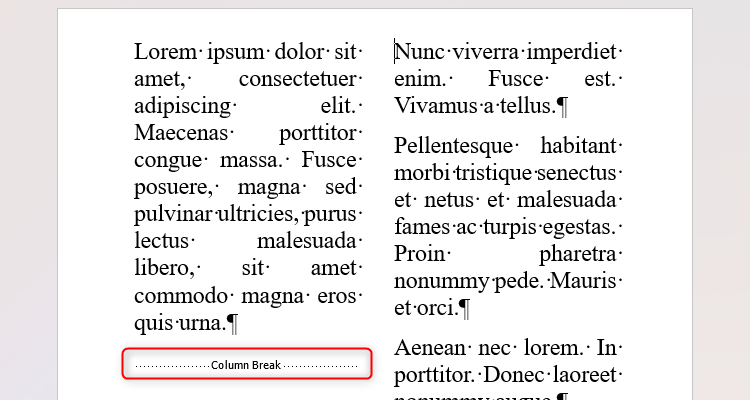
If you have used columns within your work (Layout > Page Setup > Columns), a Column Break will move your cursor—or the text after the Column Break—to the next column.
Adding a Column Break in the last column of your document will force Word to start a new page and move the text to a new column on that page. If you haven’t used columns in your document, a Column Break will act in the same way as a Page Break.
Text Wrapping Break
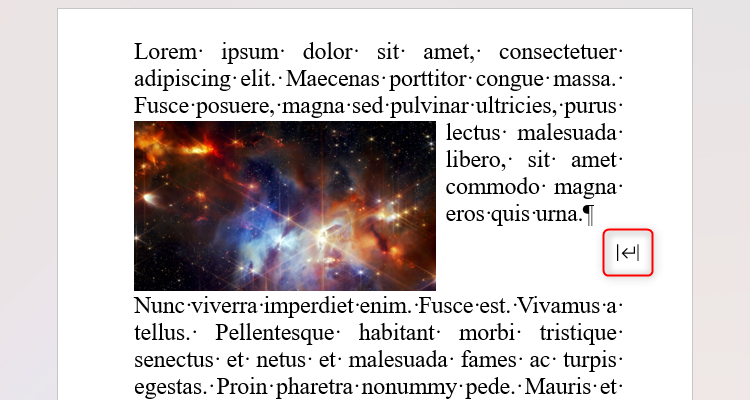
If you have text wrapped around an image, the Text Wrapping tool in the Breaks menu will end the wrapping and move your cursor to the first line beneath the image.
You might use this tool if the text surrounding the image relates to what the image shows, while the following paragraph is still on the same topic but does not discuss the content of the picture.
Next Page and Continuous Section Breaks
Section Breaks are more definitive than Page Breaks, allowing you to format each section of a document separately.
For example, you might want to use columns in one section but not in the next section. If you use a Page Break, the columns will continue onto the next page, but a Section Break tells Word that you only want the columns to appear in that section. Similarly, adding a Section Break means you can use different page footers or page numbers for different parts of your work, such as in a legal or academic paper.
A Next Page Section break ends the current section and moves to the next page, while a Continuous Section Break starts the next section on the same page.
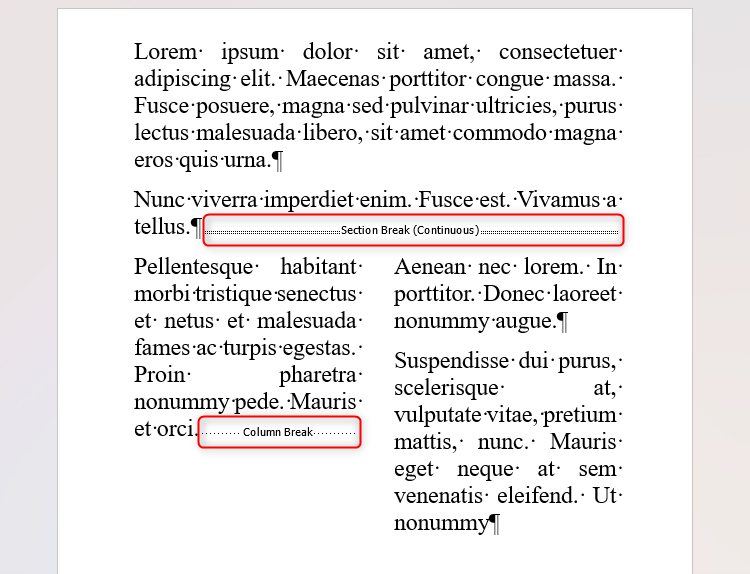
The screenshot below shows a Continuous Section Break and a Column Break on the same page. The Section Break allows me to use two columns in the next section, while the Column Break helps me to divide my text into two appropriately sized columns.
Even Page and Odd Page Section Breaks
These types of breaks are entirely stylistic and often used in books. For example, if you wanted each new chapter of a novel to start on an even page, you would use the Even Page Section Break.
Keep With Next
This valuable tool keeps a paragraph or heading next to the following paragraph, useful if a natural page break would otherwise split them up.
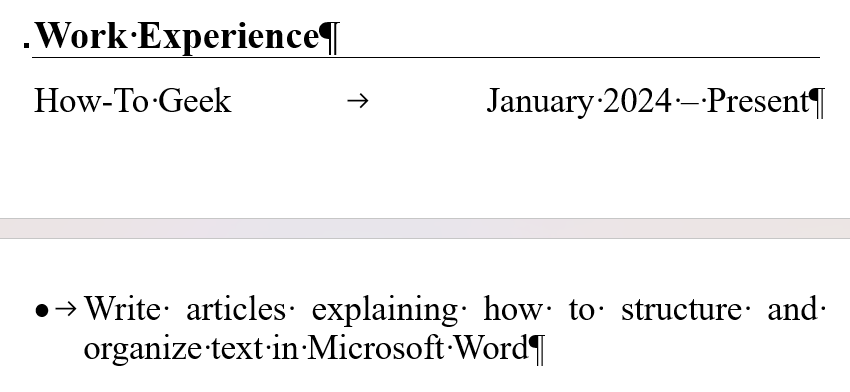
In the example resume below, the bullet point looks unusual on its own at the top of page 2—it would be better if it stayed with the two lines of text that stayed on the previous page.
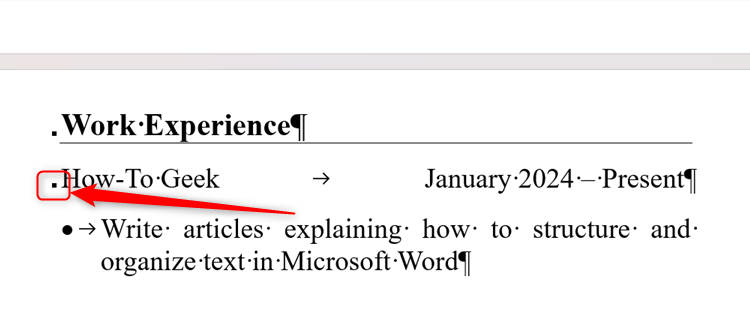
Notice the small pagination marker next to the Work Experience title. This is telling me that it is automatically formatted to stay with the text directly beneath it, something that happens automatically when you use a Heading style.
However, the following line, starting How-To Geek, is written using the Normal style, so it does not have this pagination marker. So, we need to manually tell that line to stay with the next line.
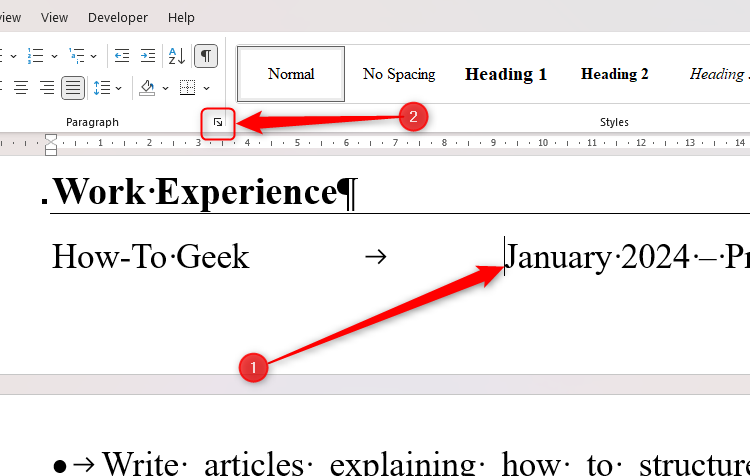
To do this, click anywhere on the line of text that you want to keep together with the following line, and click the “Paragraph Settings” icon in the Home tab on the ribbon.
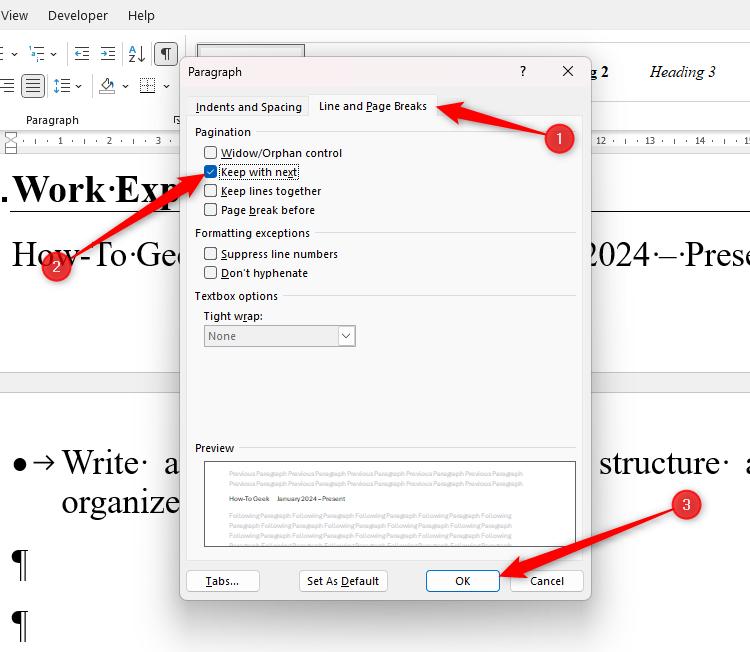
Then, in the Paragraph dialog box, open the “Lines And Page Break” tab, and check “Keep With Next,” before clicking “OK.”
You will then see the lines pull each other together, so that they’re not affected by the natural page break. Notice, also, how that Word has added a pagination marker to tell you that you’ve changed the paragraph settings.
In the same Paragraph dialog box (press Alt+H+P+G to open it quickly), you have other useful tools to control your paragraphing:
- Widow/Orphan Control—This option stops the first line of a paragraph from appearing on its own at the end of a page, and the last line of a paragraph from appearing on its own at the start of the next page. Instead, it will ensure that at least two lines stay together.
- Keep Lines Together—If you want to force all lines of a paragraph to stay together, rather than splitting between two pages, this is the option for you.
- Page Break Before—This is a good option for ensuring a paragraph always stays at the top of a page, no matter where it is in your document.
As well as taking more control of your document’s structure, check out our useful tips for presenting your work professionally.


