Do you find yourself taking longer than you hoped to complete your Word document? Microsoft Word has many tools that can help to make your life easier, but knowing the following tips and tricks will go a long way to making your experience significantly more efficient.
Organize Your Folders
This tip may seem unusual, as it’s not something you would do in Word itself. However, taking the time to create folders and save your work in the right place will save you significant time. It’s much like having a tidy desk—knowing where everything is stored and where to go to find something will avoid you having to remember where you put it. Then, if you want to amend, print, reference, or share an existing document, you already have a good idea of where you’ll find that work.
Similarly, having folders already in place before you start your Word document will mean you already know where you’ll save the work as you go. This will encourage you to save your work as soon as you begin, an essential step if you’re working on the Word desktop app—the AutoSave function will only work once you have given your file a name and placed it in the correct location.
Right-click a more frequently used folder in Windows File Explorer and click “Pin To Quick Access” to force it to display in the left-hand sidebar menu at all times. This means you’ll be able to open the folder with a single click, which is especially useful if a frequently used folder is stored within another folder.
Remove Formatting From Pasted Text
Are you copying (Ctrl+C) and pasting (Ctrl+V) text into your work from another source, such as the internet or another Word document? If the source formatting differs from your Word document’s formatting, you will end up with inconsistent font typefaces, colors, and sizes.
For example, pasting some text from the NYT website resulted in an oddly-presented paragraph.
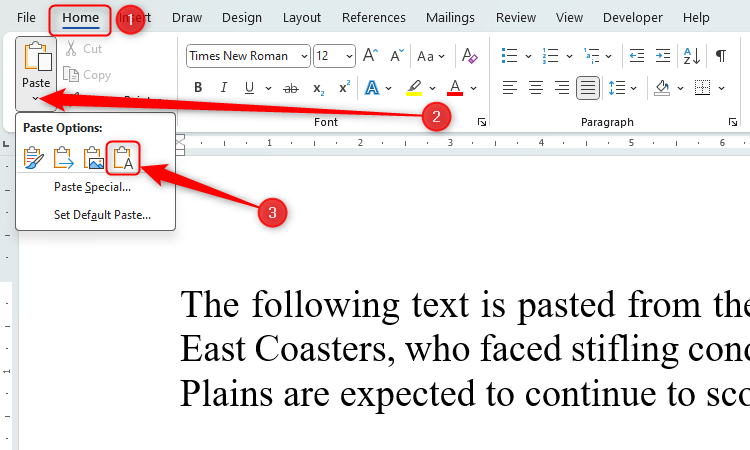
To avoid this, select and copy (Ctrl+C) the text from the source, and head to your Word document. There, in the Home group on the ribbon, click the “Paste” drop-down arrow, and select the “Keep Text Only” icon.
The pasted text will then display according to the formatting you have set in that position in your document. For example, if you paste the text in a paragraph with a Normal style, it will adopt the defined formatting for this style. Likewise, if you paste the text in an area defined under a Heading style, it will appear as a heading.
If you have actions that you perform regularly in your Word document and struggle to remember the many keyboard shortcuts that come with these commands, you can add single-click buttons to the Quick Access Toolbar (QAT) to make these processes happen in an instant.
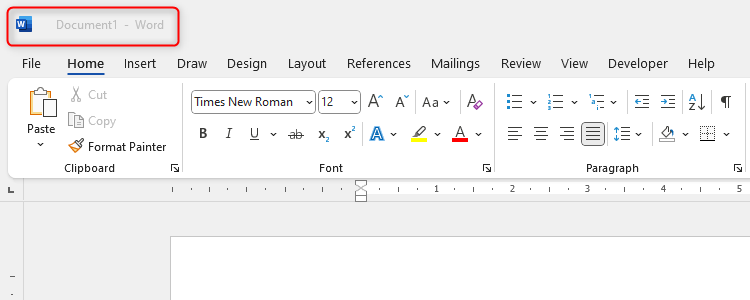
If all you can see in the top-left corner of your Word document window is the Word icon and the name of the document, this means you do not have the QAT displayed.
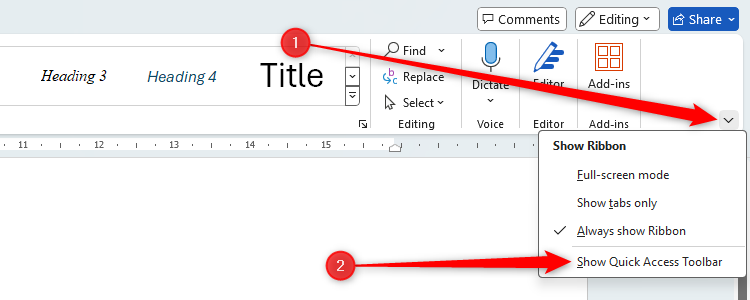
To enable the QAT, click the down arrow positioned at the right-hand side of any of the tabs on the ribbon, and click “Show Quick Access Toolbar.”
The QAT will then appear next to the document name in the top-left corner of the window.
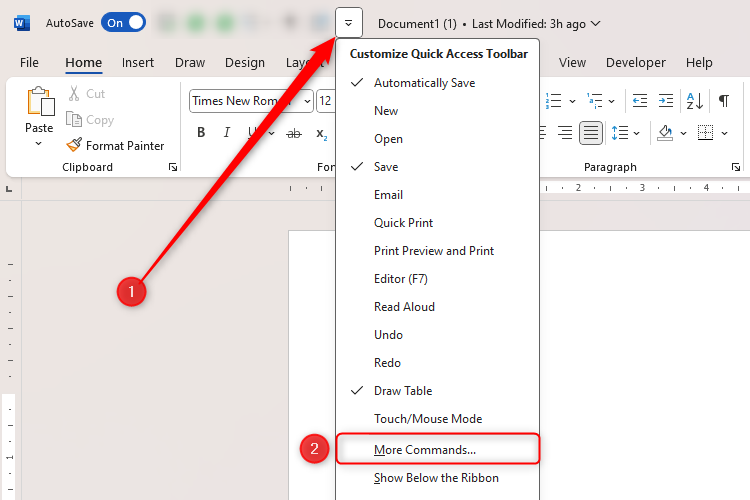
You may see some default QAT buttons appear, such as the AutoSave toggle. To add more icons, click the “Customize Quick Access Toolbar” down arrow. You can then choose from the options displayed, or click “More Commands” to see more options.
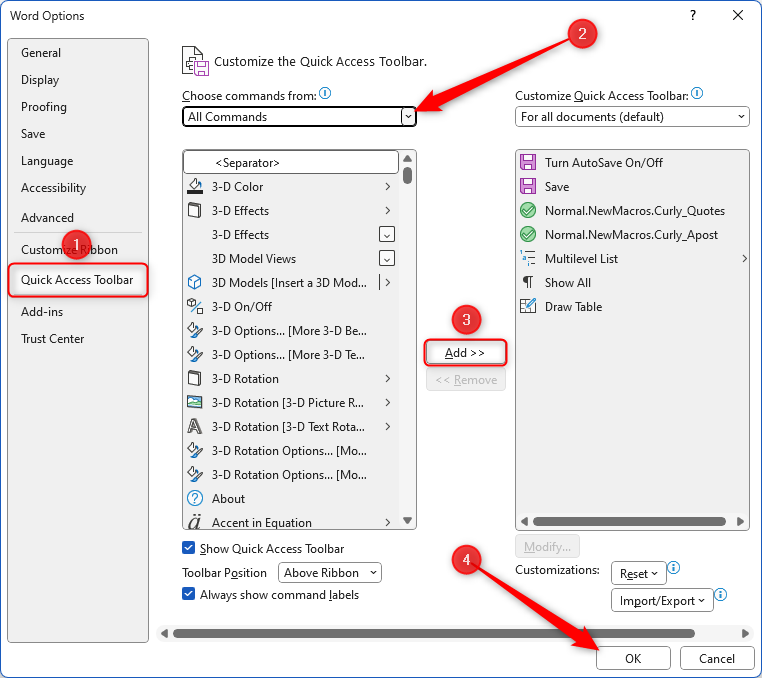
In the Quick Access Toolbar menu of the Word Options window, choose from the different options in the “Choose Commands From” menu, or click “All Commands” to see every option available. When you find and select an action you want to add to your QAT, click “Add,” and then click “OK” when you’re done.
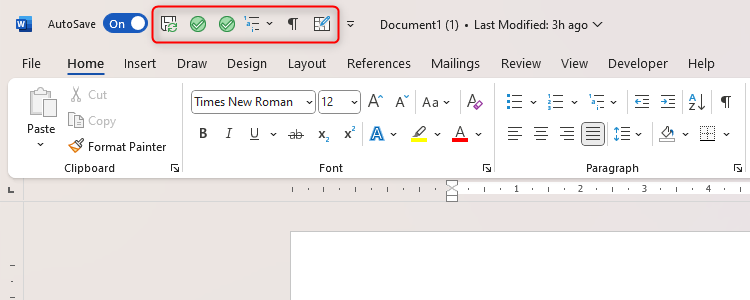
You will then see your QAT at the top of your window, which you can use anytime. In the screenshot below, you can see the Save icon, two macro buttons, the Multilevel List icon, the Show/Hide icon, and the Draw Table icon.
Select Sections Without Using Your Mouse
Selecting words, lines, or paragraphs using your mouse can be a tedious task, especially if you’re using a laptop mouse pad or struggling with work-related RSI. For many people, most of their work is on their keyboard, so it’s handy to know some extra ways to move the cursor and select text using only the keys. We all know Ctrl+C for copy and Ctrl+V for paste, but the navigation shortcuts are just as essential for quick-paced work in Word.
Moving the Cursor
Avoid repeatedly tapping your arrow keys to move around. Instead, hold Ctrl and use the arrow keys at the same time to move the cursor more quickly:
- Ctrl+Up will move your cursor to the start of the current paragraph, and if you press Up again, you’ll move to the beginning of the previous paragraph.
- If you press Ctrl+Down, you’ll move to the next paragraph.
- Ctrl+Left or Ctrl+Right will move you across the line of text much more quickly.
Selecting Text
You can then follow a similar principle when selecting text, but hold Ctrl+Shift when pressing your arrow keys:
- Ctrl+Shift+Up will select the part of the line before the cursor, and then the line above, and then the paragraph above.
- Ctrl+Shift+Down will select the part of the line after the cursor, and then the line below, and then the paragraph below.
- Ctrl+Shift+Left or Ctrl+Shift+Right will select words across a line.
It’s also worth knowing what the Home and End keys can do to help you quicken your work:
- Home and End move your cursor to the start and end of the line.
- Ctrl+Home and Ctrl+End move your cursor to the start and end of your document.
- Ctrl+Shift+Home selects all text before the cursor’s position, and Ctrl+Shift+End selects all text after the cursor’s position.
The best way to get used to these essential shortcuts is to open a Word document, type
=lorem()
, and press Enter to create a body of random text. Then, experiment with the above combinations of Ctrl, Shift, Up, Down, Home, and End.
Change the Case Without Deleting Your Work
If you have made a mistake or want to amend the case (capitalization), it might be instinct to delete the word and retype it. After all, selecting the text and using the Caps Lock key doesn’t work. However, if you’ve got a large body of text you need to switch, retyping the work is a big time-waster.
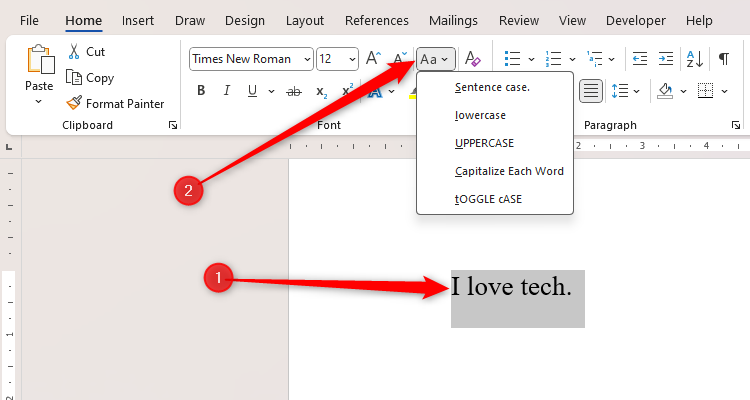
Instead, select your text using Ctrl+Shift+Arrows, and then click the Change Case icon.
You can then choose from the options available to quickly change the case of the text you have selected.
Use Find and Replace
I use Find And Replace all the time—and if you need to make wholesale changes to a word, part of a word, a word form, or other items each time they occur in a document, you should too. For example, if you want to change each instance of “Internet” to “internet,” or change all examples of “reign” and “rain” to “rein,” doing this manually might take hours, and you’re bound to miss a couple.
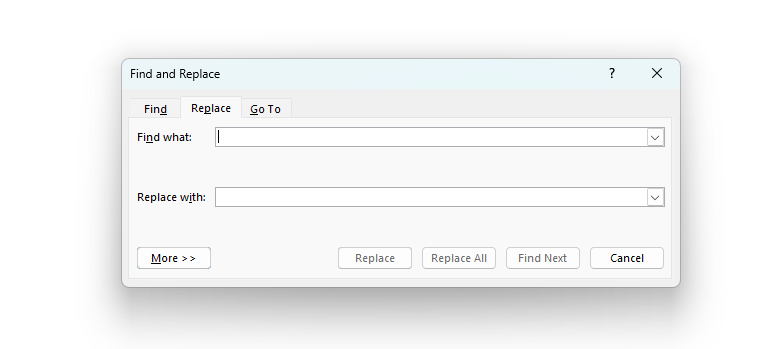
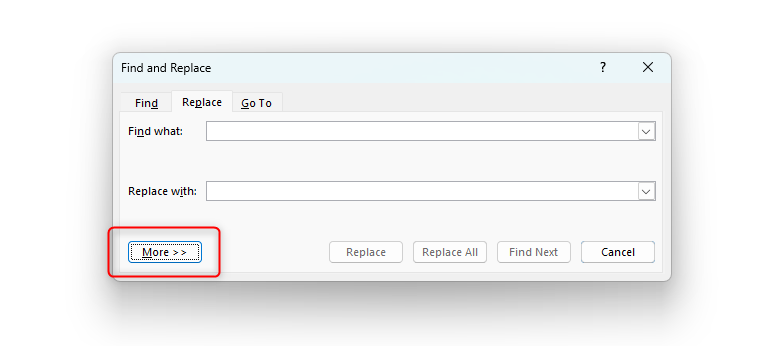
Press Ctrl+H to launch the Find And Replace dialog box.
The Find tab helps you to identify words in a document, the Replace tab lets you change them for something else, and the Go To tab allows you to jump to specific places in your document.
If you click “More,” you can perform your search with more specific parameters, such as matching the case, finding whole words only, or finding word forms.
As an academic proofreader, I can safely say that this single and straightforward shortcut has saved me the most time of all the tips in this article.
Have a Notepad and Pen by Your Side
As advanced as Microsoft Word can be with all its features and ways to speed up your workflow, nothing beats having a notepad and pen by your side.
For example, noting down the different formatting and styles for a multilevel list before you launch the dialog box will help you to make sure your numbering, indentation, and fonts are accurate and consistent. If you’re mid-way through typing a paragraph and something comes to mind for a different section of your work, having a notebook by your side means you can quickly jot things down without disrupting your momentum or forgetting what you wanted to do.
Yes, we love tech at How-To Geek, but I can’t vouch enough for a simple notepad and pen as a desktop companion.
Speeding up your workflow is just one way to make the most out of Microsoft Word—take a look at our top tips for crafting a professional document.


