Tweaking the Registry Editor can be risky, which is why many Windows users find it intimidating. Though it can be tricky, it’s a powerful tool that lets you customize and optimize your operating system in ways that wouldn’t be possible otherwise. Here are a few tweaks worth knowing about.
Disable the Lock Screen
When you start your computer or wake it from sleep, you’re first presented with the Lock Screen before reaching the Login Screen to enter your password. You can bypass the Lock Screen using the Registry Editor to speed up this process. Press Win+R, type Regedit, and hit Enter to open the Registry Editor.
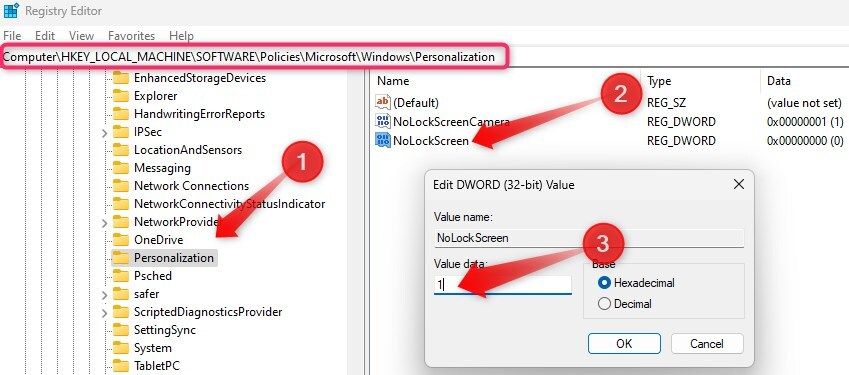
Navigate to HKEY_LOCAL_MACHINE > SOFTWARE > Policies > Microsoft > Windows > Personalization. With the “Personalization” folder selected, right-click on the right pane, choose New > DWORD (32-bit) Value, and name it NoLockScreen. Double-click this newly created key and set its value to 1. Then, click “OK” to save the changes.
If any of the keys in the specified path don’t exist, you can create them. Right-click on the preceding folder in the path and select New > Key, then name the new folder accordingly.
To apply the changes made in the Registry Editor, you’ve to restart your computer. It’s also a good idea to
back up the Windows Registry
before making any changes.
Just keep in mind that the lock screen is an important security feature, and disabling it allows anyone with physical access to your PC
Remove Shortcut Arrows From Desktop Icons
While desktop shortcut icons make accessing apps and essential files easy, the small arrow Windows adds to the lower-left corner of these icons can ruin your desktop’s visual appeal. You can remove these arrows directly through the Registry Editor if you prefer a cleaner and clutter-free look.
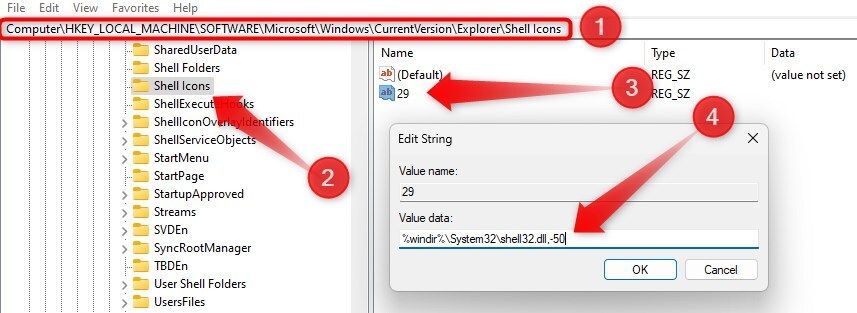
Navigate to HKEY_LOCAL_MACHINE > SOFTWARE > Microsoft > Windows > CurrentVersion > Explorer. If the Shell Icons key doesn’t exist, right-click on the “Explorer” folder, select New > Key, and name it Shell Icons. Then, select the “Shell Icons” folder, right-click on the right pane, choose New > String Value, and name it 29.
Next, double-click the newly created String Value, set its value data to %windir%\System32\shell32.dll,-50, and click “OK.”
One of the things I disliked most after updating to Windows 11 was the new simplified right-click context menu. While Microsoft reduced clutter, they also removed valuable options I was used to. Also, expanding the menu whenever I wanted to access those options was inconvenient. So, I reverted to the classic context menu with a simple Registry tweak.
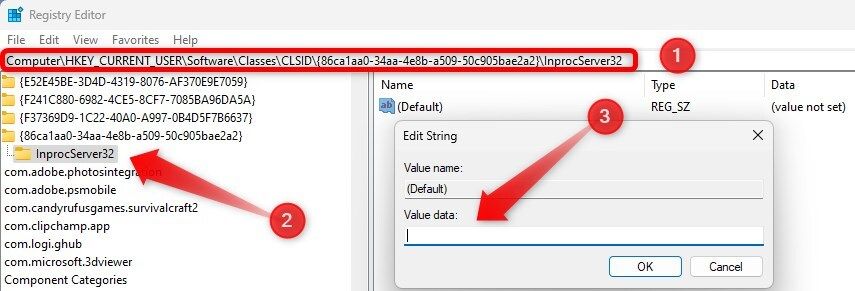
Navigate to HKEY_CURRENT_USER > SOFTWARE > CLASSES > CLSID. Right-click on the “CLSID” folder, select New > Key, and rename it to {86ca1aa0-34aa-4e8b-a509-50c905bae2a2}. Then, right-click on this newly created key, select New > Key, and name it InprocServer32.
Next, double-click the “(Default)” value and ensure the value data field is empty. If it isn’t, remove anything added to it.
Hide the OneDrive Icon in File Explorer
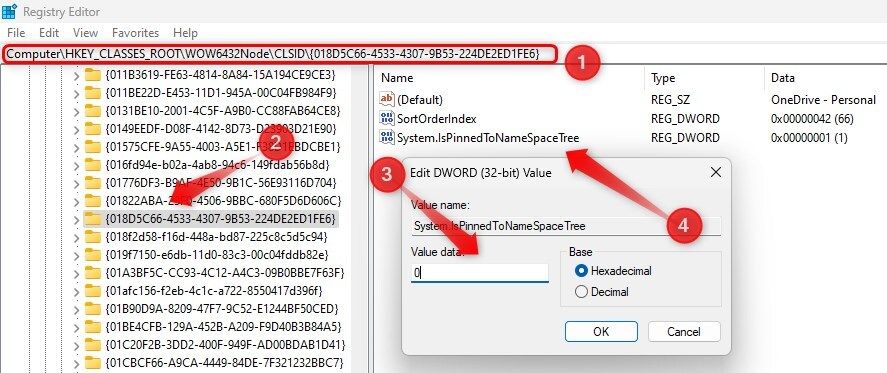
If you use OneDrive to back up your Windows folders, you can skip this step. But if you don’t, it’s a good idea to hide the OneDrive folder and icons from the navigation pane for a cleaner, clutter-free File Explorer. On 32-bit Windows, navigate to HKEY_CLASSES_ROOT > CLSID > {018D5C66-4533-4307-9B53-224DE2ED1FE6}.
For 64-bit Windows, go to HKEY_CLASSES_ROOT > WOW6432Node > CLSID > {018D5C66-4533-4307-9B53-224DE2ED1FE6}. Select the last key in the path, double-click on “System.IsPinnedToNameSpaceTree,” and change its value data to 0. Then, restart your computer.
Add “Open Command Window Here” to the Context Menu
If you’re a Windows power user or system administrator who frequently uses Command Prompt, this tweak can be a game changer. You can add the “Open Command Window Here” option to the context menu, which allows you to quickly open a Command Prompt window in any directory. This eliminates the need to navigate through folders manually.
To do this, navigate to HKEY_CLASSES_ROOT > Directory > shell > cmd. Right-click on the “HideBasedOnVelocityId” value in the right pane and select “Delete.”
If you use the default simplified context menu in Windows 11, this option could be hidden in the unexpanded view. To have it appear in the main context menu, locate the “Extended” value in the same “cmd” key, right-click on it, and select “Delete.” This ensures you won’t need to expand the context menu to use the option.
Disable the Caps Lock Key
As a writer, I find it frustrating when I accidentally activate Caps Lock, which causes my keyboard to type in uppercase when I only intended to use Shift for typing one capital letter. To get rid of this issue, I disabled Caps Lock entirely. If you also face this issue and rarely need Caps Lock, you can turn it off through the Registry Editor.
Navigate to HKEY_LOCAL_MACHINE > SYSTEM > CurrentControlSet > Control > Keyboard Layout. Right-click on the “Keyboard Layout” key, select New > Binary Value, and name it Scancode Map. Double-click on the new Binary Value and enter 00000000 00000000 02000000 00003A00 00000000 in the binary value field.
Hide Specific Drives in File Explorer
If you share or use your computer in an office setting, you must carefully protect your data from prying eyes. While you can hide individual files, a more efficient method is to keep sensitive data on a separate drive and hide the entire drive from view in File Explorer. This approach not only maintains privacy but also helps keep File Explorer uncluttered.
To do this, navigate to HKEY_LOCAL_MACHINE > SOFTWARE > Microsoft > Windows > CurrentVersion > Policies > Explorer. Right-click on the “Explorer” key, choose New > DWORD (32-bit) Value, and name it NoDrives. Double-click the new entry and set its value to the binary equivalent of the drive letter you want to hide.
Each drive letter corresponds to a binary value: A=1(2^0), B=2(2^1), C=4(2^2), D=8(2^3), E=16(2^4), F=32(2^5), G=64(2^6), H=128(2^7), etc. Just be sure to set the Base to “Decimal.”
Quickly Switch Between Windows of the Same Application
When you open multiple windows of the same program, like File Explorer, Windows groups them together. To switch between these windows, hover over the program’s icon on the taskbar and choose the desired window from the thumbnails. Even with just two open windows, this can be cumbersome if you frequently switch between them.
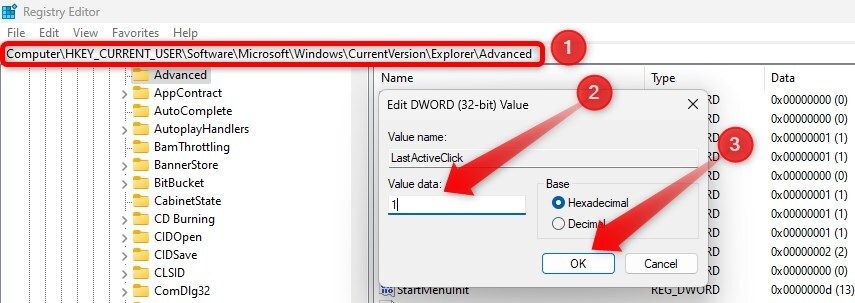
To simplify this, you can modify the Registry Editor to open the last active window with a single click. To do this, go to HKEY_CURRENT_USER > Software > Microsoft > Windows > CurrentVersion > Explorer > Advanced. Create a new DWORD (32-bit) Value named LastActiveClick and set its value data to 1.
The Registry Editor allows you to make changes that are sometimes impossible otherwise. However, you’ll have to follow the above steps carefully. If you don’t have any experience or are uncomfortable making these changes, you should avoid altering the registry. Instead, explore alternative methods to make the same modifications, if possible.


