Microsoft Word offers many tools for making your academic documents professional, easy to read, and in line with your college’s expectations. As a former teacher and current academic proofreader, here are my best tips for creating academic papers in Microsoft Word.
Most schools have a style guide for academic writing, so make sure you read that first. This guide tells you how to modify and use most of the elements that are likely included in that style guide.
1 Modify the Styles
The first thing to do is modify the styles. Microsoft Word’s styles contain predefined formatting that you can apply to different parts of your document, such as the main body (known as the Normal style) and headings. They help you ensure your formatting is consistent and are great for saving time if you need to tweak your layout.
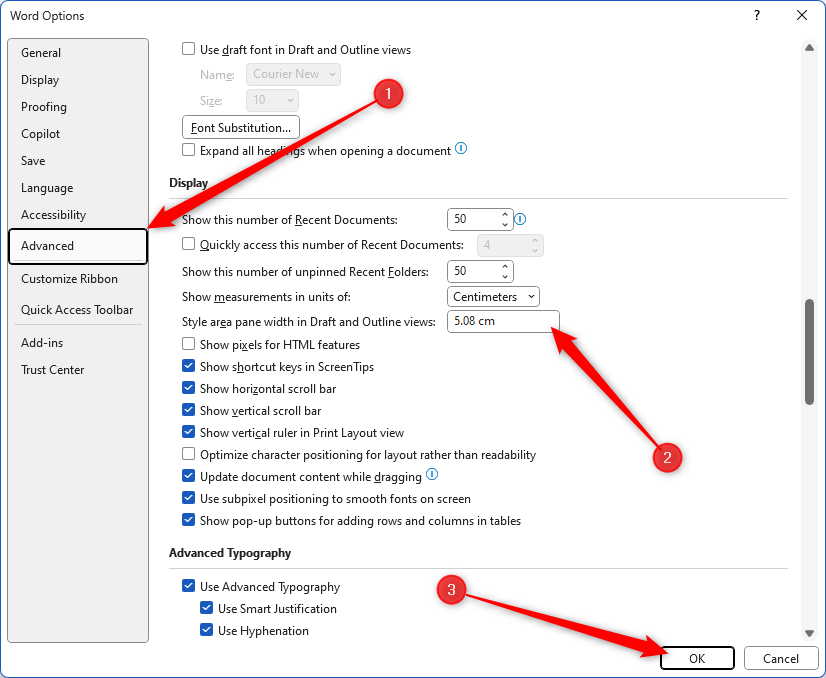
First, click File > Options. Then, in the Word Options dialog box, click “Advanced,” and change “Style Area Pane Width In Draft And Outline Views” to 5.08 cm or 2 in. Then, click “OK.”
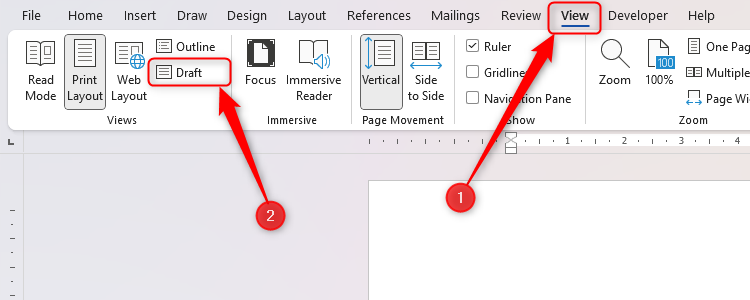
Now, click “Draft” in the View tab.
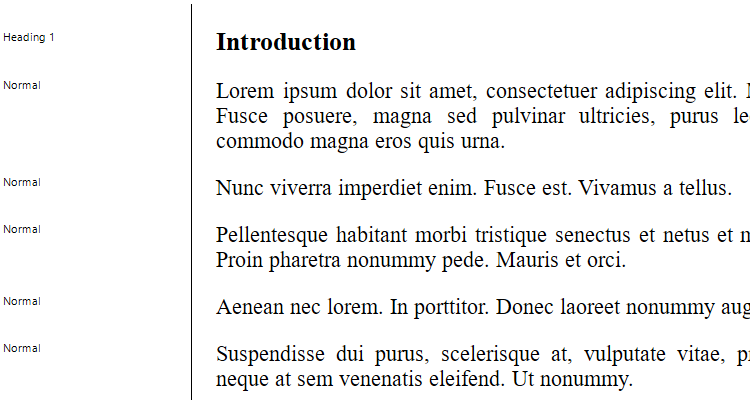
The Style Area Pane is now on the left of your screen and shows the style applied to each paragraph in your document.
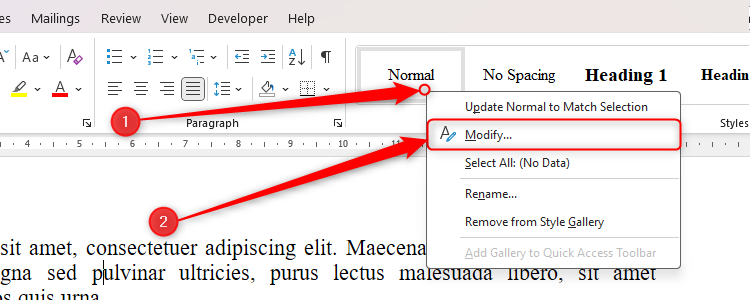
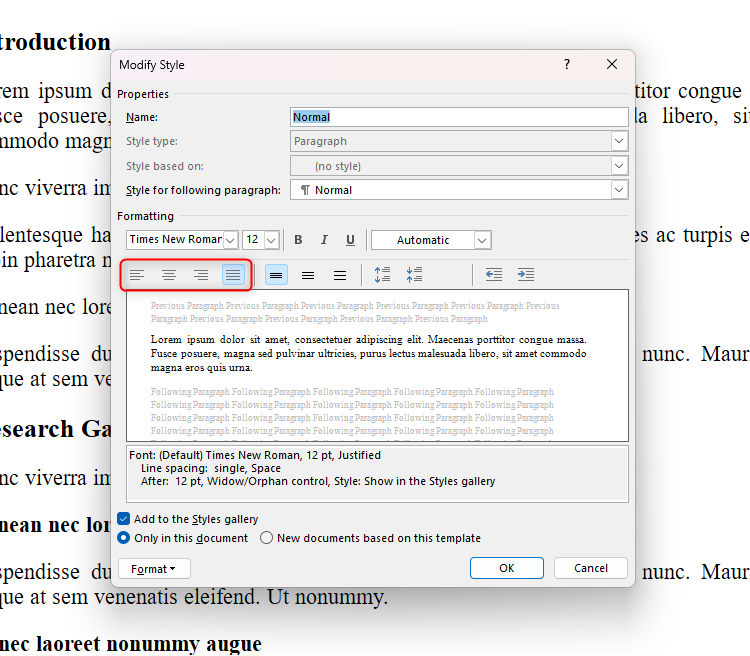
Now, you’re ready to change the style settings to align with the style guide. Right-click the “Normal” style in the Style Gallery, which is in the Home tab. Then, click “Modify.”
In the Modify Style dialog box that appears, choose your alignment. Some universities prefer left-aligned text, as it’s believed to be easier to read, but many institutions are now opting for justified alignment.
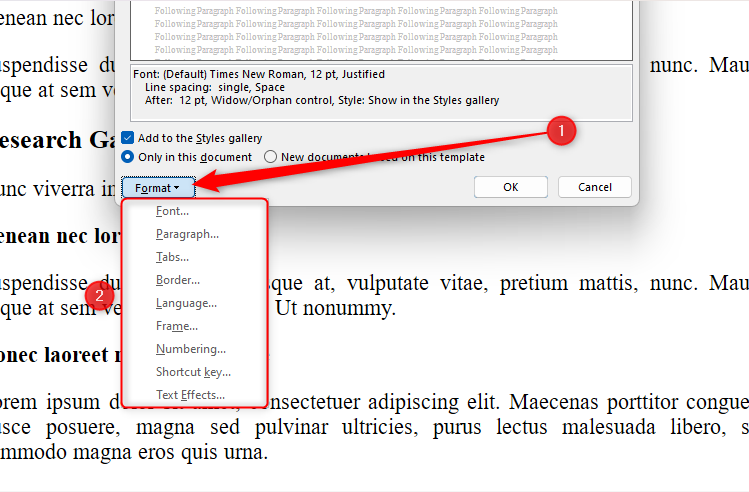
You can now amend your other style settings by clicking “Format” to access the different options.
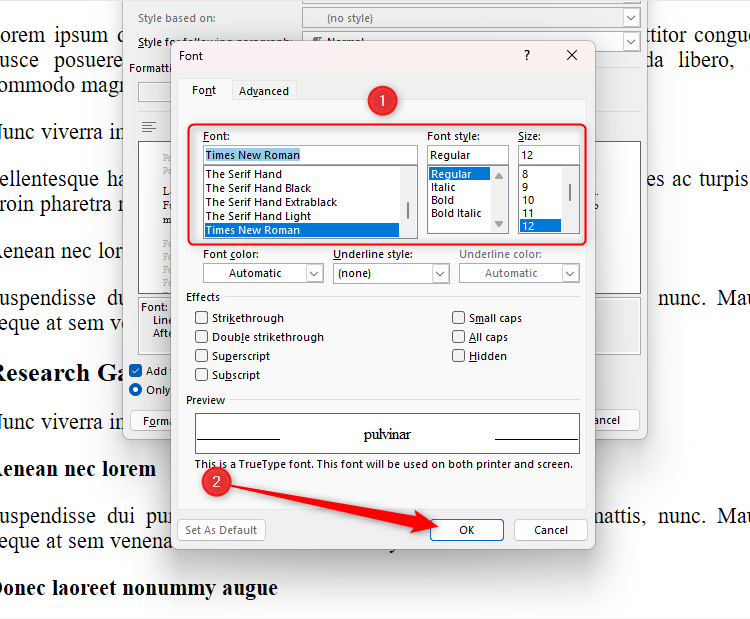
Click “Font” to choose a font, font style, and size. Many colleges prefer a size-12 academic font, such as Times New Roman. Heading styles are usually bold. When you’re done, click “OK” to return to the main Modify Style dialog box.
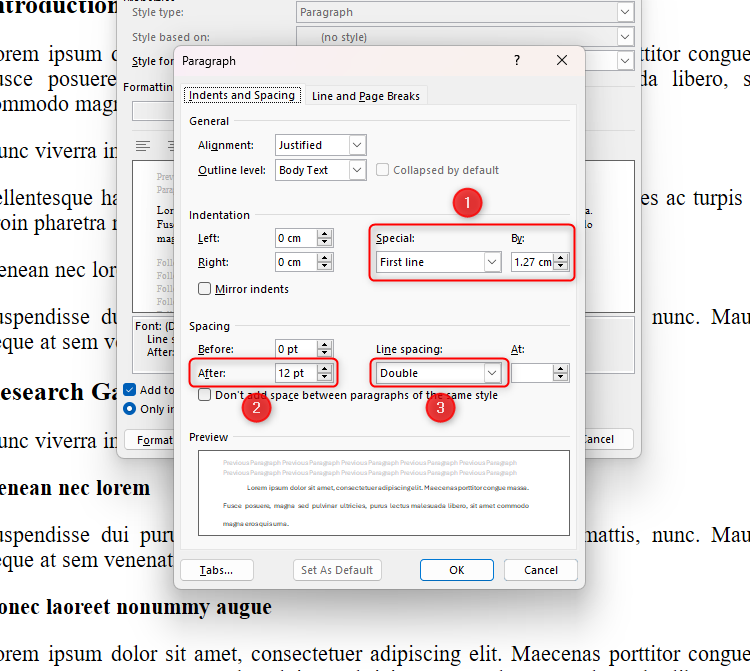
Next, click “Paragraph” from the Format drop-down to decide whether you want the first line of each paragraph to be indented, and whether you want a space after each paragraph. This is also where you can adjust the line spacing, which many institutions like to be double-spaced.
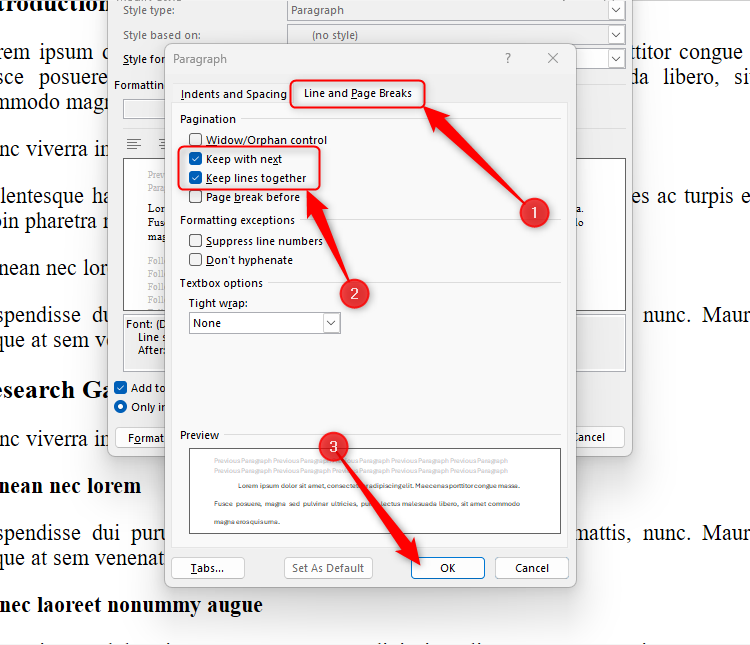
When modifying the Heading styles, head to the “Line And Page Breaks” tab, and check “Keep With Next” and “Keep Lines Together.” Then, click “OK.”
When you modify the Normal style, since this is the main style in your document, some of the other styles will also be adjusted. This saves you from repeating every step when you modify the other styles.
When you’ve finished defining the settings for the Normal style, click “OK.”
Follow the same process for the other styles you will use in your academic document, such as the Heading styles. Then, whenever you want to apply a style to a paragraph in your work, place the cursor within that paragraph, and click the style in the Style Gallery.
2 Multilevel Lists
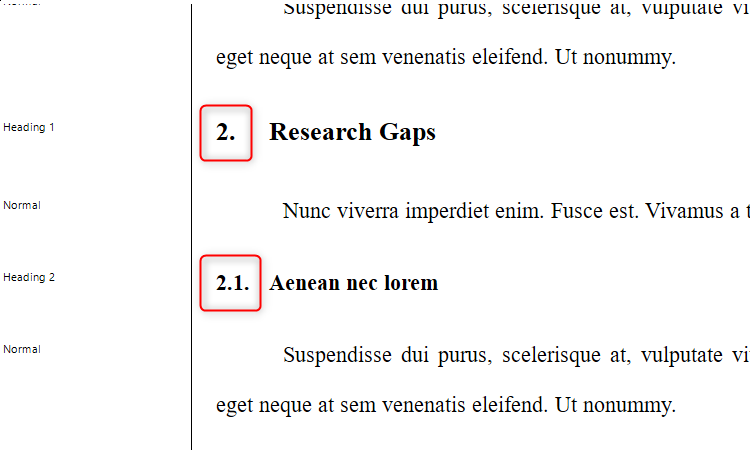
If you have used more than one Heading style, you will likely need to consider how they’re numbered. For example, your main headings might be numbered with a single digit, while any subheadings might be numbered with decimal places.
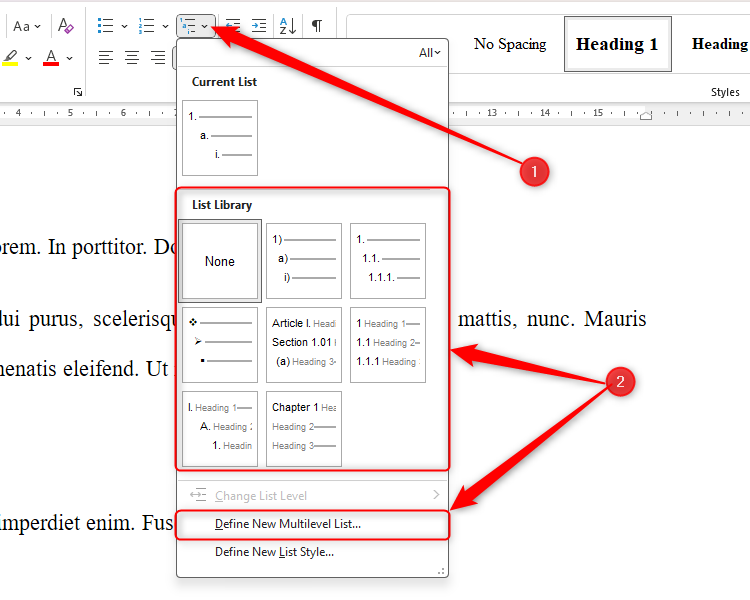
The best way to control the numbering of your headings is through Word’s multilevel list tool in the Paragraph group of the Home tab. You can either choose one of the preset multilevel lists or click “Define New Multilevel List” to create your own.
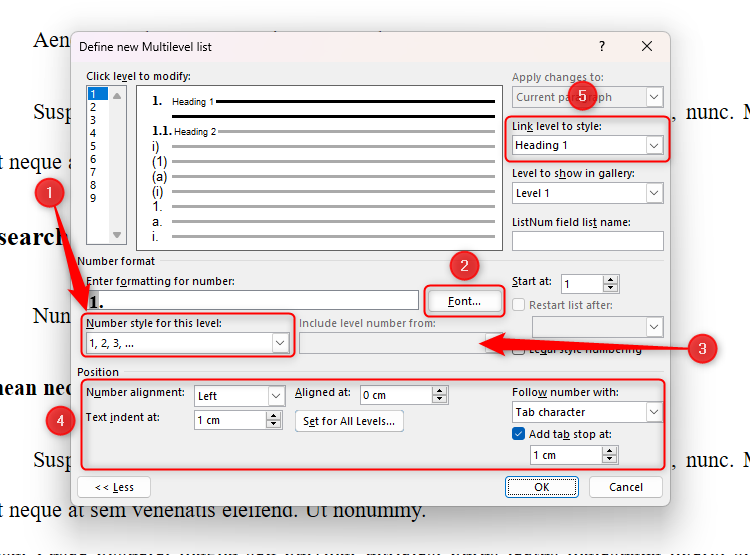
If you selected “Define New Multilevel List,” each number on the left of the dialog box is a new level. For example, your main headings will be level 1, your first subheadings will be level 2, and so on. Work through each level, defining the settings as necessary. Here are the main things to look out for:
Click “More” at the bottom of the window to see all the available settings.
- Choose whether you want Arabic or Roman numerals or a letter (such as a, b, c, and so on).
- Click “Font” to align your number formatting with the Heading style formatting you modified earlier.
- If you’re using decimalization for subheadings (such as 1.7), remember to include the number for the section’s main heading (1) before the sublevel number (7).
- Choose your alignment, including whether you want the numbers and text to be indented and, whether you want to use a tab stop to create a gap between the number and the text.
- Finally, link each numbering level to the relevant Heading style.
3 Insert Page and Section Breaks
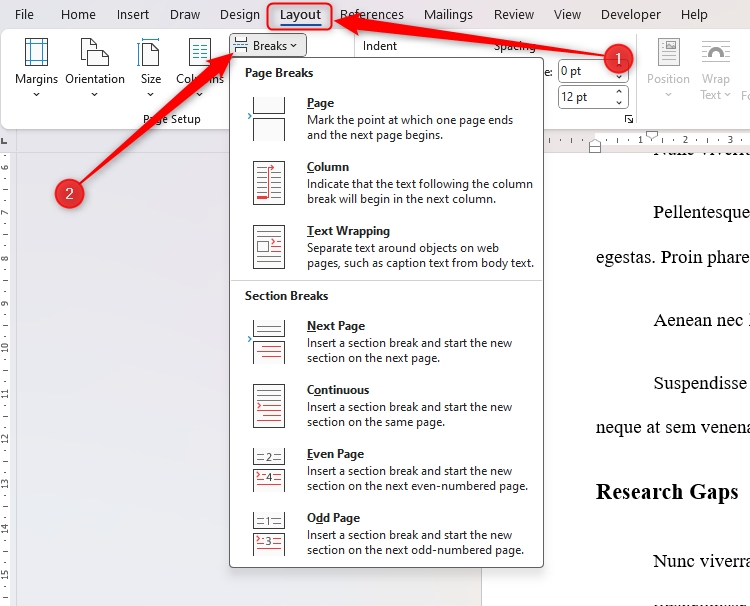
You can access Page and Section Breaks by clicking “Breaks” in the Layout tab.
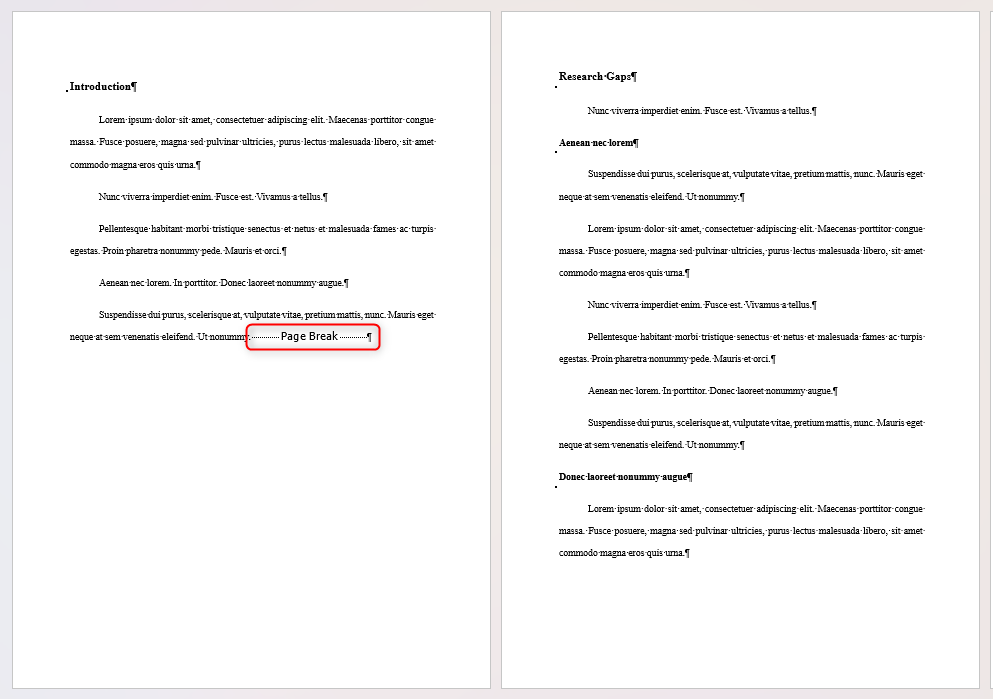
Click “Show/Hide” (¶) in the Home tab to see the Page and Section Breaks after you add them.
Page Break
Adding a Page Break (the first option in the drop-down menu) after a paragraph forces the next paragraph to start on the next page. This is useful if, for example, you have a contents page at the start of your work and want to begin the main body on the next page, or if you have a bibliography at the end of the document that you want to separate from the pages before.
Section Break
On the other hand, a Section Break is more definitive, allowing you to format each section of a document separately. For example, if you want to use columns in section 1 but not in section 2, a Section Break will allow you to do this. You can also use a Next Page Section Break to restart your page numbering, such as using Roman numerals for your introduction and Arabic numerals for your main body.
A Next Page Section Break ends the current section and moves to the next page, while a Continuous Section Break starts the next section on the same page.
4 Add Captions
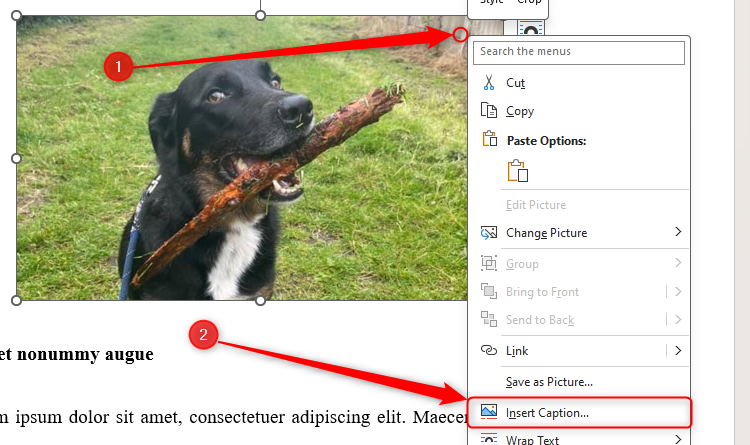
All images in an academic document should have captions explaining what the image shows. To add a caption, right-click the image, and click “Insert Caption.”
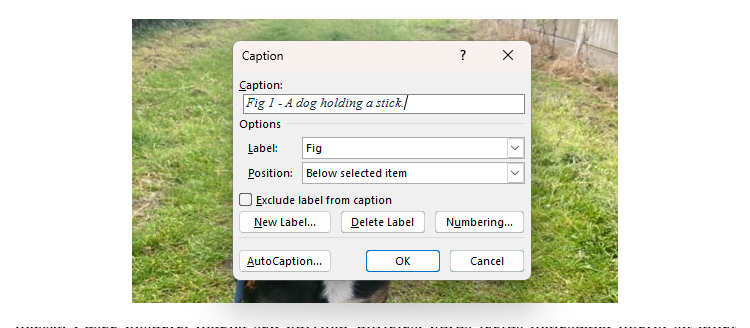
Then, in the Caption dialog box, choose your label and position. Click “New Label” if none of the labels align with your style guide, and you can also choose a different numbering system if you wish. Type the details of the image in the “Caption” field, and click “OK” when you’re done.
The caption now appears under or above the image, depending on the position you selected.
To change your caption’s font or line and paragraph spacing, place your cursor in the caption, and press Ctrl+Shift+S. Then, click Modify > Paragraph, and adjust the settings as necessary. Since you’re using the Modify Style dialog box, all captions will adopt these amended settings.
5 Use a Table of Contents
Earlier, I talked about the benefits of using styles. One benefit I didn’t mention is that any text formatted with a Heading style will automatically appear in Word’s automatic table of contents.
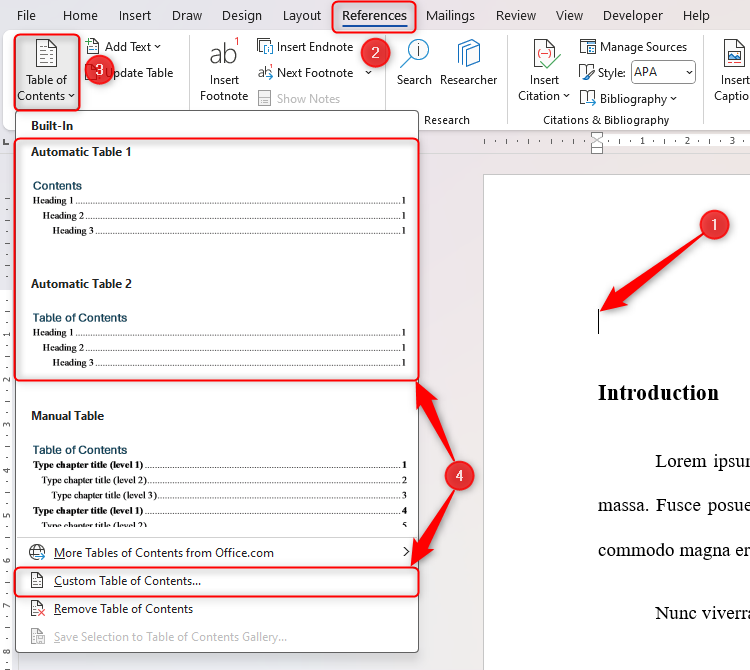
Place your cursor where you want the table of contents to go, and click “Table Of Contents” in the References tab. Choose either of the first two options (the “Automatic Tables”), or click “Custom Table Of Contents” to review the settings first.
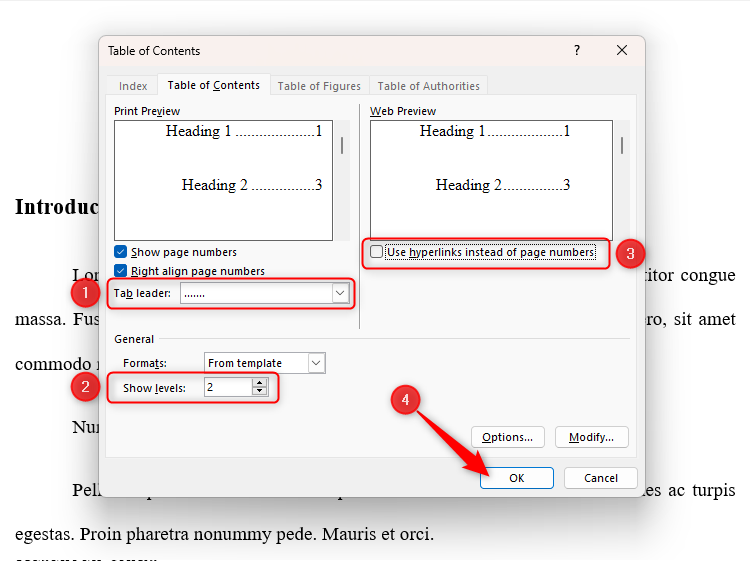
Clicking “Custom Table Of Contents” will show you the different options you can modify, such as the type of tab leader it uses, the number of levels it shows, and whether it contains hyperlinks to the various sections in your document. When you’ve amended the relevant settings, click “OK.”
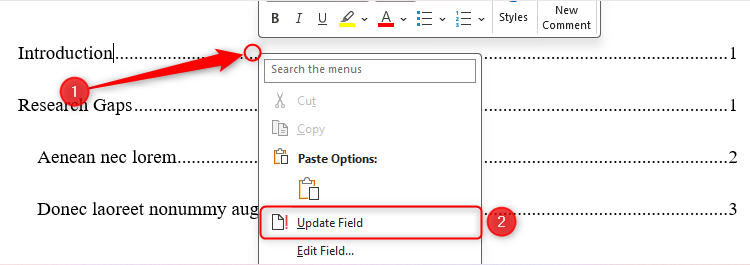
If you need to update your table of contents, right-click the table, and click “Update Field.”
6 Add a Table of Figures
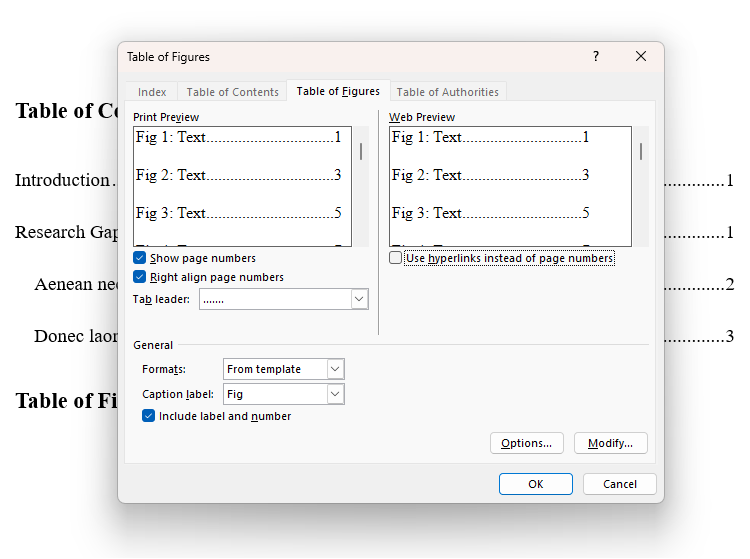
As well as a table of contents, you might want to add a table of figures, which automatically includes any captions you added earlier. In the References tab, click “Insert Table Of Figures.”
Then, as with the table of contents you added earlier, define the settings for your table of figures, and click “OK.”
Your table of figures will appear wherever your cursor is placed.
7 Include Page Numbers and Headers and Footers
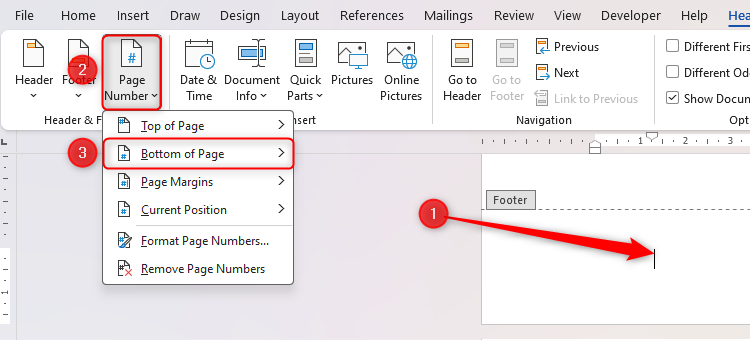
All academic documents need page numbers, usually in the footer. To add these, double-click any page footer, click “Page Number” in the Header And Footer tab, and choose the style. Page numbers in academic documents usually go at the bottom.
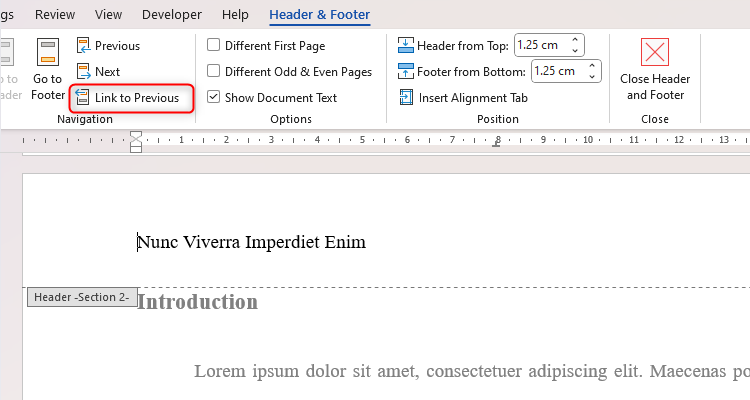
If you used Section Breaks as described above, deselect “Link To Previous” if you want different types of page numbers in each section.
While the headers and footers are activated, you can add any other necessary details, like your name or the document’s title.
8 Add Citations and Bibliographies
Word is ready to help you add citations and a bibliography to your academic document.
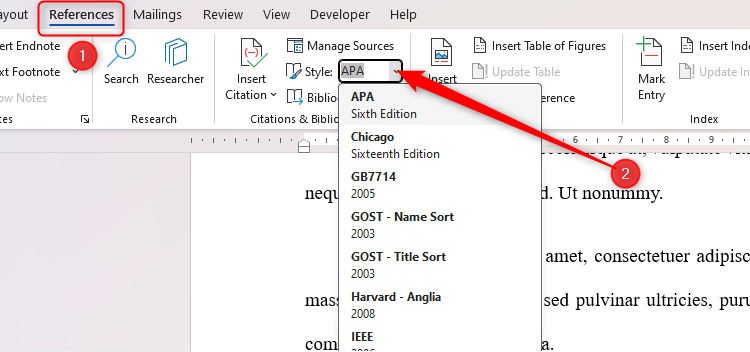
First, select the citation style you want to use according to your university’s style guide from the “Style” drop-down in the References tab.
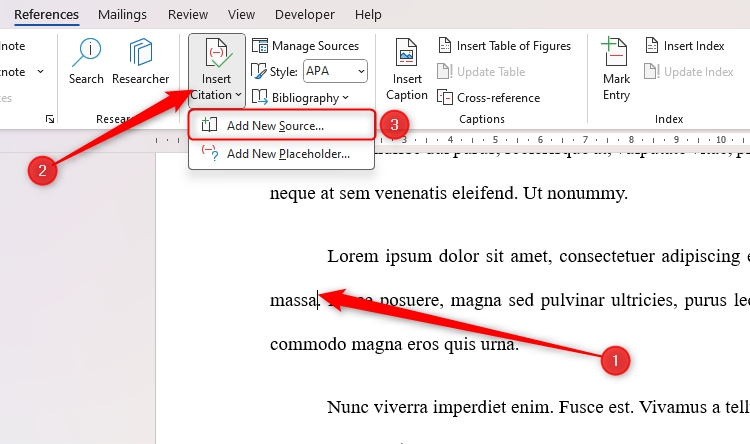
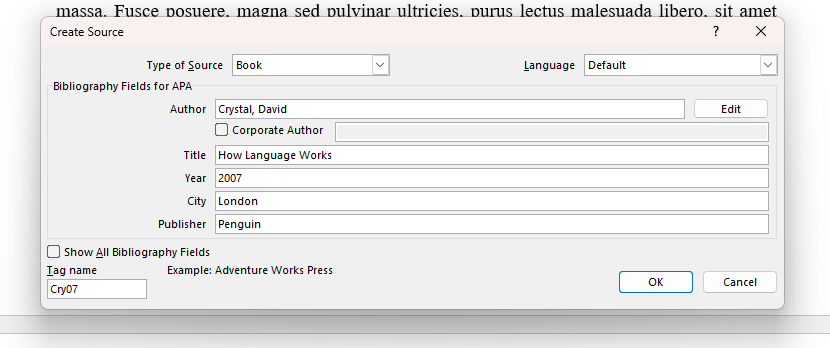
Now, place your cursor where you want your first citation to go, and click Insert Citation > Add New Source in the References tab.
Next, complete the details of the source, and click “OK.”
The citation will then appear within your text.
Before you add your bibliography, which will automatically include all the citations you added, add a Page Break or Section Break after the final section.
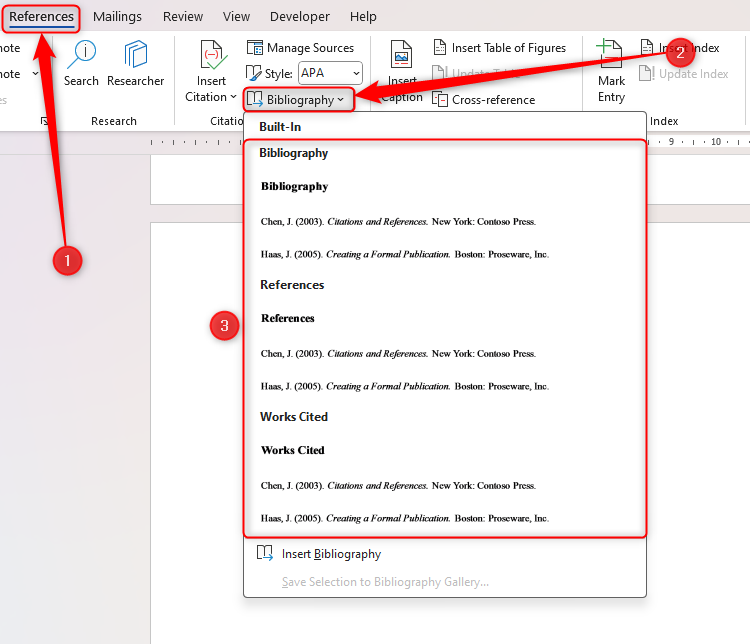
Then, click “Bibliography” in the References tab, and choose which version you wish to add. The only difference between the default options is their respective titles.
The bibliography will then appear in alphabetical order based on the citations you placed throughout your document.
As with your table of contents and table of figures, right-click anywhere within your bibliography and click “Update Field” to force Word to refresh its contents.
If you’re turning in your paper by hand, adjust your print settings so that your work looks on paper exactly as it does on screen.


