

Chromebooks work exceptionally well straight out of the box. With an easy setup process and an operating system that just works, they’re perfect for less techy folk. But Chromebooks are also great for more experienced users like myself. In fact, I personally made the switch from a Windows PC to a Chromebook and haven’t looked back.
While ChromeOS may not be as customizable as Linux or even Windows, it offers plenty of power if you know what to do. After tweaking some of the more basic settings, here are the next steps you should take if you want to level up your Chromebook skills and do more with less.
Learn all the useful keyboard shortcuts
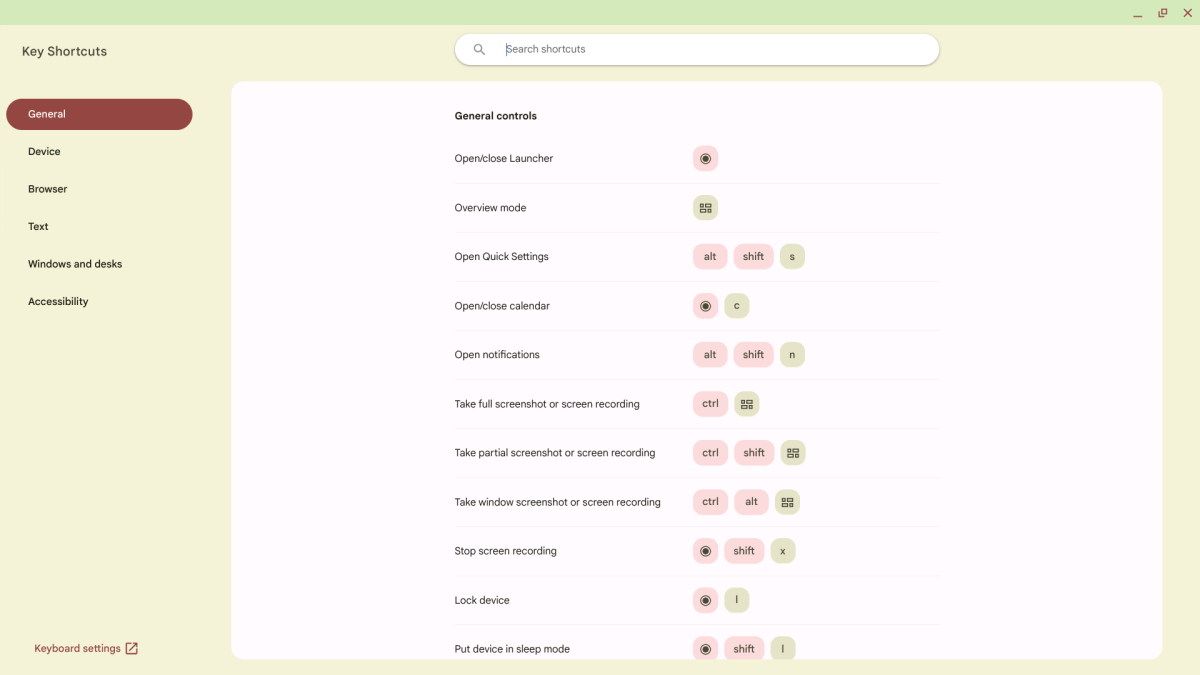
Dave Parrack / Foundry
Honestly, if there’s only one thing you do to enhance your productivity, let it be this: memorize as many keyboard shortcuts as you can and train yourself to use them every day.
Keyboard shortcuts offer the most bang for your buck, and that’s true whether you’re on a Chromebook or otherwise. It’s extremely inefficient to move your hand from keyboard to mouse, then move the cursor to where it needs to go, to press buttons and navigate menus. Why bother when you can often do it all with a single keystroke? And that inefficiency really adds up over the course of a day.
You can view a list of all possible keyboard shortcuts in ChromeOS by using the Ctrl + Search + S keyboard shortcut. Alternatively, use your mouse to navigate to Settings > Device > Keyboard and inputs > View keyboard shortcuts. (See how much faster it is to just use the keyboard shortcut?!) What’s nice is that you can even customize some of these keystroke combinations, which is useful for frequently used actions.
Pin oft-used apps to your shelf
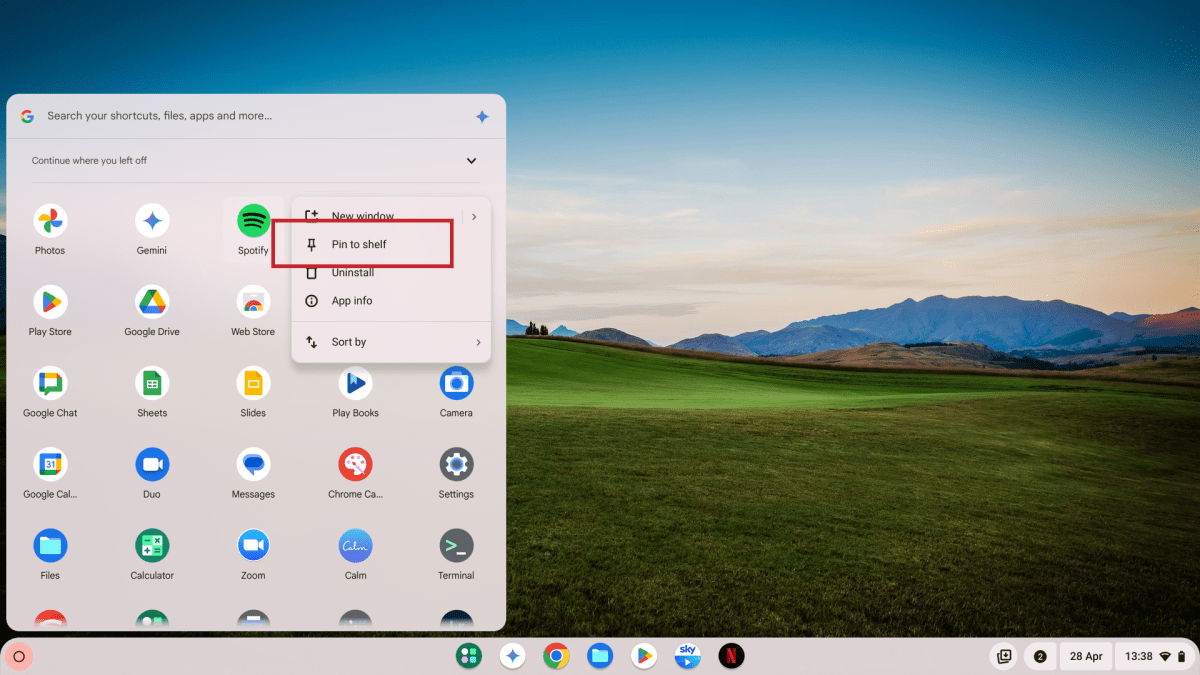
Dave Parrack / Foundry
While pinning apps to your Chromebook shelf is a basic feature, a lot of regular users seem to skip this step for some reason. If you find yourself launching the same apps over and over—maybe even on a daily basis—then pinning them to the shelf means they’re instantly available without needing to open the launcher and locate the app every time.
To pin an app to your Chromebook shelf, open the launcher in the bottom-left of your screen. Find the app you want to pin to your shelf, then right-click on it. Select Pin to shelf to instantly pin it. You can later unpin an app by right-clicking on it in the shelf and selecting Unpin.
Use split screen for multitasking windows
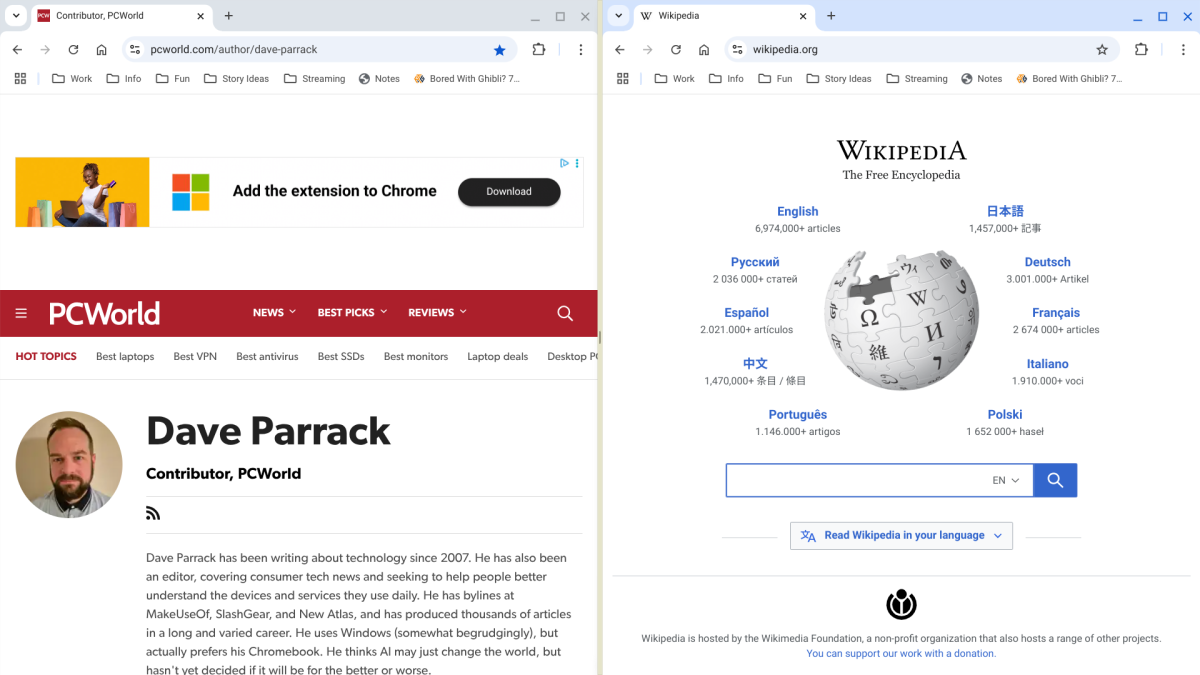
Dave Parrack / Foundry
I don’t blame anyone for using multiple monitors for productivity. Extra screen real estate is a godsend, and it can be hard to be efficient when you’re constantly flipping back and forth between apps.
But you don’t need multiple monitors to multitask, especially if you have a larger display with a 1080p or even 4K resolution. Before you shell out for a portable monitor or two, try using ChromeOS’s built-in split screen feature for stacking two windows side by side.
To split the screen, you have a few methods you can use:
- Hover over the Maximize/Restore button in any window to open the window layout menu, where you’ll see options for Split, Partial, Full, and Float. Choose Split to create two equally sized windows.
- Drag the title bar of any window to either side of the screen, then release the window to snap it to that side and fill that half of the screen. Then select another window to fill the opposide side.
- Use the Alt + [ keyboard shortcut to snap a window to the left side of the screen. Use Alt + ] to snap to the right side.
Organize windows across multiple “desks”

Dave Parrack / Foundry
You know the saying “out of sight, out of mind”? One way to boost productivity is to keep those distracting apps and windows out of sight, only turning to them when you actually need them. In ChromeOS, you can do this using virtual desktops called “desks,” with each desk housing its own set of windows that don’t appear on other desks.
To create an addition desk, tap the Show Windows key on your keyboard. Then, at the top right, click the Add new desk button. You can have up to a total of 8 desks. You can also use the Show Windows key to switch between desks, rename desks, show or hide desks, move tabs or windows between desks, and even combine desks together.
You might also want to learn the Shift + Search + 1 through 8 keyboard shortcuts to instantly switch between your various desks, or the Search + [ and Search + ] shortcuts to switch to left or right desks, respectively.
Use the search function to find files
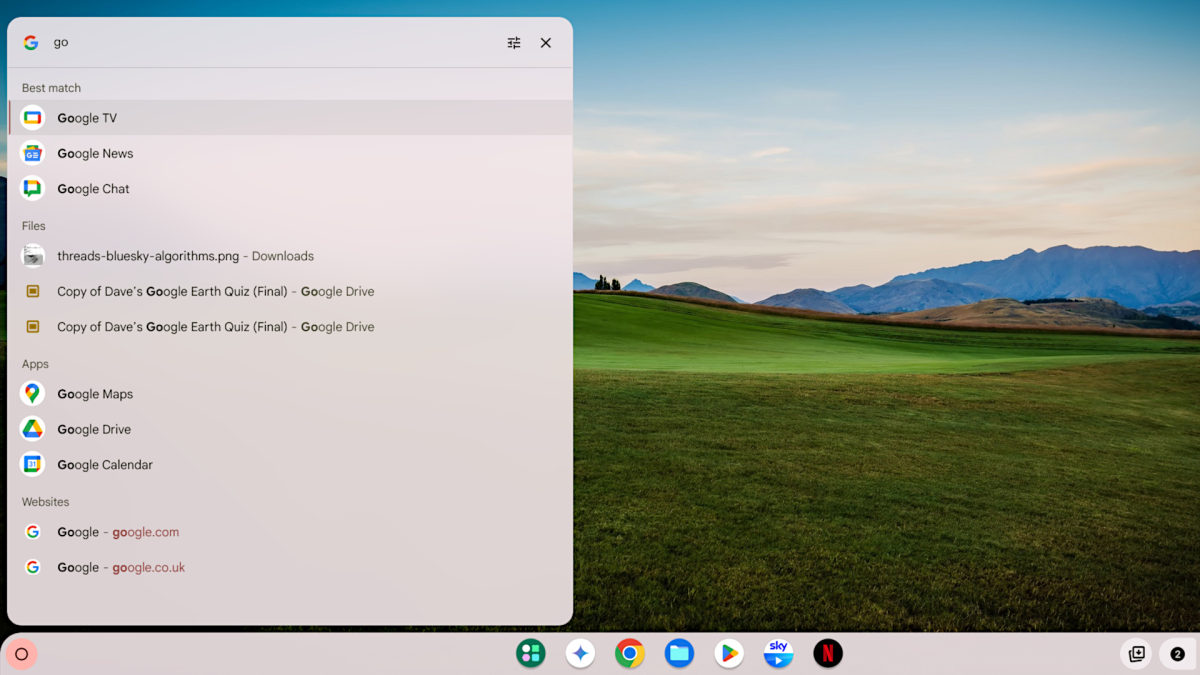
Dave Parrack / Foundry
ChromeOS has a surprisingly capable search feature that makes it easy to find any file, app, shortcut, and more. It’s a shame more people don’t use it. If you’ve ever used the Spotlight search feature on macOS, then you kind of know what I’m talking about.
To access the search tool, open the launcher by clicking the Launcher button at the bottom left on the shelf (or tapping the Search key on your keyboard). You’ll see a search bar, which you can click to focus and start typing whatever you want to look for.
As you type, ChromeOS will make suggestions while showing matching results sorted into categories (e.g., websites, files, apps, etc.), with the best matches at the top. Click the result that best fits what you were looking for, and you’ll be whisked straight to it.
Connect an external keyboard and mouse
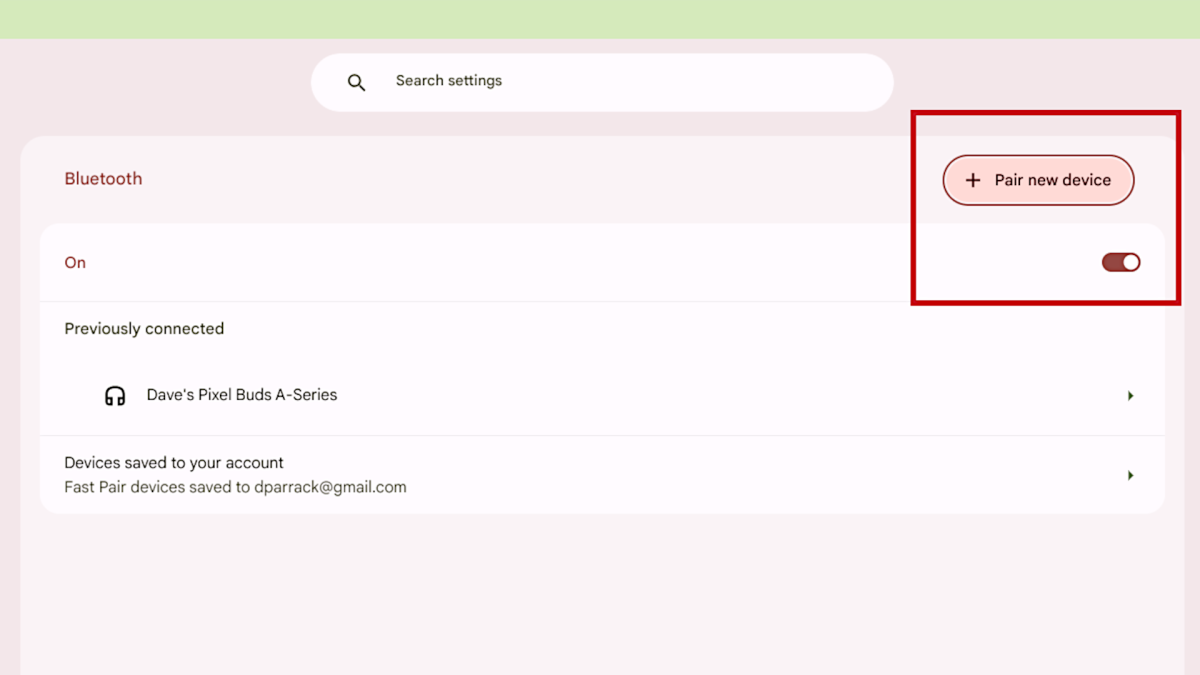
Dave Parrack / Foundry
If you want a fuller desktop-style experience than your Chromebook can offer, consider connecting an external keyboard and mouse. You can do so either via USB or Bluetooth depending on your specific gear and the port availability on your specific Chromebook.
Connecting an external keyboard and/or mouse via USB is as simple as plugging them in. Connecting via Bluetooth requires you to enable Bluetooth from the menu in the bottom right, then pairing your devices by following the on-screen instructions.
Explore the Crosh terminal
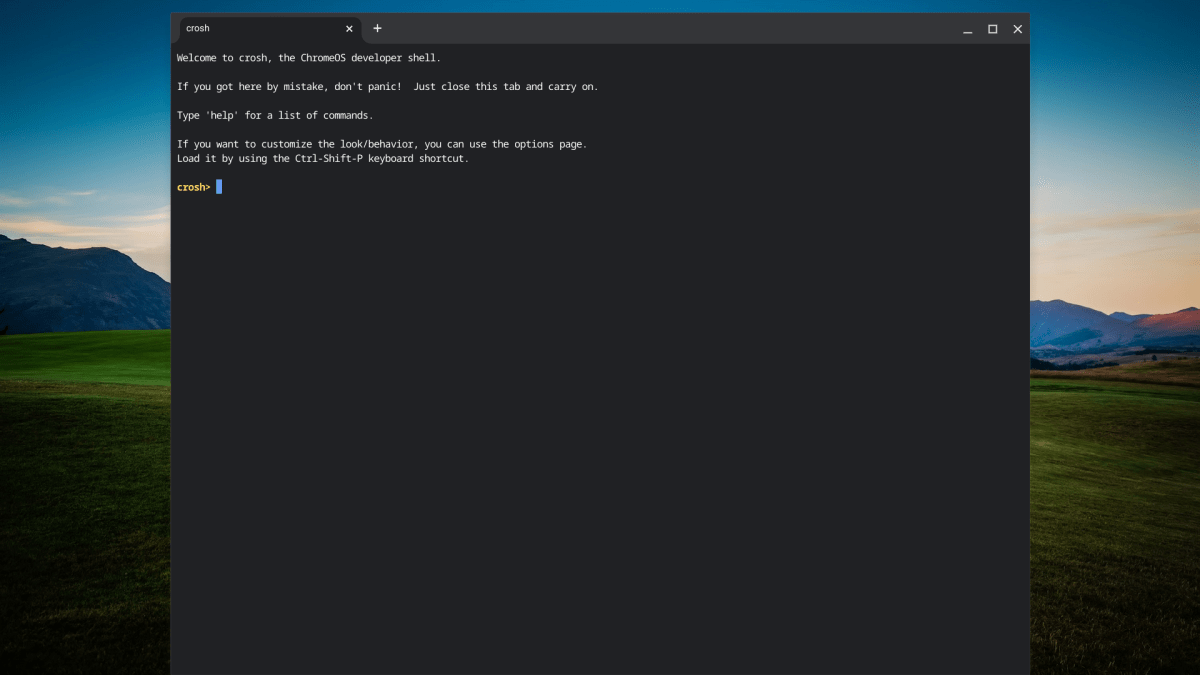
Dave Parrack / Foundry
Crosh is ChromeOS’s developer shell—a command-line interface that can be used to perform all kinds of tasks. Think Command Prompt in Windows or Terminal in macOS. And while Crosh isn’t something the average user would ever need (or want) to explore, ChromeOS power users should take advantage if they want to do advanced things.
To access Crosh, you can use the Ctrl + Alt + T keyboard shortcut. Once open, type help for a list of commands you can use in Crosh. Only use Crosh if you feel the need to delve deeper into ChromeOS, as the majority of users don’t need to do so.
Commands that you may want to use include memory_test to see information about your Chromebook’s memory, battery_test [seconds] to check battery health with a battery discharge test, and ping [domain] to run a ping test.
Enable the Linux subsystem for more apps
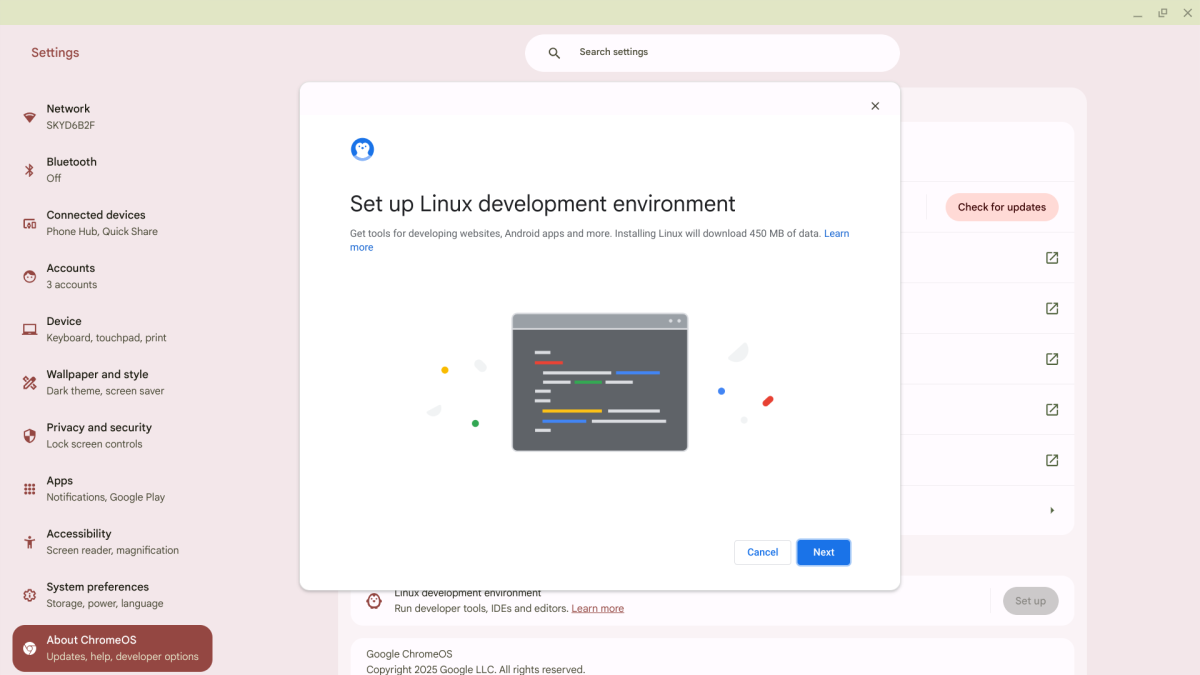
Dave Parrack / Foundry
If you’ve done everything you can to maximize ChromeOS productivity but still feel limited, and if you’re a techy power user with a tinkerer’s mind, then you might want to enable Linux on your Chromebook.
Enabling Linux on ChromeOS (sometimes called Crostini) is an easy way to expand the power of your Chromebook. You basically get a Linux container than runs within ChromeOS, allowing you to run full-blown Linux apps that behave as if they were native ChromeOS apps, all while benefiting from ChromeOS’s usability and battery management.
To get started, go to Settings > About ChromeOS. Under the Developers subcategory, navigate to Linux development environment, click on Set up, then follow the on-screen instructions. After setup is complete, you’ll have access to a Linux environment where you can run Linux commands and install Linux apps.
Note that since Linux runs in its own environment, you have to manually mark certain files and folders if you want them to be accessible to Linux apps. It’s easy to do, though. Just right-click any file or folder and select Share with Linux. Boom!
Maybe consider experimental features
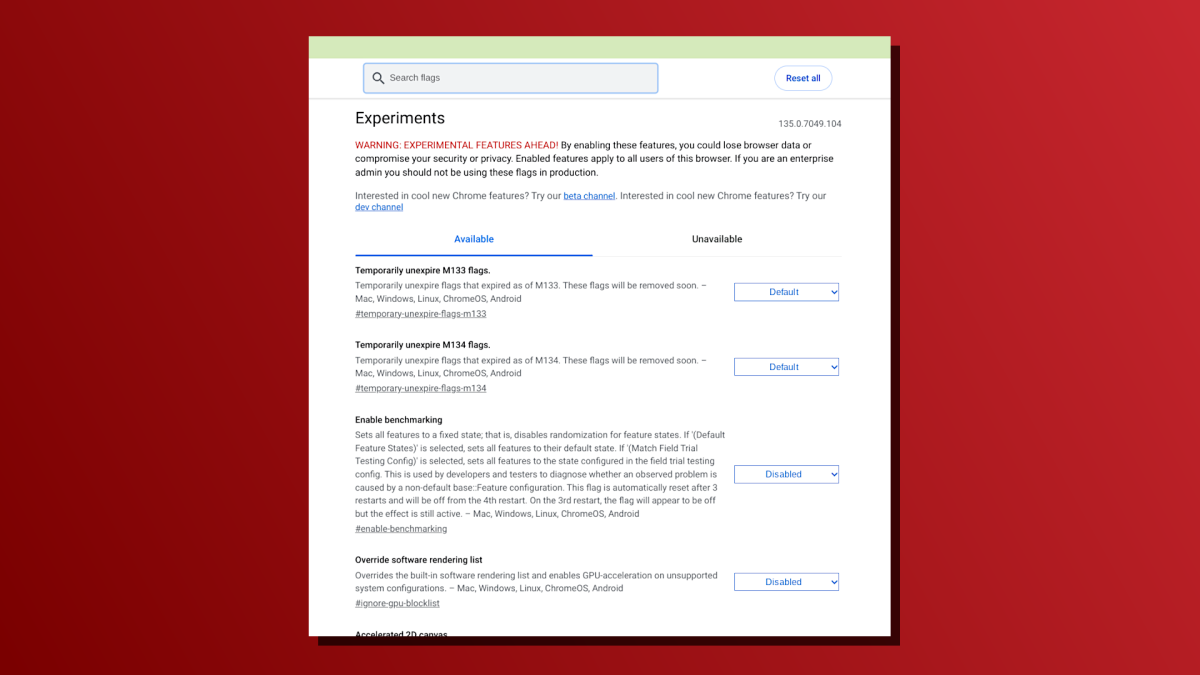
Dave Parrack / Foundry
In ChromeOS, a “flag” is an experimental setting that hasn’t yet made it into the operating system’s stable release. By tweaking flags, you can essentially test out features that are still in the works. But do so at your own risk because experimental features may cause hardware, software, or security issues, according to Google.
To access ChromeOS’s experimental features, open Chrome and type chrome://flags in the address bar. You’ll be taken to a special flags page with all the available flags on your version of ChromeOS, along with a search bar for quickly finding the ones you need.
Some flags that can improve your Chromebook performance and productivity include #enable-zero-copy (which allows data to be transferred without extra copies) and #smooth-scrolling (which makes page scrolling smoother). You can also use flags to tweak the look and feel of the Chrome browser itself.
Alternatively, you can gain access to even more experimental features by switching to the Beta or Dev releases. The Beta channel is low risk and updated every 4 weeks while the Dev channel is buggier and updated once or twice every week. But I don’t recommend doing this if you’re on a work machine and need long-term stability.
Further reading: The best Chromebooks you can buy this year


