Summary
- To run an old app or game on Windows 11, use your operating system’s built-in compatibility mode.
- To use compatibility mode, right-click your app or game, click “Properties,” open the “Compatibility” tab, and configure the available options.
- You can find and fix compatibility issues by right-clicking your program and choosing Show More Options > Troubleshoot Compatibility.
If an app is refusing to open or work as expected, try running it in Windows 11’s compatibility mode. This mode fixes any compatibility issues, and I’ll show you how to use it for your installed programs.
What Is Compatibility Mode?
Compatibility mode is a Windows 11 feature that simulates older Windows versions for your programs. This allows you to run old software on your Windows 11 machine. Since the feature is built into the operating system, you don’t have to download or install anything to use it.
Note that the feature doesn’t change your apps in any way. Instead, it just offers an older Windows version environment for your apps to work in. This mode is app-specific, meaning it’s only applied to the apps you choose. Your other apps continue to work outside of this mode.
When Should You Use Compatibility Mode?
If you’re experiencing compatibility issues with your apps or games, try using compatibility mode to fix those issues. Some common problems include an app refusing to launch or displaying unsupported errors, where compatibility mode can help.

Related
Old Games Are Tricky to Run On Modern PCs, So Try These Tips
Many games from back in the day can have some troubles running on modern hardware.
If certain features have stopped working in your apps, the mode can help fix them. Also, if your program was originally made for an older Windows version, it makes sense to run it under that Windows environment.
How to Launch a Program in Compatibility Mode
Running a program in Windows 11’s compatibility mode is as easy as choosing a menu option. To do that, find your program’s shortcut. If your program’s shortcut isn’t on your desktop, open Windows Search (press Windows+S), type your program’s name, and select “Open File Location” on the right pane.
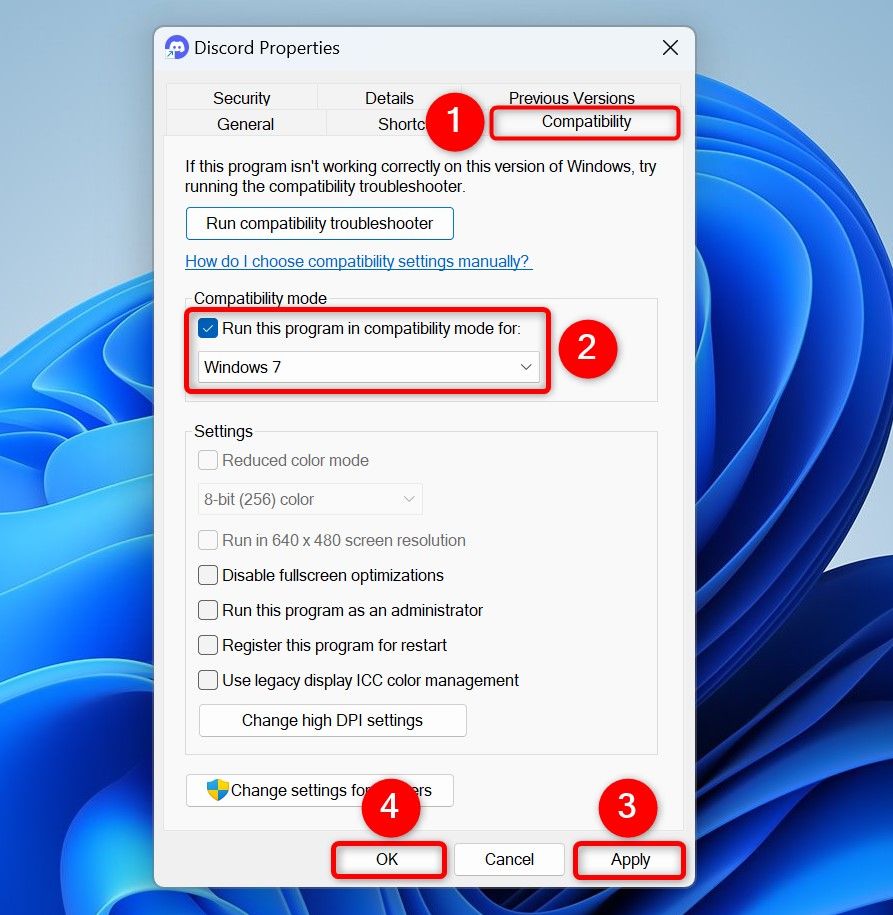
Right-click your app or game’s icon and choose “Properties.” On the open window, access the “Compatibility” tab. Here, turn on the “Run This Program in Compatibility Mode For” option. From the drop-down menu, select the Windows version under which you want to launch your program. Your options are Windows 8, Windows 7, Windows Vista, Windows Vista (Service Pack 1), and Windows Vista (Service Pack 2).
Optionally, you can configure other compatibility options on the same window. Those options are:
- Reduced Color Mode: This mode helps use 16-bit color schemes for old programs.
- Run in 640 x 480 Screen Resolution: This reduces the screen resolution for very old apps and games.
- Disable Fullscreen Optimizations: This option fixes display performance issues.
After making changes, at the bottom of the window, click “Apply” followed by “OK.”
To launch your program in compatibility mode, double-click the program’s shortcut. It will run according to the settings you’ve configured above. In the future, to disable compatibility mode, right-click your program and choose “Properties.” Access the “Compatibility” tab and turn off “Run This Program in Compatibility Mode For.” Then, choose “Apply” followed by “OK.”

Related
How to Fix a “This app can’t run on your PC” Error on Windows 11
Unless the app is inherently incompatible, there are ways to make it work.
What if Your Program Doesn’t Work in Compatibility Mode?
If your app or game won’t work even after enabling compatibility mode, you have a few ways to resolve the problem.
Use the Compatibility Troubleshooter
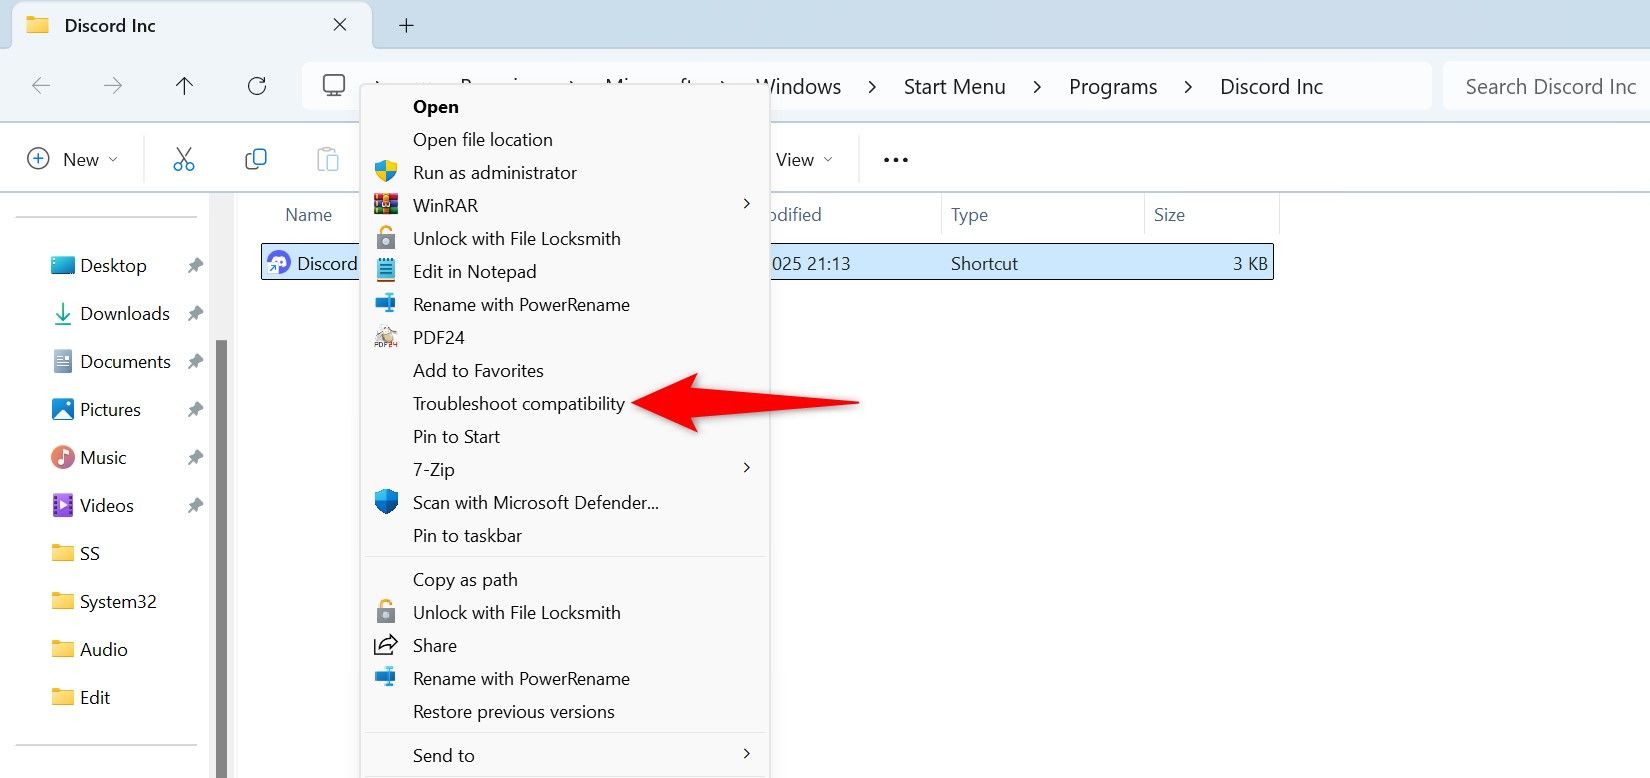
Windows 11 has a compatibility troubleshooter that allows you to find and fix compatibility issues with your programs. You don’t have to configure any options manually, as this tool does that for you. To use it, right-click your app or game and choose Show More Options > Troubleshoot Compatibility. If you don’t see that option, right-click your program and choose “Properties.” Open the “Compatibility” tab and select “Run Compatibility Troubleshooter.”
Wait while Windows 11 finds and fixes compatibility issues with your program.
Use a Virtual Machine
If you’re trying to use an extremely old app or game, you’re better off running it in a virtual machine. In this case, you’ll use Windows 7 or Windows XP in your virtual machine to run the program. Setting up a virtual machine isn’t as difficult as you might think.
Find Updated or Alternative Options
It’s possible your program’s developer has released an updated program version, which can work on Windows 11. In this case, visit your program maker’s site and see if an updated version is available. Then, download and use that updated version.

Related
These Are My Go-To Free Alternatives for Paid Windows Apps
No need to pay for what you can get for free.
If there’s no updated version, consider getting an alternative to your app. There are many programs that will do the same job as the one you’re trying to run. This lets you get your tasks done without much hassle on your Windows 11 computer.
And that’s how you make old programs compatible with your Windows 11 computer. Did you know Microsoft Office also offers a compatibility mode?


