When using Microsoft Word, you can press Enter to start a new paragraph. However, there are various changes you can make to a paragraph’s layout, including adjusting the alignment, adding indents, controlling the spacing, and defining how paragraphs interact with each other. Here’s how.
Direct Formatting vs. Style Formatting
There are two ways to change the paragraph settings in Word: direct formatting and style formatting.
Direct formatting
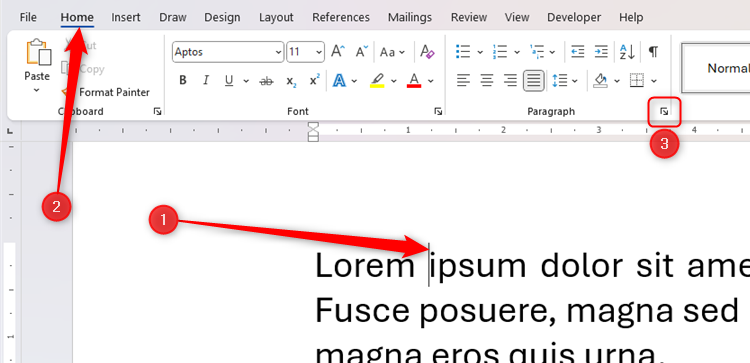
When you format a paragraph or heading directly, it affects only that paragraph or heading in isolation. To do this, place your cursor in the relevant paragraph or heading, and click the “Paragraph Settings” dialog box launcher button in the bottom-right corner of the Paragraph group in the Home tab on the ribbon.
You can then adjust the settings in the Paragraph dialogue box that appears.
Style formatting
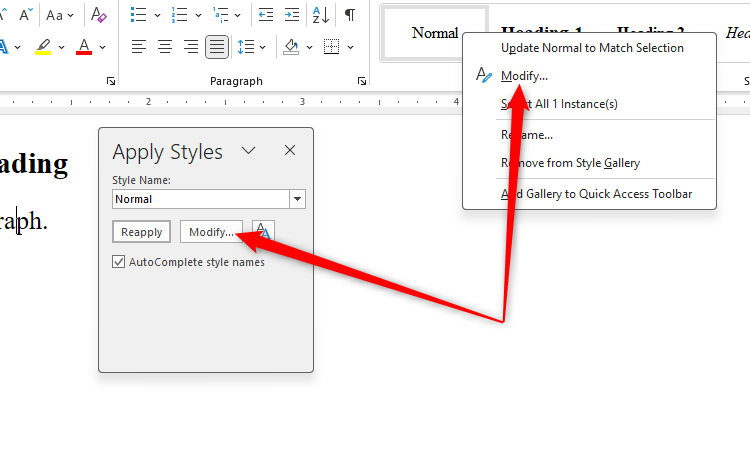
On the other hand, formatting a style affects all paragraphs or headings in that style. There are two ways to do this: right-click a style in the Style Gallery of the Home tab on the ribbon, or place your cursor in a paragraph or heading and press Ctrl+Shift+S. Whichever method you use, click “Modify” to adjust the style settings.
Related
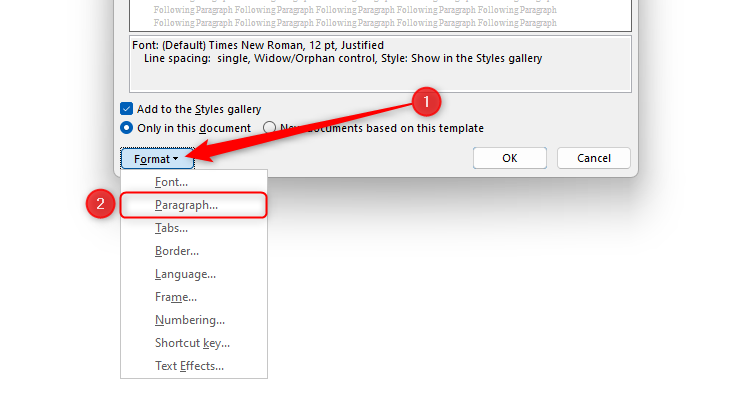
Then, in the Format drop-down menu of the Modify Style dialog box, click “Paragraph.”
By default, most styles are based on the Normal style. For example, changing the line spacing of the Normal style will affect the line spacing of the other styles until you modify them separately.
Alignment
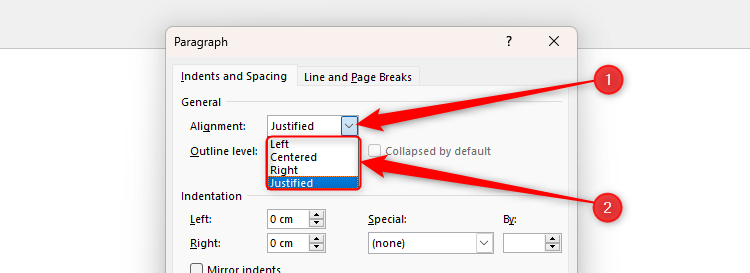
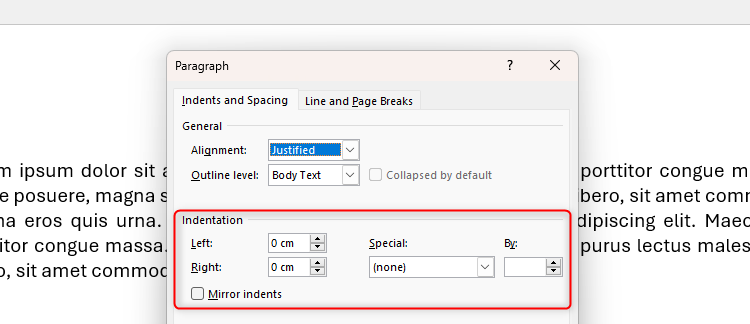
The first setting you can adjust in the Indents And Spacing tab of Microsoft Word’s Paragraph dialog box relates to the paragraph’s alignment, and there are four options to choose from:
Click “Left” to align the text to the left margin only. Choosing this option will mean that the right edge of the paragraph won’t align to the right margin.
Choose “Center” to align the text to the middle of the page.
Click “Right” to align the text to the right margin only, leaving the left edge of the text unaligned to the left margin.
Finally, select “Justified” to align the text to both the left and the right margins.
The Outline Level drop-down menu defines the level at which the paragraph appears when you activate Microsoft Word’s Outline view. The program adjusts this setting based on the style applied to a paragraph, so you don’t need to worry about making any changes here, especially if—like me—you never use the Outline view.
Indentation
Microsoft Word’s paragraph indentation settings let you position a paragraph relative to the margins, decide whether the indentation of a paragraph’s first line should differ from the rest of the paragraph, and control how paragraphs work when you add bullets or numbering.
You can also click and drag the markers on the ruler to make the same indentation changes. However, adjusting the settings in the Paragraph dialog box lets you be more precise with your measurements. What’s more, if you make indentation changes to a style’s paragraph settings, you can guarantee that they’ll apply consistently to all instances of that style throughout your document.
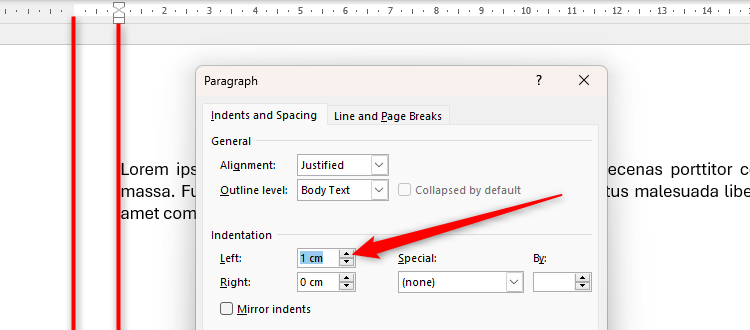
Increasing the left indentation creates a gap between the whole paragraph and the left margin. You might choose this option if you want things like an important quote or tagline to stand out from the rest of your text.
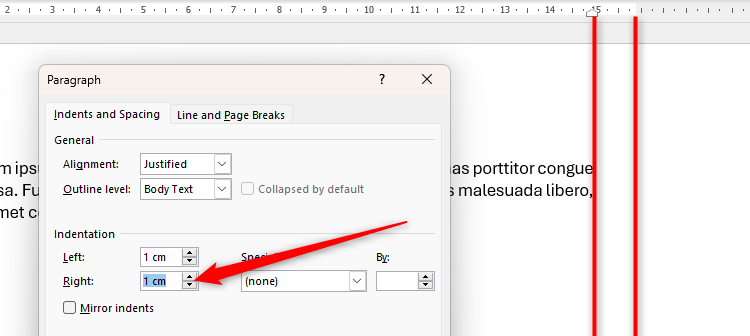
Similarly, increasing the right indentation creates a gap between the paragraph and the right margin.
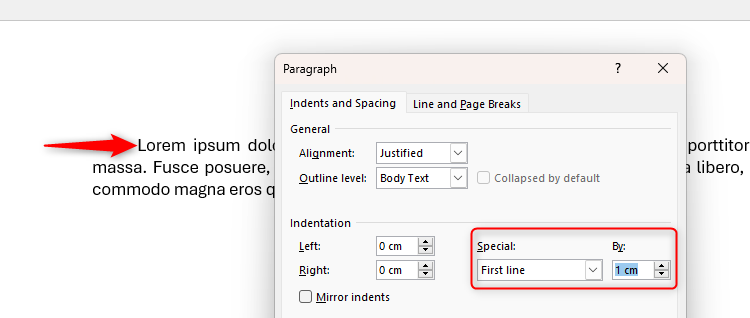
If you want to only indent the first line of the paragraph, set the left and right indentations to 0, and choose “First Line” in the Special drop-down menu, with the value in the By field reflecting the size of the indent you want the first line to have.
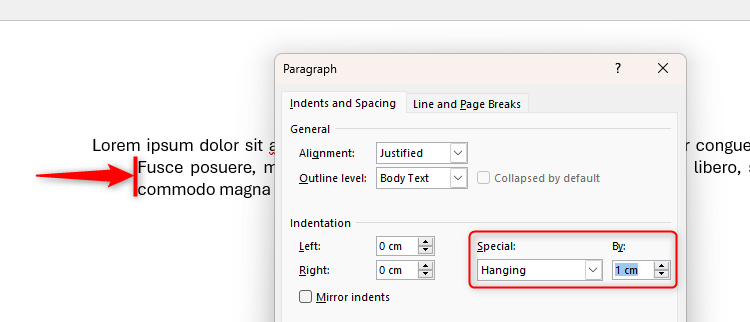
On the other hand, if you want to indent every line in a paragraph except for the first line, set the left and right indentations to 0, choose “Hanging” in the Special drop-down menu, and adjust the measurement in the By field to dictate how far from the margin you want that indentation to be.
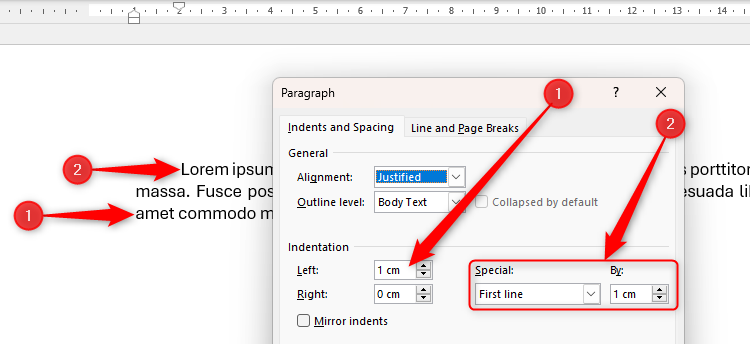
You can also combine these settings. For example, try increasing the left and first line indentation at the same time.
Microsoft Word’s indentation settings are also crucial for controlling how your paragraphs are presented when you add bullets or numbering to them. After turning a paragraph into a bulleted or numbered paragraph (manually or by applying the List Paragraph style to the relevant paragraph), adjust the necessary settings in the Indents And Spacing tab of the Paragraph dialog box:
|
Setting |
What This Setting Does |
|---|---|
|
Indentation: Left |
This is where you want the bullet or number to go. For example, if you want the bullet to sit at the edge of the left margin, type 0 in this field. |
|
Special: Hanging |
This is the left alignment of the text relative to the bullet or number position. For example, if the left indentation is 0, a 1 cm hang will mean that all the text in that bulleted or numbered paragraph will be 1 cm from the left margin. Clicking “None” in the Special drop-down menu means the bulleted or numbered paragraph will align to the left margin after the first line. |
|
Special: First Line |
Choose this setting if you want the bullet or number indented, and the rest of the paragraph to align to the left margin. |
If you’re creating a book-style document with facing pages, check “Mirror Indents” in the Indents And Spacing tab of the Paragraph dialog box to match the left indent on odd pages with the right indent on even pages. Taking this step helps you ensure the outer edges of a double page remain consistent.
Paragraph Spacing
The Spacing section of Microsoft Word’s Paragraph dialog box helps you decide the gaps between each paragraph.
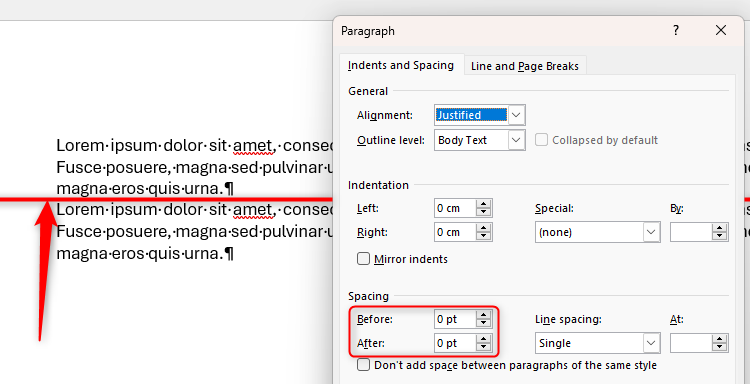
In this example, because Spacing Before and Spacing After are both set to 0, there isn’t a clear gap between each paragraph.
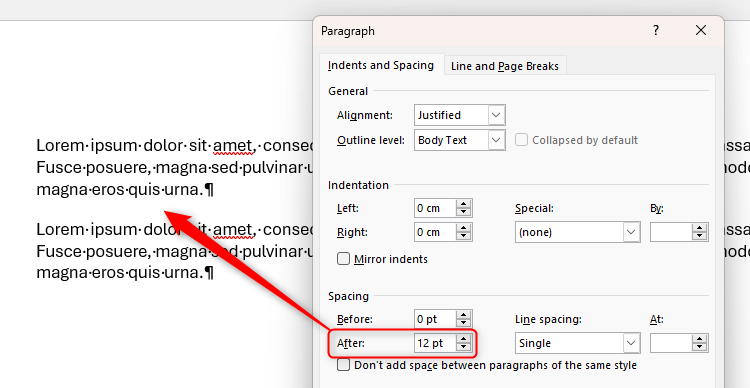
However, when I change the Spacing After setting in the Normal style to 12 pt, a gap appears between the two paragraphs.
Changing the paragraph spacing is a better way to separate your paragraphs than pressing Enter twice, as this method maintains your document’s structural integrity. However, the key is to be consistent: you could end up with differently sized spaces if you change both the Spacing Before and Spacing After settings. Personally, I only ever adjust Spacing After, leaving Spacing Before at 0 pt.
Related
Don’t Press Enter Twice in Word: Use Spacing After Instead
Secure your document’s layout with consistent spacing.
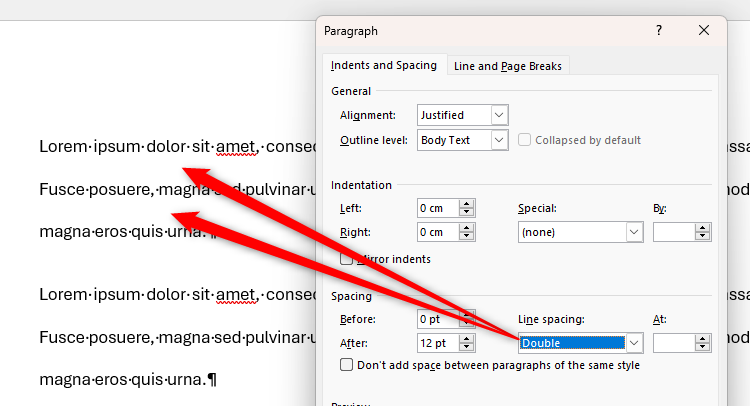
The Line Spacing option in the Indents And Spacing tab lets you dictate the gaps between lines within paragraphs. This screenshot shows how the paragraphs are presented if you select “Double” here.
The Single, 1.5 Lines, and Double Line Spacing options base their dimensions on the largest character in each line. For example, applying double-spacing to a line whose largest character is 14 pt will result in a 28 pt space being placed above it.
Widow and Orphan Control
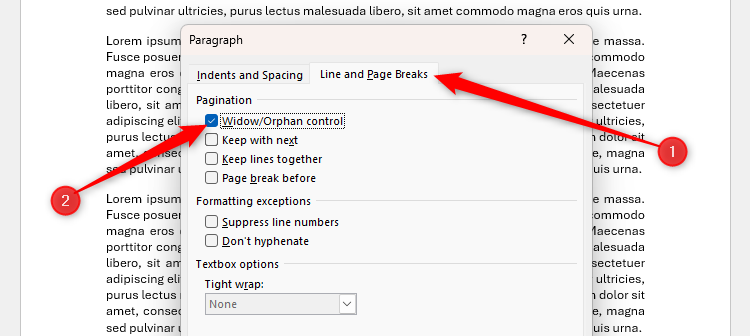
The first option in the Line And Breaks tab of Microsoft Word’s Paragraph dialog box is Widow/Orphan Control. This is a really handy setting if you don’t want a single line from a paragraph to be on its own at the end or start of a page.
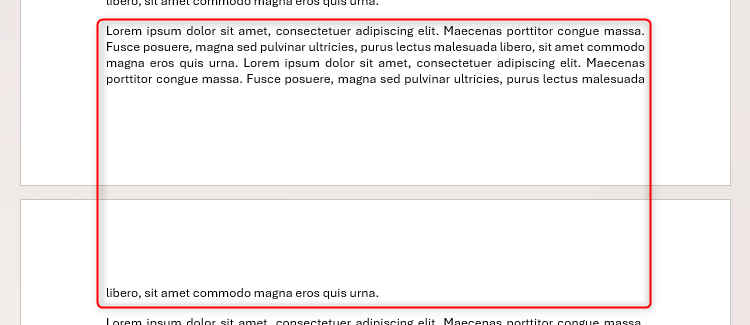
In this example, the final line of the paragraph is on its own on the second page (known as a widowed paragraph), disrupting the layout and flow of the document.
Similarly, the first line of a paragraph being on its own at the end of a page (also known as an orphaned paragraph) causes the same readability issues.
To solve this issue, simply check “Widow/Orphan Control.” Remember to apply this to the Normal style—rather than a paragraph in isolation—to make this change throughout your work.
Keep With Next
Moving down the Line And Breaks tab of Microsoft Word’s Paragraph dialog box, the next option is Keep With Next. Imagine you have two paragraphs in your document: paragraph 1 and paragraph 2. Applying the Keep With Next option to paragraph 1 means that paragraph 2 will essentially stay glued to paragraph 1, even if a natural page break would ordinarily keep them apart.
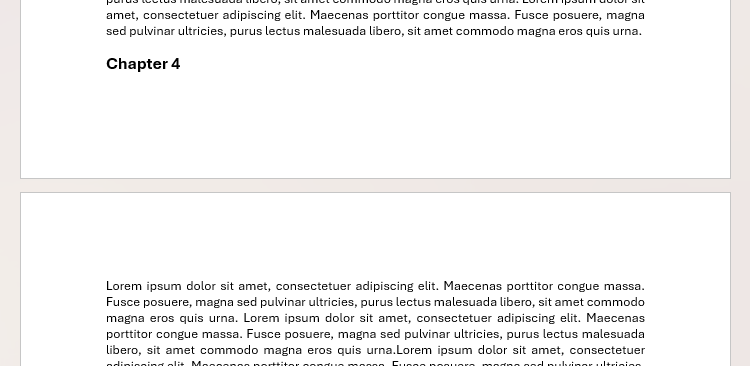
The Keep With Next setting is best reserved for headings, which is why Word’s Heading styles have this option enabled by default. In the following example—where Keep With Next is not applied to the heading—the chapter heading is separated from the corresponding content.
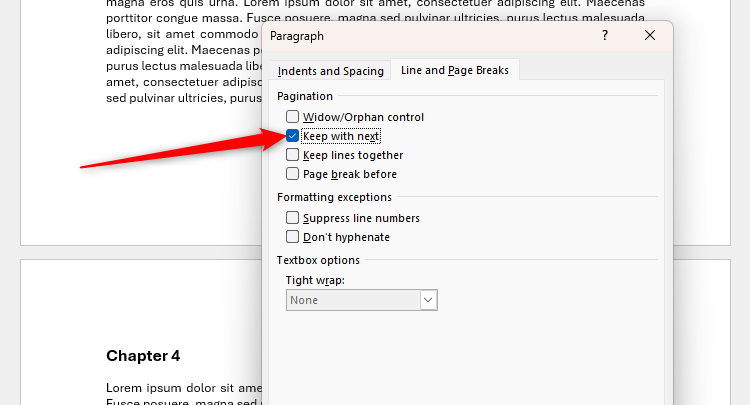
On the other hand, checking Keep With Next in the Paragraph dialog box for this Heading style ensures the chapter title stays immediately before the paragraph that follows.
Keep Lines Together
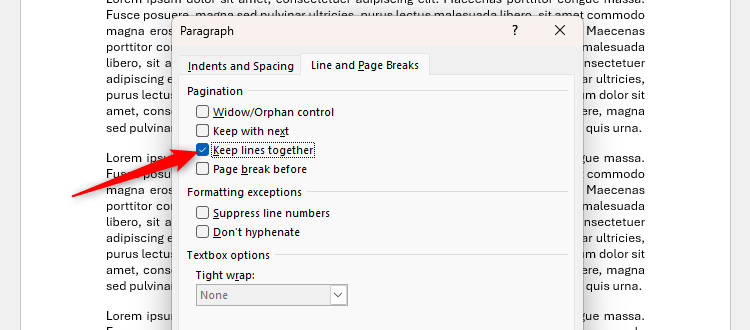
Earlier, I talked about how using the Widow/Orphan control stops a single line of a paragraph appearing on its own at the top or bottom of a page. The Keep Lines Together tool is similar, but rather than preventing a single line from being separated from a paragraph, it prevents any lines from being separated across pages. As a result, any paragraph with this setting applied to it will jump to the next page if the whole paragraph cannot fit at the end of the previous page.
Since this setting makes the whole paragraph move to the next page, applying it means that you may end up with a large area of white space at the end of the previous page.
Page Break Before
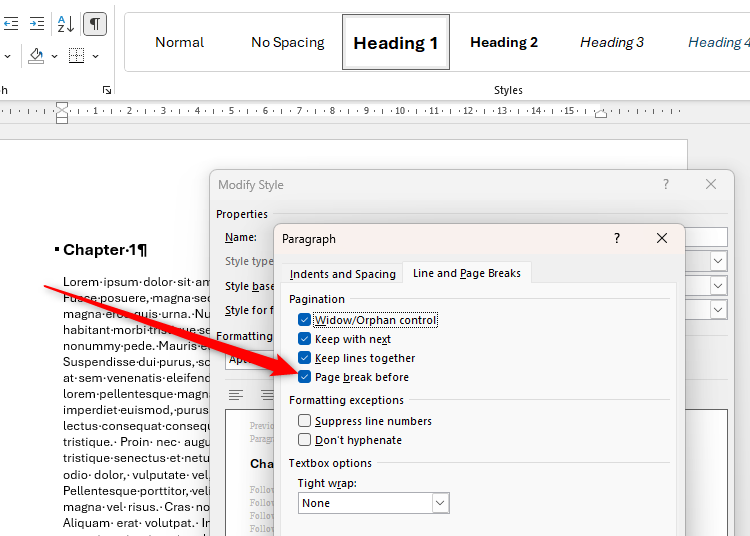
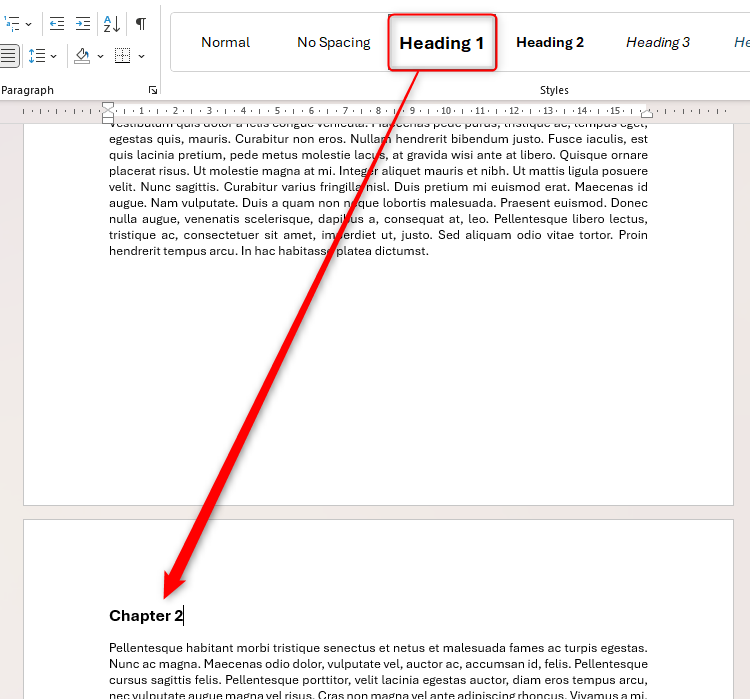
Are you writing a lengthy document whose chapters must start on a new page? If so, apply the Page Break Before option to the appropriate Heading style to force Word to do the formatting for you. Open the style’s Paragraph dialog box, and check “Page Break Before.”

Related
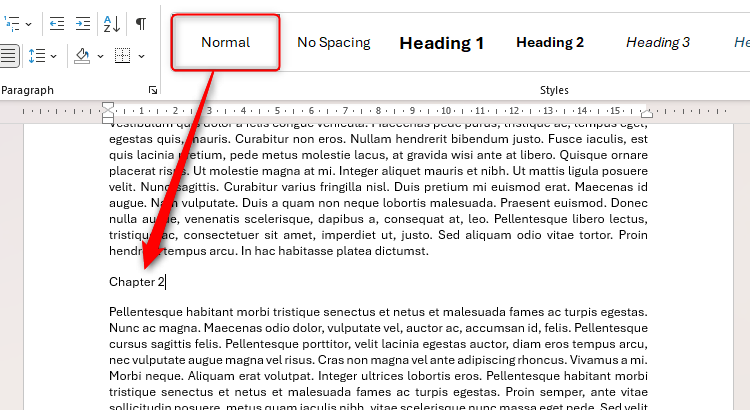
In this Word document, the title “Chapter 2” is currently in the Normal style.
However, since I have applied the Page Break Before setting to the Heading 1 style, as soon as I use this style in the title “Chapter 2,” a page break is added, and the title is moved to the next page.
The Page Break Before setting doesn’t work on the very first paragraph or heading of a document.
Formatting Exceptions
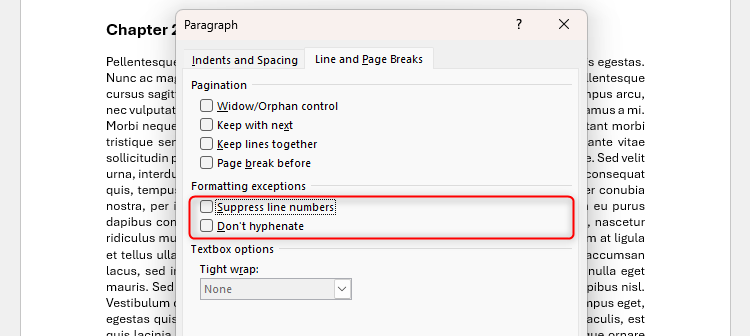
The Line And Page Breaks tab of the Paragraph dialog box in Microsoft Word also has a Formatting Exceptions section with two options:
- Suppress Line Numbers: If you add line numbers to your Word document, check “Suppress Line Numbers” to exclude the paragraph or any paragraphs assigned to a certain style from the count.
- Don’t Hyphenate: If Word’s Automatic Hyphenation option is activated in your Word document, check “Don’t Hyphenate” to stop the paragraph or any paragraphs in that style from hyphenating words at the ends of lines.

Related
How to Add Line Numbers to a Microsoft Word Document
Adding line numbers to your Microsoft Word document helps you reference specific sections.
Textbox Options
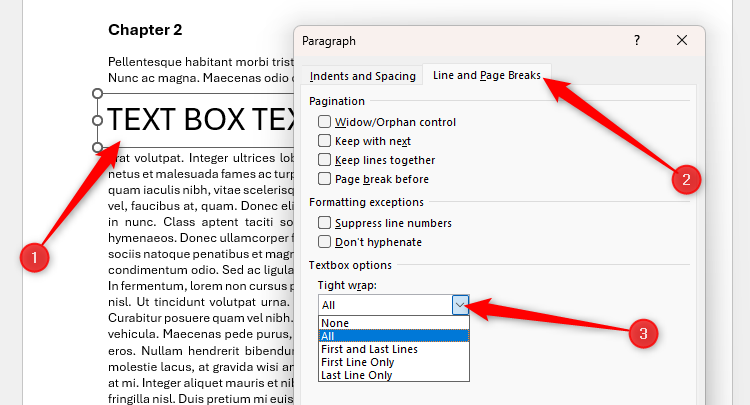
The final section in the Lines And Page Breaks tab of the Paragraph dialog box in Microsoft Word is Textbox Options, which allows you to define how paragraphs interact with any textboxes you’ve added to your document. Specifically, the options refer to how the document’s text wraps around the textbox.
To use the Textbox options, the textbox border must be transparent (no line or fill), and the Wrap Text must be set to Tight or Through.
After selecting the relevant textbox and clicking the “Paragraph Settings” dialog box launcher, expand the “Tight Wrap” drop-down list to see the five options:
- None: The document’s text is not tightly wrapped around the textbox.
- All: The document’s text is tightly wrapped around the textbox on all sides.
- First And Last Lines: The document’s text is tightly wrapped around the textbox at the top and bottom only.
- First Line Only: The document’s text is tightly wrapped around the textbox at the top only.
- Last Line Only: The document’s text is tightly wrapped around the textbox at the bottom only.
If, like me, you tend not to use textboxes in Microsoft Word, you can ignore this setting altogether.
Controlling paragraphs isn’t the only way to structure and organize text in Microsoft Word. For example, you could add non-breaking spaces, insert manual page and section breaks, and make your document easier to navigate.


