

Microsoft has started a gradual rollout of Windows Recall and other related AI features, including Click to Do and Semantic Indexing for Windows Search for Copilot+ PCs running the latest version of Windows 11. These features are coming out almost a year after several delays and security concerns.
Originally, Windows Recall was supposed to be released alongside the launch of Copilot+ PCs and Windows 11 version 24H2 in June 2024. However, the company had no choice but to postpone the release until October 2024 due to privacy and security concerns, but since the feature wasn’t ready, it was delayed one more time.
Microsoft has now spent many months improving the security of Recall, and it’s gradually making it available along with Click to Do and Semantic Indexing for compatible devices.
In this how-to guide, I’ll outline the details to get started with these new AI features on Windows 11.
What’s new for Windows Recall
On Windows 11, Recall is a feature that takes screenshots of all your activities every few seconds. Then, it applies AI to analyze the information, making everything searchable using natural language.
As part of this rollout, the system update will download and install the necessary components (if they are not already available), including the Windows Copilot Runtime, the Recall app, Click to Do, and Semantic Indexing.
Windows Copilot Runtime is the platform that provides more than 40 AI models (including a Screen Region Detector, Optical Character Recognizer, Natural Language Parser, and Image Encoder) to power this and many other features. These smaller AI models are running concurrently to detect text, images, videos, audio, and more.
Recall is an app that offers an interface that allows you to find and interact with the snapshots.
Click to Do is a feature that works inside and outside of the Recall app, and it’s the feature that handles the AI actions that you can perform on selected text and other objects.
Finally, Semantic Indexing is a technology that allows the use of AI, more specifically Natural Language Processing (NLP), to allow the system to make sense of the query.
Enable Recall
If the system hasn’t already prompted you to enable the feature, you can use these instructions to opt into the Windows Recall:
- Open Settings.
- Click on Privacy & security.
- Click the Recall & snapshots page on the right side.
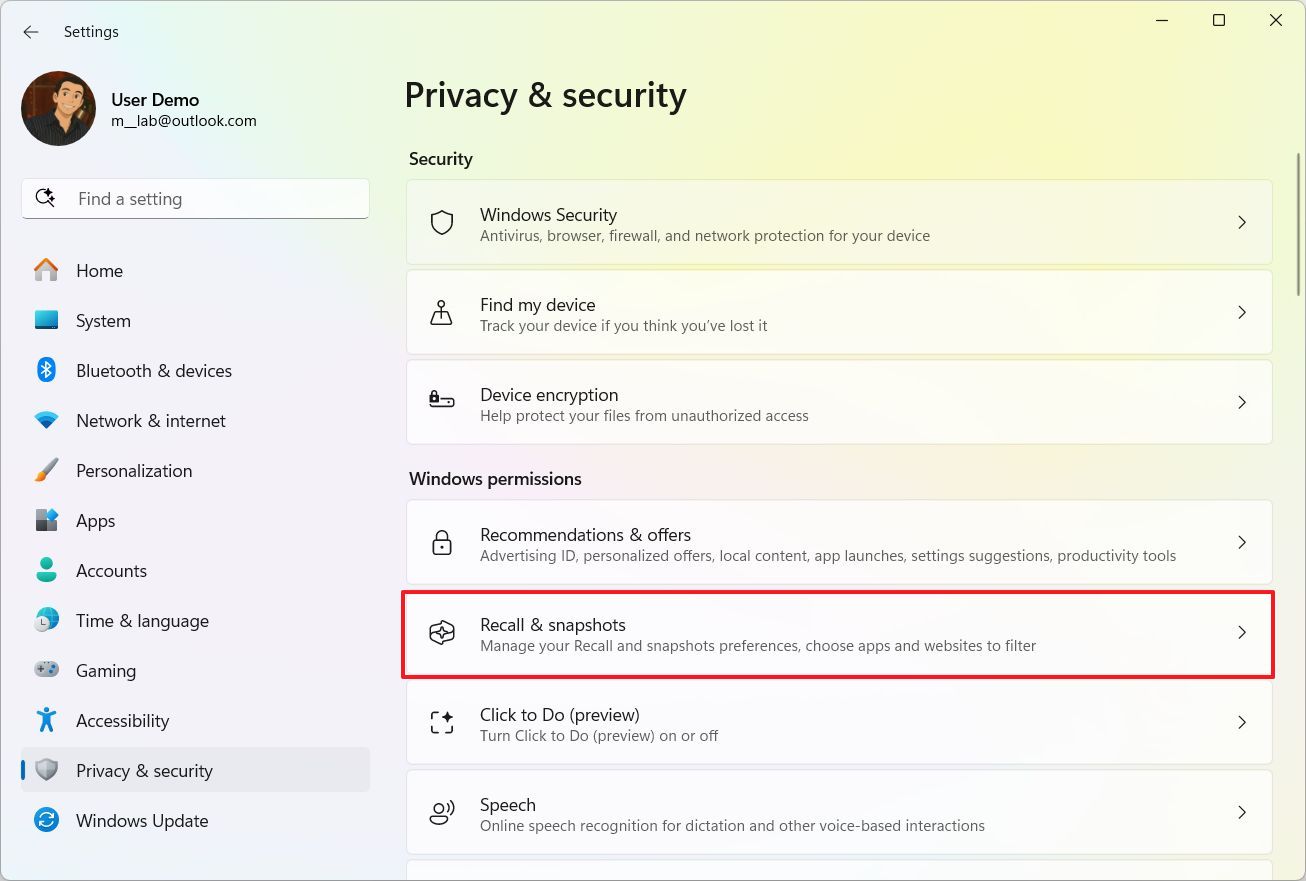
- Turn on the “Save snapshots” toggle switch to enable Recall.
Alternatively, you can turn on the AI feature by launching the “Recall” app and opting in to save snapshots on your computer.
Access Recall
To get started with the Windows Recall app, use these steps:
- Open Start.
- Search for Recall and click the top result to launch the app.
- Quick tip: You can use the “Windows key + J” keyboard shortcut or open the Recall flyout in the Taskbar and click “Open Recall” to launch the app.
- Continue by authenticating using Windows Hello.
- (Option 1) Use the search box to search for a snapshot using natural language.
- Quick tip: You can also click the “microphone” button and perform a voice search.
- Click on the snapshot from the search result.
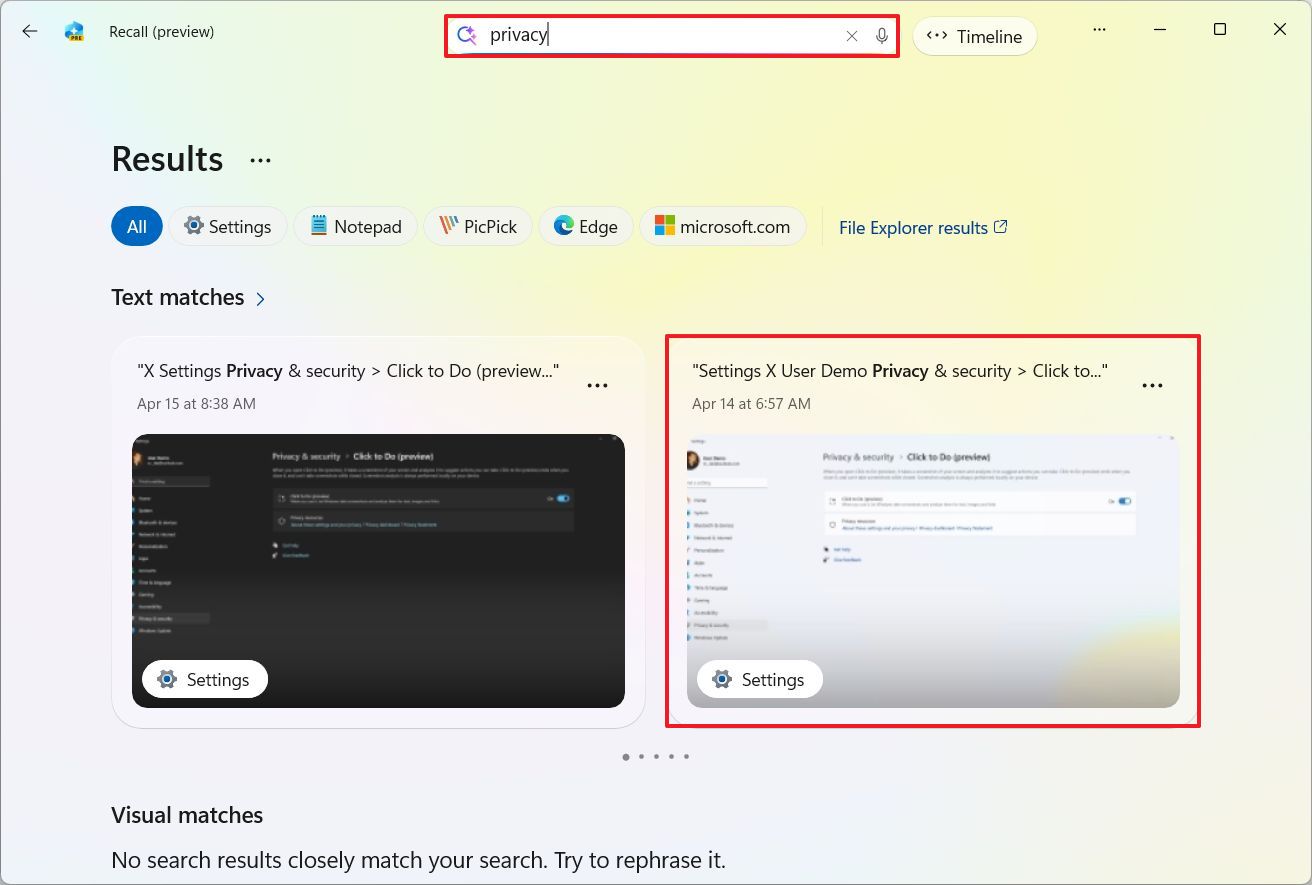
- Quick tip: If the feature can’t find any matches, you can click the “File Explorer results” option to perform a traditional Windows Search.
- (Option 2) Use the slider to scroll through the timeline and find a specific snapshot.
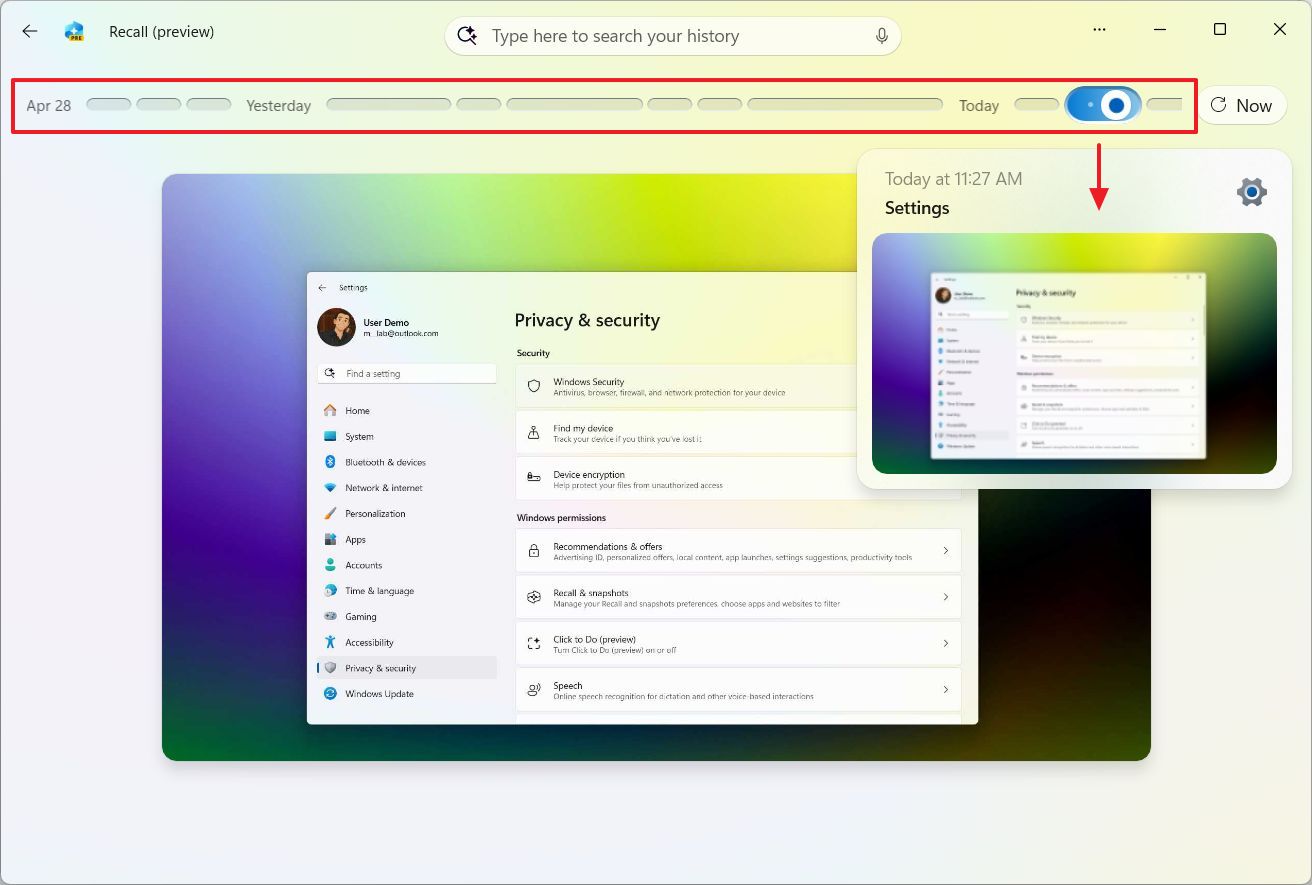
- Choose the snapshot with the activity you want to analyze.
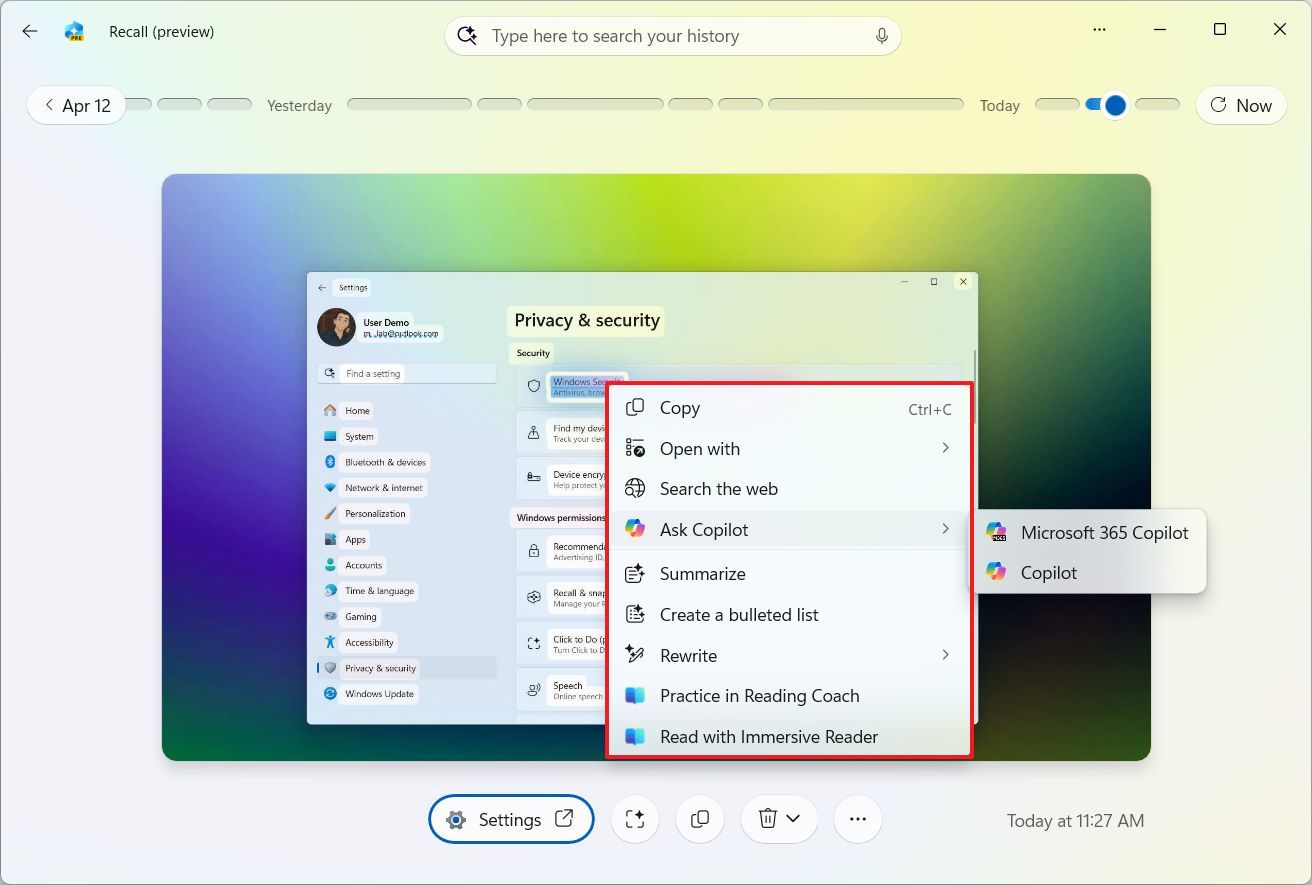
- Select the text or object of interest and right-click the selection to access the different actions using Click to Do.
- (Optional) Click the app button to launch the program in the snapshot.
- Quick note: This option only opens the app, not the contents on the snapshot.
- (Optional) Click the Copy button to copy the snapshot as a screenshot to the clipboard.
- (Optional) Click the Delete button to remove the snapshot from your computer.
You can also click the “Recall” button in the System Tray to access the flyout, which includes a preview of the current snapshot, the option to open the app, and the option to temporarily pause the feature.
The flyout also includes an option to access the settings to manage Windows Recall.
Configure Recall
To configure the Windows Recall features, use these steps:
- Open Settings.
- Click on Privacy & security.
- Click the Recall & snapshots page from the right side.
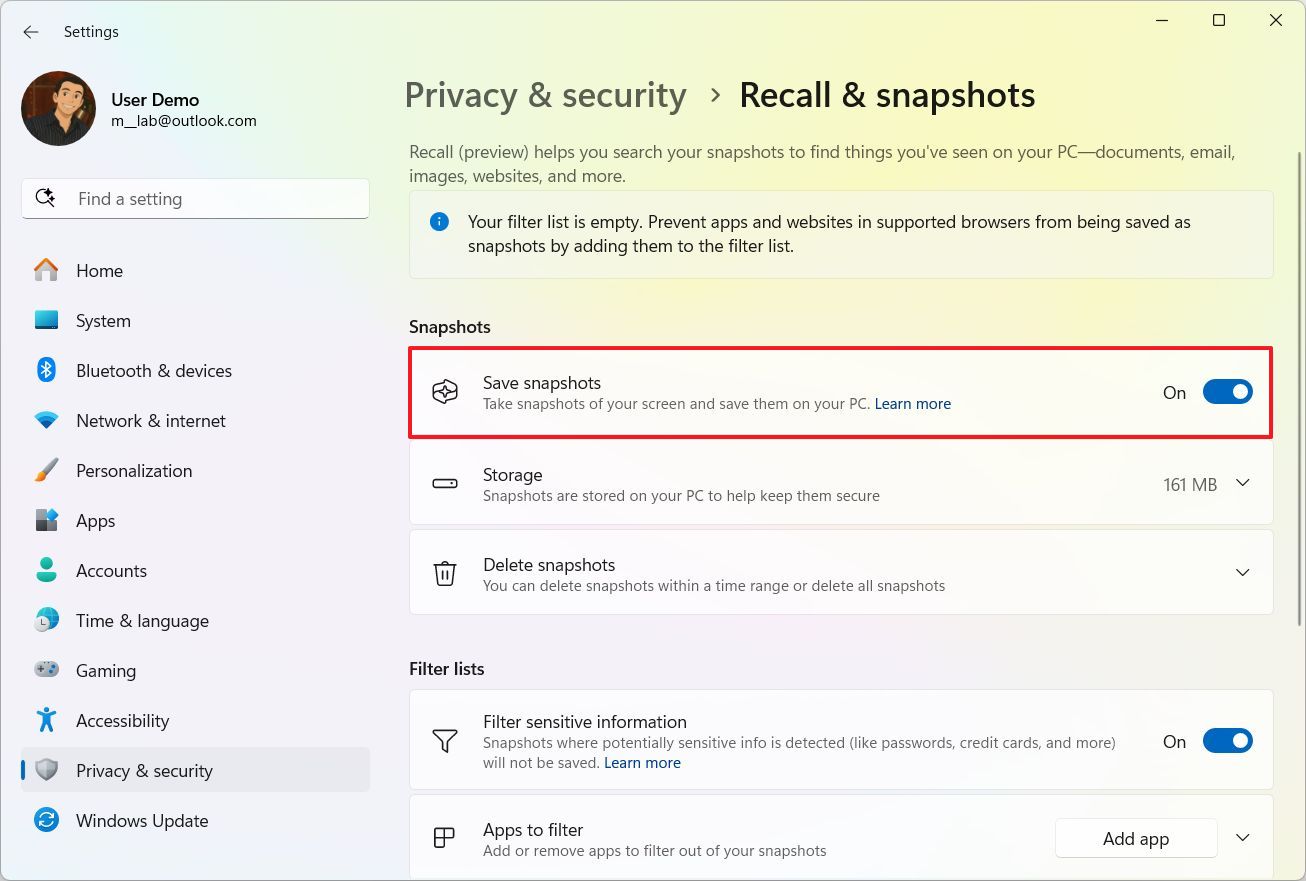
Using the “Recall & snapshots” settings page, you can control various aspects of the feature.
The “Save snapshots” toggle switch allows you to turn the feature on or off. However, turning off the Recall feature doesn’t delete the snapshots already saved on your computer.
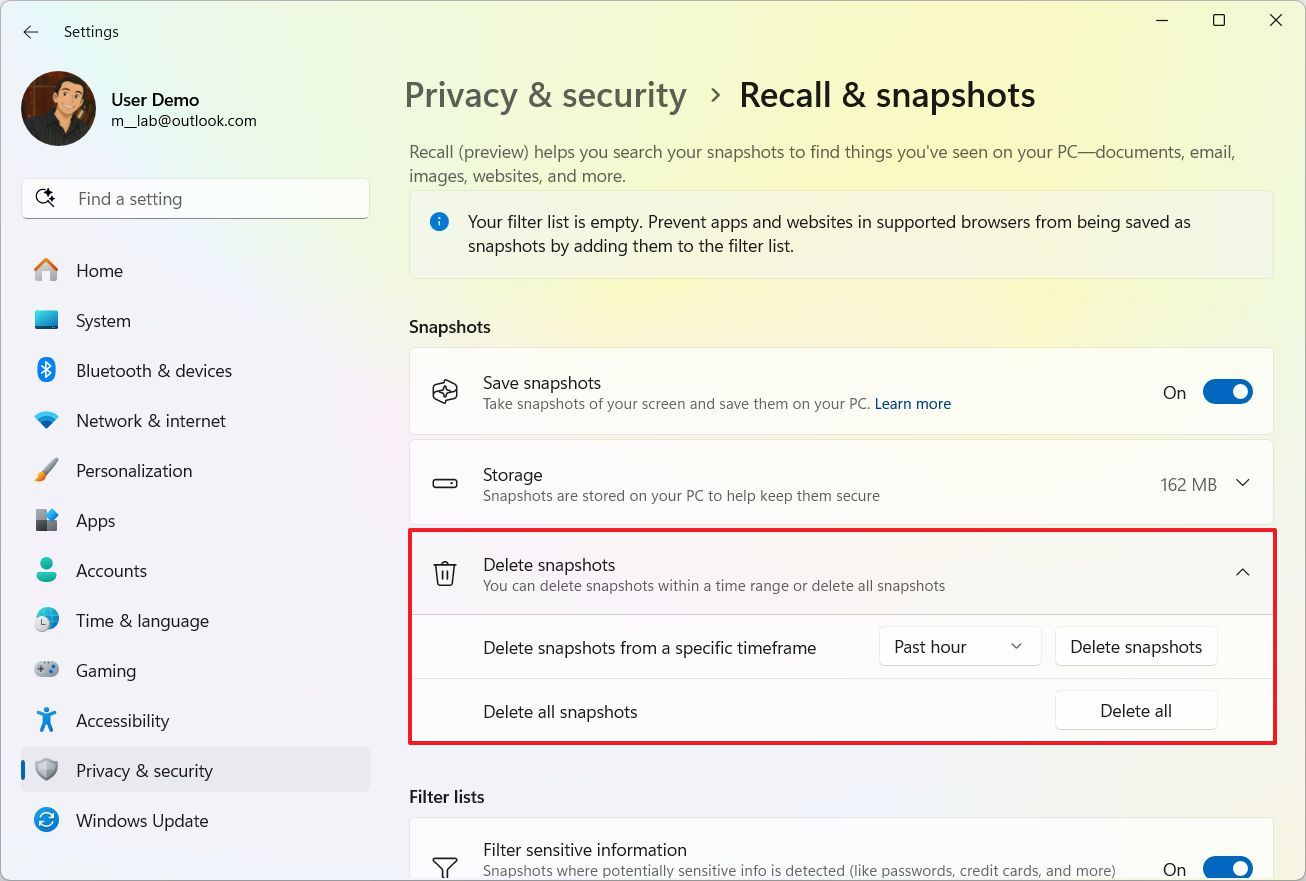
If you want to delete the snapshots, click the “Delete snapshots” setting, choose the period, and click the “Delete snapshots” button from the “Delete snapshots from a specific timeframe” setting.
Or click the “Delete all” button from the “Delete all snapshots” to clear all the data stored on your computer.
By default, the system reserves 25GB of storage on devices with a 256GB SSD, 75GB for a 512GB SSD, and 150GB for a 1TB SSD. However, you can increase or decrease the allocation with the instructions below.
If you want to change the storage settings, click the “Storage” setting and choose the storage allocation size using the “Maximum storage for snapshots” setting.
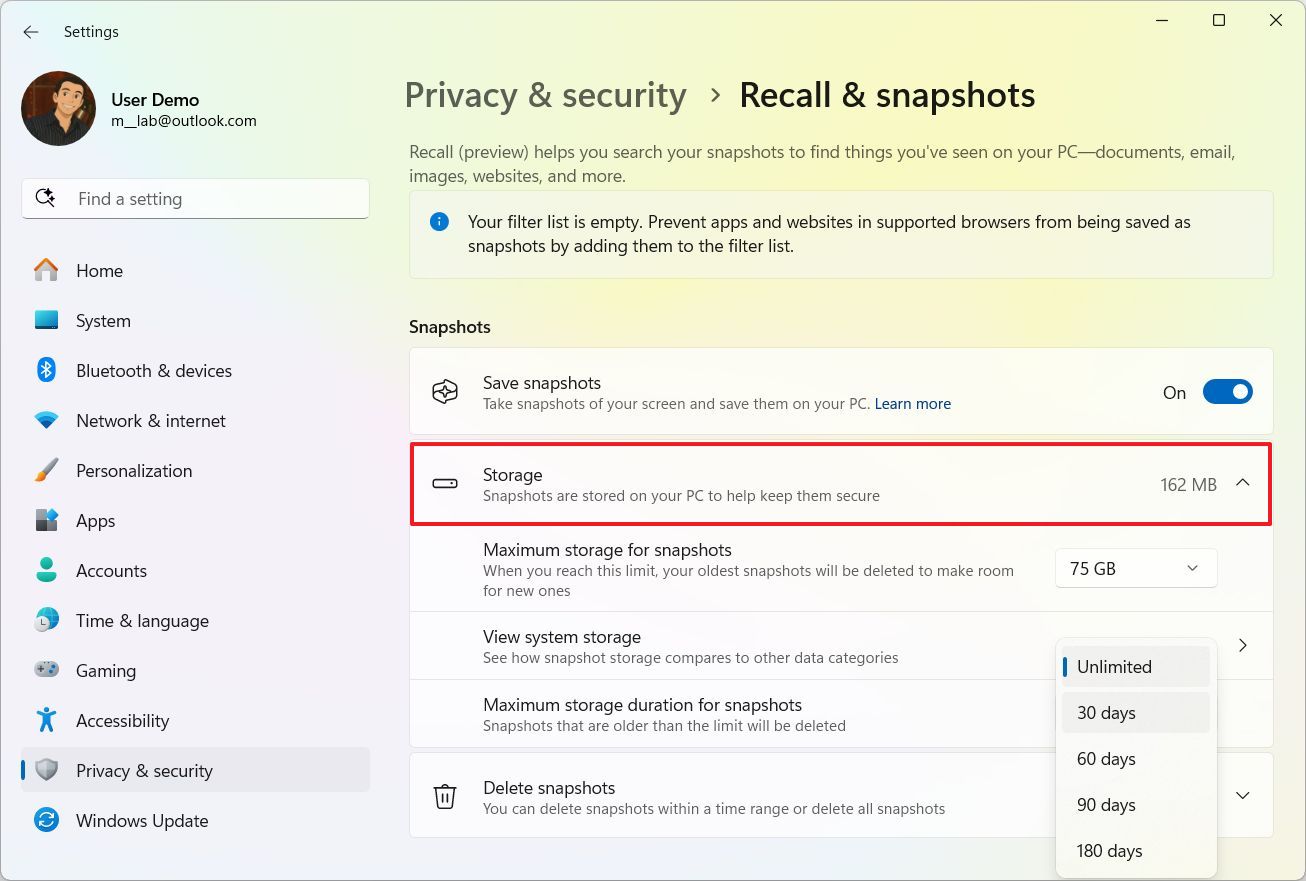
You can also use the “Maximum storage duration for snapshots” setting to allow the feature to delete snapshots after a specific time.
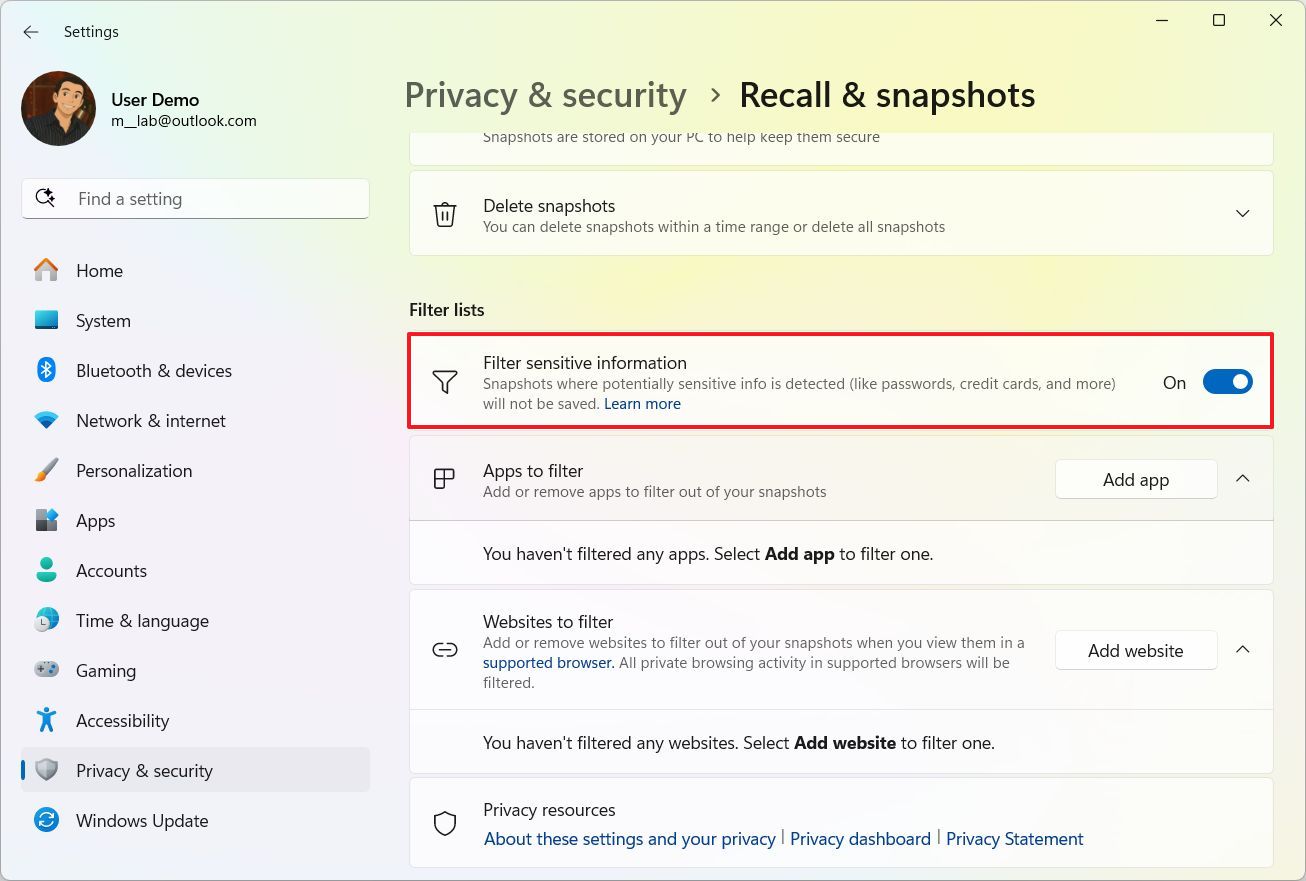
The “Filter lists” settings allow you to prevent the Recall feature from saving sensitive information. By default, the feature can filter passwords, credit cards, and more. However, you can also exclude apps and websites.
If you choose to exclude a specific website, consider that this feature only works on Microsoft Edge, Google Chrome, Opera, Mozilla Firefox, and other Chromium-based browsers.
You can learn more about Windows Recall in my more in-depth guide.
You can also use the “Maximum storage duration for snapshots” setting to allow the feature to delete snapshots after a specific time.
The “Filter lists” settings allow you to prevent the Recall feature from saving sensitive information. By default, the feature can filter passwords, credit cards, and more. However, you can also exclude apps and websites.
If you choose to exclude a specific website, consider that this feature only works on Microsoft Edge, Google Chrome, Opera, Mozilla Firefox, and other Chromium-based browsers.
You can learn more about Windows Recall in my more in-depth guide.
What’s new for Click to Do
On Windows 11, Click to Do is another AI feature that provides different options to perform specific actions using AI based on the content available on the screen. Also, Click to Do works inside and outside of Windows Recall.
One interesting aspect of this feature is that it can take snapshots and then detect text and images using AI, but it doesn’t recognize the content.
When using Click to Do, everything happens locally, and no data is uploaded to the cloud unless you do a web search or ask Copilot for help.
Turn Click to Do on or off
To turn Click to Do on or off on Windows 11, use these steps:
- Open Settings.
- Click on Privacy & security.
- Click the Click to Do page on the right side.
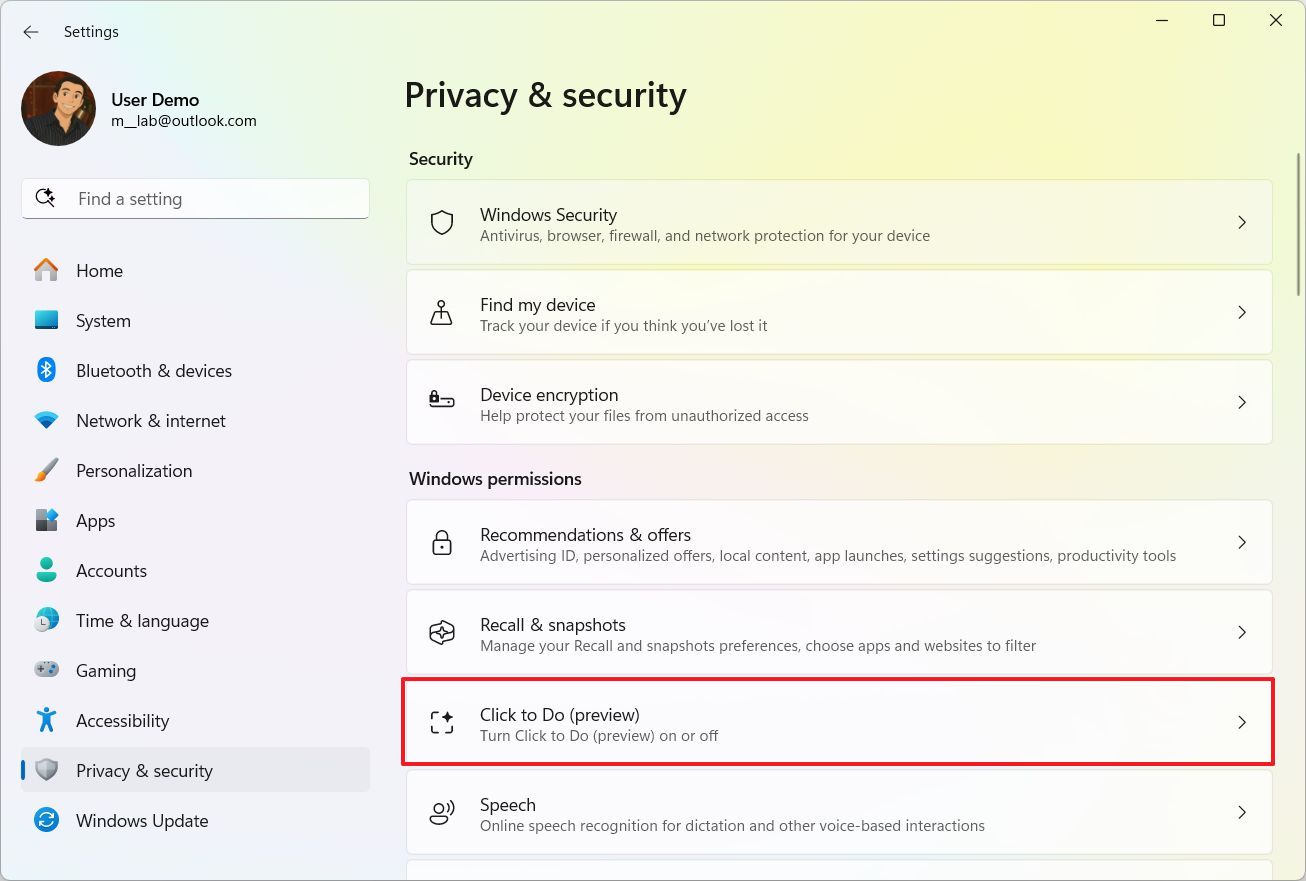
- (Option 1) Turn on the “Click to Do” toggle switch to enable it.
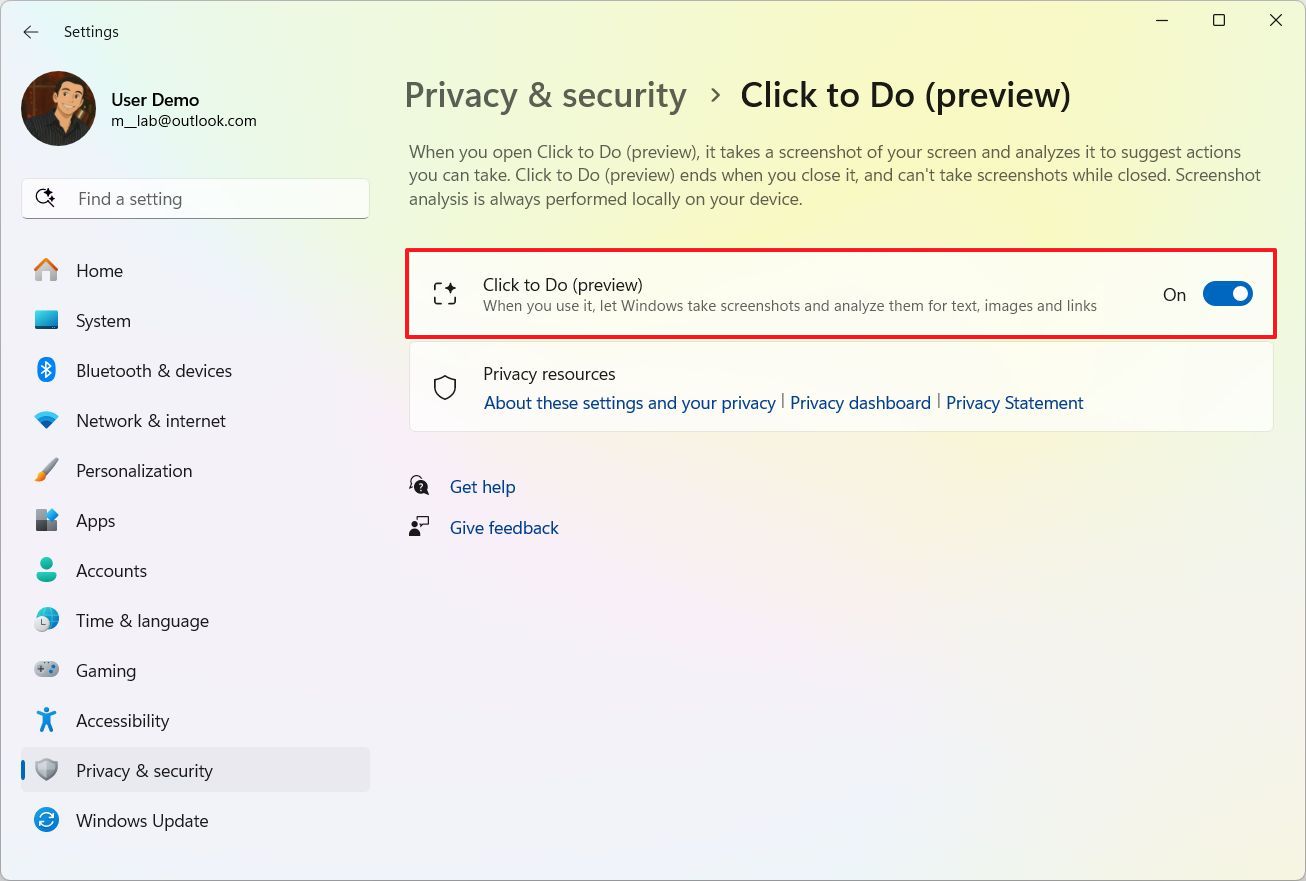
- (Option 2) Turn off the “Click to Do” toggle switch to disable it.
Access Click to Do
To access Click to Do from outside of Recall, use these steps:
- (Option 1) Open Start, search for Click to Do, and click the top result.
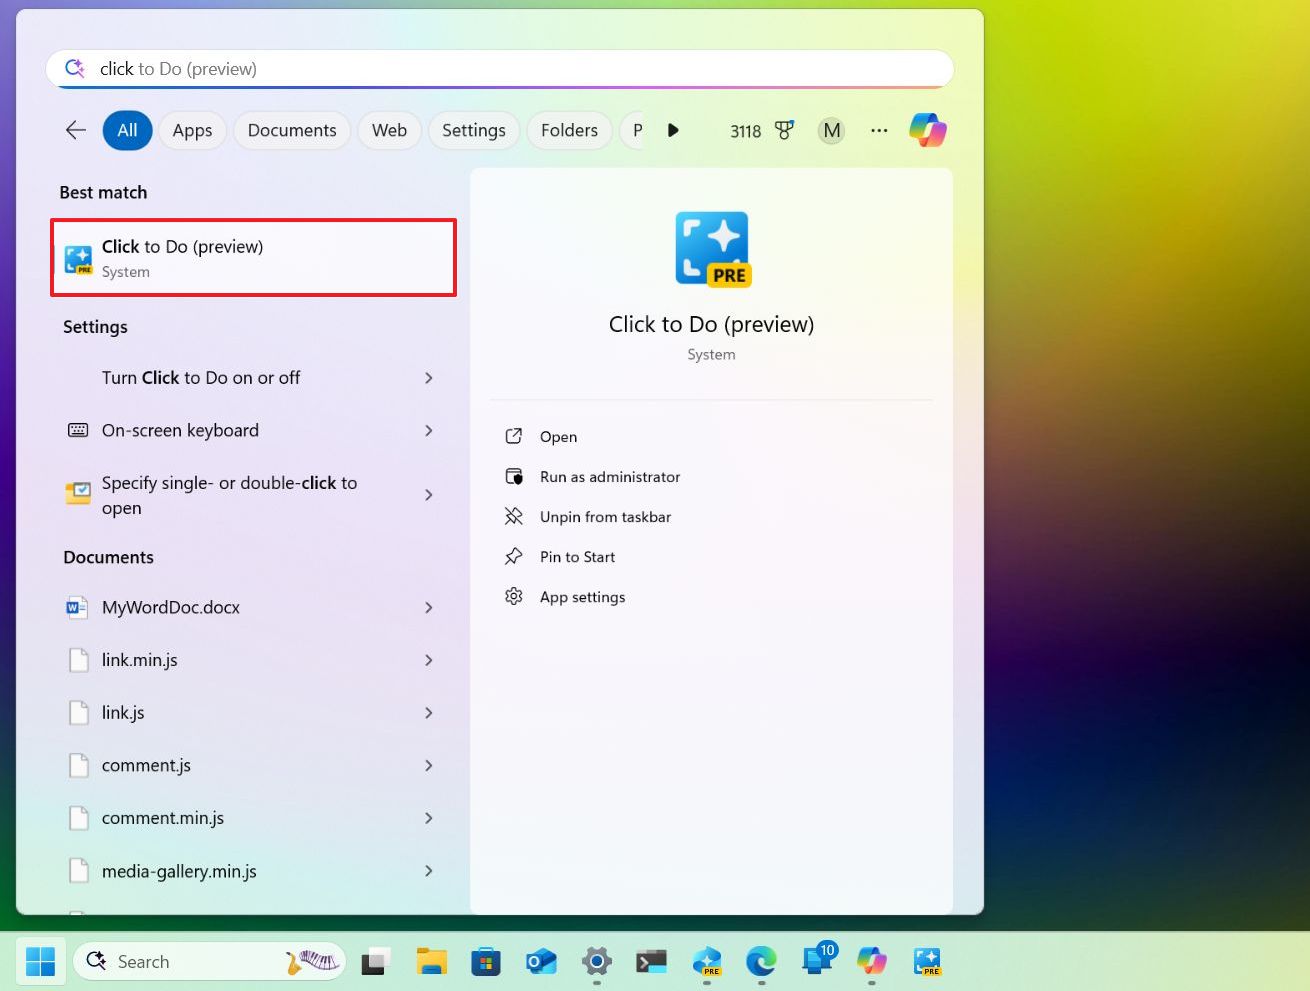
- (Option 2) Invoke the “Windows key + Mouse click” shortcut anywhere on the screen to open the app.
- (Option 3) Invoke the “Windows key + Q” shortcut to launch the app.
- (Option 4) Open Click to Do from the Snipping Tool toolbar.
When launching the experience, the feature will produce a wobbling visual effect around the screen, and then the toolbar will appear.
You can use the search box to find a specific text or object using natural language, but you can always select and right-click the text or an image to unveil the different actions.
For example, if you select text, the context menu will include the following options:
- Copy.
- Open with.
- Search the web.
- Ask Copilot.
- Summarize.
- Create a bulleted list.
- Rewrite.
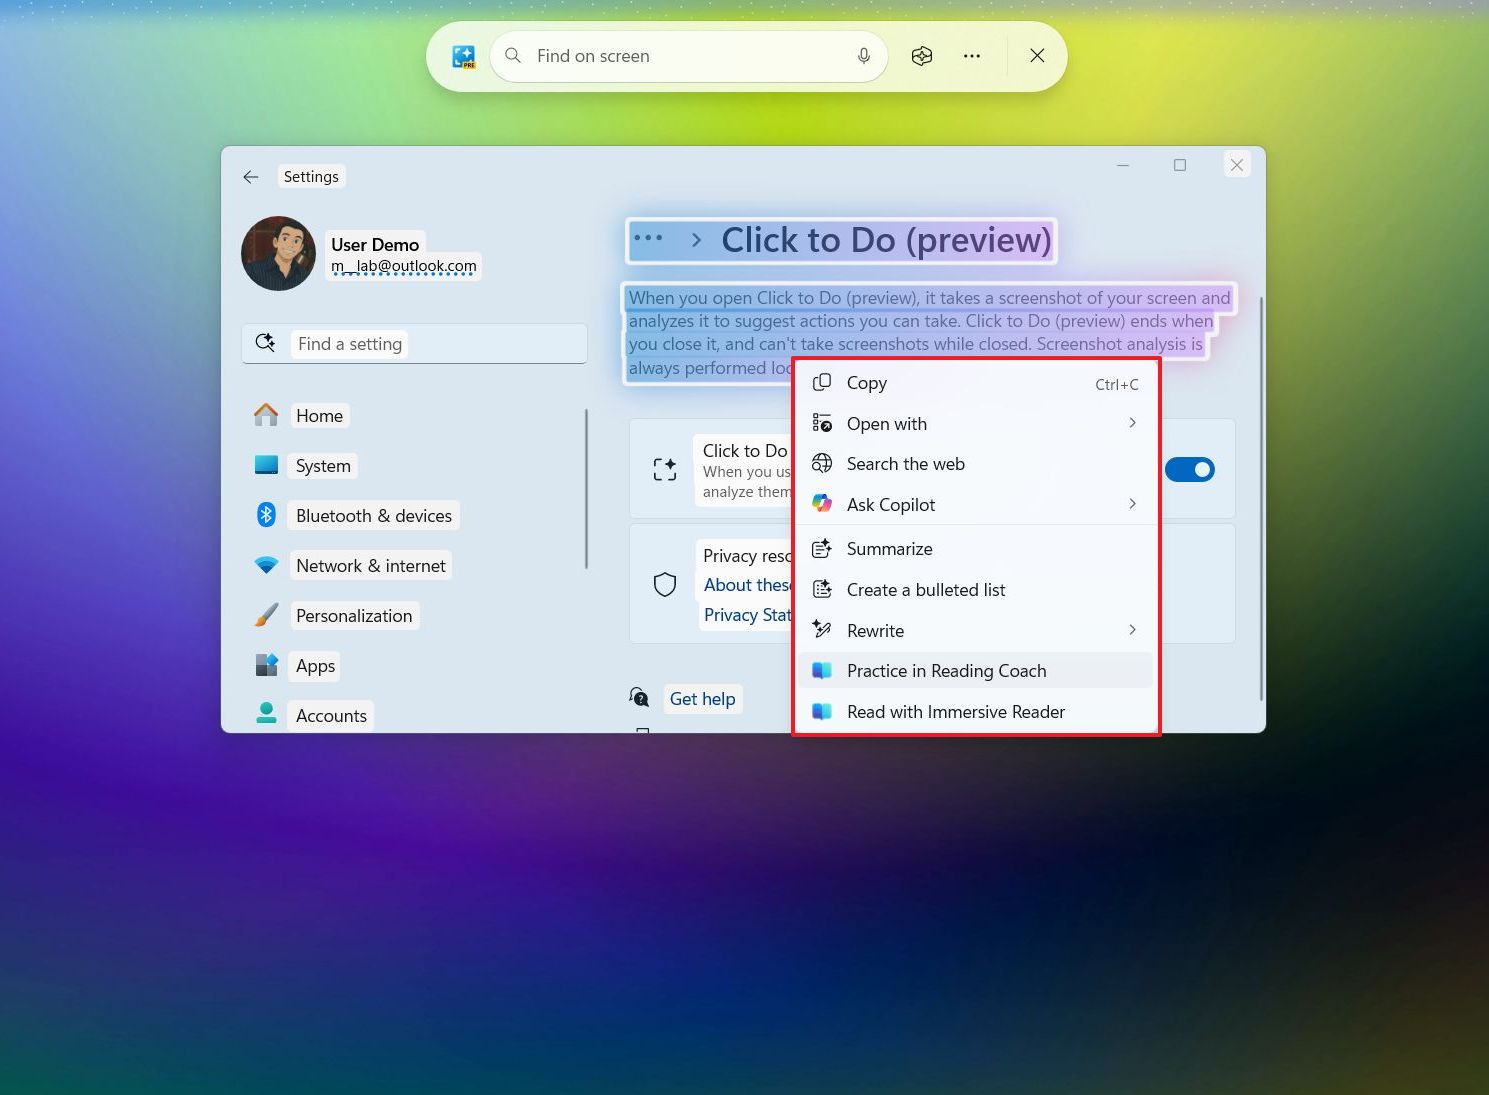
If you have the “Reading Coach” app installed, then you can access the “Immersive Reader” and “Reading Coach” features.
If you’re selecting a web link, then you’ll find the “Open website” option.
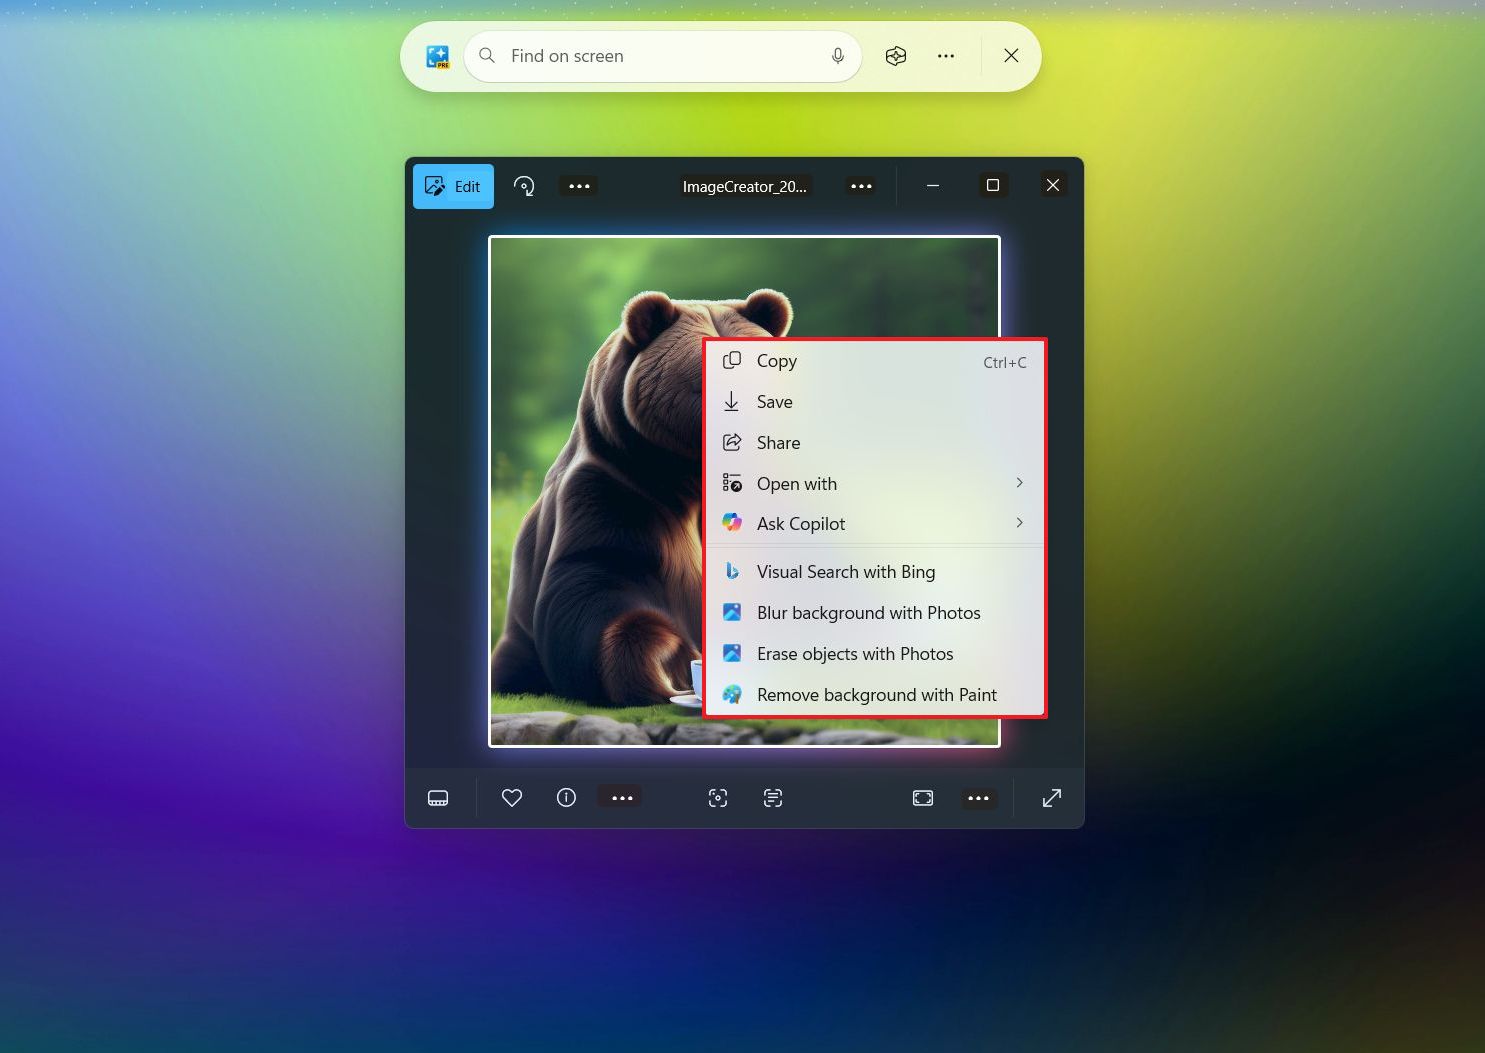
In the case that you right-click on an object, the context menu will include these options:
- Copy.
- Save as.
- Share.
- Open with.
- Ask Copilot.
- Visual search with Bing.
- Blur background with Photos.
- Erase objects with Photos.
- Remove background with Paint.
You can also use Click to Do inside the Recall app and refer to the previous steps to access the feature.
What’s new for Windows Search
Microsoft is also introducing Semantic Indexing to bring AI to the Windows Search feature.
Semantic Indexing is a feature part of Windows Search that uses Natural Language Processing (NLP) with AI to make sense of your query as if you were asking another person, allowing you to search and find files, settings, and other content using conversational language.
It’s important to note that Semantic Indexing doesn’t replace Windows Search. Instead, it’s just another feature of the search experience.
This allows you to continue to search using keywords, but now, you can also describe what you’re looking for without specifying anything specific about the file, for example.
Access Semantic Indexing
To use Windows Search with Semantic Indexing, use these steps:
- Open Start or Windows Search from File Explorer.
- Click on the search box.
- Compose your search query using natural language. For example, show me the picture I created with AI about a bear drinking coffee.

It’s important to note that Semantic Indexing will show results of images stored in the cloud as well as from files stored locally on the computer.
Furthermore, exact matches for your keywords within the text of your cloud files will also appear in the search results.
Semantic Indexing is available in the search box in the Start menu, on the Windows Search home page, in the search box from the Taskbar, in the search box for File Explorer, and in the search experience for the Settings app.
You will notice that the AI feature for Windows Search is available because of the colorful new search icon that includes two starts and a new colorful underline in the search box interface.
Change search settings
To improve the search experience, Microsoft recommends to enable the “Enhanced” option:
- Open Settings.
- Click on Privacy & security.
- Click the Searching Windows page on the right side.
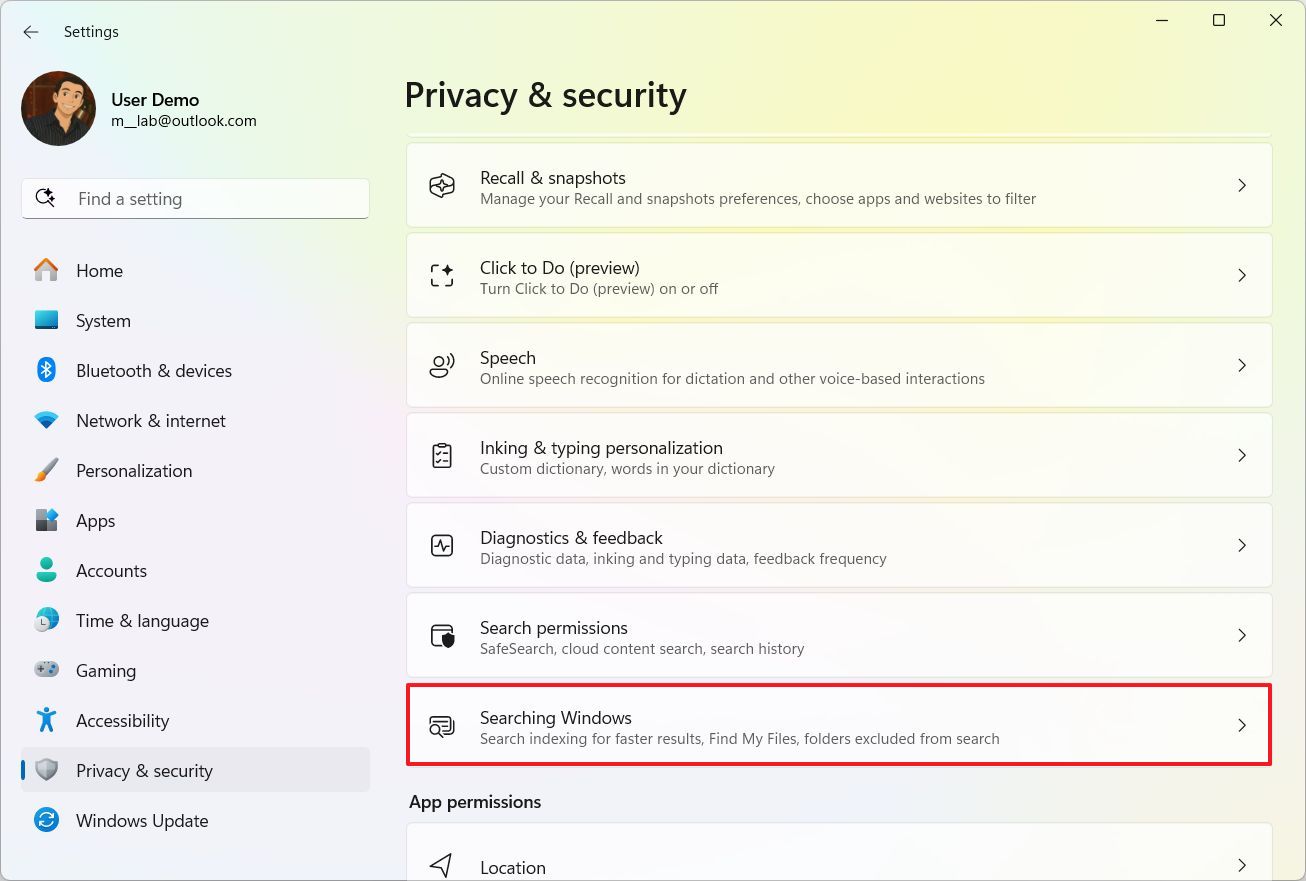
- Click the “Find my files” setting.
- Select the Enhanced option.
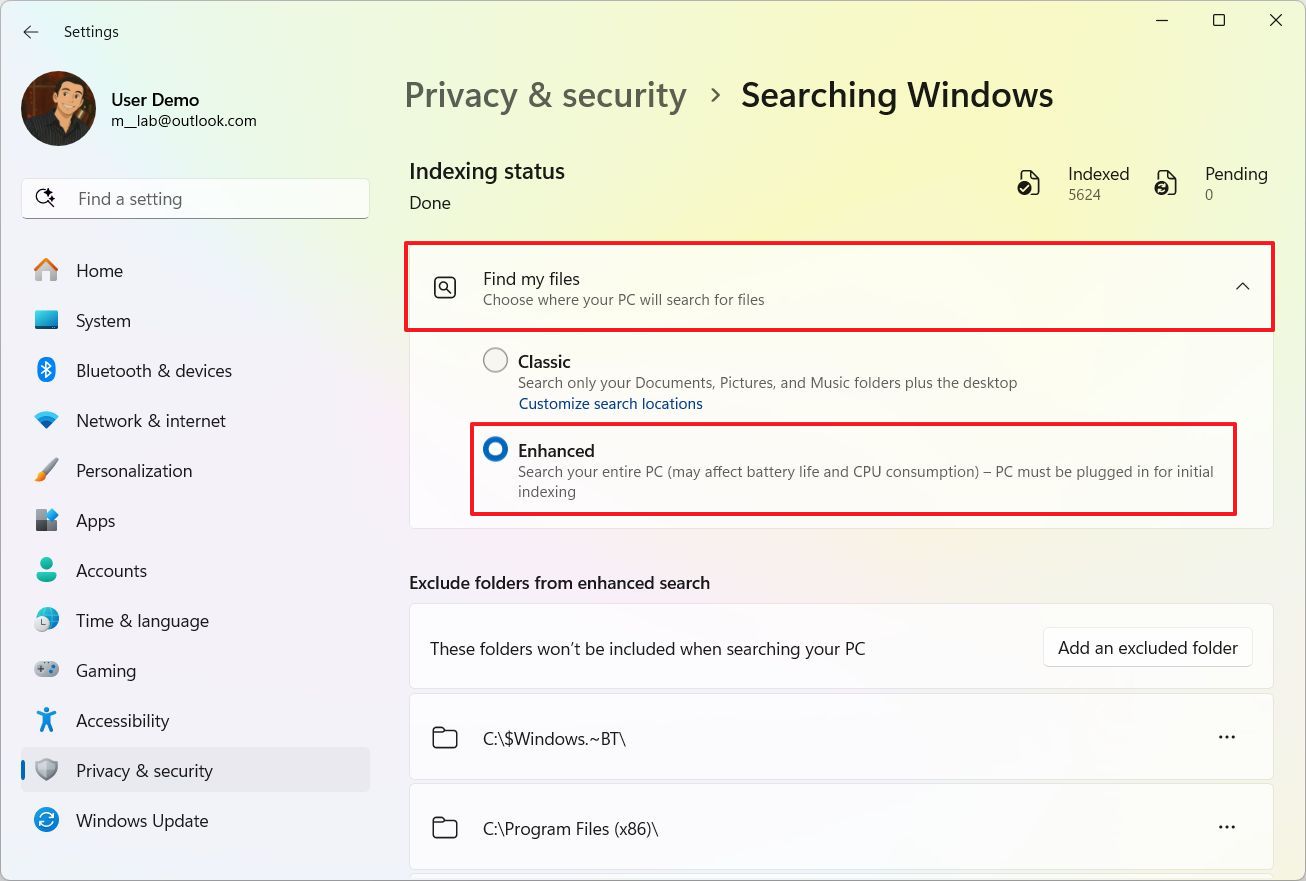
Once you complete the steps, the search results should be more accurate.
System requirements
Windows Recall, Click to Do, and Semantic Indexing for Windows Search are exclusive for Copilot+ PCs, meaning that they’re not available for existing laptops and desktops without a Neural Processing Unit (NPU).
A Copilot+ PC usually includes these minimum hardware requirements:
- Processor: ARM or x86 CPU with NPU (40 or more TOPS).
- Memory: 16GB or more.
- Storage: 256GB or more of SSD.
- Security: TPM (Trusted Platform Module) 2.0.
If you have an ARM device, it needs to have one of the latest Snapdragon X Series processors from Qualcomm. If you have an AMD or Intel-based device, then it needs to have one of the Ryzen AI 300 Series or Ryzen AI PRO 300 & AI Max PRO Series chips, and on Intel, the device has to have one of the Core Ultra 200V Series processors.
Get the AI features
If you have a Copilot+ PC, you can download and enable Windows Recall, Click to Do, and Semantic Indexing now with the latest preview of the May 2025 Security Update, which Microsoft currently defines as the April 2025 non-security update.
To update your system manually, use these steps:
- Open Settings.
- Click on Windows Update.
- Turn on the “Get the latest updates as soon as they’re available” toggle switch.
- Click the “Check for updates” button.
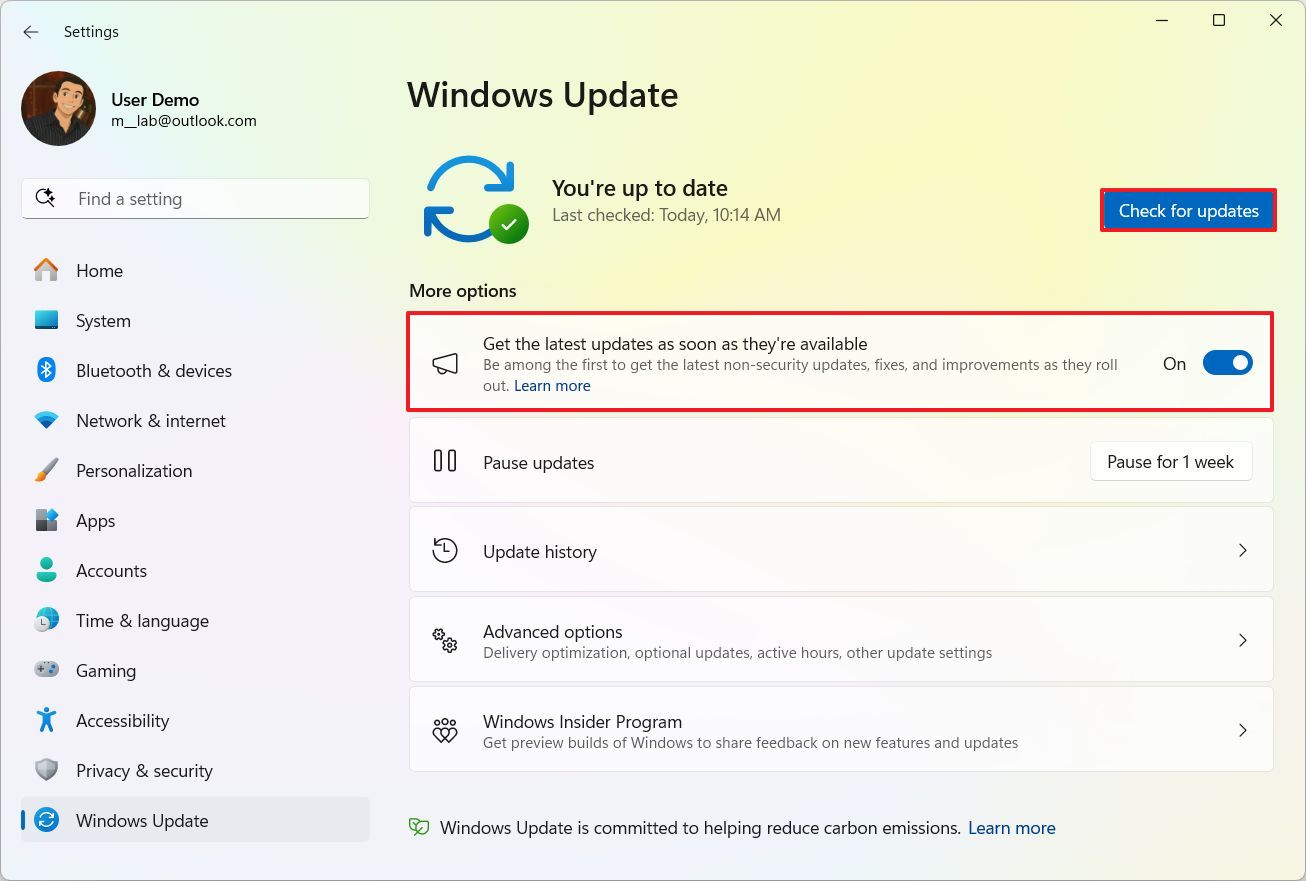
Once you complete the steps, the system should download and install the updated KB5055627, which contains the new features.
It’s important to note that Microsoft is rolling out these features gradually, and even after installing the update, it may take some time for you to access them.
Also, initially, these features will only be available in some markets. However, Recall and Click to Do are not expected to arrive in the European Economic Area until later in 2025.
Finally, these three features are currently only optimized for English, Chinese (Simplified), French, German, Japanese, and Spanish.
More resources
Find in-depth guides, troubleshooting tips, and the latest updates on Windows 11 and 10 here:


