Summary
- The best way to free up RAM is to close unused apps. You should also prevent these apps from running in the background so they don’t consume RAM.
- Another way is to adjust your startup apps and restart your PC.
- Other ways include fixing memory leaks, enabling Efficiency Mode, scanning the PC for malware, using lightweight apps, and increasing virtual memory.
If your Windows 11 PC occasionally lags or freezes up, it could be due to the lack of enough RAM (Random Access Memory). You can take a few steps to free up the available RAM space, and I’ll show you how.
Close Unused Apps to Free Up RAM
The easiest way to free up RAM on Windows 11 is to close unwanted apps. All the running apps consume your RAM, leaving less RAM available for other programs.
You can close your apps by simply clicking “X” in the app window’s top-right corner. If you want to see the apps using the most amount of RAM (so you only close those apps), launch Task Manager by right-clicking the Windows taskbar and selecting “Task Manager.”
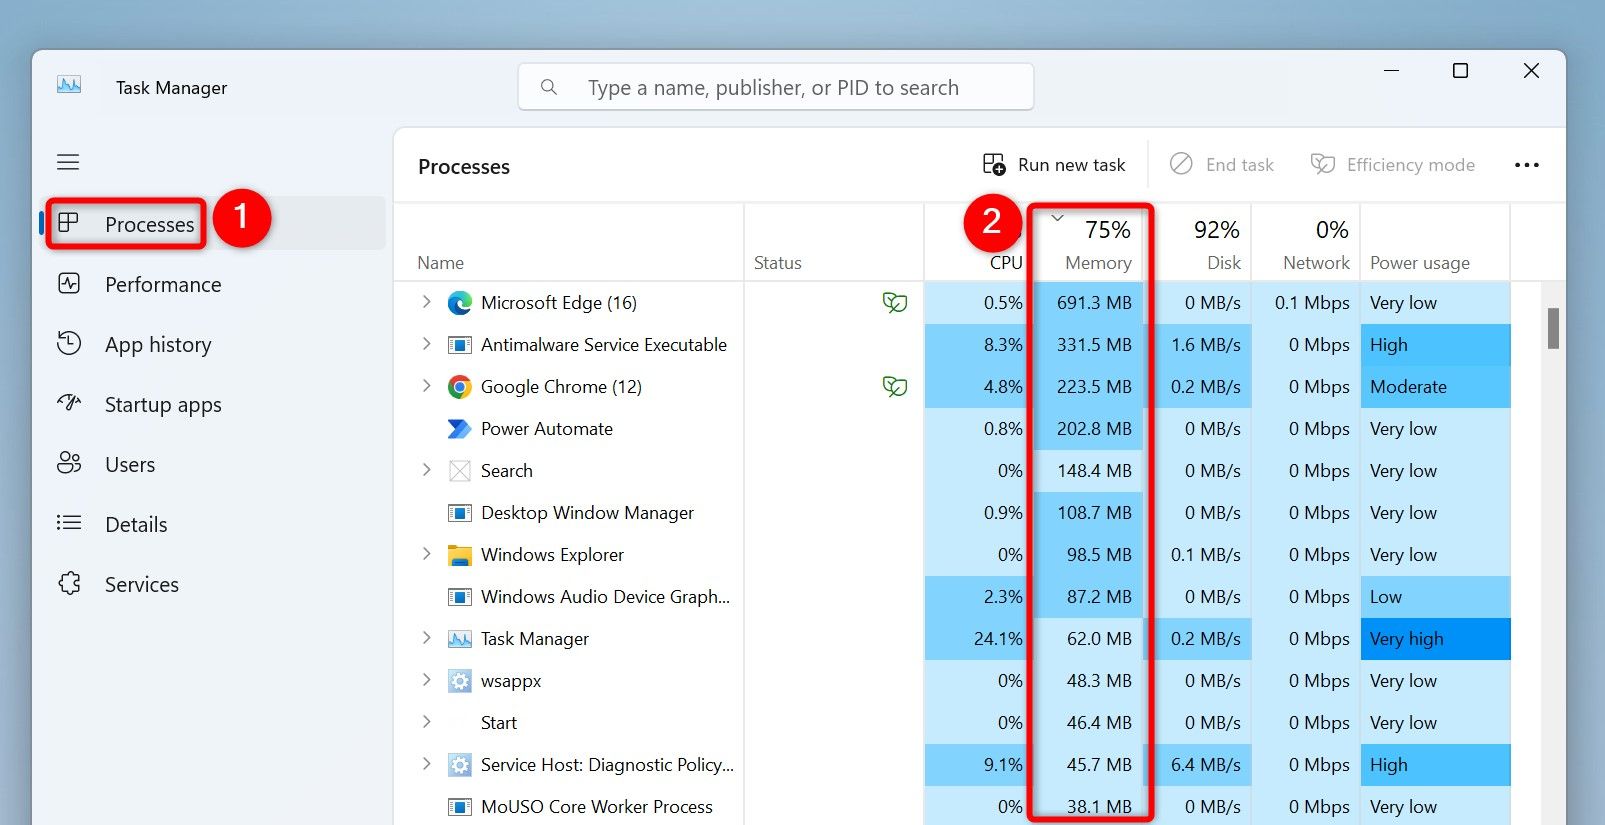
In Task Manager, on the left, click “Processes.” On the right pane, in the Memory column, you’ll see each running app’s RAM usage. You can click this column’s title to sort the apps by their RAM usage.
If you don’t see the Memory column, right-click an existing column and enable “Memory.”
Once you’ve found the unwanted apps using the most amount of RAM, close them how you normally would. If the apps refuse to close, right-click them in Task Manager and choose “End Task” to force-close them.
Restart Your PC to Clear All Contents on RAM
Another way to free up available RAM space is by rebooting your computer. When you turn off your computer, your system clears all the contents stored on the RAM. The system begins to fill up RAM when you turn on your machine.
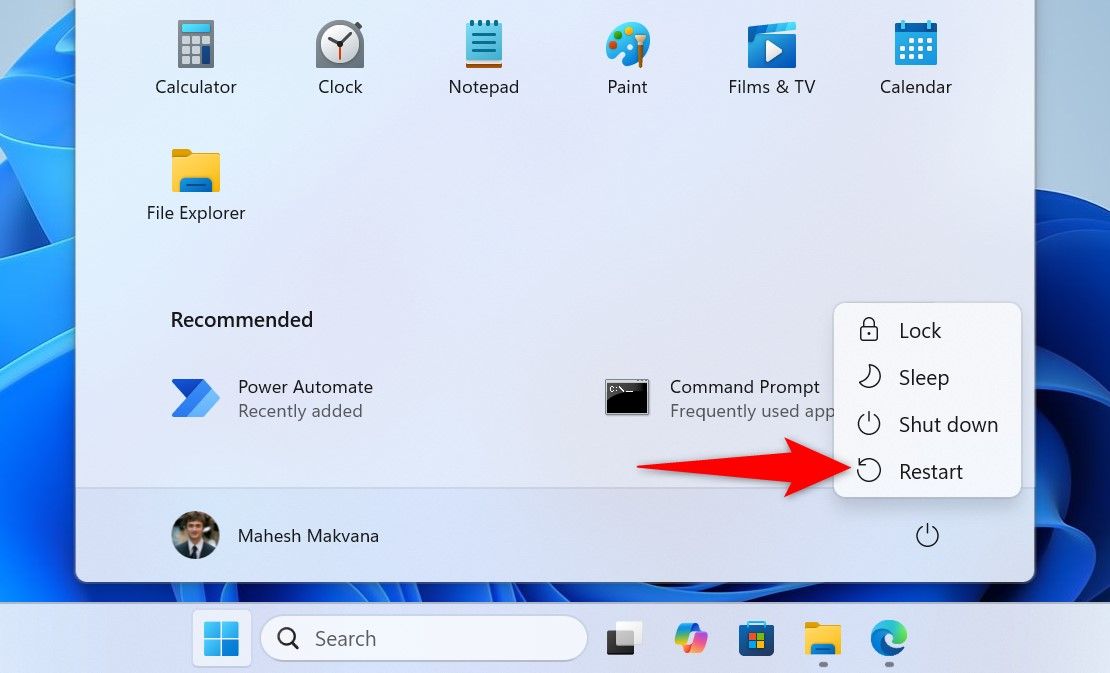
Before you reboot your machine, ensure you’ve saved any unsaved work in your apps. Then, open the Start Menu, click the Power icon, and select “Restart.”
Check Startup Apps and Disable the Unwanted Ones
If your RAM starts filling up as soon as you turn on your computer, one or more of the startup apps might be the culprit. These apps automatically launch on your PC’s boot and start consuming your machine resources, including RAM.
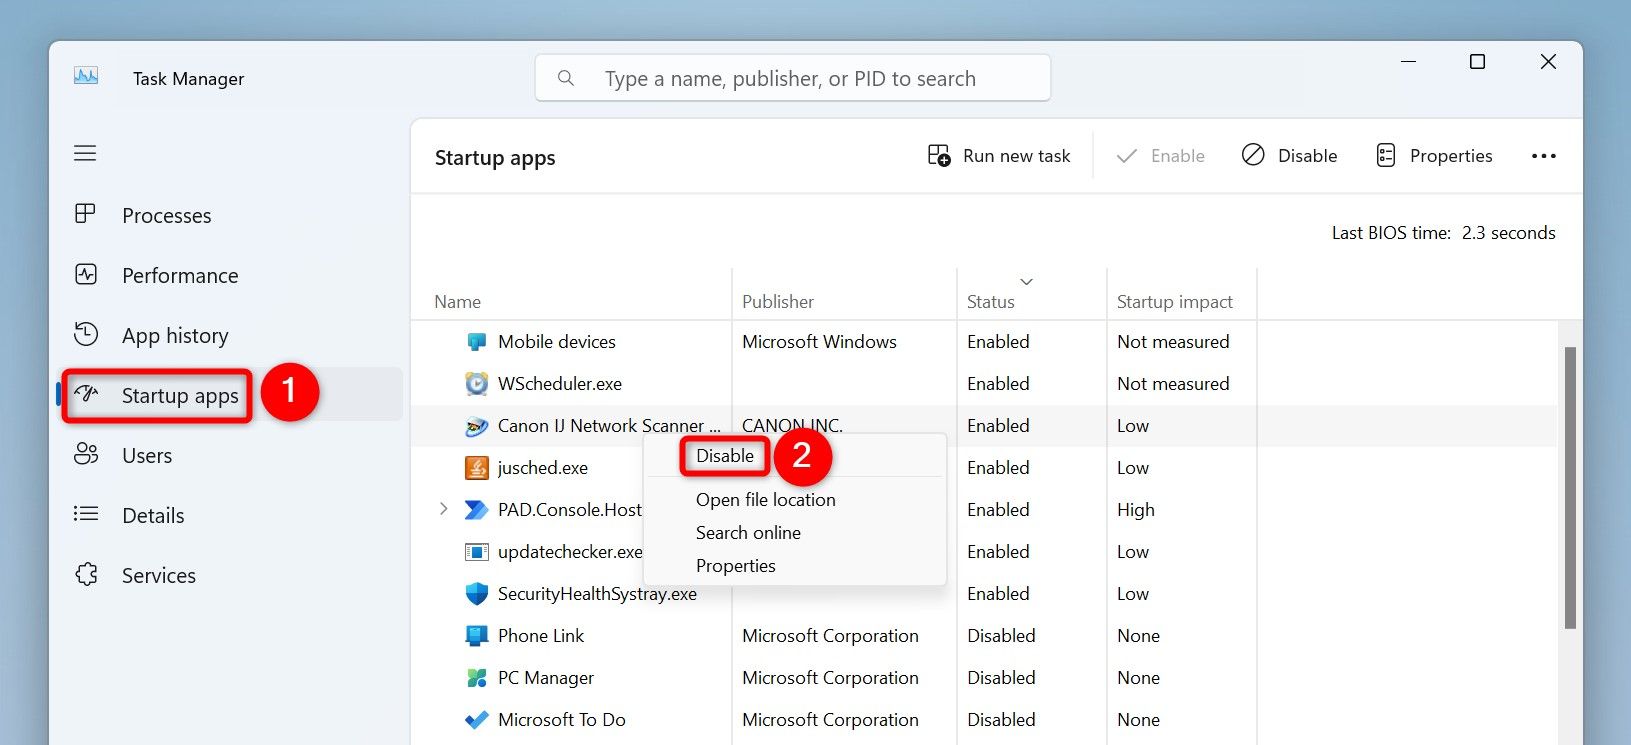
To fix that, review your startup apps list. Open Task Manager by right-clicking the Windows taskbar and choosing “Task Manager.” On the left, select “Startup Apps.” On the right, each app whose Status column says Enabled automatically opens on your computer’s boot.
To prevent an app from automatically launching when you turn on your computer, right-click that app on the list and choose “Disable.” Do this for all the apps you don’t want automatically launching.
Find Memory Leaks With Performance Monitor
If your PC continues to run out of RAM, your system might be experiencing memory leak problems. In this case, use a built-in tool to detect those issues.
To do that, open the Run dialog box by pressing Windows+R. Type the following in the box and select “OK” or press Enter:
perfmon
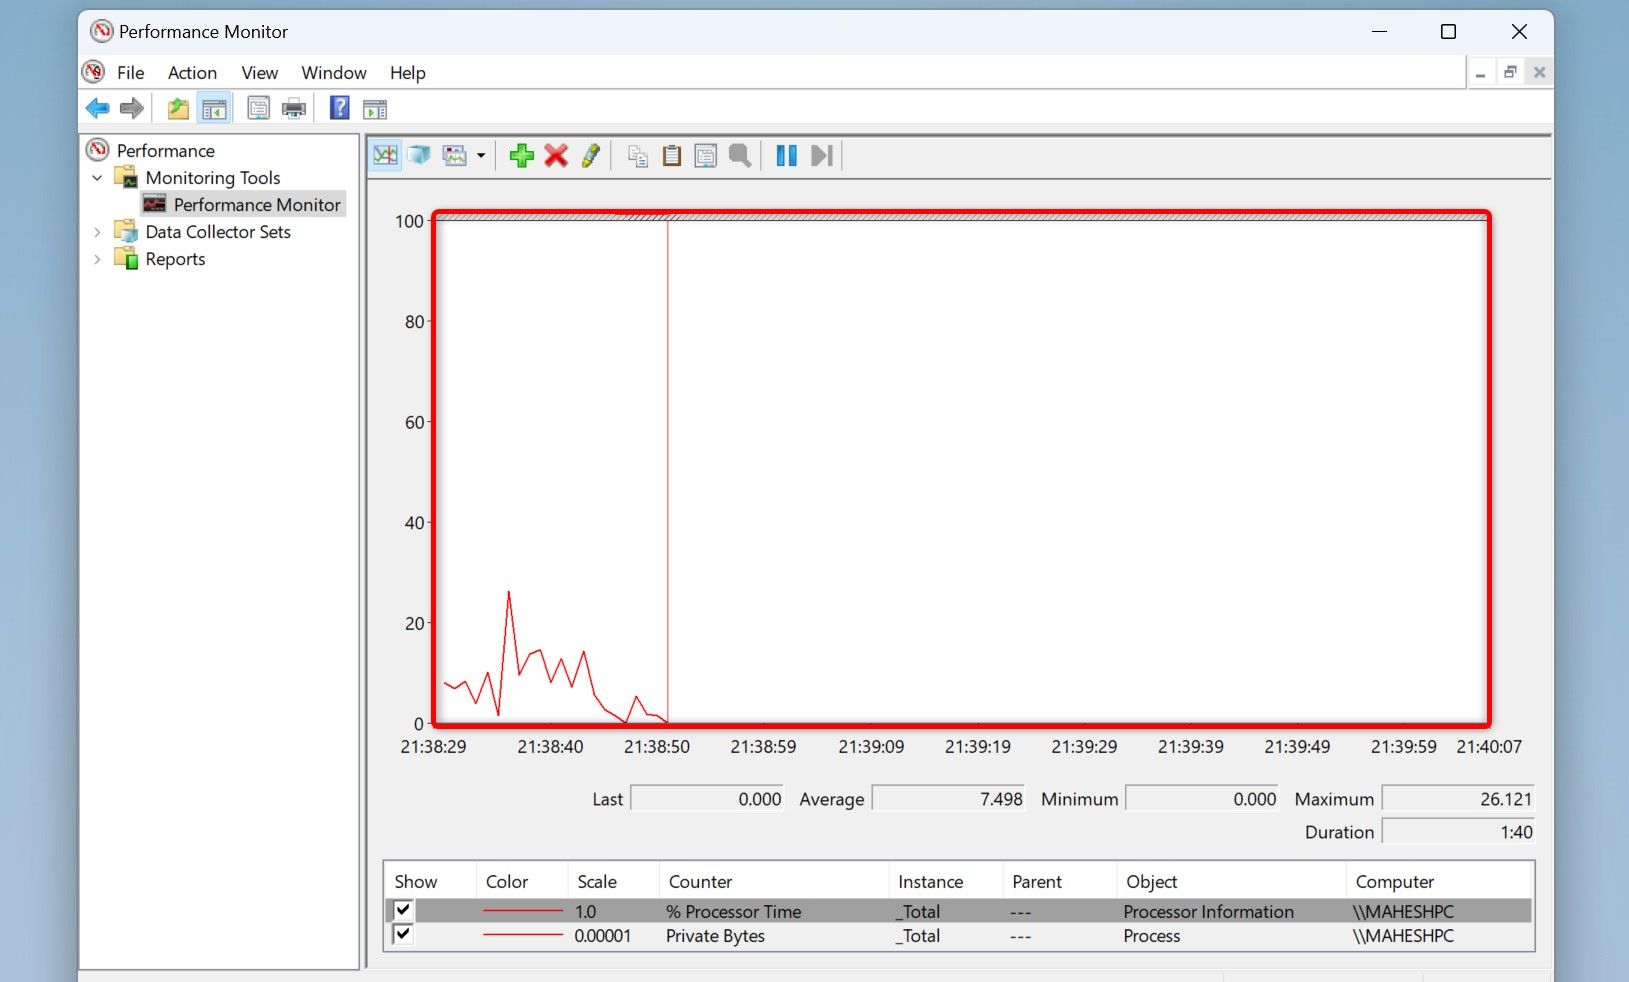
In the left sidebar, navigate to Monitoring Tools > Performance Monitor. Click “Add” or press Ctrl+N and add Process > Private Bytes. Choose “OK.” Back on the main screen, check if an app’s memory usage keeps going but never down.
If the memory usage is high even though the app is in idle mode, the app likely has a memory leak. In this case, update the app if an update is available. Try uninstalling and reinstalling the app to see if that fixes the issue. If the problem persists, use an alternative to this app.
Prevent Apps From Running in the Background
Some apps run in the background even when you aren’t using them. These apps might be eating into your RAM, causing your system to run out of RAM space. In this case, prevent these apps from functioning in the background.
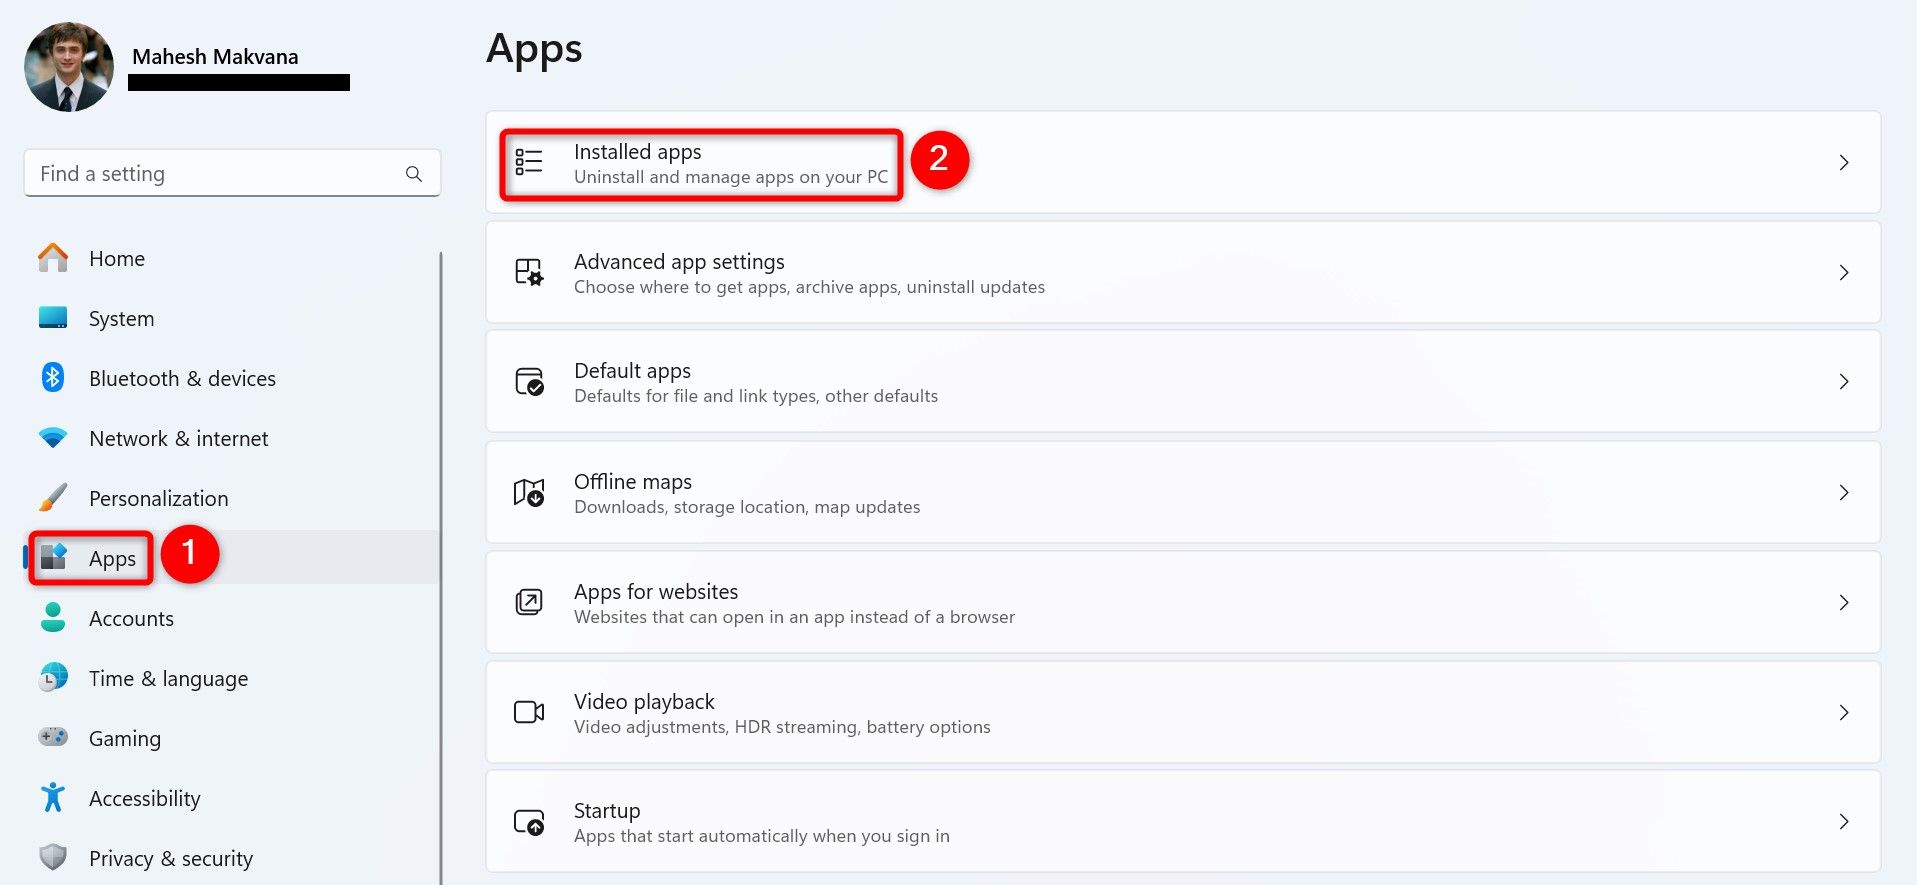
To do that, launch Settings by pressing Windows+i. From the left sidebar, choose “Apps.” On the right pane, select “Installed Apps.”
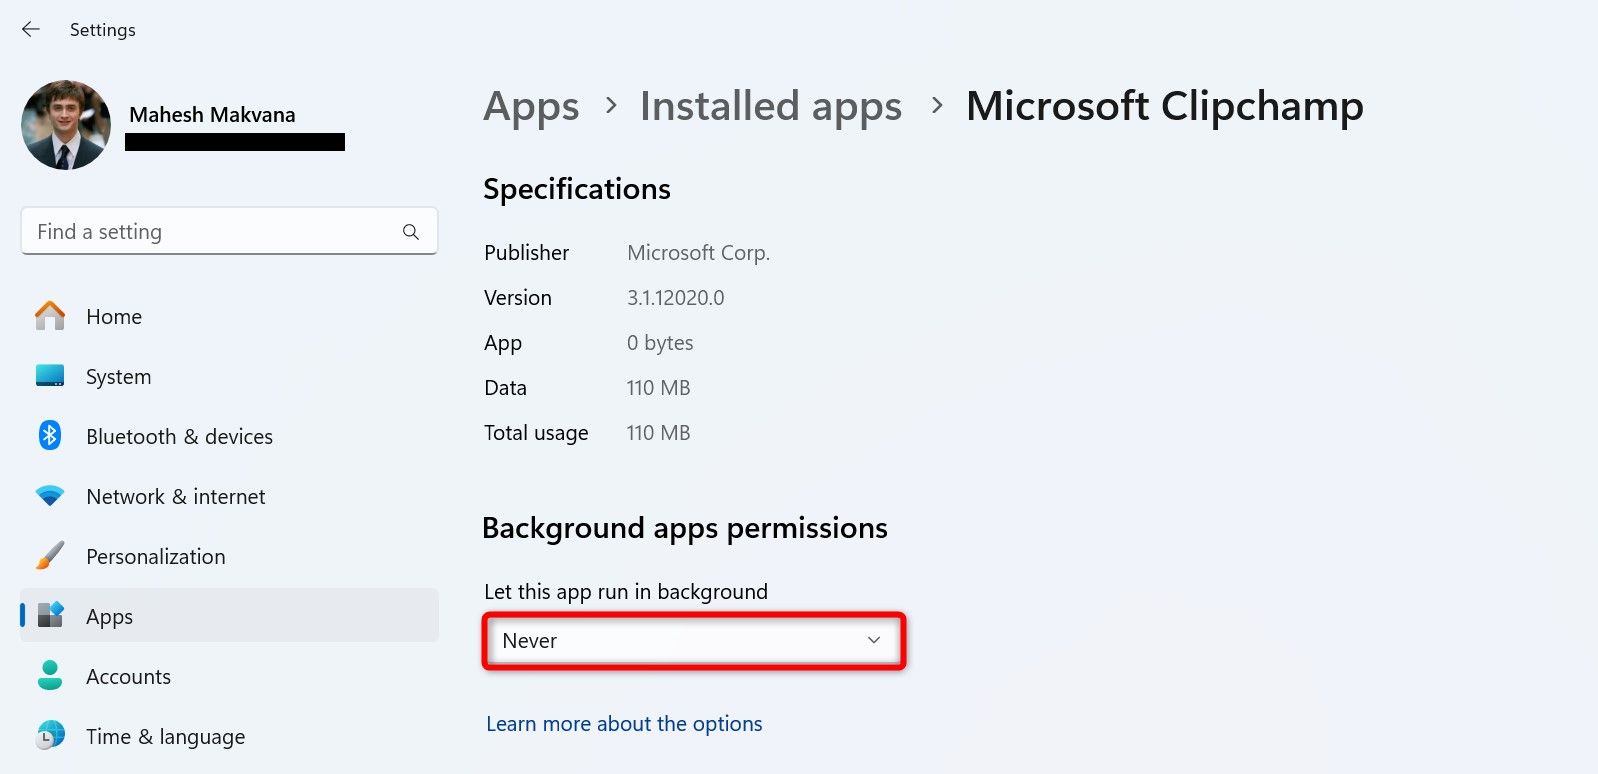
Find an app that runs in the background. Next to the app, click the three dots and choose “Advanced Options.” On the following screen, click the “Let This App Run in Background” drop-down menu and choose “Never.”
Repeat the above step for each app you don’t want to allow to run in your system’s background.
Related
How to Disable Background Apps in Windows 11
Disable Background Apps on your Windows device and enhance its speed and performance.
Use Efficiency Mode for Your Apps
Windows 11 includes an Efficiency Mode that allows you to free up RAM without closing your apps. This mode prioritizes the RAM usage for your active apps.
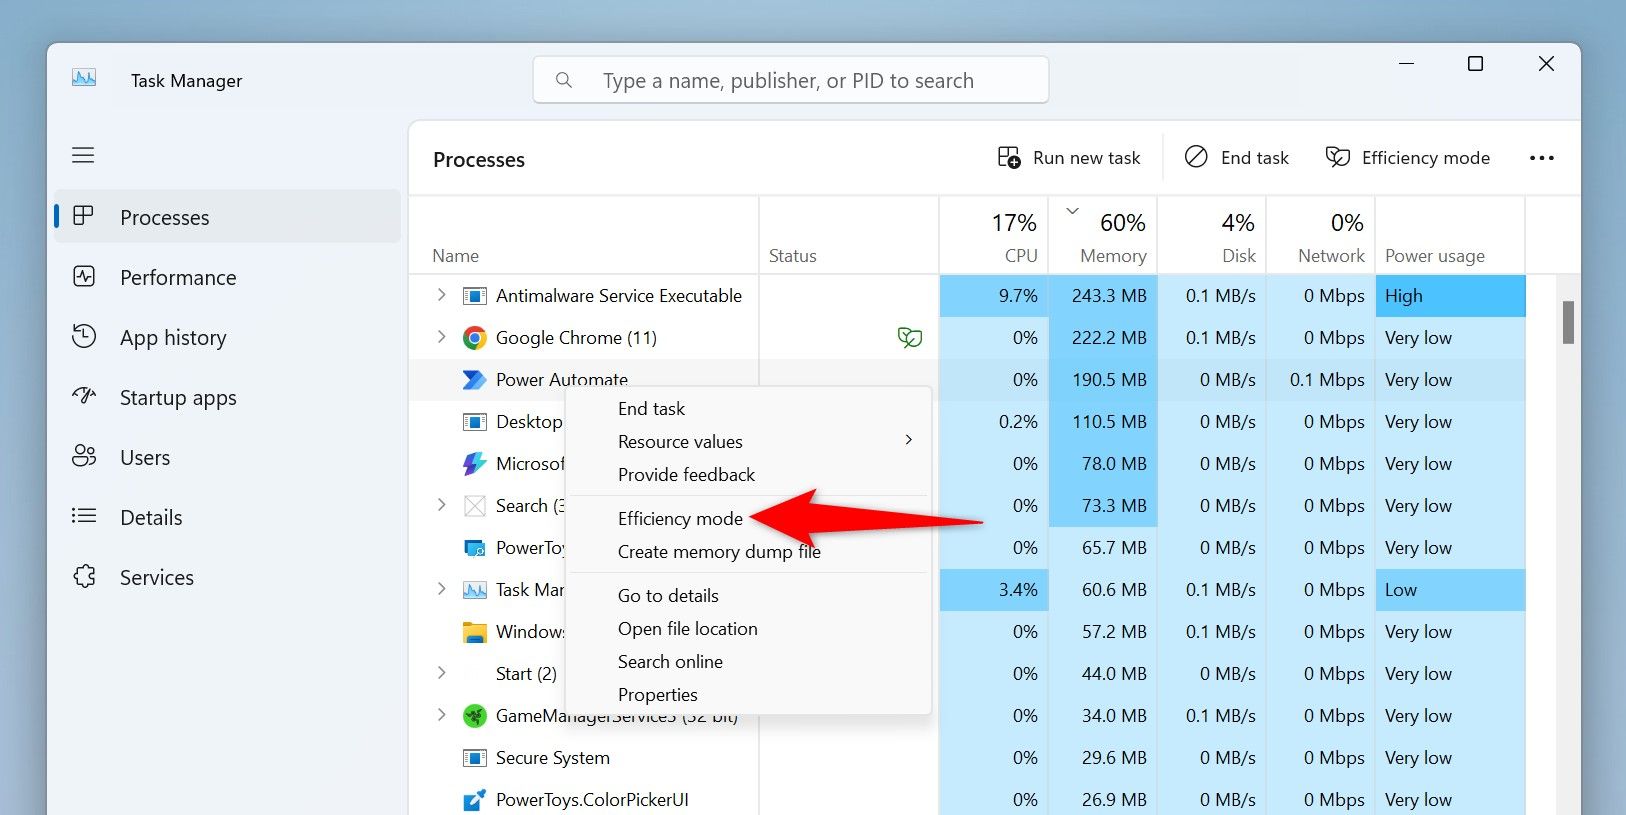
To enable that mode, launch Task Manager by right-clicking the Windows taskbar and choosing “Task Mananger.” Access the “Processes” tab and find the app you want to enable Efficiency Mode for. Right-click the app and choose “Efficiency Mode.”
Later, to turn off Efficiency Mode, right-click your app and select “Efficiency Mode.”
Find and Remove Malware That Might Be Using RAM
Sometimes, malware or viruses that have infected your PC can use your RAM. This can cause a sudden spike in RAM usage, making less RAM space available for other apps to use. In this case, run a malware scan to find and remove any threats from your computer.
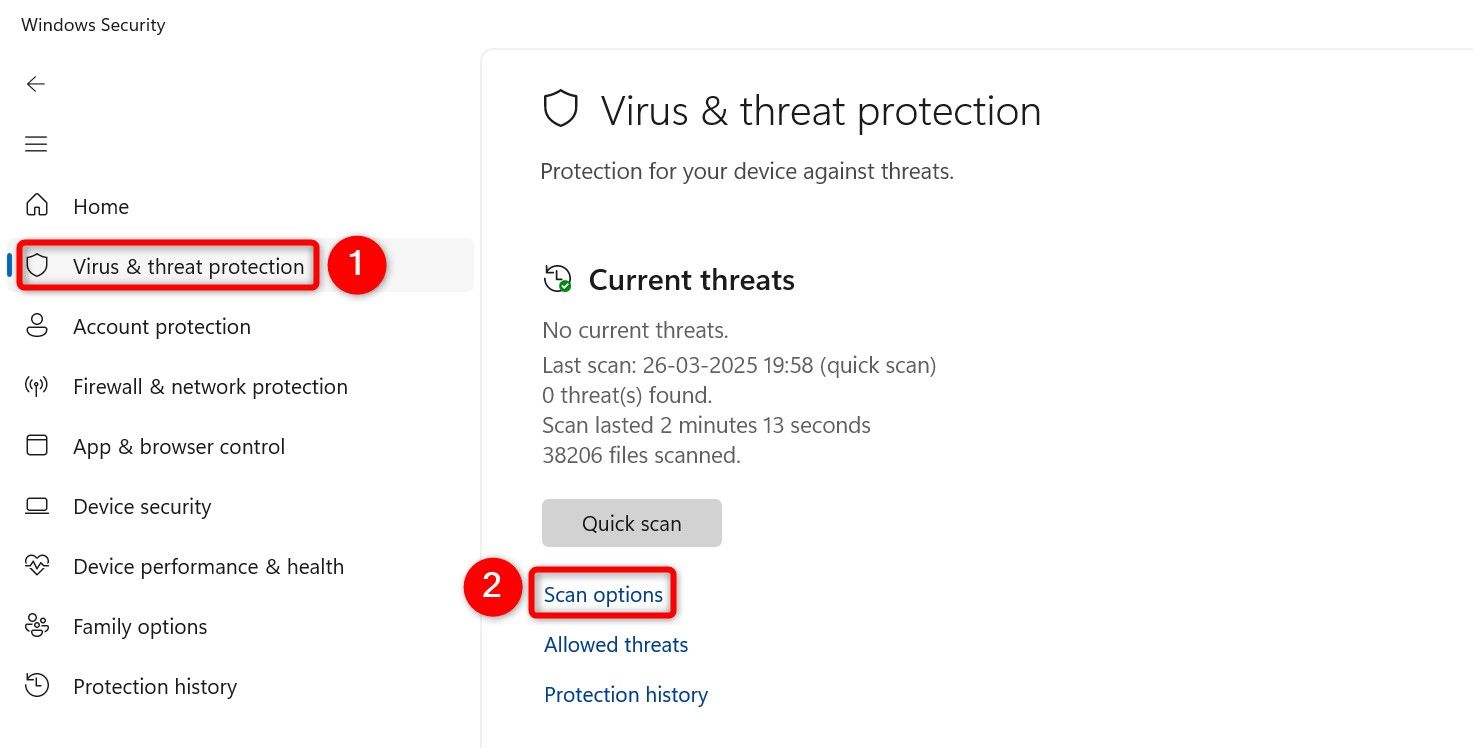
You can choose an antivirus of your choice or the built-in Microsoft Defender Antivirus to do that. To use the latter, launch Windows Search (press Windows+S), type Windows Security, and open the app. Select “Virus & Threat Protection” in the app and choose “Scan Options.”
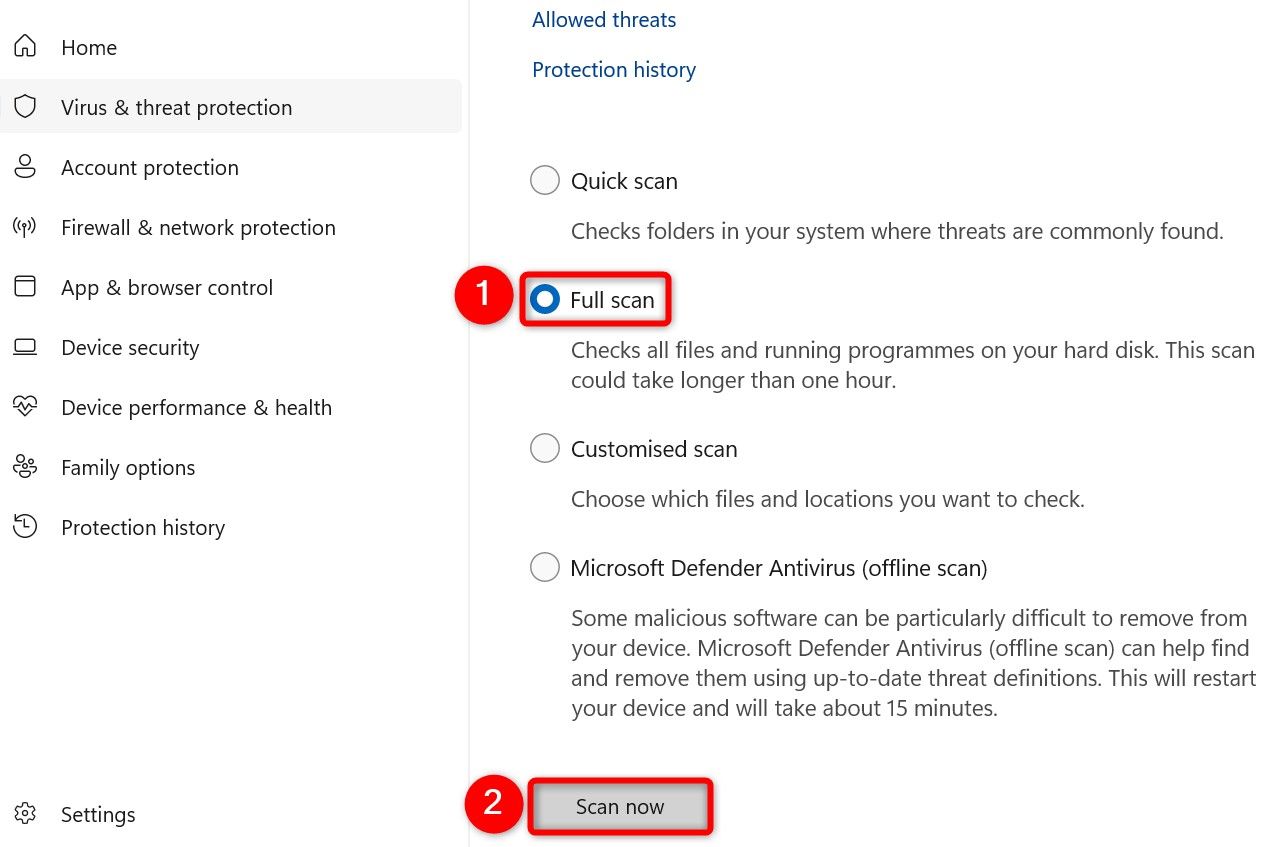
Enable the “Full Scan” option and choose “Scan Now.”
Wait while Windows Security finds and removes any viruses and malware from your computer. When that’s done, restart your PC.
Use Lighter Alternatives of Your Favorite Apps
Some programs use a lot of RAM, and you can switch to their lighter alternatives that use less RAM. This means you can get your tasks done while still keeping some RAM freed-up.
For example, Google Chrome is known to be resource-hungry. If this happens to be your primary web browser, you can switch to a lighter alternative like Mozilla Firefox. Similarly, if you use Adobe Photoshop, you can switch to an app like Paint.NET for basic photo editing. These alternatives use less RAM than their main programs.
Increase Virtual Memory to Have More RAM Storage
Virtual memory is the disk space on your computer that Windows 11 uses as RAM storage. This is basically an extension of your physical RAM. You can increase this virtual memory amount to make more RAM available for your apps to use.
To do that, open Windows Search (press Windows+S), type View Advanced System Settings, and choose that item. On the open window, in the Performance section, click “Settings.”
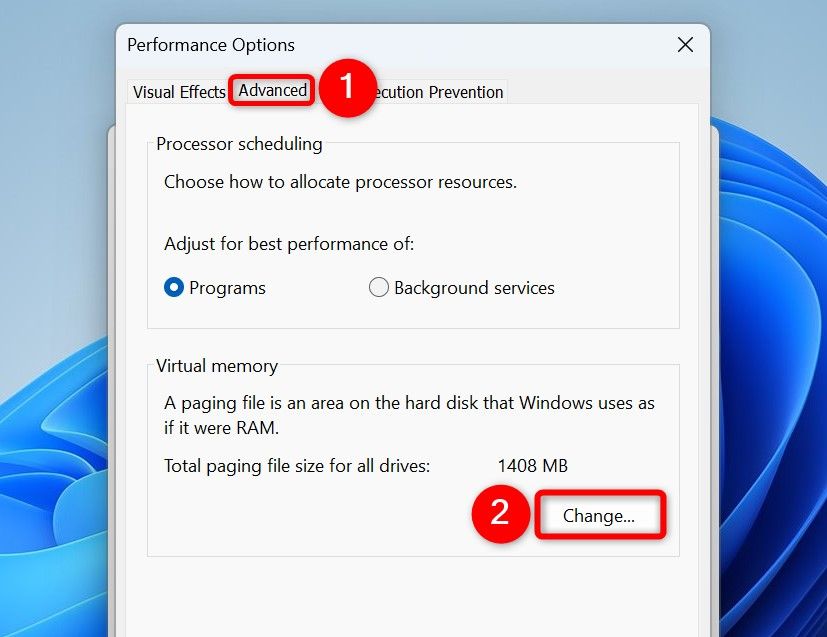
On the Performance Options window, access the “Advanced” tab. In the Virtual Memory section, click “Change.”
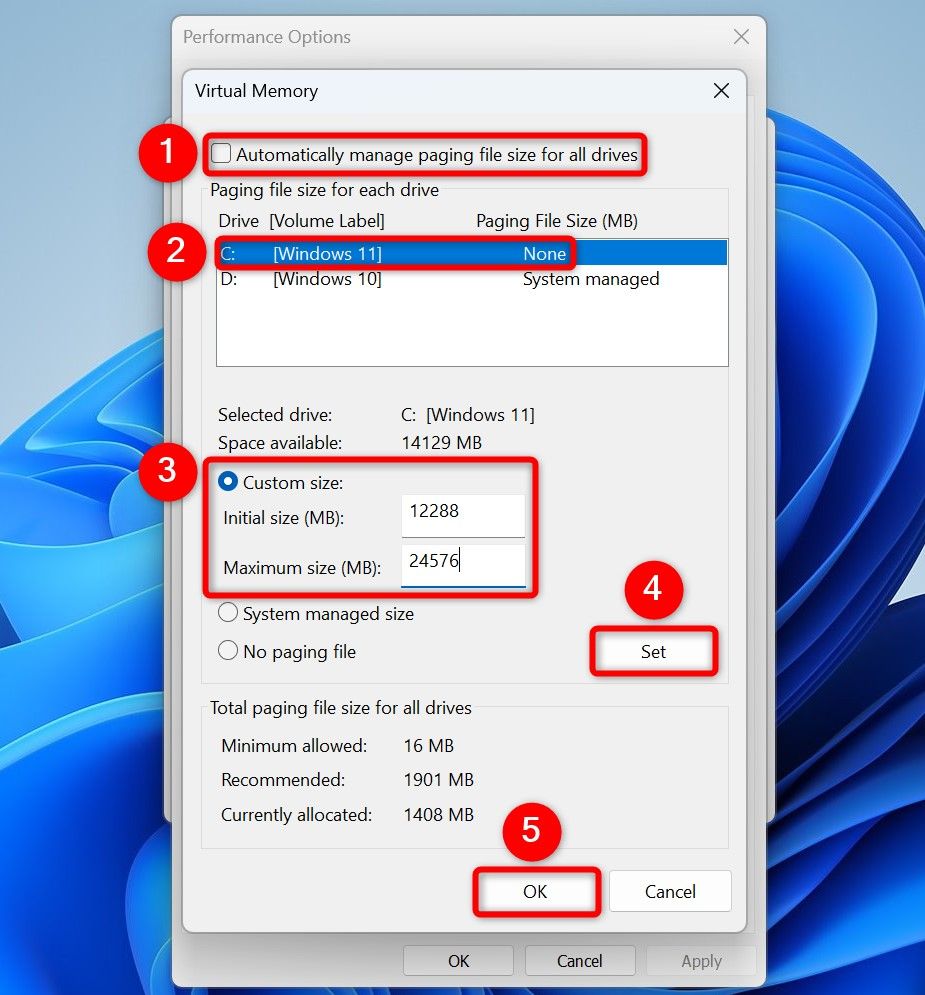
On the Virtual Memory window, at the top, turn off the “Automatically Manage Paging File Size for All Drives” option. Then, choose your Windows installation drive. Enable the “Custom Size” option. Click the “Initial Size (MB)” field and type 1.5x of your current RAM. Select the “Maximum Size (MB)” field and type 3x of your current RAM. Then, click “Set” followed by “Apply” and “OK.”
Restart your computer.
Add More RAM to Your PC
If your machine constantly runs out of RAM, it’s time to add more physical RAM to your PC. Whether this is possible or not depends on your specific configuration.
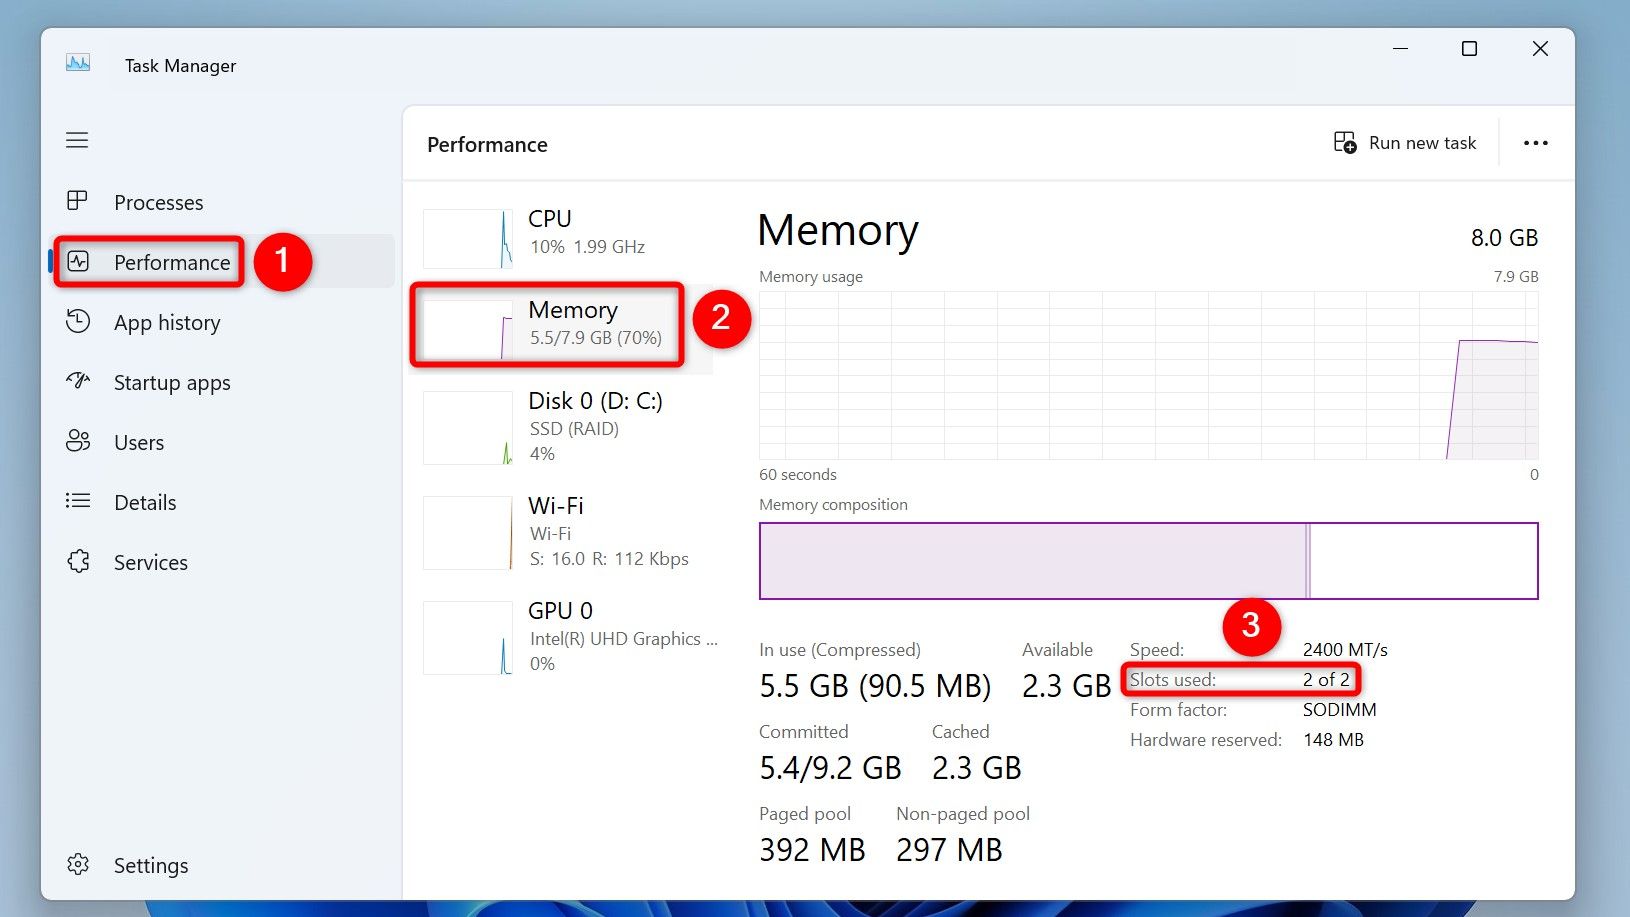
You can check the currently installed RAM information from Task Manager. To do that, right-click the Windows taskbar and choose “Task Manager.” In the left sidebar, click “Performance.” On the right pane, select “Memory.” Next to Slots Used, you’ll see if a slot is available to add more RAM.
If all slots are used, you can still upgrade RAM on your PC. To do that, you can add higher-capacity RAM in the existing slots. For example, if you currently use 4 GB RAM in your slots, upgrade those to 8 GB, and so on.
And that’s how you free up RAM to make your apps and games run smoother on your Windows 11 machine. There are also other ways to speed up your Windows computer.


