

Pages on the Mac has a reputation for being too basic because Apple gives it away for free, but it hides exceptionally powerful word processing features.
This is an exaggeration, but broadly Microsoft Word wants you to be impressed with all of its features — while Apple Pages wants you to get on with your writing and layout. So Pages gets out of your way, and as good as that is, it has an unexpected side effect.
Since you can’t see a ribbon toolbar with dozens of options, and since the menus are not over flowing with choices, you can think Pages lacks features. It is still the case that Microsoft Word has more, but Pages is replete with features that are just a click away.
Creating a new Pages document
This is one part where Apple’s drive for simplicity pays off. Launch Pages and you immediately get an Open dialog which includes a New Document button.
Click that and a blank new document opens up, ready for you to write in.
Pages also comes with templates, pre-designed documents that are laid out nicely for you to write business letters, a resume, a newsletter, and so on. There is no way to choose one of these just when you launch Pages, though.
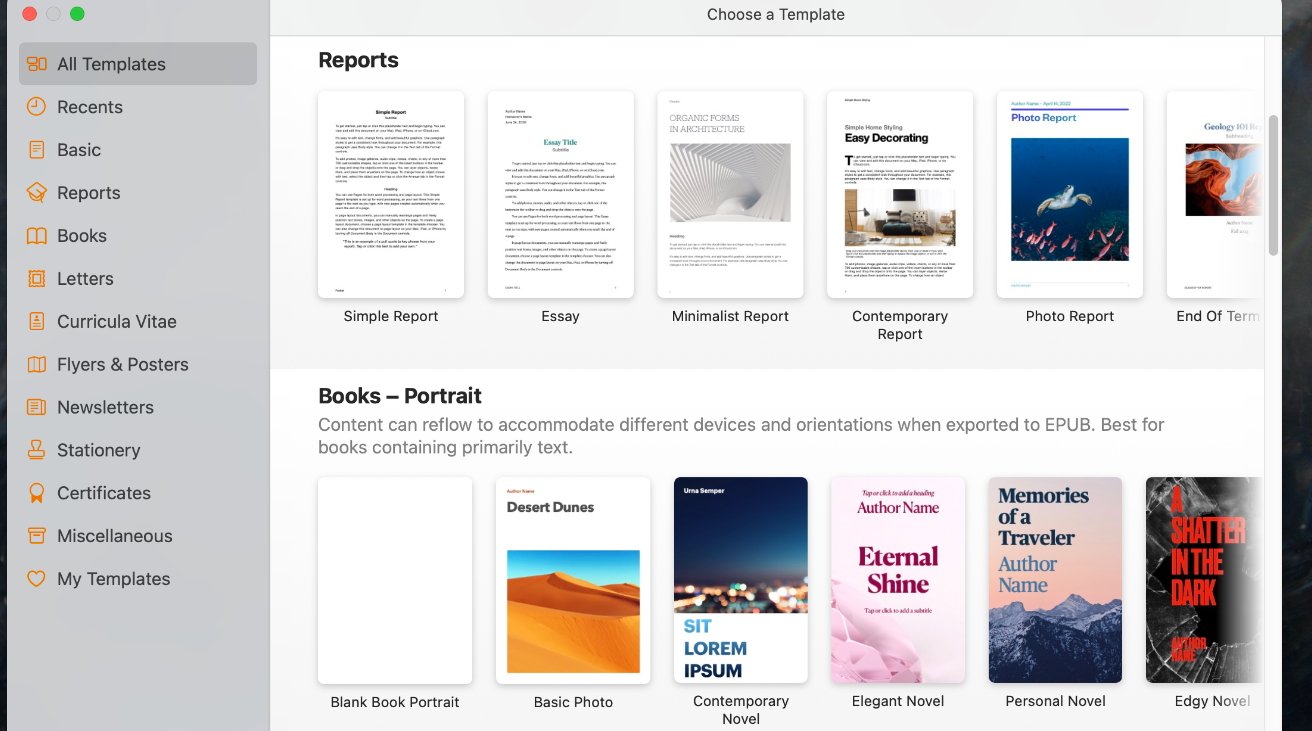
Pages comes replete with predesigned document templates
Instead, you have to have Pages open and then choose the File, New… menu. This gets you a large dialog with very many templates.
The odds are, though, that you’re only going to use one or two of these — if you use any at all. So it can quickly become a pain having to scroll through the Template Chooser before you can start writing.
What you can do, though, is:
- In Pages, choose Pages, Settings
- Make sure the General tab is selected
- Under For New Documents, click on Use Template
That last part sounds wrong — you’re trying to not have to choose a template. But all Pages documents begin with a template, it’s just that one of them is a completely blank document.
So you click to turn on Use Template and then the Change Template… button becomes active. Find the Blank template, or any other you want to usually write in, and then click Choose.
From now on, any time you start a new Pages document, it will immediately be that template and you won’t have to ever see the long Template Chooser again.
Unless you want to.
To briefly use it, go to the File menu and hold down the Option key. The regular New menu option changes to New from Template Chooser….
Opening documents
Pages opens and saves documents in the same way as any other Mac app — but there are wrinkles that are particularly useful, and especially when you’re dealing with Word documents.
To open a Pages document, you can:
- Double-click on the document
- Drag it to the Pages icon in the Dock
- Use File, Open from within Pages
The thing is that each of these can also work if you’re trying to open a Microsoft Word document. Drag any document at all to the Pages icon in your Dock and that icon will darken if Pages can open that type of file.
Double-click on a Word document and except in one specific case, it too will automatically open up in Pages. The one specific case where it won’t is when you already have Word on your Mac, in which case that’s the app that will open.
This is true even if you no longer subscribe to Word but still have the app on your Mac. You won’t be able to edit it, but you can still read it in Word, so that’s the app you get.
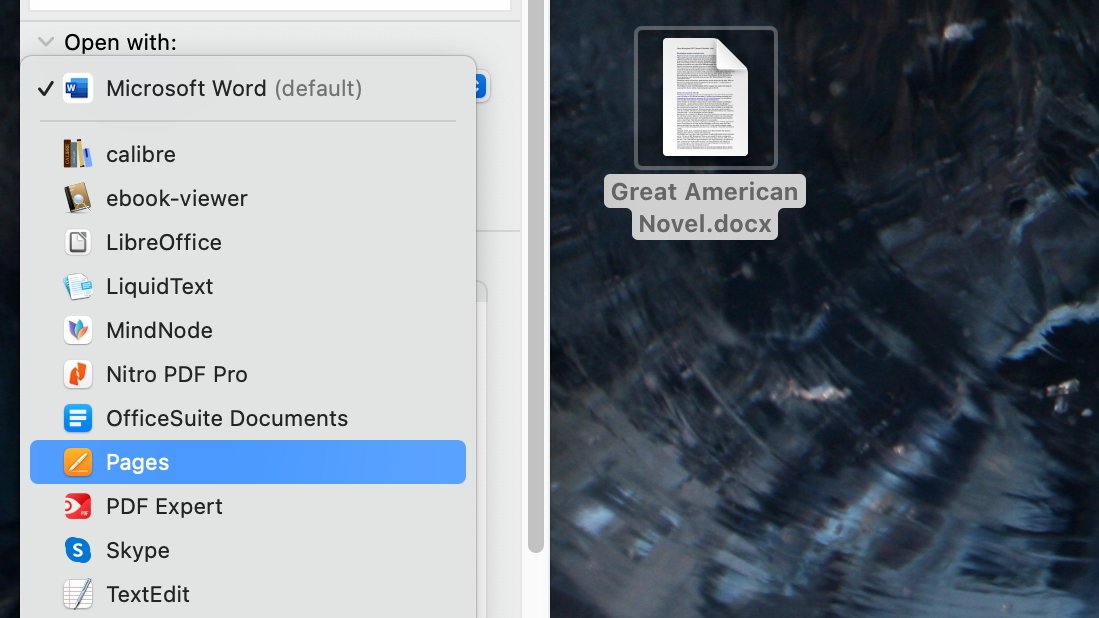
Select just one document and through Get Info, you can say you want all documents of this type opened by Pages
If you need to keep Word around for any reason, you can set the Mac to ignore it and open all such documents in Pages when you double-click them. Find one Word document in the Finder, click once to select it, then press Command-I (I for Information), or choose File, Get Into.
Toward the bottom of the information pane that appears, there is an Open With section. It will say “Microsoft Word (default), but it says that on a drop-down menu that lists every Mac app you’ve got that could conceivably open that file.
Choose Pages from the list, then close the information pane. Now any time you double-click on a Word document, it will open in Pages.
There is one irritating thing, though. Every time you open a Word document in Pages, you will often get a pop-up about it.
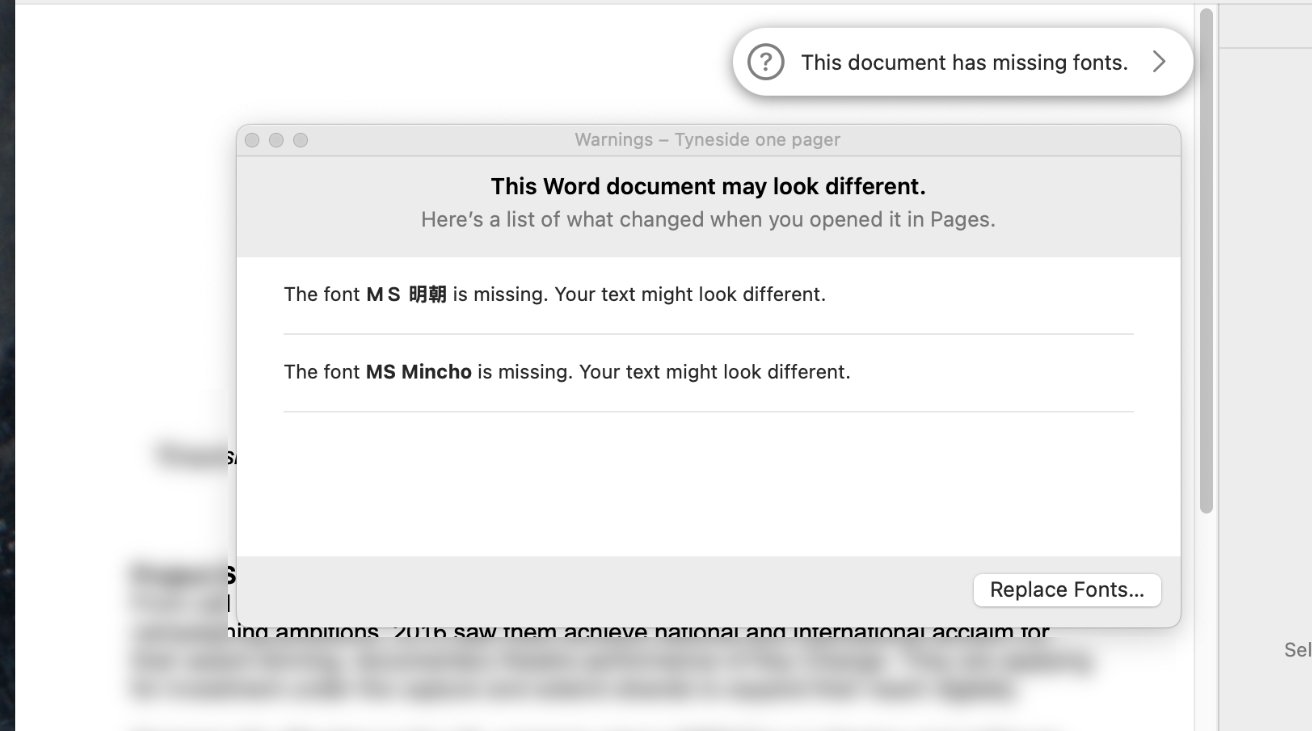
Opening a Word document in Pages almost always gets you the top pop up, or sometimes the whole dialog box
That pop-up will say the document has missing fonts, or it can say that it will just look different. You cannot stop Pages showing you this, you just have to either dismiss the pop-up every time, or wait until it decides to go away by itself.
You can use the pop-up to find replacement fonts for whatever is missing. But trust me, when you’ve had to read a hundred Word documents for research, you will want to tear that damn popup off the screen.
Saving documents
There’s just a couple of things to note about saving documents, and some of this is another example of Apple trying so hard to keep things simple that it becomes a problem. It’s also inconsistent, but at least often if you create a new document and choose File, Save, you get a minimalist Save As dialog.
It shows you a space for the title, which you can edit. It includes a section for Tags, which you probably ignore. And then there is a Where section, which lists one single place such as the Desktop.
That is another dropdown menu and when you click on it, Pages shows you what can be quite a long list of folders on your Mac. But you can be sure it does not include the folder where you want to save this new document.
It also never gives you the option to create a new folder to save it in.
Click instead on the small down arrow next to the Where section. It changes the whole dialog box into the full, regular one that lets you navigate around your Mac.
And that includes a New Folder button, too.
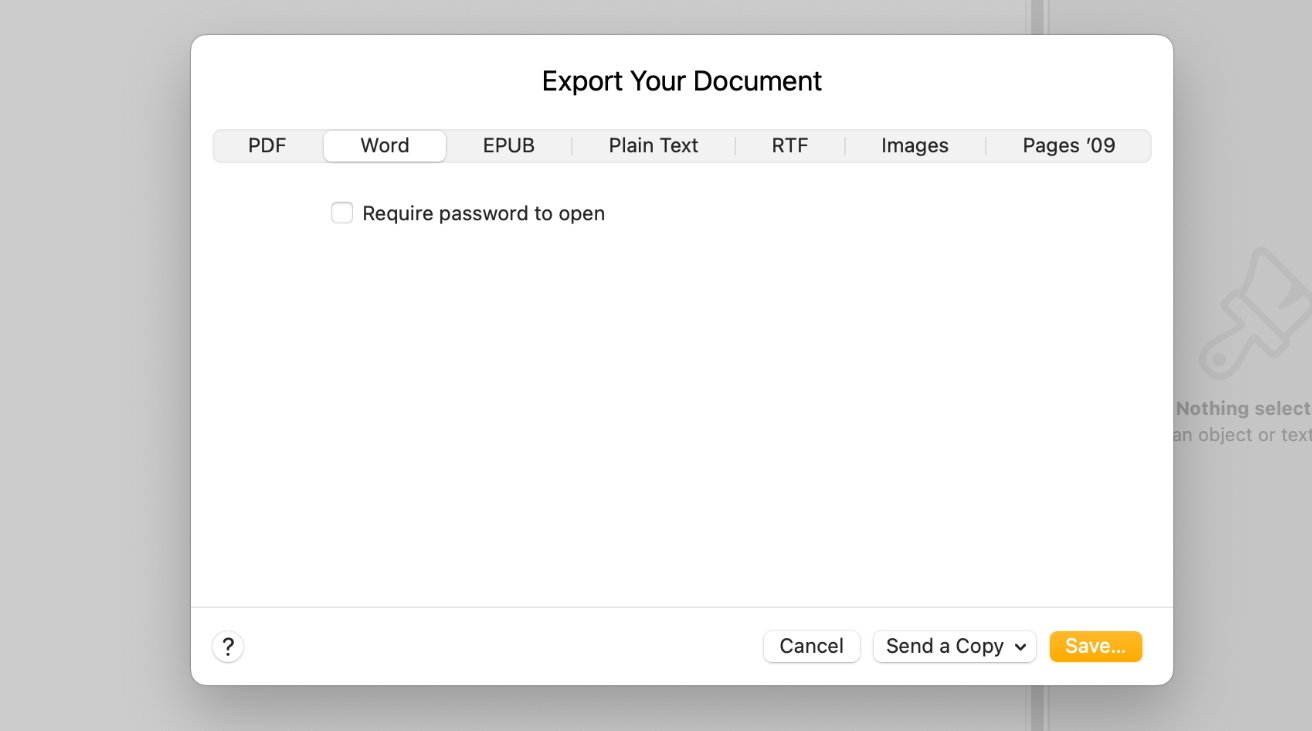
Note that any time you save a document in Pages, it will be saved in Pages format. So if, for instance, you’ve opened a Word file and you want to save it back in that format, you have to:
- Choose File, Export To…
- Select Word… from the pop-out menu
- Decide whether to tick Require password to open
- Click on Save…
- Then go through the regular Save dialog to decide where to save it
Don’t require a password unless you need to. It’s definitely going to irritate your Word-using recipient, but it’s also another possible point of failure.
Over more than a decade of exporting from Pages to Word, I’ve only had it go wrong once. I suspect my recipient wasn’t actually using Word, I think they were using one of the free knock-off equivalents like LibreOffice, but still they could not open the Word document I sent them.
Keep it simple, skip password options, and you cut down the number of things that can go wrong exchanging Word documents through Pages.
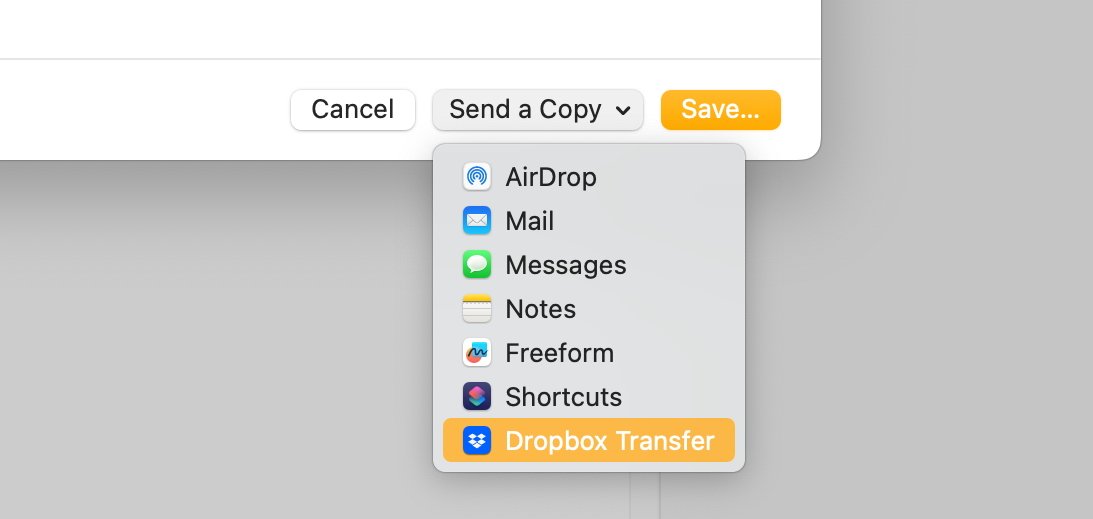
That’s also why I will always go through this process of saving a Word document on my Mac and then sending it. You can just Share the document straight from Pages:
- Choose File, Export To…
- Select Word… from the pop-out menu
- Click on Send a Copy…
- Choose AirDrop, Mail or so on
The options for Send a Copy… vary depending on what apps you have on your Mac. But in each case, Pages creates the Word document and then sends it over Mail or wherever.
That sounds good and it can be fine. But the result is your recipient gets the Word document — and you do not.
Even though it takes some manual effort and discipline, it is better to have a copy of the Word document you sent them. I will create a folder I call TX and keep the sent Word documents in there.
While exporting to Word format (or others), you can save a step by sending the new document to someone directly
It means when they lose the document, you can rapidly send them a copy and don’t have to think about whether you’ve made any further changes to the Pages one.
Duplicate versus Save As
That first time you go to save a new document, you do get a Save As dialog box instead of a Save one. They are identical bar the words “Save As” instead of “Save,” so you may not even notice the difference.
But if you have used Macs for long enough, seeing the words “Save As” might even make you nostalgic. Because for years, Apple has seemingly replaced the Save As option with Duplicate.
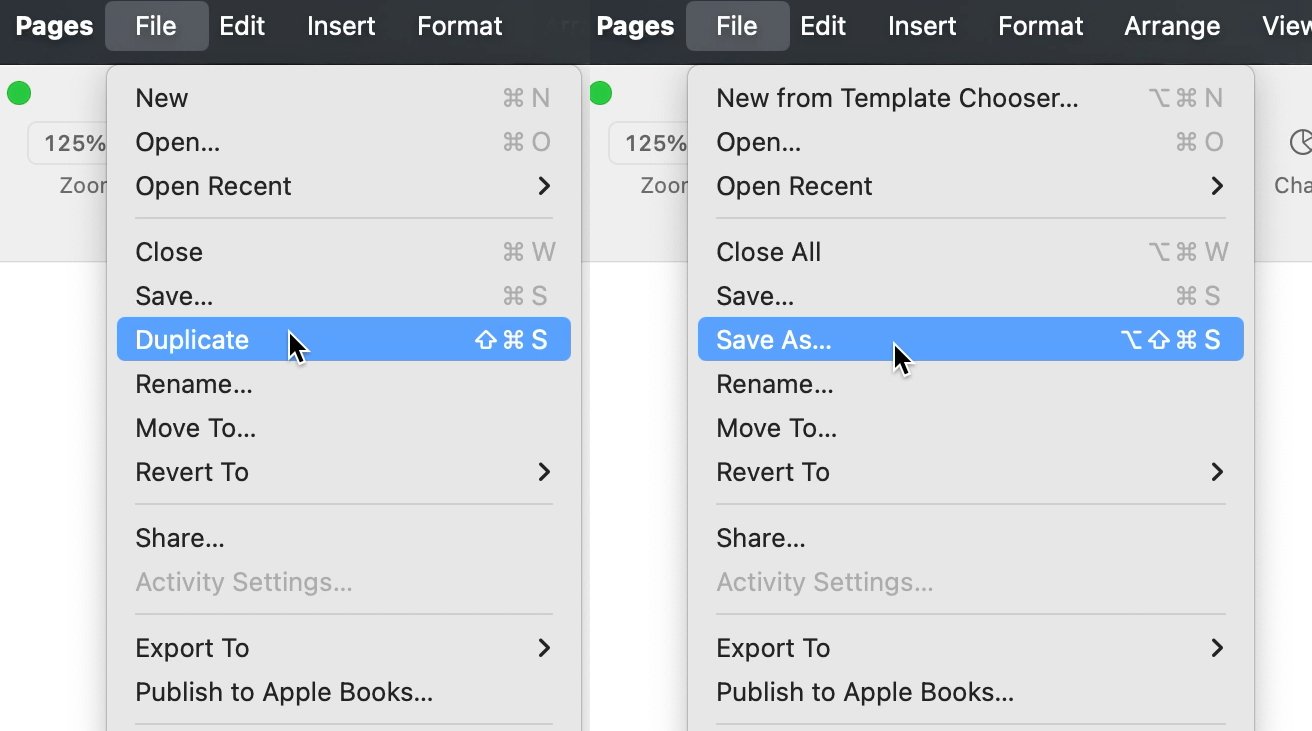
Left: the regular Duplicate button. Right: you can change that to Save As by holding down the Option key
So if you have a document and you want to save it under a new name — because, say, you’re basing a second document on that original — you had to go through a couple of steps. With the document open, you appear to have to:
- Choose File, Duplicate
- Close the original document
- Save the new one
It’s a faff having to remember to close the original document, but if you don’t, at some point you will inadvertently make changes to it instead of the new one. I’ve done this with invoices — open up the last one to a client, accidentally overwrite that with the new details, then find out I’ve done that at tax time.
However, Save As still exists, it’s just hidden. With the original document open:
- Choose the File menu
- Hold down the Option key
The Duplicate menu item changes to the old Save As.
Now you have one document on your screen, and it is the new one. The old can’t be accidentally touched.
Writing and saving documents
You’ve opened an existing Pages document, or you’ve converted a Word one, or you’ve started a new document. Now you can just go right ahead and write.
Pages will constantly save the document, but it’s best that you do that first. Choose File, Save and be sure to give the document a name and save it somewhere you will find it.
These days, that’s a bit belt-and-braces, since even without you saving it yourself, Pages is doing this business of saving a copy for you. But if Pages or your Mac crashes for any reason, it’s a lot easier to find your document again if it’s not just “Untitled 77”.
As for writing in Pages, you do just type away and that could be all you need to know or care about.
But it won’t be. Not if you are writing anything more than a simple note.
Writing long documents
If you really are just writing some notes, you’re better off doing it in Apple Notes. In Pages, you have to save each document you scribble in, and you end up with countless ones to search for.
When you’re writing something that is longer than, say, a page, then there are tools in Pages that will help you. They will also help your reader find their way around your document.
In Pages, you can have:
- Headers and Footers
- Headings and main or body text
- Footnotes and Endnotes
- Cross-references
- Table of Contents
- Styles
That last option, Styles, may actually be the most significant and it gets more so the longer your document is.
Styles
Every word processor has Styles — it’s one thing that differentiates them from text editors — and bless them for it. The Styles feature lets you say, for instance, that you want all of your headings to be 14 point Palatino and Bold, while your body text is 12 point Times New Roman and plain.
Select some text and you can change its style with a click.— or a keyboard shortcut
So far, that sounds like a shrug. But later on when you’re submitting the manuscript and find out that a publisher demands body copy be in Helvetica and headings in American Typewriter, you can change your entire document with a couple of clicks.
A Style is at least a font face and size, but it can also be:
- Line spacing and space before and after paragraphs
- Bullets or lists
- Drop caps
- Left, right, center or fully justified
- Indented
In Pages itself, you have a Style section, but Apple actually refers separately to what it calls Paragraph Styles and Character Styles. Paragraph Styles are to do with the main text of the whole paragraph, and then you can use Character Styles to change specific letters or words to have them be:
- Bold
- Italic
- Underline
- Underscore
- Color
It can be a chore as you write and have to nominate this line has a heading, that line as a subheading. But most of your writing will be body copy, and Pages to defaults to the body style.
Plus you can set it so that the Styles will change automatically.
For instance, a chapter title is unlikely to be followed by another chapter title. So you can set Pages so that when you’ve written a chapter title and pressed return, it automatically switches to the body text style.
Pages comes with many options like this, as well as multiple preset Styles. To choose from the existing list of Styles, you:
- Click on the Format icon at top right
- In the top section that appears, click the down arrow
- Click to choose which Style you want
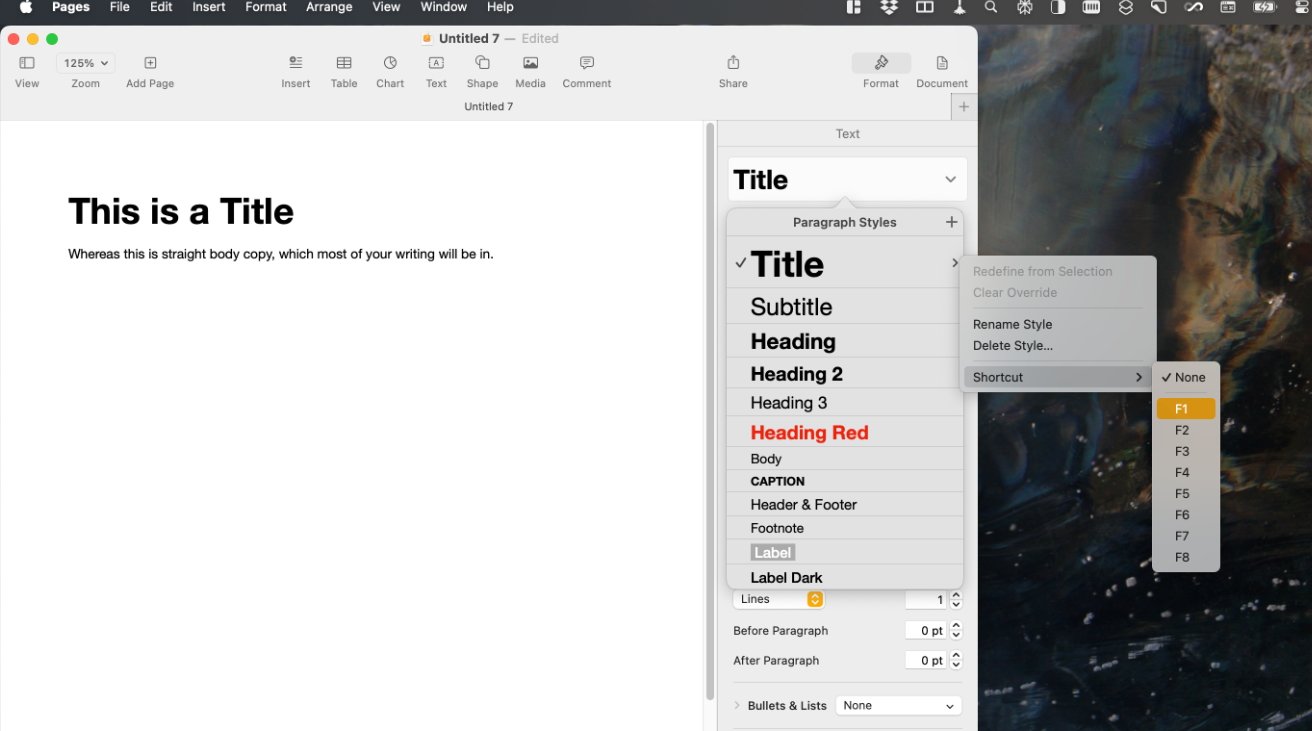
If you’re swapping back and forth between Styles a lot, going through the menus is a pain. But you can instead create a shortcut so that you just have to press a couple of keys and you’re switched to a different style.
To set this up:
- Click on the Format icon at top right
- In the top section that appears, click the down arrow
- Without selecting any of the Styles, move your cursor down to one you want
- Click on the small forward-facing arrow that appears next to that Style
- Click on the word Shortcut
- Choose a key from the short list that appears
It’s a very short list of possible keys — Apple expects you to be satisfied with just eight of them. Specifically, it expects you to use only the function keys F1 to F8 for styles.
More than limiting, this means you have to remember that, say, F3 is the style for a chapter title. It would be so much better if you could assign a keyboard shortcut like, for instance, Shift-Control-C where you’d remember that C stands for character.
But there is this automatic switching when you’re done with a style. To have that happen:
- Click on the Format icon at top right
- Just underneath the top section, click the More button
- Click on the drop down menu under Following Paragraph Style
- Choose the Style
Creating and changing Styles
Apple’s pre-supplied list of headings and text Styles may very well be enough for you. But if you need to make small changes, or you need a totally new Style, you can do it easily,
To make a change:
- Write a line or two in a given Apple Style
- Make any change you like, such as font size
- Open the format pane
- Click where it says Update next to the Style name
From now on, any time you choose that Style, your text will look the way you set up those couple of lines.
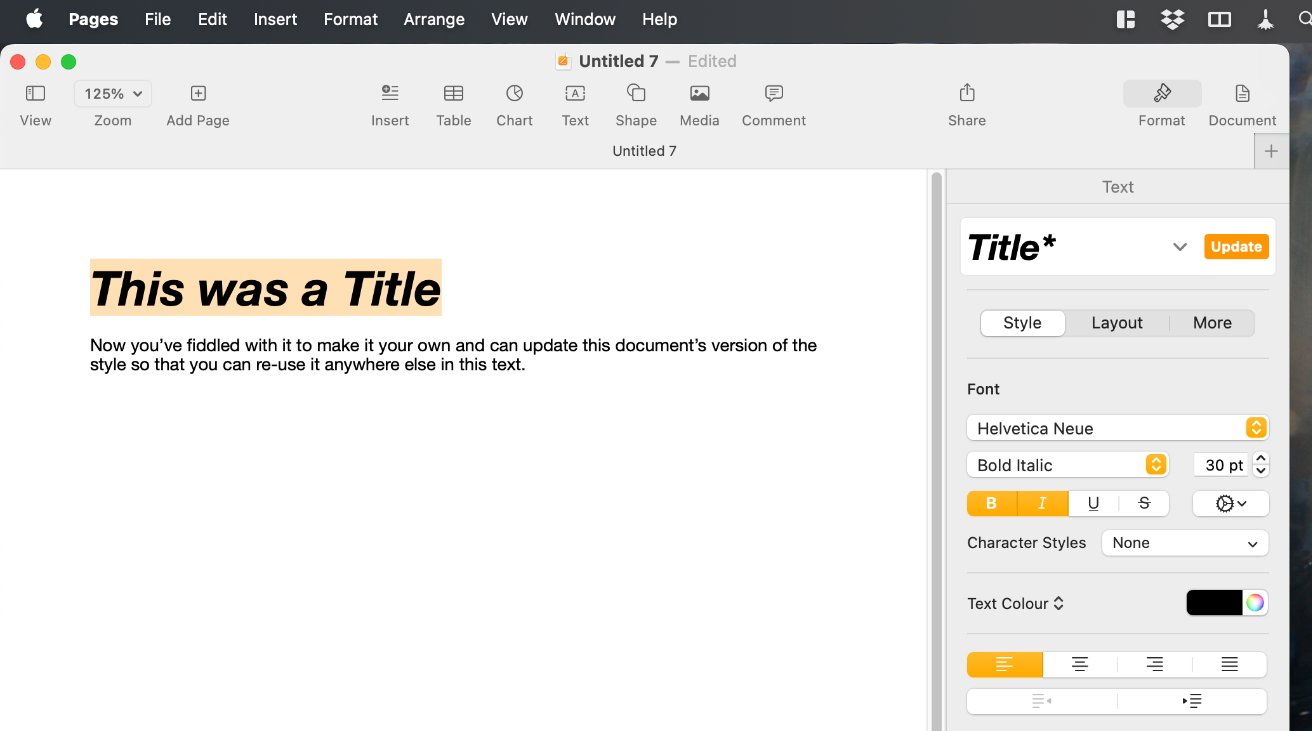
Once you change some text’s formatting, you can update the Style so that all others follow
Similarly, to add an entirely new Style:
- Format a paragraph the way you want
- From the open Format pane, click on the down arrow next to the Style name at the top
- Choose the tiny + plus symbol at the top of the drop down menu
- Type a name for that new Style
Important: new and updated Styles will work the way you expect in this document forever. They will not, however, apply to any other document.
Whether you open an old document or create a new one, it has the default Styles.
To bring your carefully crafted or altered Style to another document, you have to first select some text that is in that Style. Then choose Format, Copy Style in the document.
Next, go to the new document and choose Format, Paste Style.
It can be easier, though, to set up a lot of styles in one go and then save that document as a template. To do that, choose File, Save as Template.
Headers, Footers, and Page Layout
Templates are particularly useful if you need to change page layout. For instance, I’m in the UK where the standard paper size is called A4, but to send to colleagues in America, I will reformat the document as US Letter size.
This feature is controlled through the File, Page Layout menu, which is also where you can set up your default printer.
If you ever swap layouts, you’ll have to keep checking which one you’re using now because there’s no indication until you choose File, Print, or go back into Page Setup.
Pages intentionally looks blank so as not to distract you — but then you have to know to click at the top to set a header
There’s nothing you can do about that, but you can set Pages to show you more about the page than normal. Choose View, Show Page Layout, and you’ll see faint outlines showing the space for headers and footers, and where your main text will go.
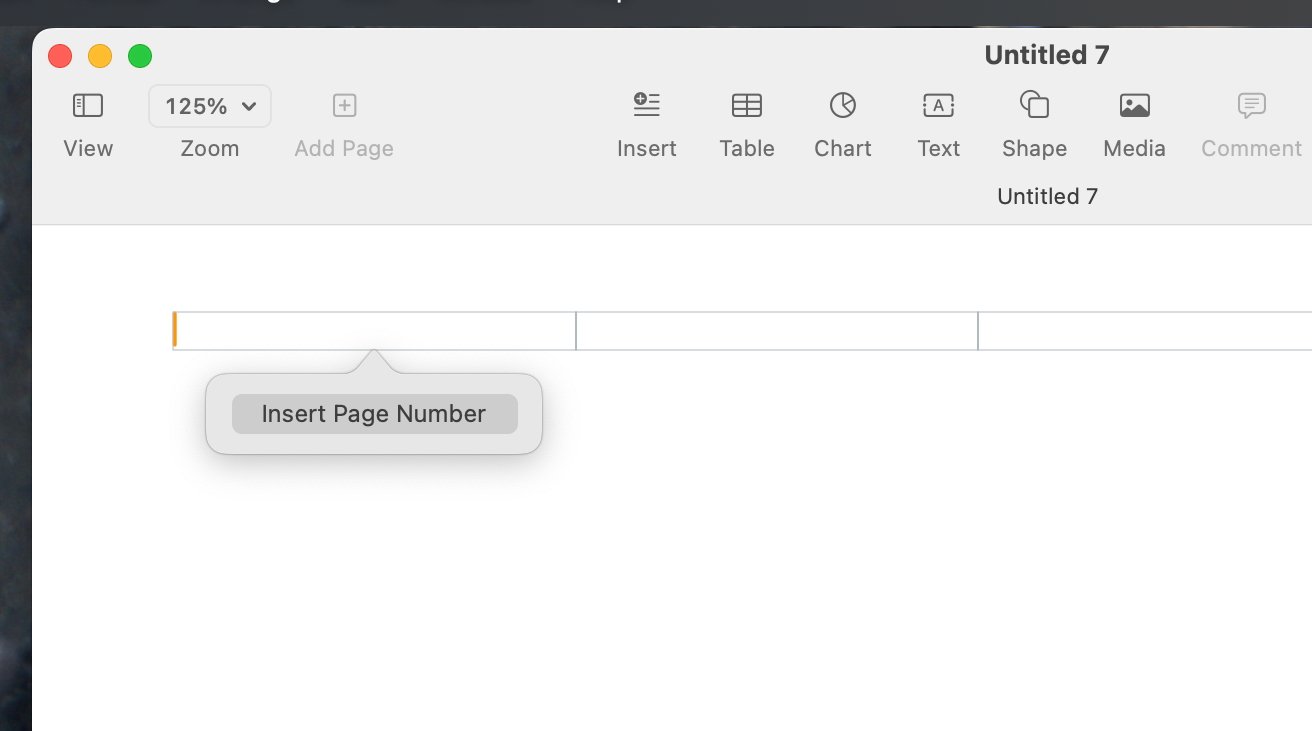
Headers and Footers are both shown in three boxes. These represent whether the header or footer will be at the left or right of the page, or centered.
Click in one of the three boxes to choose that and start typing whatever you need the header or footer to say. The first time you click into any of the boxes, you get an option pop up called Insert Page Number.
Within that, you have options for just the number, or a phrase like “1 of 2”. Pages automatically updates that second number as your document gets longer.
Longer documents obviously tend to be divided into chapters — or sections. You also typically don’t want a header or footer on the first page of a document or a section.
To mark a new section and hide the header or footer, you first choose Insert, Section Break. Then:
- Click on the Document icon at top right
- Choose the Section heading
- Tick Hide on first page of section
Navigating around a long document
Most of the time, you will be moving down a document by typing and typing and typing. But as you edit and revise it, you’ll want to move more quickly, in which case:
- Click the sidebar icon (top left, next to the view percentage)
- Choose Page Thumbnails
Alongside your page, there is now a filmstrip-like series of images representing each page in the document.
You’re not the only person who will need to move around the document quickly, though. There’s also your reader, and you can help them by creating bookmarks.
Any word or words in your document can be turned into a bookmark. Once you’ve set a bookmark, you can link to it from anywhere else in the document.
So you could have an abstract at the start which picks out particular chapters, and then the reader can click to jump straight to that place.
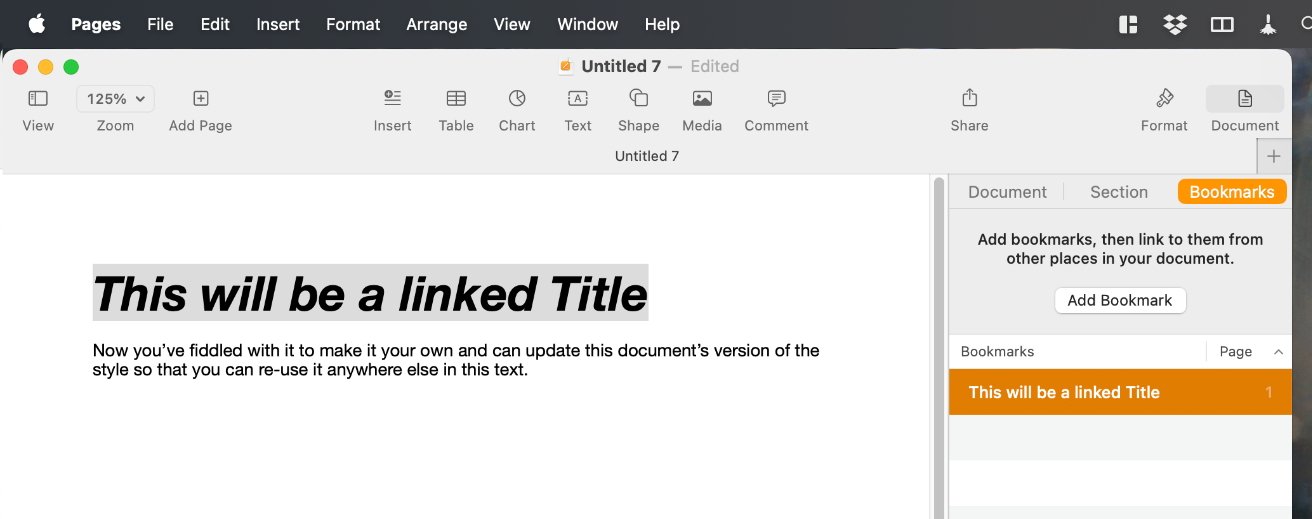
Cross-referencing is done by setting bookmarks and then linking to them
This is how Pages handles cross-referencing. You set up a bookmark, then you set up a link to it:
- Select some text, then click the Document icon at top right
- Click on Bookmarks
- Click Add Bookmark
- Next, select the text you want to link to that bookmark
- Right-click and choose Add Link
- Click on Bookmark
- From the Bookmark list that appears, pick the one you want
You can have any number of links, and any number of bookmarks. But any one link can only link to one bookmark.
A very common use for linking two parts of a document is to have a footnote at the bottom of the page — or an endnote at the end of the section. I was going to say that for some reason this is the most oddly awkward feature in Pages, but as I was writing this, a reader emailed pointing out that it’s actually a failing.
Footnotes should go at the bottom of a page, typically taking up something like a sixth or a fifth of a page. If there is more text than can fit in that space, the footnote is supposed to continue at the foot of the next page.
It doesn’t in Pages and there’s nothing you can do about it. The text just truncates.
A similar thing happens with endnotes, which go at the end of a chapter, a section, or your book. These too have to be concise or they will be cut off in mid-flow.
That’s quite an astounding failure in Pages, but even when footnotes and endnotes work, there is an issue. You can’t, for instance, have both footnotes and endnotes, you have to choose.
Generally, and maybe even close to universally, papers that have such notes do already tend to have one or the other. But with Pages, you have no option.
Plus, for some reason, you can’t set up a endnote first. You have to make a footnote, and then convert it to an endnote.
Fortunately after all this, setting up a footnote is particularly easy.
- Click in the text where you want the footnote link
- Choose Insert, Footnote, or click the Insert icon and choose Footnote
- Write the footnote text in the box that appears
Footnotes are automatically numbered in the correct format. And the number updates as you add new footnotes.
To instead make an endnote:
- Click in any one footnote
- Click to open the Format pane
- Choose the Footnotes section
- Under Type, choose a type of endnote
Your options here are to have an endnote at the end of the whole document, or just at the end of the current section.
It’s not as if this is a difficult thing to do, but it’s fiddly — and there is surely no possibility a user can stumble across it by accident.
This is the reason that Pages users often don’t realise that it can do as much as it can. But if Apple arguably errs on hiding the more involved features of Pages, the overall aim is to help.
Pages is quite an astoundingly powerful word processor, even if it does have some oddities.


