Pairing AirPods or AirPods Pro with a PC may not be as utterly simple as with an iOS device, but it’s only marginally harder. You just connect the earbuds via Bluetooth—a straightforward, fast process in both Windows 10 and Windows 11. Just follow our steps below and you’ll be off and running.
Do note, however, that as an Apple product, AirPods and AirPod Pros lose some functionality in Windows. They work well for listening to audio, but fall quite short of microphone quality you’d get on iOS or macOS. So while Apple’s earbuds can handle Zoom calls in a pinch, we’d steer clear of them as your main Windows headset.
How to pair AirPods or AirPods Pro with Windows 10
First, make sure your AirPods are fully charged with both earbuds in the case, and the lid is shut. Also confirm your Windows 10 PC is capable of running Bluetooth devices. (The overwhelming majority of modern laptops have Bluetooth built in, as do prebuilt desktop PCs from vendors like Dell and HP.) If your system lacks support, you can buy an inexpensive dongle like this TP-Link one to add that feature.
- Open the Settings app in Windows 10. You can find it by typing settings in the Windows 10 search bar and selecting the app once it appears. Its icon looks like a cog. Alternatively, you can press the Windows key + I at the same time.
- In the Settings menu, choose Devices.
- The Bluetooth & other devices page will pop up. First, make sure that Bluetooth is turned on by checking the toggle near the top of the page. If it isn’t, flip it on.
- Select Add Bluetooth or other device.
- The Add a device menu will pop up, asking you which kind of device you’d like to pair with. Select Bluetooth.
- Grab your AirPods or AirPods Pro and open the lid.
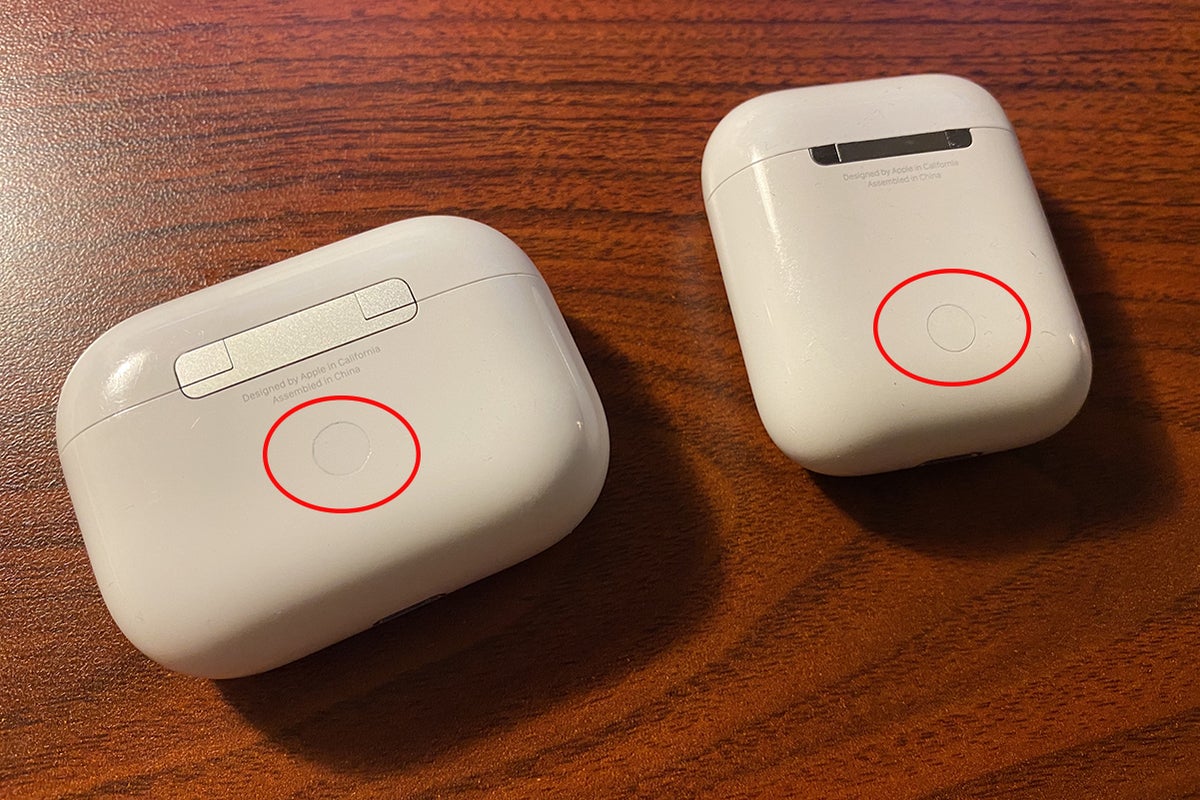
- Hold down the circular button on the back of your AirPods for around three to eight seconds. The charging light on your AirPods will eventually start pulsing white. When this happens, lift your finger and look back at the Add a device menu.
- Be patient. It might take a couple of seconds for the AirPods to appear. When they do, they’ll likely appear as “Headphones” at first and then Windows 10 will load them as “AirPods Pro” (or whatever name you gave them on iOS, if you have an iPhone or iPad you previously used them with). Select them.
- You’ll get a notification saying, “Your device is ready to go!”
Your AirPods should immediately become your default listening device. When you put them back into your case, Windows 10 will automatically revert to the last audio device you used.
How to pair AirPods or AirPods Pro with Windows 11
Before pairing, your AirPods should be fully charged, with both earbuds in the case and the lid shut. Also verify that your Windows 11 computer supports Bluetooth connections. Most laptops have Bluetooth built in, as do desktop PCs purchased through companies like Dell or HP. If your PC can’t run Bluetooth devices, you can buy an inexpensive dongle (like this TP-Link model) to add the feature.
- Open the Settings app in Windows 11. You access it by clicking on the Start menu, then clicking on the grey cog icon labled Settings. You can also bring it up by typing settings into the search bar, or pressing Windows + I on your keyboard.
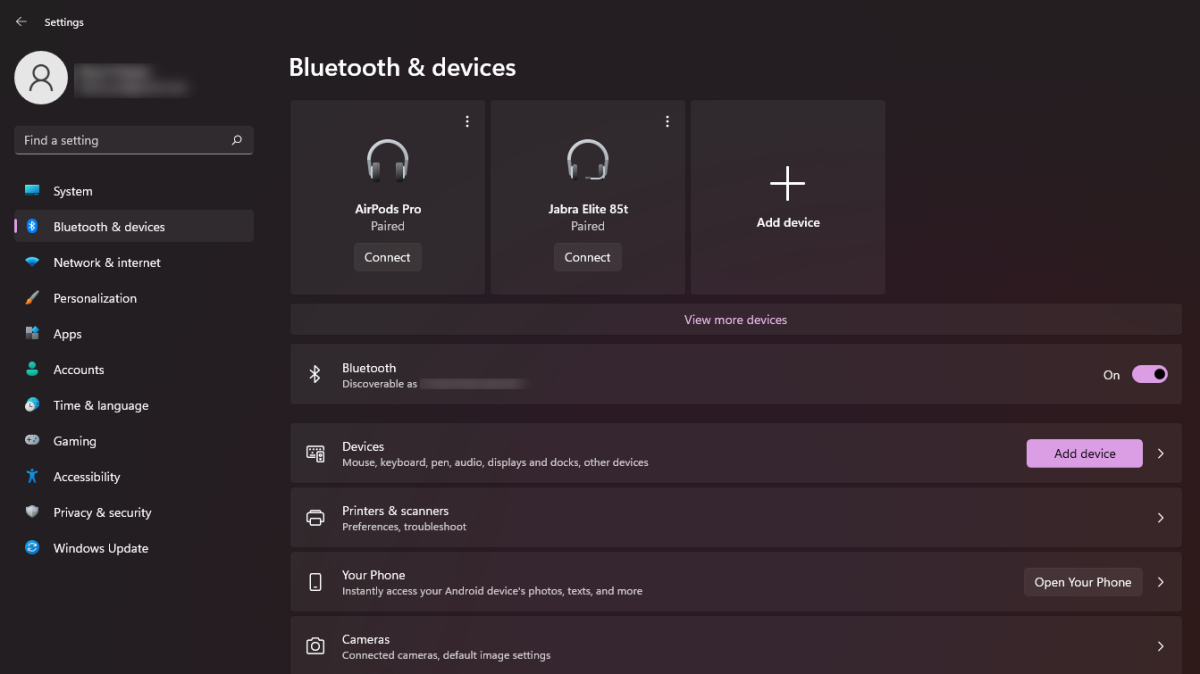
- In the Settings menu, choose Bluetooth & devices.
- Confirm that the toggle for Bluetooth is turned on. If it’s not, click on it.
- At the top of the screen, click on the big button that says Add device.
- When the Add a device menu appears, choose Bluetooth from among the options.
- Now open the lid on your AirPods or AirPods Pro. If this is your first time ever pairing the device, you can skip to Step 8.
- Otherwise, hold down the circular button on the back of your AirPods. The charging light on your AirPods will eventually start pulsing white after several seconds. (It can take as long as 10 seconds, though.) When this happens, lift your finger and look at the Add a device menu.
- Be patient, as it can take a few seconds for the AirPods to appear. They’ll likely appear as “Headphones” at first and then Windows 11 will load them as “AirPods” or “AirPods Pro” (or whatever you’ve renamed them to, if you’ve previously used them with an iPhone or iPad). Select them.
- A new window will appear that says “Your device is ready to go!”
Your AirPods should now be your active listening device. You’ll see it as a new button at the top of the Bluetooth & devices screen; its status should be marked with a green dot and listed as Connected voice, music. You can put them back into the case to automatically disconnect them. Windows 11 will then automatically switch to the last audio device you used.
How to reconnect or disconnect AirPods with your PC (Windows 10)
Your AirPods should automatically start working with your PC once you put them back in your ears. If they don’t, you can connect them manually.
- Open the Settings app in Windows 10.
- Select Devices.
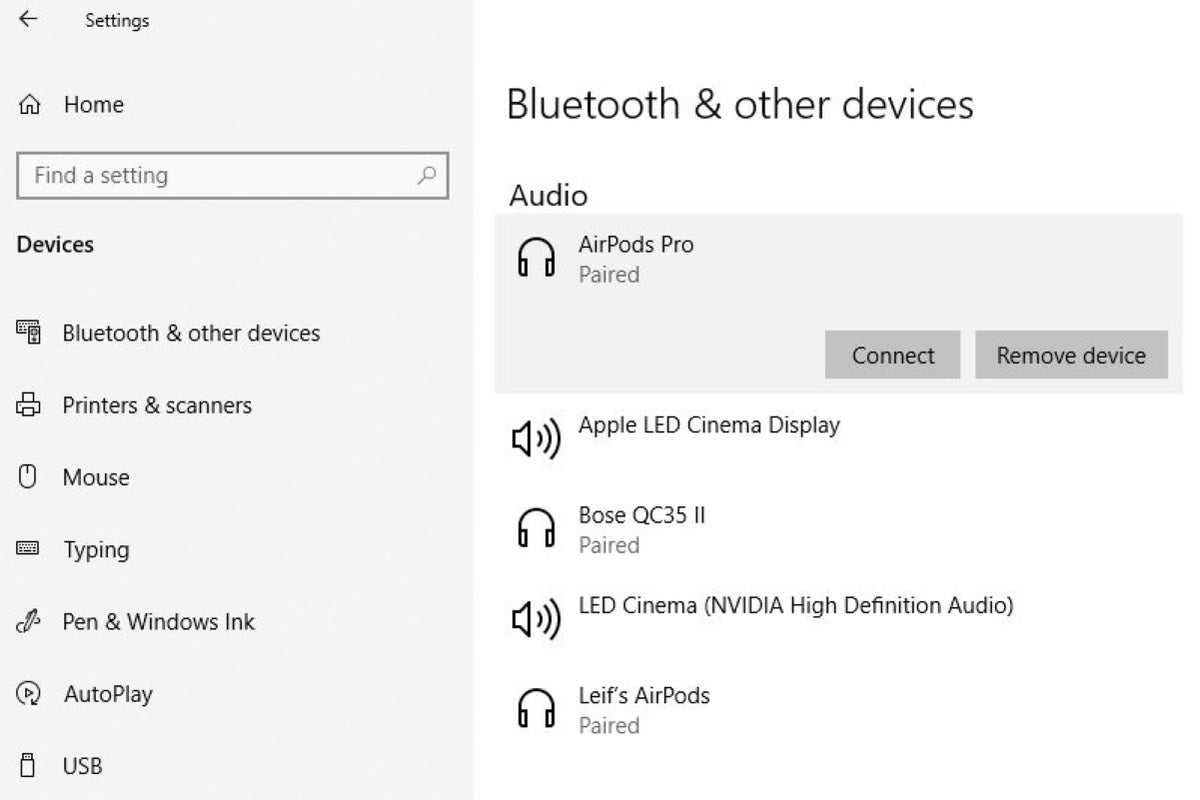
- Scroll down to the Audio section and select your AirPods.
- In the prompt that pops up, press Connect. Your AirPods should now work.
You can also use these same steps to disconnect your AirPods from your PC if you want to use them with an iPhone, iPad, or Mac you’ve previously paired them with. Just keep in mind that you’ll now need to manually connect your AirPods through the Bluetooth menus on those devices while your AirPods are still paired with your Windows PC.
How to reconnect or disconnect AirPods with your PC (Windows 11)
Your AirPods should automatically reconnect to your Windows 11 PC after you pull them from your case. If they don’t, you can connect them manually.
- Open the Settings app in Windows 11.
- Choose Bluetooth & devices.
- At the top of the screen, you should see a large button for your AirPods (e.g., “AirPods Pro”).
- Click the Connect button.
- If you don’t see your AirPods among the buttons on this screen, click on View more devices just underneath them. Then scroll down to Audio.
- On the AirPods entry, click on the vertical set of three dots.
- In the pop-up window that appears, choose Connect.
Your AirPods should now work. To disconnect them from your PC, use these same steps. If you want to use your AirPods with a previously paired device, you may need to connect to it manually through its Bluetooth menu if automatic connection fails.

PCWorld
How to unpair your AirPods from your Windows 10 PC
Permanently unpairing your AirPods involves a similar series of steps as reconnecting them, but with a single difference.
- Open the Settings app.
- Press Devices.
- Scroll down to the Audio section and select your AirPods.
- In the prompt that pops up, press Remove device.
How to unpair your AirPods from your Windows 11 PC
To remove your AirPods as a device, you’ll take similar steps as when reconnecting them.
- Open the Settings app.
- Select Bluetooth & devices.
- Locate the big button for your AirPods (e.g., “AirPods Pro”).
- Click on the vertical line of three dots at the upper-right corner of the button.
- In the small pop-up window that appears, choose Remove device.
- If you can’t find your AirPods among the buttons on this screen, click View more devices just underneath them. Then scroll down to Audio.
- On the AirPods entry, click on the vertical set of three dots.
- Choose Remove device.


