While it’s not as popular as MOV or even FLAC files, you might occasionally encounter an MKV, or Matroska, file. When you’re dealing with subtitles on an audio or video track, an MKV file can come in handy.
When it’s time to convert an MKV file into something your device will support, like an MP4 file, it’s important to make sure you follow these steps to prevent any data loss.

CloudConvert (web-based)
The best way to convert an MKV file to an MP4 file is by using an online service. There are plenty to choose from, but we think CloudConvert is the best. It’s simple and supports a wide variety of file formats. It’s a hosted service, so you’ll have to upload your video files to their server. You may have privacy concerns, and if you do, you can simply use software to edit them on your own device.
Otherwise, you have the choice to immediately delete your file as soon as it converts. Just click on the X icon next to the Download button to do so. Be warned that it can take up to 24 hours, but your videos should be deleted from their servers permanently.
Here’s how to use it.
Step 1: Go to the CloudConvert homepage and click Select file to choose a file from your computer. If you select the drop-down arrow within the Select file button, you can choose from files you keep in Google Drive, Dropbox, or other online storage options.
Step 2: Select the arrow next to Convert to and then choose MP4 from the video formats list. Select the Convert button to start the process.

Step 3: The conversion doesn’t take too long, and you know the process is done when the option to download appears. (CloudConvert may automatically playback your newly converted video for you, so that you can see if the conversion went well before you download the new file.) Select the green Download button to download your new video. Once you download your MP4 file, you can use it on any compatible device or platform. If you’re going to convert files frequently, you might want to add the CloudConvert Chrome extension.

VLC (Windows/MacOS)
The VLC media player can recognize and play almost any video format, including MKV. Better yet, it can also convert them to something more universal, like MP4. Here’s how.
Step 1: Head over to VideoLAN’s website and download VLC. Make sure to read the fine print when installing, so you aren’t introducing your computer to any bloatware.
Step 2: Open the software and select the Media tab in the upper-left corner and select Convert/save from the resulting drop-down menu.
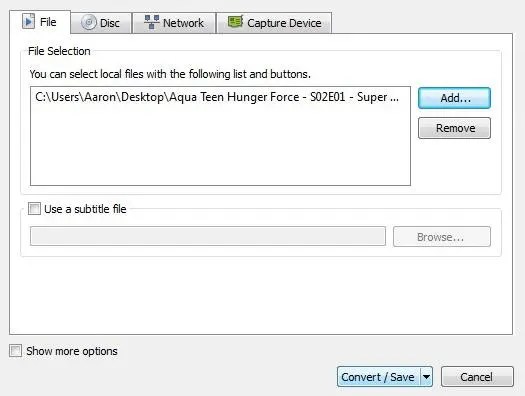
Step 3: Select the Add button and locate the file you wish to convert on your PC. Once it’s selected, press the Convert/save button at the bottom of the window.

Step 4: Specify your desired video format — in this case, we’d recommend H.264 + Mp3 (MP4) — using the drop-down menu beside Profile. Selecting the tool icon (next to the drop-down menu) will also allow you to further fine-tune your settings.

Step 5: Specify under Destination where you would like VLC to export your file. Then, select Start. The timeline will turn into a progress bar and once it finishes, your video will be ready. Remember that the old MKV file still exists. If you no longer want the old file and would prefer more storage space on your computer, you should delete all your old MKV files when finished.
Editors’ Recommendations


