Apple’s many generations of AirPods products have been ruling the worlds of both in-ear and over-ear audio for some time now. Featuring sleek designs, adaptive controls, incredible sound and call quality, and a host of other great features, Apple has been steadily improving its go-to earbuds and headphones from one generation to the next.
The company has also been adding and tweaking a range of abilities and customizations to allow users to experience the AirPods in new and improved ways. Whether you’re looking for a way to share audio with a friend or to customize the touch controls of your AirPods, we’ve assembled this roundup of 14 Apple AirPods tips and tricks to help you tap into the full potential of your Apple audio.
What AirPods models can you buy?

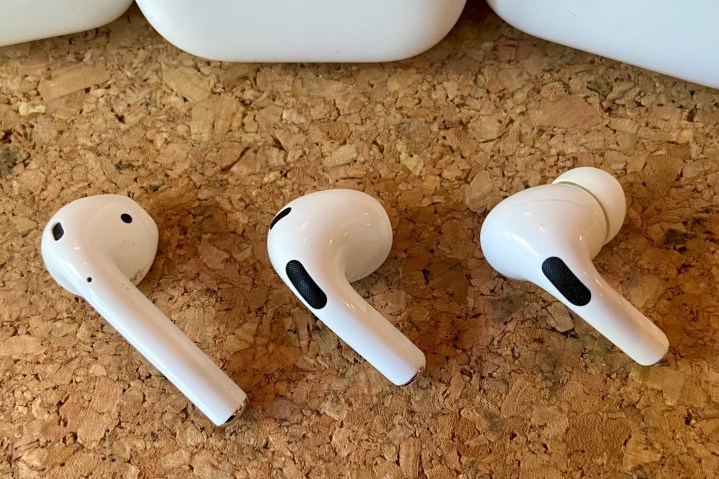
Right now, prospective buyers can choose between the second-generation AirPods ($130), the third-gen AirPods ($180), the AirPods Pro ($250), and the over-ear AirPods Max ($550).
On the bottom rung of the ladder, the $130 second-gen AirPods include the Apple H1 chip that allows for quick-connecting the buds to Apple hardware, along with double-tap controls for playback/track skipping, plus up to five hours of listening time and more than 24 hours with the charging case.
The third-gen AirPods introduced spatial audio with dynamic head tracking, Apple’s adaptive EQ and redesigned AirPods drivers, along with up to six hours of AirPods battery and 30 additional hours with the charging case.
Then the AirPods Pro came a-knockin’. At $250, these bad boys introduced Active Noise Cancellation and Transparency modes, along with the handy Ear Tip Fit Test and a slew of other AirPods Pro exclusives. In terms of battery, the Pros are a tad bit weaker than the gen-three AirPods, with up to four and a half hours of AirPods life and 24 extra hours with the charging case.
Oh, and let’s not forget the AirPods Max, Apple’s over-ear headphones with all the bells and whistles of the traditional AirPods, on top of multiple color options, 20 hours of listening time, and some of the best active noise cancellation capabilities we’ve ever seen. They’ve also got adaptive EQ and spatial audio with head-tracking.
First, a caveat
Regardless of what AirPods you’ve decided on, our list of tips and tricks applies to all versions of the AirPods, unless an exact model or set of models is specified.
Oh, and one special note for our Android device users: Yes, you can pair your AirPods to pretty much any Apple or non-Apple device, but most of our tips and tricks will only work with AirPods that are paired with an Apple product. Sorry, friends.
Quick pairing through your Apple ID
One of the best features of all AirPods products is the ability to instantly pair them with your Apple hardware without having to walk through the Bluetooth pairing process for each individual device. This is all thanks to your Apple ID, which shares your unique AirPods info with all of the devices linked to your Apple registration.
Out of the box, the only thing you’ll need to do is connect your AirPods to a single Apple product, which in most cases ends up being an iPhone or an iPad.
To kick things off, head to the Settings app and make sure Bluetooth is turned on. Then, with both AirPods seated in the charging case, place the case beside your iOS device and press and hold the Pairing button on the case.
After a moment or two, a pop-up window will appear on your phone or tablet. Choose Connect from the window and walk through the last parts of the setup wizard to complete the pairing process.
Now let’s say you’ve got your AirPods paired to your phone for your commute to work but enjoy having them paired to your MacBook Air in your workplace cubicle. Thanks to your Apple ID’s sharing power, your MacBook and any other Apple hardware will only require that you select your AirPods as an audio device — no actual pairing required (just make sure that your Apple device is online and signed into iCloud).
Customize tap and touch commands

One of the best things about owning a set of AirPods is the ability to customize the tap and touch controls inherent to each set of buds. For first- and second-gen AirPods, commands like play/pause, track skipping, and Siri summoning are initiated by tapping on the sides of one or both earbuds.
For the AirPods 3 and Pro models, touch controls are moved from the body of the bud down to the stems, which utilize force sensors to receive and execute commands. And with the AirPods Max, commands are handled by one, two, or three presses of the Digital Crown (a protruding knob on the right earphone), as well as a press-and-hold command for calling up Siri.
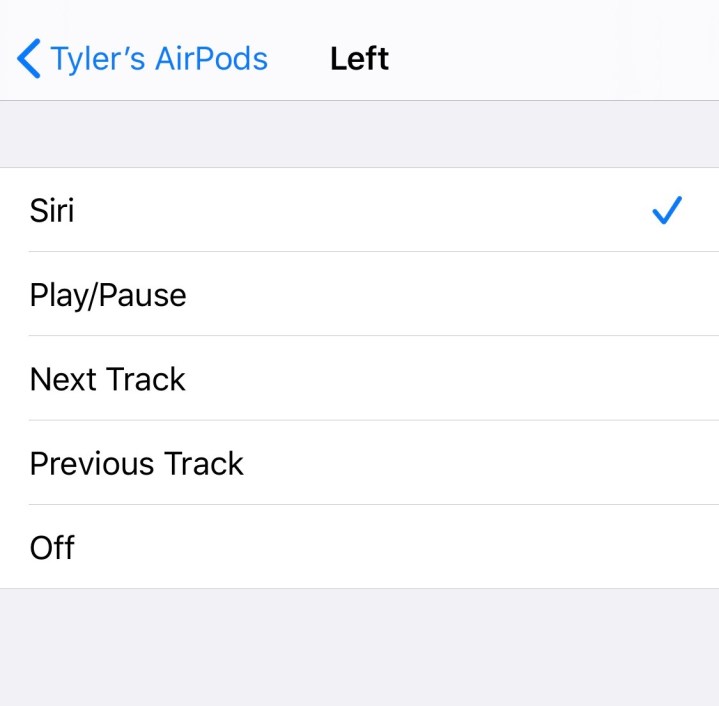
If you want to customize the touch commands of your AirPods, grab your iOS device, head into the Settings app, and select Bluetooth. Then, tap the (i) icon located next to the name of your AirPods. From here, select Left or Right to choose which bud of the set you want to customize, and then choose what command you want the AirPods to perform based on the number of taps you issue.
Unfortunately, the only thing you’ll be able to customize with the AirPods Max is the scroll direction for adjusting volume. This is accessed by going into Settings on your iOS device. Choose Bluetooth, select the (i) icon next to the name of your AirPods Max, choose Digital crown, and decide whether you want to use the Clockwise or Counterclockwise orientation.
Enhance dialogue with Conversation Boost
Introduced as part of iOS 15 but only available for the AirPods Pro, Conversation Boost is a unique feature that combines computational audio and the Pro’s mics to turn the earbuds into a powerful set of hearing aids. Meant to aid those with certain hearing disabilities to better understand what’s being said in a back-and-forth exchange, Conversation Boost is a convenient addition to the AirPods Pro’s bevy of features, and it’s a capability that’s simple to turn on and off.
To do so, head into the Settings app on your iPhone or iPad and select Accessibility. Scroll down to Audio/visual, and choose Headphone accommodations. Once you’ve toggled Headphone accommodations on, select Transparency mode at the bottom of the page and switch Conversation boost to the On position.
The ins and outs of noise cancellation
Both the AirPods Pro and AirPods Max feature Active Noise Cancellation (ANC) and Transparency modes for filtering out environmental sounds, making your next plane ride or subway excursion a much more pleasant experience. And whether you own the Pros or Max, there’s more than one way to access the noise control settings for both products.
For AirPods Pro users, you can cycle between ANC and Transparency by pressing and holding the stems of either the left or right AirPod. For Max owners, noise-canceling controls are relegated to the noise control button on the right earphone.
For the AirPods Pro and Max, you can also customize what noise-canceling modes your AirPods switch between (ANC, Transparency, or Off) by heading into the Settings app on your iOS device.
Choose Bluetooth, select the (i) icon next to your AirPods name, then pick either the Left or Right bud under the Press and hold tab to customize what kinds of noise cancellation your AirPod Pros will cycle between. For the Max, these customizations are applied to the noise-cancellation button.
Furthermore, you can access your AirPods’ noise control settings directly through your iOS device. To start, open the Control center, and while wearing your Pros or Max, select and hold the Volume slider to pull up additional volume controls. Do you see the Noise cancellation icon at the bottom-left? You can use this button to easily toggle between ANC, Transparency, and Off modes for your AirPods.
Get immersed in Atmos with spatial audio

AirPods Pro, Max, and third-gen AirPods owners can experience the incredible world of Dolby Atmos through the power of spatial audio. This exciting feature uses your AirPods’ accelerometer and gyroscope as part of a head-tracking technology suite to beam sound all around you, adding more depth and realism to your listening experience.
Enabled by default, you can change spatial audio settings to Automatic, Always on, and Off by heading to the Settings app of your iOS device and choosing Music. Select Dolby Atmos, then choose which of the presets you want your AirPods to abide by.
Find your lost AirPods
Nothing is worse than cracking open your AirPods case, only to realize that you’re missing a bud. Well, thanks to Apple’s Find My network feature (available for most Apple products), you’ll be able to perform a search-and-rescue mission for your missing AirPods (if they’re connected; if not, you can see their last known location) and AirPods Pro or Max, even if your iPhone’s Bluetooth isn’t close enough to your AirPods.
To ensure that Find My network is enabled for your AirPods Pro or Max, head into Settings on your iOS device and select Bluetooth. Tap the (i) icon next to your AirPods name, then go to the bottom of the next page where you’ll see the Find my option. If it’s turned off, just turn it on. Check out our in-depth post on how to use the Find My app on your iPhone for all the details.
Opt for one microphone (or two)

Did you know that you can set up your AirPods to only use the left or right bud’s microphone, as opposed to both? While you may be wondering why you would ever want to do this in the first place, think about the busy office worker fielding numerous phone calls per day through the AirPods. Instead of draining the battery on both buds, the savvy employee can use the left bud until the battery is zapped, pop it in the charging case, and then switch to the right bud for the rest of the workday.
Of course, the AirPods are smart enough to automatically activate the mic of whichever bud is currently being used.
To designate which AirPod mic you want in-use, head into Settings, then choose Bluetooth. Select the (i) icon next to your AirPods, then choose Microphone. From here, you’ll be able to choose between Always left AirPod, Always right AirPod, and Automatically switch AirPods.
Use Live Listen to turn your iPhone into a spy machine
Ever want to be privy to the inside baseball of your judgmental family? With Live Listen, you can turn your iPhone or iPad into an audio-gathering snitch. All you have to do is leave your device in the general vicinity of the conversation so its microphones can send the juicy details straight back to your AirPods for proper absorption and emotional disconnection.
To launch the feature, you’ll first want to make sure your AirPods are paired to the device that’ll be doing the listening. Then, grab that iOS hardware and open up Control center. Choose the Listening icon, select your AirPods, then tap Live listen.
Share your audio to another set of AirPods
Did you know that you can cast whatever music you’re listening to on your AirPods to a friend’s pair, allowing you both to jam out to the same tune? To enable this capability, you’ll actually be connecting more than one set of AirPods to your hosting iOS device, so before you get started, make sure said device is running on iOS 13 or later (this is the iOS version that introduced the Share Audio feature).
Assuming your personal set of AirPods is already linked and ready, pull up the Control center, choose the AirPlay icon, then select Share audio. Then, place the second set of AirPods next to your host device, walk through the quick setup wizard, and bada-bing!
Do note that in order to successfully cast audio from one set of AirPods to another, both users will have to be close enough for the hosting device’s Bluetooth to link up with both sets of buds and/or headphones.
Keep tabs on your battery

You can monitor how much charge your AirPods and charging case are holding using an iPhone, iPad, Mac, or Apple Watch. Additionally, the actual charging case itself will give you an idea of what kind of life you can expect from your AirPods. Let’s first unpack the latter method.
With the AirPods placed in the case and lid open, your charging case’s indicator light will reflect the battery of the AirPods themselves, with a green color that means fully charged and an amber hue meaning less than a single full charge remains. With the AirPods out of the case, the indicator light reflects the battery level of the charging case itself.
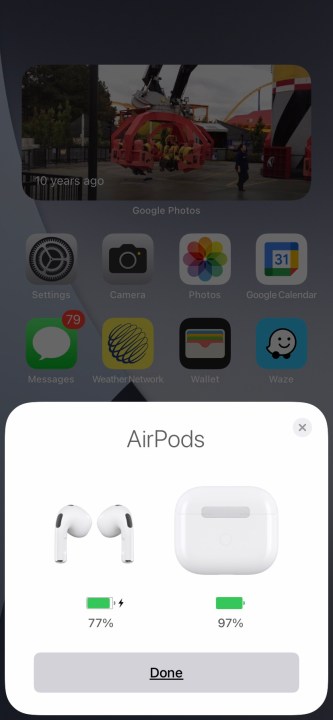
To see exactly how much battery is left on your AirPods and charging case, you can use various Apple devices to get the job done. For iPhones and iPads, one method is to place the AirPods inside the case and seat the case next to your phone or tablet. A pop-up window will appear on your iOS device, showing your AirPods and the charge level remaining.
You can also check the battery status of your AirPods and charging case through your phone or iPad’s battery widget, and even just by asking Siri how much charge your AirPods and its case have left.
Have Siri announce notifications
By default, Siri is programmed to read out time-sensitive notifications from your connected Calendar and Reminder apps, but you can expand these readouts to any other compatible app in just a few simple steps.
First, head to Settings, then choose Notifications. Then, all you have to do is pick which app you want Siri to work with and make sure that Announce notifications is switched on.
Toggle Automatic Ear Detection

Automatic Ear Detection gives your all-knowing AirPods a mind of their own. With the feature enabled (and it is by default), when your AirPods are lodged in your ears or placed over them, audio will function as normal. But as soon as you take your AirPods out or un-seat one of the earphones, your music will stop playing.
If this feature isn’t for you, you can disable it by, you guessed it, popping into iOS Settings, choosing Bluetooth, selecting the (i) icon, and then toggling the Automatic ear detection slider into the Off position.
Use the Ear Tip Fit Test for superior sound
While the AirPods Pro are packaged with small, medium (attached out of the box), and large-sized eartips, it can be tough to figure out which tips are best for your specific ears. Heck, you may even have a small tip for your left ear and a large tip for your right. After all, the human body strives for symmetry but doesn’t always stick the landing.
If you’re unsure of what tips you should be using, the AirPods Pro have a handy Ear Tip Fit Test you can use to zero in on what tips are best. To start, head to Settings on your iOS device, choose Bluetooth, then select the (i) icon next to your AirPods. Then, pick Ear tip fit test and select Continue to launch the tool.
Give your AirPods a unique name
Newly paired AirPods will be labeled with your first name and the AirPods model, but you can change this designation to something of your own choosing.
All you have to do is grab your iOS device, launch Settings, choose Bluetooth, then choose the (i) icon. From the list of options, pick Name, create the actual name, then select Done.
Want to learn more about the world of Apple AirPods? Check out our comparisons of the Apple AirPods 3 versus the Apple AirPods, the Google Pixel Buds Pro versus the Apple AirPods Pro, and the AirPods Pro versus the AirPods 3.
Editors’ Recommendations


