If you’re anything like us, you love your music, and you want to be able to enjoy it anywhere, on any device. Downloading your music collection onto your iPhone, iPad, or iPod Touch gives you access to your music pretty much everywhere — so it makes sense to know exactly how to download music onto all of your Apple devices.
Unfortunately, getting your music onto your device sometimes isn’t fully straightforward, and methods differ depending on how you want to do it. Newer macOS devices differ from older ones, and Windows devices are different again. Thankfully, we’re here to help. Here are some easy ways to add your music to your Apple device.
Also, don’t forget that data is cheap these days, and music streaming services are extremely good value for money. Check out our list of the best music streaming apps as well, so you don’t have to just rely on downloaded songs.
Adding music to iTunes or Music
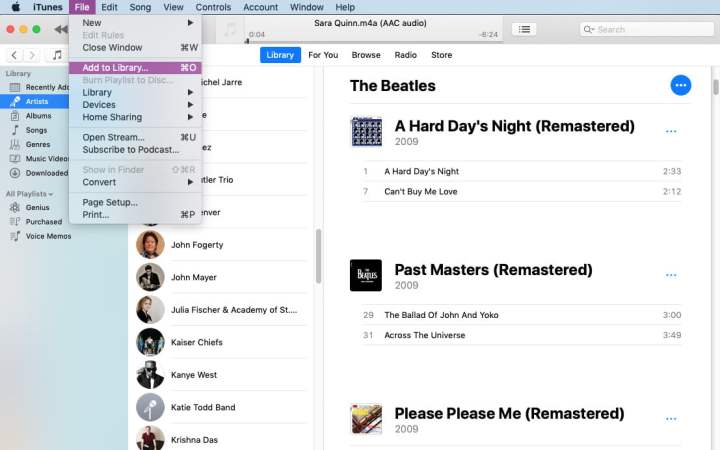
Of course, make sure you’ve got the files you want in your iTunes or Music library. To import music, go to iTunes (on Windows PCs or older macOS devices) and select File > Add to Library. In Music (on newer macOS devices), you’ll instead go to File > Import. This is your one-stop-shop for adding music to your library, and it’s pretty foolproof. It’ll even convert files into useable file types for you. If you need a more in-depth guide, we have a guide to importing music without iTunes.
Adding music using a macOS device running macOS Catalina or newer
Apple’s all-purpose multimedia repository, iTunes, was the music management hub for your Apple devices for many, many years. Not so from macOS Catalina and onward. Now, new macOS devices use Apple’s Finder app to import music. But this change doesn’t mean it’s a complex procedure — far from it.
You’ll just need a few things to get started: Make sure your device is updated to the latest version of macOS, and make sure you have a cable you can connect your two devices with. For example, if it’s a recent MacBook and an iPhone, you’ll need a USB-C-to-Lightning cable (USB-C for the Macbook, Lightning for the iPhone). For ease of writing, in this example, we’ll be using an iPhone, but the method is the same for an iPad and iPod Touch.
Step 1: Attach your iPhone to your MacBook with a cable. If it’s the first time you’ve done this, you may need to let your iPhone “trust” your MacBook by selecting Trust and entering your passcode.
Step 2: Open the Finder app, and check the sidebar for
Step 3: Select the Music tab, then Sync music onto
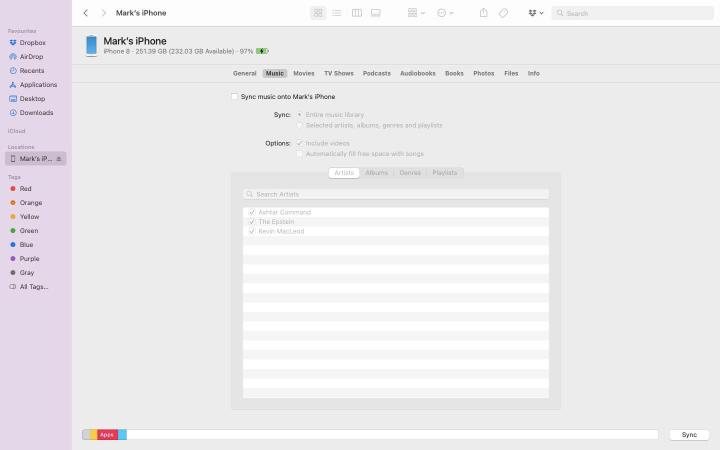
Step 4: You can choose whether to sync your entire library or just a certain number of artists, genres, or playlists. You can also choose to automatically fill free space with songs and add videos, too, if you have the room to spare.
Step 5: Select Apply, and your devices will sync up.
Adding music using iTunes on Windows or an older macOS device
Using an older macOS device or a Windows PC? Worry not, you can still sync across your music collection. Make sure you’ve updated your operating system to the latest version your desktop or laptop can run, and also make sure you’ve downloaded the latest version of iTunes from the Apple website if you’re using a Windows PC or older macOS device.
Step 1: Open iTunes on your device of choice, and attach your iPhone using a compatible cable. As with the steps above, you may need to select the Trust option and enter your passcode.
Step 2: Your iPhone appears as an icon at the top left-hand column of the iTunes window. Click it, then the Music tab on the left.
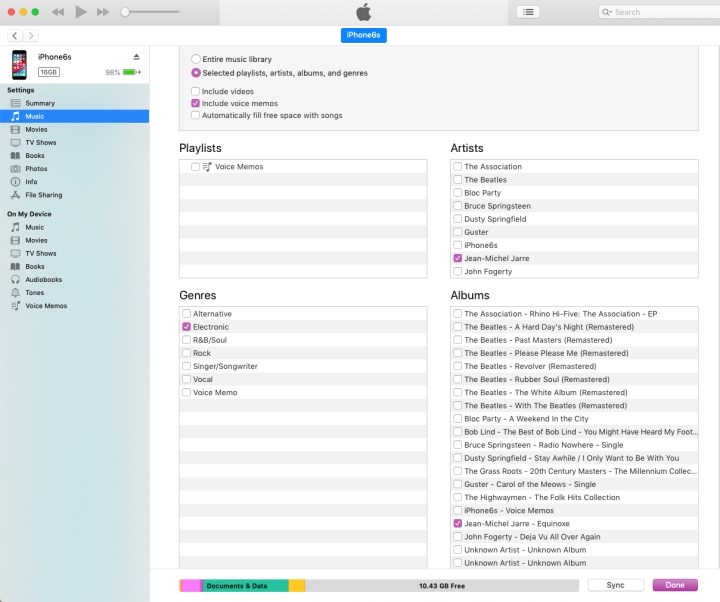
Step 3: Tick the Sync music option. As before, you can choose to sync everything or just certain artists, genres, or playlists.
Step 4: When you’re done, select Apply, and the syncing process will begin. If you have a large library, this may take some time.
Step 5: Make sure you keep your device connected until it’s done. You can keep an eye on progress using the bar at the top of the screen. When it’s finished, select Done, and you can eject your iPhone whenever you’re ready.
The wireless way
Some of the newer Mac laptops are — shall we say — USB-challenged. If you lack the cables to quickly attach your MacBook and iPhone or have simply developed an aversion to cables, there’s a wireless way to get your tunes into your phone via your Wi-Fi connection. Here’s how to do it.
As always, It’s best to have all your software updated. So, in addition to updating your macOS and iTunes on the computer, you also want to download the latest version of iOS for your iPhone, iPad, or iPod Touch.
Step 1: First, you’re going to need to plug your iPhone into your MacBook and ensure the option to sync over Wi-Fi is enabled. Plug your iPhone in using a compatible cable.
Step 2: Select the iPhone icon at the top left-hand column of the iTunes window, and then ensure the option titled Sync with this iPhone over Wi-Fi is enabled. Select Apply > Done. Eject your iPhone and disconnect the cable.
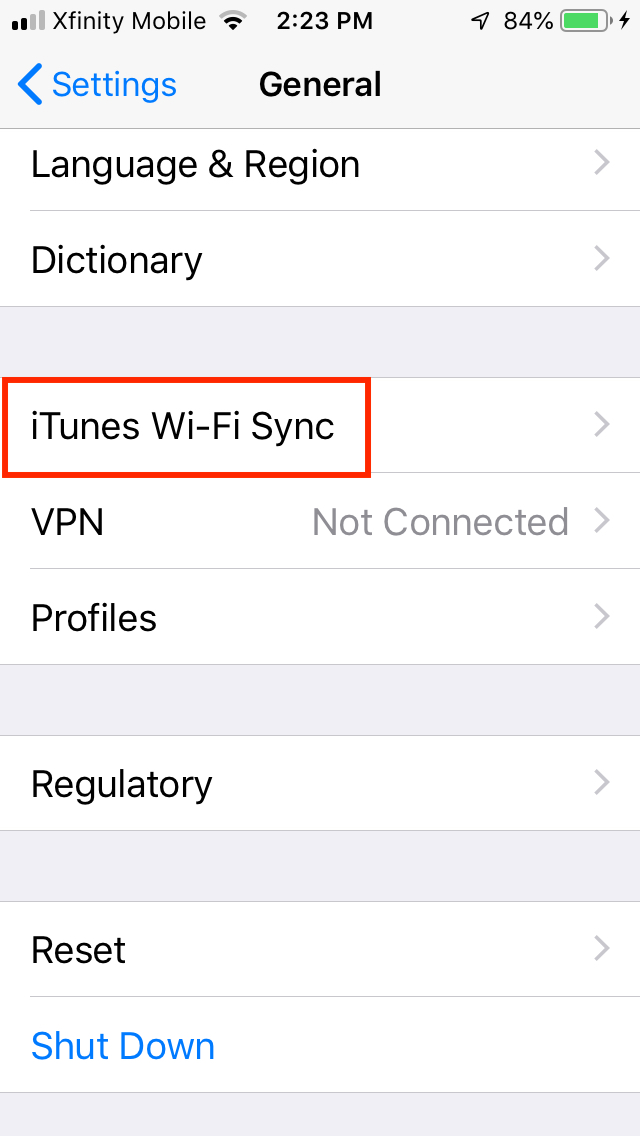
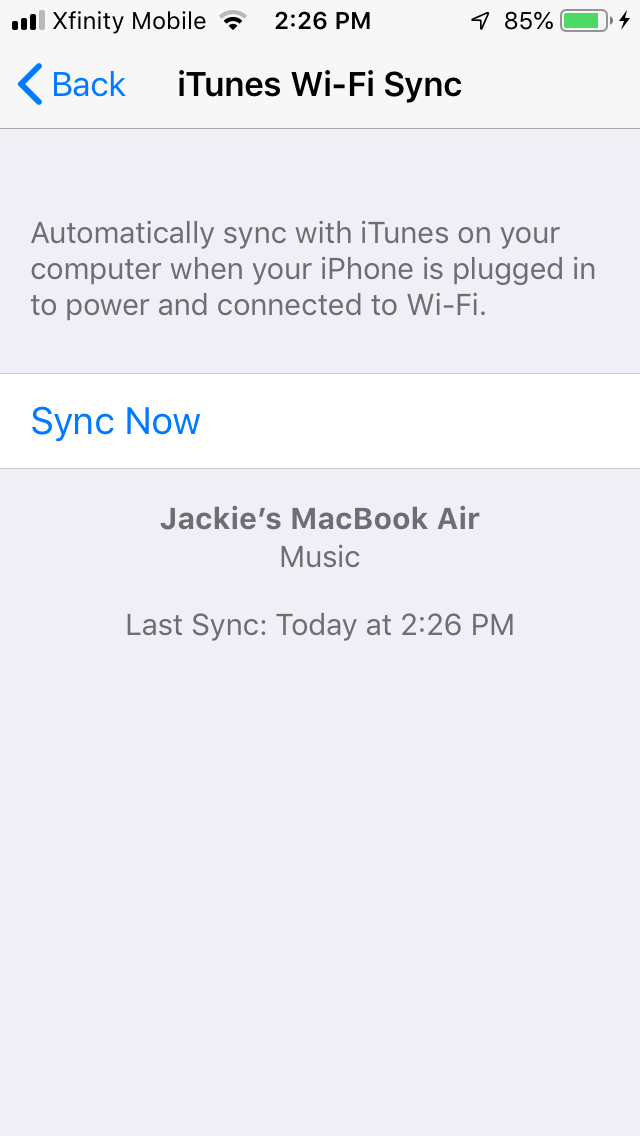
Step 3: When you weant to sync, head to Settings > General > iTunes Wi-Fi sync and tap the Sync now button.
Syncing through iCloud
There’s wired and wireless, but there’s yet another way: the cloud. With Apple’s iCloud, you have the option of backing up your music in the cloud and accessing any song you want at any time. iCloud covers all of the music you purchased from the iTunes Store, but not tunes you obtained any other way. In addition to iCloud backup available via iTunes, Apple offers two paid cloud-based services designed to cover the rest of your collection, augment your musical collection, and make your current songs available everywhere and at all times: Apple Music and iTunes Match.
Apple Music
Apple Music is a subscription plan that offers a variety of features. In addition to its subscription music catalog, it offers iCloud Music Library syncing across devices, Beats 1 radio, customized playlists based on your preferences, artist exclusives, and even song lyrics. Its three plans target individuals, families, and college students or teachers for $10, $15, and $5 per month, respectively, for streaming content or downloading music to listen to offline. The Individual plan lets you access 50 million songs in addition to your personal iTunes library and other exclusive content. The Family plan offers the same features, except it can include up to six accounts. The Student plan has the same benefits as the Individual plan for half the price and is available to both students and teachers. A three-month free trial lets you try before you buy. Apple’s Music app on your phone lets you access all your synced music from iTunes on your desktop, as well as Apple’s music subscription service.
You can sign up for Apple Music on your desktop or on your mobile device. On the Mac, launch iTunes and click the For you tab at the top of the window, then click the Choose your plan button. On your mobile device, click Apple’s Music app and tap on the For you heart icon at the bottom of the screen to get the same choice of plans.
iTunes Match
For $25 per year, iTunes Match uses metadata matching and audio fingerprinting to match your songs to its iTunes Store recordings and maintain your iCloud Music Library. If you aim to have your personal iTunes library available on all your devices and don’t care about subscription services, iTunes Match may be your jam. The service can match up to 100,000 of your songs to its database, letting you stream or download them on up to 10 devices. Music you already purchased from the iTunes Store does not count toward the limit. iTunes Match is currently integrated into the Apple Music subscription service, so if you subscribe to Apple Music, you can say goodbye to iTunes Match and its extra fee. If you aren’t interested in an Apple Music subscription, you can still hold on to iTunes Match.
To subscribe, launch iTunes and click the Store tab at the top of the window. Then, scroll all the way down the page until you see iTunes Match under the Features section. Click the link and subscribe.
iCloud Music Library
This service works with both Apple Music and iTunes Match to store your personal music files by matching your songs to tracks already available in the iTunes Store. That lets you either stream or download any selection of up to 100,000 songs to up to 10 authorized devices. If you enable iCloud Music Library, you cannot sync music from your computer to your phone, because this setup facilitates only sharing between devices.
Regardless of which methods you choose to purchase, store, and listen to your music, you have many options that let you tote your favorite tunes around with you wherever you go.
Editors’ Recommendations


