If you have a new laptop (opens in new tab) (or desktop) running Windows 11, you first need to set it up and adjust the settings to make it personal and make the most of it.
On Windows 11 (opens in new tab), setting up a new laptop is a straightforward process, and it only takes some time to complete the initial setup to create an account and choose your preferences. In addition, you want to remove all unwanted software, download the latest updates, install and configure the apps you need, transfer your files from your old computer, and customize the desktop to make it more personal.
This guide will walk you through the steps to correctly set up your new laptop.
How to set up installation on Windows 11
You can set up a new laptop in at least two ways. You can use the original installation and continue with the out-of-box experience (OOBE) to create a new account, choose your preferred settings, and continue undoing custom configurations and removing those pre-installed junk apps (bloatware). Or you can reinstall the operating system to start fresh with a clean copy of Windows 11.
Out-of-box experience (OOBE)
To set up a new device, use these steps:
- Select your region.
- Click the Yes button.
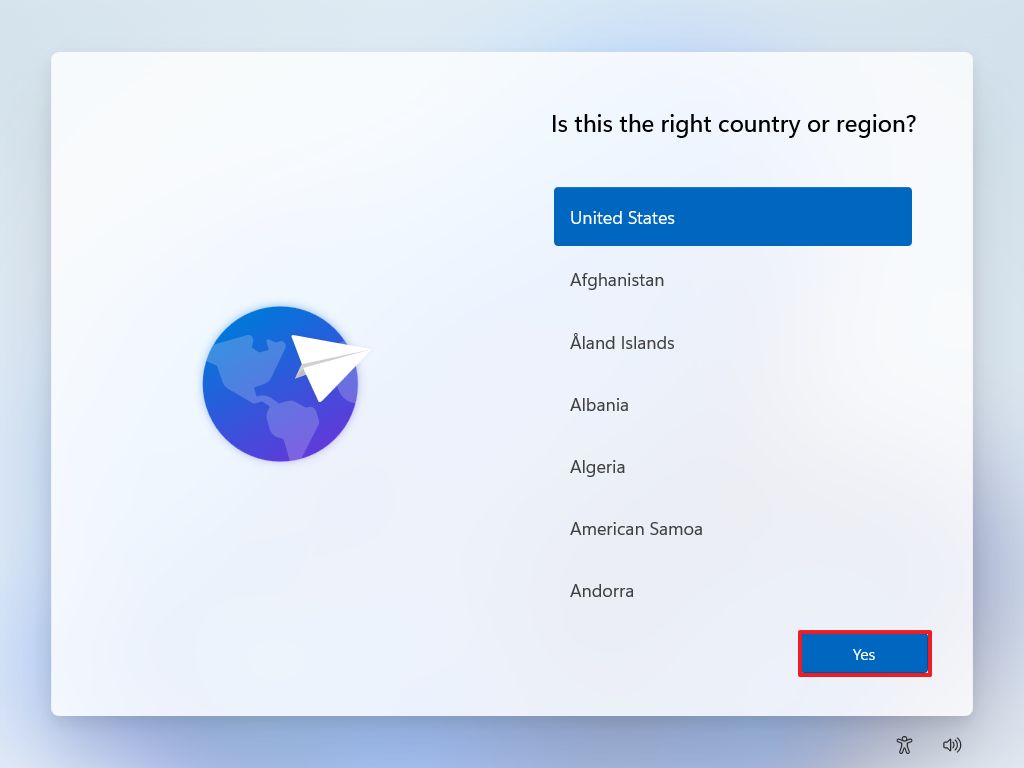
- Select your keyboard layout.
- Click the Yes button.
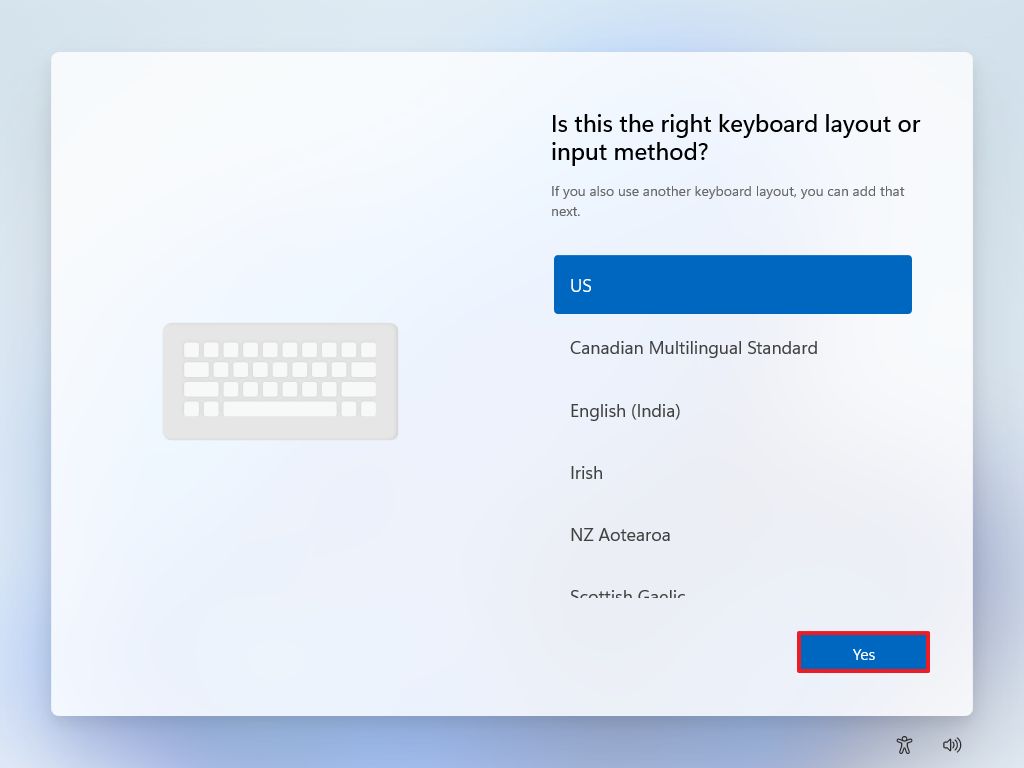
- Click the Skip button.
- Click the Accept button.
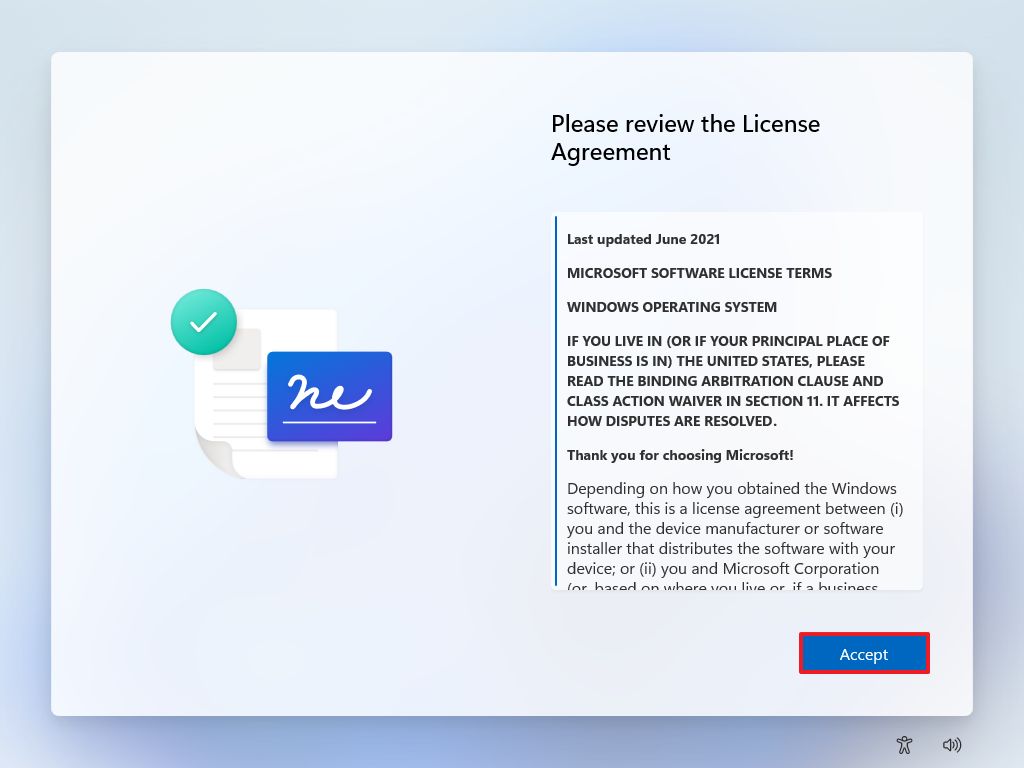
- Select the wireless network.
- Quick note: If the laptop has a wired connection, the connection with occur automatically. Using a wireless connection, you must connect to the network. Otherwise, you won’t be able to continue with the setup.
- Click the Connect button.
- Specify a name for the laptop (spaces are not allowed in the name).
- Click the Next button. (This action will cause the device to restart.)
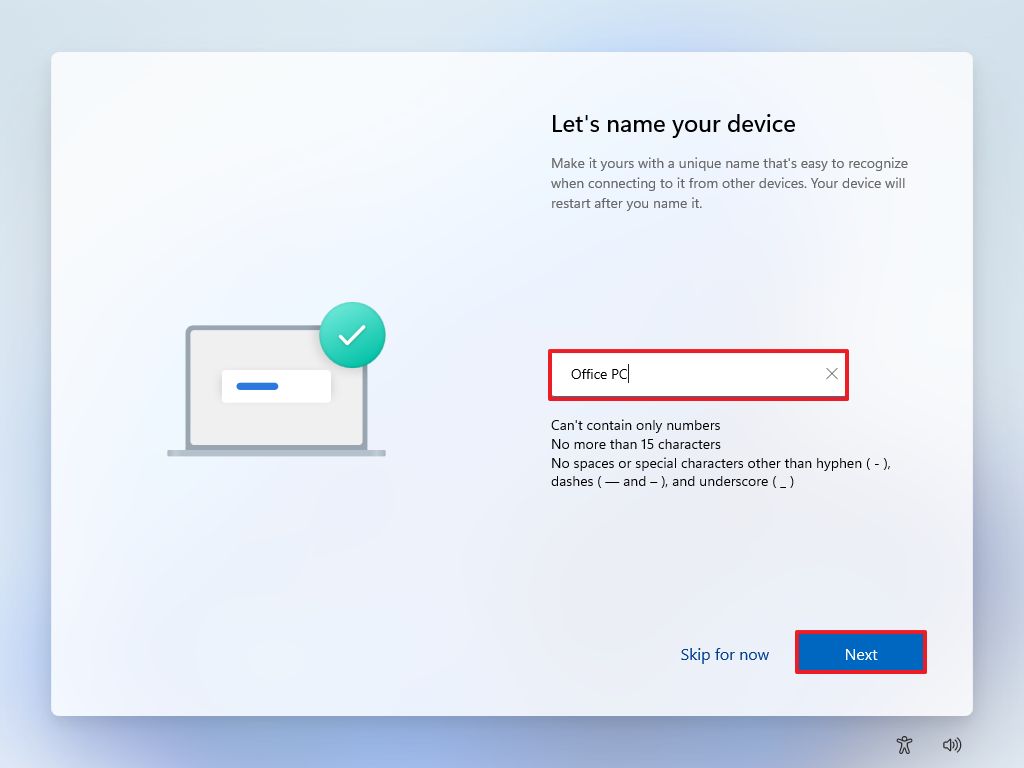
- Select the “Set up for personal use” option for Windows 11 Pro. On the “Home” edition, this option is not available.
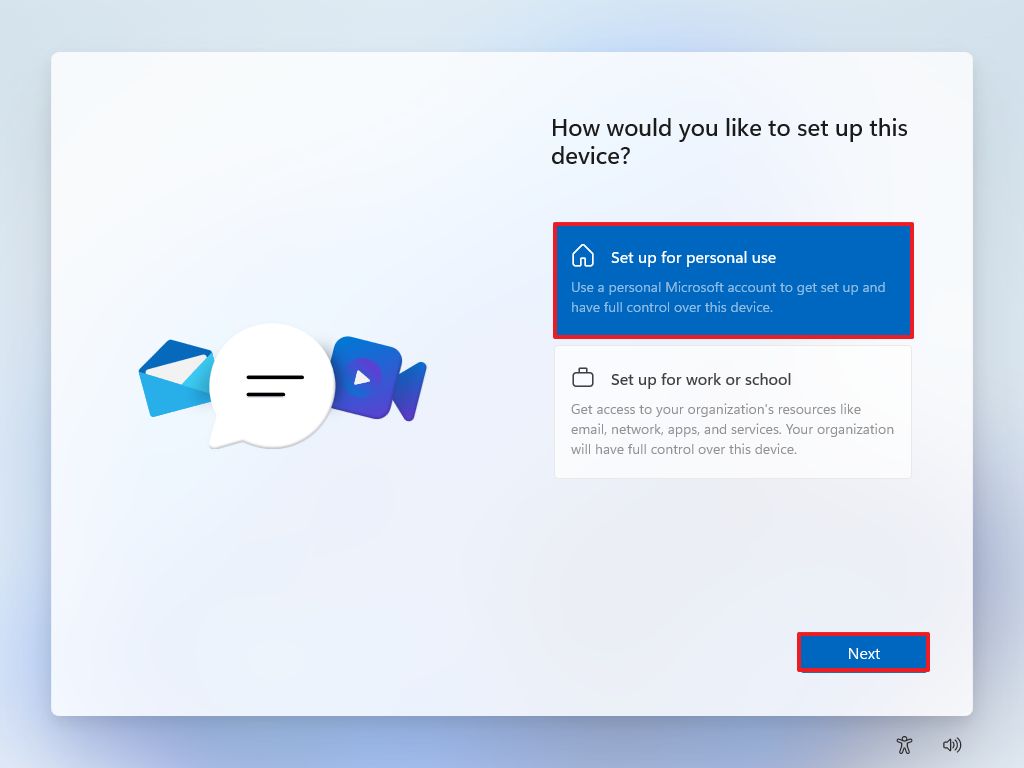
- Sign in with your email address to set up the primary Windows 11 account.
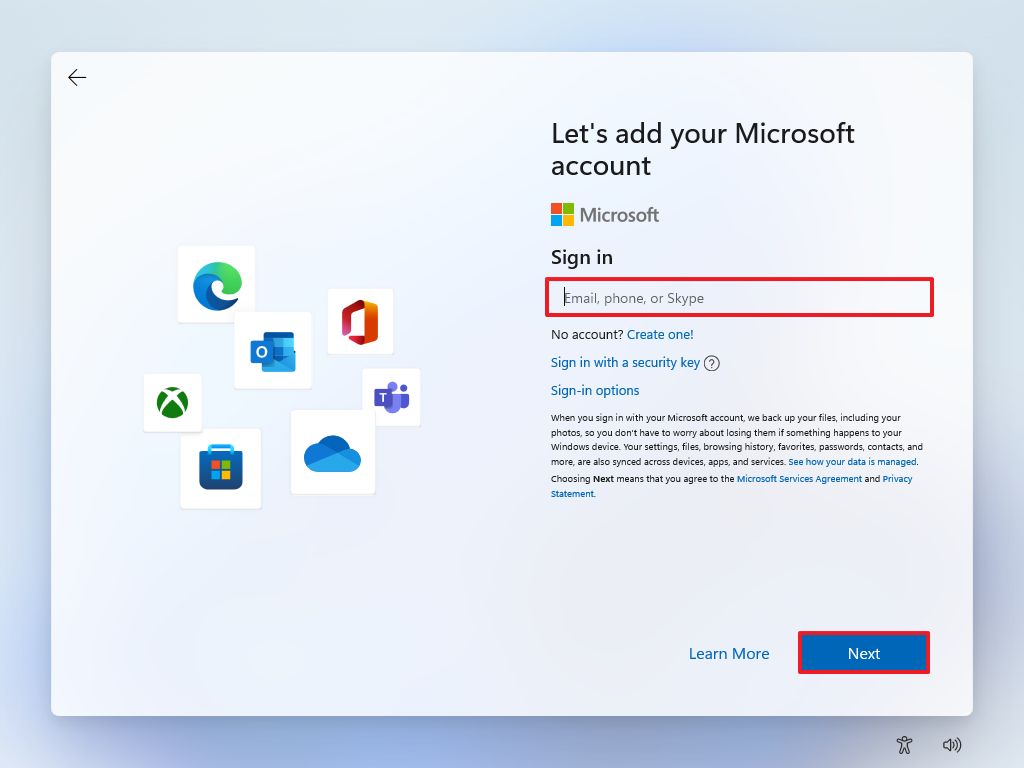
- Click the Next button.
- Confirm your account password.
- Click the Next button.
- Click on “View more options.”
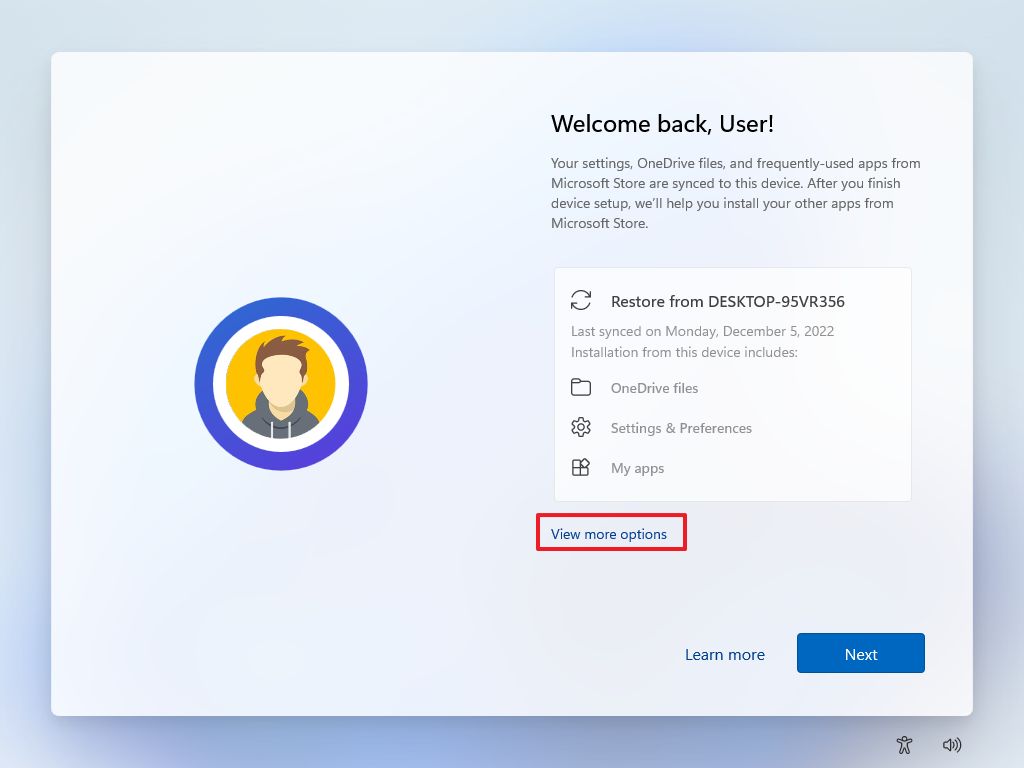
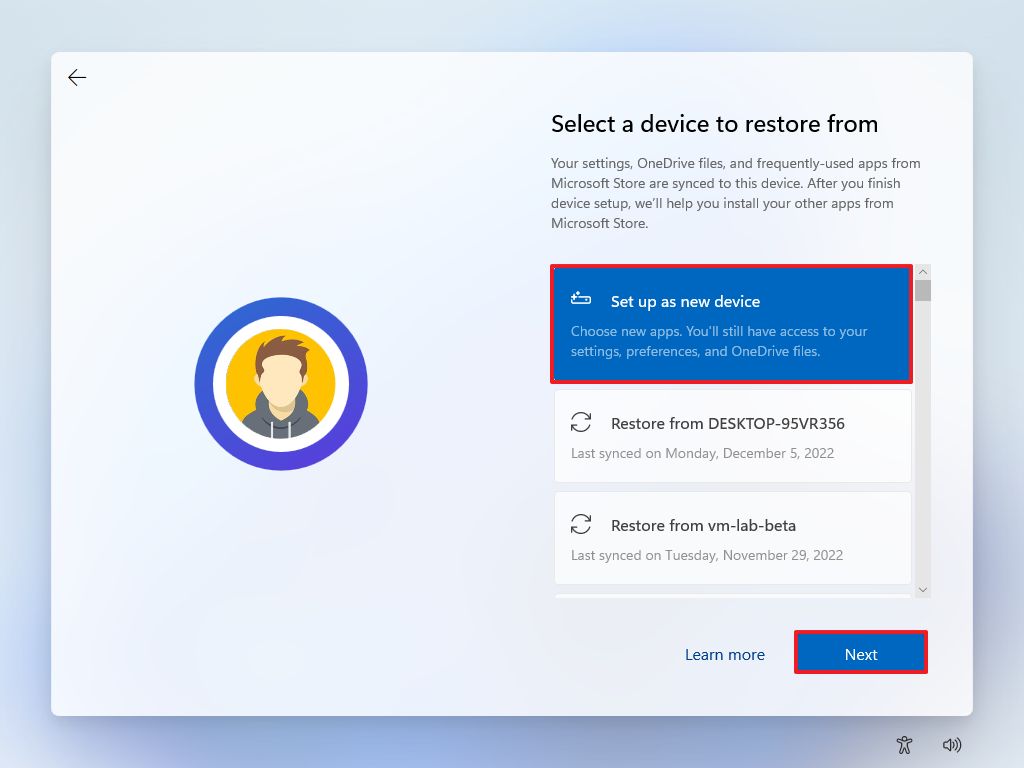
- Choose the “Set up a new device” option.
- Click the Next button.
- Click the Create PIN button to set up Window Hello.
- Confirm the PIN for the account.
- Click the OK button.
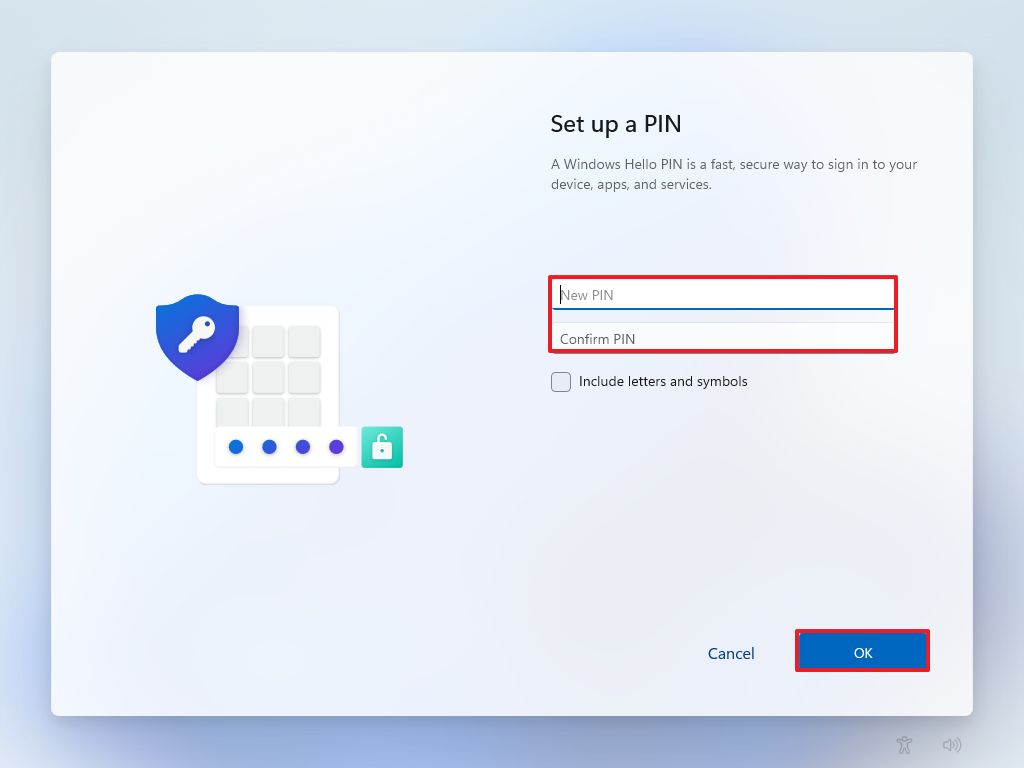
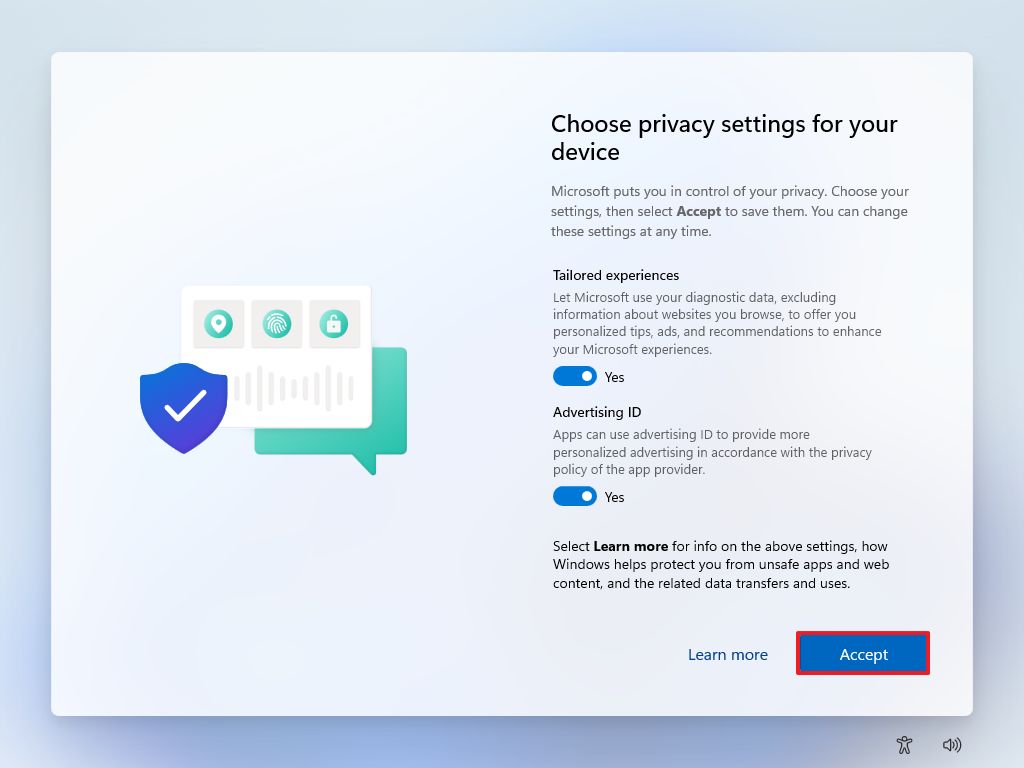
- Choose the privacy settings.
- Click the Next button.
- Click the Next button again.
- Click the Accept button.
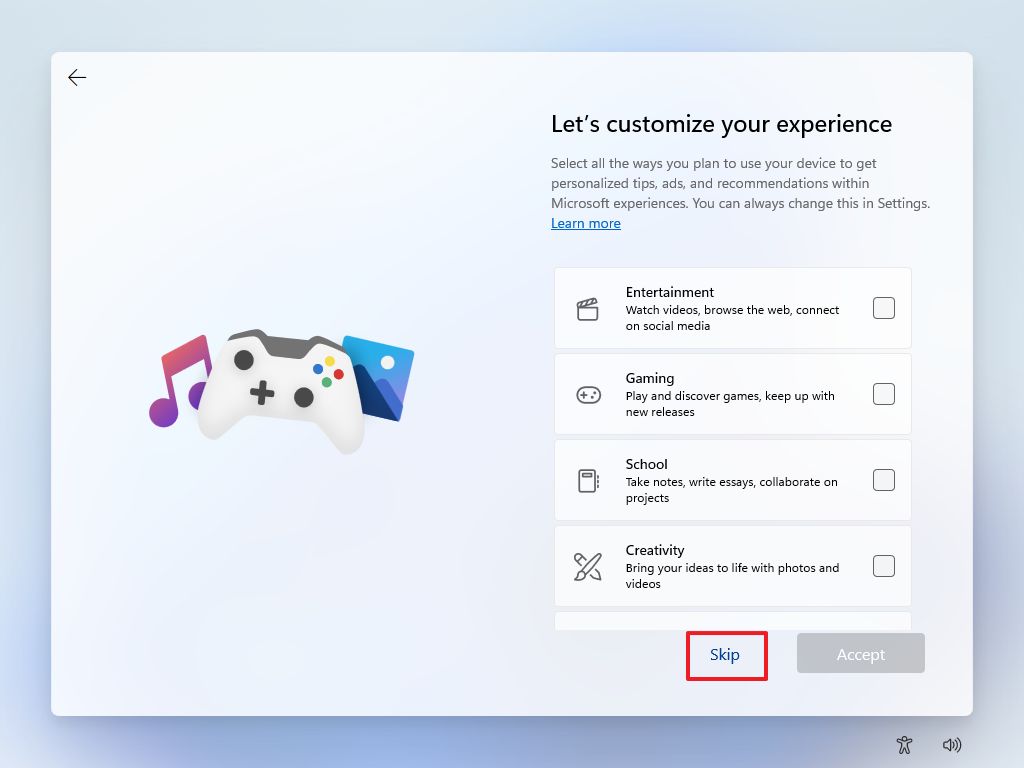
- (Optional) Choose how you plan to use the computer to allow the system to show tailored recommendations.
- Click the Accept button or the Skip button to skip this feature.
- Click the Skip button to ignore the phone link setup. (You can always set up this later.)
- (Optional) Click the Decline button to skip the Office app setup.
- (Optional) Click the Decline button to skip the OneDrive offer.
- (Optional) Click the “Skip for now” button to skip the Game Pass subscription offer.
Once you complete the steps, the system will finish the setup automatically.
The steps outlined above represent the experience on version 22H2, but your experience may be slightly different. Also, manufacturers often provide a customized version of the out-of-box experience with different settings, including a device registration form and specific settings for the device, which you can always skip.
If you want to keep the original installation, you can continue with the steps below to uninstall those promotional applications. Alternatively, you can perform a clean installation to ensure you will start with a completely fresh copy of Windows 11.
Uninstall bloatware
If you plan to keep the same installation, you want to remove those applications that the manufacturer pre-installed on your computer to free up space and system resources.
To uninstall pre-installed apps on Windows 11, use these steps:
- Open Settings.
- Click on Apps.
- Click the Installed apps page on the right side.
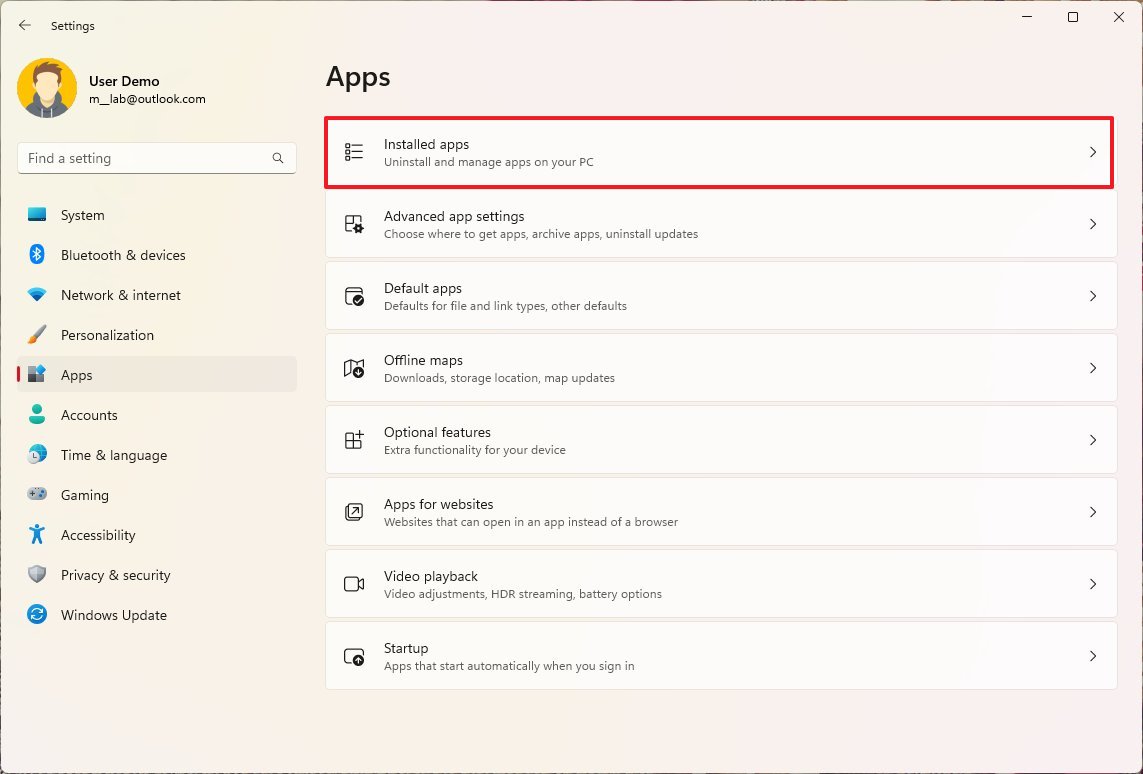
- Select the unwanted app, click the (three-dotted) menu button on the right, and select the Uninstall button.
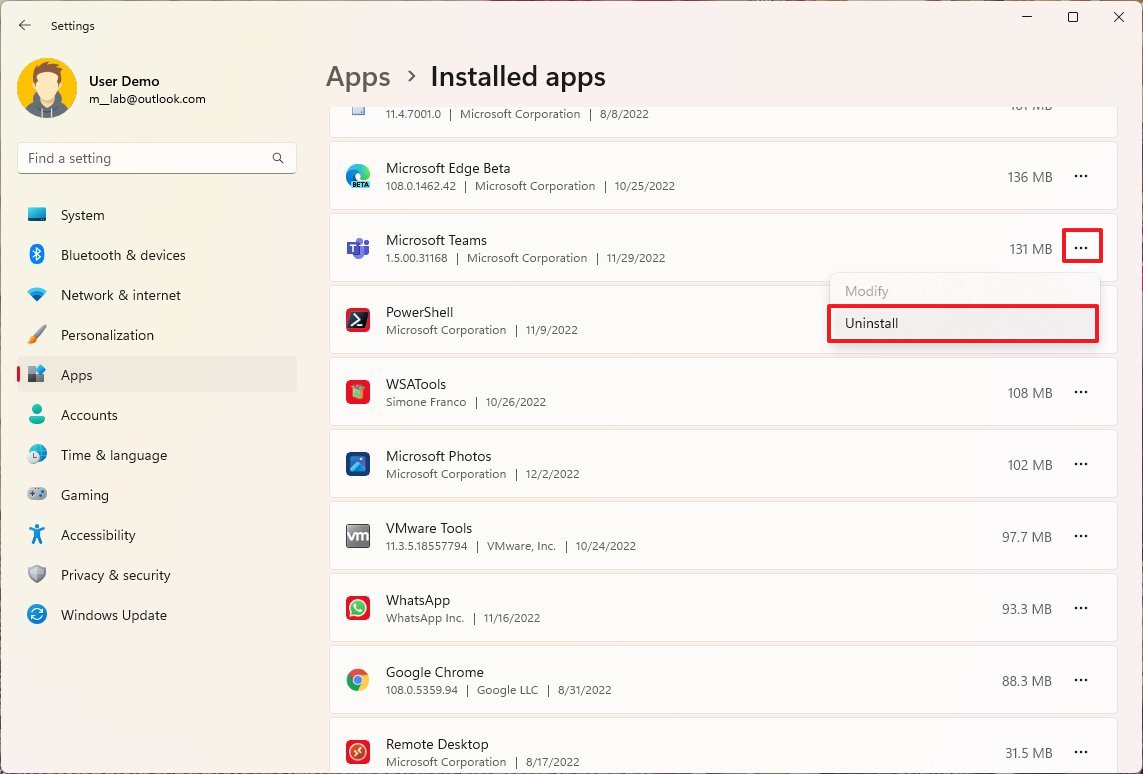
- Quick tip: If you need to know which apps to remove, usually, you want to start with antivirus trials and tools that do not come from Microsoft Corporation. You can quickly determine the publisher by looking under the app name to identify the publisher.
- Click the Uninstall button again.
- Continue with the on-screen directions (if applicable).
After you complete the steps, you may need to repeat the instructions to uninstall other bloatware.
Clean installation set up
Although the default installation may come with unwanted configurations and applications, the setup should be alright for most users. However, the best approach is to clean the system and start with a fresh installation of Windows 11.
The only caveat about using a clean installation is that you may need to spend more time reconfiguring some devices and settings.
To start fresh with a clean installation of Windows 11 on your new computer, use these steps:
- Open Settings.
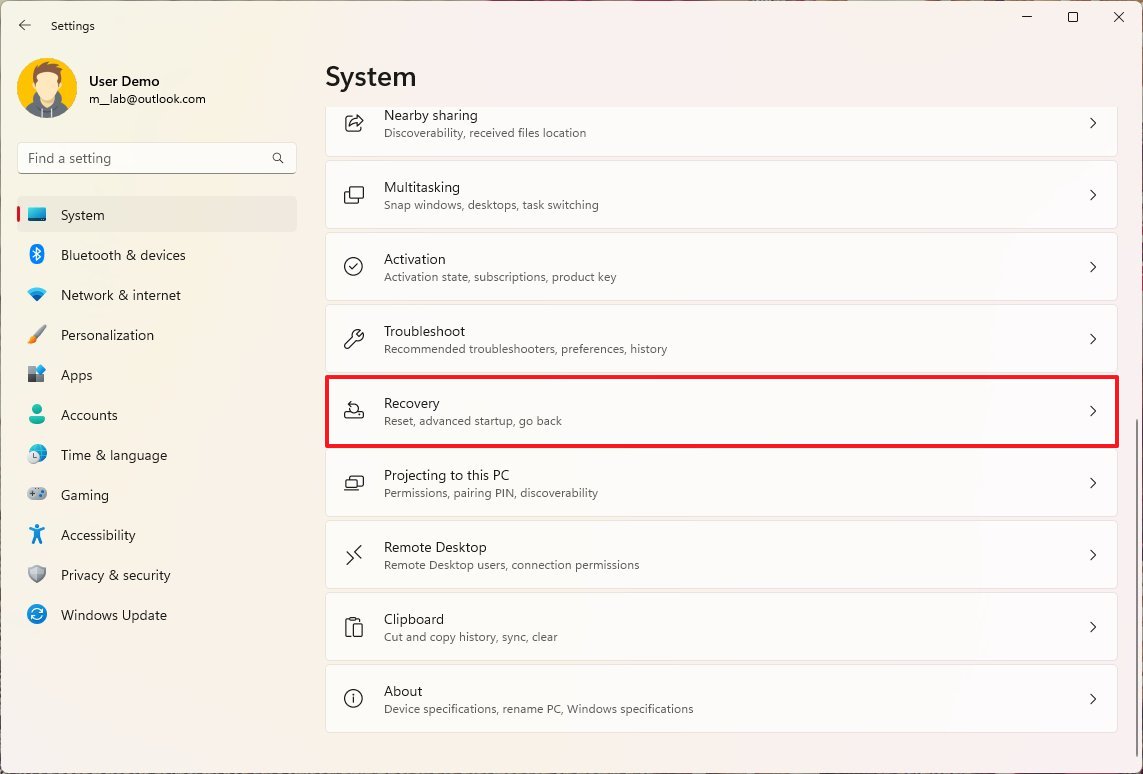
- Click on System.
- Click the Recovery page on the right side.
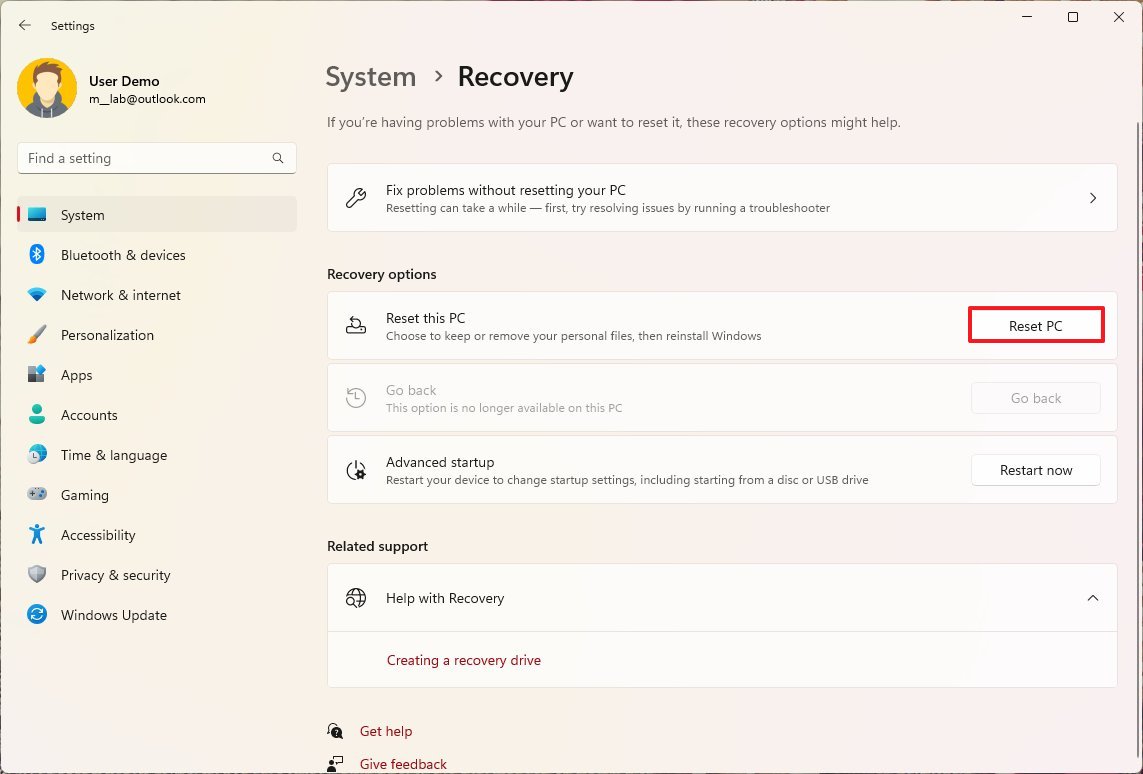
- Under the “Recovery options” section, click the Reset PC button for the “Reset this PC” feature.
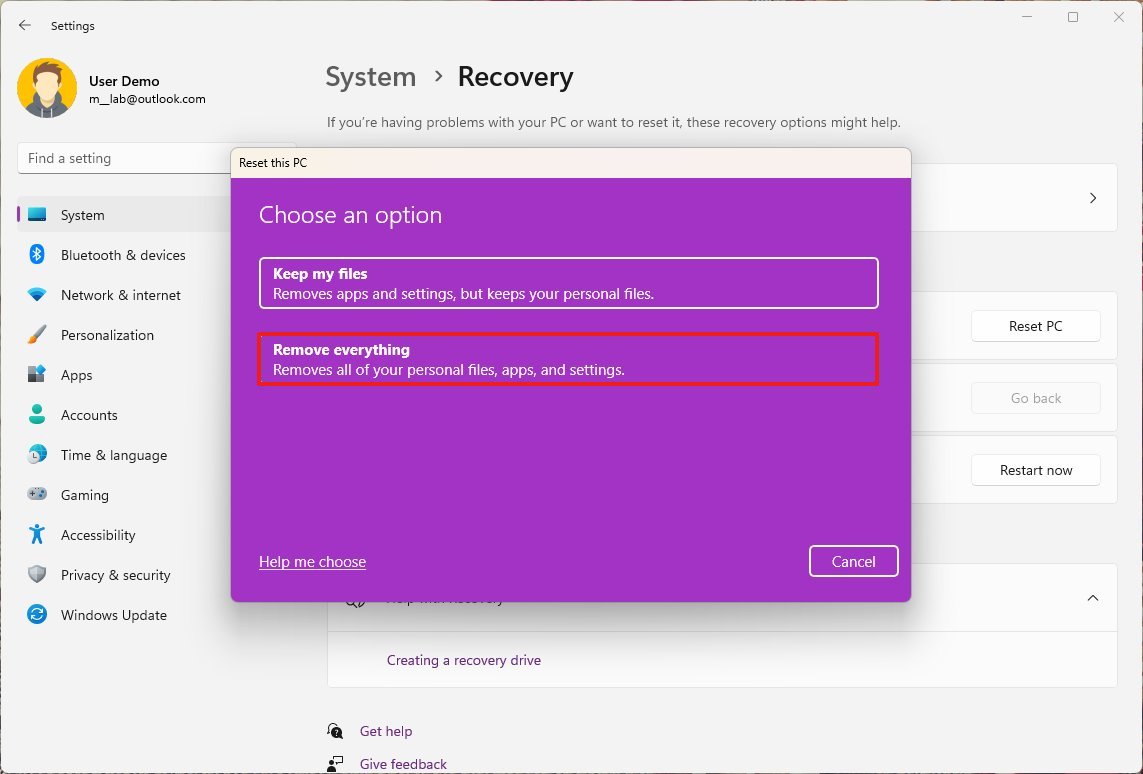
- Click the Remove everything option.
- Click the Cloud download option.
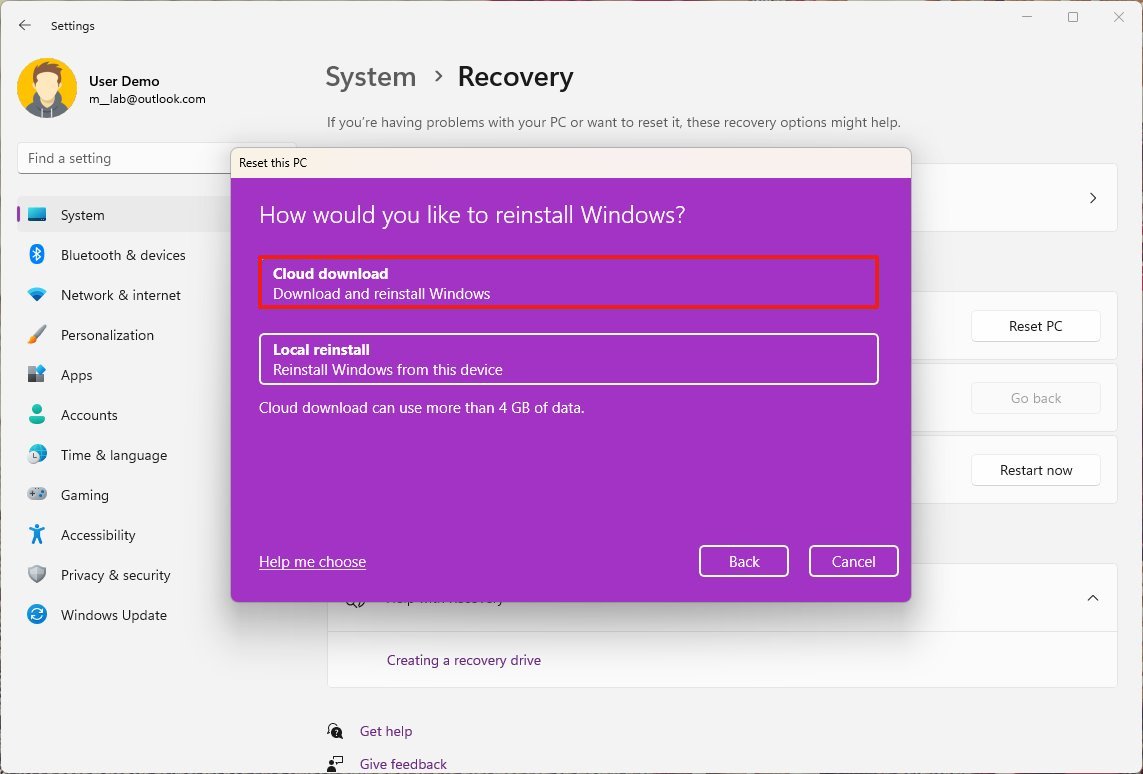
- Click the Next button.
- Click the Reset button.
Once you complete the steps, the setup will erase the current installation, download the default image file from the Microsoft servers, and proceed with a clean installation of Windows 11.
After the installation, you will need to complete the out-of-box experience to choose your preferences and create a default account.
How to install updates on Windows 11
On Windows 11, updates download and install automatically, but it’s always a good idea to manually update the system to ensure the device isn’t missing anything critical.
Cumulative updates
To update your new computer running Windows 11, use these steps:
- Open Settings.
- Click on Windows Update.
- Click the Check for updates button.
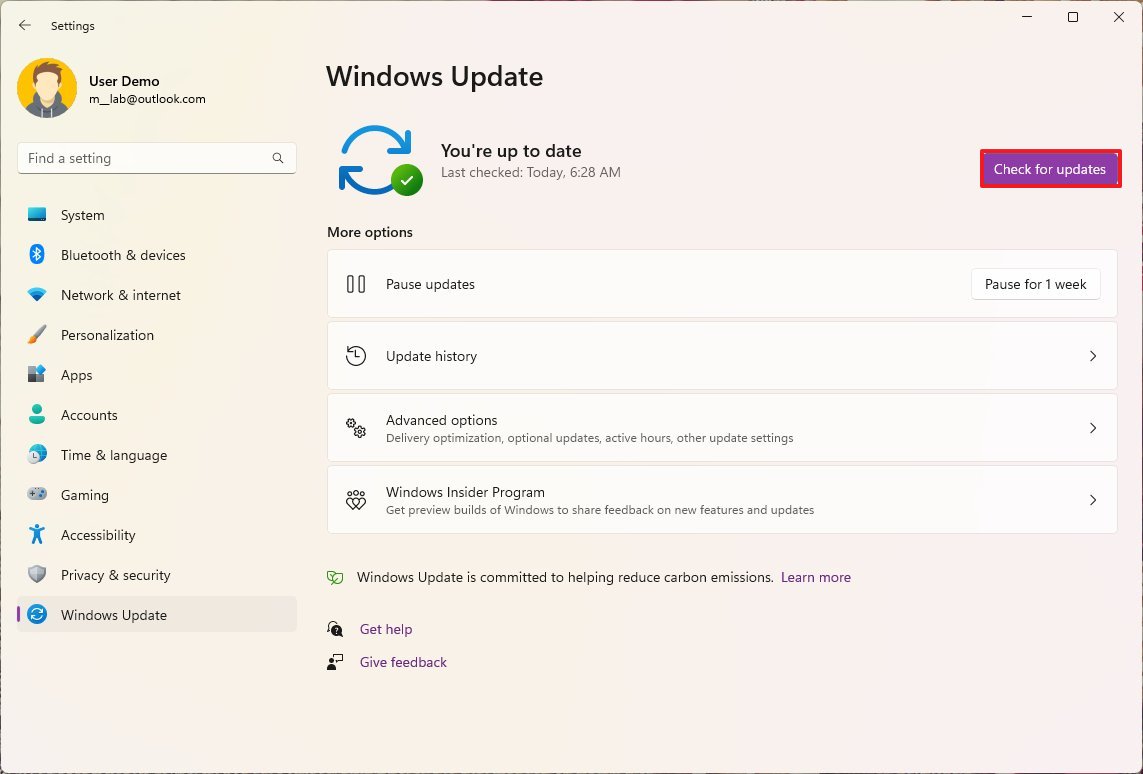
- Click the Restart now button.
After you complete these steps, the available updates will download and install automatically.
Upgrade to version 22H2
If you have a new laptop with Windows 11 version 21H2, as part of the initial setup, you want to upgrade to version 22H2. You can do this in at least two ways from the Windows Update settings and Installation Assistant tool.
Windows Update
To download and install updates on Windows 11, use these steps:
- Open Settings.
- Click on Windows Update.
- Click the Check for updates button.

- Click the Download and install option.
- Click the Restart now button.
Once you complete the steps, Windows 11 will restart and continue with the upgrade process to version 22H2.
Installation Assistant
Alternatively, you can use the Update Assistant app to upgrade your device to version 22H2, and here’s how.
- Open Microsoft support website (opens in new tab).
- Under the “Windows 11 Installation Assistant” section, click the Download Now button.
- Double-click the Windows11InstallationAssistant.exe file to launch the tool.
- Click the Accept and install button.
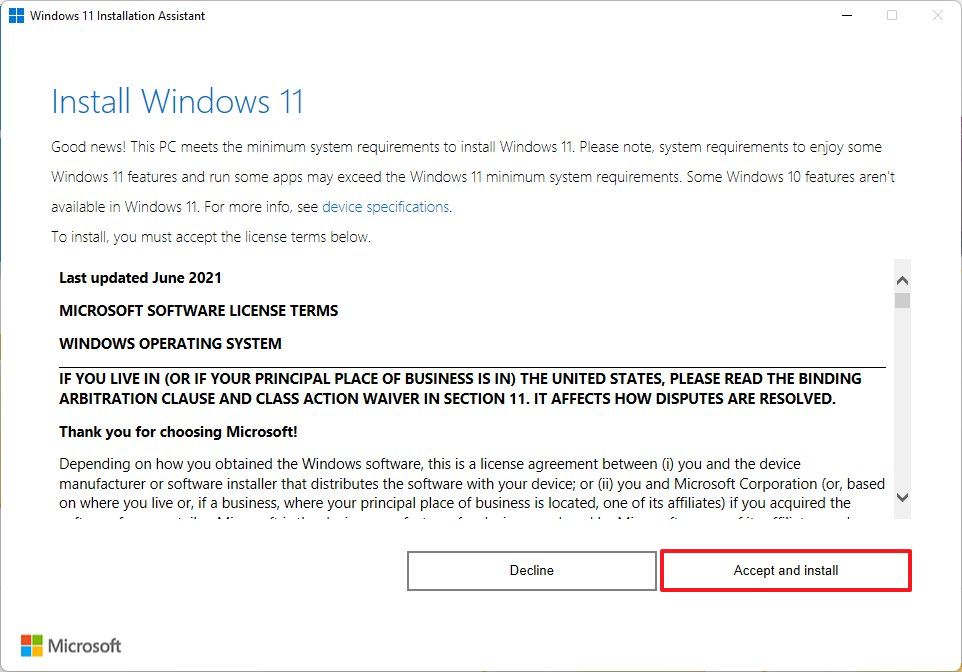
After you complete the steps, the tool will download the required files to upgrade the system to version 22H2.
How to check drivers on Windows 11
As part of the setup process, it’s important to check and confirm that components and peripherals are correctly configured.
Device Manager
To check that none of the devices are missing or having problems with drivers on Windows 11, use these steps:
- Open Start.
- Search for Device Manager and click the top result to open the app.
- Confirm that none of the devices have a yellow or red mark, and confirm nothing shows up as unknown.
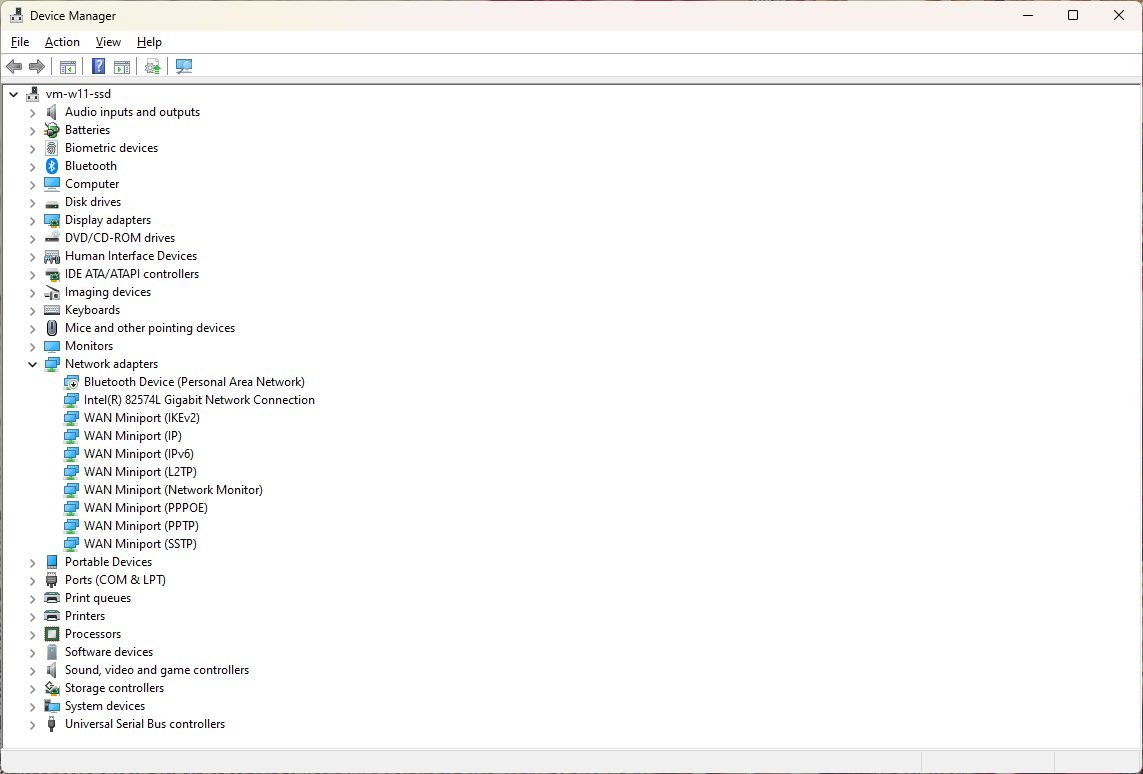
If some components have problems, you may need to manually download and install the latest drivers from your computer manufacturer’s support website.
Windows Update
If the computer is missing or has problems with a specific driver, you can use Windows Update to fix this problem.
To install or update drivers on Windows 11, use these steps:
- Open Settings.
- Click on Windows Update.
- Click the Advanced options page on the right side.
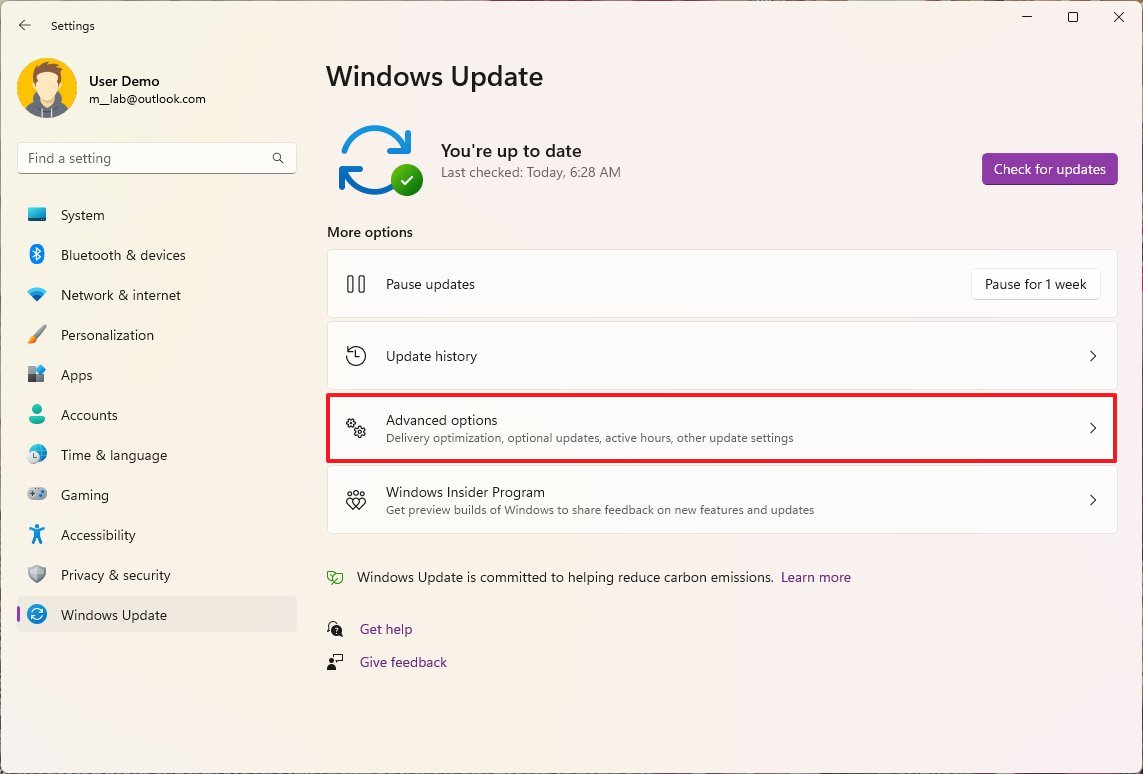
- Under the “Additional updates” section, select the Optional updates setting.
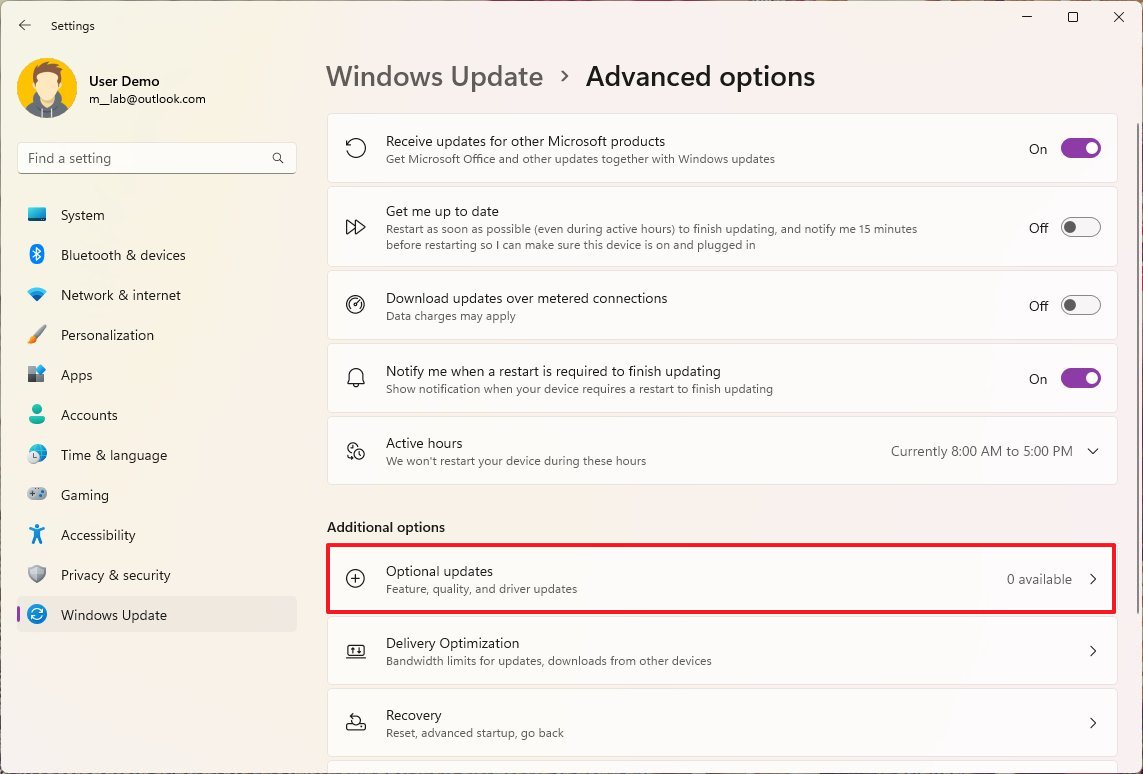
- Select the Driver updates section.
- Check the drivers to install in the new setup of Windows 11.
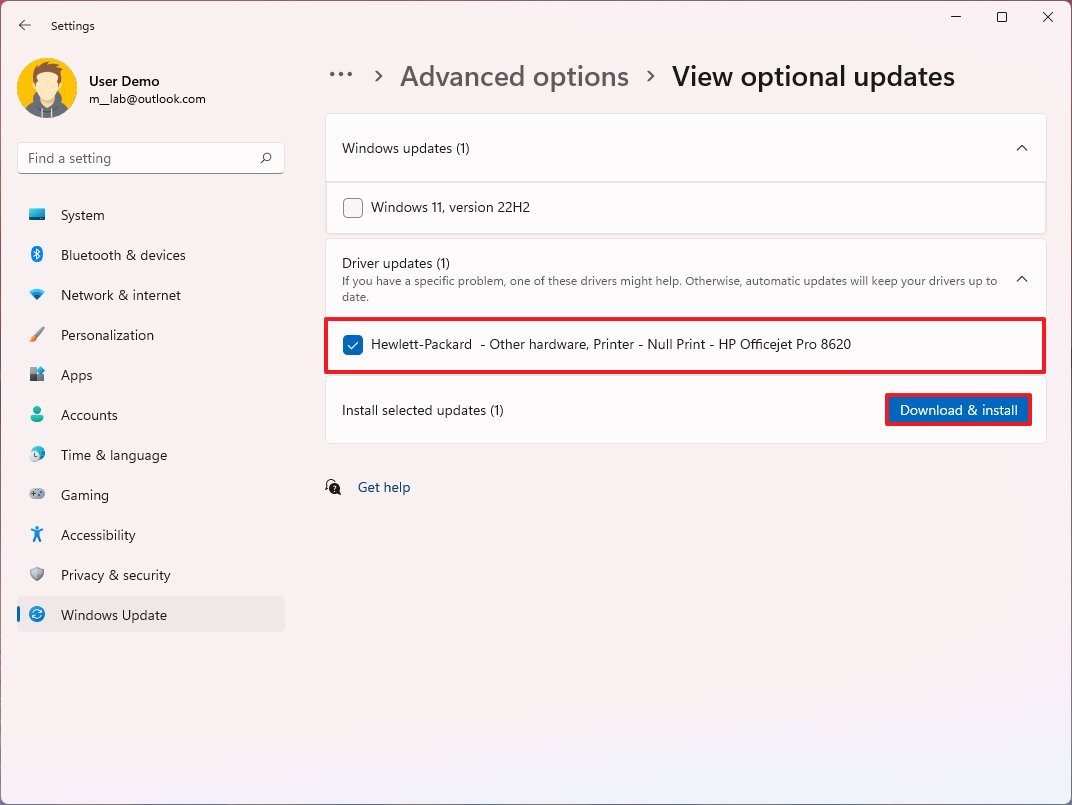
- Quick note: If the page doesn’t show any driver updates, Windows Update doesn’t have any additional updates for your hardware configuration.
- Click the Download and install button.
Once you complete the steps, Windows Update will automatically download and install the drivers.
If Device Manager shows a problem with one of the components and a driver update isn’t available through Windows Update, you will need to check your manufacturer support website to download the driver in question.
How to personalize desktop on Windows 11
After completing the initial setup and updates, you want to personalize the experience tailored to your preference. For example, you want to change the desktop background, choose a system color mode, change the access color, and customize things like the Start menu and Taskbar to make you more productive.
Change theme
A theme is a collection of images and colors to quickly change the look and feel of the desktop and apps.
To change the theme on Windows 11, use these steps:
- Open Settings.
- Click on Personalization.
- Click the Themes page on the right side.
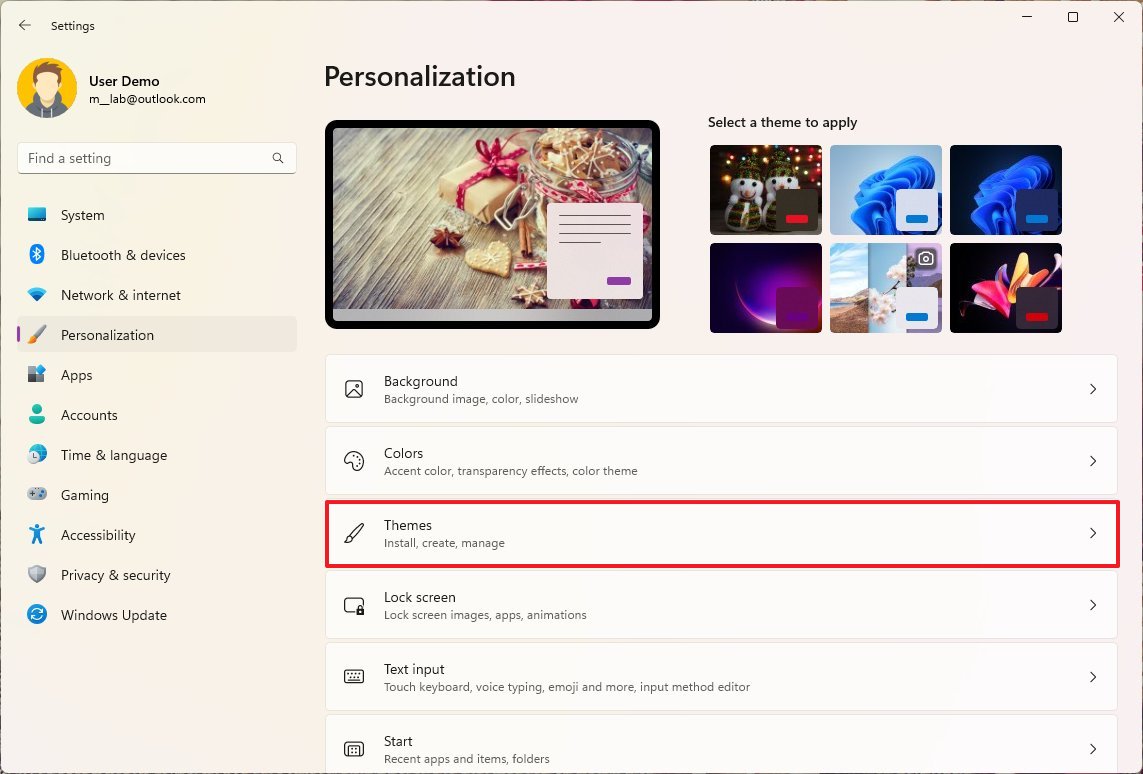
- Choose one of the available themes to apply it.
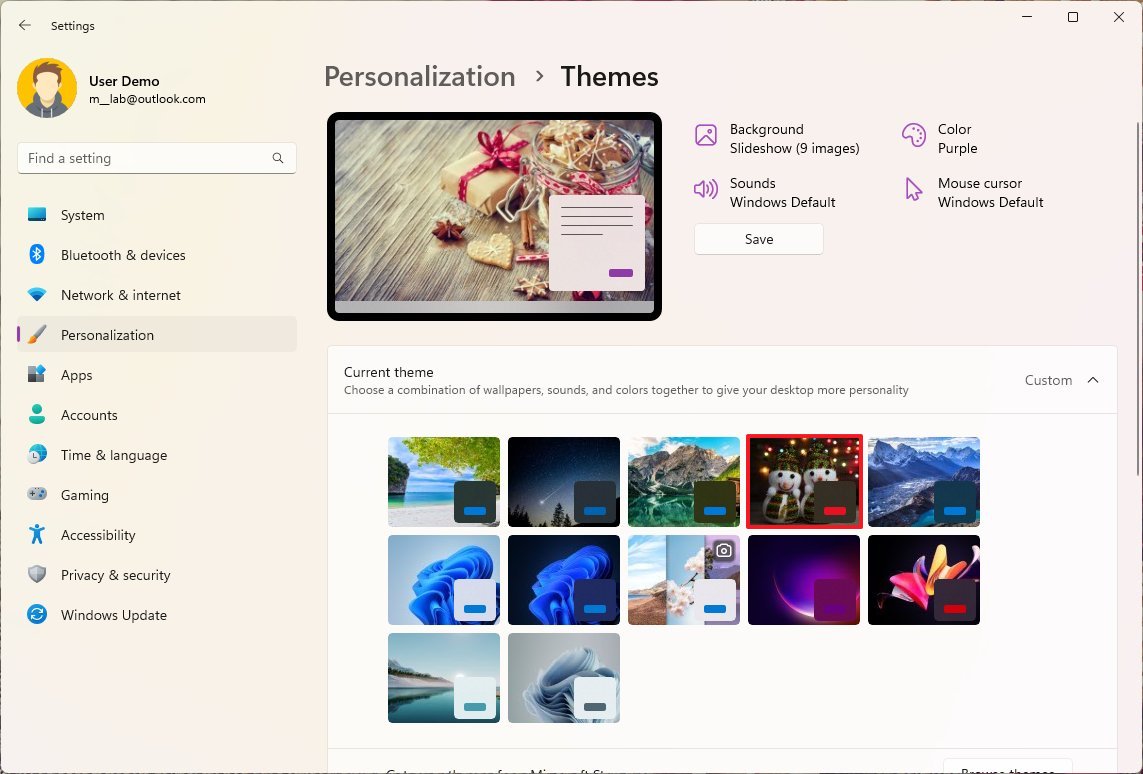
Once you complete the steps, the theme will change the system colors and desktop wallpaper.
Install themes
To download more themes from the Microsoft Store, use these steps:
- Open Settings.
- Click on Personalization.
- Click the Themes page on the right side.

- Under the “Current theme” section, click the Browse themes button.
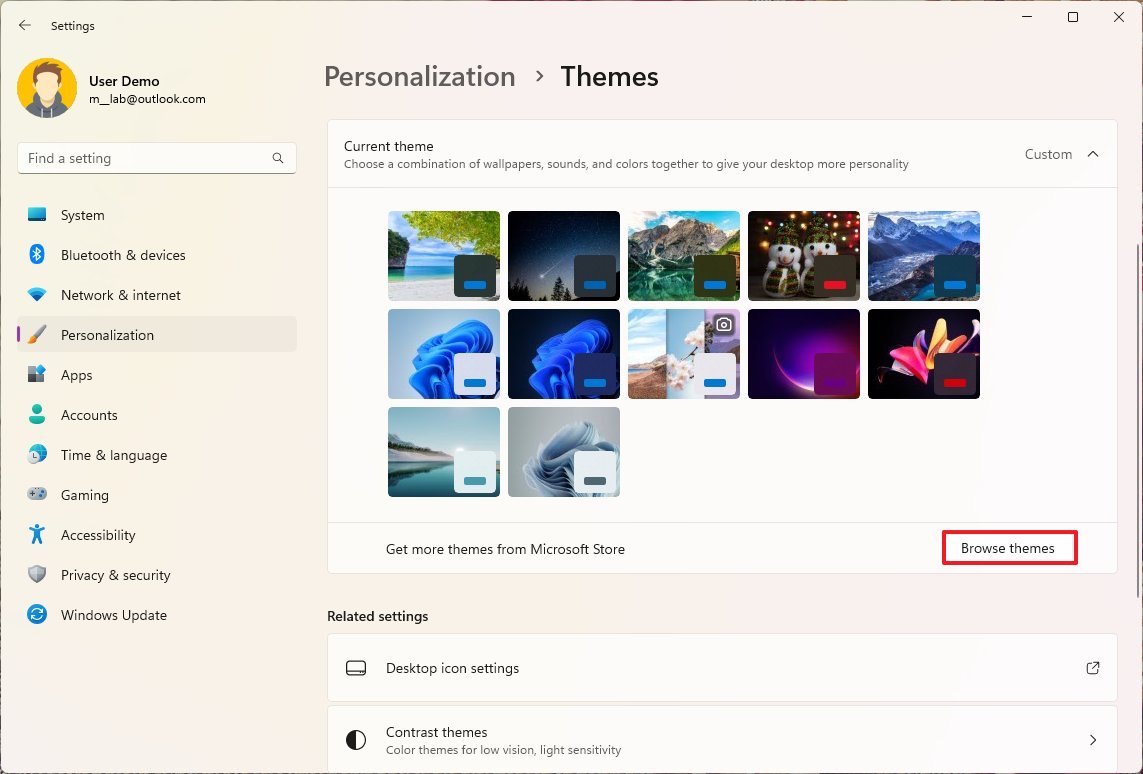
- Select the theme to download.
- Click the Install button.
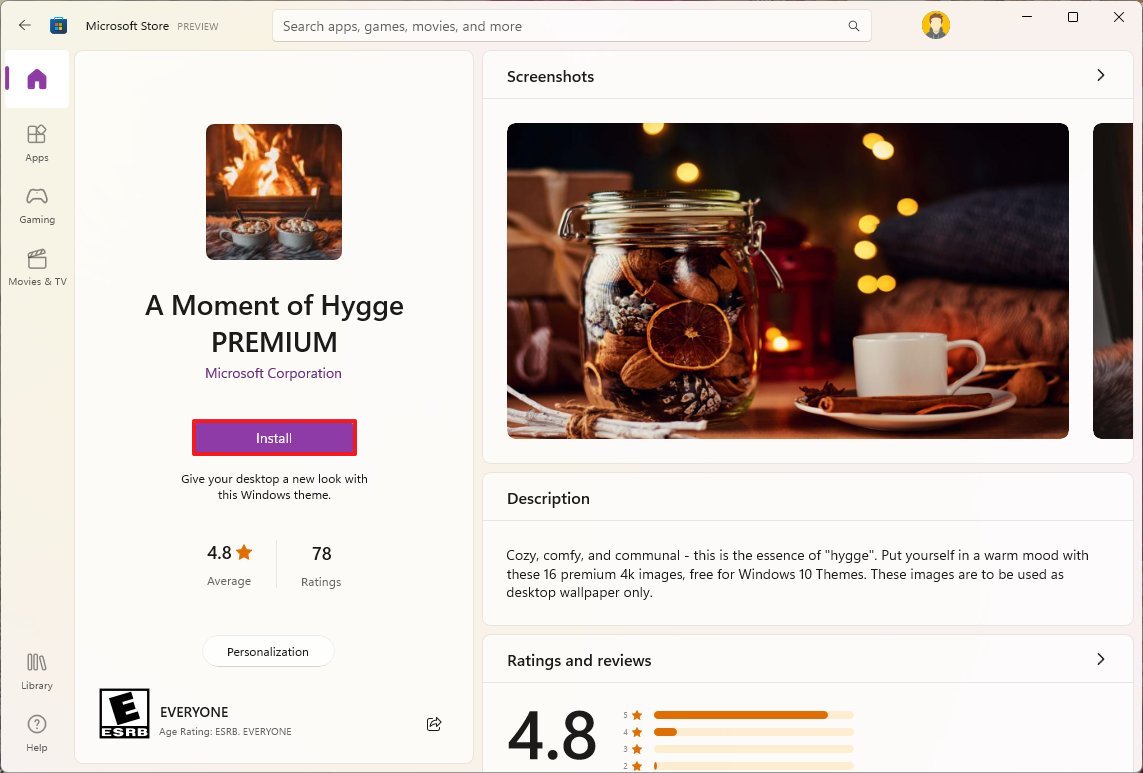
- Click the Open button.
- Choose one of the available themes to apply it.
After you complete the steps, the theme will download and apply on Windows 11.
Change color mode
On Windows 11, you can choose from two color modes, including “light mode,” which works best for the daytime, and the “dark mode,” which is best for low-light situations.
To change the color mode on Windows 11, use these steps:
- Open Settings.
- Click on Personalization.
- Click the Colors page on the right side.
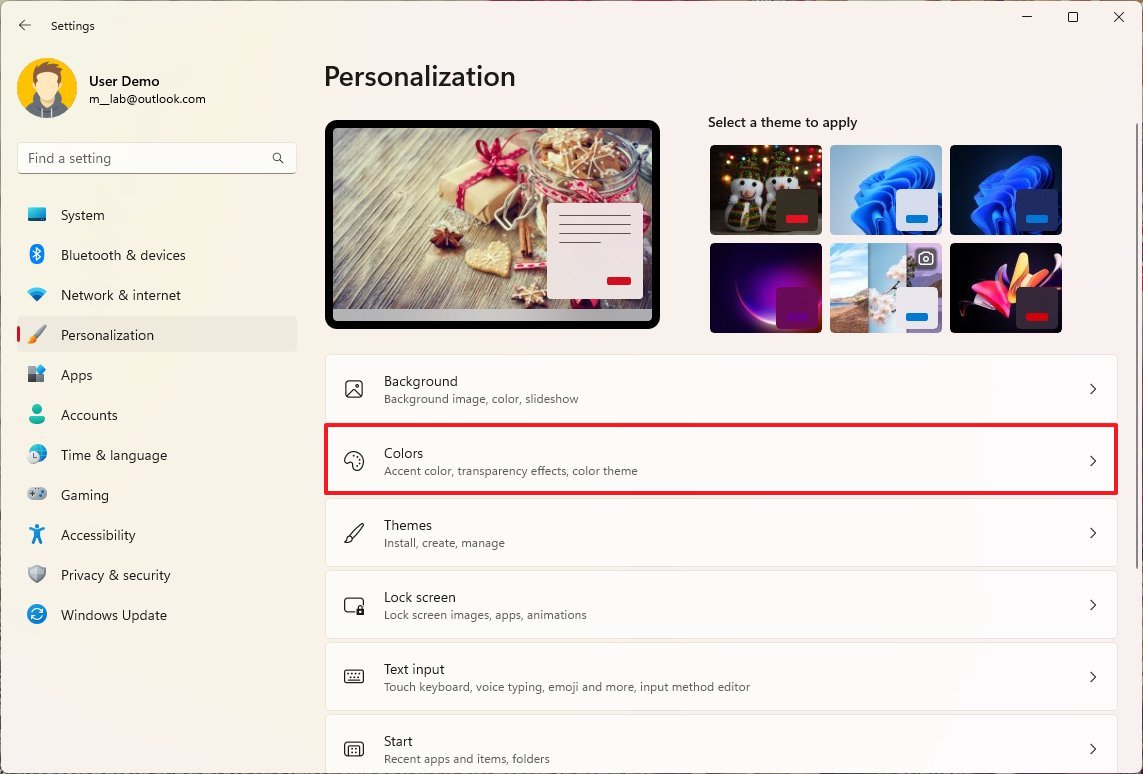
- Use the “Choose your mode” drop-down menu and select one of the available options.
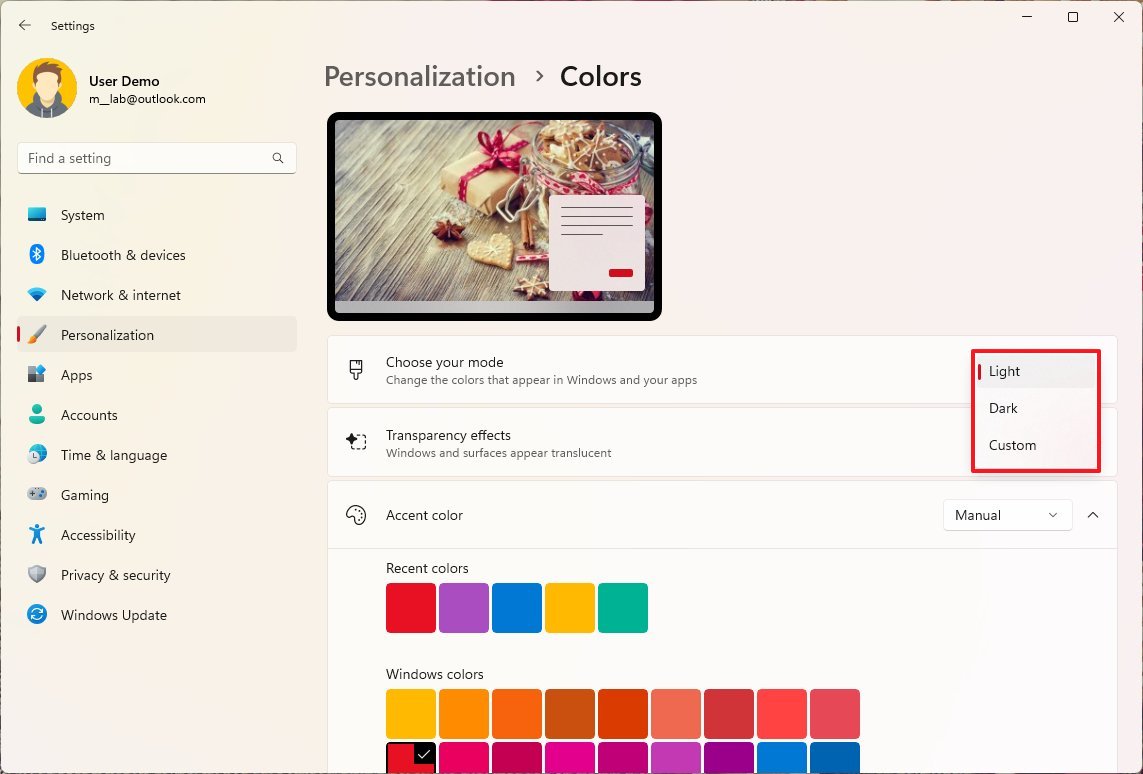
- Light – Applies a white color scheme across the system and apps.
- Dark – Applies a dark color scheme across the system and apps.
- Custom – Allows you to decide the color mode for apps and the system separately.
Once you complete the steps, the Start menu, Taskbar, and other elements will switch to the new color mode.
Change accent color
The accent color is the color that allows certain elements to blend with the current theme.
To change the system accent color on Windows 11, use these steps:
- Open Settings.
- Click on Personalization.
- Click the Colors page on the right side.

- Under the “Accent color” section, select the accent color for the experience.
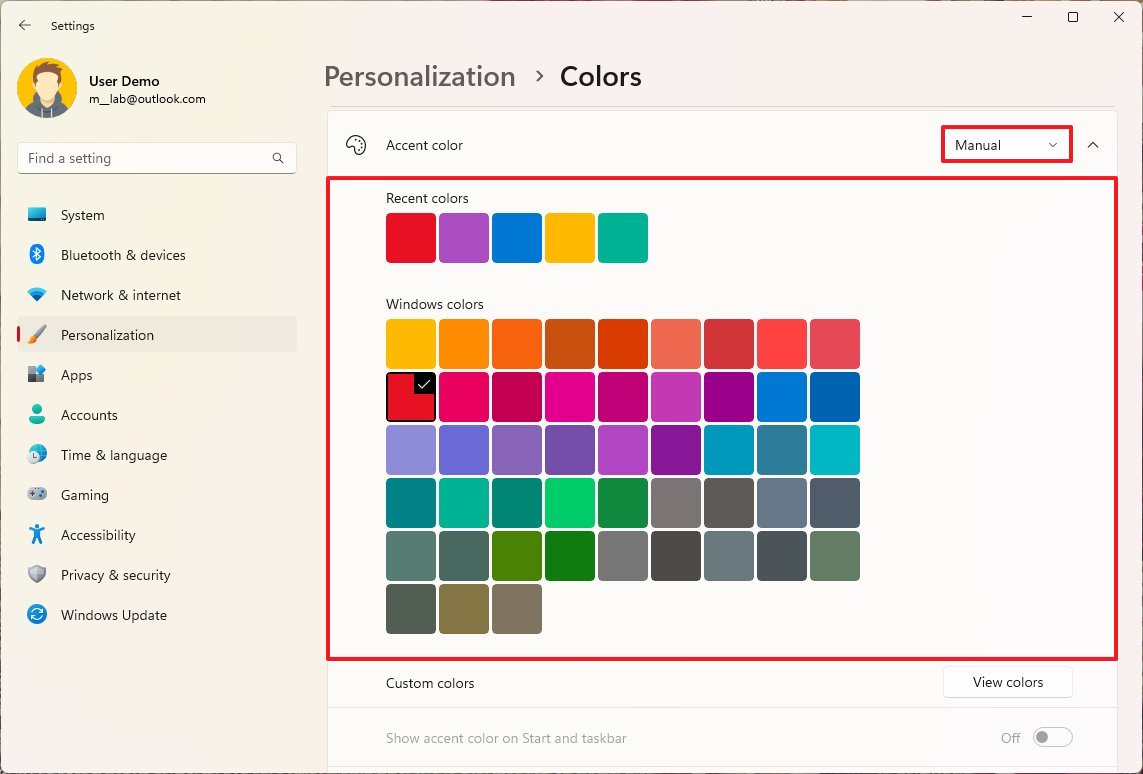
- Quick tip: You can use the Custom color setting to create a custom accent color.
- (Optional) Under the “Accent color” section, select the Automatic option to allow the system to set a color scheme based on the colors of the current wallpaper.
- (Optional) Turn on the “Show accent color on Start and taskbar” toggle switch to show different colors in the Start menu and Taskbar elements.
- Quick note: This option is only available when using the Custom option for the “Choose your mode” setting and you select the Dark option for the “Choose your default Windows mode” setting.
- (Optional) Turn on the “Show accent color on title bars and windows borders” toggle switch to show different colors around the application frame.
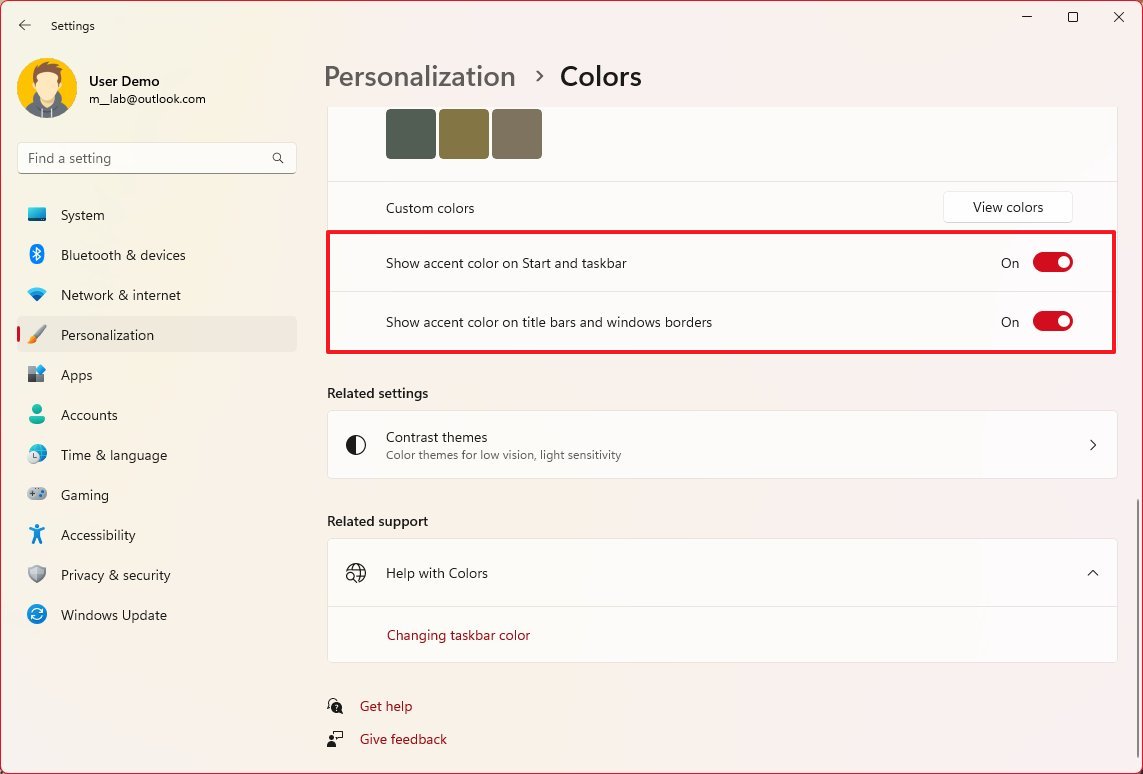
After you complete the steps, buttons, links, system icons, and other elements throughout the experience will reflect the new color accent. The color will also be reflected in parts of the Start menu, Taskbar, and applications if you enable the option to show accent colors on title bars and windows borders and the Start and Taskbar in the “Colors” settings page.
Custom or dynamic background images
Windows 11 allows you to change the desktop wallpaper in at least two ways. You can use custom images, such as pictures from your collection, or you can enable the Spotlight feature that will dynamically download and change wallpapers automatically.
Custom image
To use a custom background image on Windows 11, use these steps:
- Open Settings.
- Click on Personalization.
- Click the Background page on the right side.
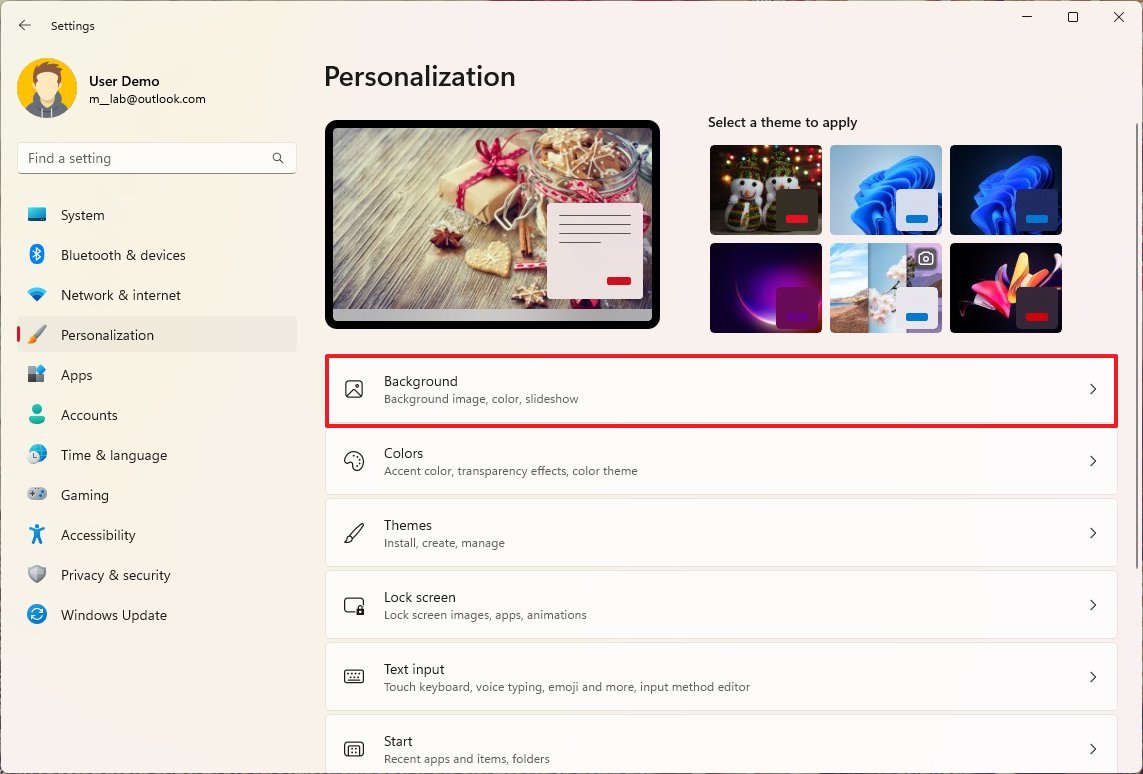
- Use the “Personalize your background” drop-down menu and select the Picture option.
- Click the Browse photos button to select an image.
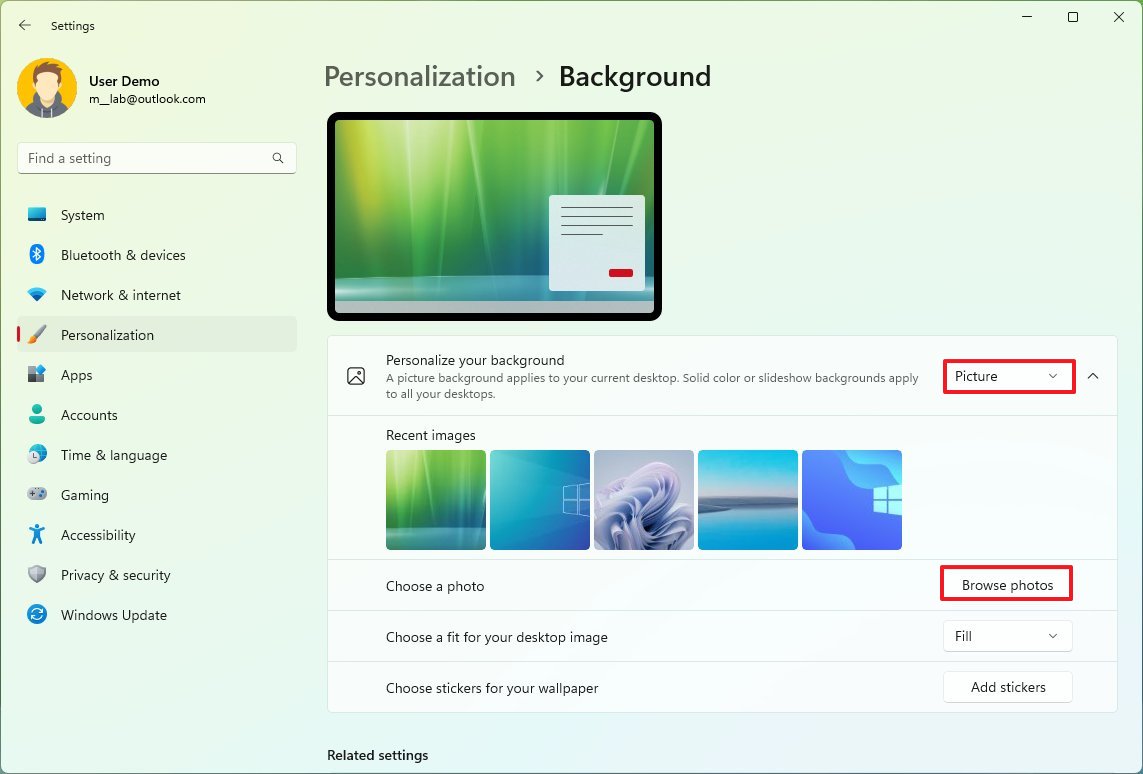
- Use the “Choose a fit for your desktop image” drop-down menu and select the fit that best suits the images:
- Fill.
- Fit.
- Stretch.
- Center.
- Span.
Once you complete the steps, the new custom image will appear in the desktop background.
Spotlight
To enable Spotlight on Windows 11, use these steps:
- Open Settings.
- Click on Personalization.
- Click the Background page on the right side.

- Use the “Personalize your background” drop-down menu and select the “Windows spotlight” option.
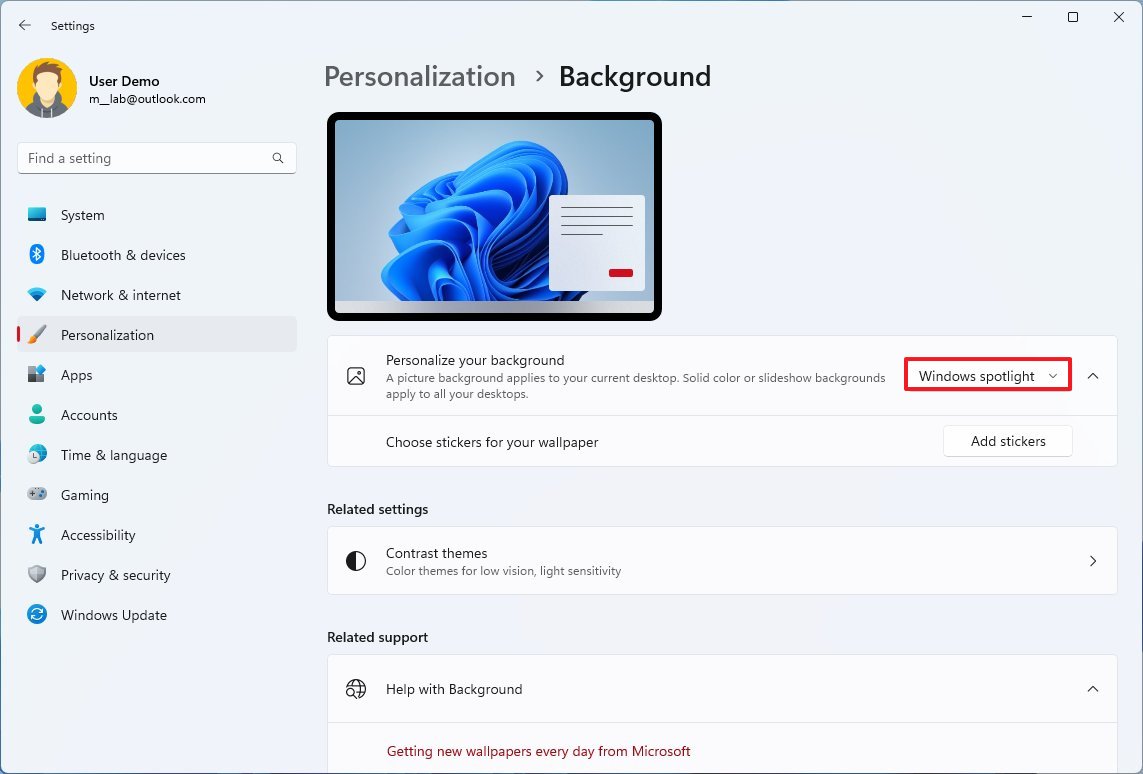
After you complete the steps, the system will download and refresh the desktop background throughout the day. (This feature takes a while to start showing images.)
If you are showing desktop icons, you will also notice a new icon, which you can right-click to switch to the next picture or thumb up or down to allow the system to learn the kind of images you like.
Customize Lock screen
You can also customize the Lock screen background and notifications.
To customize the Lock screen on your new laptop, use these steps:
- Open Settings.
- Click on Personalization.
- Click the Lock screen page on the right side.
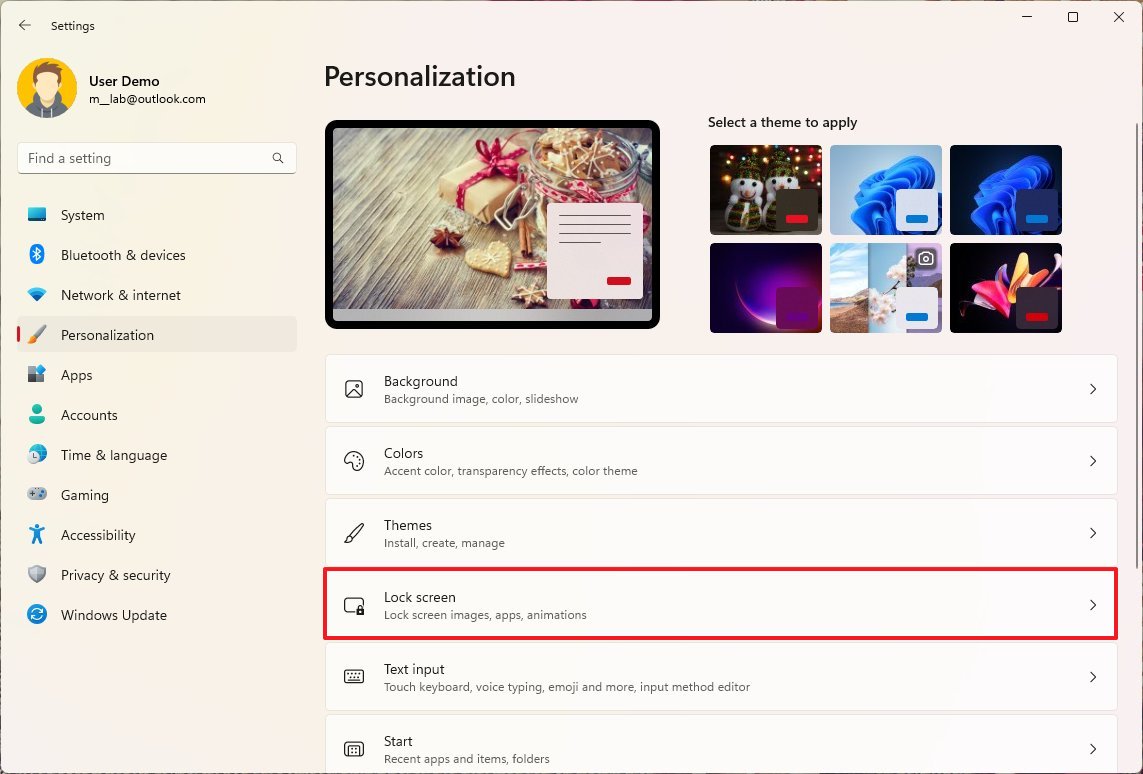
As part of the Lock screen settings, you can customize several options, including the background image and app status.
In the Lock screen, the Windows spotlight is the default option that shows a different background every time you sign in to your account. However, you can use the Picture option to showcase a custom image or the Slideshow option to rotate a collection of photos.
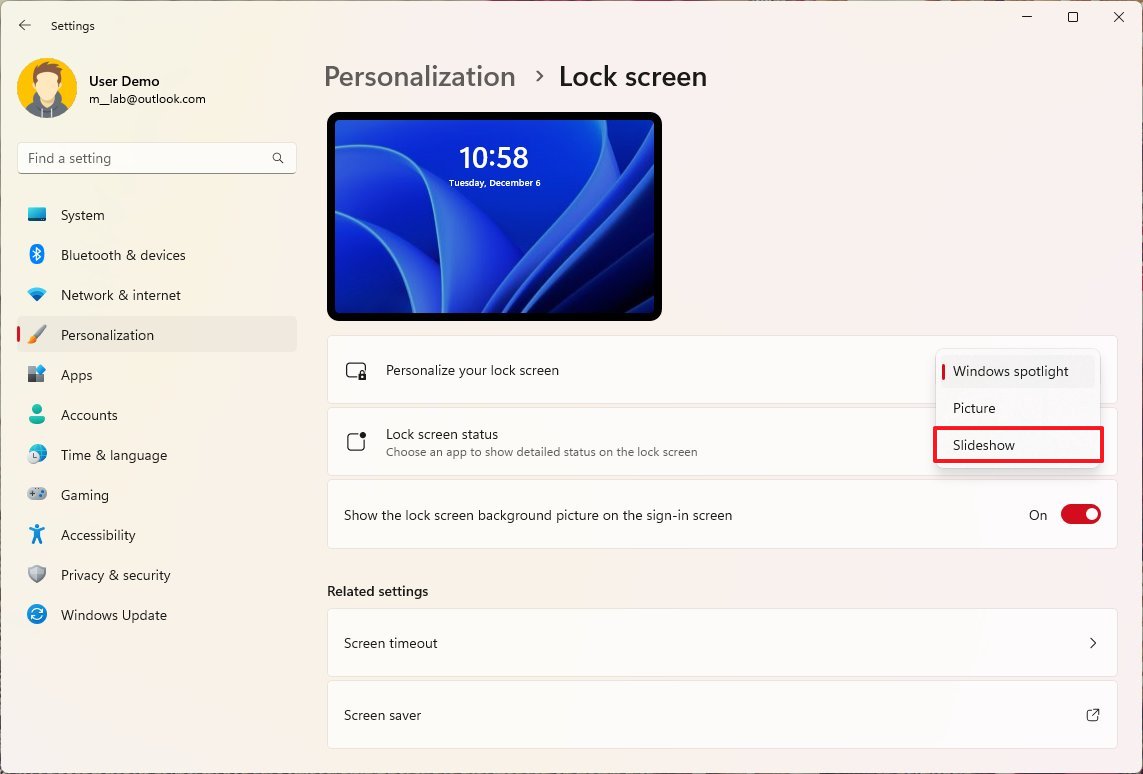
If you select the Slideshow option, the system will load the images from the Pictures folder. However, you can add and remove the folders to show on the Lock screen. You can even include the camera roll folder from your computer and OneDrive.
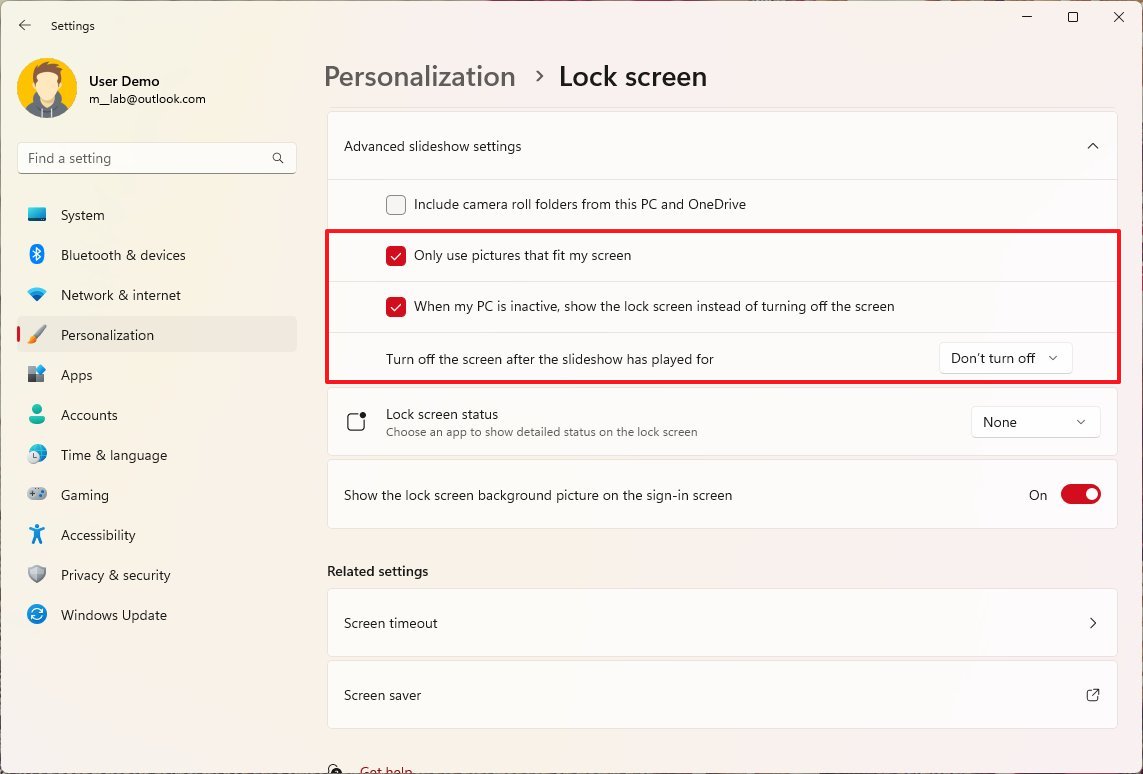
In addition, there’s an option to show the Lock screen with the slideshow when the device is inactive.
Some applications can show detailed status, and you can configure this feature by using the Lock screen status drop-down menu and selecting the app you want to see the information.
Customize Start menu
The Start menu may not be as flexible as the classic design. However, you can customize various aspects, such as folder icons, pins, and recommendations, and even disable the highlight information in the search interface.
Recommendations
On Windows 11, you can’t disable apps and file recommendations, but you can show more pins than suggestions. Here’s how:
- Open Settings.
- Click on Personalization.
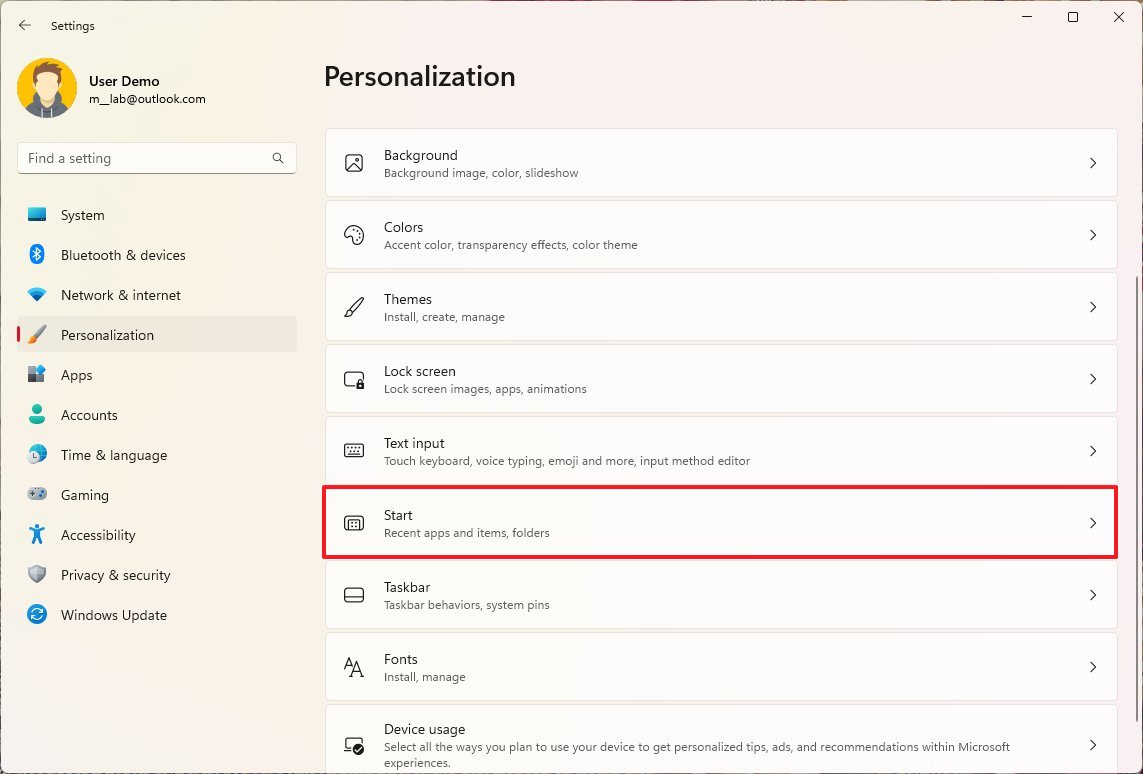
- Click the Start page on the right side.
- Under the “Layout” section, select the More pins option.
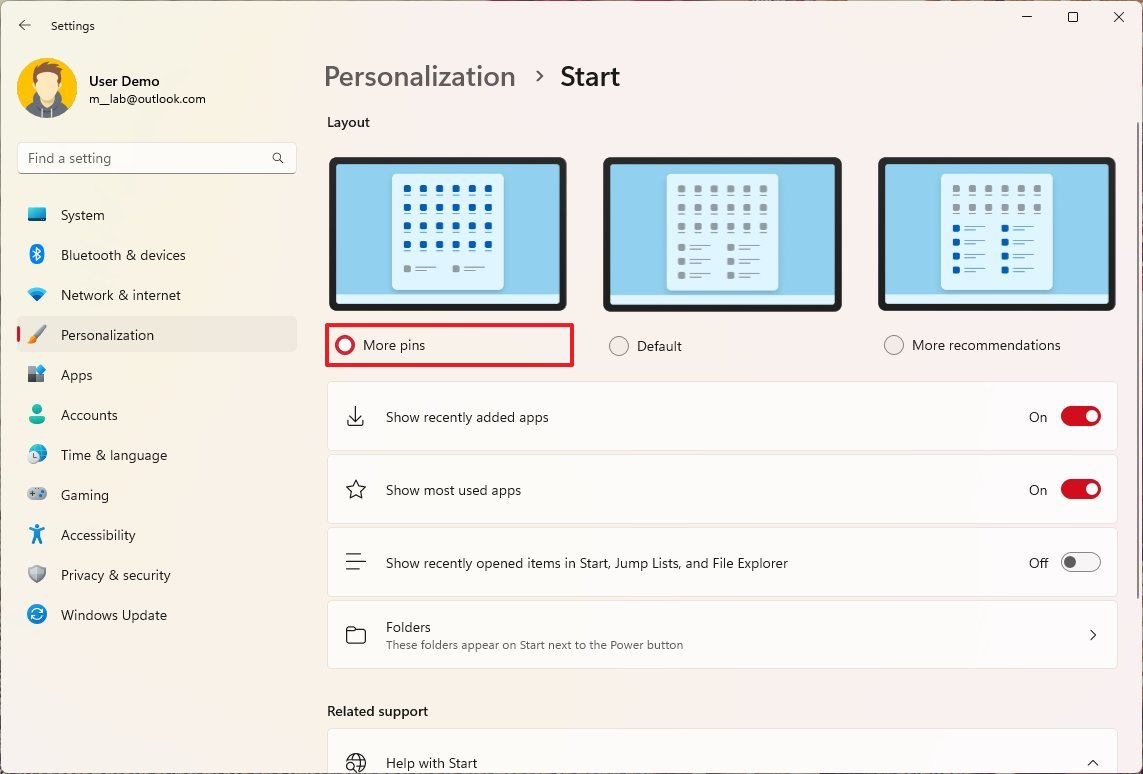
- (Optional) Turn off the “Show recently added apps” and “Show recently opened items in the Start, Jump Lists, and File Explorer” toggle switches to disable “Recommended” items in Start.
Once you complete the steps, the Start menu will show four rows of pins and only one row of suggestions.
Folders
On Windows 11, you can create folders to organize your apps in groups, and here’s how:
- Open Start.
- Drag an app on top of another app to create a folder.
- Continue dragging more apps to add them to the folder.
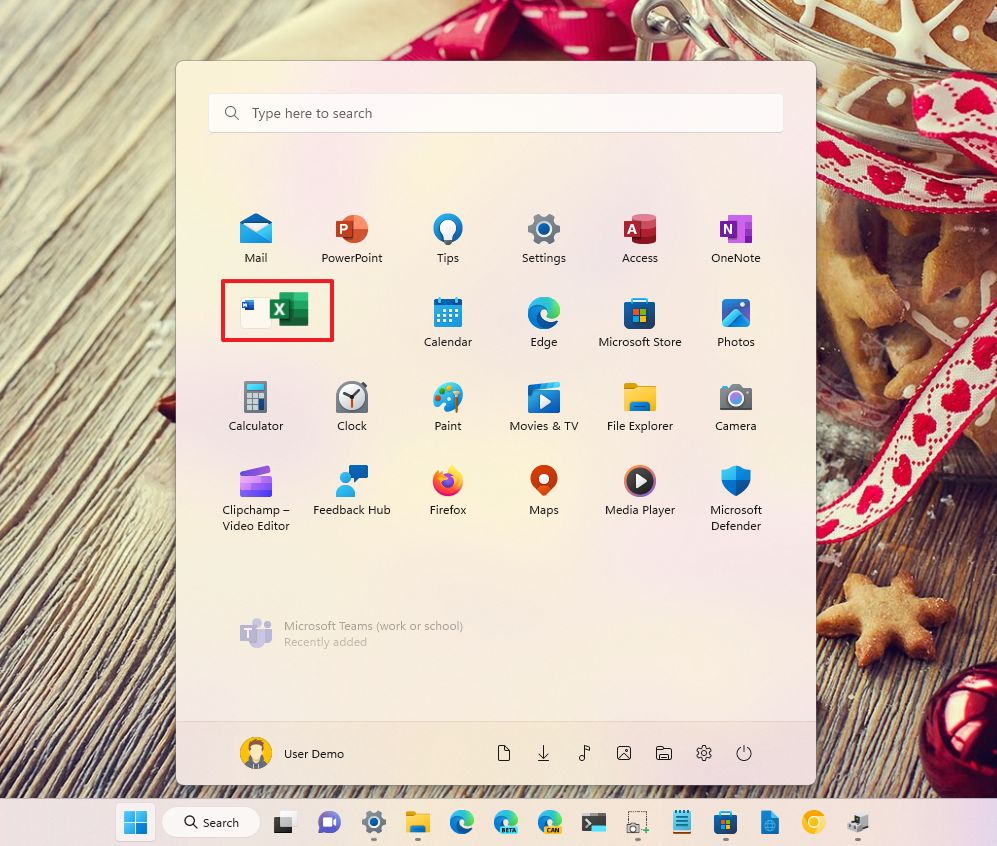
- Click the folder to open it.
- Click on Edit name.
- Confirm a name for the folder and press Enter.
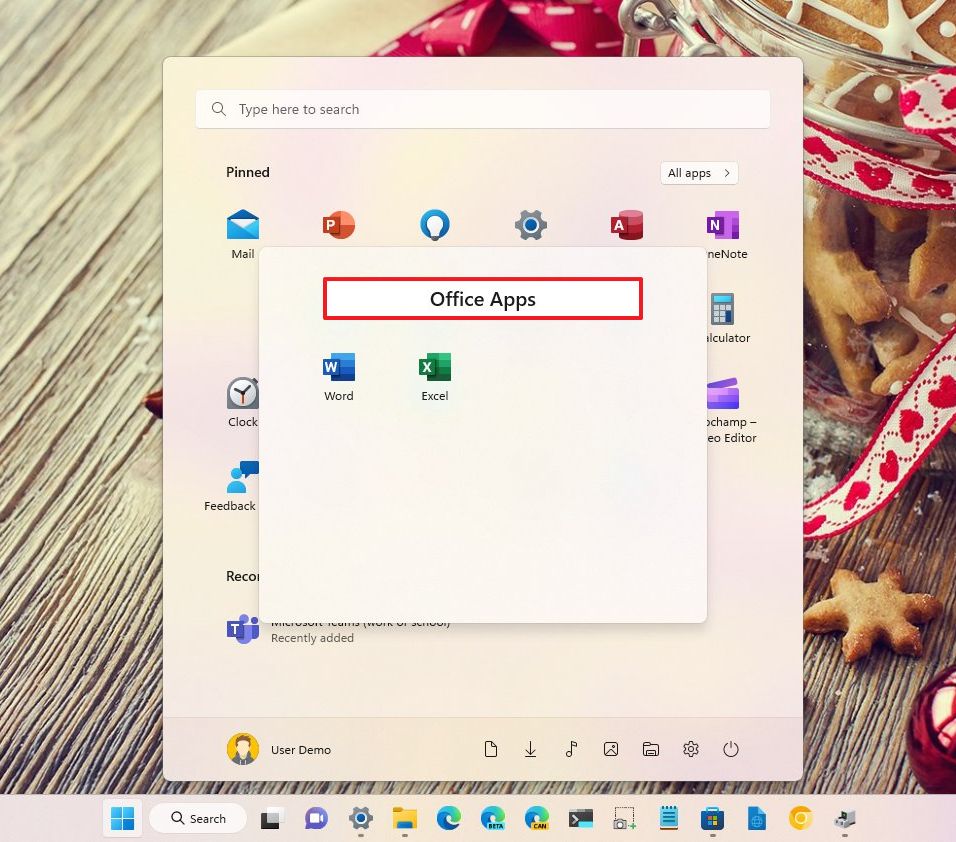
Inside the folder, you can rearrange the apps to update the preview and drag out the apps one by one to delete the folder.
Pins
The “Pinned” section lets you list your favorite apps for quick access.
To add or remove apps from the “Pinned” section, use these steps:
- Open Start.
- Click the All apps button in the top right corner.
- Right-click the app and select the “Pin to Start” option.
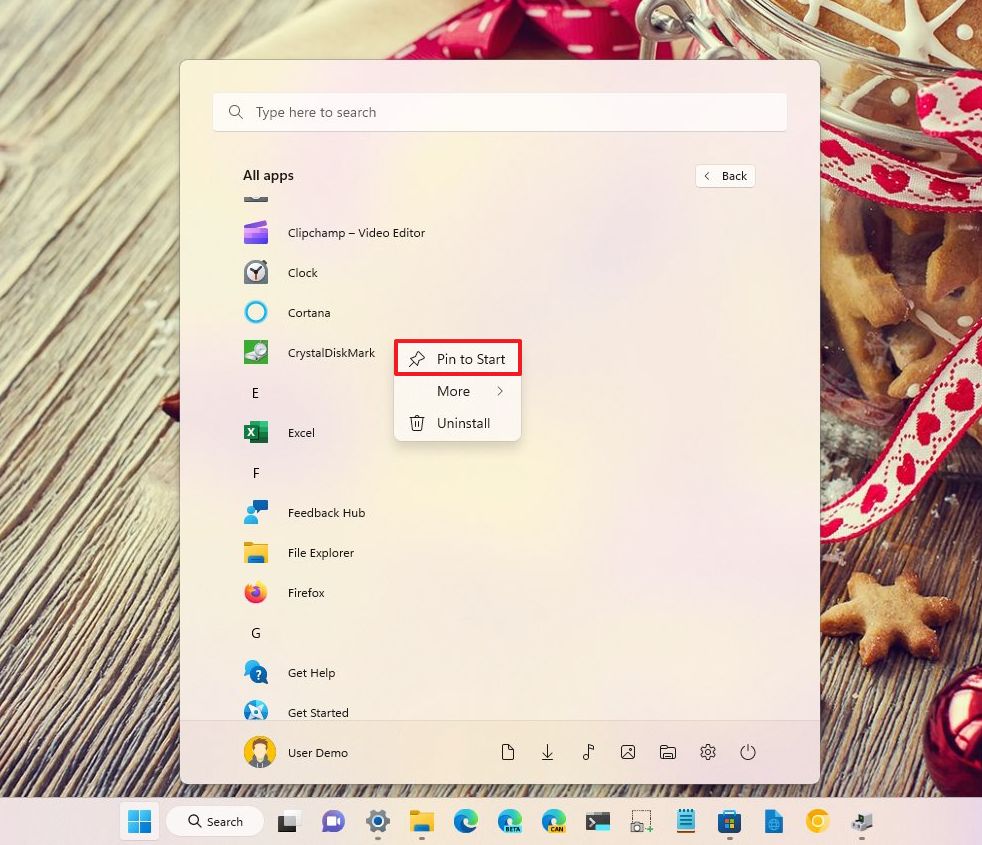
- Repeat step 3 to pin more apps.
- Click the Back button.
- Right-click an app and select the “Unpin from Start” option to remove the app pin.
After you complete the steps, the Start menu will only show your favorite apps in the “Pinned” section.
Quick access
In the Start menu, you can also add quick access to “Folders,” such as Settings, File Explorer, Documents, Downloads, etc., next to the power button, and here’s how:
- Open Settings.
- Click on Personalization.
- Click the Start page on the right side.

- Click the Folders setting.
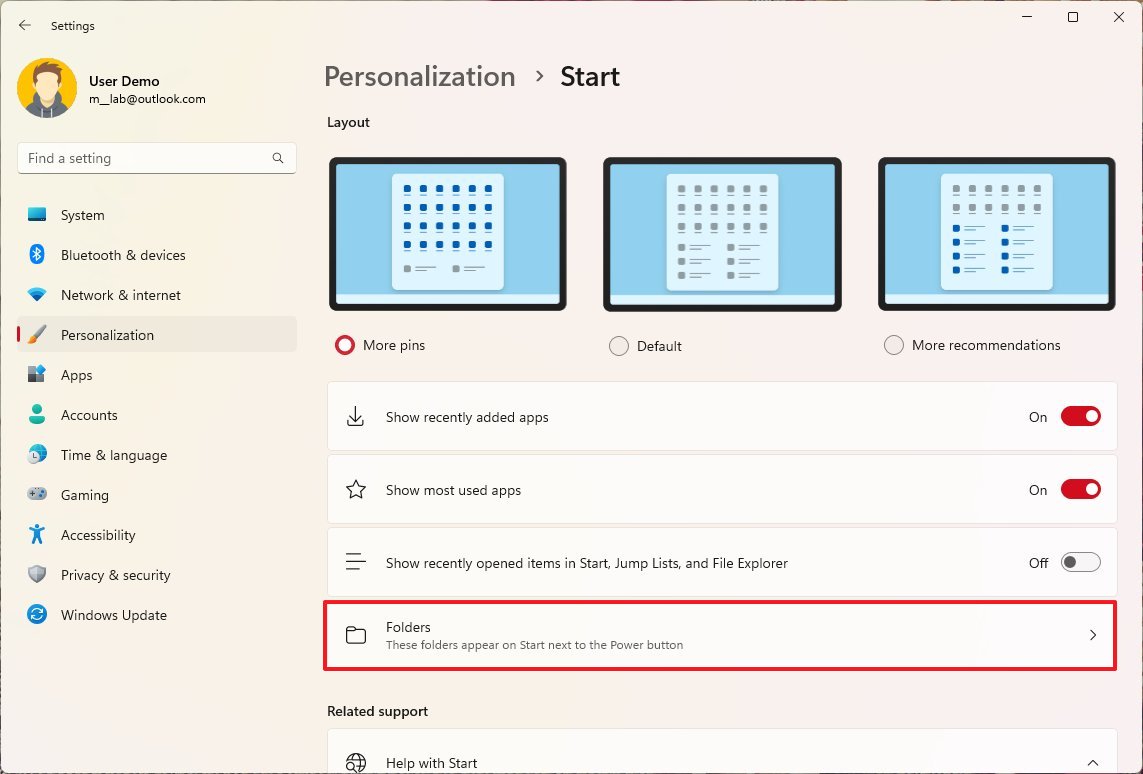
- Turn on the toggle switches to add items to the Start menu next to the Power button.
- Turn off the toggle switches to remove items from the Start menu.
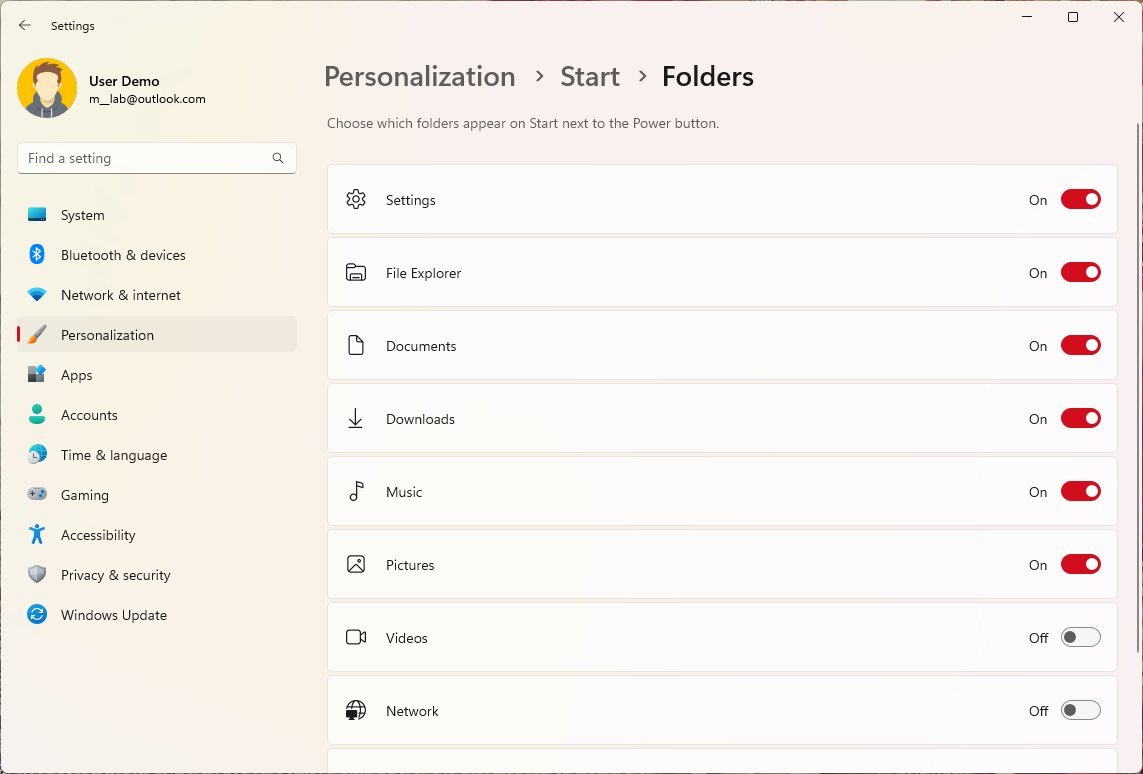
After you complete the steps, the items should be available next to the power button in the Start menu.
Customize Search
In the Search interface, there’s not a lot you can customize. However, you can turn off the ability from Windows 11 to show news and information that may make you less productive.
To disable the highlights feature from Search, use these steps:
- Open Settings.
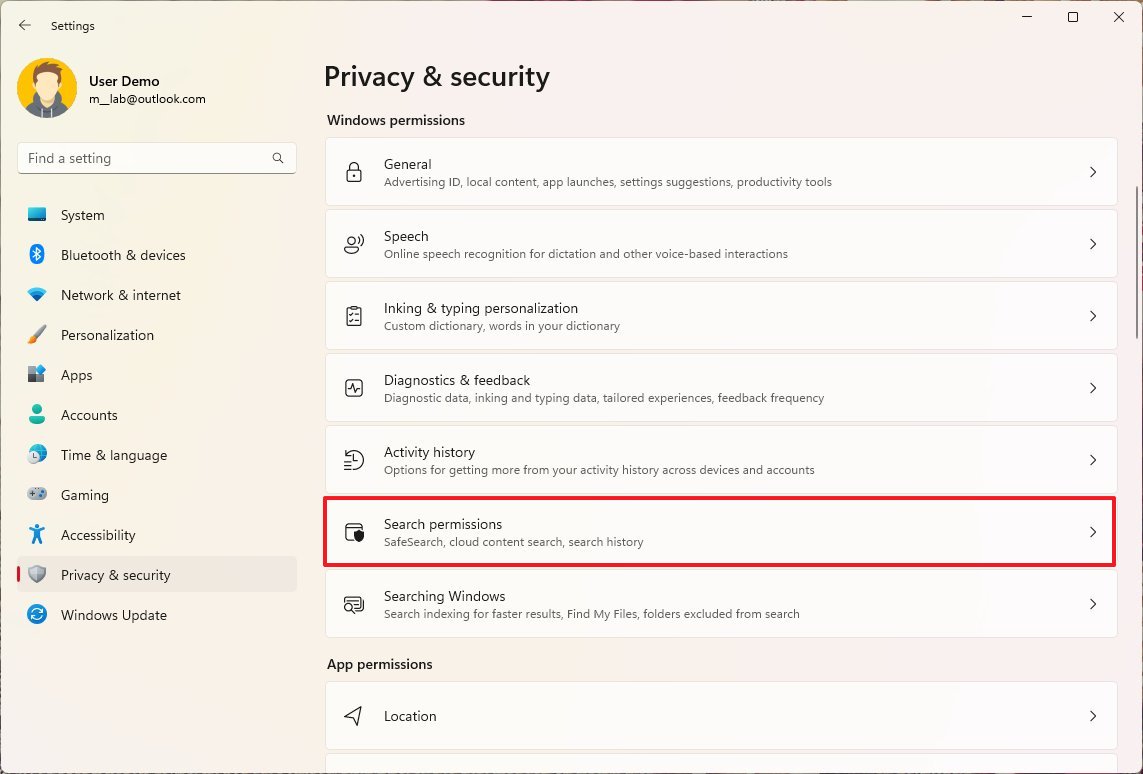
- Click on Privacy & security.
- Under the “Windows permissions” section, click the Search Permissions setting.
- Under the More settings sections, turn off the “Show search highlights” toggle switch.
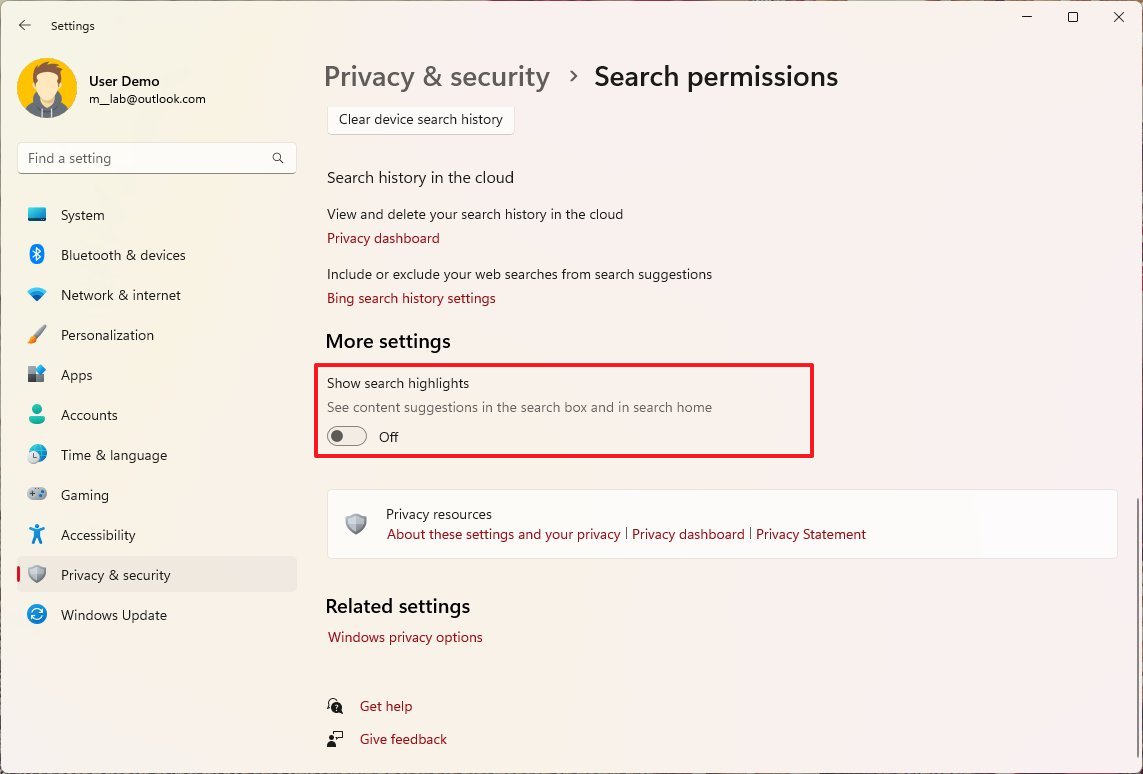
Once you complete the steps, the Search interface will show quick searches for settings and a list of your top apps instead of news headlines.
Customize Taskbar
The Taskbar is more limited than in previous versions, but there a least two things everyone should do when setting up a new device, including changing the icon alignment to the left and removing those unnecessary items.
Left icon alignment
To align icons and the Start menu to the left for a more classic experience on Windows 11, use these steps:
- Open Settings.
- Click on Personalization.
- Click the Taskbar page on the right side.
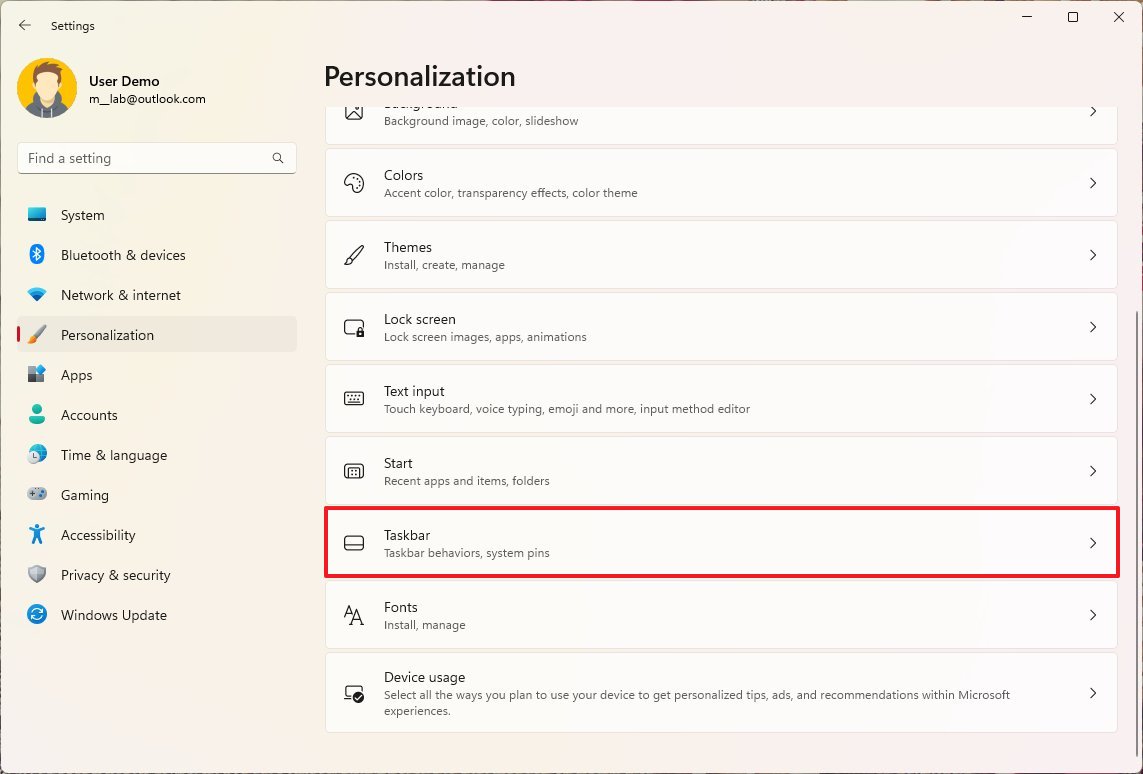
- Click the Taskbar behaviors setting.
- Select the Left option in the “Taskbar alignment” setting.
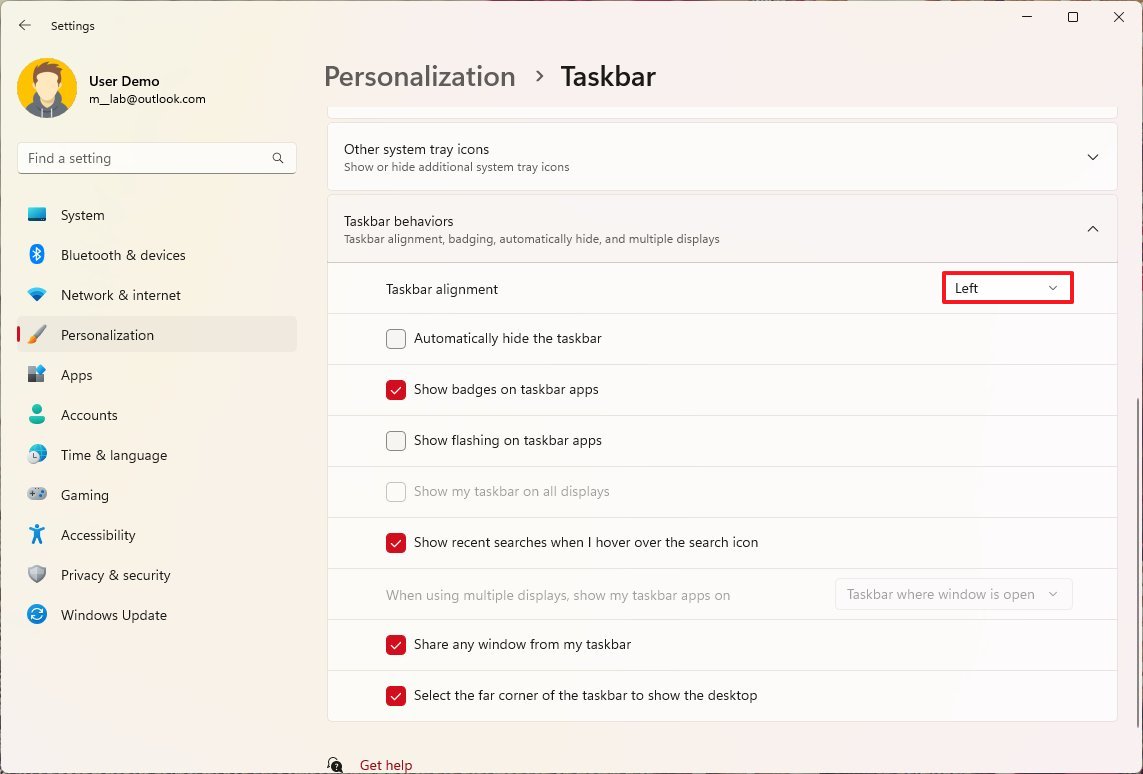
After you complete the steps, the icons and Start menu will align to the left, like on Windows 10.
Remove items
To remove items from the Taskbar on Windows 11, use these steps:
- Open Settings.
- Click on Personalization.
- Click the Taskbar page on the right side.

- Under the “Taskbar items” section, turn off the feature you prefer not to have in the Taskbar, including Search, Task View, Widgets, and Chat.
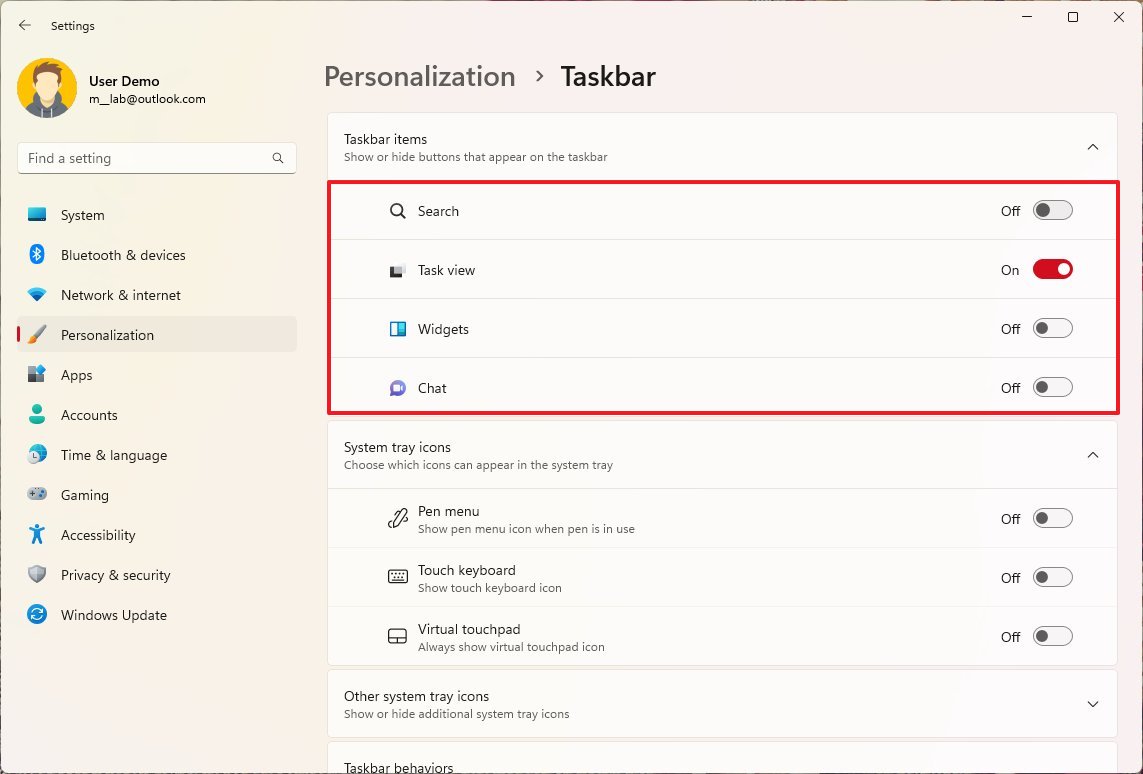
Once you complete the steps, the specified icons will no longer be available in the Taskbar. However, you will still be able to access search from the Start menu or using the “Windows key + S” keyboard shortcut or the “Windows key + W” keyboard shortcut to open the Widgets board.
How to optimize system performance on Windows 11
Applications and services that start automatically on startup can negatively impact performance and account load times on your new laptop. After installing the necessary apps, you should review the “Startup” settings and disable those that may affect the experience.
Control startup apps
To disable apps on the Windows 11 startup, use these steps:
- Open Settings.
- Click on Apps.
- Click the Startup page on the right side.
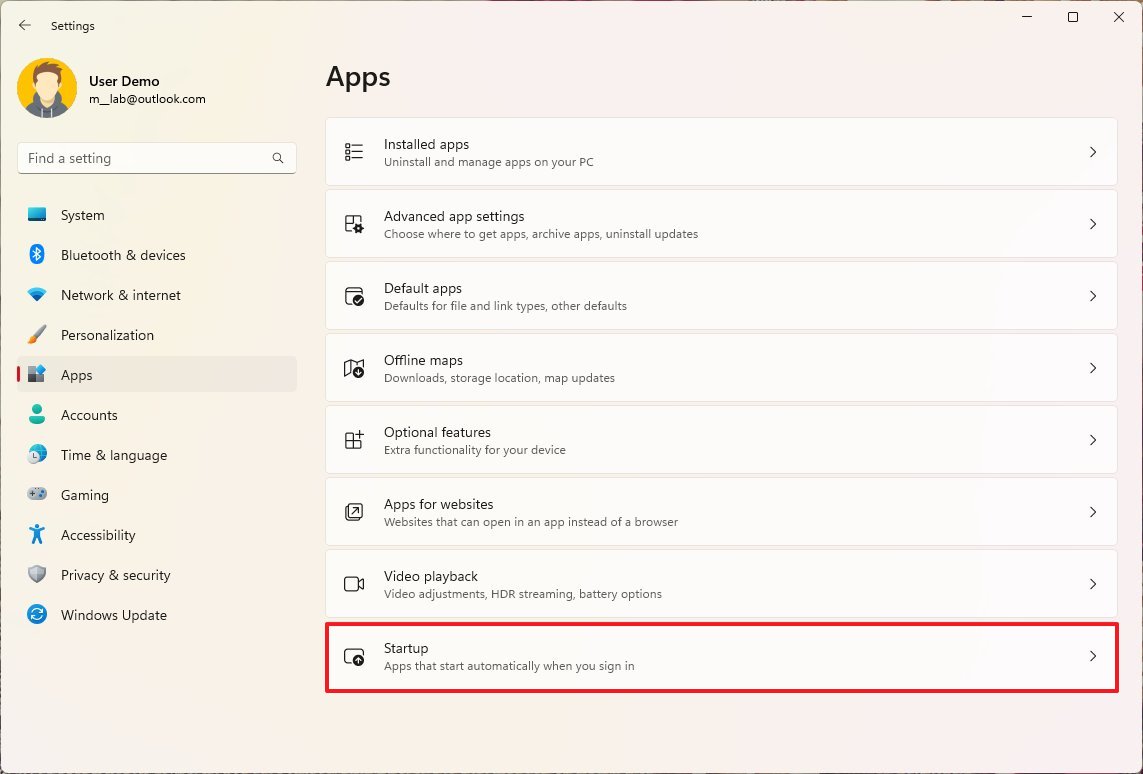
- Turn off the toggle switch for apps to disable at startup.
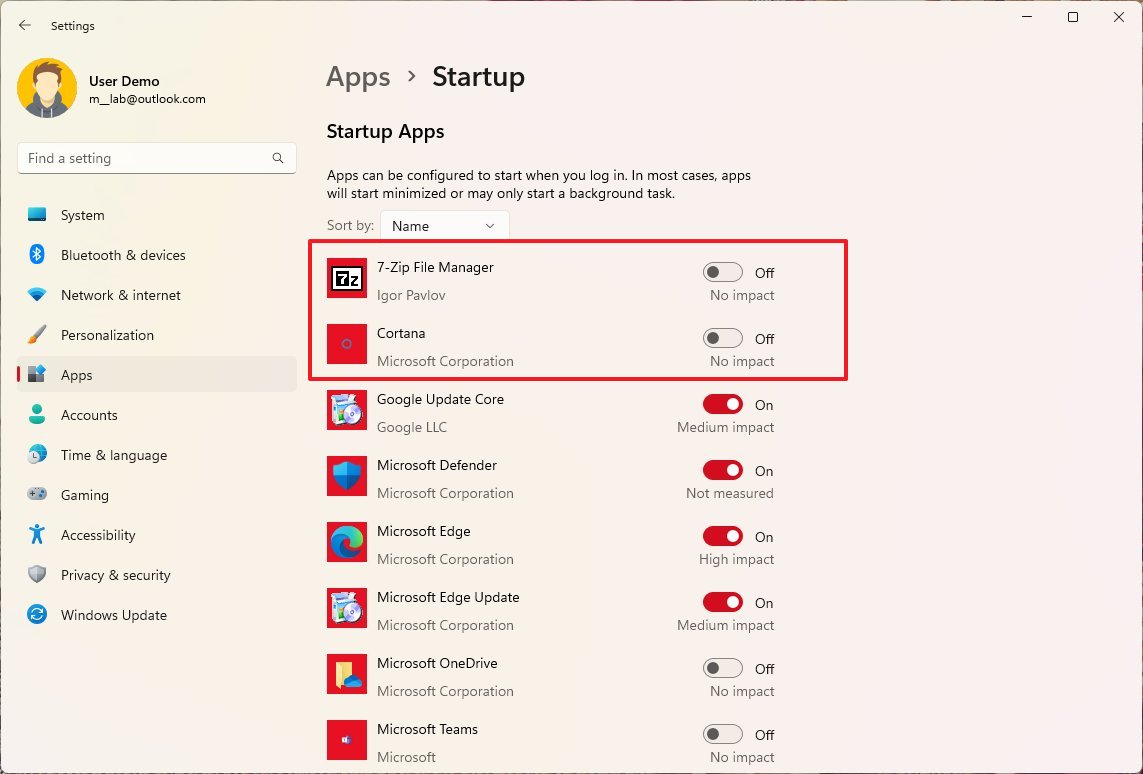
After you complete the steps, the startup process should be noticeably faster.
Change power modes
On laptops is a good idea to review and adjust the power settings to conserve battery life as much as possible.
To change the Windows 11 power settings, use these steps:
- Open Settings.
- Click on System.
- Click the Power & battery (or Power) page on the right side.
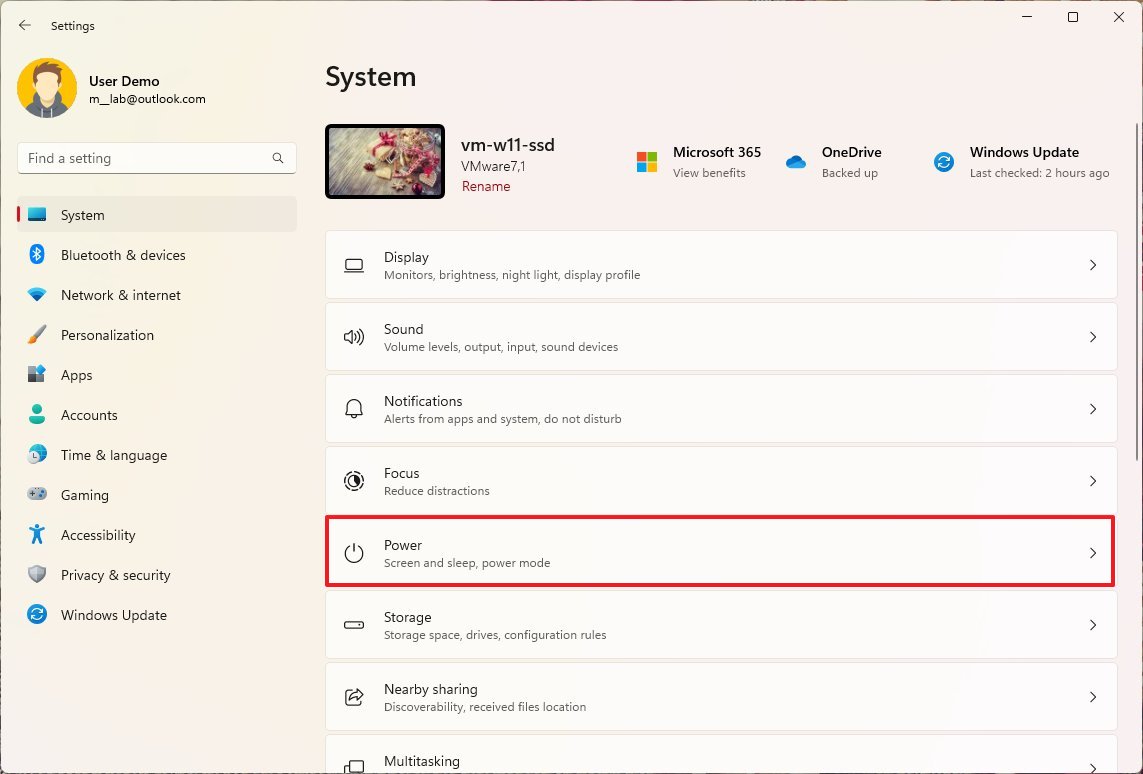
- Under the “Power” section, select the “Screen and sleep” setting.
- Use the On battery power settings to specify when the screen should turn off and when the computer should go into sleep mode when running on battery.
- Use the When plugged in settings to specify when the screen should turn off and when the computer should go into sleep mode when the laptop is plugged in.
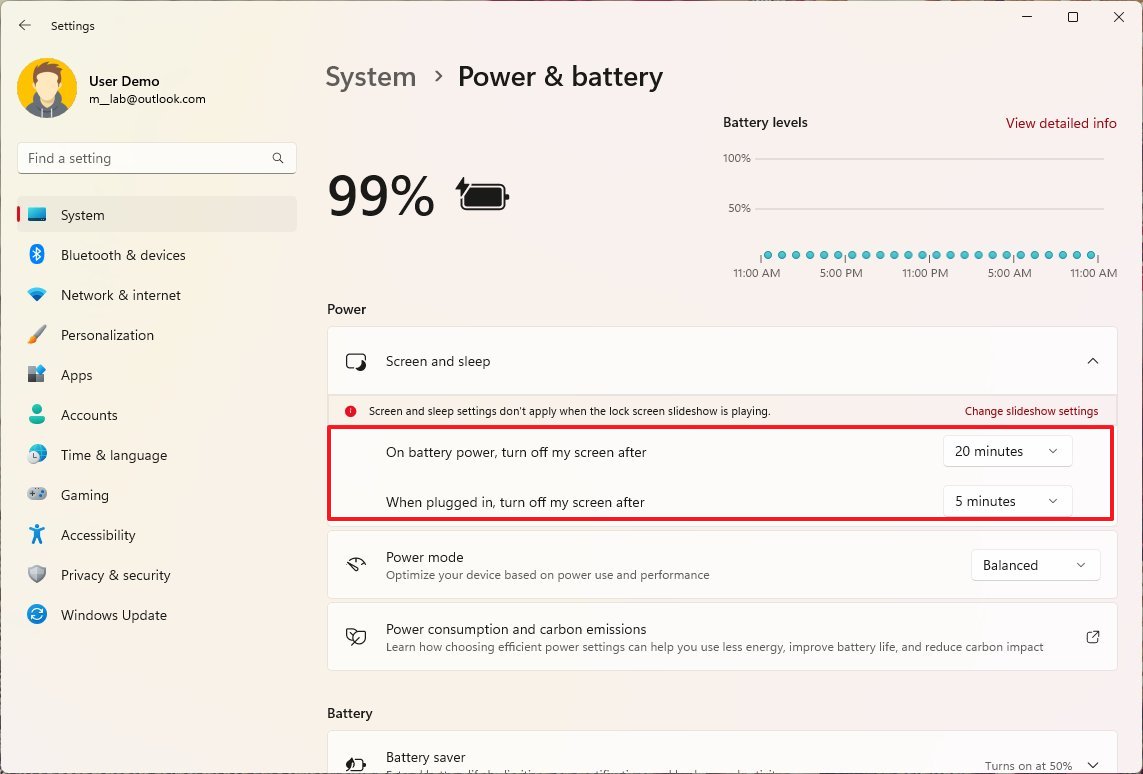
Once you complete the steps, the computer will turn off the display and sleep according to your settings.
Configure power saving
You can also change the power settings to decide when the system should enable battery-saver mode to conserve battery.
To configure battery saver mode on Windows 11, use these steps:
- Open Settings.
- Click on System.
- Click the Power & battery (or Power) page on the right side.

- Under the “Battery” section, select the Battery saver setting.
- Use the “Turn battery saver on automatically at” setting to specify how low the battery life should be before activating the saver mode.
- Check the “Lower screen brightness while in battery saver” option to preserve even more energy.
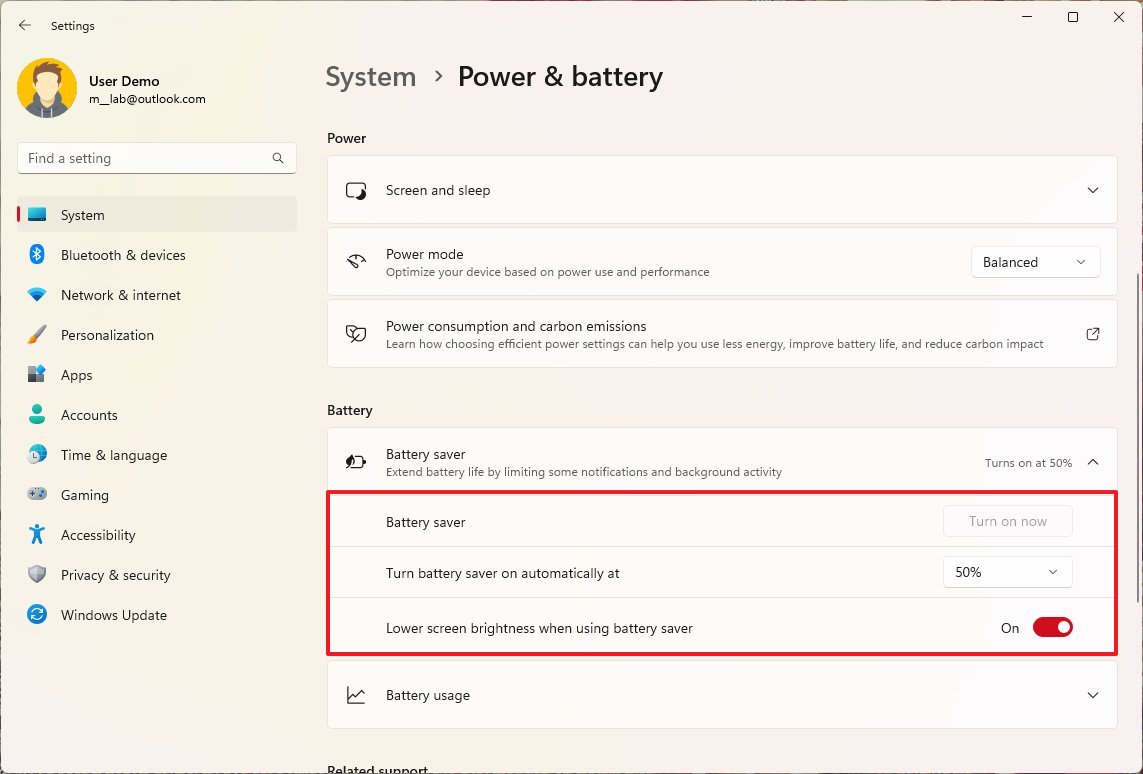
- (Optional) Click the Turn on button for the Battery saver setting to turn on the feature immediately (if available).
Once you complete the steps, battery saver mode will activate, according to your configuration.
Enable night light
The night light feature reduces the amount of blue light at night and uses warmer colors to minimize eye strain and help you fall asleep when working long hours at night.
To enable night light on Windows 11, use these steps:
- Open Settings.
- Click on System.
- Click the Display page on the right side.
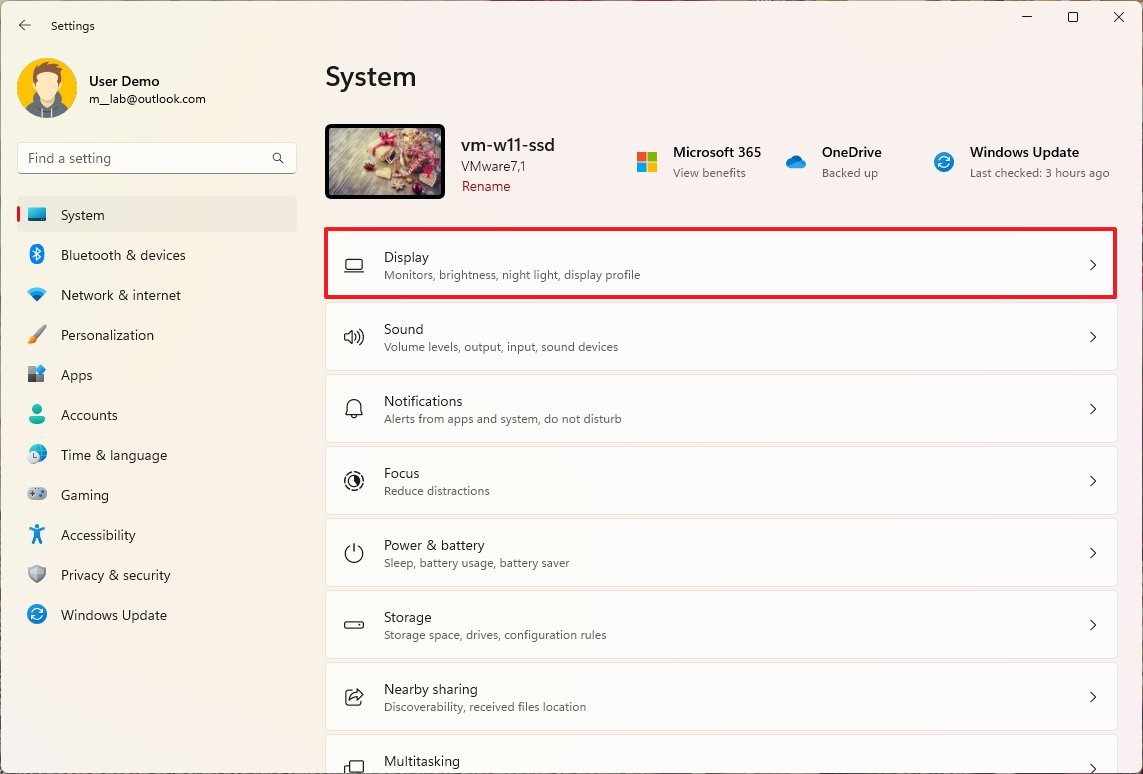
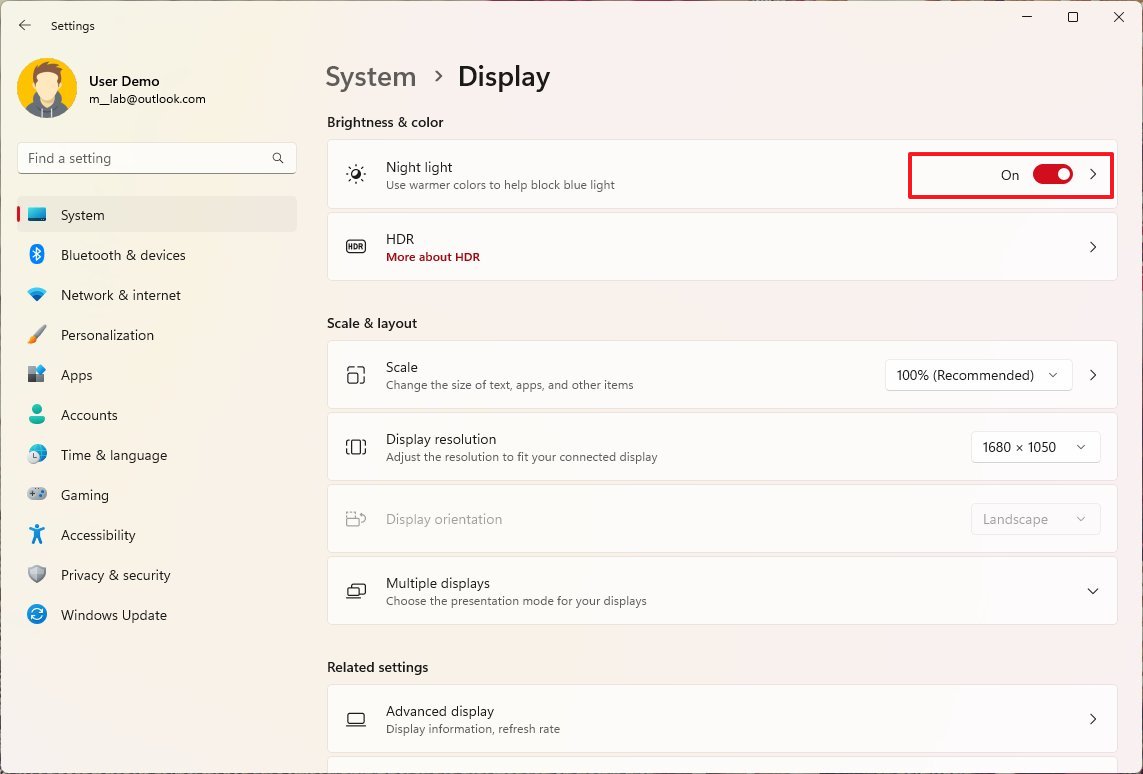
- Under the “Brightness & color” section, turn on the Night light toggle switch to enable the feature.
- (Optional) Turn off the Night light toggle switch to disable the feature.
- (Optional) Select the Night light setting.
- Use the “Strength” slider to adjust the color temperature.
- (Optional) Click the Turn on now button to enable the feature on-demand outside the schedule.
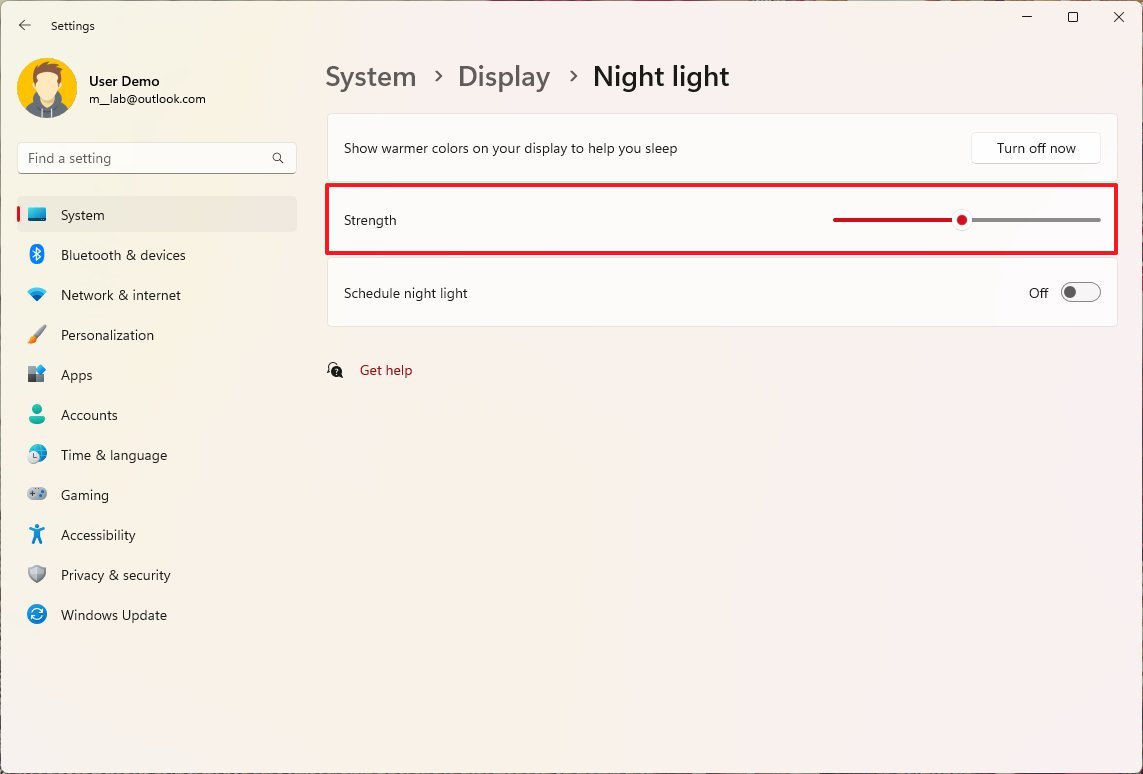
Once you complete the steps, the feature will show warm colors on the screen to help minimize eye strain while working at night.
How to set up apps on Windows 11
We all have different app requirements. However, we usually need the same core apps and configuration. For example, Google Chrome, Mozilla Firefox, Opera, Microsoft Edge, and others to browse the internet. If you use the computer for school or work, you probably need to install the Office apps.
Install browser
Although Microsoft Edge is one of the best browsers for Windows users, you may still want to use another application, such as Google Chrome or Firefox.
To install a new browser on Windows 11, use these steps.
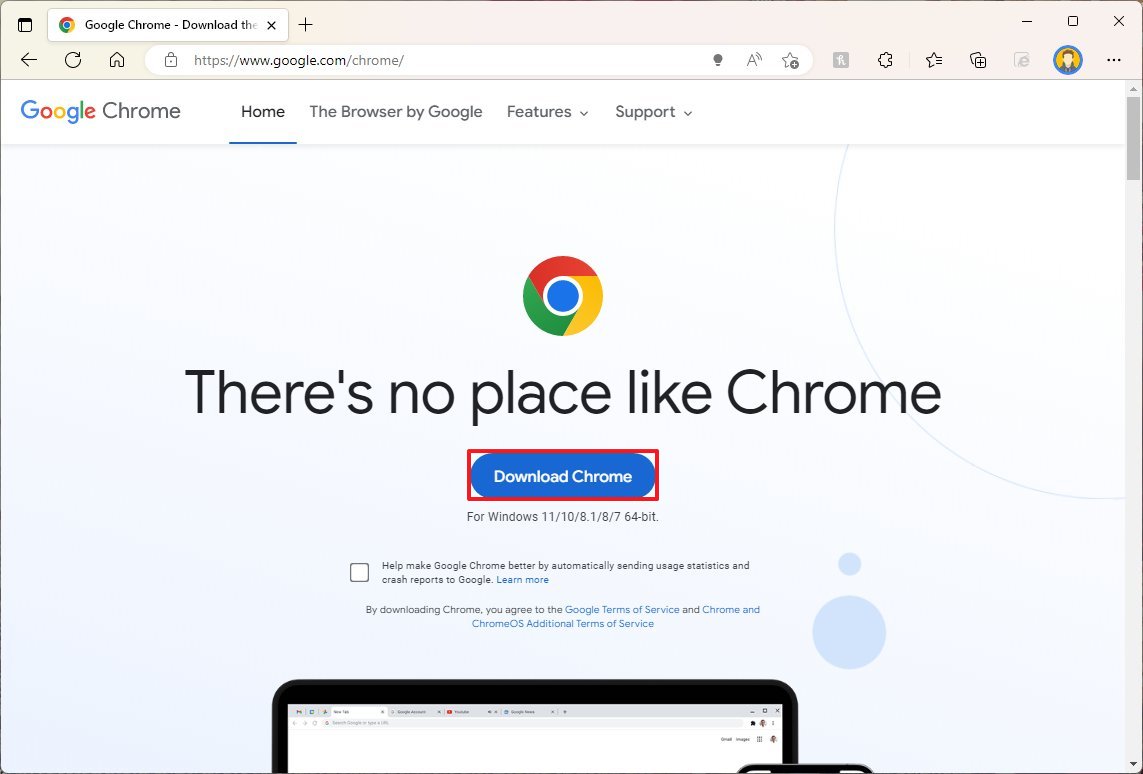
- Open Chrome (opens in new tab) or Firefox (opens in new tab) official page.
- Click the Download button.
- Double-click the installer to launch the setup.
- Continue with the on-screen directions to complete the installation.
After you complete the steps, the browser will install on Windows 11.
Change default browser
To change the default browser experience on Windows 11, use these steps:
- Open Settings.
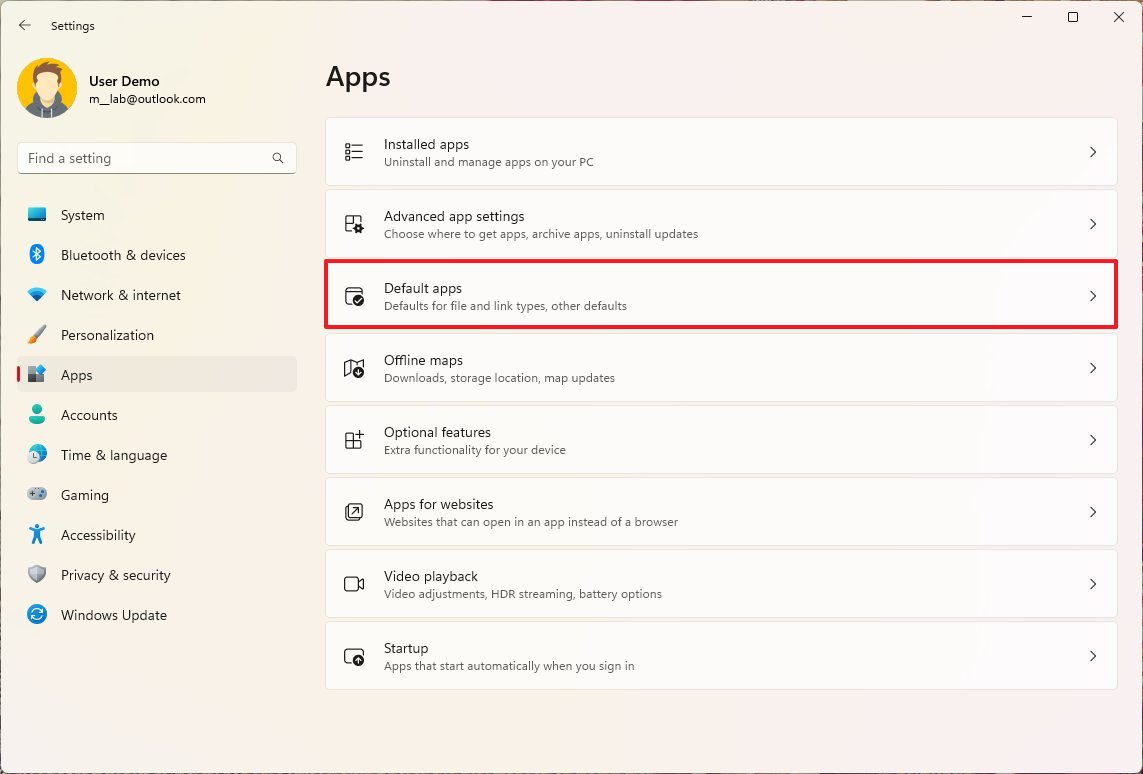
- Click on Apps.
- Click the Default apps page on the right side.
- Select the browser to use as the new default on Windows 11. For example, Google Chrome.
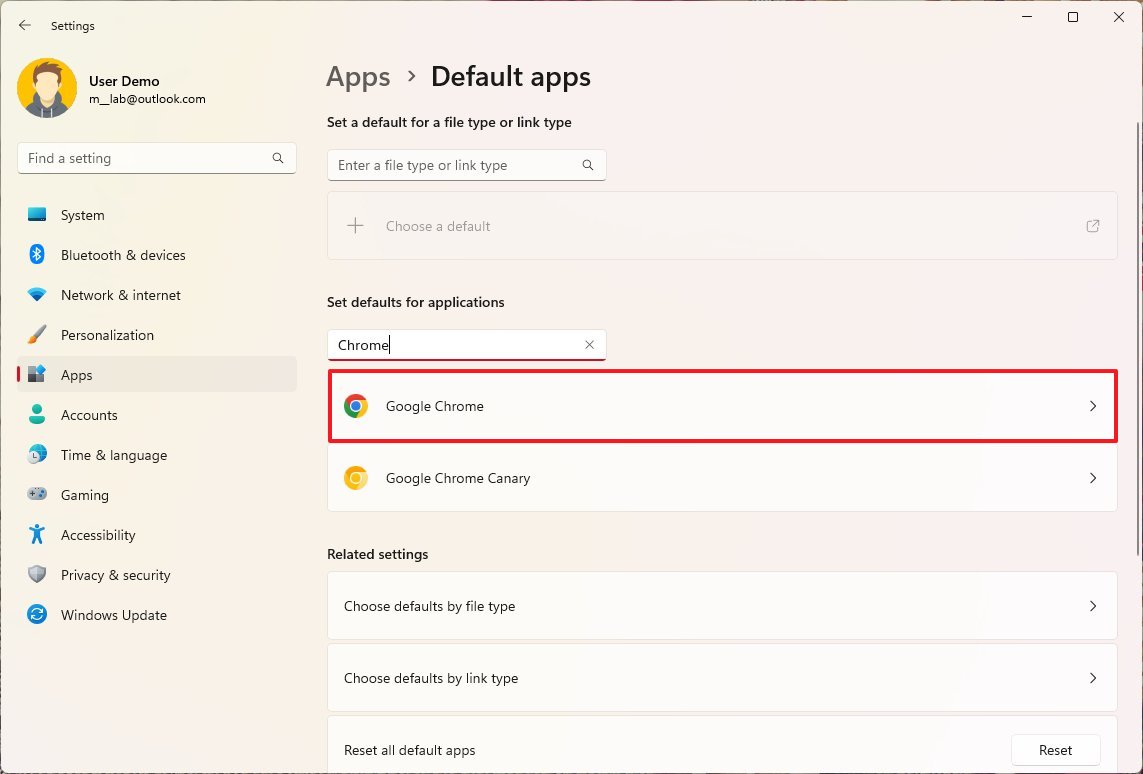
- Click the Set default button.
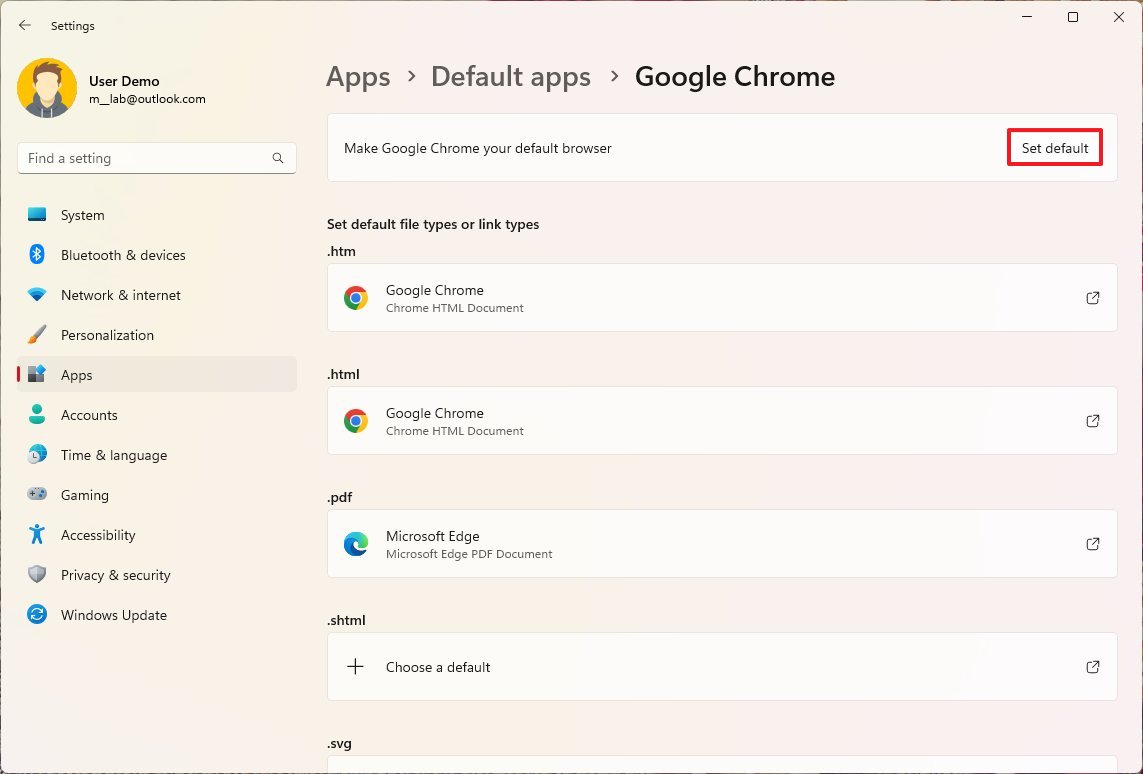
- (Optional) Click the .pdf default application and select the Chrome option to open PDFs with Chrome.
- Click the Set default button.
Once you complete the steps, Windows 11 will set the specified browser as the new default.
Set up Office
If you need the suite of Office apps, the best way to get the apps is through a Microsoft 365 subscription.
The Microsoft 365 Personal plan costs $70 per year, and the Microsoft 365 Family plan costs $100. They give you access to all the apps and other perks like 1TB of OneDrive storage. If you choose the Family plan, you can share the benefits with six people.
Get more and increase productivity with the latest features
Microsoft 365 gives you access to all the Office apps and benefits like 1TB of OneDrive, Outlook.com premium, and Skype minutes. You can also install Word, Excel, PowerPoint, Outlook, and other desktop apps on up to six devices, and depending on the plan, you can share the subscription with up to six people.
To install Office from Microsoft 365, use these steps:
- Open Office website (opens in new tab).
- Sign in with a Microsoft account (if applicable).
- Click the Install Office button.
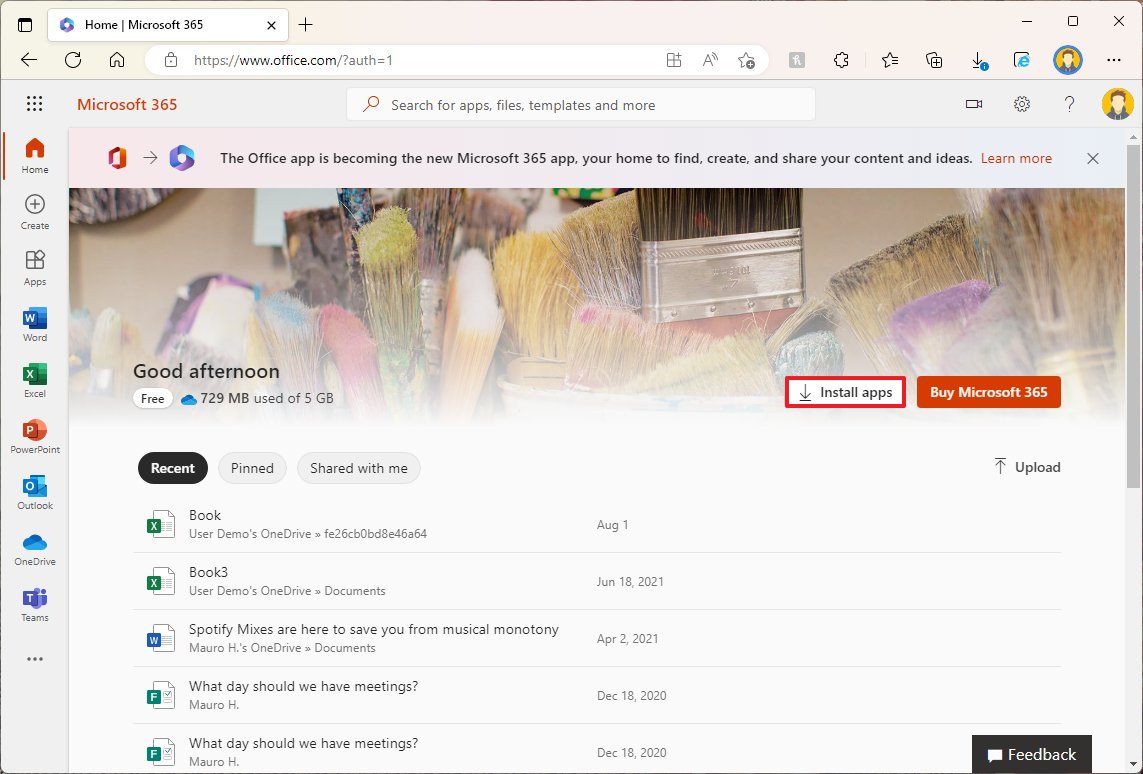
- Under the “Install Office on all your computer” section, click the Install Office button.
- Click the Install button.
- Continue with the on-screen directions to complete the setup as necessary.
After you complete the steps, Word, Excel, Outlook, PowerPoint, and the other apps and features will install on the computer.
How to transfer files on Windows 11
If switching from an old to a new computer, you may need to bring over the files stored on the other device. If this is the case, transferring your files is an easy process. You can use cloud storage services like OneDrive, which makes restoring files almost instantaneous. Or you can move your files with a portable drive when dealing with multiple terabytes of data.
Transfer files from OneDrive
If your files are available through OneDrive, you do not need to complete these instructions since the files will already be accessible as you set up the account with a Microsoft account.
To transfer documents and other files to the new laptop, use these steps on the old laptop:
- Open File Explorer.
- Browse to the folder with the files to transfer.
- Select the files.
- Quick tip: You can select items individually or all contents using Ctrl + A keyboard shortcut.
- Right-click the selection and select the Copy option.
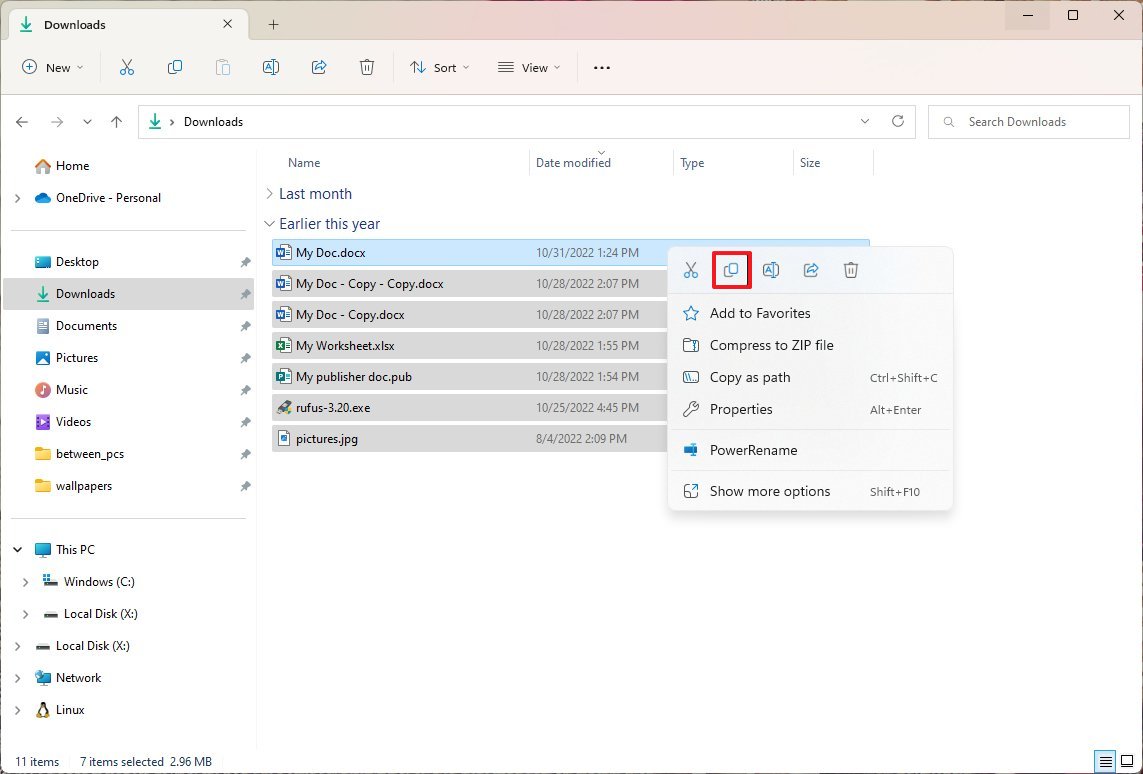
- Open the OneDrive folder.
- Use the Ctrl + Shift + N keyboard shortcut to create a new folder.
- Confirm a name for the folder – for example, Old Laptop Backup.
- Open the newly created folder.
- Right-click inside the folder and select the Paste option.
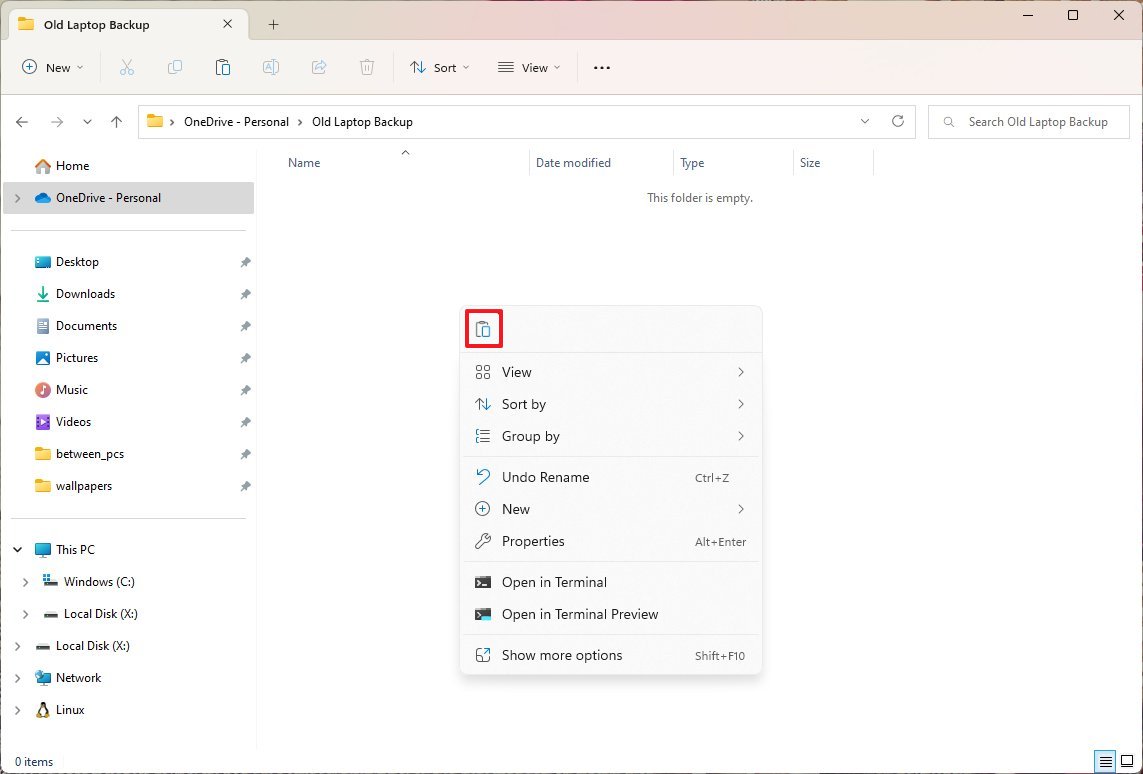
After you complete the steps, it could take some time for the files to upload to OneDrive. Once the upload completes, you will be able to access the files from the OneDrive folder on the new computer.
Transfer files from portable drive
If you have a lot of files, consider transferring files over to the new computer using a portable USB drive.
On the old laptop, connect an external hard drive with enough space, and use these steps:
- Open File Explorer.
- Browse to the folder with the files to transfer.
- Select the files to move to the new computer.
- Right-click the selection and select the Copy option.

- Open the external storage.
- Use the Ctrl + Shift + N keyboard shortcut to create a new folder.
- Confirm a name for the folder – for example, Old Laptop Backup.
- Open the newly created folder.
- Right-click inside the folder and select the Paste option.
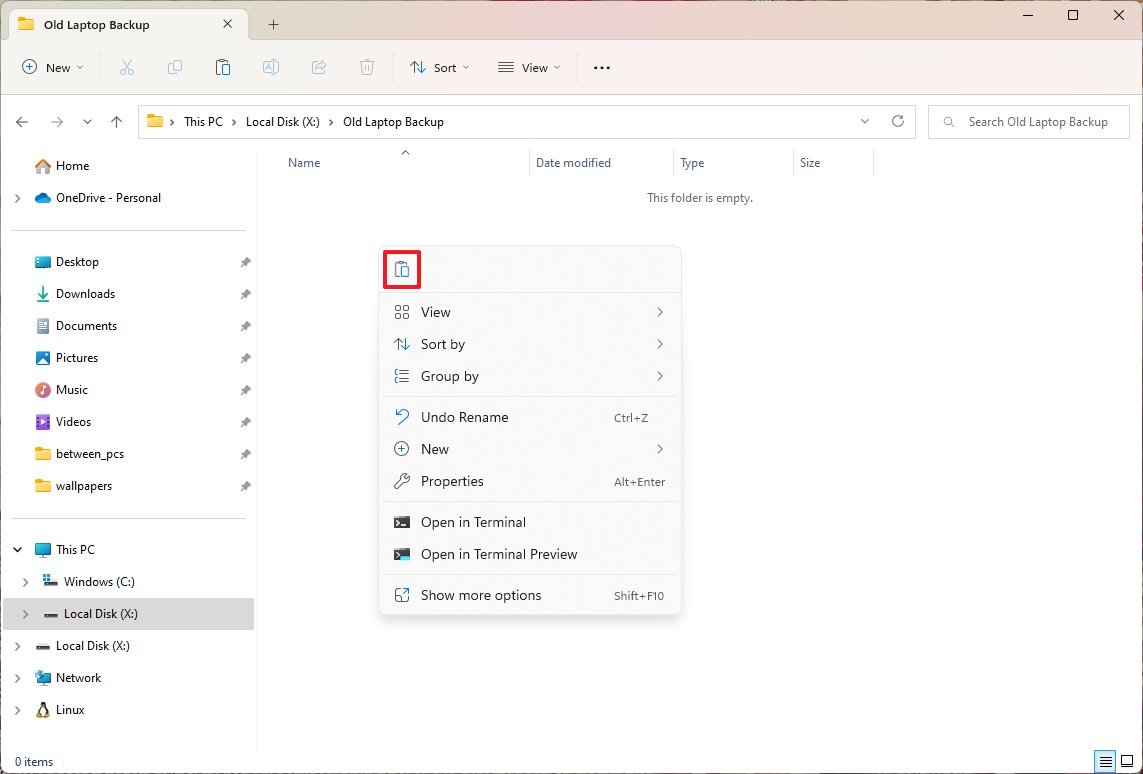
- Disconnect the drive from the old computer and connect it to the new computer.
- Open File Explorer.
- Browse to the folder location with the files.
- Right-click the selection and select the Copy option.
- Open the folder location to download the files.
- Right-click inside the folder and select the Paste option.
Once you complete the steps, the files will be imported to the new computer. If you have a lot of files, this process could take a very long time.
How to secure computer on Windows 11
Another important step while setting up your new laptop is to ensure that all the security features are working correctly to keep your device and data safe and secure, including Microsoft Defender Antivirus and Microsoft Defender Firewall.
Antivirus scan and updates
The Microsoft Defender Antivirus is always running in the background. However, it’s still a good idea to check the antivirus status and updates.
To check the status of the Windows 11 antivirus, use these steps:
- Open Windows Security app.
- Click on Virus & threat protection.
- Under the “Virus & threat protection settings” section, click the Manage settings option.
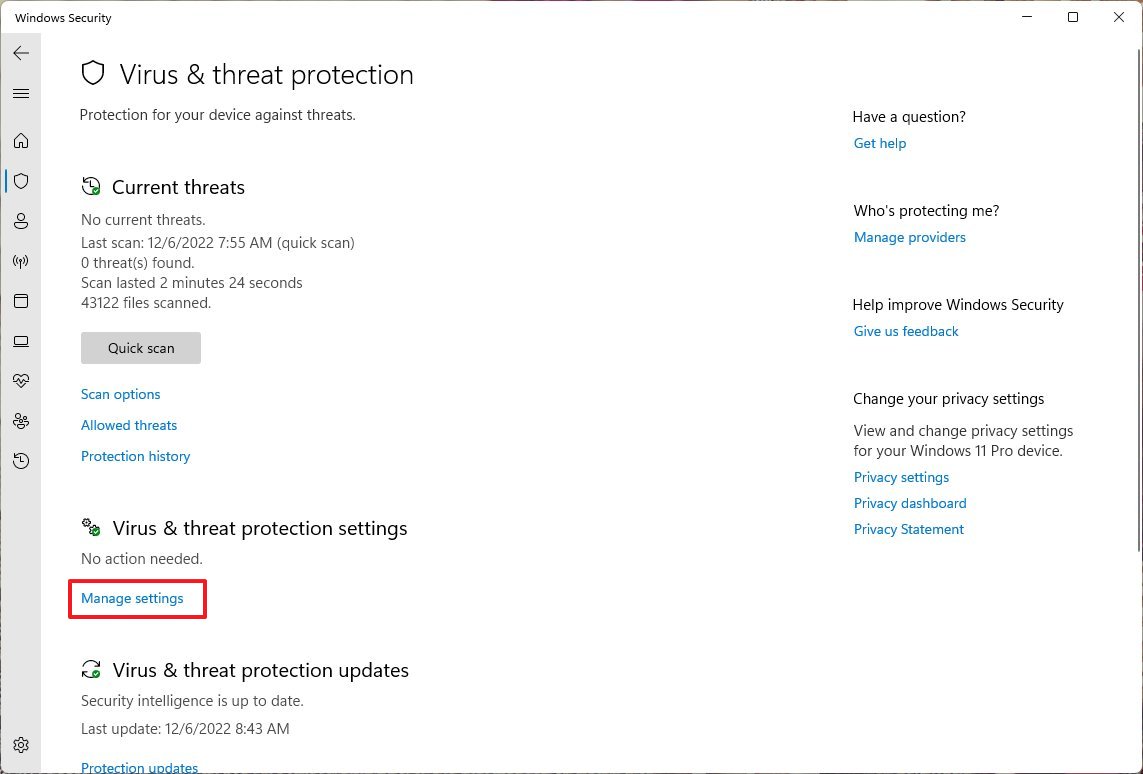
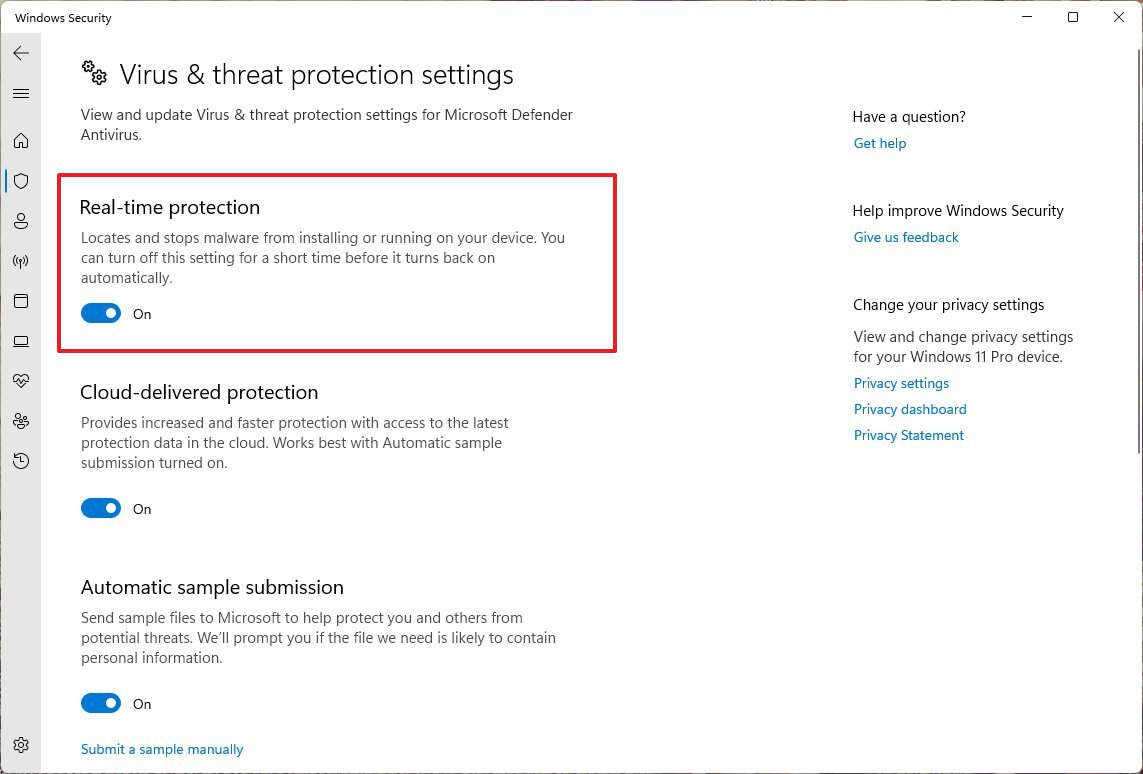
- Turn on the Real-time protection toggle switch (if applicable).
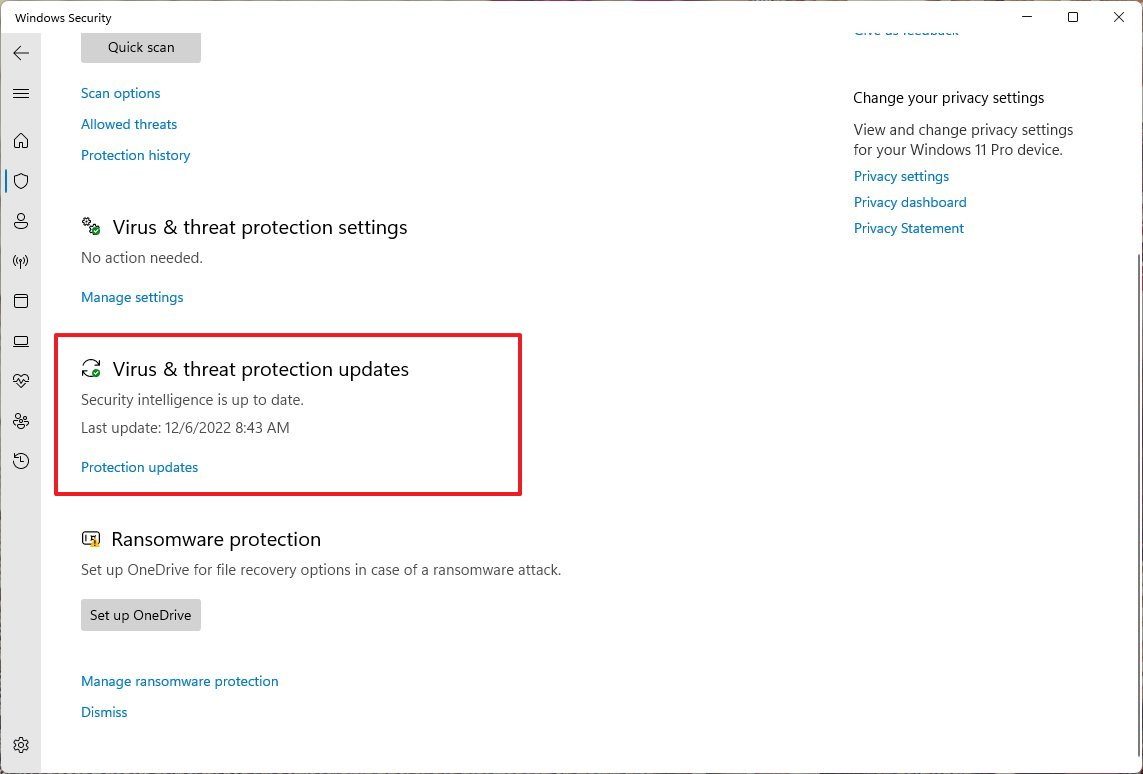
- (Optional) On the Virus & threat protection page, click the “Virus & threat protection updates” section and click the Protection updates option.
- Click the Check for updates button to ensure the Microsoft Defender Antivirus has the most up-to-date definition.
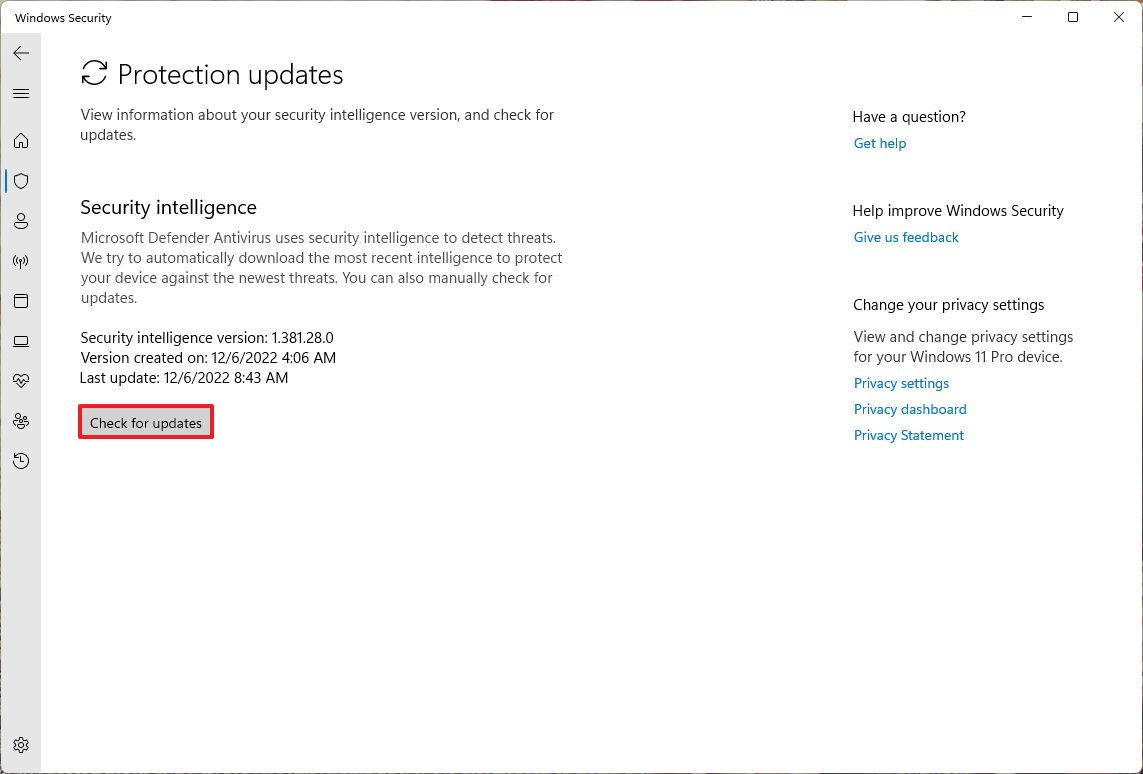
After you complete the steps, the antivirus will protect the laptop and files against viruses and other types of malware.
If the default antivirus from Microsoft isn’t for you, check our roundup of the best antivirus software in 2022 (opens in new tab) to find third-party alternatives.
Enable firewall
A firewall is another critical element to protect your device and files from malicious attacks. It monitors the incoming and outgoing network traffic, allowing only packets based on security rules. By default, the Microsoft Defender Firewall offers the optimal security settings for most users. You only need to make sure that it’s enabled on your device.
To enable the Microsoft Defender Firewall, use these steps:
- Open Windows Security app.
- Click on Firewall & network protection.
- Click the “Turn on” button for the Domain, Private, and Public networks, or click the “Restore settings” button (if applicable).
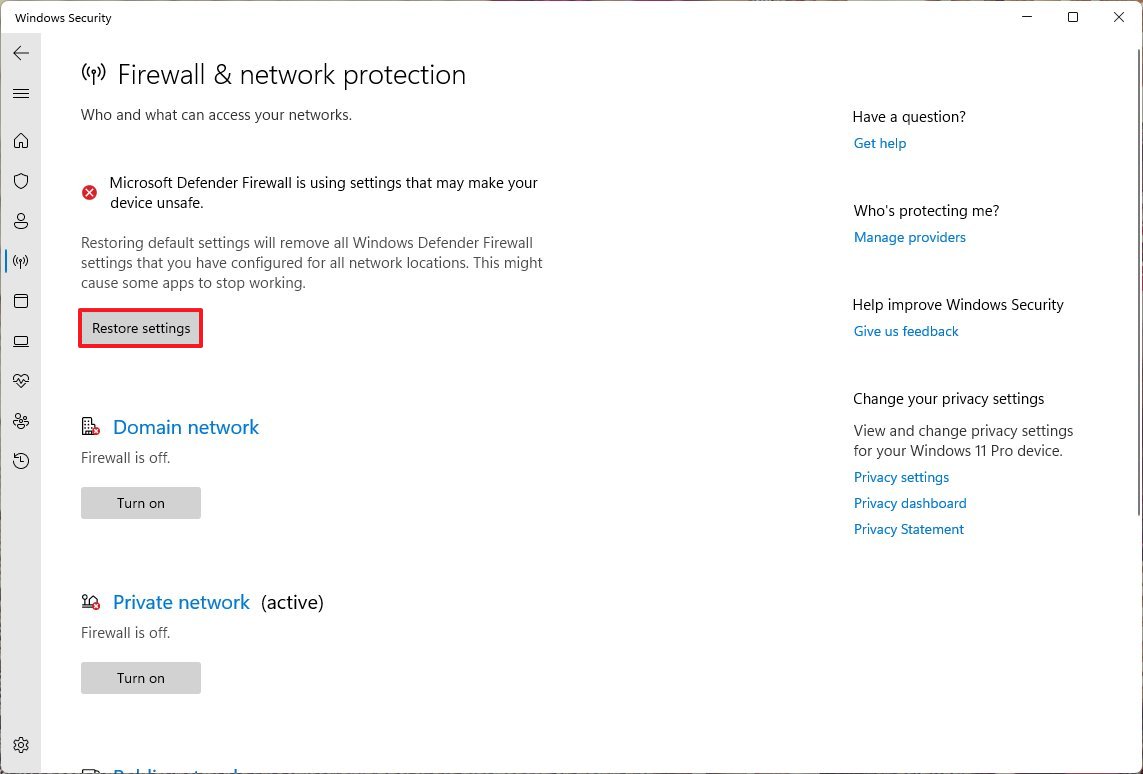
Once you complete the steps, the Microsoft Defender Firewall will monitor incoming and outgoing network connections to protect the device from network threats.
Enable Find my device feature
Windows 11 includes a “Find my device” feature that saves the most approximate physical location of the laptop in your Microsoft account, which you can use to find your computer if it ever gets lost or stolen.
To enable “Find my device” on Windows 11, use these steps:
- Open Settings.
- Click on Privacy & security.
- Click the Find my device page on the right side.
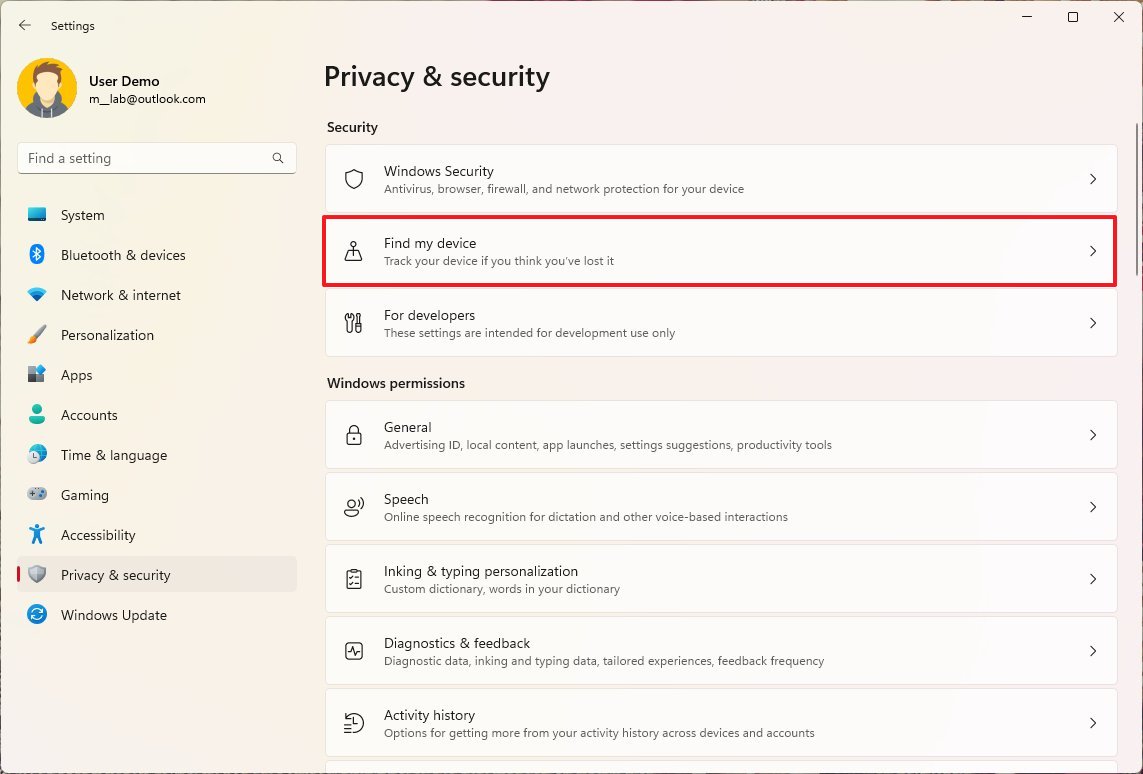
- Turn on the Find my device toggle switch (if applicable).
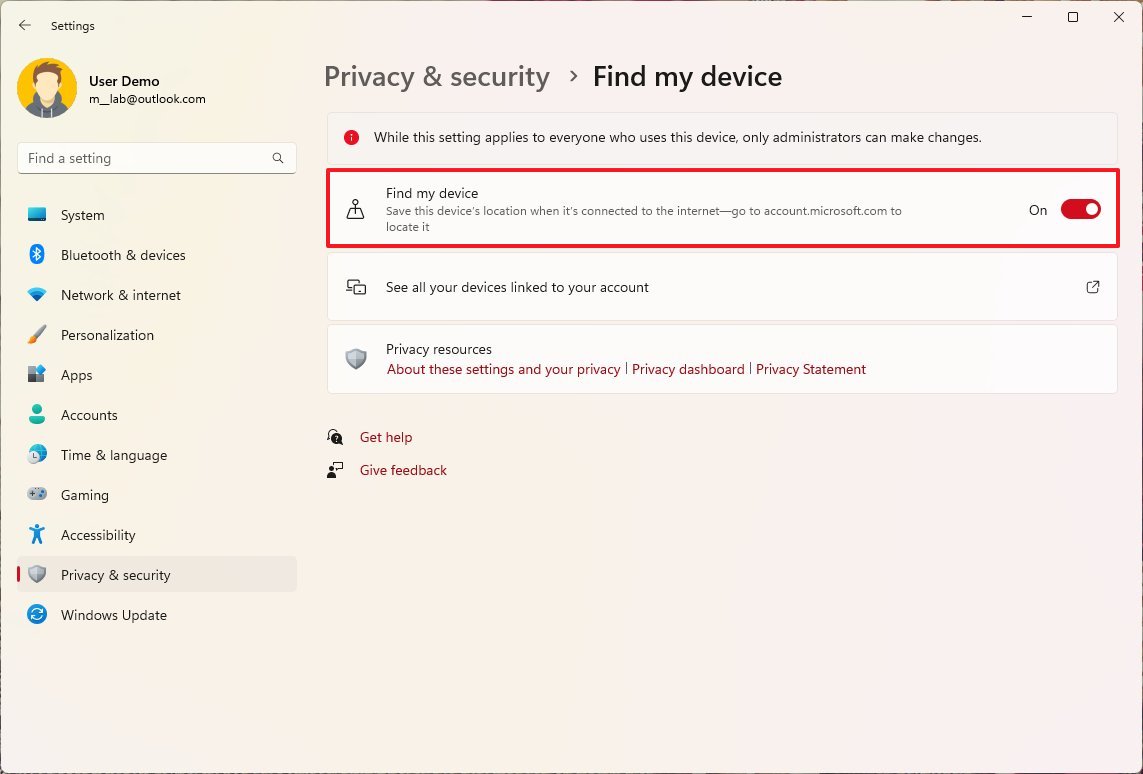
After you complete the steps, if you need help remembering where you left your laptop, you will be able to find the last known location by checking the details on the Find My Device page (opens in new tab) available in your Microsoft account.
How to create full backup on Windows 11
It’s also a good idea to create a full backup of the new system if you need to recover from hardware failure, malware attacks, or file corruption.
You can use many available third-party software products. However, you can still use the legacy tool on Windows 11, which allows you to create a full backup (opens in new tab) to a portable drive, which you can disconnect and store in a safe location.
Important: Microsoft has stopped maintaining the backup feature, but it’s still available to create a temporary full backup.
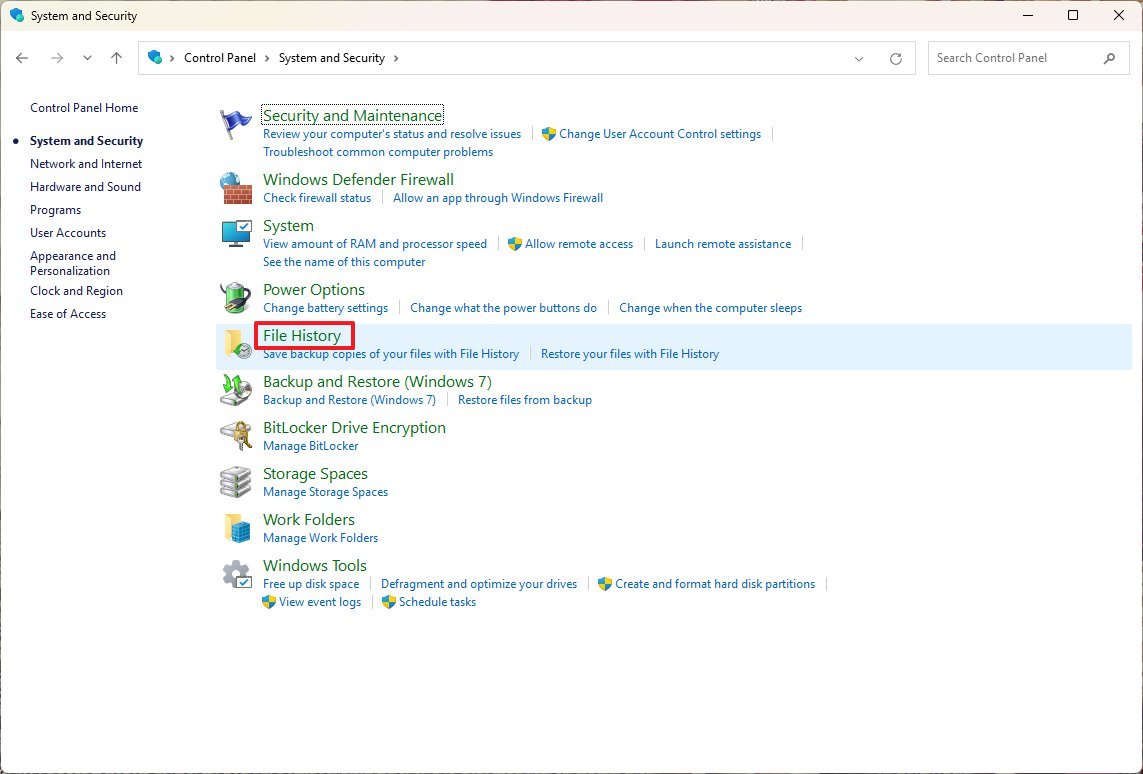
To create a full backup on Windows 11, connect a storage drive with enough space, and use these steps:
- Open Start.
- Search for Control Panel and click the top result to open the app.
- Click on System and Security.
- Click the File History setting.
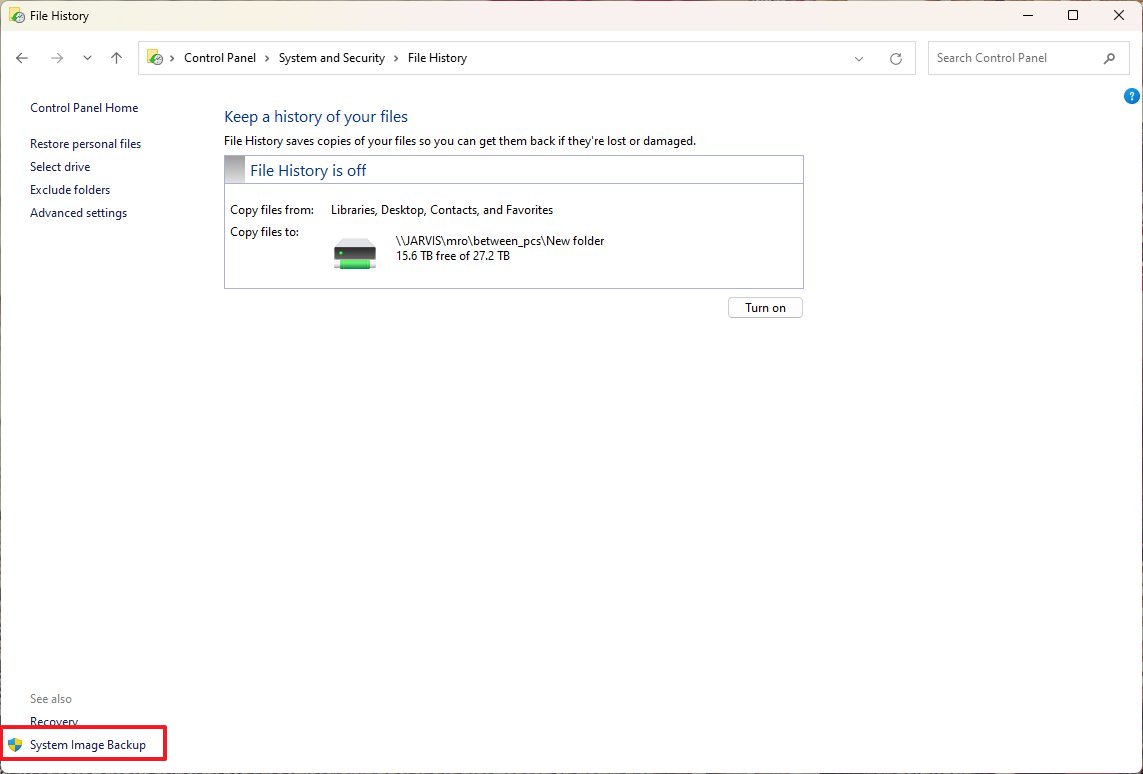
- Click the System Image Backup option from the bottom-left corner.
- Click the Create a system image option from the left navigation pane.
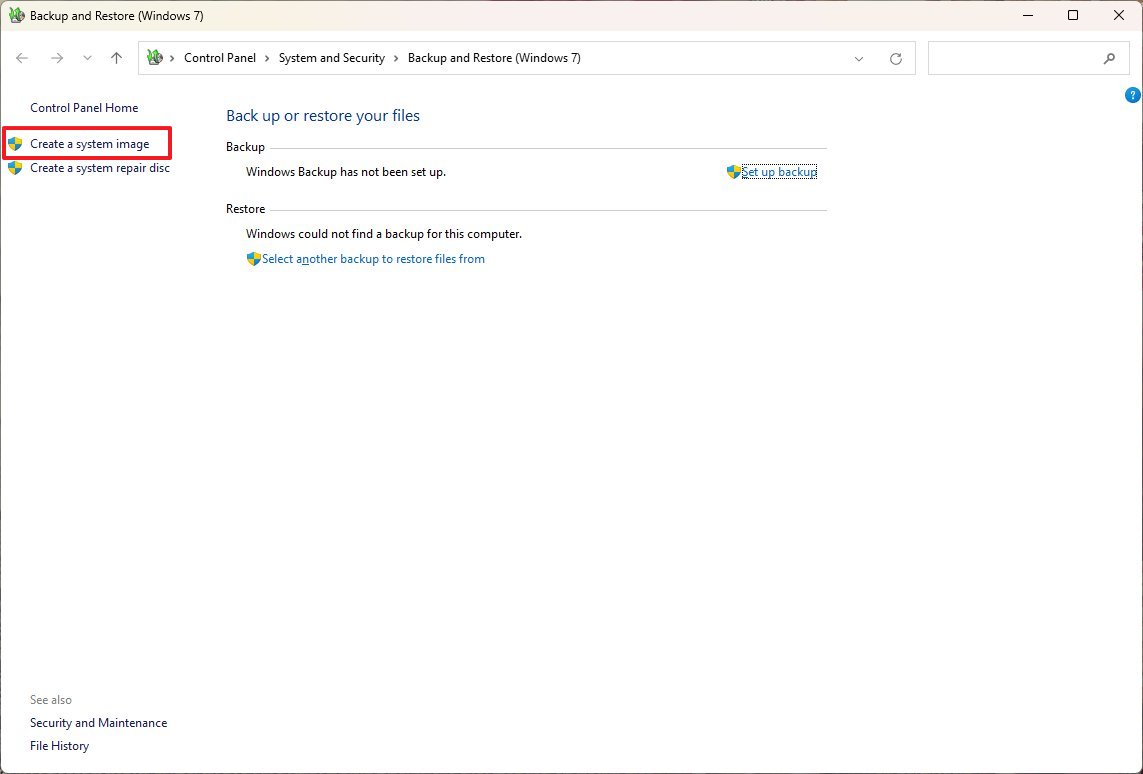
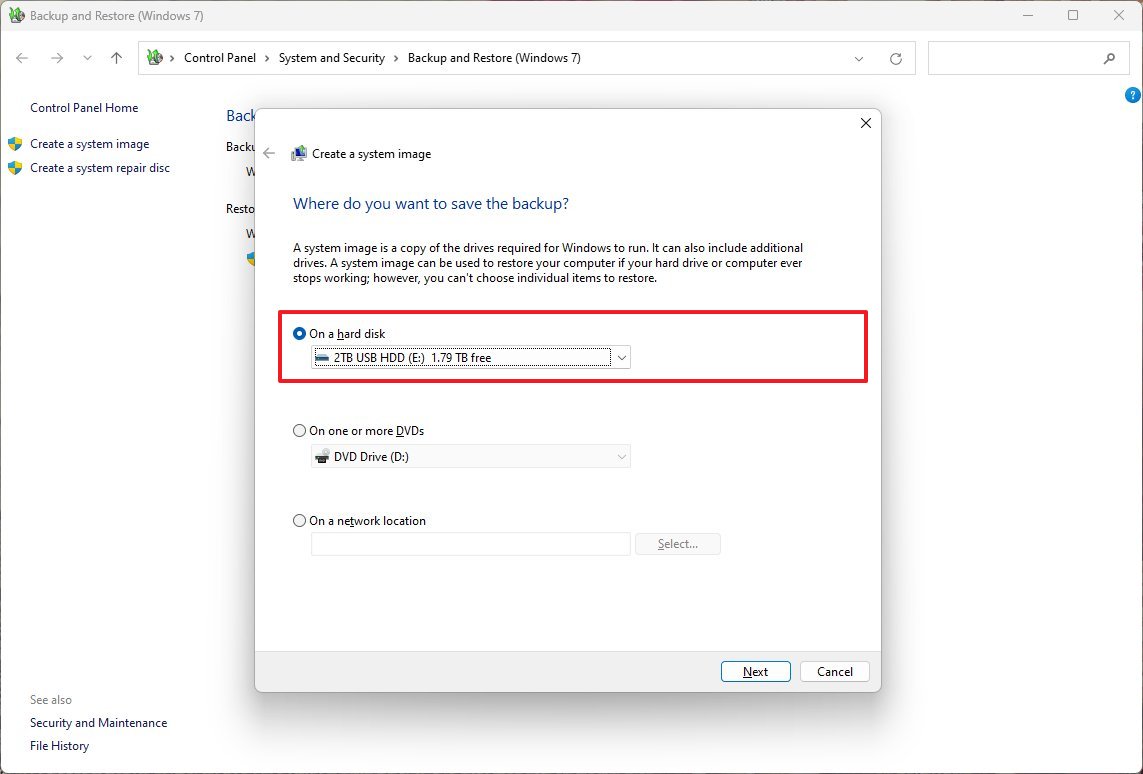
- Select the On a hard disk option.
- Use the “On a hard disk” menu and select the Windows 11 full backup destination.
- Click the Next button.
- (Optional) Select any additional drive to include in the backup.
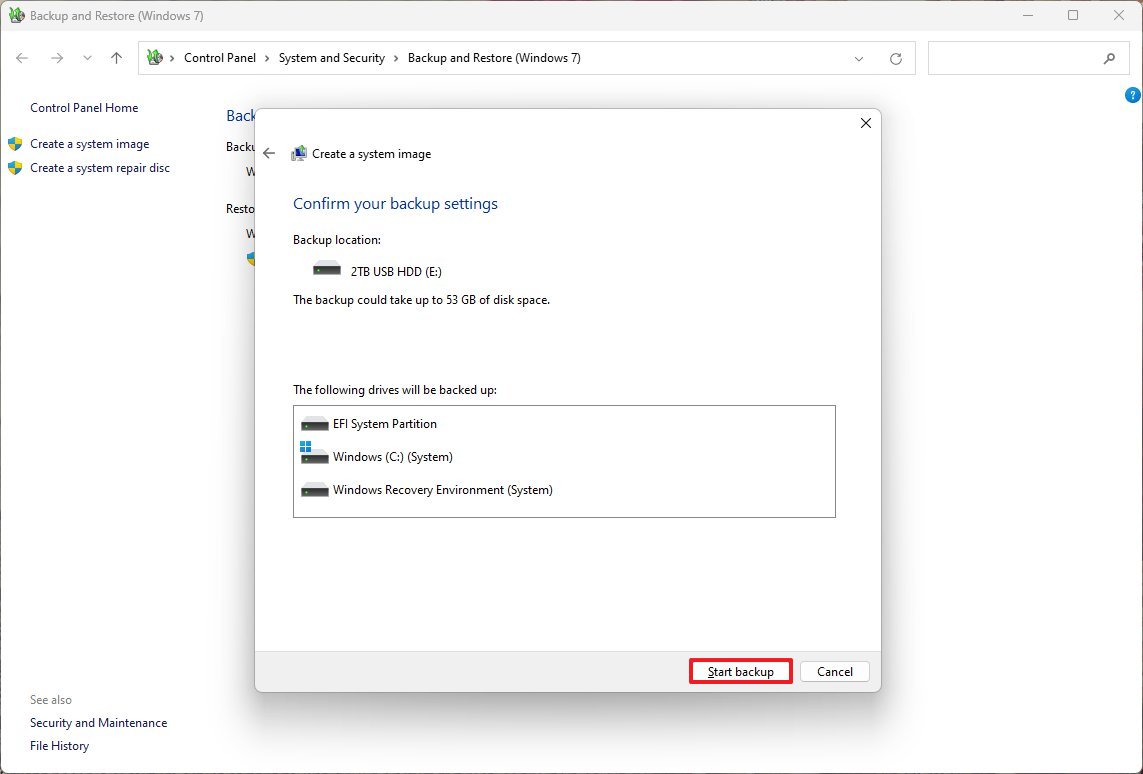
- Click the Next button.
- Click the Start backup button.
- Click the No button.
- Click the Close button.
Once you complete the steps, the tool will back up everything on the primary hard drive and other internal storage you may have chosen to export. After the process is complete, disconnect and store the external drive safely.
Although this is a handy tool for creating a backup of your computer, you can only restore changes until the last backup. Apps, files, and settings added after the backup won’t be part of the recovery process.
In addition, the Backup and Restore feature was designed to restore the whole system, not individual files. If you want an up-to-date backup of your files, consider using other solutions, such as OneDrive, to back up your files to the cloud or File History, which is still available on Windows 11.
More resources
For more helpful articles, coverage, and answers to common questions about Windows 10 and Windows 11, visit the following resources:


