

Your Fire Stick device isn’t limited to video streaming. You’ll even find games, browsers, and apps in other categories at your disposal. The Alexa virtual assistant can also make navigation simple with voice commands. Also, a Fire Stick supports screen mirroring, even on TVs that don’t natively support the feature.
Overall, the device makes a great cord-cutting companion. There are different types of Fire TV Sticks, each with its own features and price. The Fire TV Stick Lite is the cheapest of them all, peaking at 1080p and offering average functionality for just $20. The latest model is the Fire TV Stick 4K Max, which is the most expensive. It supports up to 4K Ultra HD resolution and Wi-Fi 6 for a faster and more stable streaming experience for $40.
How to set up your Amazon Fire TV Stick for the first time
If you’ve bought a brand new Fire TV Stick, it comes in a box. The packaging should contain the following items:
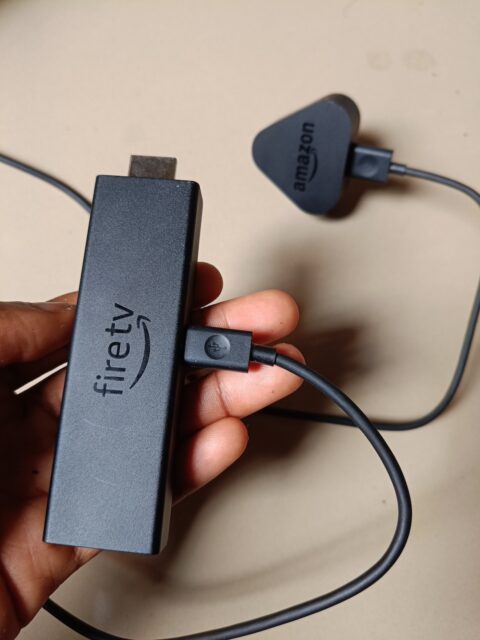
- Amazon Fire TV Stick: This is the main item in the box. It contains the streaming apps and casting features you need for your TV.
- Alexa remote control: It has buttons for navigation, control playback, command Alexa with the built-in microphone, and other functions.
- Two AAA batteries: They power the remote control and make it work.
- Product Manual: It contains information about the Fire TV Stick and instructions on how to use it.
- Charger head & USB Type-C cable: You’ll connect both parts together to transmit power from a wall outlet to the Fire TV Stick.
- HDMI extender cable: It improves Wi-Fi reception, allows flexible placement, reduces heat, and simplifies access to crowded HDMI ports.
Note: The content of your Fire TV Stick’s packaging may vary, depending on the model you have. But you’ll understand what role each one plays as you read on. For this walkthrough, we use an Amazon Fire TV Stick 4K Max.
Assembling the Amazon Fire TV Stick & accessories
1. Unpack the content of your Amazon Fire TV Stick’s packaging.
2. Connect the charger head and USB cable together. Then connect the charger to the Fire TV Stick.
3. Plug the Fire TV Stick into a HDMI port on your TV. Then connect the charger to a wall outlet.
4. Alternatively, connect the Stick to the HDMI extender and plug the extender into the HDMI port on your TV. This step is optional. Use it when you need better Wi-Fi or better port access.
5. Put the AAA batteries in your remote control.

6. Switch on your TV and use its remote control to change to the correct HDMI input where you plugged in the Stick.
Setting up the Amazon Fire TV Stick
1. As the Fire TV Stick starts up, the Amazon logo will appear on your TV screen. It may take a while for this logo to disappear.
2. Press the play/pause button on the remote control to start. Then choose your language.

3. It’s time to add your WiFi network. For this step, you may use either the Fire TV app or the remote control. We’ll be using the remote control.
4. Your device will start scanning WiFi networks. Ensure that your router or mobile hotspot is on and that you have a stable internet connection.
5. Your Fire TV stick will begin downloading the latest software. It should restart after completion, and continue downloading software. Be patient until it finishes, and do not unplug the device.
6. If you have an existing Amazon account, select the sign-in option. If not, hit the New to Amazon option to create a new account and follow the prompts.

7. If you’re an existing Fire TV customer, you’ll receive a prompt to restore your old data. If not, select the skip option.
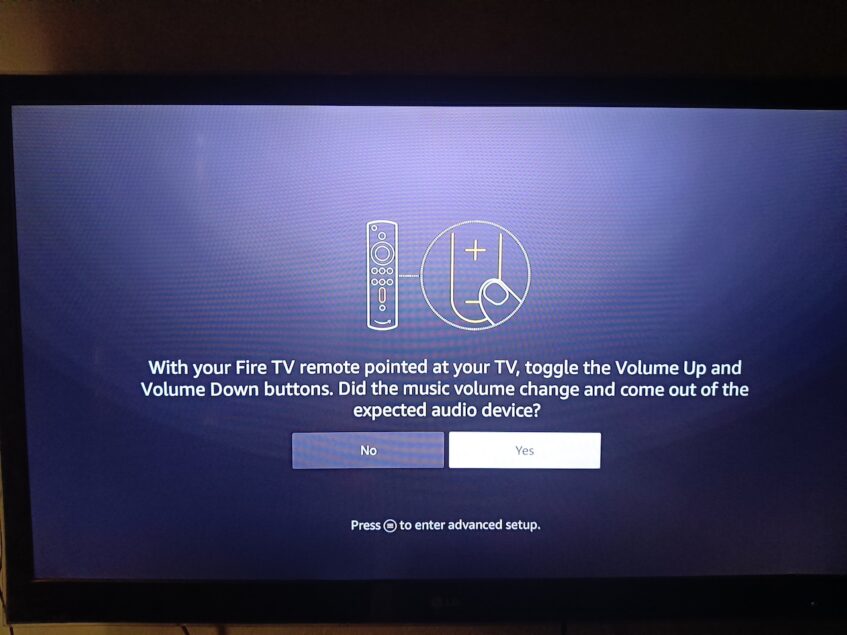
8. Your Fire TV Stick will perform a little exercise to test that it works properly. Use the volume buttons to run the test. If everything works fine, select the Yes option to proceed.
9. Afterward, Amazon will push some subscription prompts in your face. Ignore them.
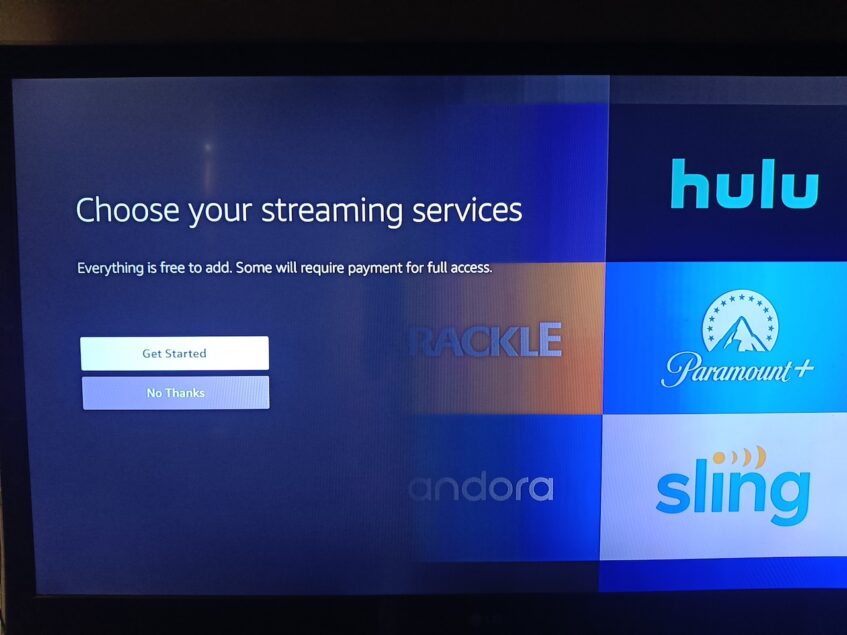
10. Select Get Started to choose the streaming apps you want to add to your Home screen. Adding them is free, but you’ll still pay for the in-app content if they require a subscription. E.g., Netflix. This step is optional.
11. Choose to use your personal images on Amazon Photos or generic stock photography as your screensaver.
12. Choose to enable control for kids or continue without doing so.
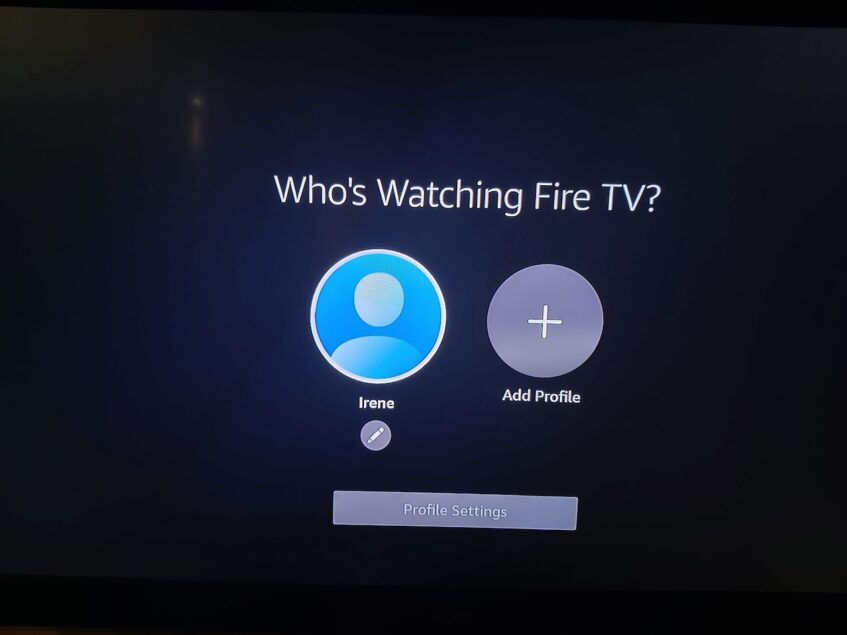
13. Add profiles to your device and continue to begin streaming.
Enjoy uninterrupted streaming with your Amazon Fire TV Stick
There you have it. You’ve set up your Fire TV Stick successfully and can begin streaming the best movies or TV Shows. If you struggle to sign into your account, you can begin the account recovery process on the website. It’s quicker if you use your phone to initiate it and verify your identity before attempting to sign in with the Stick. Also, ensure that you have a strong Wi-Fi connection to avoid errors along the way. You can always contact Amazon’s support team via the website if issues still persist.


