

There are many ways you could make your Windows 11 system more performant for gaming. Luckily, you don’t need to be a rocket scientist to get some of them up and running. Here are some simple ways to improve your PC performance.
Enable Game Mode
Game Mode has been available since Windows 10 and was carried over to Windows 11. According to Microsoft, entering Game Mode increases your frame rate and makes for a more consistent gaming experience. It does this by prioritizing processing threads from your game, giving it a fast track to your GPU and CPU.
Windows 10 and 11 PCs come with Game Mode enabled by default. However, you may have turned yours off inadvertently if you were tweaking settings. To turn on (or off) Game Mode in Windows:
- Right-click on the Start Button.
- Select “Settings.”
- Find “Gaming” in the left panel.
- Toggle the Game Mode on or off.

Disable Windows 11’s Memory Integrity
Windows 11 comes with core isolation enabled by default, and memory integrity is part of that suite of security measures. In the past, memory integrity did present some problems to users. According to Microsoft, memory integrity ensures that if your PC is infected, malicious software won’t be able to access high-security processes. Unfortunately, it might cause performance issues on your machine.
To remove memory integrity from your device:
- Hit the Start button.
- Search for Core Isolation
- Select it and toggle “Memory Isolation” off in the resulting window.

While Memory Isolation doesn’t cause that much of an issue with games anymore, turning it off could increase your performance by just a little bit.
Turn Off Virtual Machine Platform (VMP)
Another one of those “enabled by default” settings is Virtual Machine Platform, or VMP. Virtualization allows for the emulation of other operating systems like Android and Linux. The downside of this flexibility is that it could slow down your gaming experience.
To turn on or off VMP:
- Hit the Start button and search for Optional Features.
- Scroll down to “More Windows Features.”
- Scroll down until you find Virtual Machine Platform and adjust the setting as necessary.

VMP’s impact on gaming vary, but it’s a simple way to squeeze more out of your Windows 11 system for gaming.
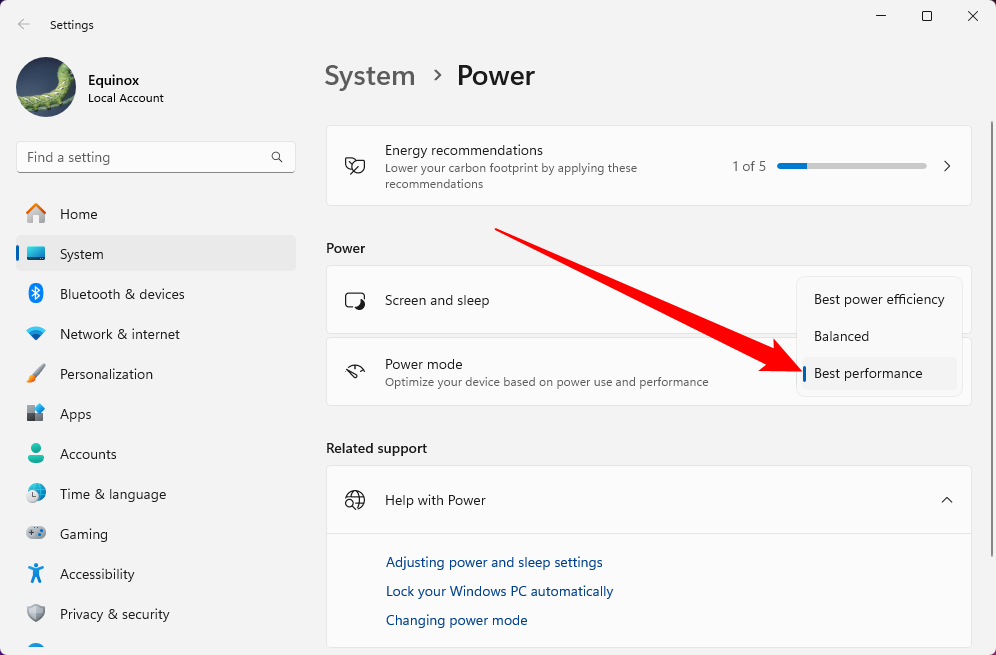
Optimize Your Power Settings
Power settings have been a core part of Windows since XP. However, most Windows 11 systems come with their power set to “Balanced” by default. To get the best performance out of your Windows 11 system, it might be advisable to set your power settings to “Best Performance.” Here’s how you do it:
- Hit the Start button and search for Power, Sleep and Battery Settings.
- Change the Power Mode to “Best Performance.”
 Manage Your Background Apps
 Manage Your Background Apps
 Background apps can slip in unnoticed and start up with your PC. While many of them are harmless, some of them can significantly impact your gaming experience. Depending on how much of your system’s resources are being used, a background app could lead to frame-stuttering or even hangs and crashes.
Disabling your startup apps is simple. Here’s how you do it:
- Hit the Start button and search for Startup Apps.
- Select the button that shows up and turn on/off any of the apps you want.

Windows has a handy feature that shows you what the impact of a particular app is on the system, so pay attention to these to know which ones are worth turning off.
Keep an Eye on Disk Space
Your hard drive’s space plays a crucial part in your Windows 11 performance. Freeing up your disk space by deleting files and folders is one way to do so, but Windows also comes with its own Disk Cleanup utility that you can access from the Start menu via a search. However, that’s not the only way that users have to free up disk space.
Here’s how you can access the Storage system in Windows 11 to free up disk space:
- Hit the Start button and search for Storage.
- In the window that pops up, click the “Temporary Files” button and purge the files you see there.
- You can also select the “Cleanup Recommendations” button for a list of files that haven’t been used in a while.

These can give you back a significant amount of space on your drive, depending on how much space you’re wasting on upgrade downloads and old files. Don’t forget to empty your Recycle Bin either. Files that you’ve deleted from your file system will remain in your Recycle Bin until you empty it, meaning that you won’t get back that space until you do.
Update Drivers and Software
Drivers are necessary to get your operating system talking with its peripherals. You should try to keep your drivers for Windows 11 updated as much as possible. Some hardware, like your graphics card, will need frequent updates to ensure that you don’t get slowdowns in performance.

To check for driver updates, you can use Windows Update itself. It will scan your system for outdated drivers and offer you newer versions. Graphics card manufacturers also have their own proprietary software that helps to keep your hardware updated by prompting you to install new stable drivers as they become available.
Set Your Visual Performance Settings
Visual performance settings won’t affect a lot in your gaming experience, but adjusting them might help. By default, Windows 11’s visual performance settings are set to balanced. However, if you want to ensure that your desktop settings won’t get in the way of your game’s performance, setting it up is simple:
- Hit the Start button and search for Advanced System Settings.
- In the popup that shows up, select the top “Advanced” button, then click “Settings.”
- Change the setting to “Best Performance.”
You might notice some changes in your desktop experience after this, but that’s normal. You can always reset it after you finish gaming.
Small Adjustments Can Go A Long Way
Windows 11 offers many small adjustments that users can make to create a more streamlined gaming experience. However, there’s no replacement for a proper upgrade. While these small tweaks will help you get a little bit more out of your gaming machine, upgrading your hardware will give you a lot more in terms of performance over the long term.

