


G.Skill
RAM is one of the key components of any computer, so when it starts failing, things like crashes and performance issues start occurring — even if you have the best RAM you can buy. Even if you know what RAM is and how it works, instability might not be obvious, which is why it’s important to know how to test your RAM.
Instability is a spectrum, so depending on how unstable your RAM is, different things can happen. Slightly unstable RAM might perform a little worse than expected and could cause the occasional crash. More instability will cause more performance issues and more BSODs. For instance, the “page fault in non-paged area” BSOD error message is one you can expect if your RAM is unstable.
Windows Memory Diagnostic
Windows has a built-in memory testing tool called Windows Memory Diagnostic. It’s a simple but usually effective tool for finding RAM issues. Before you start, make sure you save all your data, because you will need to restart your PC.
Step 1: Go to the Windows search bar and type in Memory diagnostic. Select it.
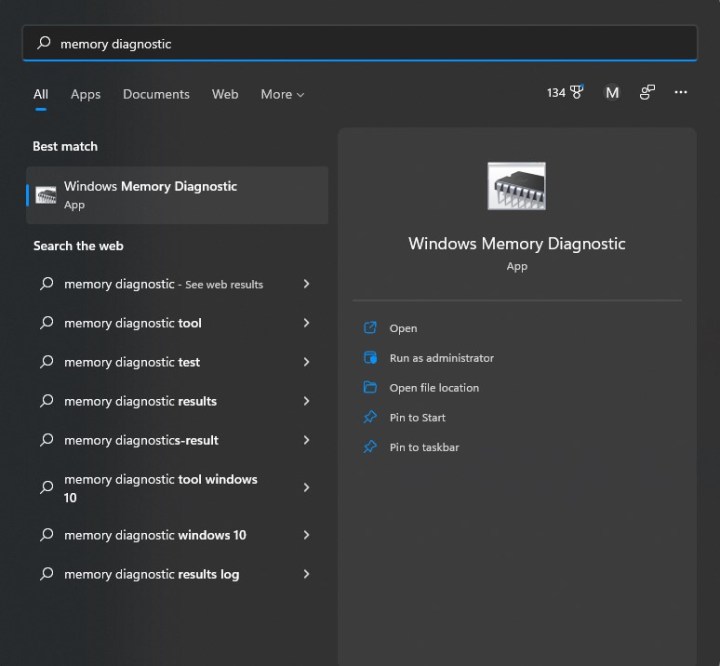
Image used with permission by copyright holder
Step 2: Then, you will see the window below. Click the first option, which will automatically restart your PC.

Image used with permission by copyright holder
Step 3: When your PC reboots, you’ll be greeted with a blue-looking screen that tells you that your RAM is being tested. This takes about 15-30 minutes to complete.
Step 4: Once the test finishes, your PC will reboot back into Windows. Once you log in, you’ll get a notification that will inform you whether your RAM passed the test. A fail means the RAM is unstable, and you should replace your modules.
MemTest86
If your PC passed the Windows Memory Diagnostic but you still suspect you have a RAM issue, then you’ll want to try MemTest86, a much more comprehensive test by PassMark. Much like Windows Memory Diagnostic, it runs a test outside of Windows itself, so you’ll be unable to use your PC while the test is going. All you need to use MemTest86 is a USB storage device, which you will have to format, so make sure there’s nothing important on the device
Step 1: Download the free version of MemTest86 on PassMark’s website. You’ll receive a .zip file.

Image used with permission by copyright holder
Step 2: Open the .zip file and copy/paste its contents into a new folder.

Image used with permission by copyright holder
Step 3: Plug in your USB storage device and run imageUSB.exe. Again, your storage device will be formatted, so make sure nothing important is on it.
Step 4: At the top of the window, select the storage device you want to use for MemTest86, then find the Write button at the bottom and select it. The program will ask you if you’re really sure, since this part formats your storage device. After a minute, you’ll see an Imaging complete notification, which means your device is ready to use MemTest86. Before you move on, save all your data, because you will be restarting your PC soon.

Image used with permission by copyright holder
Step 5: Now you’ll need to boot into your USB storage device. First, go to the Windows search bar and search Advanced startup, which should pull up Change advanced startup options. Select it.
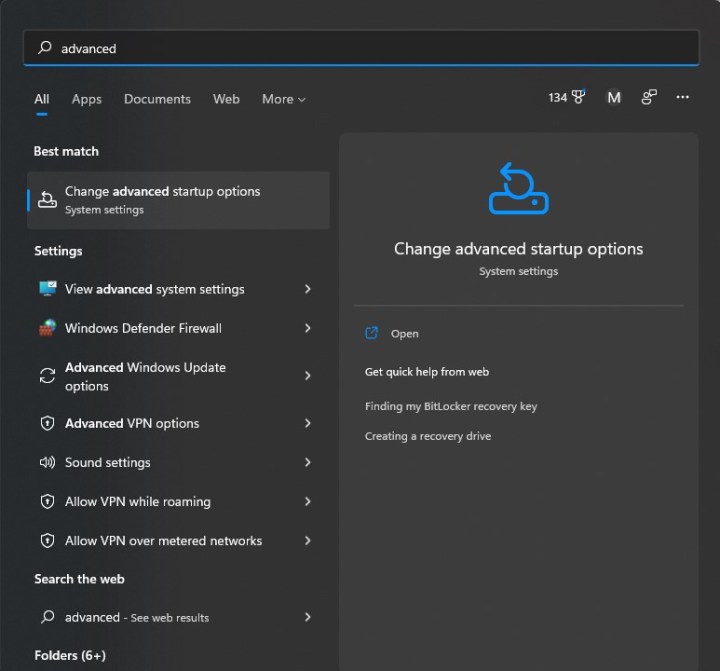
Image used with permission by copyright holder
Step 6: You should see a box labelled Advanced startup with a Restart now button. Select it and your PC will restart.

Image used with permission by copyright holder
Step 7: Once your PC reboots, you should see the Windows recovery screen. Click Choose a device and select your USB device, which might be called something like UEFI: Removable Device.
Step 8: Your PC will then load MemTest86, which should start testing immediately. It can take around three hours to finish testing, so be patient.
Step 9: Once the test has finished, you’ll see a message that either says the RAM passed or that it failed. If it has failed, you need to replace your RAM — maybe with some of the best RAM for gaming.
If your RAM didn’t pass either test, then it’s unstable or bad. There are a few solutions that might work for you, but first check how much RAM you need.
It’s possible that if you’re overclocking your RAM, you overclocked too hard and will need to dial things back. Either reset your RAM back to the default speed and timings, or reduce your overclock and test again. Overclocking RAM is difficult and finicky, so it’s entirely possible even a slight overclock can make your RAM unstable. If you’re having trouble with this, check our guide on how to overclock RAM correctly.
If you haven’t messed around with your RAM, then there could be a system incompatibility. While all RAM can fit into any compatible motherboard, not all RAM plays nicely with every system, and every motherboard usually has a list of RAM kits that are confirmed to work well. If your PC is experiencing problems at stock settings, you can try to underclock your RAM to increase stability. Basically, follow our RAM overclocking guide and decrease the clock speed instead of increasing it. Obviously, you’re going to lose some performance doing this, but it’s better than having an unstable PC.
If your RAM is validated to work with your motherboard, if you’re on a laptop or a prebuilt PC that you haven’t modified, or if instability issues have appeared suddenly, then your RAM might be dying. If you bought your RAM and installed it in your own PC, and if it’s still under warranty, you should be able to get a new kit from the manufacturer. If you have a laptop or a prebuilt and you have never touched the RAM, you’ll probably have to get a replacement or repair from the place you bought your PC from.
You can also replace the RAM yourself. If you have a prebuilt desktop that uses off-the-shelf parts (Maingear and CyberPower desktops for example) or built your own PC, buy another kit of RAM, make sure it’s validated for your motherboard, and install the RAM as you normally would. If you have a prebuilt that uses proprietary parts (such as HP’s and Dell’s desktops) or a laptop, then you’ll probably need an OEM-certified kit of RAM. These can be trickier to find, so make sure you do your due diligence before you buy. For help, check our guide on how to upgrade RAM on a PC, and if you use a notebook, follow the steps to upgrade RAM on a laptop.


