

Smartphones have completely changed the way we interact with friends, family, and the rest of the world. Beyond just this, however, your iPhone comes with some potentially life-saving features that can help keep you and your loved ones safe.
1 Check In
You’ve probably asked a friend or family member to let you know when they arrive safely at their destination. With iOS 17, Apple took this to the next level with iMessage’s Check In. When you start a Check In, the recipient will know where you’re headed and be automatically notified when you arrive safely.
If you do not arrive at your set destination, after prompting you to extend your Check In time, your phone will send follow-up information to your recipient. To start a Check In, press the “+” icon next to the iMessage box within a conversation. From the menu that appears, select “Check In.”
Once you’ve selected Check In, you will be prompted to choose how much data should be shared if you don’t arrive at your destination as expected. Tap “Continue,” and the iMessage compose field will populate with a Check In box. Tap “Edit” to configure your Check In.

You can either configure Check In to be triggered when you arrive at a set location, or after a certain amount of time has passed. Once you arrive at your destination, Check In will inform your contact of your arrival and automatically end.

Check In is not only a great way to give your loved ones peace of mind, but should something go wrong, it gives someone you trust the information they need to help.
2 Find My
The Find My network is one of iPhone’s most useful features. Whenever I misplace one of my devices, I can find it easily on my phone. However, you can also use the Find My network to keep track of family and friends. As it works with most Apple devices, even parents of young children with Apple Watches can benefit from Find My’s live location tracking.
To share your location or to request someone else’s in the Find My app, open their contact card in iMessage. From there, you will see the option to request their location or share your own. If you choose to request, they can accept and share their location with you for a length of time.
If you share your own, you will be prompted to choose how long you want them to have access to your location. No matter how long you select, you can stop sharing your location at any time.
Once someone has shared their location with you, you will be able to see where they are under the “People” section of the Find My app. You will see their contact photo on a map, as well as the address of where they are and directions from you to them. You can even add notifications for when someone arrives or leaves a certain location.
Find My is a powerful tool that can help keep you and your family out of harm’s way. The ability to check up on your loved ones and be notified whenever a young child leaves or enters a designated location can be an extremely effective way to keep everyone safe.
3 Lockdown Mode
Lockdown Mode is an iPhone feature you’ll hopefully never need, but is still worth knowing about. This feature was intended to protect iPhone users who are at risk of being targeted by highly sophisticated, state-sponsored spyware. It offers extreme protection, but in the process, disables many iPhone features, including most message attachments. This should not be turned on for no reason, as it offers much more protection than the average user will ever need.
If you’re ever in a situation where you feel putting your iPhone in Lockdown Mode is warranted, you can do so by going to Settings > Privacy & Security > Lockdown Mode. Tap the “Turn on Lockdown Mode” button, and you will see a brief explanation of what the feature does. You will then be prompted to restart your phone to activate Lockdown Mode.
Though most of us will never need to use this feature, it is good to know that Apple is looking out for all of its users and granting them protection against serious cyberattacks.
4 Safety Check
Because of how connected our phones are to our lives, this access can be abused. In order to protect the personal safety of its users, in iOS 16, Apple introduced Safety Check. Safety Check is a quick, cohesive, organized way to review the information you have shared and make adjustments when necessary. It brings together your most important sharing settings, allowing you to revoke access from certain people or apps. It can also be used to immediately reset access for all people and apps.
To start Safety Check, head to Settings > Privacy & Security. Tap “Safety Check” to access your options. In the top right corner of your screen, you will see a button labeled “Quick Exit”. If you need to quickly exit Safety Check, you can press that button to be taken immediately to your home screen.
This will save all of your information and the Settings app will be completely closed, so anyone on your phone will not be able to see what you were previously doing.
Safety Check offers two options, one labeled “Emergency Reset” and one labeled “Manage Sharing & Access”. Emergency Reset allows you to instantly revoke your information from all people and apps with access to it, as well as giving you the option to change your Apple Account password and emergency contacts. Once you press the “Start Emergency Reset” button, you will be directed through this process.

The other available option is titled “Manage Sharing & Access”. Instead of combining all of your privacy settings, this method allows you to review who and what has access to your information separately. From here, you can view what you are sharing from person to person, or via the information itself (location, photos, and so on).
You can also review the information certain apps have access to, the devices connected to your account, and update your passwords. It may be worth running through this process every once in a while to make sure you only share sensitive information with people and apps you trust.

5 Emergency SOS
Emergency SOS has been available on iPhone since iOS 11. This feature allows you to quickly access important medical information, or to call emergency services when needed.
To activate Emergency SOS, press and hold the power button and one of the volume buttons at the same time. This will bring up the Emergency SOS menu, displaying three options. You can either power off your phone, display your Medical ID, or call emergency services.
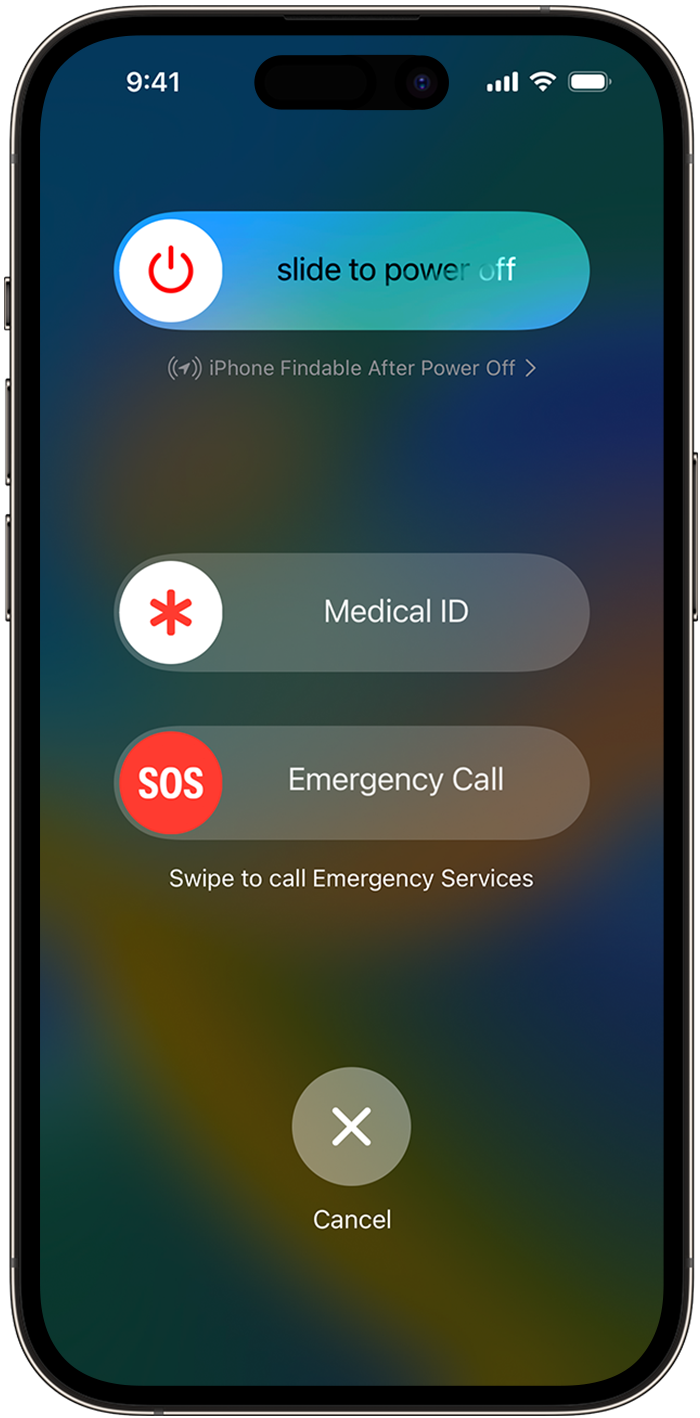
If you continue holding down these two buttons without making a selection, the screen will change and an alarm will sound. If the buttons are released before the “Cancel” button is pressed, emergency services will automatically be called.

Emergency SOS is a great way to call for help in situations where doing so normally is impossible. It also allows you to put your hand in your pocket, squeeze your iPhone’s physical buttons, and start the process of alerting emergency services.
6 Medical ID
Medical ID allows first responders to view critical medical information about you without needing you to unlock your phone. Because your phone is likely to be with you in an emergency, it is a good idea to configure this information should it be necessary in the future.
To edit your Medical ID, open the Health app on your iPhone and tap on your profile picture in the top right corner. From there, press “Medical ID” to open your Medical ID settings.

Here, you can input important medical information, including your medications, allergies, conditions, emergency contacts, and any other notes medical professionals should know. Hopefully, you never have to use this feature, but it’s a good idea to have it set up in case of an emergency.
7 Crash Detection
If you have an iPhone 14 or later, your device comes with built-in Crash Detection. This feature uses several environmental indicators, including sudden changes in speed and g-forces, to determine when you’ve been involved in a car accident. When triggered, an alarm and countdown will begin. If not canceled, your iPhone will automatically call emergency services.
Though this feature is on by default, it may be worth making sure it’s still enabled. To do so, head to Settings > Emergency SOS. You will see a toggle next to “Call After Severe Crash”. When toggled on, Crash Detection is enabled.

It should be noted that you may want to turn off this feature before heading to an amusement park, as roller coasters have been known to set off Crash Detection.
Our iPhones do a lot to make our daily life easier, as well as make it safer. The existence of these features can go a long way in not only giving us peace of mind but also allowing us to call for help when we need it most.


