Linux is generally considered to be a privacy-friendly operating system, without the spying we associate with Microsoft and even Apple. However, there are a few things you can do to further improve your anonymity; here are four tips I use myself to increase privacy on my Linux laptop.
Set Up Screen Lock
First of all, you need to set up screen lock. This is an effective way to prevent people from accessing your computer while you step away and an absolute must if you ever use your laptop in a public space. Leaving it unsecured is an invitation for any nearby person to access it and catch a glimpse of your private life.
Thankfully, setting up screen lock on most Linux distros is easy. Mint and Ubuntu will, much like Windows or Apple, have it working from the get-go, all you need to do is set the password—in most cases it’s the same as your system password—and any time you step away from your laptop the screen lock will kick in after a certain amount of time.
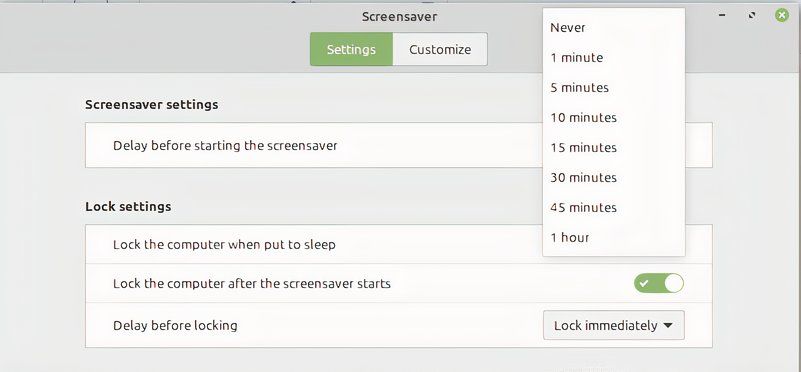
However, the set interval is 15 minutes, which is a bit long. Generally, you want to set it to five minutes, short enough to minimize mischief, but not so short as to annoy you. In Ubuntu, this setting is under Privacy in your System Settings, while Mint users can just go to their start screen and type Screensaver to access it.
Better yet is to lock your screen any time you leave your laptop alone. To do so, hit Ctrl+Alt+L by default, though you can change any shortcut on Linux.
Install a VPN
Another important step to making your Linux laptop more private is to install a virtual private network, better known as a VPN. These handy programs reroute your connection while also encrypting them in a so-called VPN tunnel. The result is that you can make it appear like you’re browsing from anywhere, while also making it much harder to track you.
VPNs are a powerful tool, but not all of the best VPNs will work on Linux systems. ExpressVPN, for example, will only work in the terminal, while NordVPN won’t work at all. However, my personal favorite VPN, Mullvad (read my Mullvad review) will work fine as will another darling of the How-to Geek office, Proton VPN—read why in our review.
Switching to a Private DNS Server
As handy as VPNs are, though, they don’t always meet your needs. They cost money—at least the good ones do, you should usually avoid free VPNs—and they slow down your connection. If you’re mainly worried about spying by your internet service provider (ISP) and you just want to make sure they don’t see what you’re doing you can also switch to private DNS instead.
When you connect to a site, your request first goes to a DNS server, which connects the URL of a site (such as www.howtogeek.com) to the IP address associated with it. This record is public and can be used by your ISP to track you.
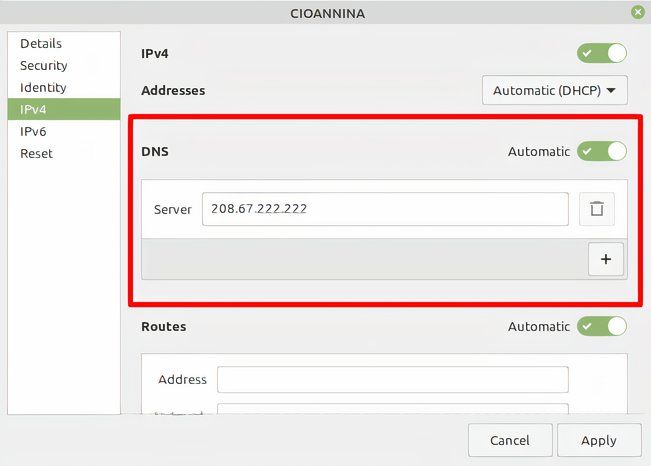
To avoid this, you should instead route your DNS requests through one of these private DNS servers instead. To do so, go to your Network Settings, select the connection you want to reroute (it has to be done separately for every network, so once for your home, once for work, etc.) and then enter the new private DNS you’d like to use instead.
Use a Privacy-Friendly Browser
Finally, you should always use a privacy-friendly browser. Though there is some discussion which browser offers the best privacy, you should definitely avoid Google Chrome as it’s had issues. Lots of them.
Most Linux distros come with Mozilla Firefox installed, meaning you have one of the best browsers all ready to go. Alternatives include Brave and the Mullvad browser; all of which offer much better privacy, though mind that you need to use private browsing and a VPN to get the most out of any of them.
Making Your Linux Laptop More Private
Using a Linux laptop is a lot more private than any of its competitors; using these four tips should help you stay even more off the radar of Big Tech and its data brokers.


