If you aren’t using voice dictation in Microsoft Word, you’re sleeping on one of its best features. It transforms how you interact with the document with hands-free typing, editing, and formatting. Here’s why you should use it and how.
Why You Should Use Microsoft Word’s Dictation
The biggest reason voice dictation is a must-use feature in Microsoft Word is its ability to speed up typing. It allows you to capture your thoughts more quickly, making it ideal for brainstorming sessions. You can always refine the text later using the keyboard or through further dictation.
Moreover, dictation helps reduce typing errors, especially when using complex words, as it converts your speech directly into text. This allows you to focus on expressing your ideas without worrying about spelling and grammar, which Microsoft Word transcribes accurately if you speak clearly.
As a result, it minimizes the effort required to produce a high-quality, consistent document during the editing phase.
Dictation also alleviates typing strain by providing a break from physical keyboard use. This can be particularly beneficial if you’re fatigued or suffer from repetitive strain injuries (RSIs) like carpal tunnel syndrome or tendonitis—conditions that prolonged typing can cause or exacerbate.
Additionally, if you have pre-recorded audio, such as an interview or lecture, Microsoft Word can transcribe it for you. You’ll only need to edit the transcription for consistency and accuracy.
How to Use Voice Dictation in Microsoft Word
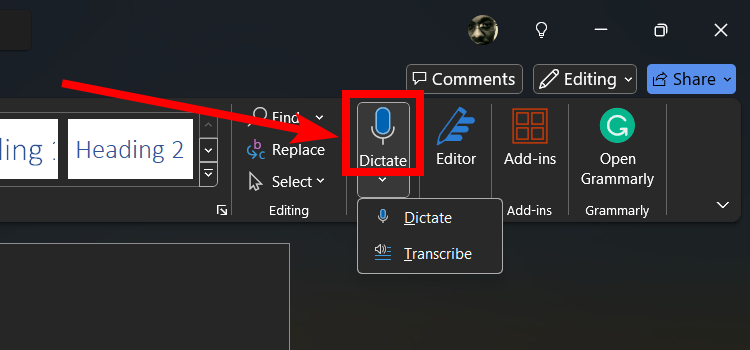
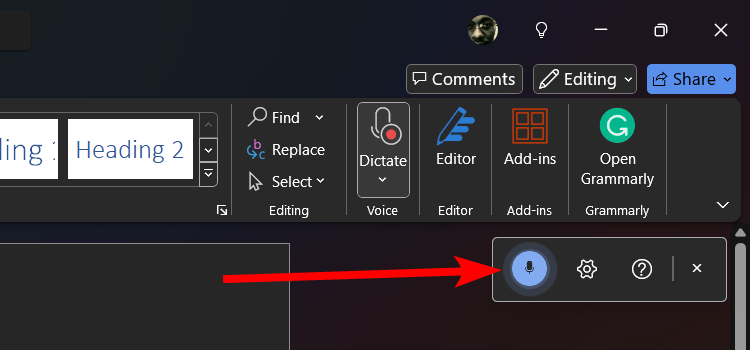
To turn on dictation, select the “Home” tab and click “Dictate” in the Voice group of the ribbon. This will make a widget appear on the screen with the dictation controls.
If your microphone is set up correctly, the words you speak should be transcribed into the document. When you’re finished dictating, you can click the “Stop Dictation” button—microphone icon—in the dictation widget or say Stop dictating to disable the feature.
To resume dictation, click the microphone icon on the widget. To close the widget, click the “X” button.
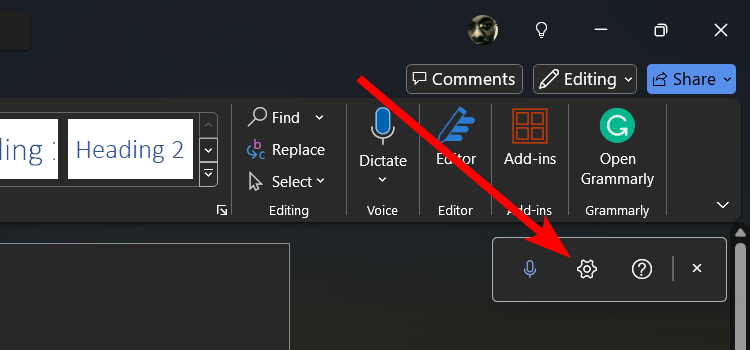
You can also customize the dictation settings to suit your needs. While the options aren’t extensive, they can significantly improve your experience. To access these settings, click the “Settings” button—gear icon—on the dictation widget.
Click the “Help” button—question mark icon—to access helpful tips, hints, and instructions on how to use voice dictation.
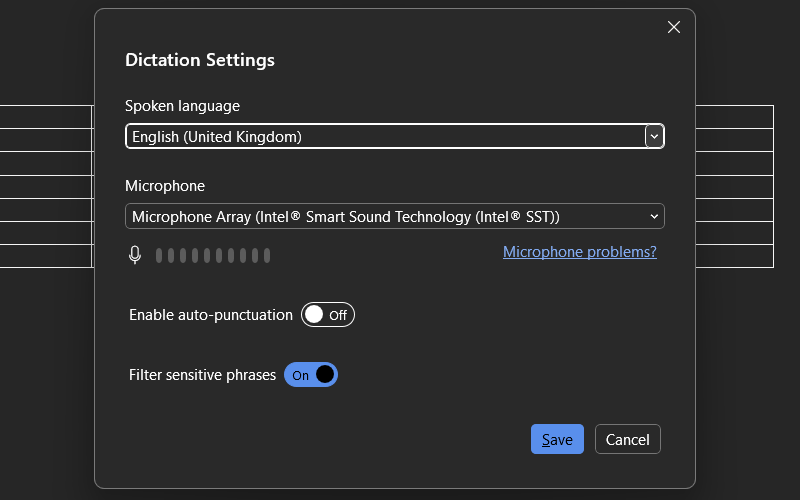
In the dialog box, you can change the spoken language, switch microphones, enable auto-punctuation, and filter sensitive phrases. When you are done tweaking the settings, click “Save” to apply them.
Voice dictation is also available in the web and mobile versions of Microsoft Word.
How to Transcribe Pre-Recorded Audio In Microsoft Word
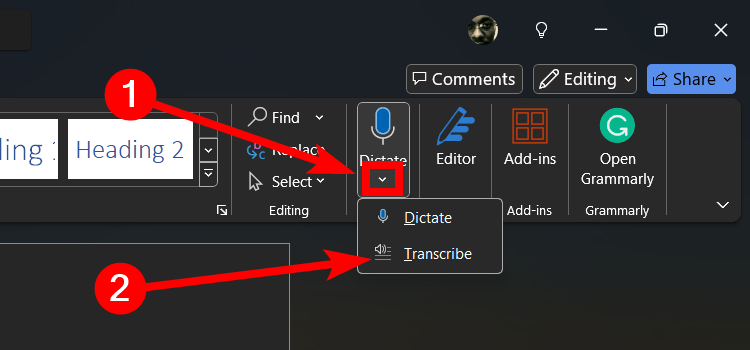
To transcribe audio, click the down arrow below the “Dictation” button. Then, select “Transcribe” in the menu that appears.
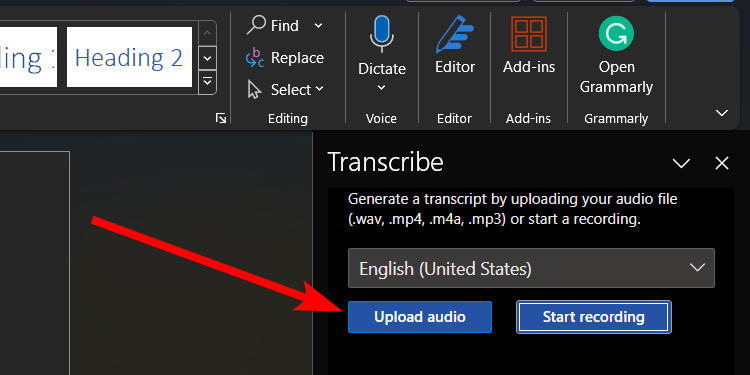
In the panel that appears on the right, click the “Upload Audio” button. Navigate to where the audio you want to transcribe is and upload it. You can upload an MP3, MP4, M4A, or WAV file.
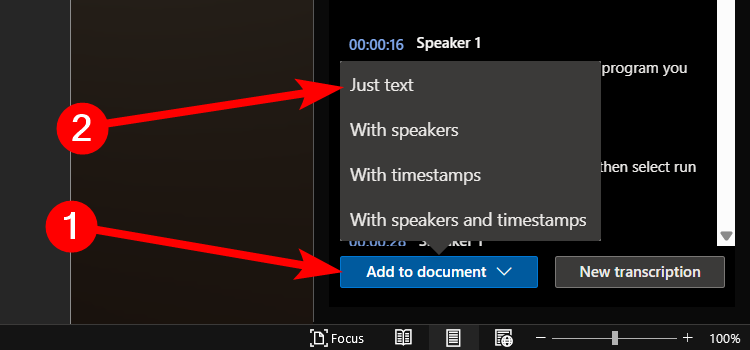
Once the upload is complete, click the “Add to Document” button at the bottom of the panel. Then, select “Just Text” in the menu.
The transcript will be pasted onto the document, and you can edit it. If you have more audio to transcribe, open the Transcribe panel again (you will see the previous file you uploaded), and click “New Transcription” at the bottom.
Keep in mind that once you start a new transcription, the previous upload will be deleted.
What You Can Do With Dictation?
You can get a lot done with dictation. Let’s take a look at some examples that can get you started.
Voice Typing
Once you turn on dictation, you can start speaking and your words will be transcribed automatically in the document. For punctuation, it’s as easy as saying words like Period, Comma, or Question mark to insert them.
If, for instance, you say If the computer does not turn on comma ensure it’s plugged into the wall outlet, this will come out as: If the computer does not turn on, ensure it’s plugged into the wall outlet.
Formatting Text
To format text using voice commands in Microsoft Word, you can use commands like bold, italic, or underline after a spoken word or phrase. For instance, to underline the word cat in the sentence The cat in the hat, say Underline cat. The output will be: The cat in the hat.
Editing Text
While dictating, you can also do some editing, although it is not as flexible as using a mouse and keyboard. You can delete the last word or phrase you uttered by saying, Delete that. You can delete specific words or phrases by saying, Delete [word/phrase].
You can even replace words within sentences by saying Replace [old word] with [new word]. If you make a mistake, you can even undo it by saying Undo.
You can select a sentence by saying Select the sentence, and then use any of the other editing and formatting commands to tweak it.
Dictation allows for hands-free typing, which can be convenient and even necessary in some scenarios. It can help you get a lot done in Microsoft Word, whether for speedy typing or accessibility. Voice dictation is best paired with other time-saving features in Microsoft Word to enhance your productivity.


