One of the primary issues people face when using Microsoft Word is how the program deals with formatting. At times, it seems the program has a mind of its own! However, many of these frustrations can be solved by displaying non-printing characters.
What Is a Non-Printing Character?
A non-printing character is a formatting mark that dictates how your document is laid out. As the name suggests, non-printing characters exist only to support your on-screen formatting and do not appear on printed-out versions of your work.
Here are some of the most common non-printing characters:
|
Non-Printing Character |
What It Symbolizes |
Keyboard Shortcut |
|---|---|---|
|
· |
Space |
Spacebar |
|
→ |
Tab (to the next stopping point on the ruler) |
Tab |
|
¶ |
The end of a paragraph |
Enter |
|
↵ |
Line break in the same paragraph |
Shift+Enter |
|
° |
Non-breaking space (keeping the two words on either side together) |
Ctrl+Shift+Space |
|
—Page Break— |
Page break |
Ctrl+Enter |
|
===Section Break=== |
Section break (such as next page section break) |
Alt > P > B > N (next page section break) |
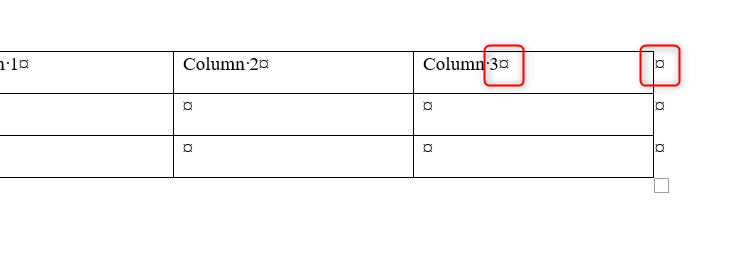
There are also some special characters that appear in tables to signify the end of a row or some content in a cell.
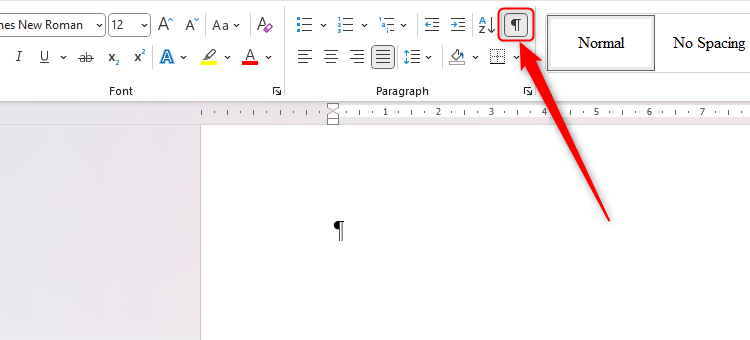
By default, Word only shows these characters when you click the “Show/Hide” (¶) icon in the Home tab on the ribbon or press Ctrl+Shift+8. Click the same icon (or use the same keyboard shortcut) to hide them again.
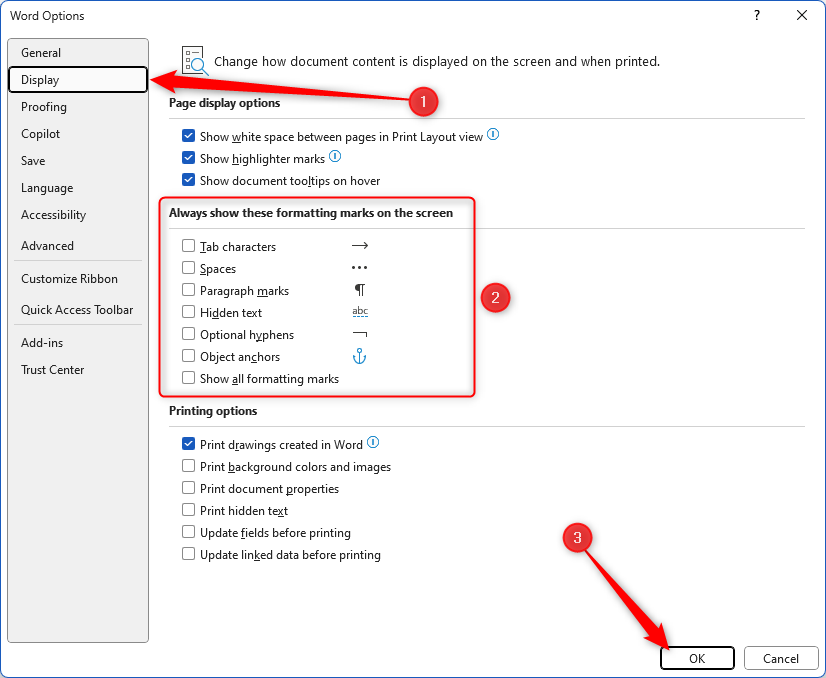
Alternatively, to display select non-printing characters permanently, click File > Options or press Alt > F > T to launch the Word Options window. Then, click “Display” in the left-hand menu, and check or uncheck the formatting marks in the list. When you’re done, click “OK.”
I prefer to have these all unchecked so that I have the option to turn them on and off through the ¶ icon in the Home tab. After all, they can sometimes get in the way!
Identifying Frustrating Formatting Issues
Because non-printing characters reveal elements in your Word document that are usually hidden, such as spaces, line breaks, paragraph breaks, and tabs, they let you see its skeletal structure.
As a result, you can identify parts of your work where spacing, alignment, page breaks, and other elements are causing issues that, without the non-printing characters being visible, would be impossible to see (and, so, causing great frustration).
For example, the words on the first line in this document are separated by unusually large spaces.
When I enable non-printing characters, I can see that this formatting is caused by a line break being placed after the period, and because the text alignment is justified, it forces the words on that line to fill the page’s full width.
So, I can remove this line break and replace it with a space or paragraph to correct this issue.
Rather than wasting time trying to diagnose the causes of formatting issues by eye, you can see problems at a glance by enabling non-printing characters with a single click.
Optimizing Collaboration
If you’ve created your own document from scratch, with every word, break, space, and paragraph added by you, you’re more likely to understand how the work has been pieced together.
However, if you’re collaborating with others on a document in real time or adding to a document you’ve been sent, it’s good to get into the habit of activating non-printing characters. Doing so will mean you can ensure everyone is following the style guide or, at least, using the same formatting “rules.”
For example, are they pressing Enter twice at the end of each paragraph, or is the document set up to add a certain-sized space after each paragraph automatically? Are people using non-breaking spaces between the numbers and words in a date (to prevent it from splitting over two lines), or are they using regular spaces?
Turning on non-printing characters in collaborative situations (and encouraging others to do the same!) can help avoid differences in approaches, meaning you (and others) won’t have to go back in and edit their work later on.
Ensuring Formatting Consistency
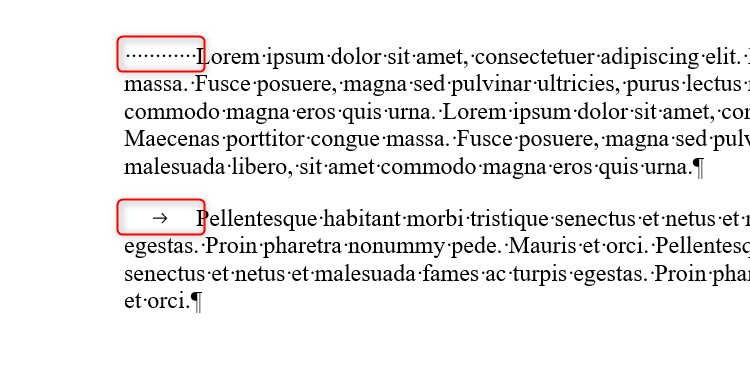
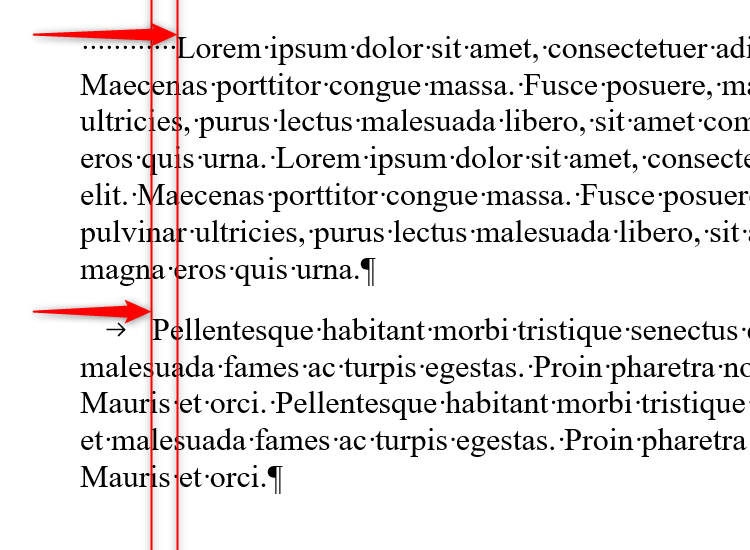
Staying on the topic of consistency, let’s look at this example, where the first line of each paragraph is indented.
Although the two paragraphs look consistent, the methods for achieving these indentations differ. In the first paragraph, a group of spaces has been added, while in the second, the Tab key has been pressed. This is only possible to see with non-printing characters turned on.
Why does this matter? Well, if I increase the document’s font size, the indent created through Tab will remain as is, though the indent created through spaces will change, as the sizes of the spaces change with the size of the font. This means I’ll have inconsistent indentation.
So, enabling non-printing characters means I can identify and—importantly, rectify—inconsistencies at the earliest opportunity.
Making Precise Edits
So, you’ve finished writing your fifty-page dissertation, and you’re ready to turn it in to your tutor. Even if your document is behaving and displaying as you would expect, it’s good to make sure your document is cleanly and professionally presented and formatted.
In this example, there are two unnecessary spaces at the end of the first heading, which can only be easily identified when non-printing characters are turned on.
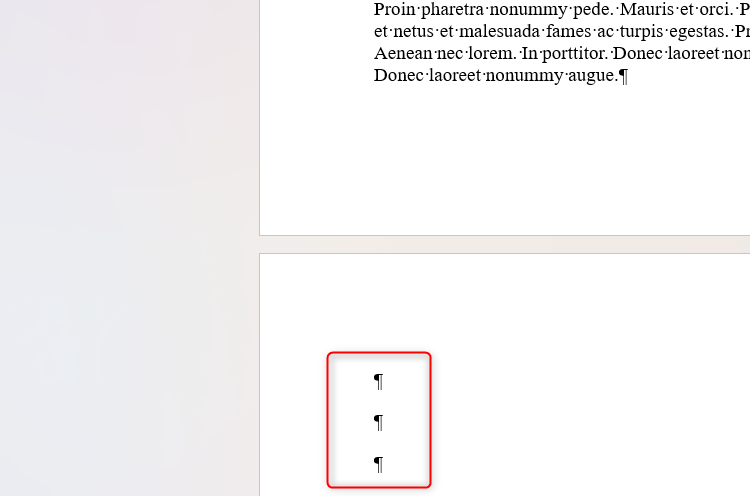
Here, the extra paragraph markers at the end of the document spill onto the next page, resulting in a useless blank page that will only serve to affect how the document prints. Also, if I save the document as a PDF, that blank page will be tagged onto the end of my file.
Because I’ve spotted these extra characters, I can remove them from my document, and thus, the need for my printer to print a blank page.
What’s more, editing your document with non-printing characters activated can help you claw back some extra characters if you’re compelled to adhere to a limit, since spaces and tabs count towards the character total.
As well as turning on non-printing spaces, there are many other ways to improve your Microsoft Word formatting, like using multilevel lists, adding an automatic table of contents, and adding spacing after your paragraphs.


