Did you know that it’s possible to require two-factor authentication (2FA) to log into user accounts on any Ubuntu system? Follow along and I’ll show you how you can add this extra layer of security to your Ubuntu account in just a few minutes.
What Is Two-Factor Authentication?
Two-factor authentication (2FA), sometimes referred to as two-step verification or dual-factor authentication, is a user verification process that requires you to provide two different authentication factors to verify yourself. This usually involves a combination of entering a password plus some type of single-use authentication code from a hardware device that only you, the legitimate user, would be able to access. There are several different types of two-factor authentication, but one of the most common types of secondary verification is entering a code provided by a special authentication application on a phone or tablet device owned by you. That is what we’ll be setting up here.
This extra layer of security makes it virtually impossible for someone else to access your account, even if they happen to discover your password. Without access to the device that generates your second authorization factor, the login attempt will always fail.
So, with that said, let’s dive into the installation of 2FA for your Ubuntu user account. Go ahead and open a terminal window and we’ll have everything set up in just a few minutes.
Step 1: Install Google Authenticator
The Google Authenticator package is what makes 2FA possible on Ubuntu. You can install this package with the following command:
sudo apt install libpam-google-authenticator
It should only take a moment for the package to download and install. When it’s done you’ll need to add one line to one of your system configuration files to give users the ability to set up 2FA for their accounts.
To open the file in the Nano text editor, enter the following command:
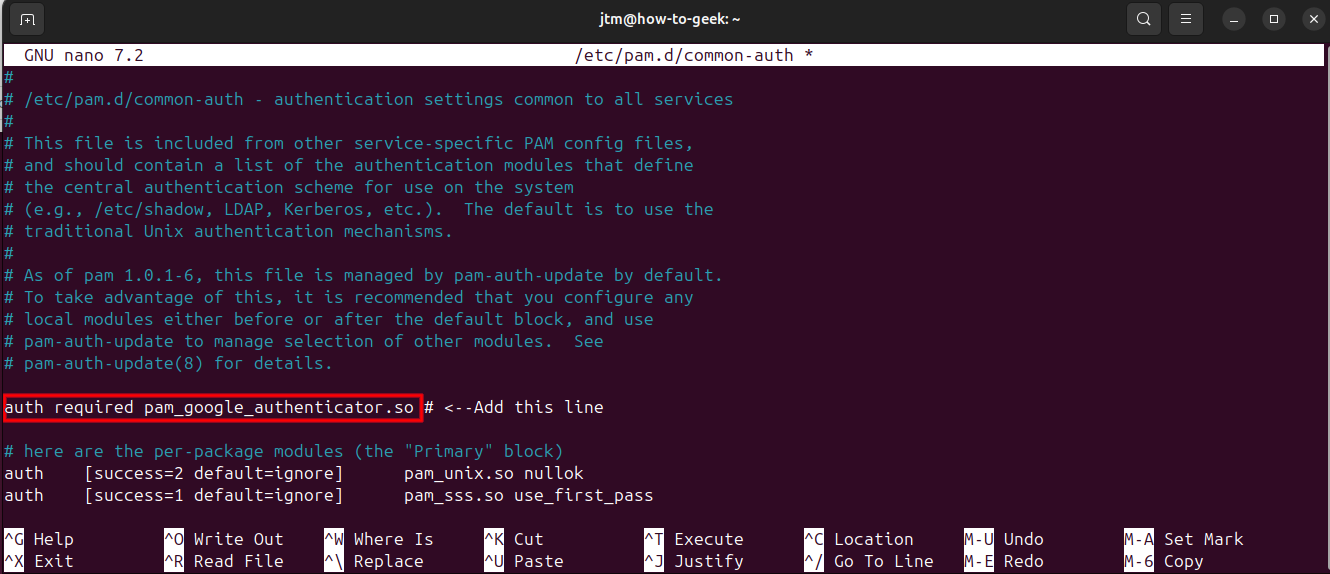
sudo nano /etc/pam.d/common-auth
With the editor open, you need to add the following line to the file as shown in the screenshot below:
auth required pam_google_authenticator.so
Once you’ve added the new line, press Ctrl+X to exit and answer yes when asked if you want to save the changes.
Step 2: Configure a 2FA App on Your Phone or Tablet
Now you can go about actually configuring 2FA for your Ubuntu user account. If you already have an authenticator app on the device you want to use, it should work just fine. If you don’t have one, Google Authenticator or other apps such as Bitwarden Authenticator or Authy will do the job.
Once you have an authenticator app ready, go back to your terminal and simply enter:
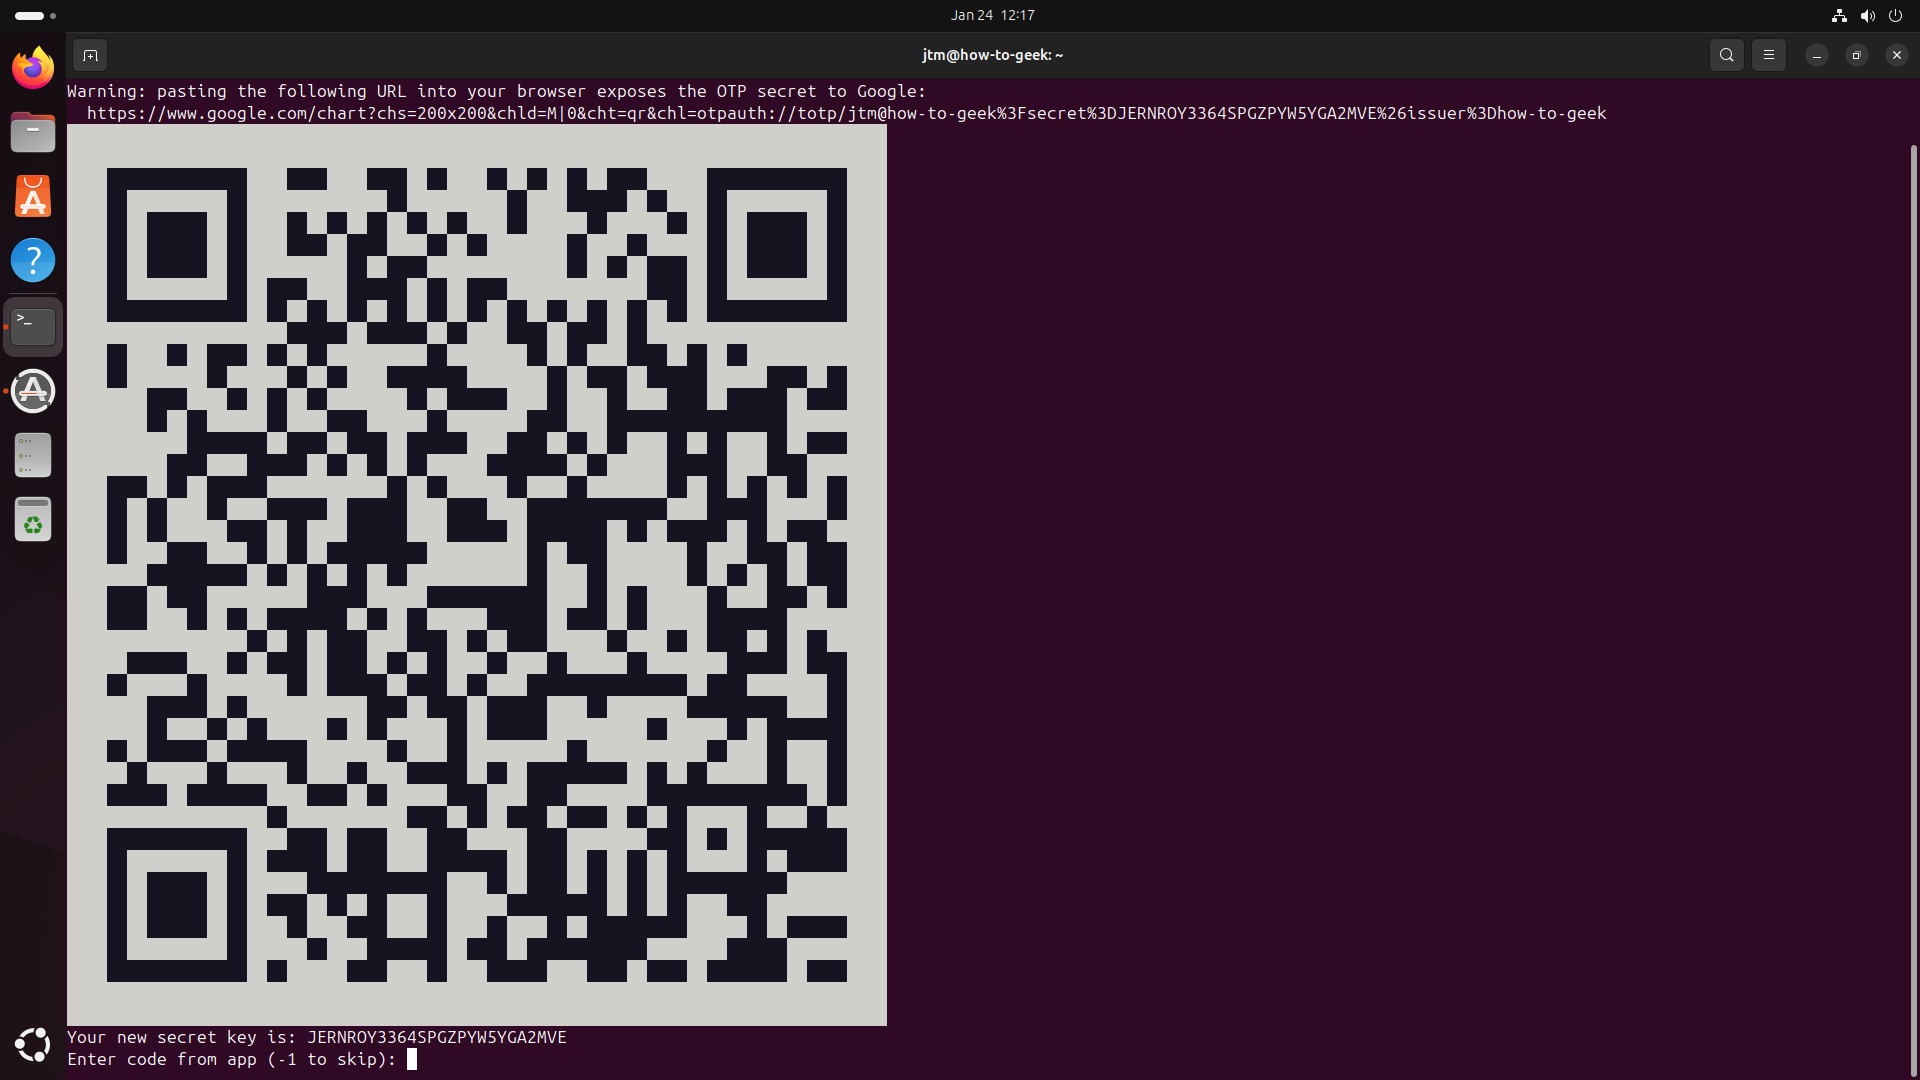
google-authenticator
This will bring up a large QR code in the terminal window. You will most likely need to adjust the size of your window to see the entire code.
In the authenticator app on your device, select the option to add a new account or login. The app should give you the option to configure the new account either by scanning the QR code or entering the key code displayed below it. You should immediately be able to generate authentication codes for this login account.
Below the configuration codes in your terminal, you will be prompted to enter a new code from your app so that the authenticator on your computer can verify that everything is working correctly. Setup should continue after you enter this code. If you get any kind of error, try scanning the QR or entering the key code again in the app on your device.
After successfully entering your 2FA code, you will be given five “emergency scratch codes”. These codes will allow you to log into your account if you happen to lose access to your 2FA device. You should write these codes down somewhere and keep them in a safe place. They will not be shown again and you can not look them up later. Without them, you may get permanently locked out of your account.
As setup continues, you will be asked a few questions about how you’d like to set some security preferences. When asked “Do you want me to update your /home/
You will then be asked if you want to disallow multiple uses of the same authentication token. Again, you should answer yes. When asked if you want to adjust the time skew window, you should answer no.
Finally, you will be asked if you want to enable rate-limiting to help mitigate brute-force attacks. You should answer yes for the best security. That should complete the configuration and leave you back at your terminal command prompt.
Step 3: Verify Two-Factor Authentication on Your Account
2FA should now be fully enabled for your Ubuntu user account. To see it in action, you’ll need to either log out of your session and log back in or reboot your computer. When you try to log in again, you will be asked to enter an authentication code before entering your password.
Once logged in, you can open a terminal and enter a command through sudo to verify that 2FA is also required when you need to enter your password at the command line.
Again, you should be asked for a verification code before entering your password as shown in the screen capture above.
You’ve Successfully Enabled 2FA for Your Ubuntu User Accounts
Congratulations! You have completed the installation and setup of 2FA for user accounts on your Ubuntu system. If there are users other than yourself that use your system, they can enable two-factor authentication for their own accounts by opening a terminal window, entering the “google-authenticator” command, and following the same steps shown above. You’ve taken a big step towards keeping your system and your data secure.
Now that you’ve secured your Ubuntu user account, it’s worth exploring options for 2FA on other accounts that are important to you.


