

There are various reasons why Windows does not start. The first assumption is a defect in the boot environment that prevents the system from starting. However, causes can also be a defective file system, defective system files, or a hardware problem.
Errors manifest themselves differently depending on the cause. If the screen remains completely black after you have switched on the PC or laptop, there is probably a hardware fault.
If a logo or messages from the firmware appear but then nothing happens, the PC is obviously trying to start the system but cannot find an operating system.
If the boot loader or system files are faulty, the automatic repair will usually start. Windows then attempts to rectify the defect, but this is not always successful. However, the problem can be solved with a manual repair.
1. The phases of Windows startup
To find the error, first determine in which phase of the system startup it occurs. There are four phases in total:
1. When you switch on the computer, the firmware searches for a bootable drive. On current devices, this is the UEFI partition (Unified Extensible Firmware Interface) in which Windows has placed the boot manager during installation.
The partition is 100MB in size and formatted with the FAT32 file system. Devices from the Windows XP or 7 era have a bootstrap code in the MBR (Master Boot Record) of the hard drive. Windows 10 and 11 do not use a hard drive with an MBR partition by default, which is why we will not discuss this further in this article.
If an error occurs in this phase, you will see a message on a black background, for example “Boot failure,” “No bootable device found,” “Failed to load Windows Boot Manager,” or similar.
2. The UEFI firmware loads the Windows boot manager from the file “\EFI\Microsoft\Boot\bootmgfw.efi” from the UEFI partition. This reads the configuration from the file “\EFI\Microsoft\Boot\BCD” (Boot Configuration Data). This contains information on the Windows installation location (hard drive and partition) and a reference to the file “\Windows\system32\winload.efi.”
If errors occur in this phase, the automatic repair will start or you will receive a message on a blue background with further information or instructions.
3. Winload.efi is the system-loading program. It loads drivers and then the Windows kernel. During this phase, you will see the Windows logo signaling the start of the system.
4. The Windows kernel activates other drivers and services that are configured in the Windows registry. The kernel is the actual operating system and is responsible for managing hardware components, main memory, and resources. It hands over control to the session manager (Smss.exe).
Errors in phase 3 or 4 also lead to automatic repair or display a message on a blue background (“blue screen”).
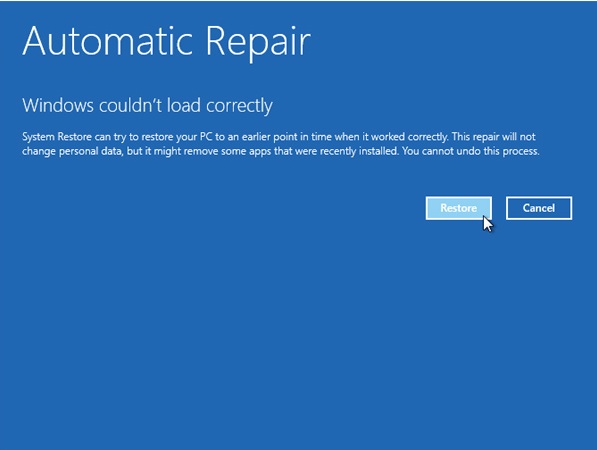
Windows starts the automatic repair function if there are start-up problems. However, this does not resolve all errors and repairs must be carried out manually.
Foundry
2. Check the firmware settings before repairs
You should first check whether the firmware has recognized the drive, whether the boot sequence is correct, and whether the Windows boot manager has a boot entry.
Carry out this check for errors in phase 1, but it is also at least informative for errors in other phases.
Depending on the computer, you can access the BIOS/firmware setup with keys such as Esc, F1, F2, F10, F12 or ENTF, which you press shortly after switching on. If the automatic repair starts but was unsuccessful, you can access the repair system by clicking on “Advanced options.”
For some errors, Windows also offers you to start the recovery environment via the F1 key. You can also access the firmware setup via “Troubleshooting > Advanced options > UEFI firmware settings.”
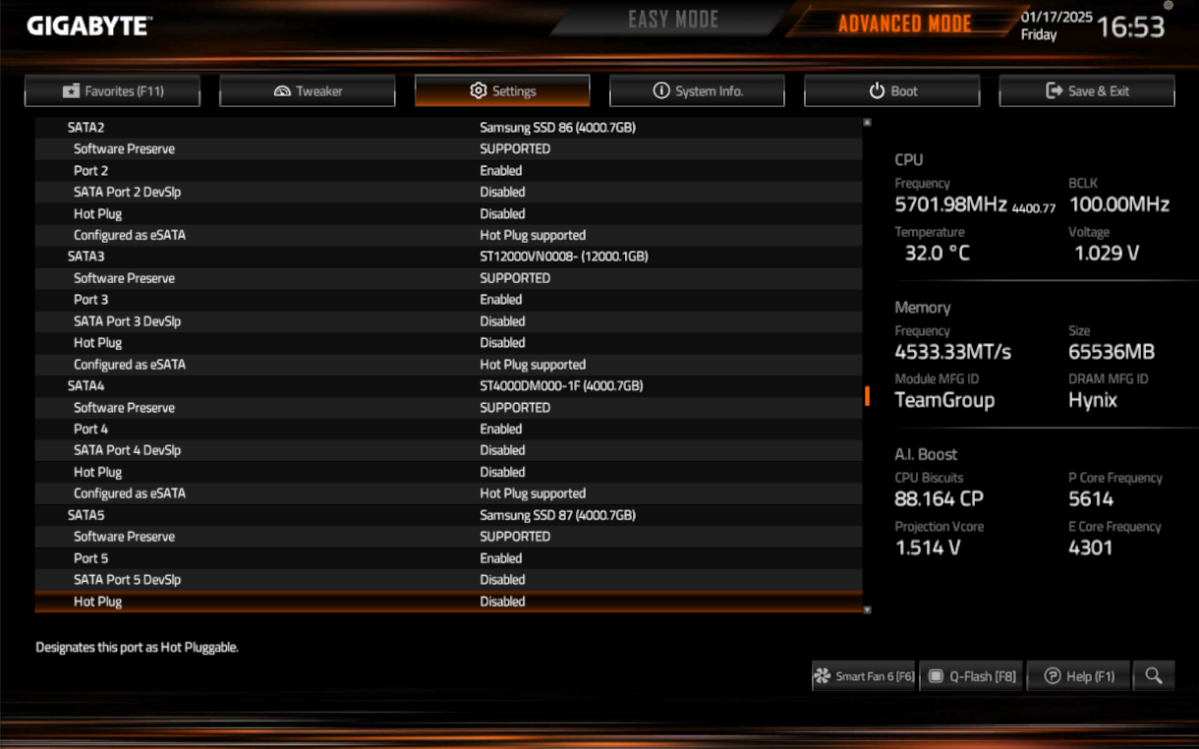
Every computer’s configuration interface looks different, and laptops usually do not offer many settings. Under a menu such as “Advanced,” for example, you will find settings such as “M.2 SSD Ports” (NVMe) and “SATA Ports.”
Make sure that the ports used are activated (“Enabled”). The firmware usually also lists the connected drives on the same page. If no drives are displayed, continue reading in point 6.
Check the boot sequence under a menu such as “Boot.” “Windows Boot Manager” should be in the first position. If this entry does not appear, the firmware has not found the EFI partition or the Windows boot manager.
The firmware of desktop PCs offers significantly more settings and is correspondingly confusing. The options for NVMe and SATA ports, for example, can be found under menus such as “Settings” or “Advanced.” Boot devices and boot options are usually displayed under a menu such as “Boot.” Make sure that all necessary ports for drives are activated and that “Windows Boot Manager” is in the first position in the boot sequence.
If the firmware displays the system drive and “Windows Boot Manager” is available as a boot option, the requirements for starting Windows have been met. In the next step (point 3), find out whether access to the file system is possible and whether the Windows boot files are available (point 4).
Further reading: Deep clean your Windows PC: 10 professional tricks and tools
For Windows to be able to use a hard disk or SSD, it must first be recognized by the PC’s firmware. This can be checked in the firmware setup.
IDG
3. Examine the situation on the hard drive
As Windows no longer starts, you will need a secondary or repair system that you can use to access the hard drive. You can use the Windows installation system, which you boot from a USB stick.
It is not only used to install Windows, but also offers a minimal Windows (WinPE, Preinstallation Environment) that can be used for analysis and repairs. If you do not have a stick prepared in this way, you will need another PC to create it.
Download the Microsoft Media Creation Tool for Windows 10 or for Windows 11 or alternatively the ISO file for Windows 11 (under the heading “Download Windows 11 drive image (ISO) for x64 devices”). Then create the USB stick with Rufus. The Windows 11 system can also be used to repair Windows 10.
Further reading: 9 tweaks that turn off your Windows PC’s most annoying ads
Change the boot sequence in the firmware setup (see point 2) so that the system boots from the USB stick. When starting, the message “Press any key to boot from CD or DVD” appears. Press any key to activate the boot from the USB stick.
After starting, you will see a window with the title “Windows 11 Setup” or “Windows Setup” for Windows 10. Press the key combination Shift-F10 to open a command prompt. Type
c:and then
dirand confirm each time with the Enter key. Sometimes the system drive is given a different letter. In this case, try “D:” and “E:” instead of “C:”.
The dir command lists the files and directories. The typical folders “Program Files” and “Windows” should be visible on the system drive. If you receive an error message instead, access to the drive is not possible. For further analysis, continue reading in point 6.
Alternatively, enter notepad in the command prompt and confirm with the Enter key. Go to “File > Open” and select “All files” after “File type.” The “Open” dialog can now be used as a file manager and you can check the folders and their contents.
Important note: If you have encrypted the system partition with Bitlocker, you must use the recovery key that you saved during encryption. Without this key, the drive cannot be accessed. This applies to this point, but basically to all access to the installed system, which we describe in the following points.
To unlock the drive, use the following command in the command prompt
manage-bde -unlock C: -recoverypassword [recovery key]Replace the placeholder “[recovery key]” with the value from the file with the saved key.
Further reading: 15 obscure Windows 11 tricks for PC power users
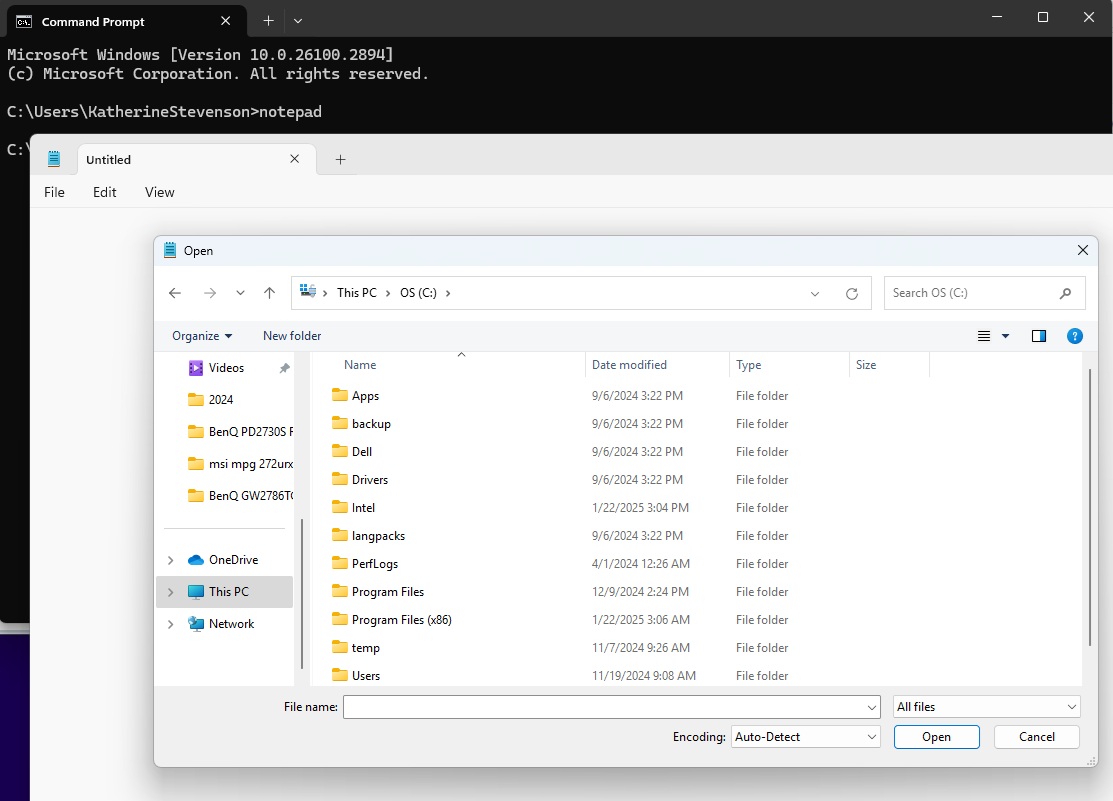
Use the “Open” dialog as a simple graphical interface when accessing the file system
Foundry
4. How to check the EFI partition
The EFI partition is hidden and Windows does not assign it a drive letter. To change this, enter the following in the command prompt
diskpartin the command prompt and confirm with the Enter key.
Use list disk to display the drives and select the system drive with sel disk 0, for example. Use list vol to display the volumes. The EFI partition is formatted with the “FAT32” file system and is approximately 100MB in size.
If the EFI partition is called “Volume 2,” for example, mount it as drive “B:” with the following two commands:
sel vol 2assign letter=b:
Press exit to leave Diskpart.
Start Notepad via the command prompt and go to “File > Open.” Click on “This PC” and navigate to drive “B:”. Set “All files” behind “File type.” Go to the folder “Efi\Boot” in which the file “bootx64.efi” must be located.
Then open the folder “Efi\Microsoft\Boot.” Here you will find the “BCD” file with the boot configuration, as well as the “bootmgfw.efi” and “bootmgr.efi” files of the Windows boot manager. If these folders or files are not present, Windows cannot start.
5. To repair the Windows boot environment
Execute the following command line in the command prompt
bcdboot C:\Windows /l de-de /s b: /f UEFIReplace the drive letter “C:” with the letter previously determined in point 3. Restart the computer. The UEFI boot environment should then work again.
Alternative method: Boot the PC from a USB stick with the Windows installation system. For Windows 11, select the language settings and the keyboard settings and click on “Next.”
Then select the “Repair my PC” option, click “Next” and select the desired language again. Windows 10 users click on “Next” and then on “Computer repair options.” Go to “Troubleshoot > Startup help” and then to the system you want to repair.
However, the “Startup help” is not always successful. The method described above using the command prompt usually works more reliably.
6. Problem accessing the hard drive
If the PC firmware does not display the system drive, there is a hardware problem. Here is a short checklist:
- Are all cables firmly connected to the PC, such as the power cable and the cable from the graphics card to the monitor?
- Are the cables inside the PC firmly plugged into the designated connections? Cables may have come loose after transporting the device.
- Are there any unusual noises coming from the hard drive? Clicking noises or loud whirring indicate a defective drive.
- Disconnect all USB devices except the keyboard and mouse from the PC. If there are other hard drives in the PC, disconnect them as well. If only the system hard drive is connected, other sources of error can be ruled out.
- Switch off the device completely. Disconnect it from the power supply for some time before switching it on again.
If the firmware has recognized the drive, try an independent second system. A Windows-based rescue system is ideal, such as Win10XPE. It uses WinPE like the Windows installation system, but with a desktop interface and additional tools. You create Win10XPE on another PC, but this takes a lot of time.
An alternative is a Linux live system that can also access drives formatted with the NTFS or FAT32 file system. Suitable, for example, is Ubuntu, which you can install with Rufus onto a USB stick and then boot.
However, even a second system cannot access a destroyed file system or a defective hard drive. But it may still be possible to recover important files.
A rescue system such as Win10XPE offers numerous tools for analyzing and repairing a Windows system. However, you have to create the rescue system yourself.
IDG
7. Repair important system files
Even if the boot environment is okay, Windows may refuse to start. Windows will then attempt to start, but will abort with an error message on a blue background. In this case, system files or the Windows registry are probably damaged.
The Windows installation system can also help here. First try the start help function as described in point 5. If this has no effect, go to “Troubleshoot” and then to “Restore system.”
Follow the wizard’s instructions to restore the system to a previous restore point. Windows and some setup programs automatically create a restore point before making major changes to the system.
A system that has been in operation for some time should therefore have several restore points. After the restore, however, you will have to reinstall updates and software that were added after the point in time at which the restore point was created.
Carry out a manual repair: The System File Checker (SFC) can be used to check and repair important system files. This also works in the command prompt of the Windows installation system. Use the following command line:
sfc /scannow /offbootdir=C:\ /offwindir=C:\Windows /offlogfile=C:\Log.txtThe drive letter may differ. Determine it as described in point 3.
8. Reset Windows or reinstall
If errors occur in phases 2 to 4 (see point 1), the automatic repair starts. If this does not resolve the error any more than the other measures in this article, click on “Advanced options” to access the WinRE (Windows Recovery Environment) repair system.
Go to “Troubleshooting,” then to “Reset this PC” and click on “Keep my files.”
You can now choose between two options:
- “Cloud download”: installs the latest version of Windows from the Internet, which takes a little longer.
- “Local reinstallation”: Uses files stored on the hard drive.
Follow the further instructions of the wizard.
The prerequisite for this function is that WinRE is correctly installed and can be started. If not, the only option is to reinstall Windows using the Windows installation medium. Create backup copies of important files beforehand using a second system (see point 6).
If the hard drive or SSD is defective, this will not help either. You will need a new drive on which to reinstall Windows. Personal files can be restored from a backup if it is available.
This article originally appeared on our sister publication PC-WELT and was translated and localized from German.

