On Windows 11 or any version of the operating system, it’s a matter of time before you notice a decline in speed and responsiveness. Usually, this happens due to misconfiguration, compatibility issues, bugs, malware, hardware problems, and so on.
When your computer starts showing signs of performance issues, there are several tweaks that you can implement to make the device faster before considering a replacement. (If you have had the same computer for more than four years, then yes, there’s a good chance that an upgrade is on the table.)
In this how-to guide, I’ll outline different tips that you can use to increase the system performance as much as possible on Windows 11.
How to increase performance on Windows 11
On Windows 11, you can perform several tweaks to help improve the overall performance, and here’s how.
1. Shut down and restart computer
The easiest way to increase the performance is by performing a basic shutdown and restart. (I know it might be obvious for many people, but it’s usually not.)
The restarting process closes background processes and applications. Also, it clears the data in memory, which usually fixes performance issues, especially if the computer has been running for a long time.
To shut down and restart the computer to resolve common performance issues, use these steps:
- Open Start.
- Click the Power button.
- Select the Shut down option.
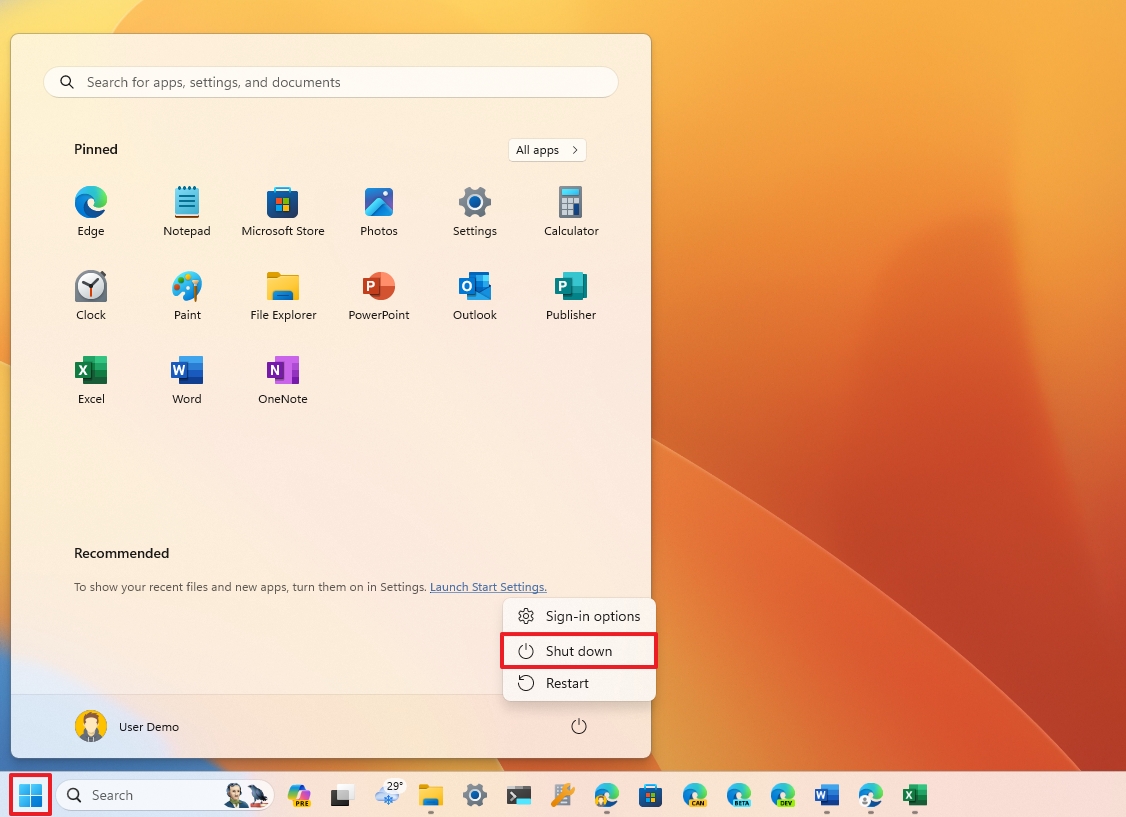
- Quick tip: The “Sleep” or “Hibernate” options do not reset the system or clear the data in memory.
- Press the power button to turn on the computer.
Once you complete the steps, you should notice some performance improvements on your computer.
If you haven’t seen any improvements, continue with the recommendations.
2. Turn off apps at startup
On Windows 11, some apps can register themselves to start automatically with the “Startup” feature, and the system can remember certain apps and restart them automatically after signing in to make it easier to pick up where you left off.
Although these are convenient features, they can significantly slow down the system and startup process. However, you can always control these features to speed up the device.
Disable startup apps
Certain apps can register with the system to launch automatically during startup. Although this behavior can speed up getting to the app, the more apps you have in the queue, the longer the device will take to start and the more resources it will waste.
If you’re trying to increase the system performance, disable as many apps as possible from the startup queue.
To manage apps at the startup, use these steps:
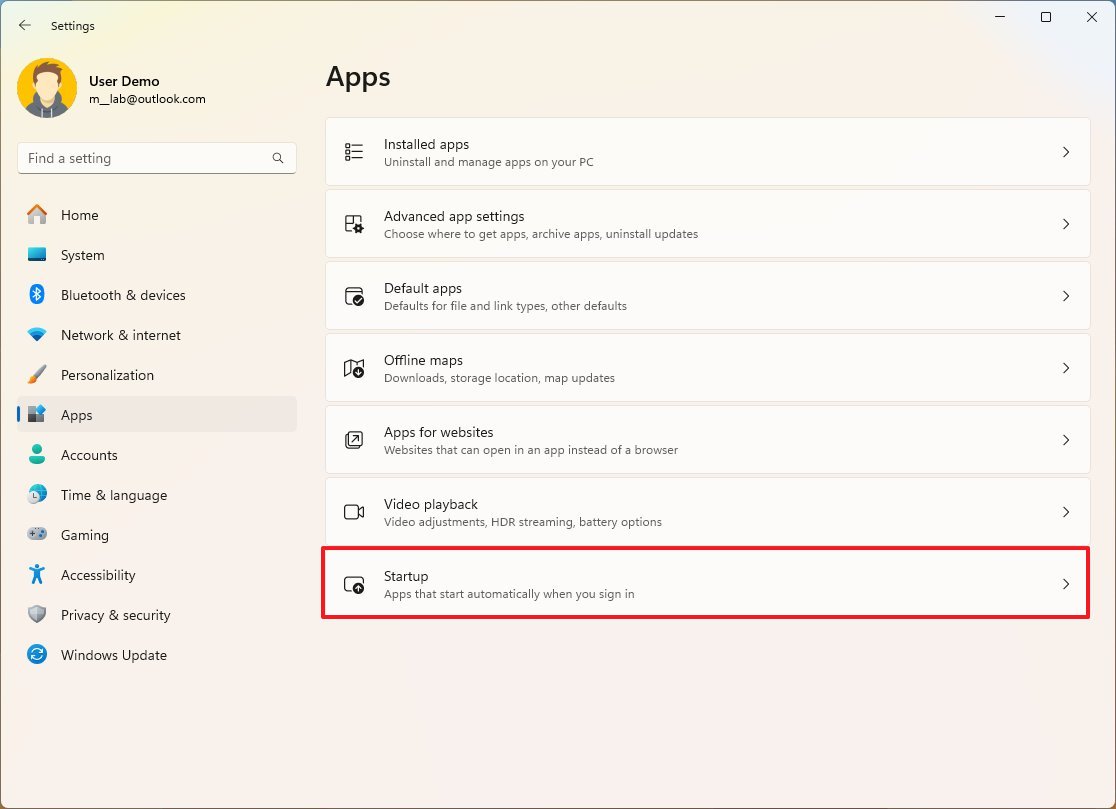
- Open Settings.
- Click on Apps.
- Click the Startup page on the right side.
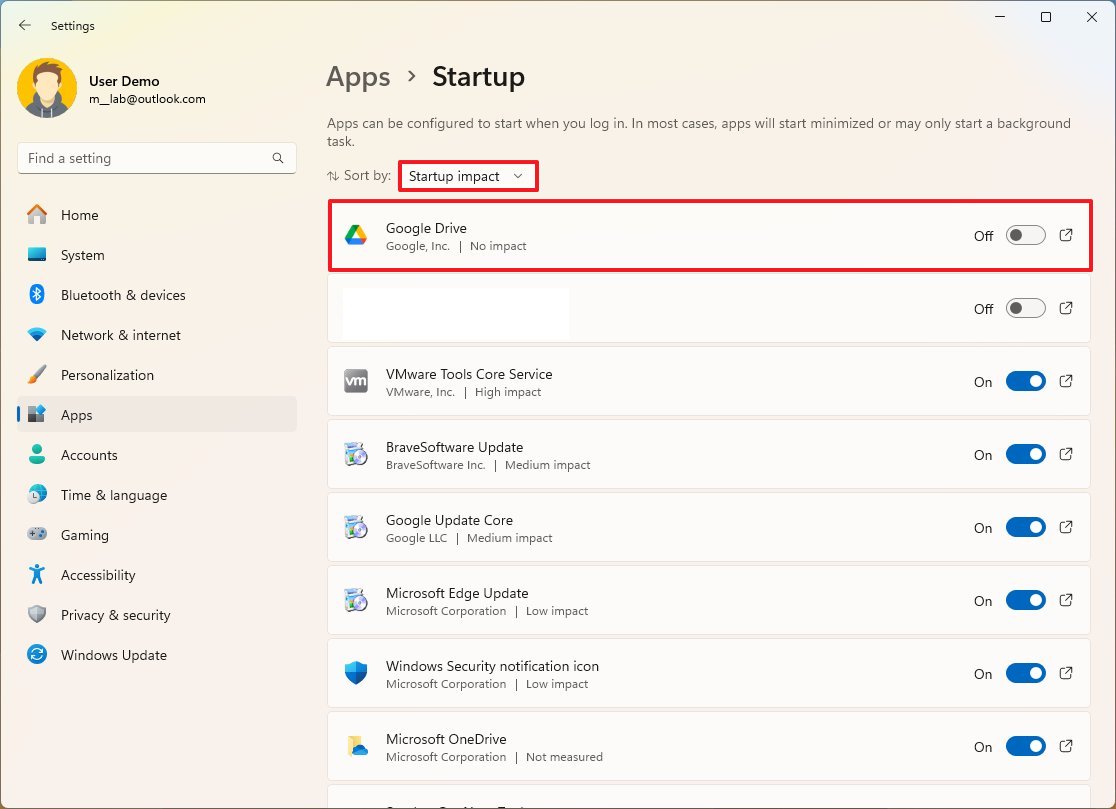
- Click the Sort by menu and select the Startup impact option.
- Turn off the toggle switch for any unnecessary app.
- Restart the computer.
After you complete the steps, the apps you turned off will no longer start automatically in the next reboot.
Disable restartable apps
Windows 11 can save and restart specific applications when you reboot the computer and sign in. However, if you want to improve the speed of your computer, you’ll be better off disabling this feature.
To turn off restartable apps on Windows 11, use these steps:
- Open Settings.
- Click on Accounts.
- Click the Sign-in options page on the right side.
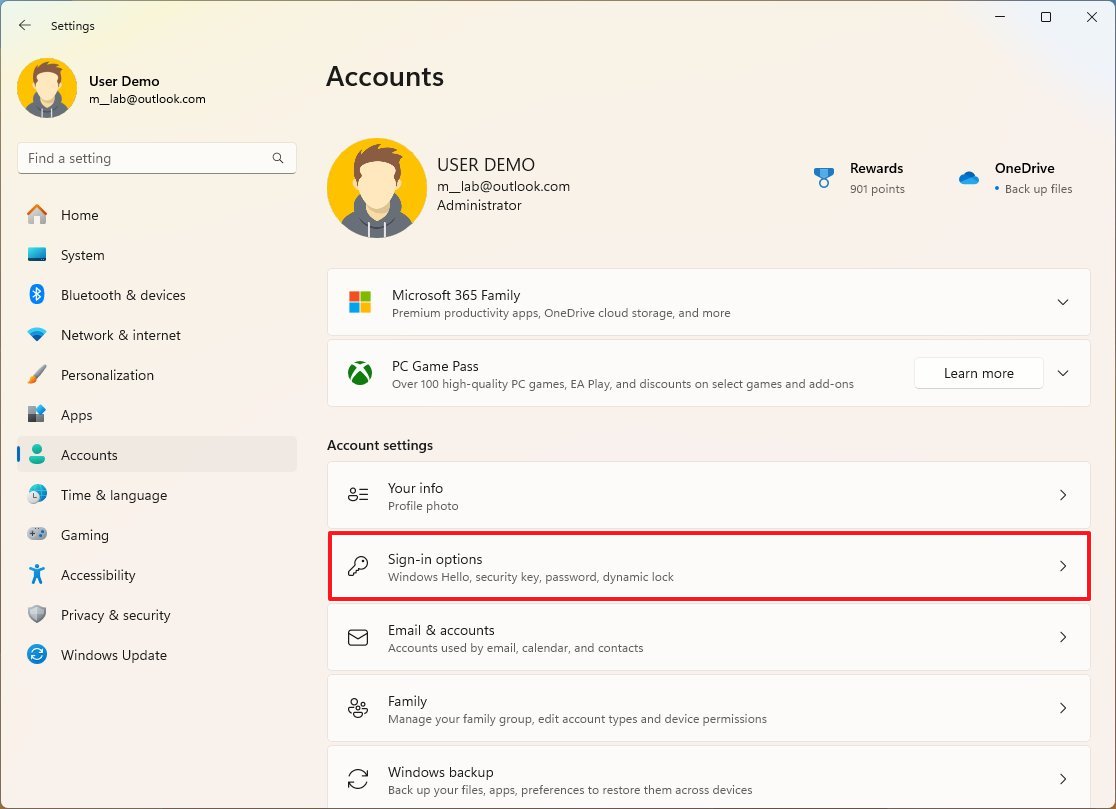
- Turn off the “Automatically save my restartable apps and restart them when I sign back in” toggle switch.
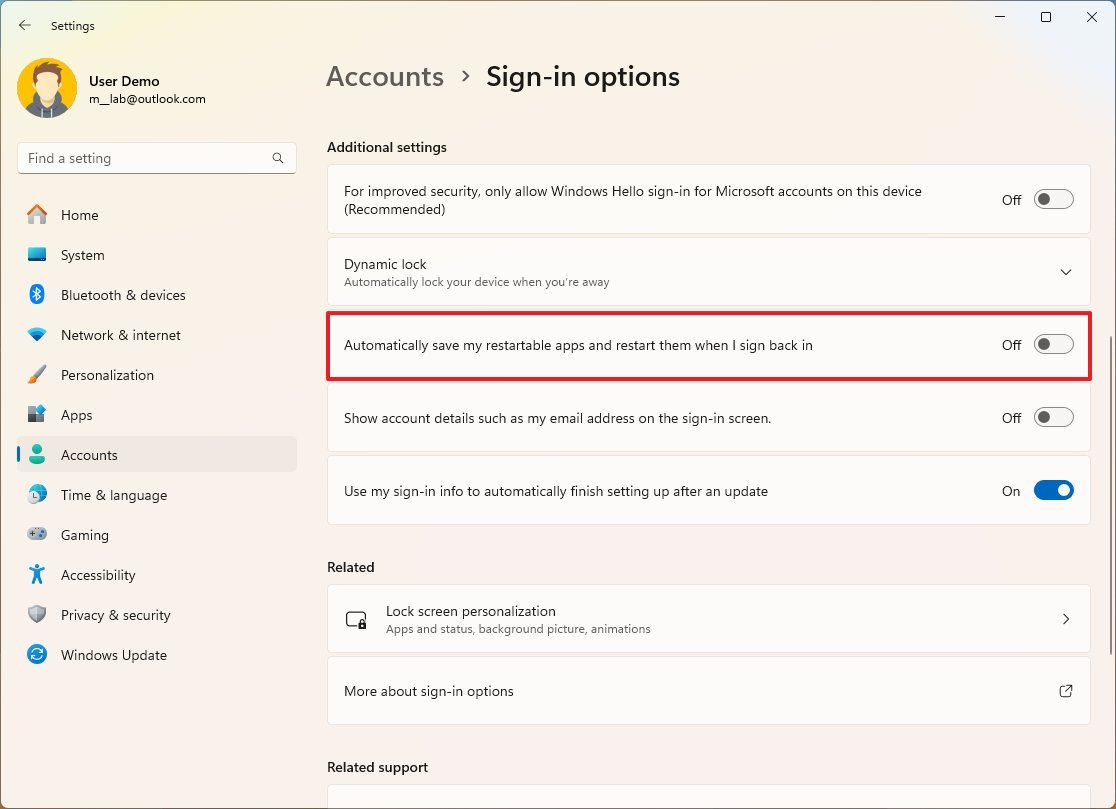
Once you complete the steps, Windows 11 will no longer save and restart compatible applications when you sign in to your account.
3. Remove unused apps
If the computer includes many applications you don’t use, they will only be wasting valuable space and system resources. Uninstalling those apps can help to increase performance.
To uninstall apps on Windows 11, use these steps:
- Open Settings.
- Click on Apps.
- Click the Installed apps page on the right side.

- Click the open the app menu from the right and choose the Uninstall option.
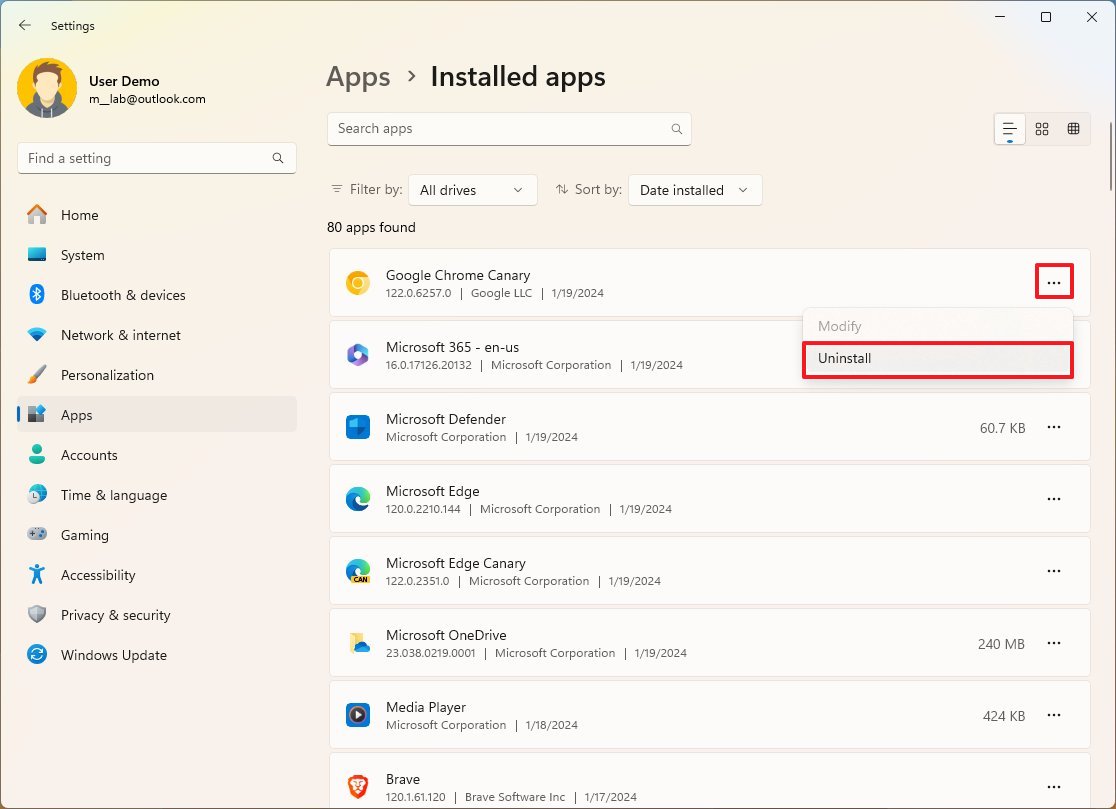
- Click the Uninstall button again.
- Continue with the on-screen directions (if applicable).
After you complete the steps, you may need to repeat the steps to remove other apps.
At all costs, avoid installing outdated or poorly designed applications and those loaded with unnecessary features, as they can impact your computer’s performance. (It’s important to note that well-known companies can also make low-quality applications.)
To maintain your device’s health and efficiency, prioritize installing reputable apps. Also, consider opting for apps available on the Microsoft Store, as they undergo thorough reviews for both security and performance. If the specific app is not in the store, only download it from a trusted source.
When in doubt, conduct online research to gather more information about the app. Explore software vendor forums to check for user experiences and potential issues.
4. Free up hard drive space
Filling up the system hard drive is never a good idea as it can affect performance.
If your computer is running slow when launching apps and managing files, the reason could be that the drive is running out of space. Typically, you will notice a performance degradation as the drive fills up around 70 percent of the available capacity.
On Windows 11, you have many different ways to free up space. However, the easiest way is to use the Storage settings to delete temporary and unnecessary files.
To free up space on Windows 11, use these steps:
- Open Settings.
- Click on System.
- Click the Storage page on the right side.
- Click the Temporary files setting.
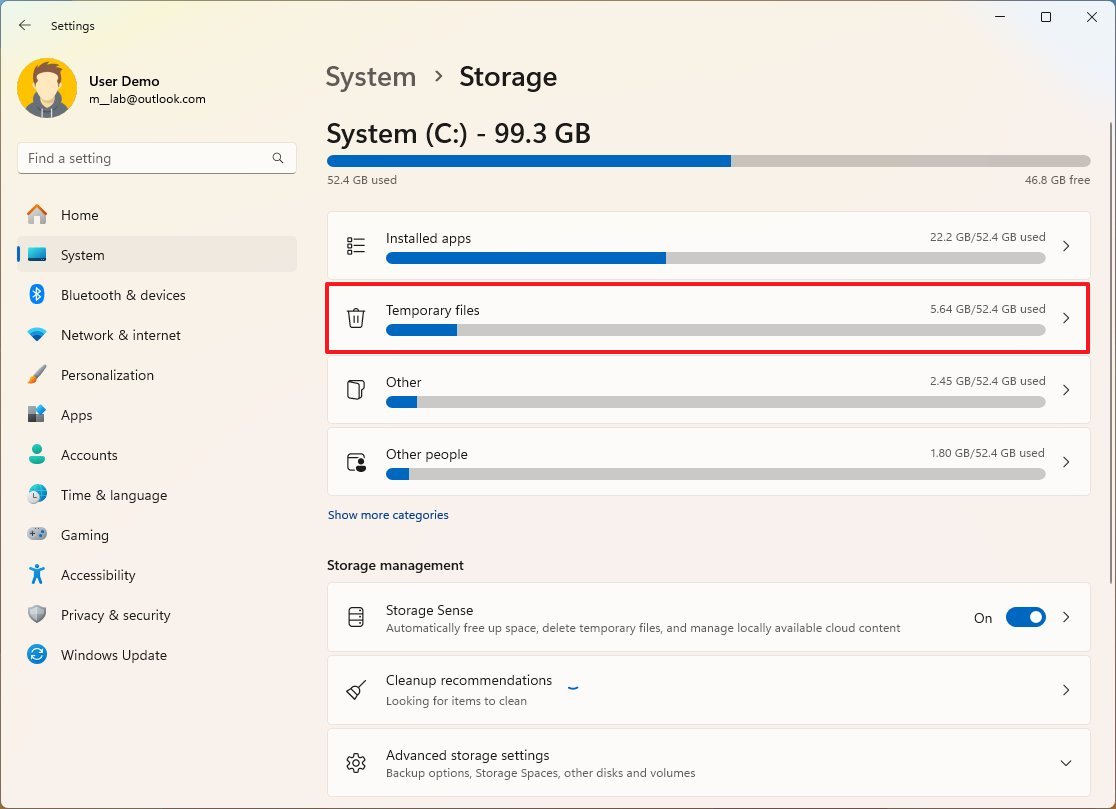
- Check the files you want to delete to reclaim space and improve system performance.
- Quick tip: When selecting the temporary files, remember that checking the “Downloads” option will delete everything inside the “Downloads” folder. If you want to keep these files, do not check this option.
- Click the Remove files button.
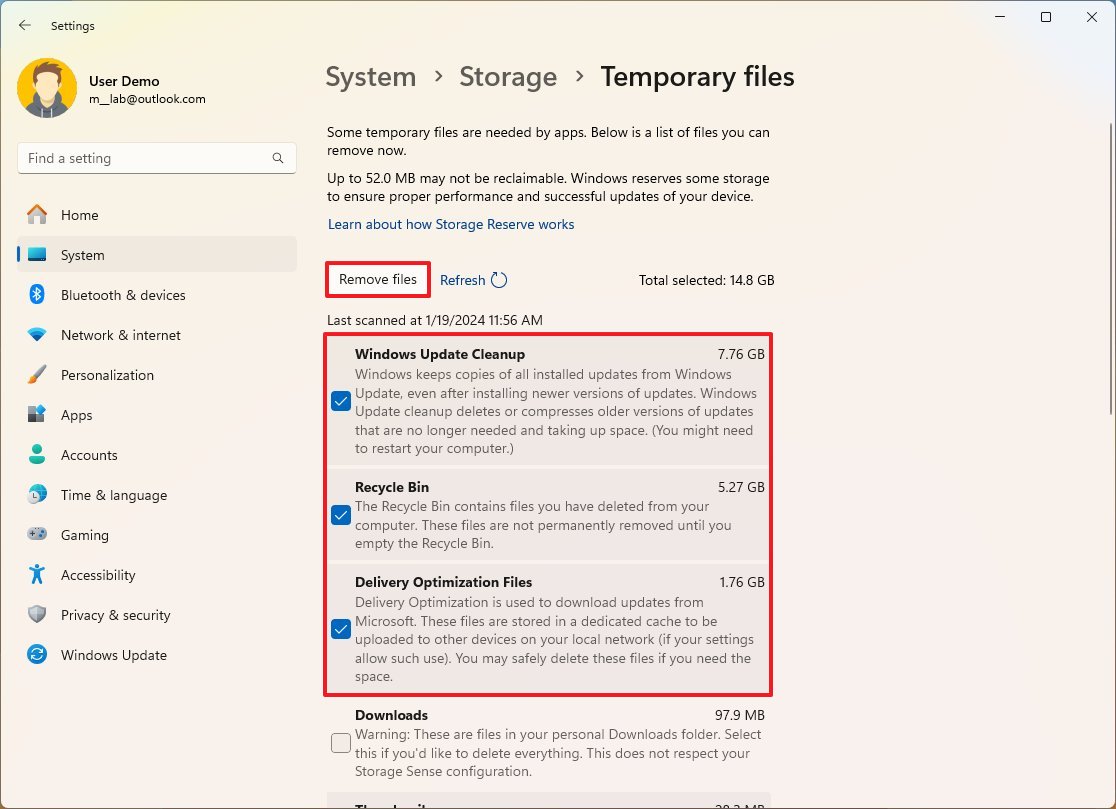
Once you complete the steps, the overall performance should be measurable.
If you need more space, use this guide to find more ways to optimize the storage on your computer.
5. Install system, driver, and app patches
Windows 11 constantly receives updates to patch security vulnerabilities, resolve problems, and add new features. As such, it’s important to update the system to ensure it has the latest fixes and improvements for optimal performance.
Install latest updates
To update Windows 11 to receive the latest patches and performance improvements, use these steps:
- Open Settings.
- Click on Windows Update.
- Click the “Check for updates” button.
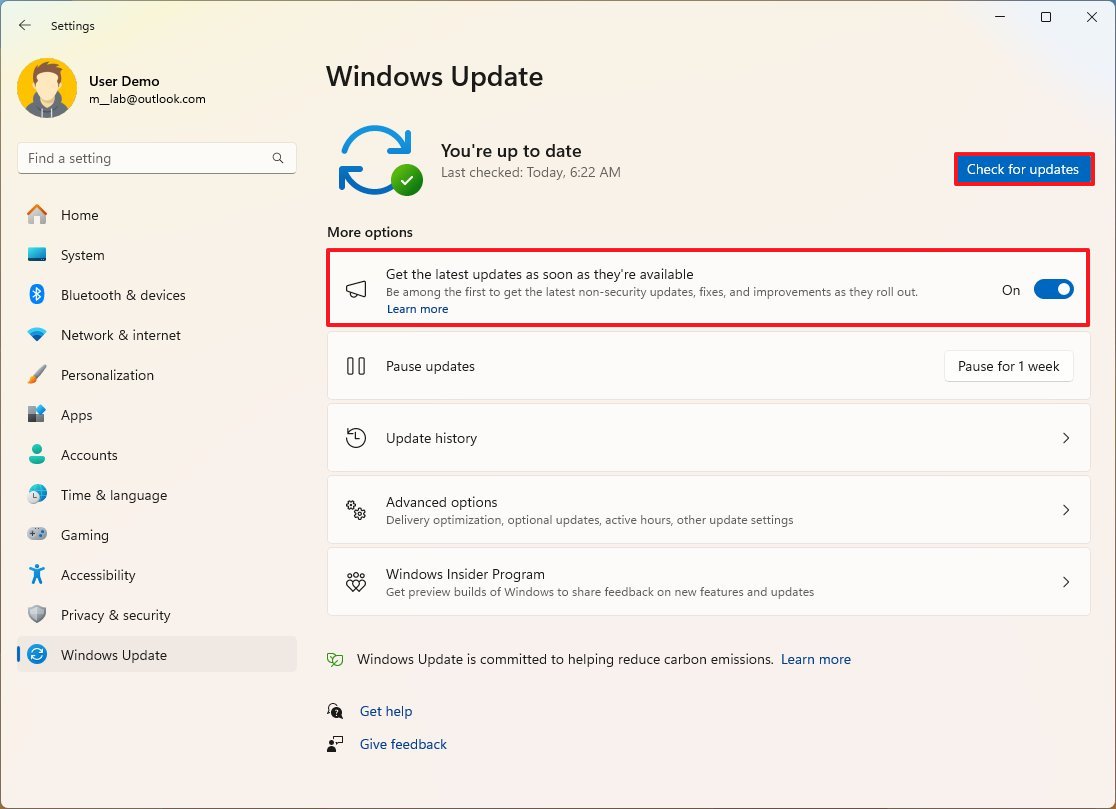
- (Optional) Check the “Get latest updates as soon as they’re available toggle” switch.
- Quick note: This option will download preview versions of upcoming updates that may include fixes to restore the system performance.
- Click the Restart now button.
After you complete the steps, system updates should be downloaded and installed on the computer.
Upgrade to latest version
To upgrade to the newest version of Windows 11, use these steps:
- Open Settings.
- Click on Windows Update.
- Click the “Check for updates” button.
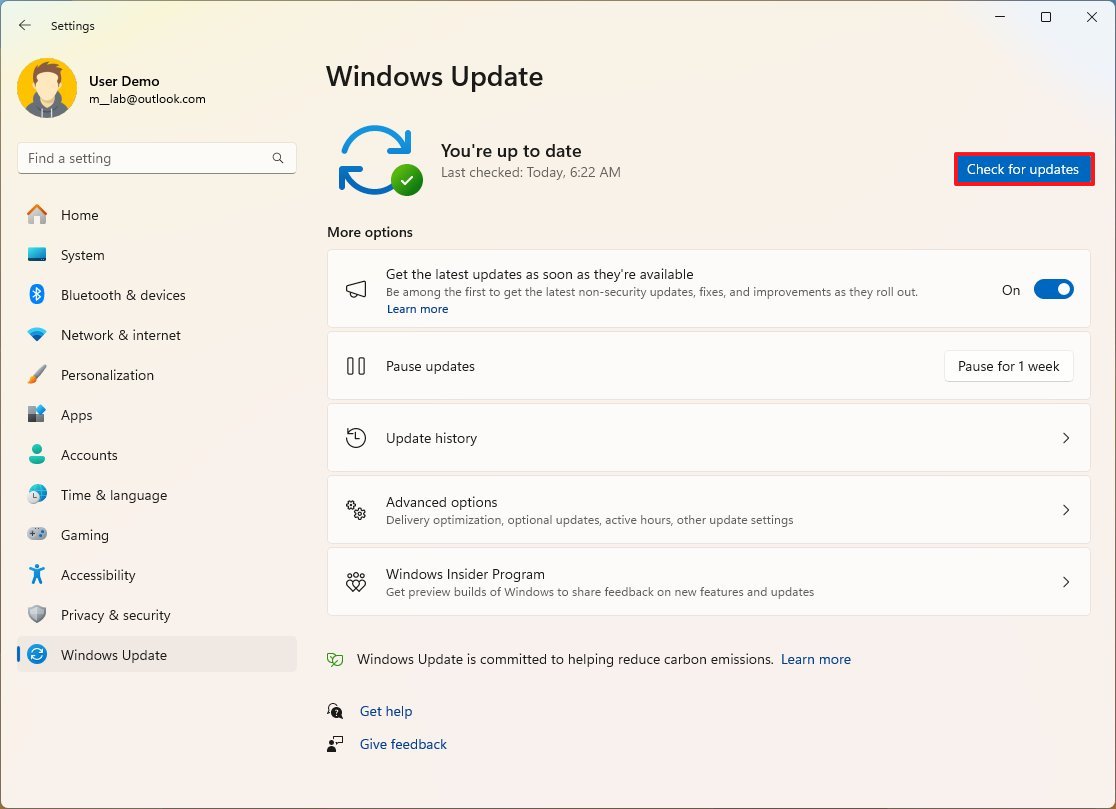
- Click the Check for updates button.
- Click the “Download & install” button.
- Click the Restart now button.
Once you complete the steps, the system will upgrade to the most recent version of Windows 11 that can potentially resolve previous performance issues.
Update drivers to latest version
To update device drivers on Windows 11, use these steps:
- Open Settings.
- Click on Windows Update.
- Click the Advanced options button.

- Click the Optional updates setting.
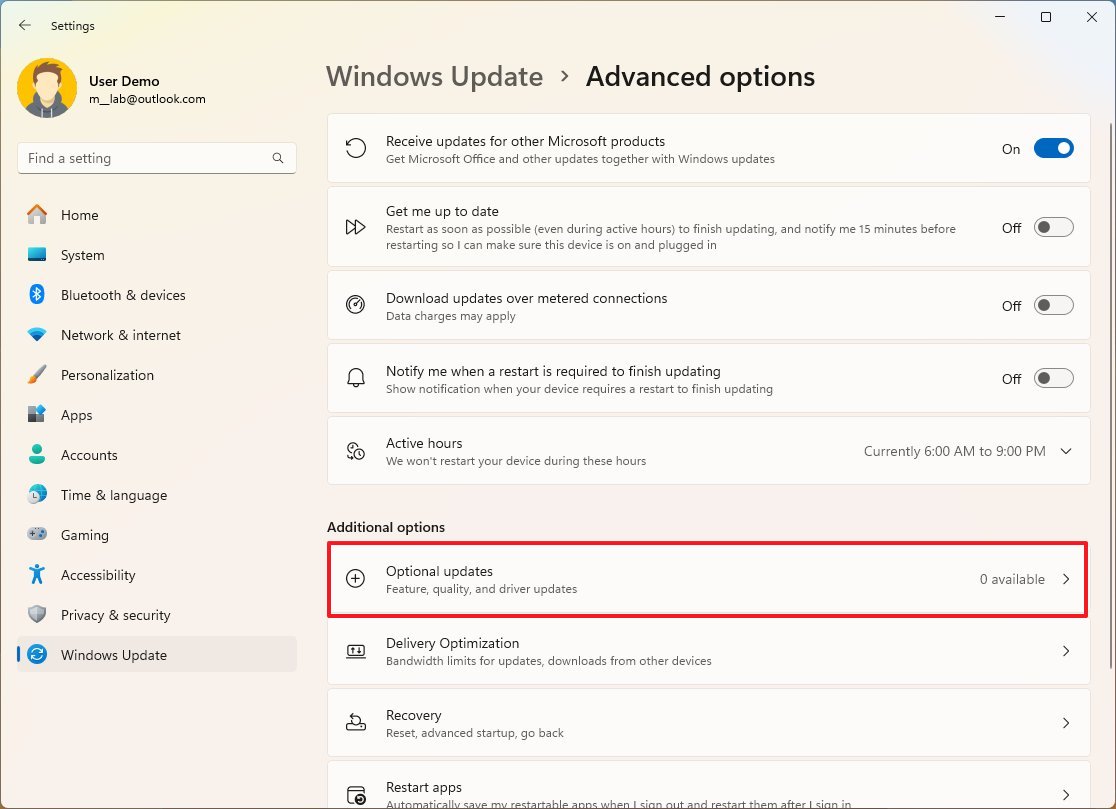
- Select the available drivers to update.
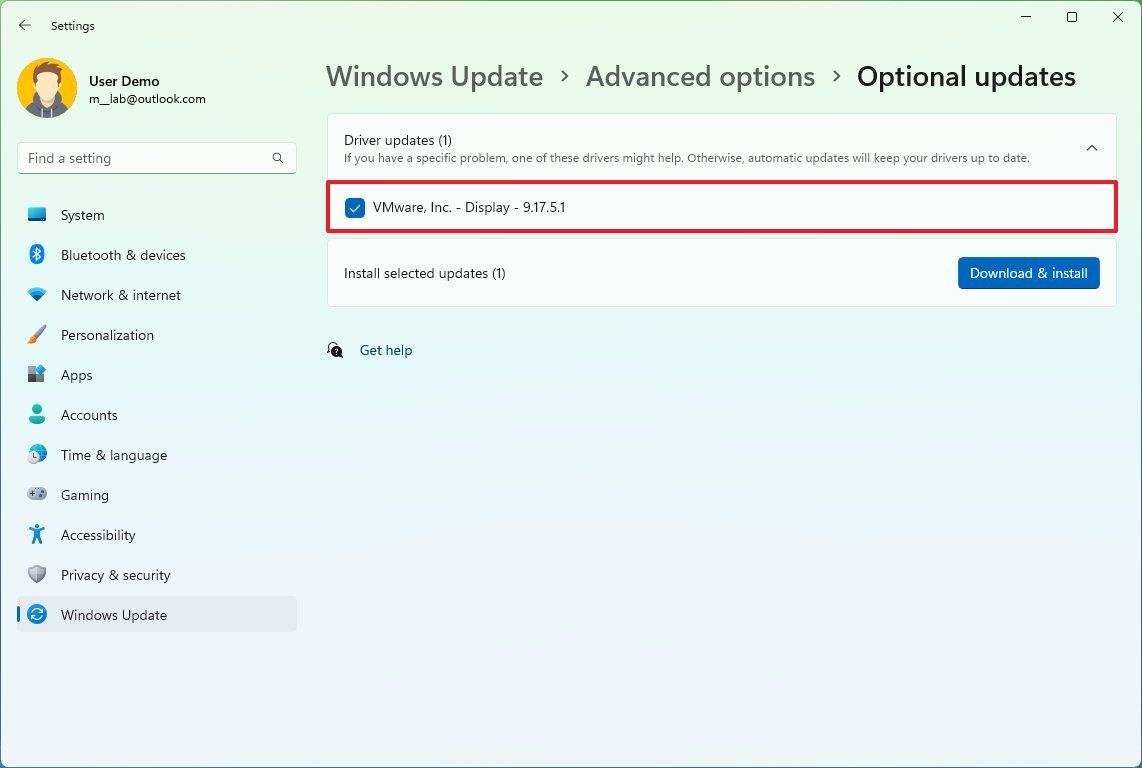
- Click the Download & install button.
If the specific device driver causing issues has no update, you should check with your manufacturer support website to download and install the latest update.
Update drivers manually
You should utilize the instructions provided on the manufacturer support website to accomplish this task. If instructions are not available, you can refer to the steps below.
- Open Start.
- Search for Device Manager and click the top result to open the app.
- Expand the branch for the device driver causing problems. For example, Display adapters.
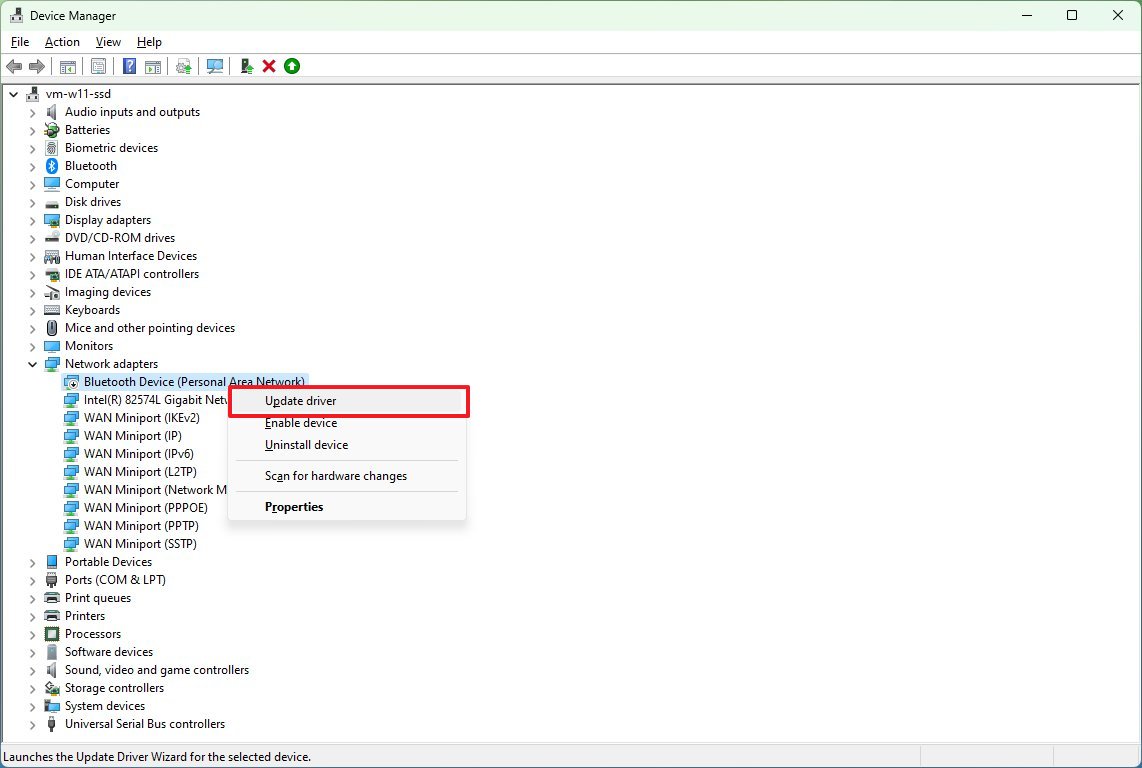
- Right-click the device and select the Update driver option.
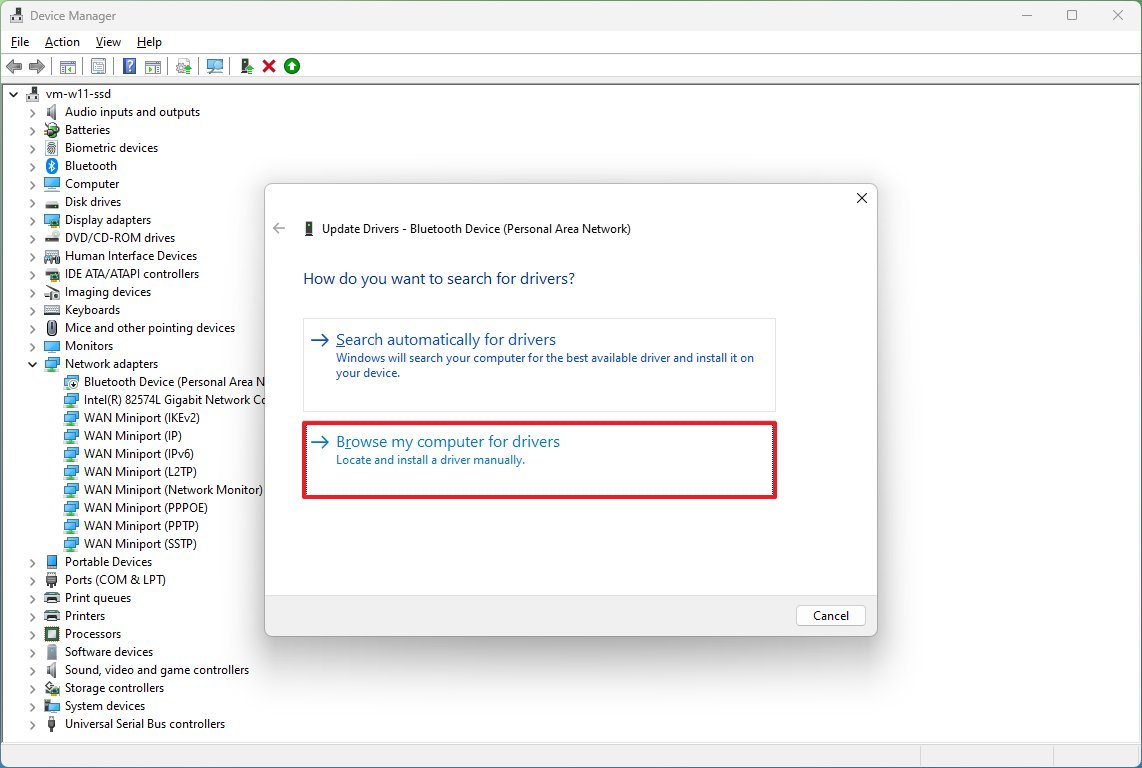
- Click the “Browse my computer for driver software” option.
- Click the Browse button under the “Search for drivers in this location” section.
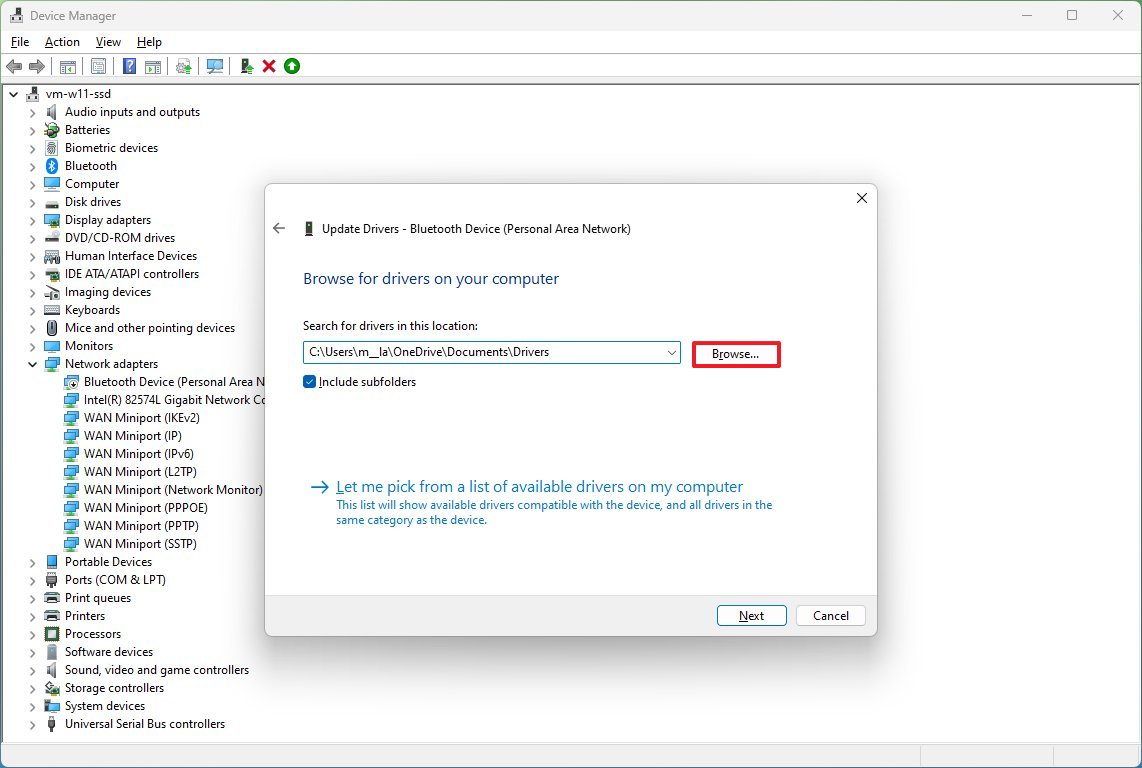
- Select the folder with the device driver installation files.
- Click the OK button.
- Click the Next button.
- Click the Close button.
Once you complete the steps, the device driver should be installed on the computer.
Update apps
To update Microsoft Store apps manually on Windows 10, use these steps:
- Open Microsoft Store.
- Click the Library button from the bottom-left corner.
- Click the Get updates button.
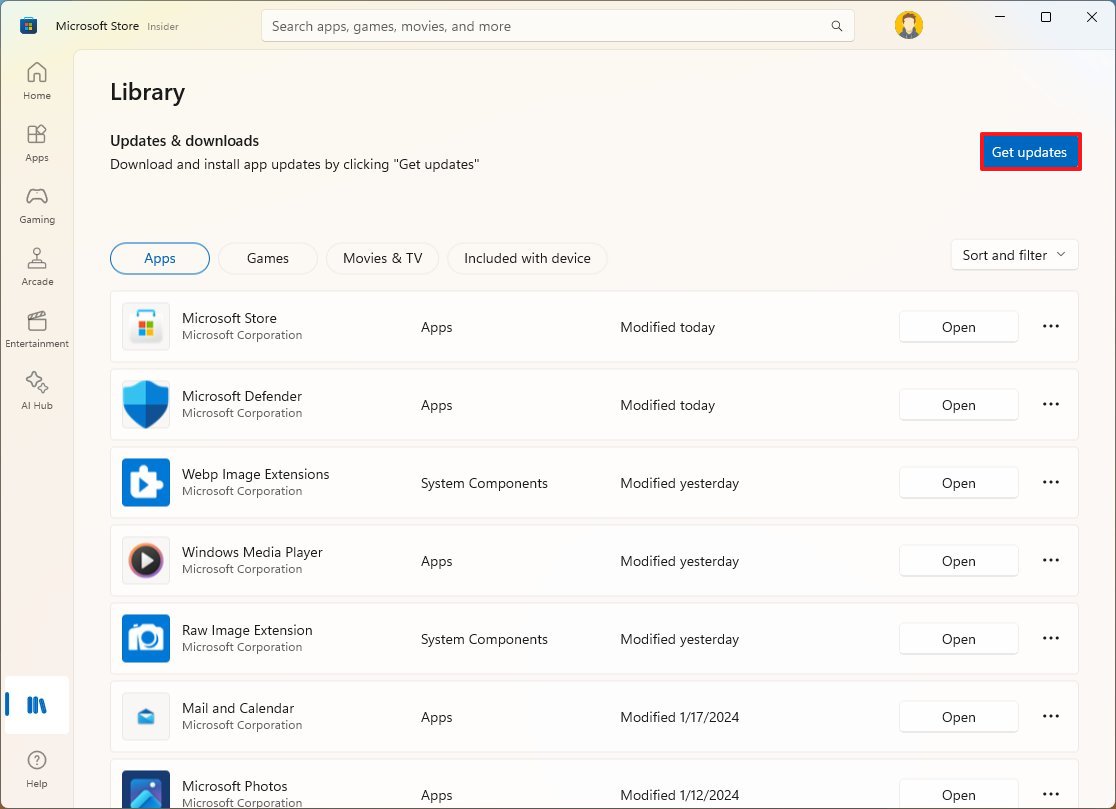
After you complete the steps, the Microsoft Store will check, download, and install the latest updates for your applications.
Check the developer support website for updates if you have non-Microsoft Store apps. You may also be able to use the update option in the application itself.
6. Rollback to previous version
Although updating your setup can indeed help to improve performance, sometimes, this process can also cause problems. Usually, this happens when a new version or an update for the operating system ships with unknown issues.
If an update or a new version was recently released, and you’re experiencing performance problems, rolling back to the previous version can help speed up the performance.
Uninstall update
To uninstall a problematic update, use these steps:
- Open Settings.
- Click on Windows Update.
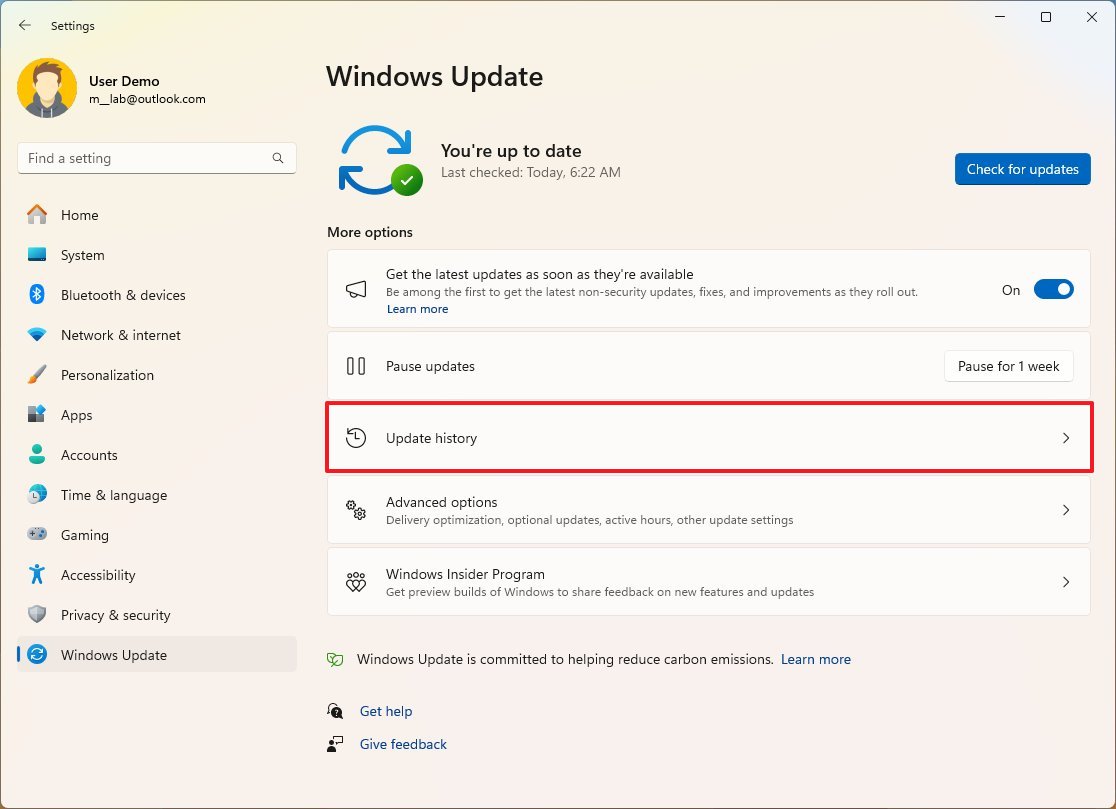
- Click the Update history setting.
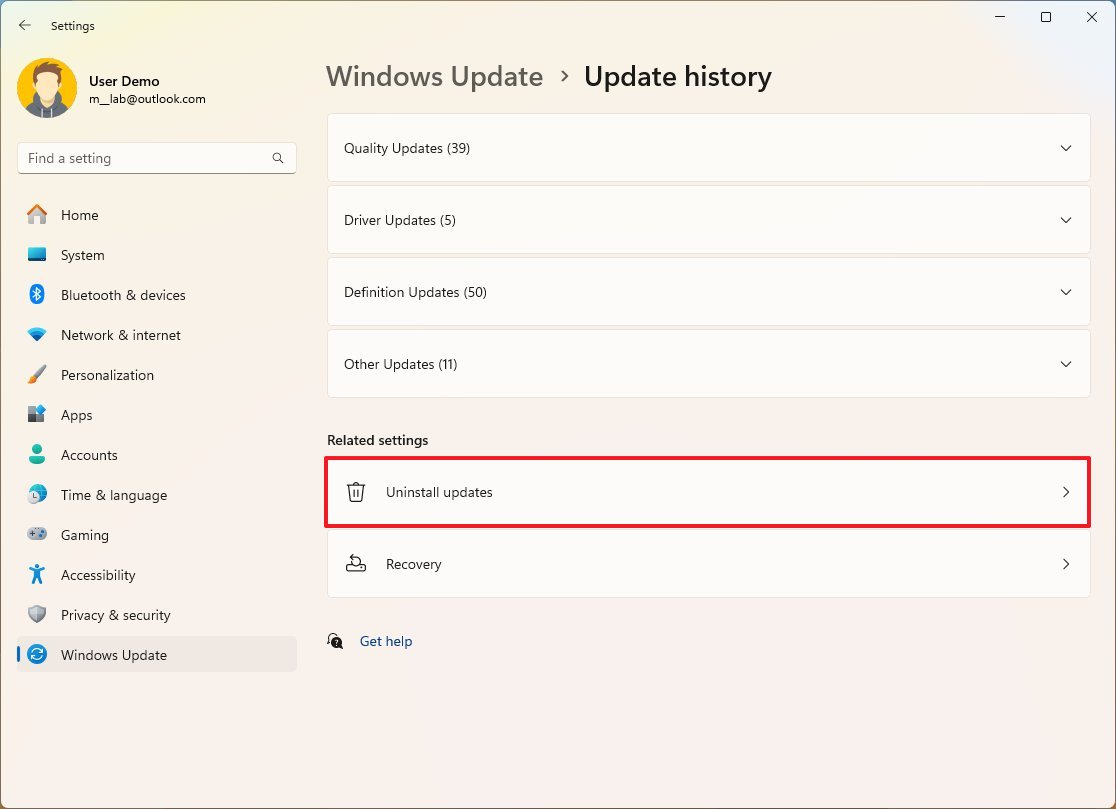
- Click the Uninstall updates setting under the “Related settings” option.
- Click the Uninstall button for the most recent update.
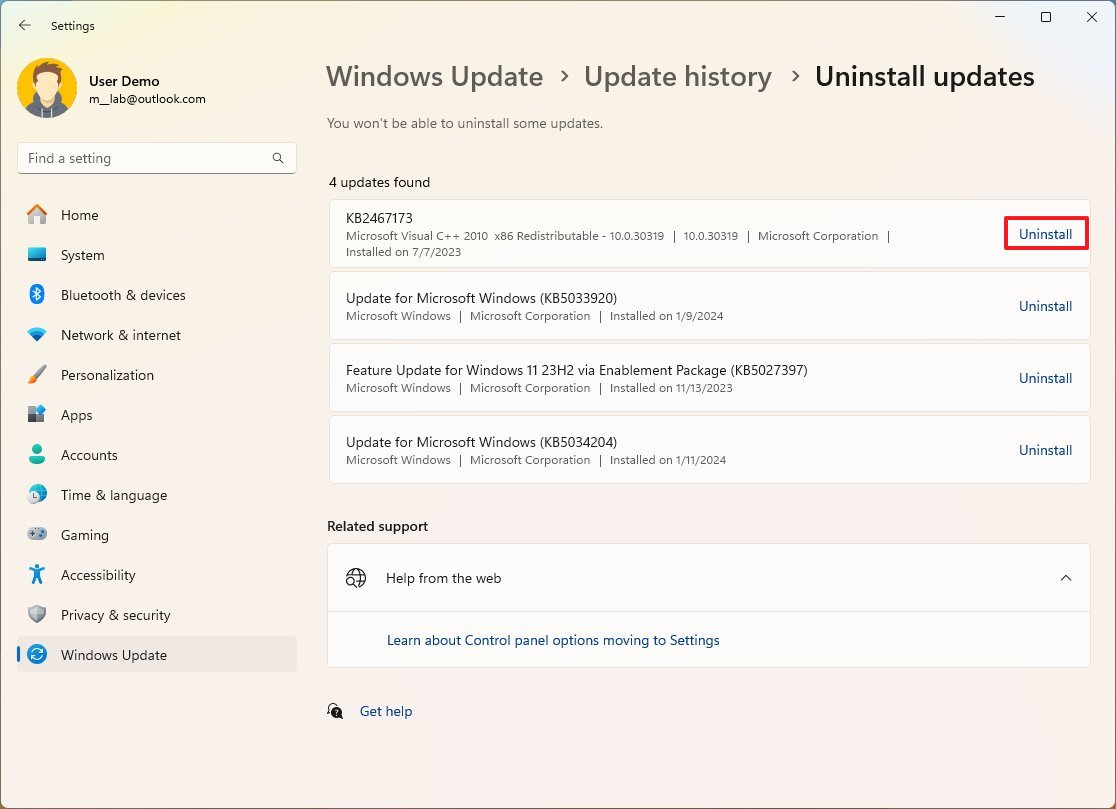
Once you complete the steps, the system will revert to the previous version before the problematic update, mitigating the performance issue on the device.
Uninstall upgrade
To roll back to a previous version of Windows, use these steps:
- Open Settings.
- Click on System.
- Click the Recovery page on the right side.
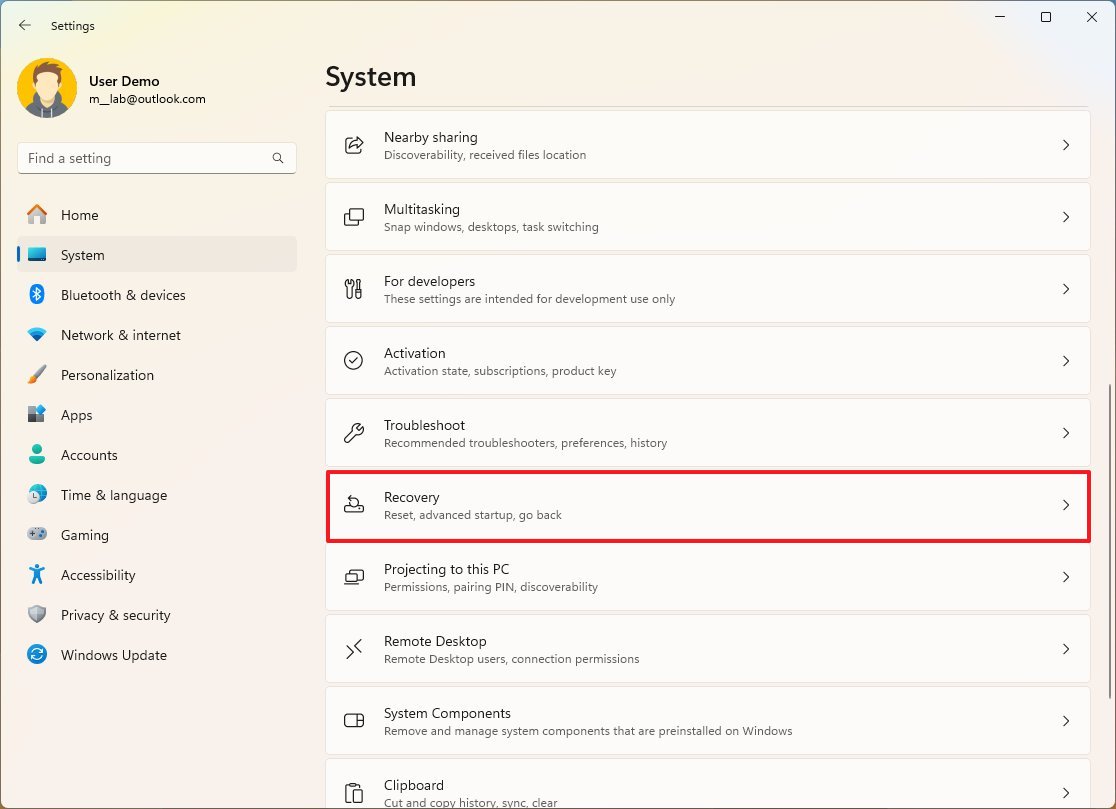
- Click the Go back button under the “Recovery options” section.
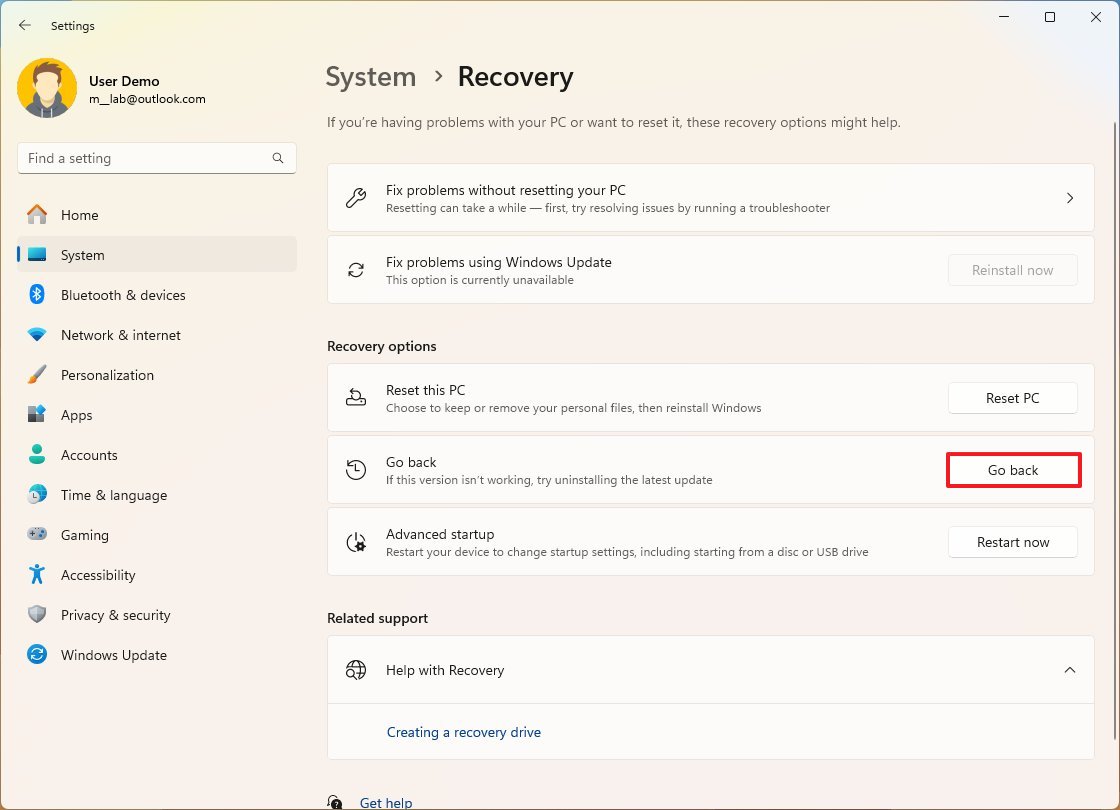
- Confirm the reason you’re rolling back.
- Click the Next button.
- Click the No, thanks button.
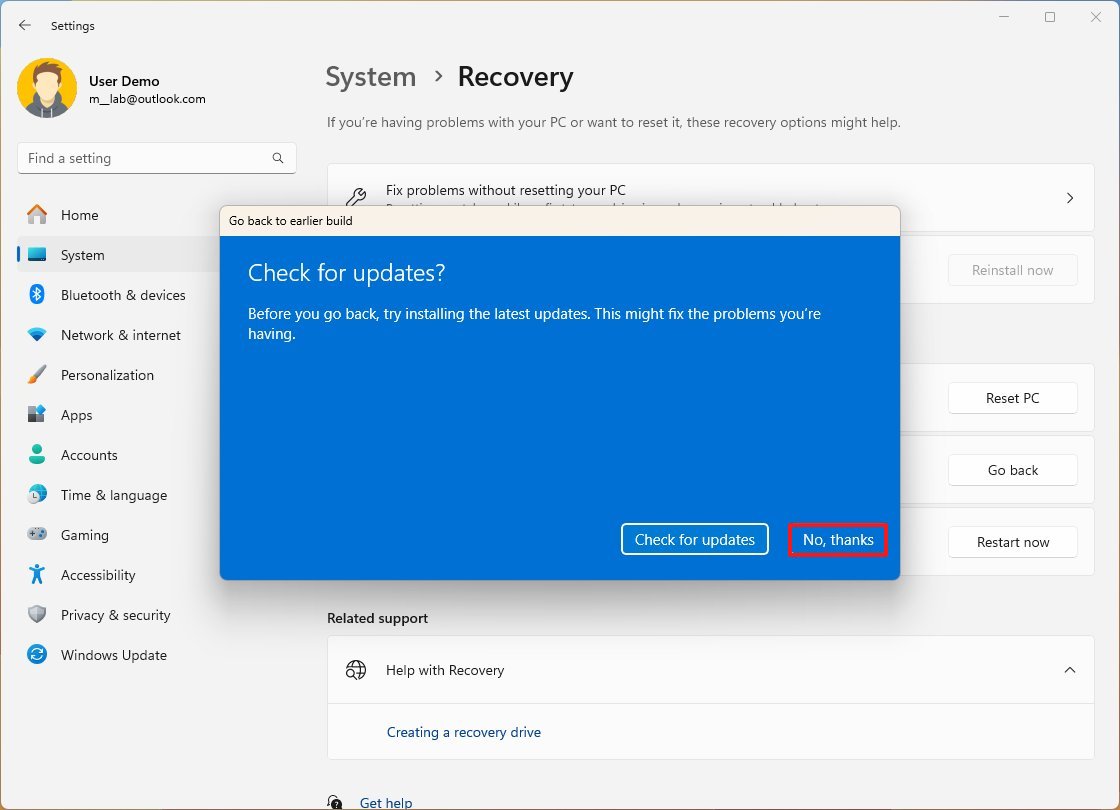
- Click the Next button.
- Click the Next button again.
- Click the Go back button.
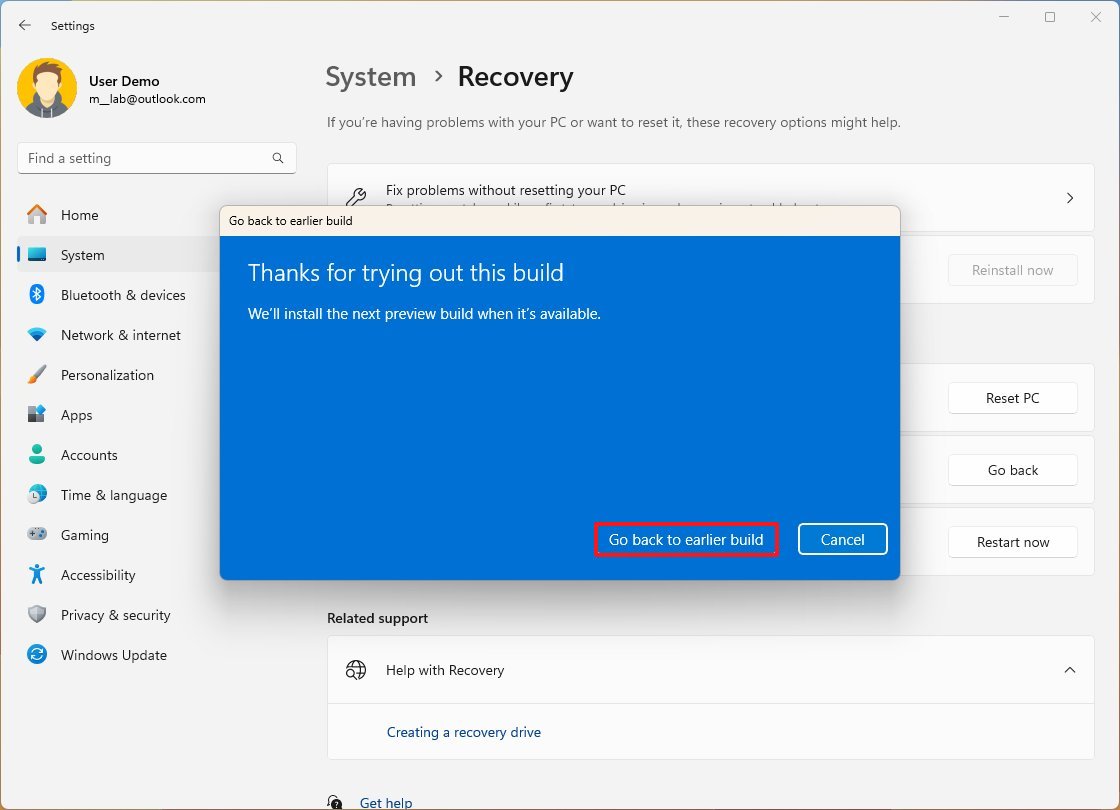
The option to roll back is only available for the first ten days after the original upgrade. Only use this option if it’s known that a bug is causing performance issues on Windows 11.
7. Change power plan to high performance
Windows 11 offers a variety of plans (Balanced, Best Power efficiency, and Best performance) to fine-tune the power consumption. If you want to enhance your system’s performance, you can opt for the “Best performance” setting. This option increases the power consumption but improves the overall performance.
To change the power plan of Windows 11 to improve performance, use these steps:
- Open Start.
- Search for Control Panel and click the top result to open the app.
- Click on Hardware and Sound.
- Click on Power Options.
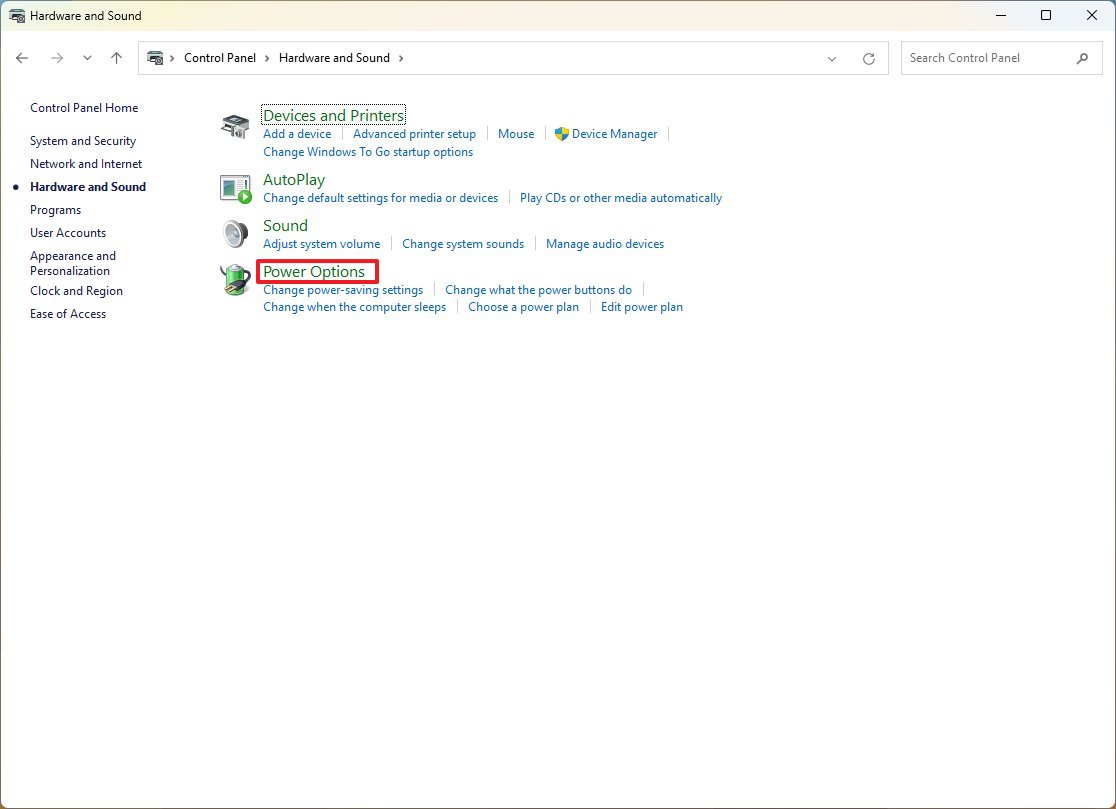
- Select the “High performance” option.
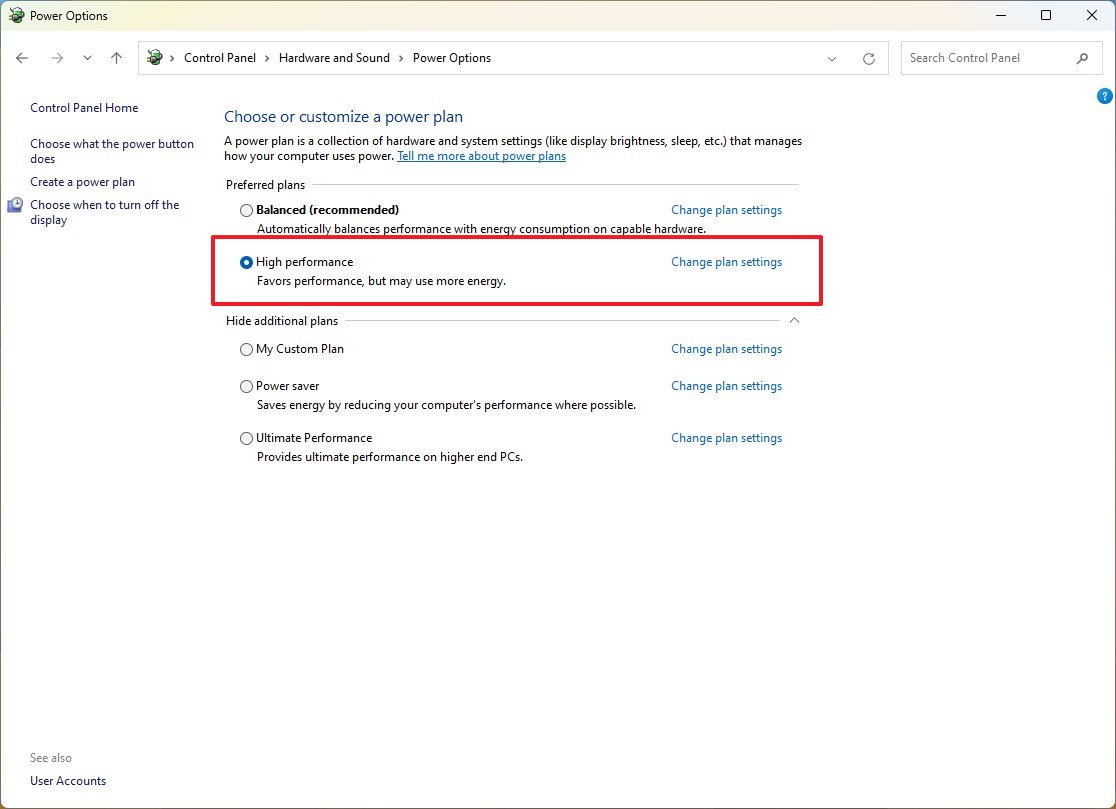
On laptops, you can also change the mode to increase performance by tapping or clicking the battery icon in the Taskbar’s notification area and selecting the “Best performance” option using the slider.
8. Choose the default GPU for applications
If you have a computer with multiple graphics cards, you can assign a specific card to a particular application for the highest performance possible.
To assign a high-performance GPU to an application on Windows 11, use these steps:
- Open Settings.
- Click on System.
- Click the Display page on the right side.
- Click the Graphics setting under the “Related settings” section.
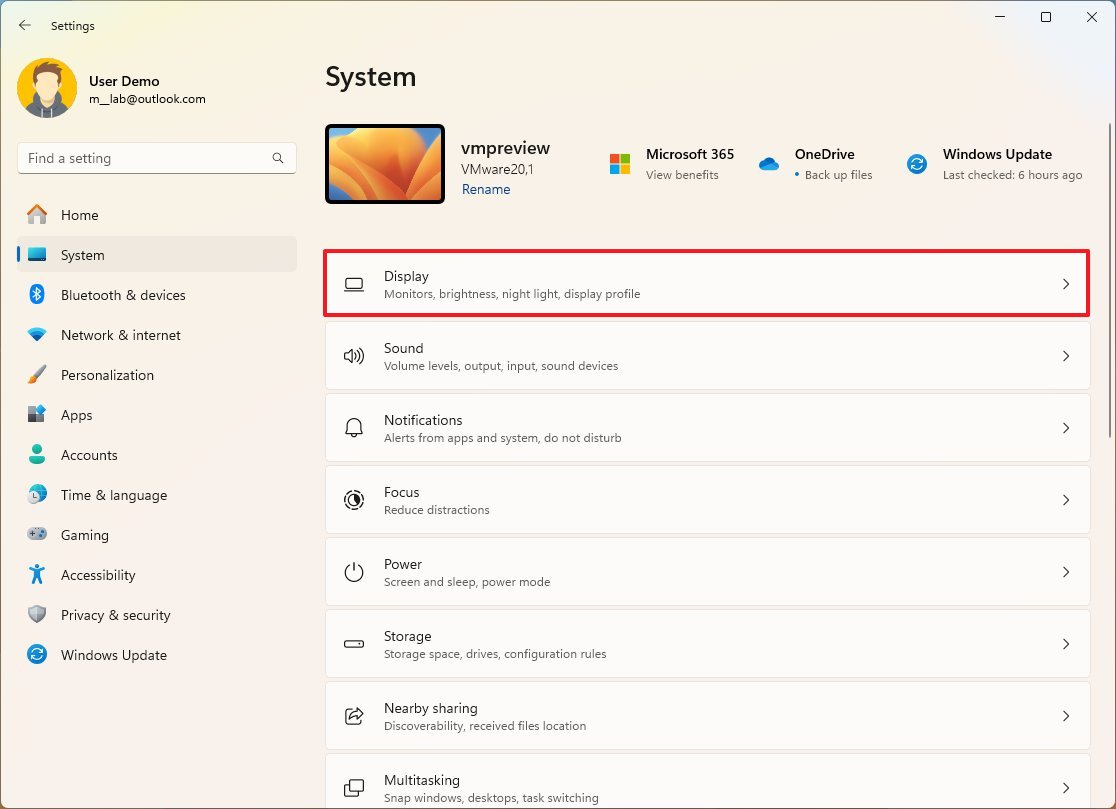
- Click the Graphics setting under the “Related settings” section.
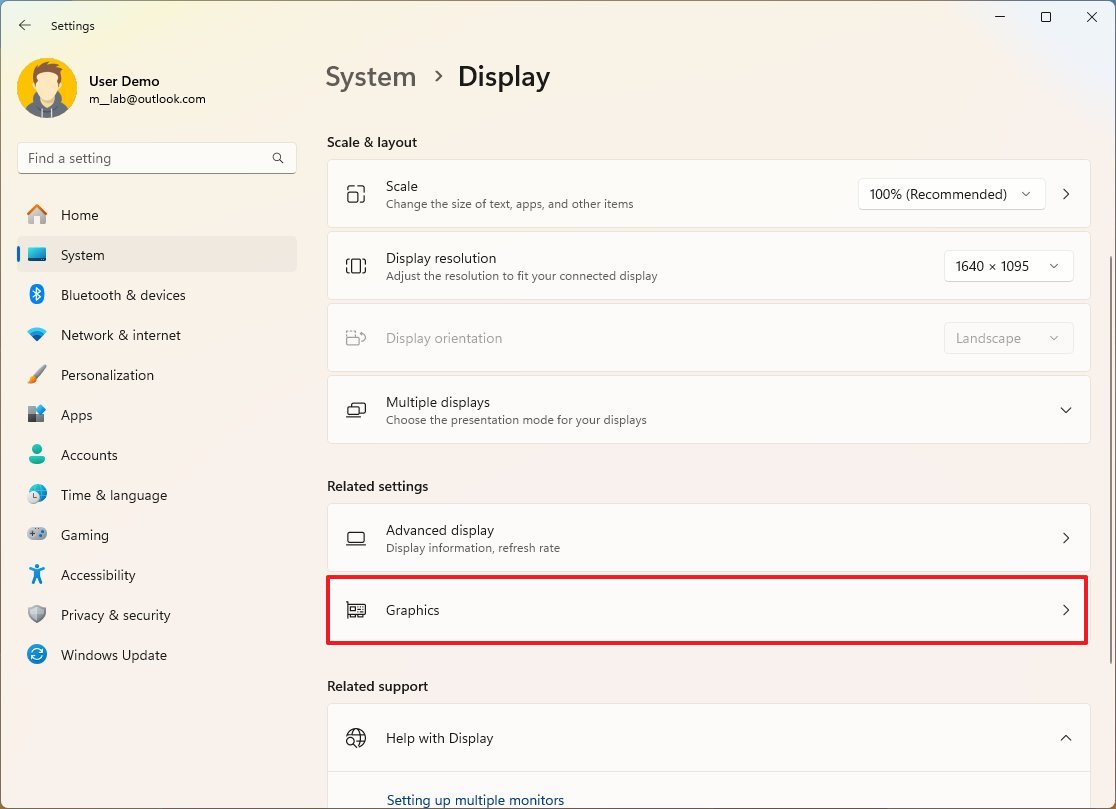
- Use the “Add an app” setting to choose the application for which you want to change its graphics settings.
- Click the Options button.
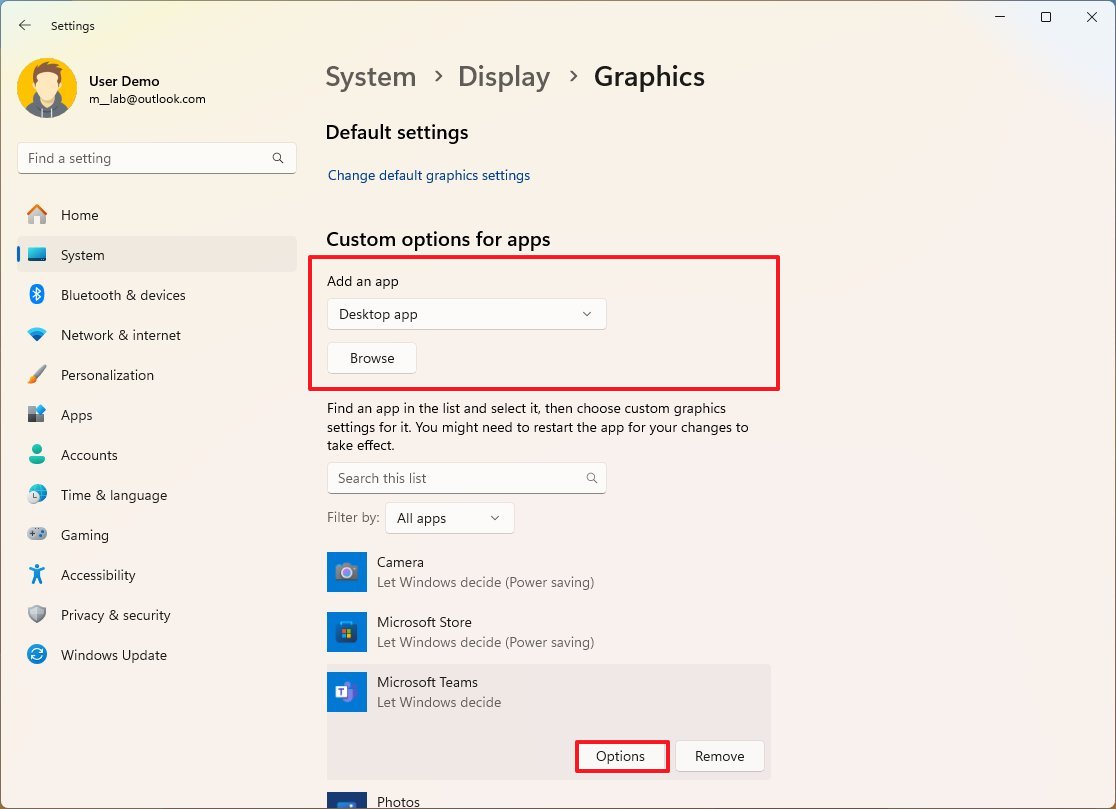
- Select the “High performance” option.
- Click the Save button.
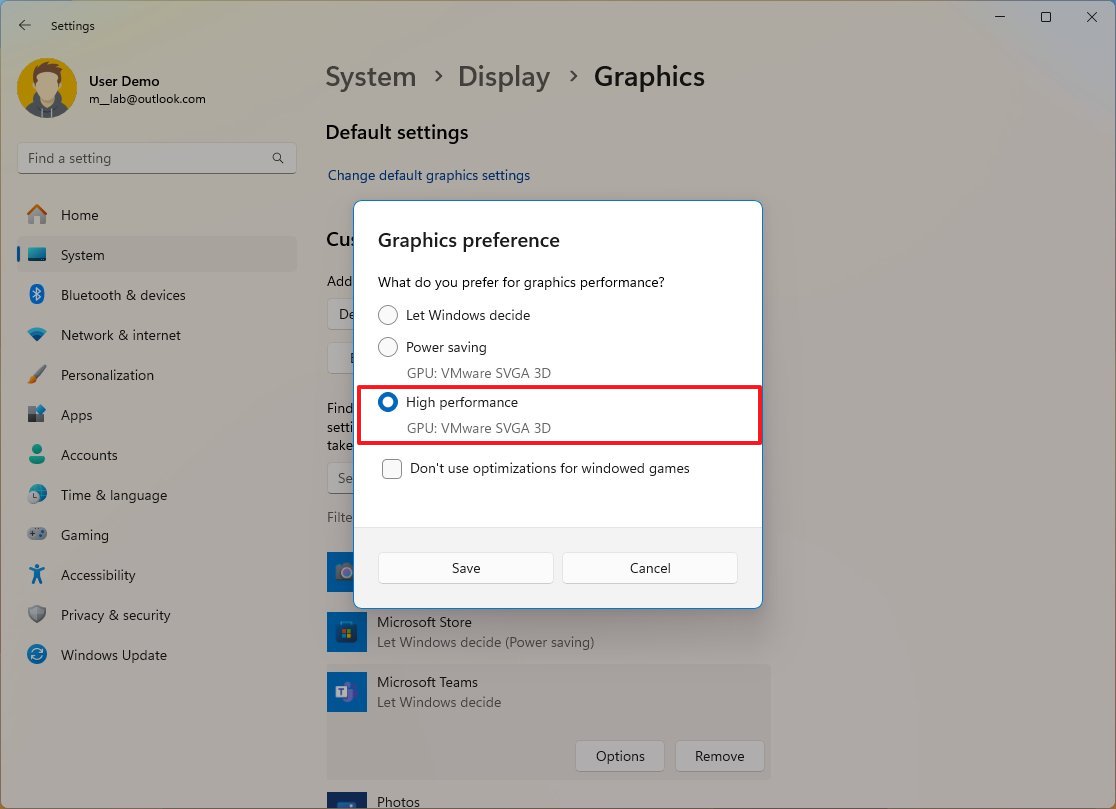
After you complete the steps, you should note an increase in performance on the application.
It’s important to note that sometimes, the application includes the option to choose the graphics card for best performance. Use the app’s settings if this is the case.
9. Disable visual effects
Windows 11 has various visual features like animations, shadows, and advanced techniques like blur and see-through effects, all part of the Fluent Design style.
While these features improve the user experience, they need extra system resources, especially for older machines, making them slower. However, you can turn off these effects to save resources and make the experience feel a little faster.
To turn off the animation effects, use these steps:
- Open Settings.
- Click on Accessibility.
- Click the Visual effects page on the right side.
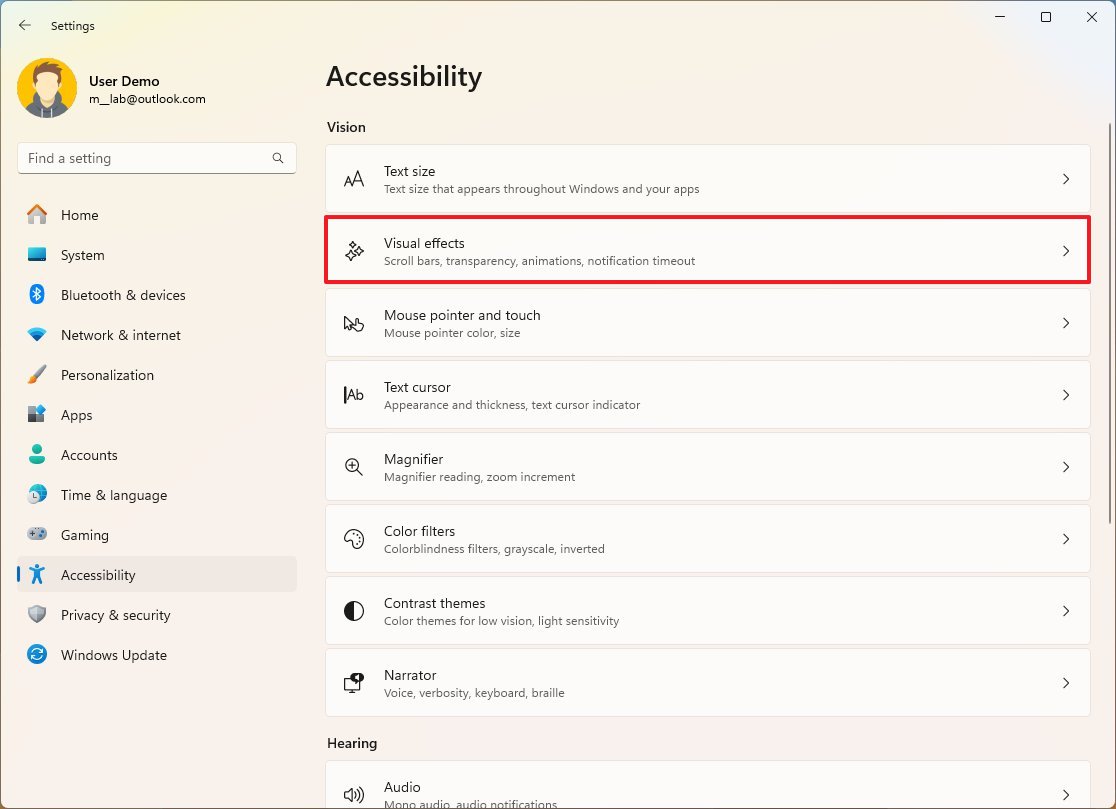
- Turn off the Animation effects toggle switch.
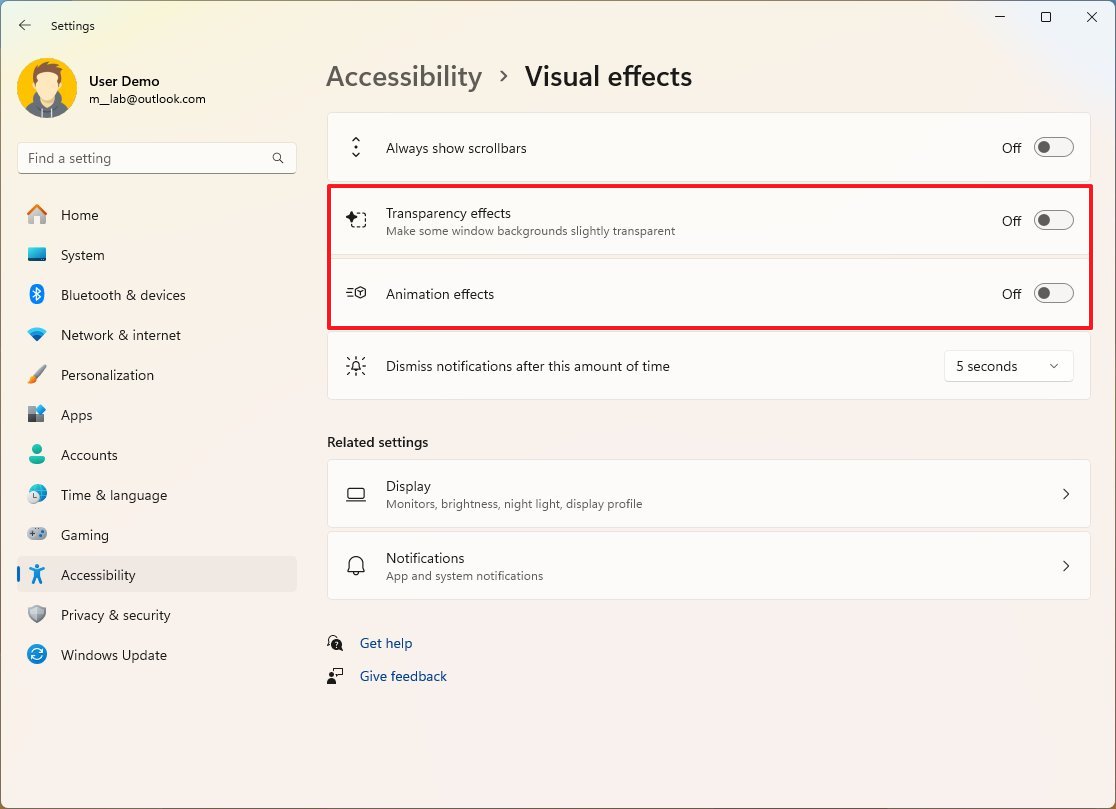
- Turn off the Transparency effects toggle switch.
You can use these instructions to turn off all the visual effects on Windows 11 to improve performance and battery life as much as possible.
10. Turn off search indexing
Search is a critical feature since it allows you to find your files, settings, and apps. However, it’s one of those components that can consume a significant amount of system resources and impact some devices like low-end computers and gaming setups.
If you want to speed up the system as much as possible, it’s possible to change the index settings to optimize the feature for performance.
To configure the indexer to improve system performance on Windows 10, use these steps:
- Open Settings.
- Click on Privacy & security.
- Click on Searching Windows.
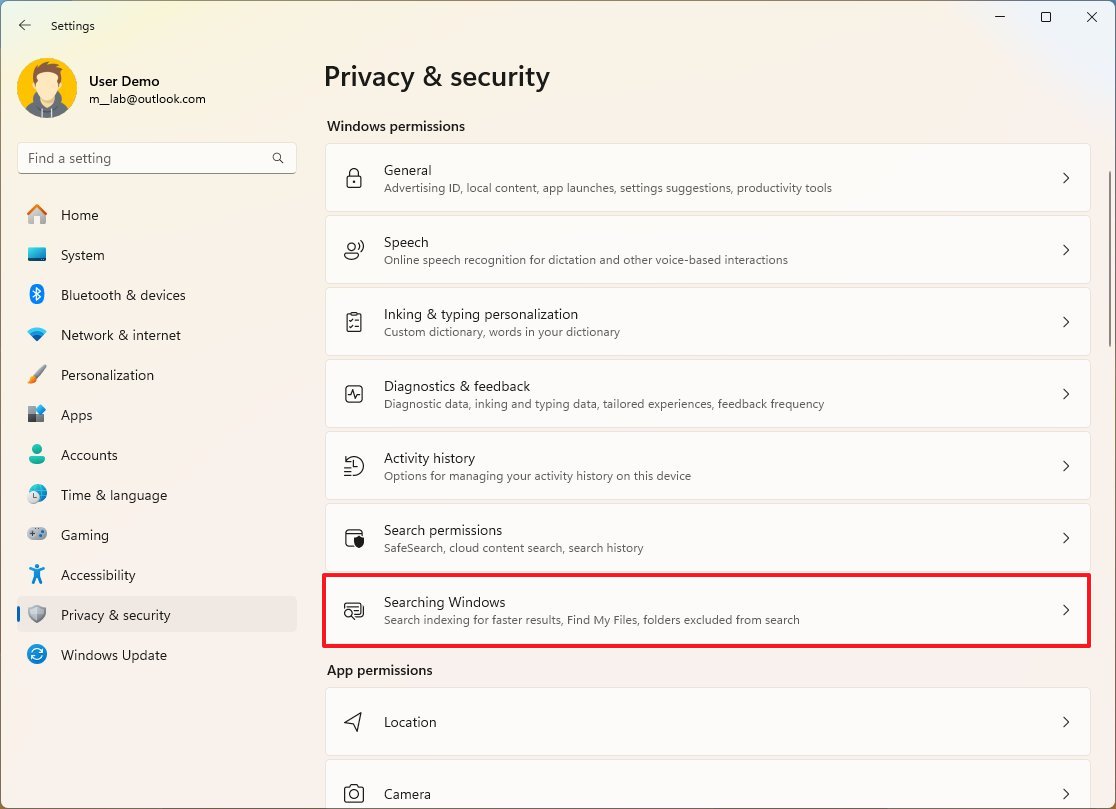
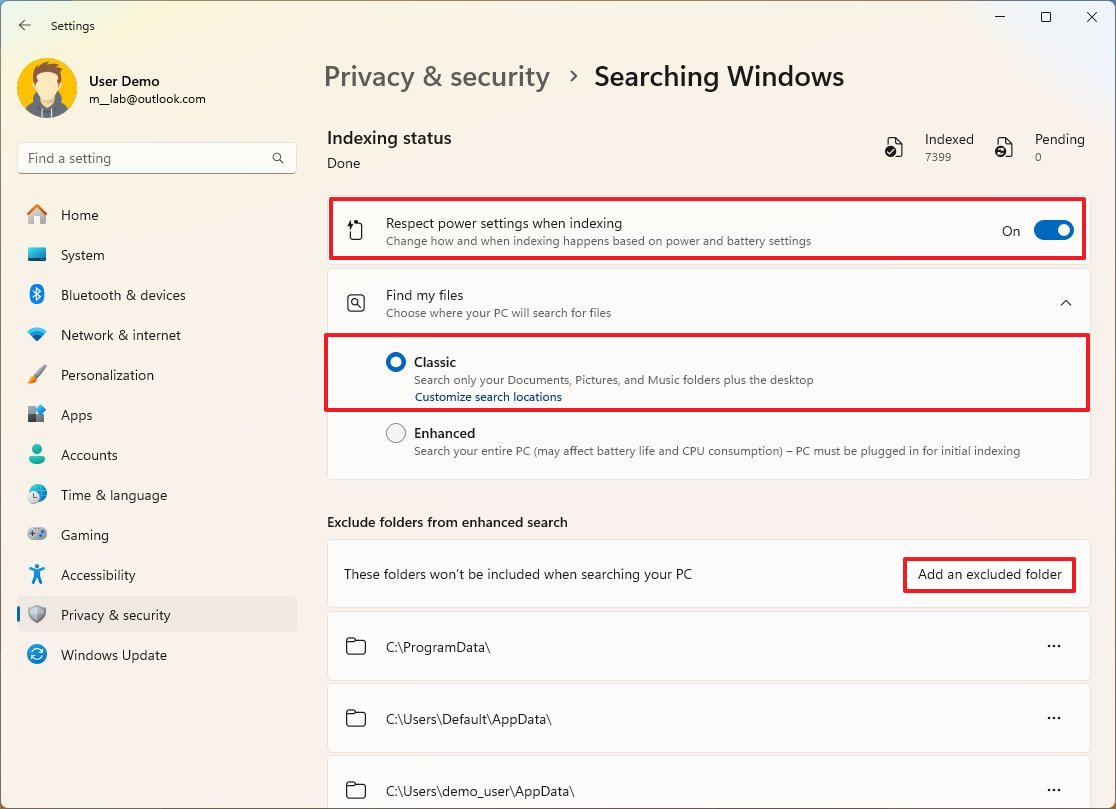
- Turn on the “Respect power settings when indexing” toggle switch.
- Choose the Classic option in the “Find my files” setting to minimize battery and processor usage.
- Click the “Add an excluded folder” button under the “Exclude folders from enhanced search” section.
- Select the folder to exclude.
- Click the Select folder button.
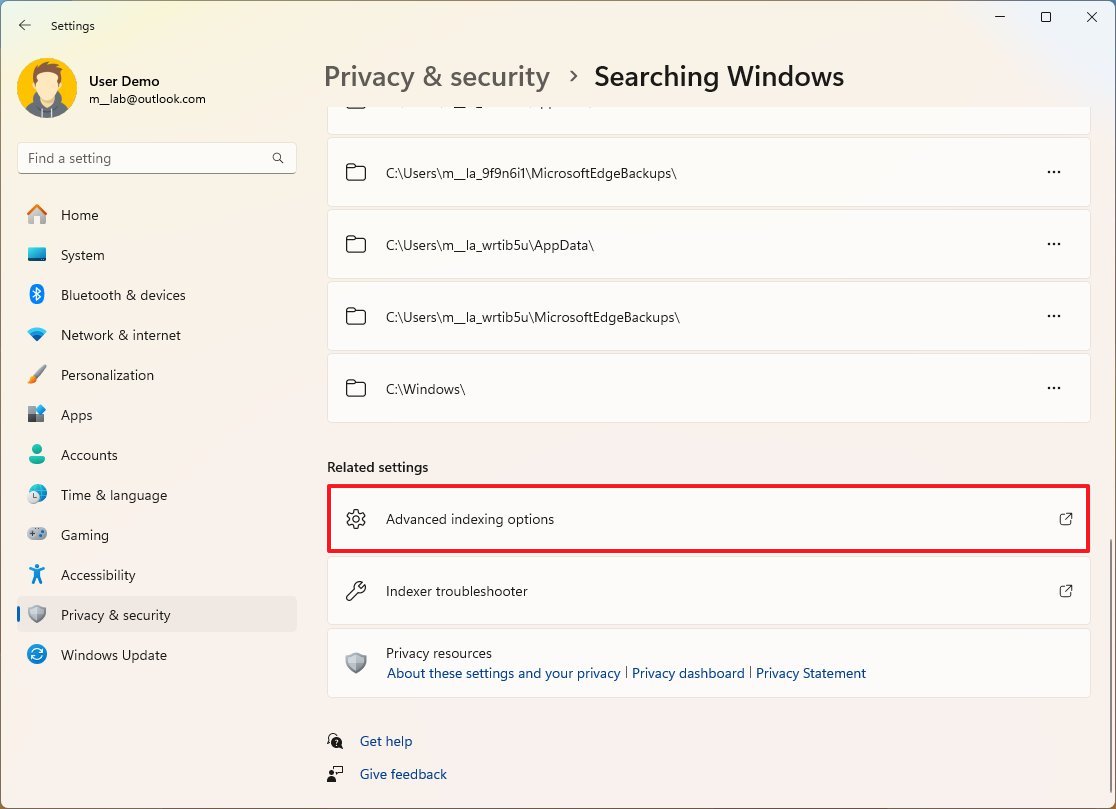
- (Optional) Click on “Advanced indexing option.”
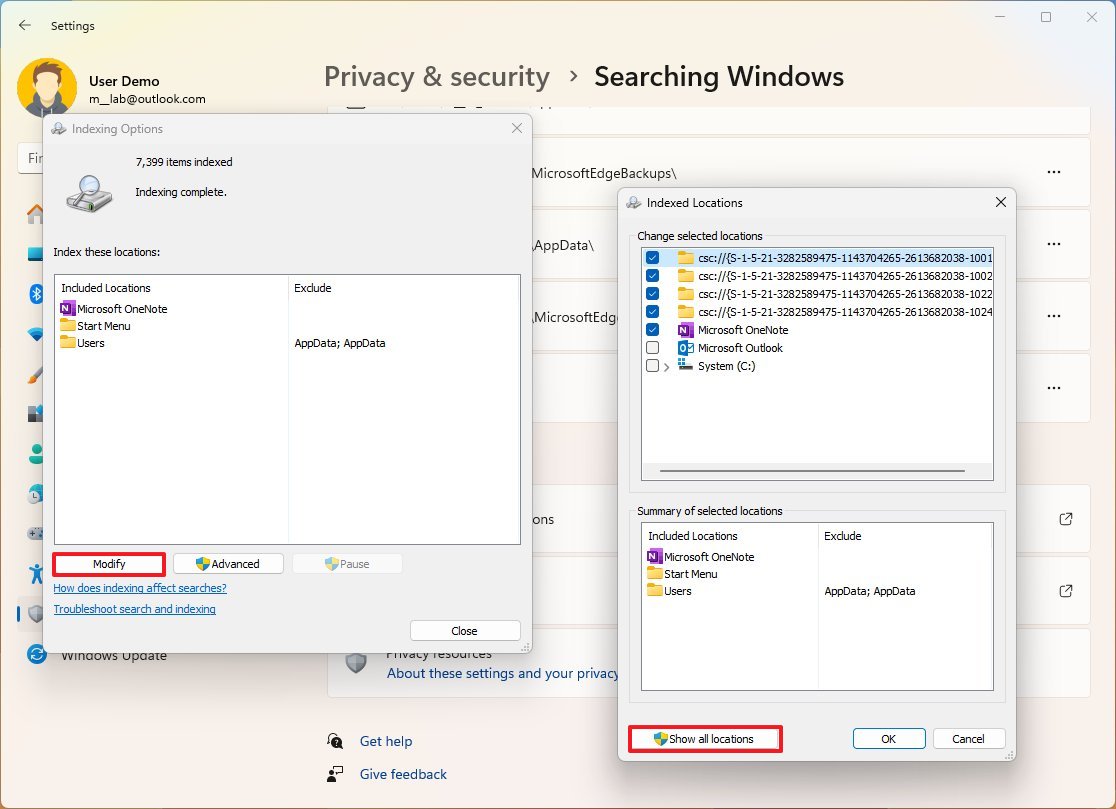
- Click the Modify button.
- Click the “Show all locations” button.
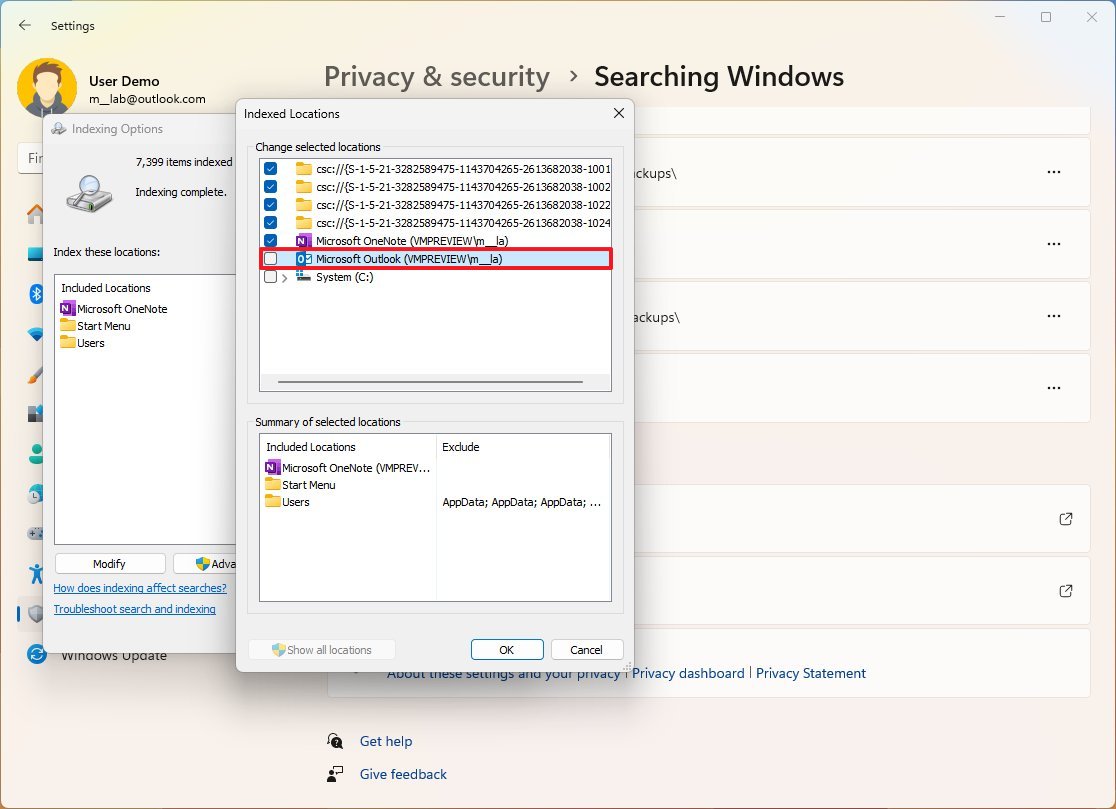
- Clear the Outlook option and other locations as necessary.
- Click the OK button.
- Click the Close button.
Once you complete the steps, indexing should stop conflicting with the system’s performance. If you’re excluding the Outlook location, Windows 11 won’t surface results from your emails when performing a search from the Taskbar.
11. Reconfigure page file settings
On Windows 11, virtual memory refers to the “page file” on the hard drive that works as a temporary memory to handle the overflow when the system runs out of physical memory.
If you know what you are doing, you can improve the system performance by increasing the page file size.
To change the page file settings to speed up Windows 11, use these steps:
- Open Settings.
- Click on System.
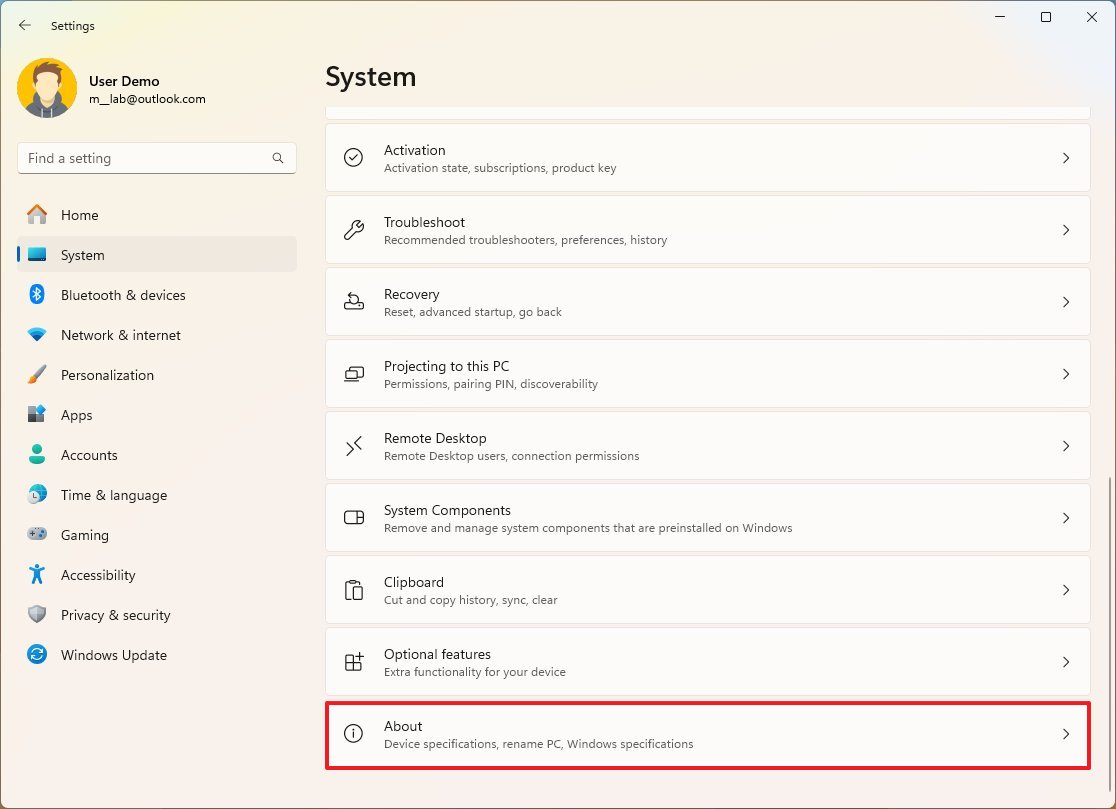
- Click the About page on the right side.
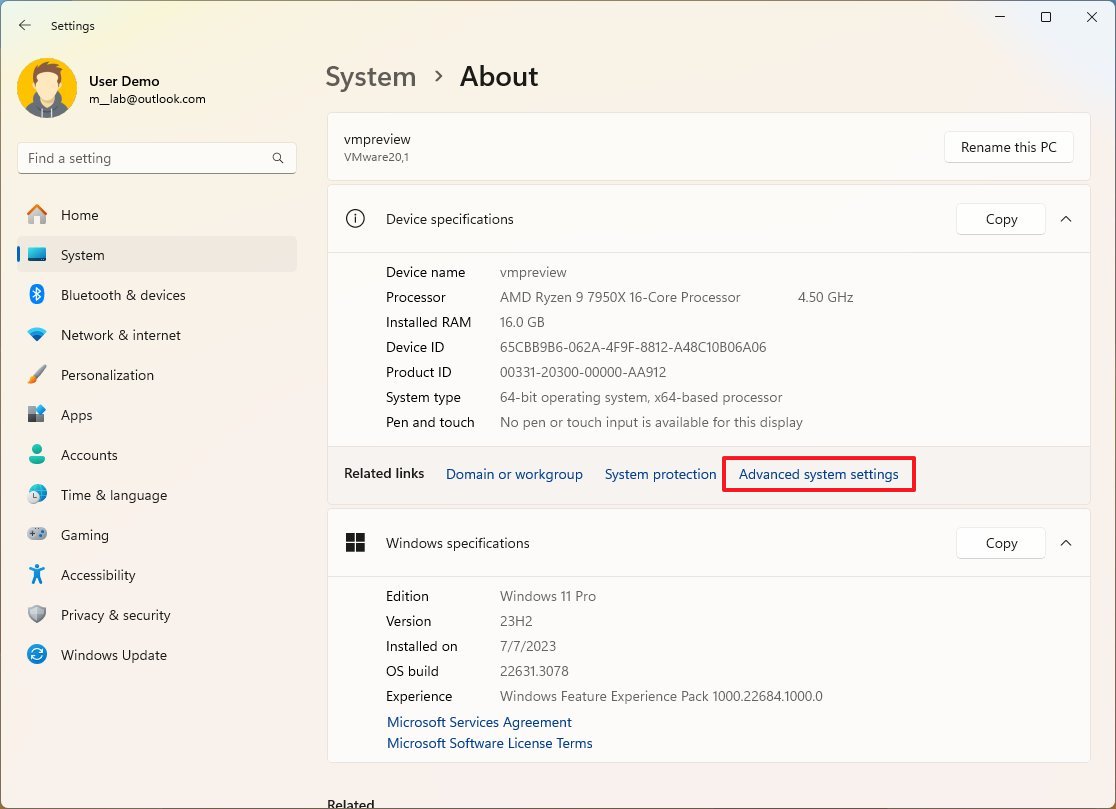
- Click the “Advanced system settings” option under the “Device specifications” section.
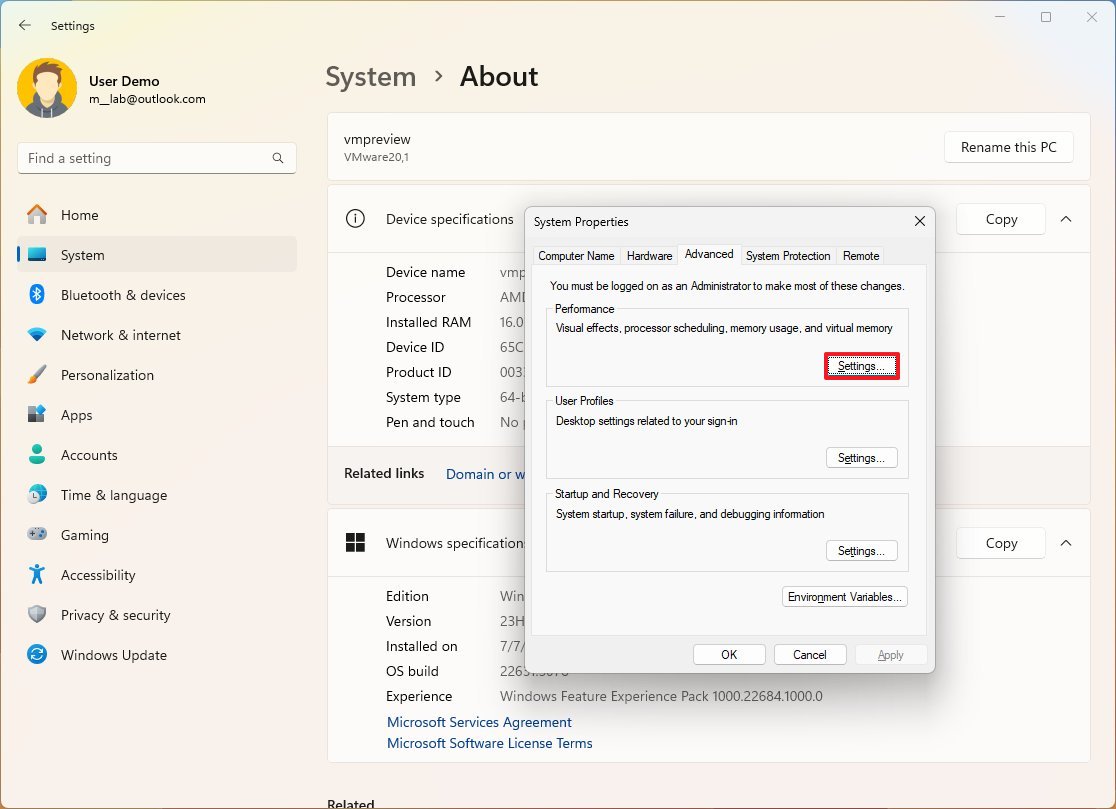
- Click the Advanced tab.
- Click the Settings button under the “Performance” section.
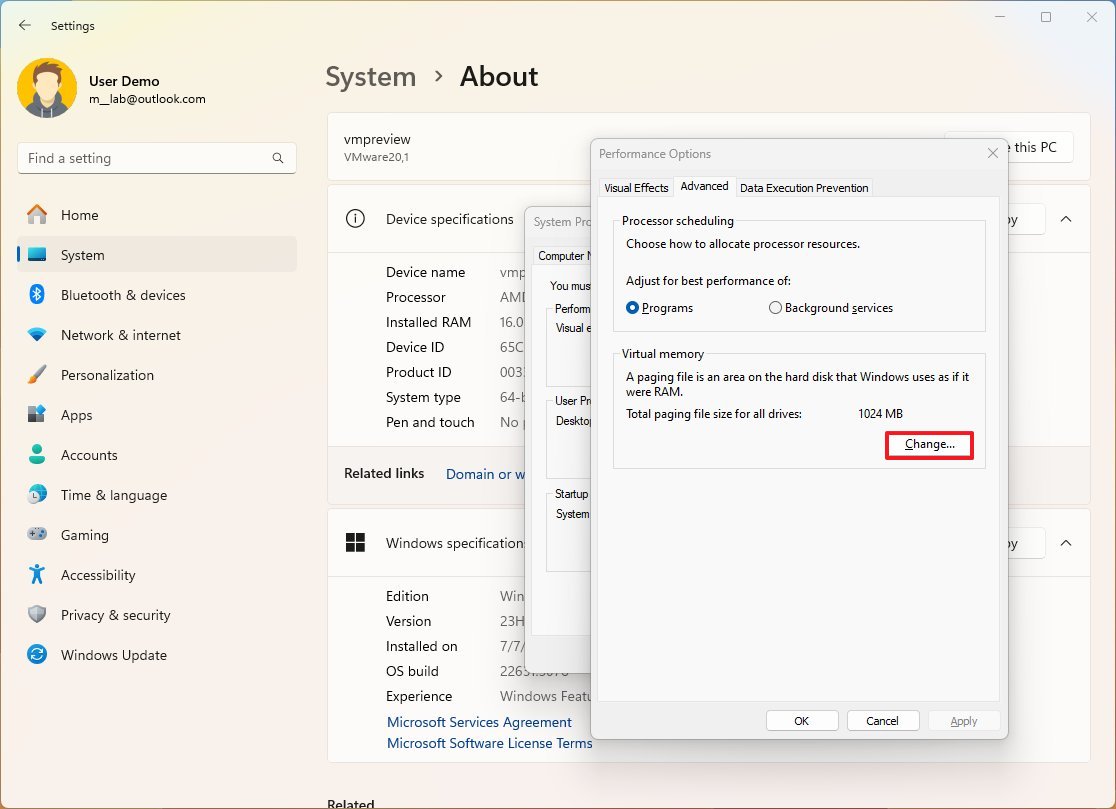
- Click the Advanced tab.
- Click the Change button under the “Virtual memory” section.
- Clear the “Automatically manage paging files size for all drives” option.
- Select the Custom size option.
- Specify the minimum and maximum size for the paging file in megabytes.
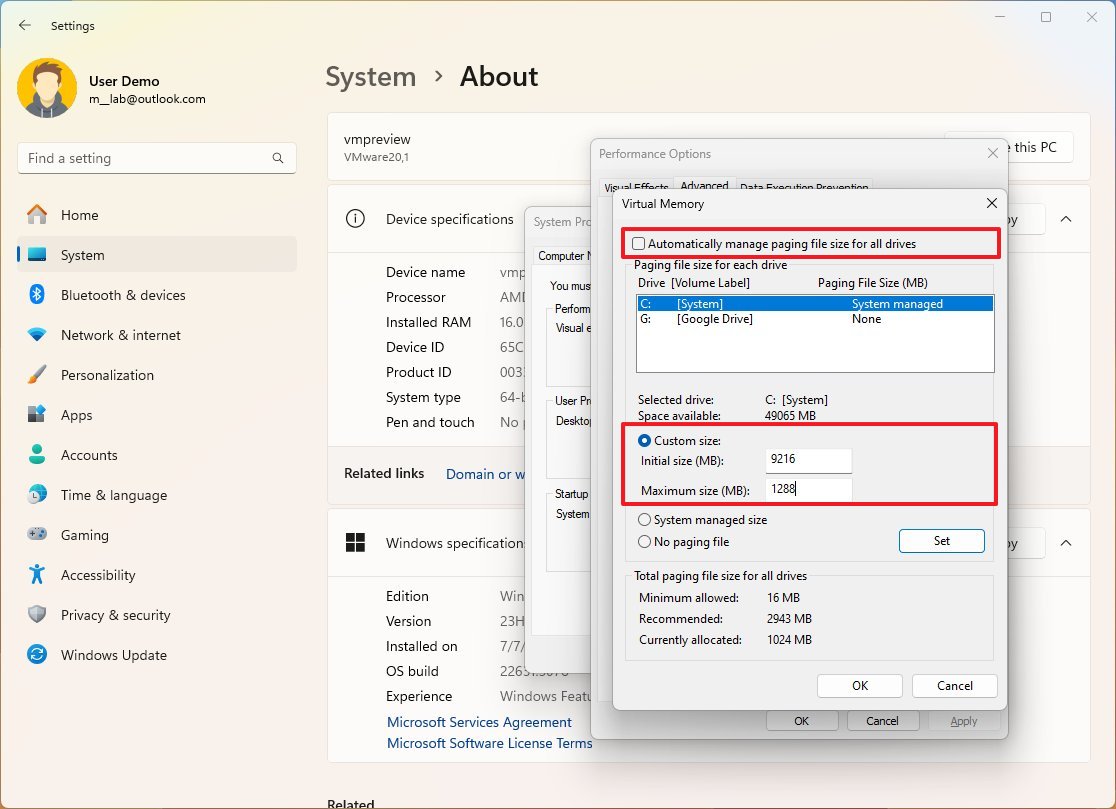
- Quick tip: Usually, you should use a number one and a half times the total available memory for the “Initial size” and three times the available memory for the “Maximum size” when possible.
- Click the Set button.
- Click the OK button.
- Click the OK button again.
- Restart your computer.
After you complete the steps, the changes will apply, and the system should show signs of improvement while using apps.
In the case that the changes are causing stability issues, undo the configuration with the same steps, but on step 9, select the “System managed size” option and check the “Automatically manage paging files size for all drives” option.
12. Repair installation files
If the computer has system files that are corrupted, you will notice performance issues and other problems. In this case, you can use the Deployment Image Service and Management Tool (DISM) and System File Checker (SFC) command-line tools to fix the setup without resourcing to reinstallation.
Fix installation files with DISM
To use DISM to repair the image system files, use these steps:
- Open Start.
- Search for Command Prompt, right-click the top result, and click the Run as Administrator option.
- Type the following command to repair the image files and press Enter: DISM /Online /Cleanup-image /Restorehealth
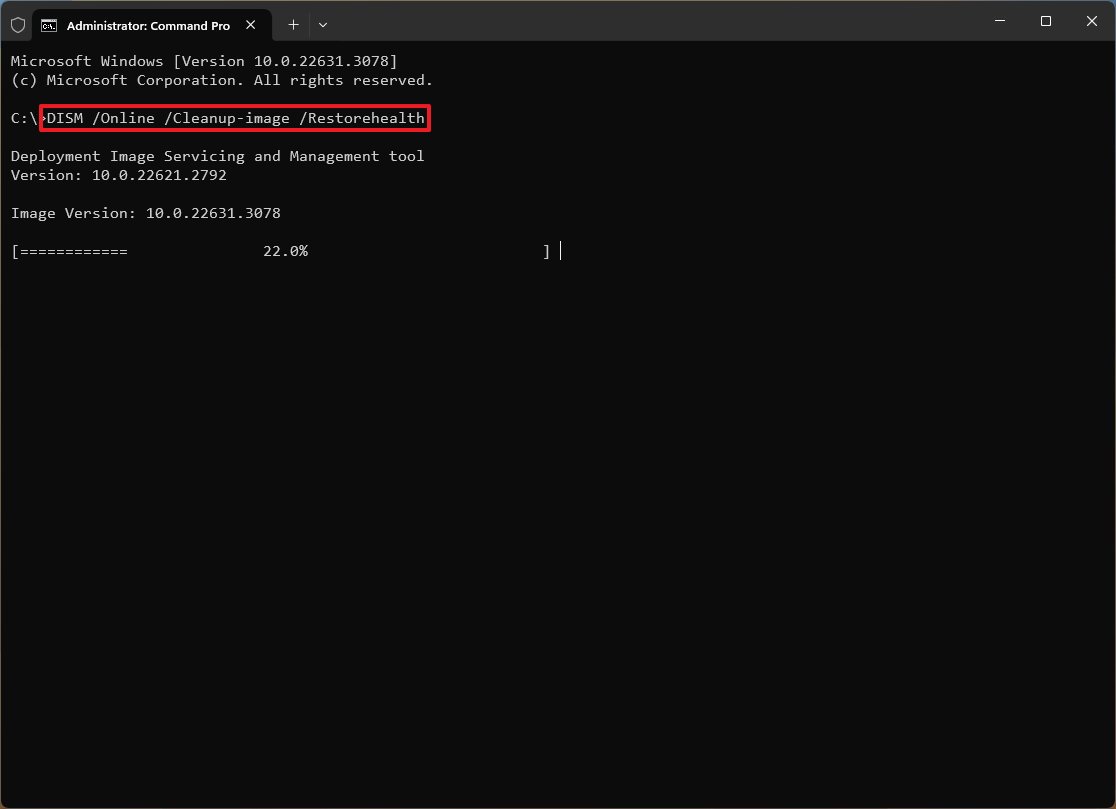
After you complete the steps, the tool will repair the files in the image, and you can then use the SFC tool to fix problems with the current installation of Windows.
Fix installation files with SFC
To use SFC to repair corrupted system files on Windows 11, use these steps:
- Open Start.
- Search for Command Prompt, right-click the top result, and click the Run as Administrator option.
- Type the following command to repair the installation and press Enter: sfc /scannow
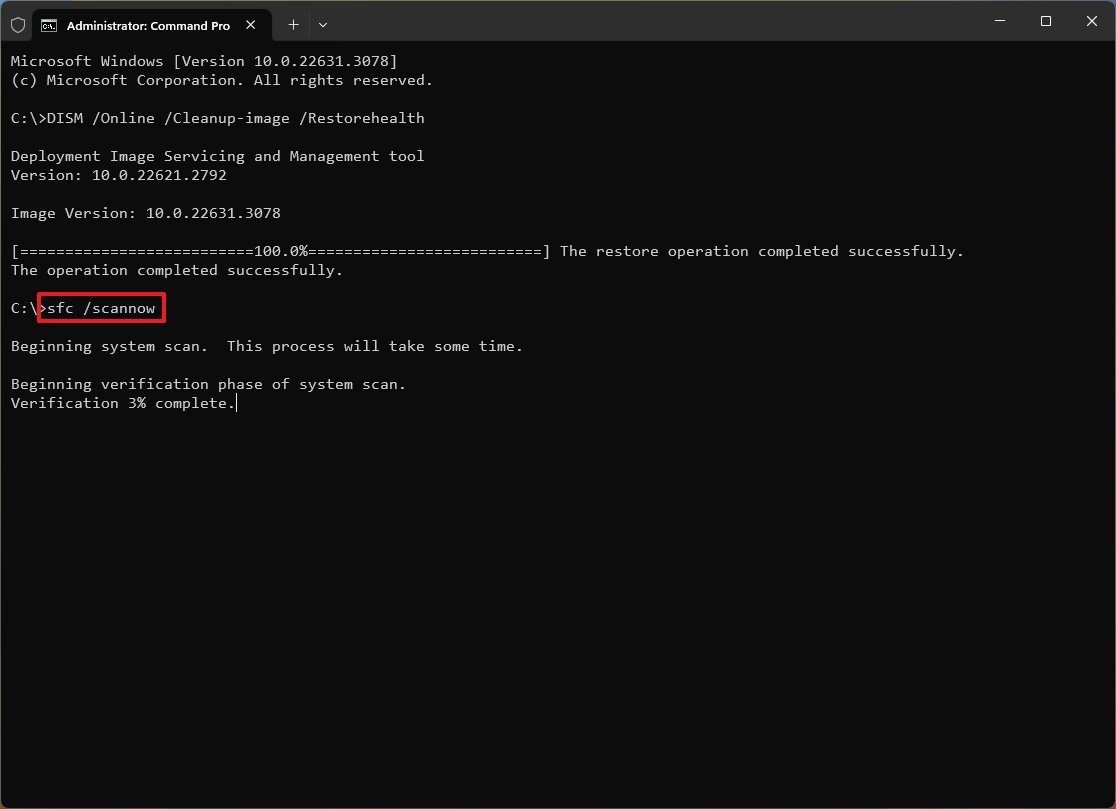
Once you complete the steps, the computer should start running normally without performance issues.
In this set of instructions, you will find more details on how to use these command-line tools.
13. Scan and remove viruses
If the computer isn’t acting up or runs slower than usual, this could be a signal that malware has gained access to the system.
Usually, viruses, spyware, and other malware types can take up substantial system resources, making the device unusable.
Although the Microsoft Defender Antivirus runs automatically, it’s not guaranteed that the device will always be free of malware. You should periodically perform a full virus scan, especially when you suspect the computer could be infected.
Defender Antivirus full scan
To run a full virus scan, use these steps:
- Open Start.
- Search for Windows Security and click the top result to open the app.
- Click on Virus & threat protection.
- Click the Protection updates option in the “Virus & threat protection updates” setting.
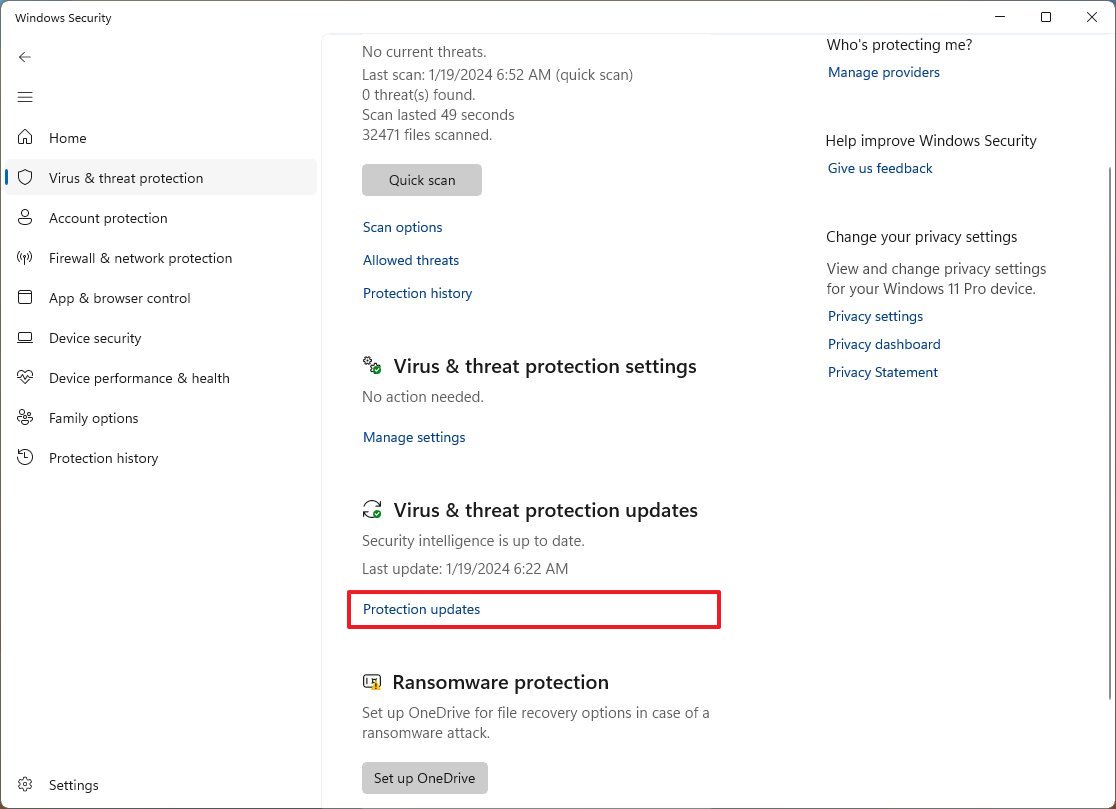
- Click the “Check for updates” button.
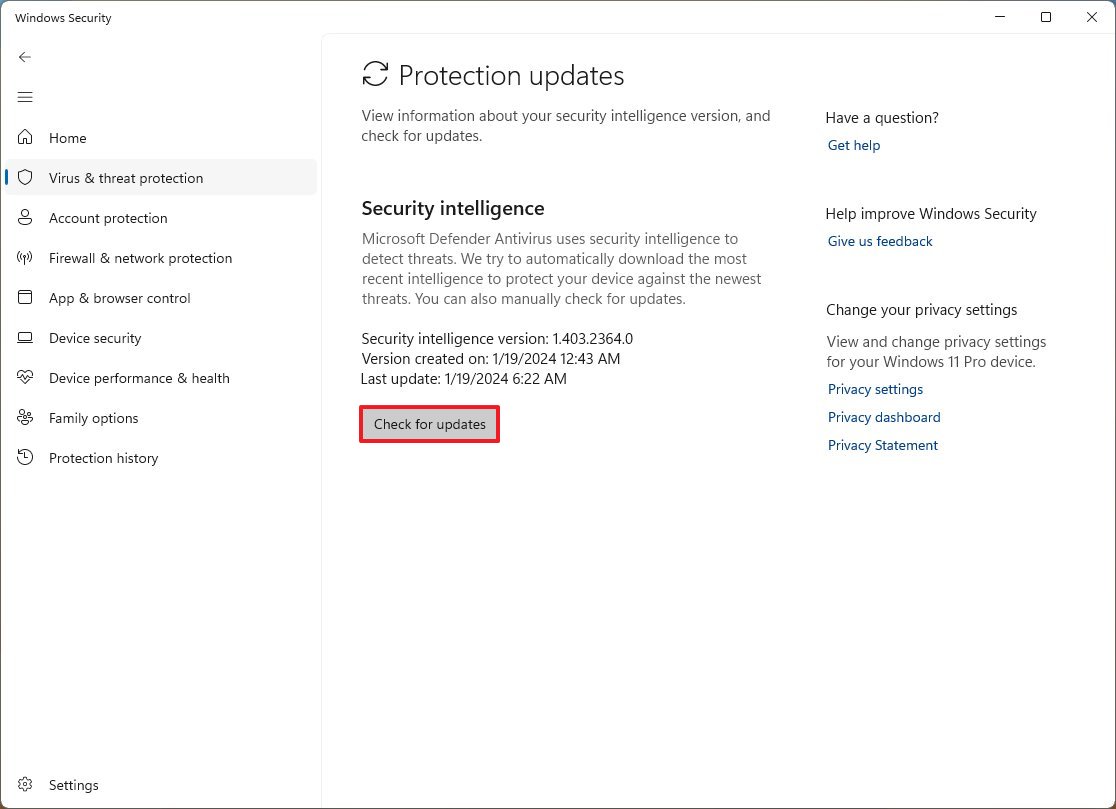
- Click on “Virus & threat protection” from the left pane.
- Click the Scan options option under the “Current threats” section.
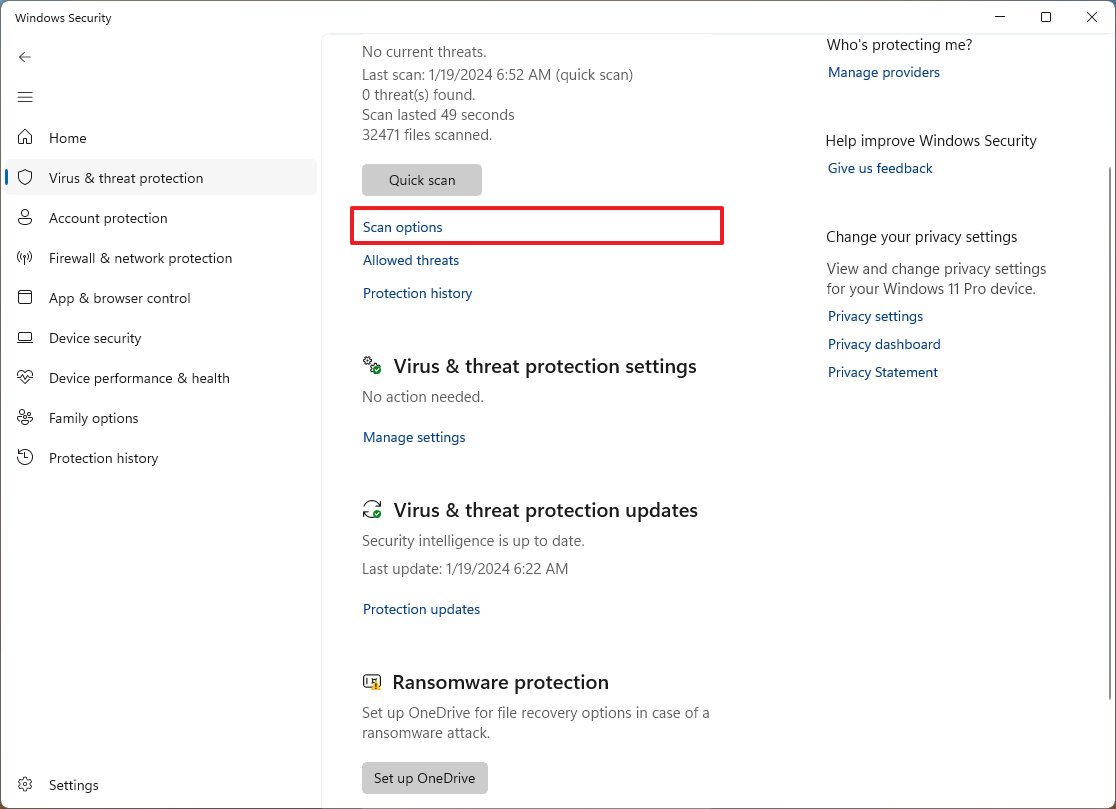
- Select the Full scan option.
- Click the Scan now button.
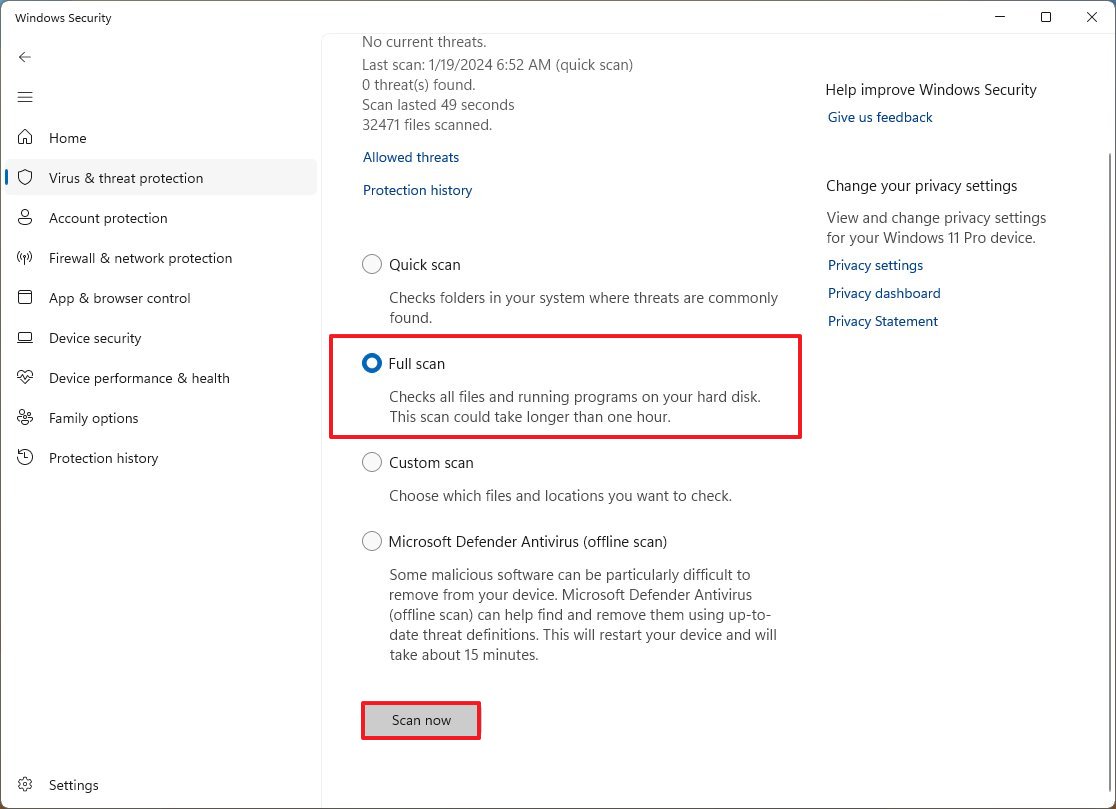
After you complete the steps, Microsoft Defender Antivirus should detect and remove any malware impacting performance.
Defender Antivirus offline scan
You can use the Defender offline feature if the antivirus cannot remove the malware because the system is running. When you run the offline scan, the computer will reboot into the Windows Recovery Environment to perform a scan when the system isn’t loaded into memory. After the scan is complete, the antivirus will remove the malware and restart the computer automatically.
To perform a Microsoft Defender Antivirus offline scan, use these steps:
- Open Start.
- Search for Windows Security and click the top result to open the app.
- Click on Virus & threat protection.
- Click the Scan options option under the “Current threats” section.

- Select the “Microsoft Defender Offline scan” option.
- Click the Scan now button.
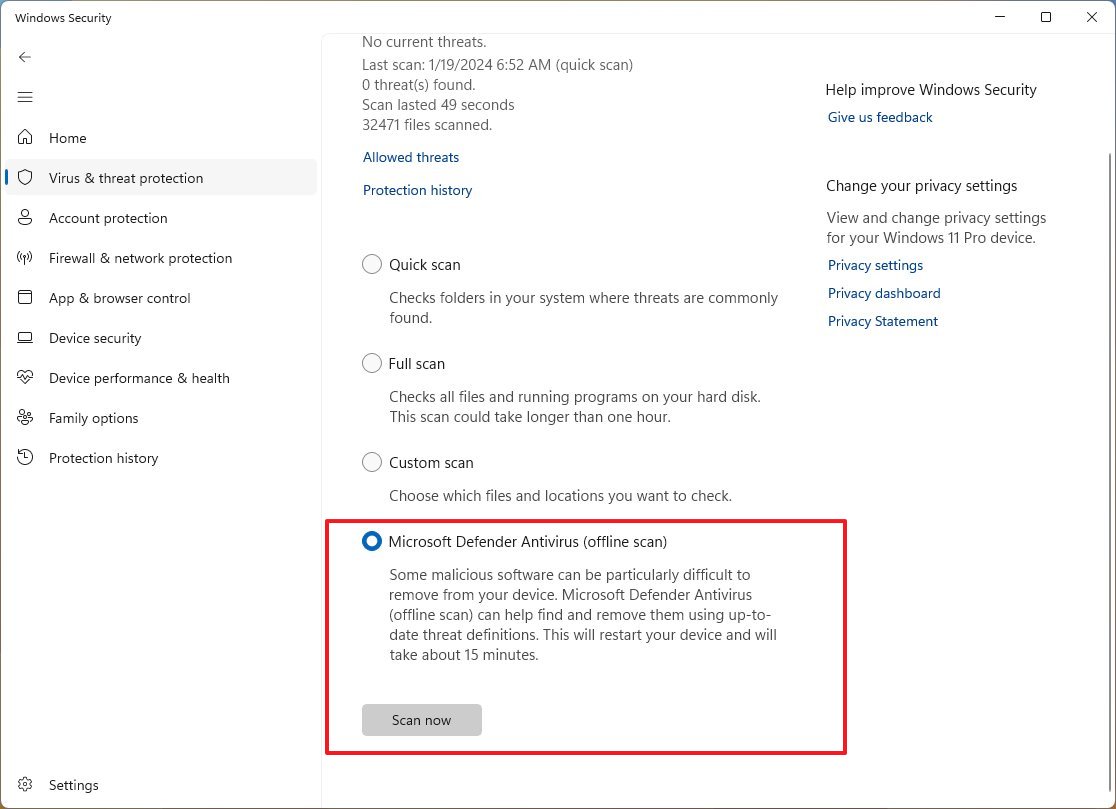
Once you complete the steps, the antivirus will scan the system and try to remove the malware causing the performance degradation.
If you use other anti-malware solutions like Malwarebytes, Bitdefender, Trend Micro, or Norton, check their support documentation to remove viruses and other malicious programs.
14. Gaming-specific performance configurations
14. Gaming-specific performance configurations
If you want to optimize the performance for gaming, in addition to the recommendations outlined in this guide, you can also perform some additional configurations.
Turn on Game Mode
To enable Game Mode on Windows 11, use these steps:
- Open Settings.
- Click on Gaming.
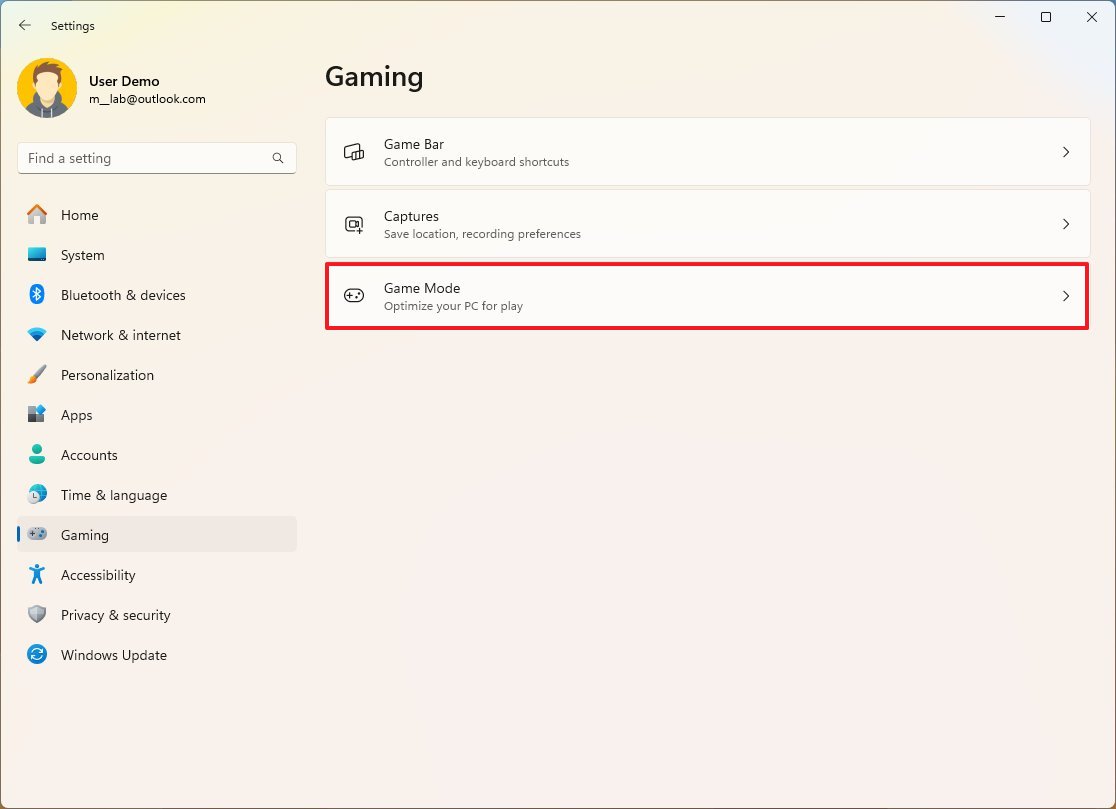
- Turn on Game Mode toggle switch.
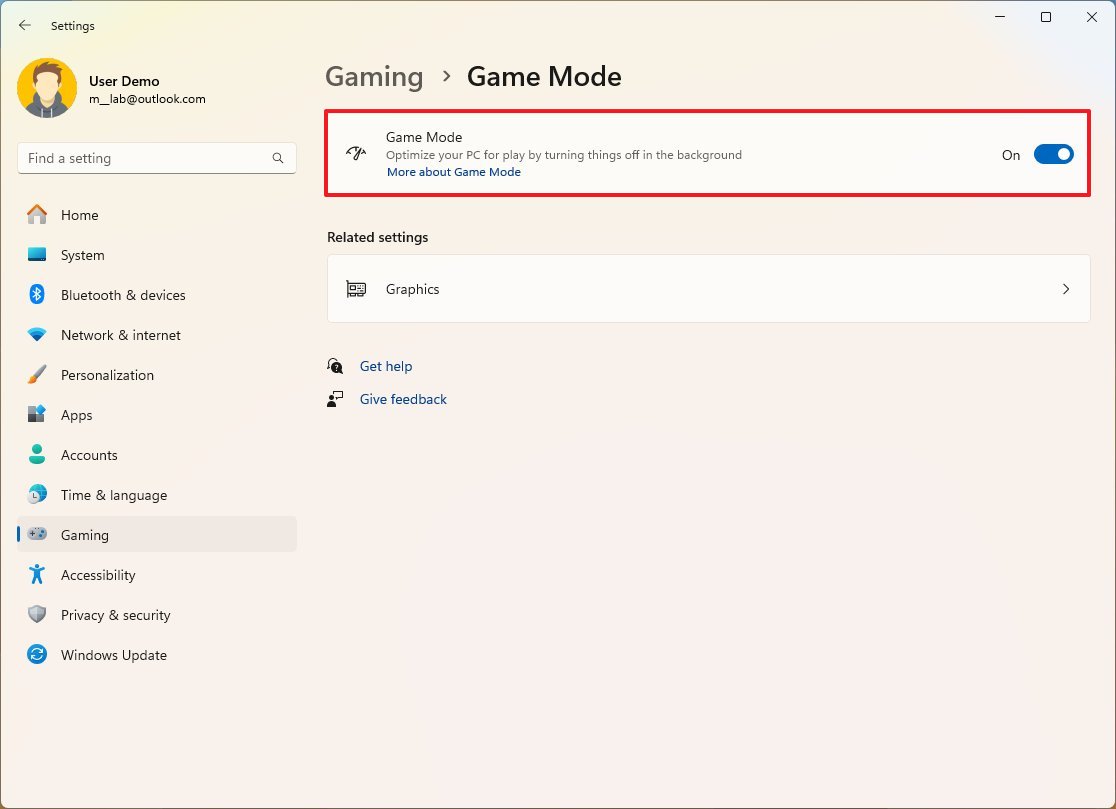
After you complete the steps, the system will optimize the computer for gaming by turning off non-essential processes to free up more resources. This mode should also improve framerates during gameplay and stop services like Windows Update from disrupting the experience.
Turn off memory integrity and virtualization
According to Microsoft, gaming performance can be affected by two security features, including Memory Integrity and Virtual Machine Platform.
If you want to improve your computer’s gaming performance, consider turning off these features. Here’s how:
- Open Start.
- Search for Windows Security and click the top result to open the app.
- Click on Device Security.
- Click the “Core isolation details” option under the “Core isolation” section.
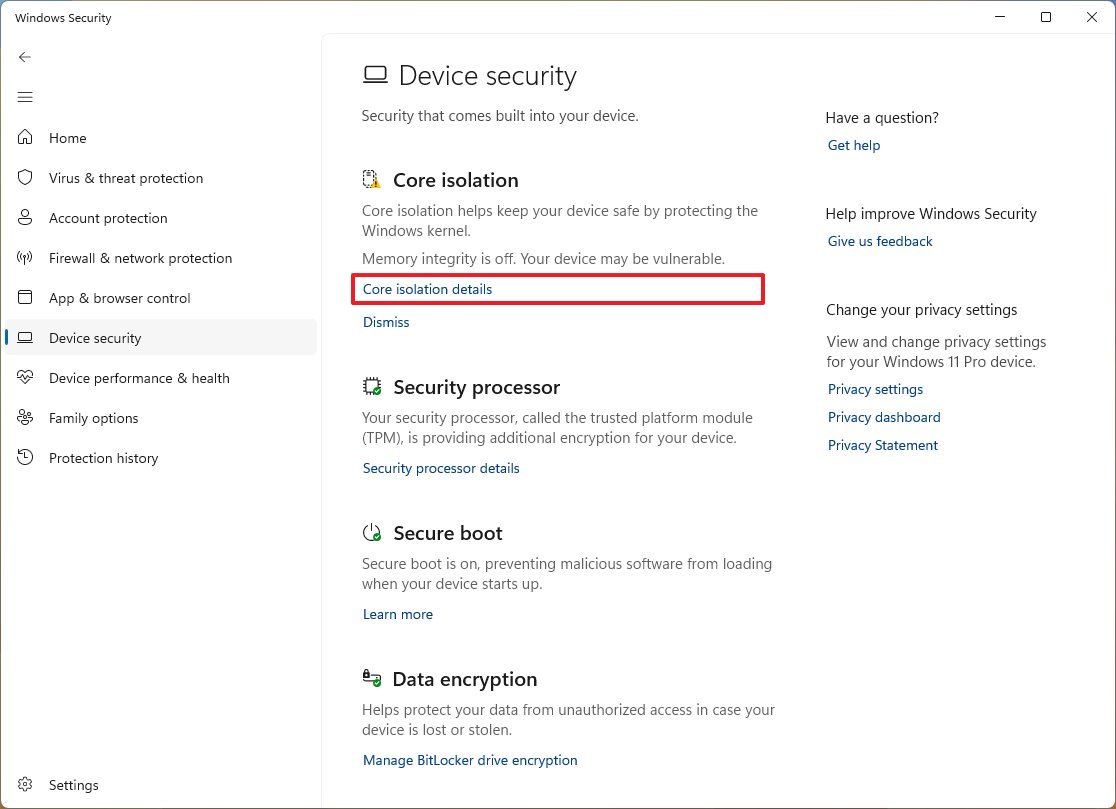
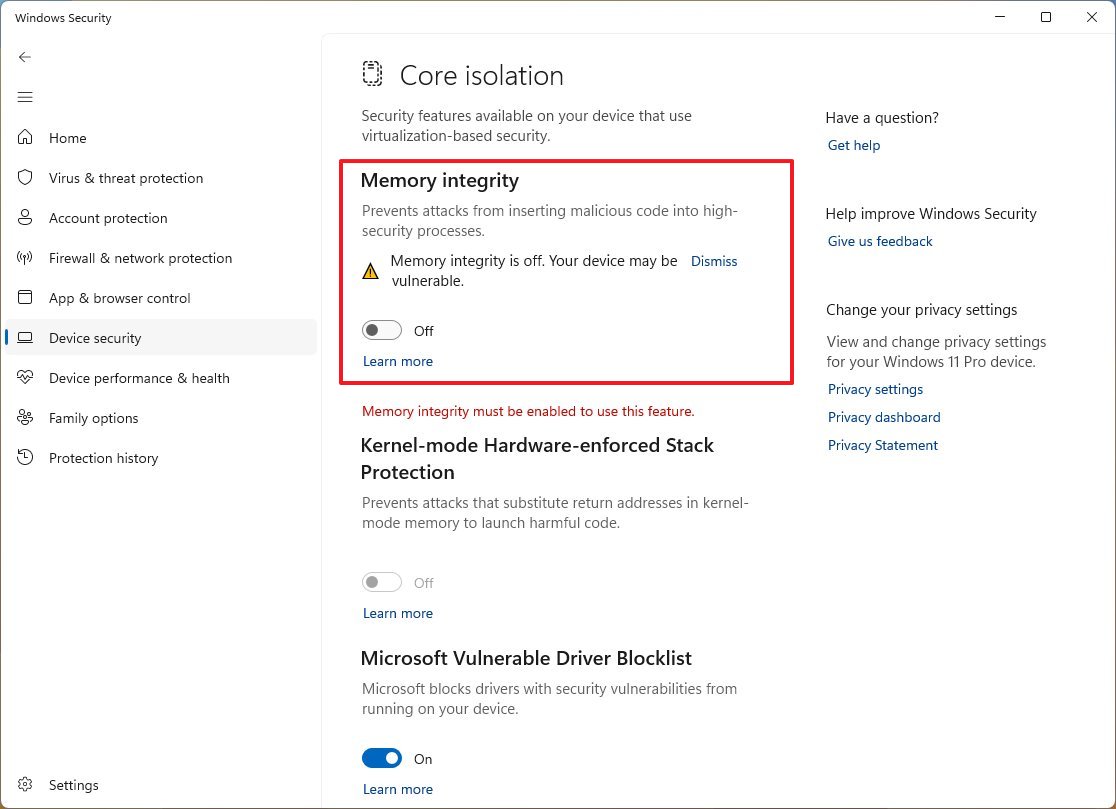
- Turn off the “Memory integrity” toggle switch (and do not restart the computer yet.)
- Open Settings.
- Click on Apps.
- Click the Optional features tab.
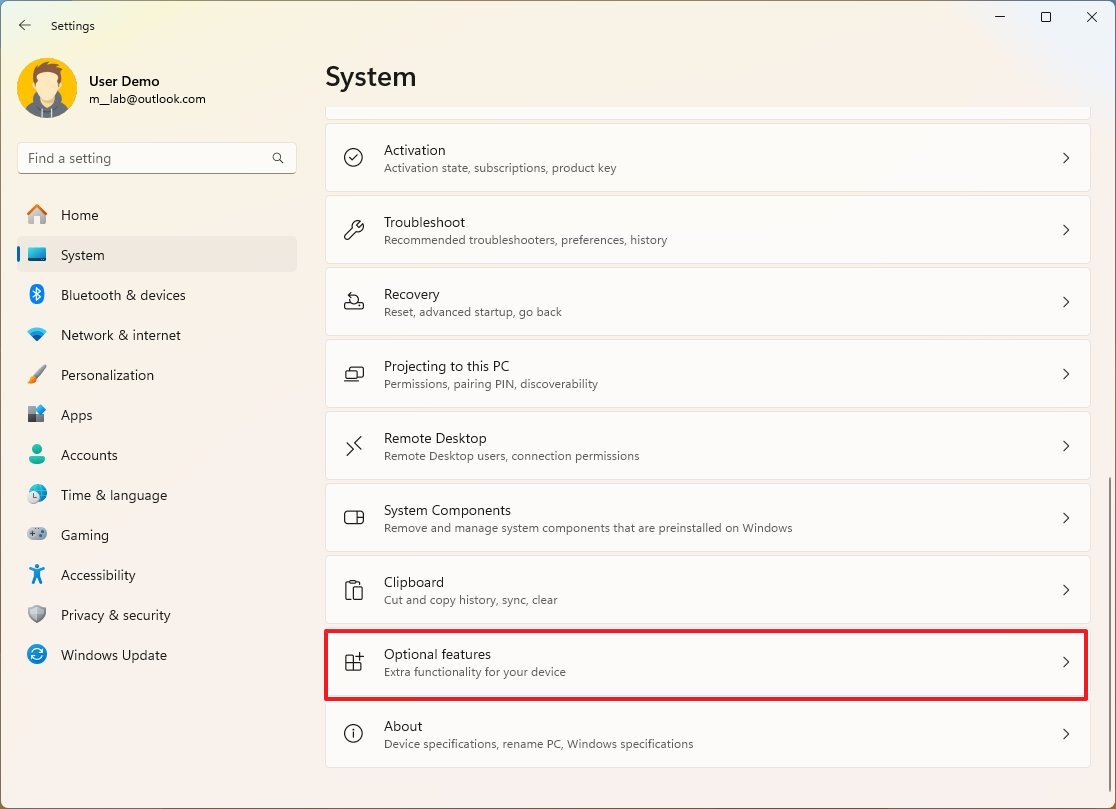
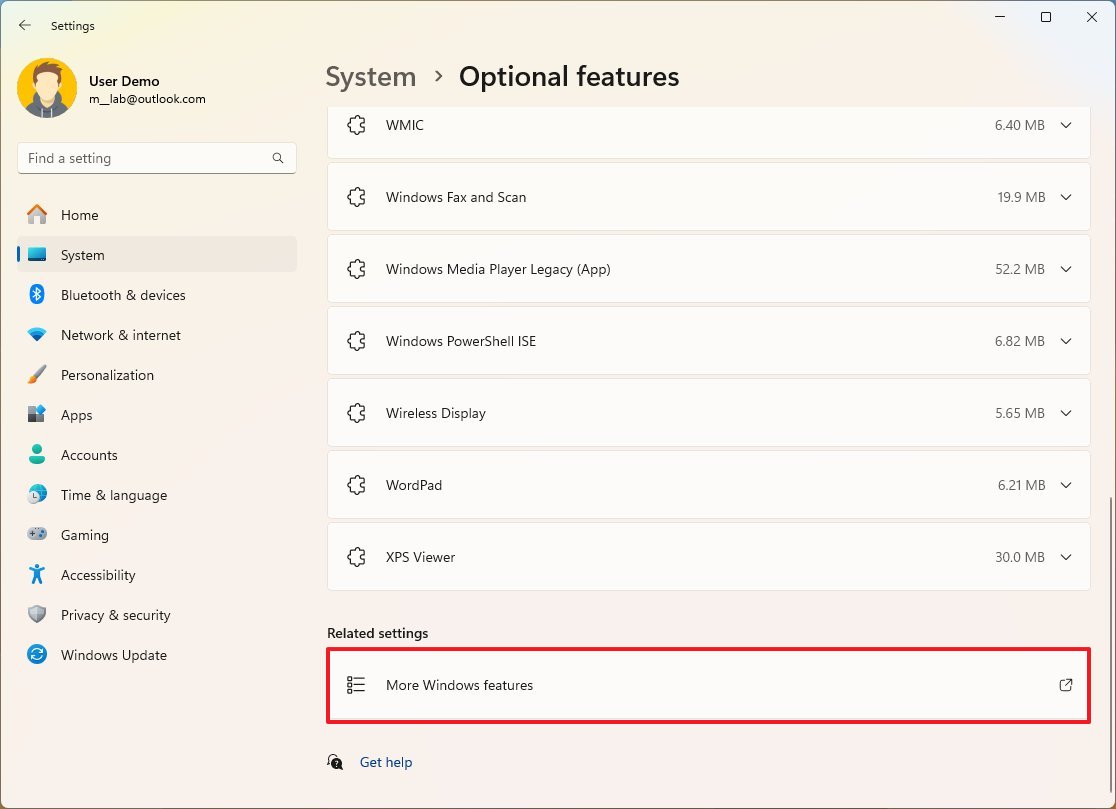
- Click the “More Windows features” setting under the “Related settings” section.
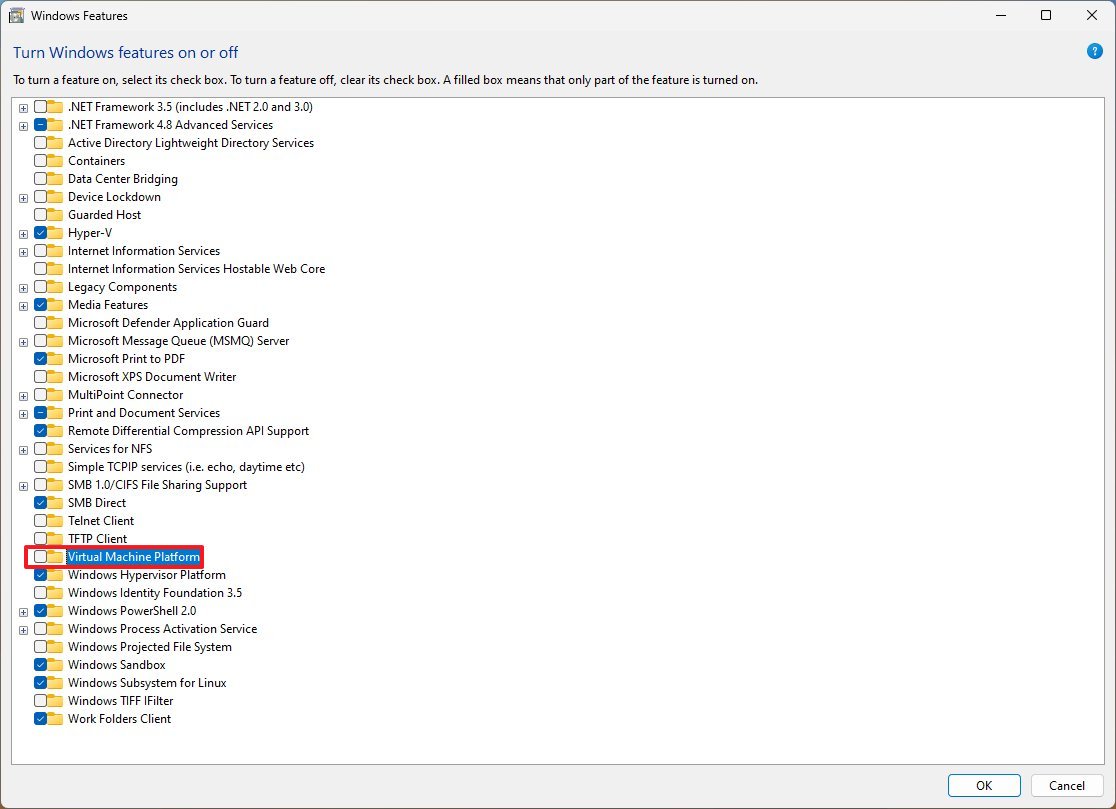
- Clear the “Virtual Machine Platform” option.
- Click the OK button.
- Click the Restart now button.
Once you complete the steps, games should run more smoothly.
It’s important to note that Microsoft recommends turning on the feature again after playing games to keep your device secure. You can always revert the changes using the same steps outlined above, but on step 5, turn on the “Memory Integrity” option, and on step 10, check the “Virtual Machine Platform” option.
15. Reset computer to factory defaults
If the device is still sluggish, and you encounter other problems after trying the different recommendations, you can try performing a factory reset without losing your files to improve performance and resolve other issues.
To reset Windows 11 without losing your files, use these steps:
- Open Settings.
- Click on System.
- Click the Recovery page on the right side.
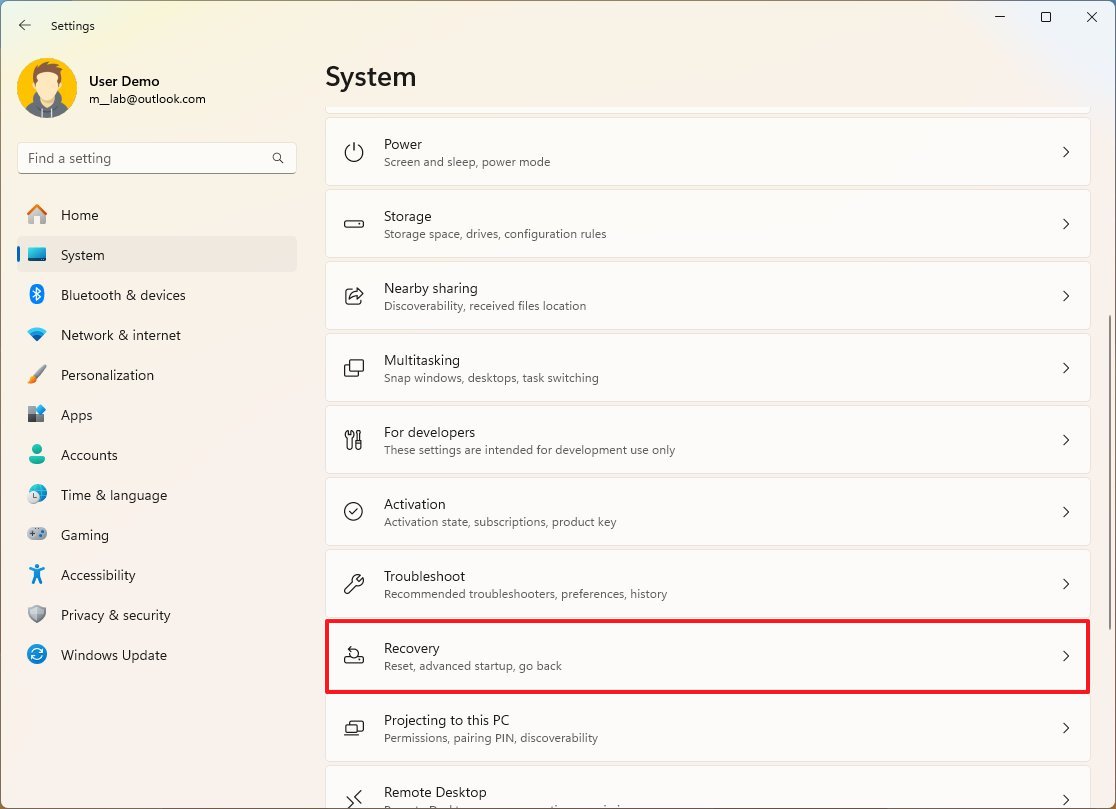
- Click the Reset PC button for the “Reset this PC” feature under the “Recovery options” section.
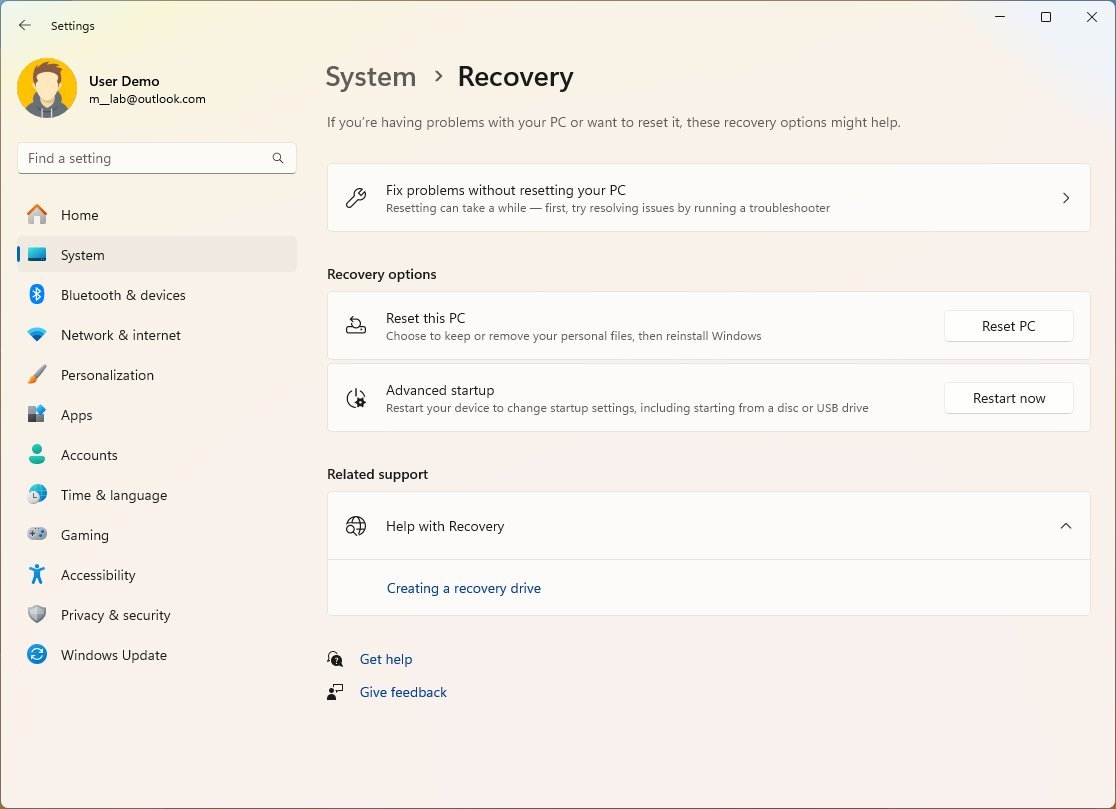
- Click the “Keep my files” option.

- Click the Cloud download option.
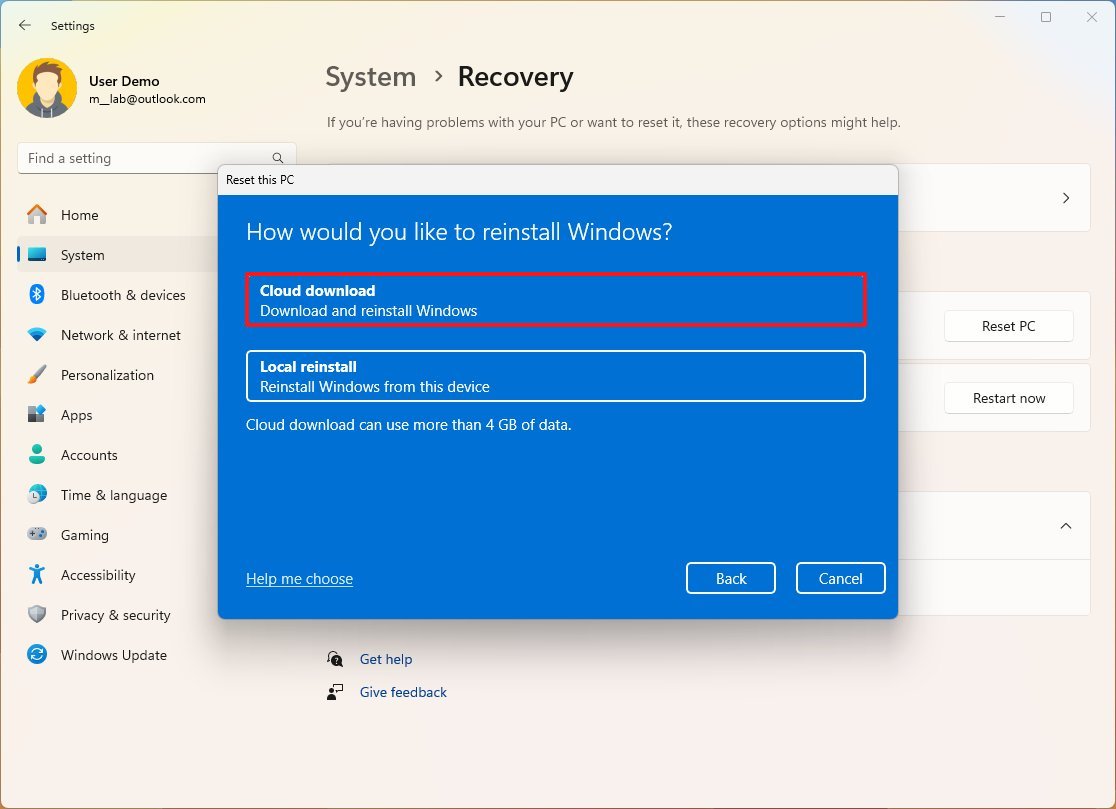
- Review the apps to reinstall after the reset to factory settings.
- Click the Next button.
- Click the Reset button.
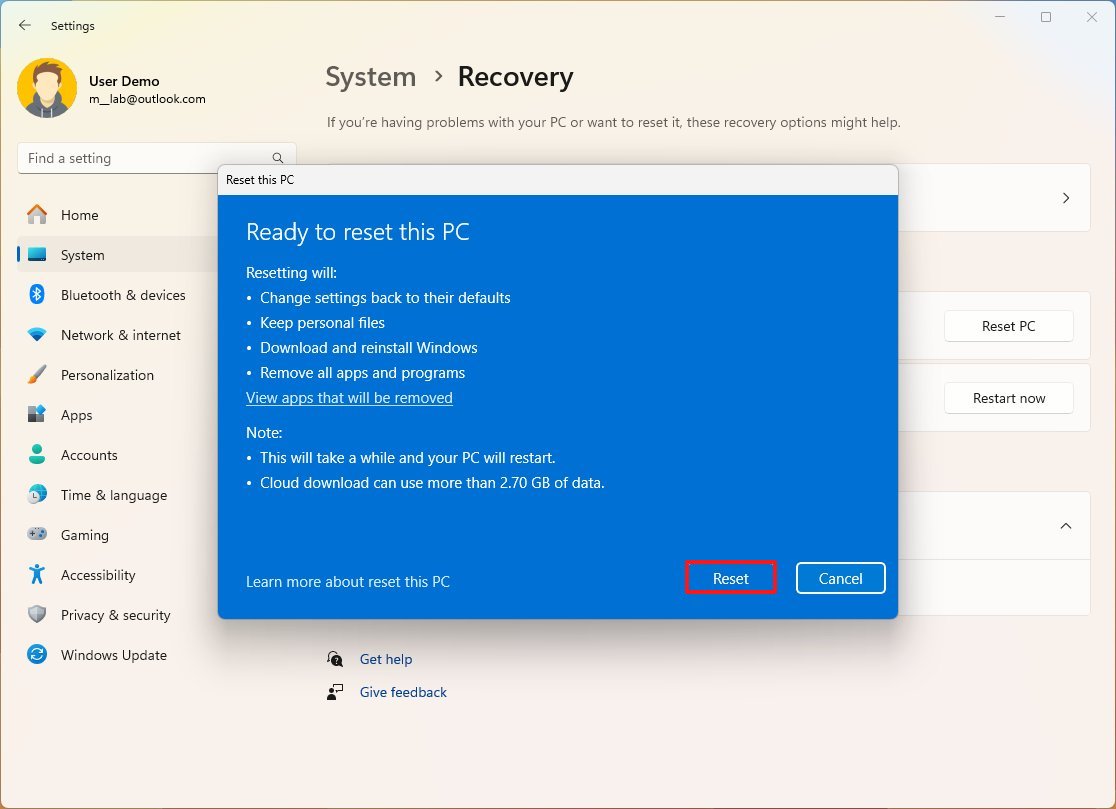
Once you complete the steps, the device will reset to the factory settings, preserving your files and restoring the performance levels.
16. Upgrade hard drive and memory (optional)
If you’re not seeing performance improvements after going through the recommendations, it might be time to upgrade the system drive and memory. You should also consider investing in a new computer if you have the system for three or four years.
Since most devices running Windows 11 already feature a Solid-State Drive (SSD), I won’t talk about how upgrading from a traditional hard disk drive (HDD) will make a difference. However, you could upgrade to a larger and higher-performance SSD or an NVMe drive if the system supports it, as this media type offers significant performance improvements over traditional SSDs.
If the computer doesn’t have enough memory, it will run slower than it should, especially if you work with memory-demanding applications.
You can always determine if the computer is running out of memory by launching and using the applications you usually use, and then open “Task Manager” (Ctrl + Shift + Esc), and from the “Performance” tab, check the memory usage.
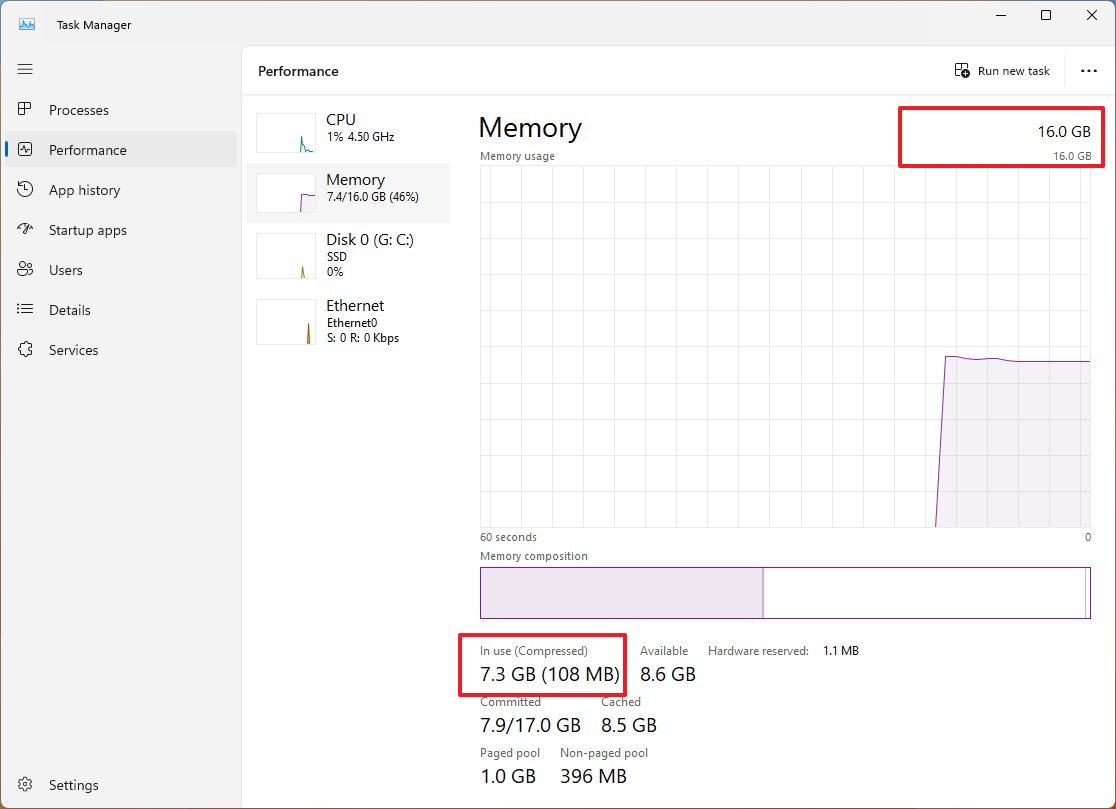
For example, check the total amount of memory in the top-right corner, and in the bottom-left corner, under “In use (Compressed),” you can find the total amount of memory currently in use.
If the total amount of “in use” memory is constantly high (around 80 percent), it’s time to upgrade.
Some extra tips
Some lesser tips that you can use to speed up the system performance include connecting your laptop to a power outlet when performing demanding tasks, especially gaming. Otherwise, the hardware is likely to start throttling as soon as the battery starts to drop.
Also, by default, Windows 11 switches to power saving mode when the device is running on battery, which limits the performance of the device.
I’m not including the defragment feature, since most devices running Windows 11 already use Solid State Drives.
More resources
For more helpful articles, coverage, and answers to common questions about Windows 10 and Windows 11, visit the following resources:


