Key Takeaways
- Steam’s built-in recording tool lets you capture gameplay for both Steam games and games from outside Steam, all without any watermarks or hidden fees.
- To use this feature, you’ll need to opt into the Steam Beta update. Then, you can set your recording preferences in the “Game Recording” settings.
- Once you’ve recorded gameplay, you can your video in the “Screenshots & Recordings” section.
The best screen recorders can be expensive, while free ones put an ugly watermark on your recordings. That’s where Steam’s built-in recorder comes in. It lets you record gameplay for both Steam games and games that aren’t on Steam.
How to Set Up Steam’s Recording Feature
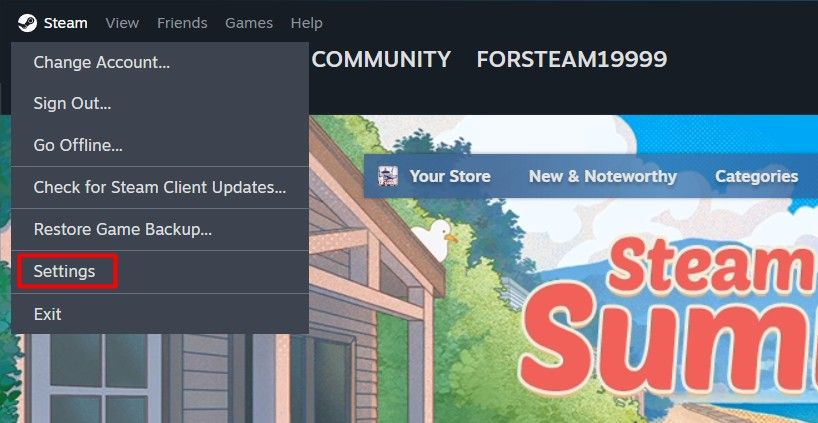
Steam’s gameplay recording feature is currently in beta. Before you start using it, you will need to opt in and turn it on. To do this, connect your device to the internet and open the Steam client. Then, click the “Steam” option in the top-left corner and choose “Settings.”
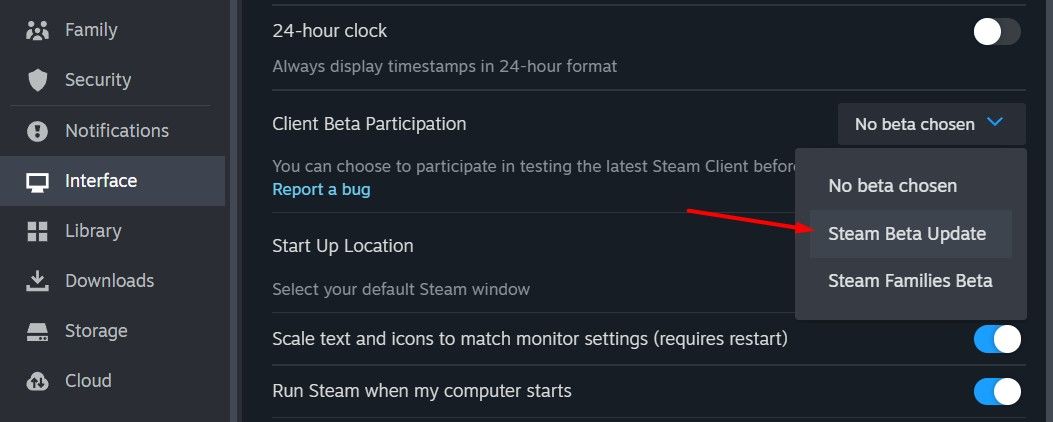
In the Steam Settings window, select Interface > Steam Beta Update from the Client Beta Participation drop-down menu.
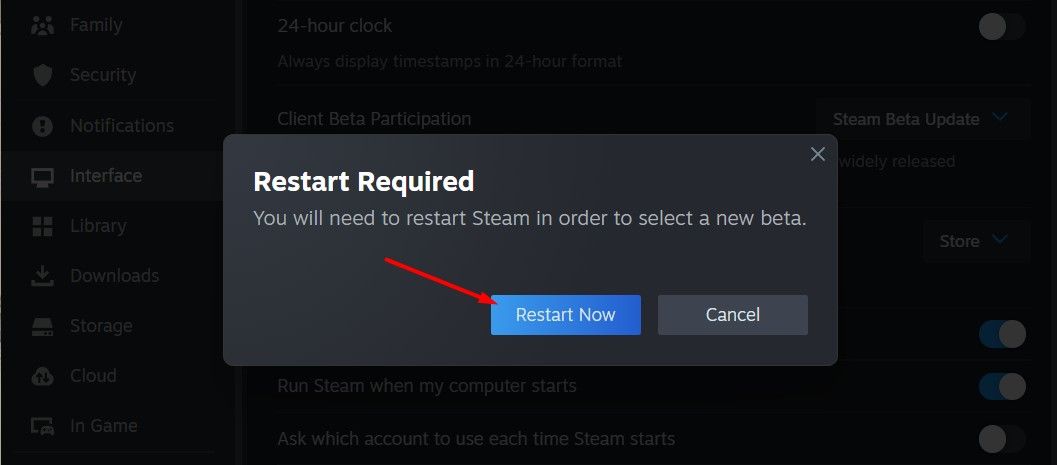
After that, click the “Restart Now” option in the pop-up window that appears. The Steam client will download an update and restart automatically. Once it restarts, you’ll be all set to use the Steam recording feature.
Use Steam’s Recording Feature to Record Steam Games
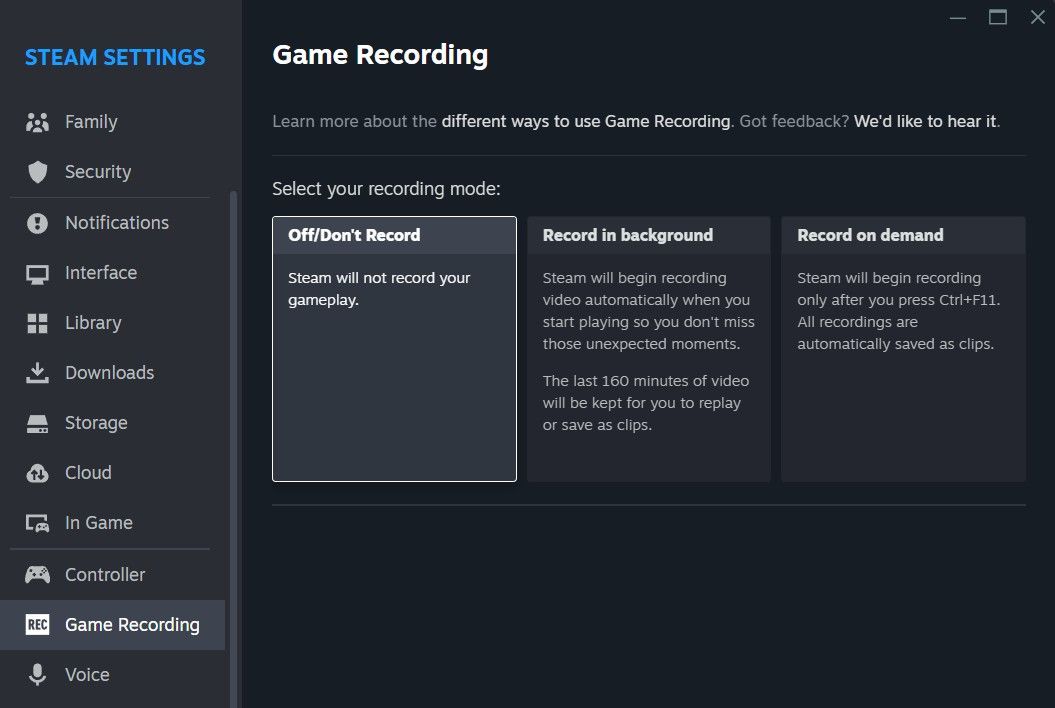
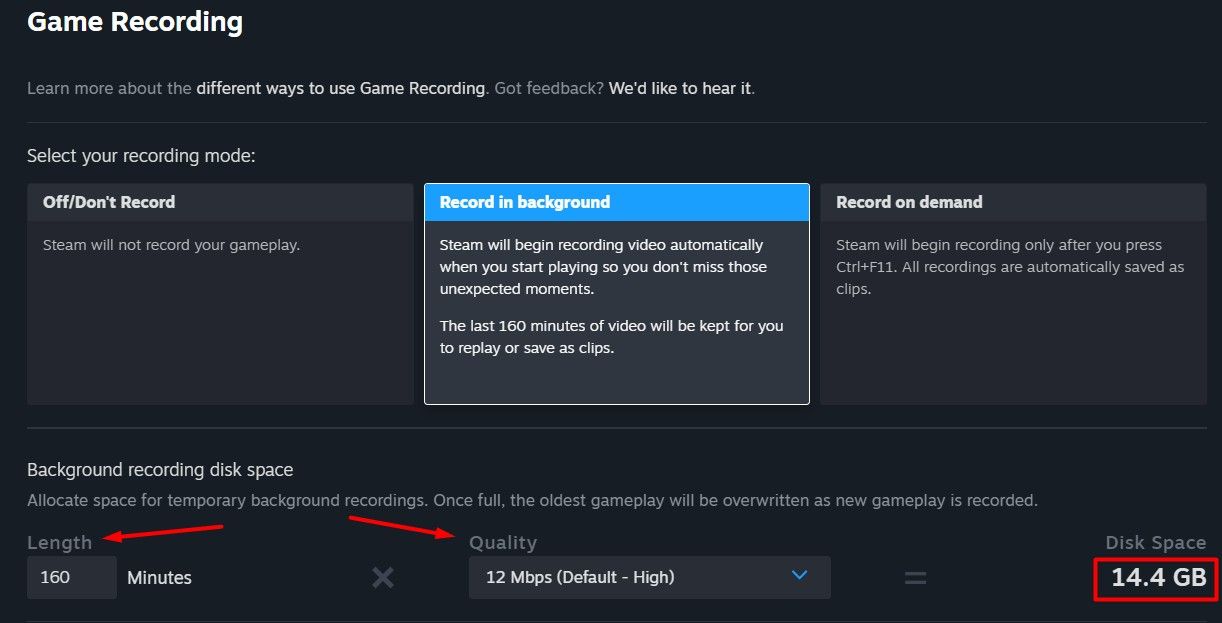
It’s easy to record your Steam games using the built-in recording feature. First, open the Steam client and click “Steam” in the top-left corner. Choose “Settings” from the menu, then select “Game Recording” from the left sidebar. On the right side, you’ll see three options — “Off/Don’t Record,” “Record in Background,” and “Record on Demand.”
When you choose the “Off/Don’t Record” option, Steam won’t record anything on your screen. However, since you want to record games, you’ll be using “Record in Background” or the “Record on Demand” option.
The “Record in Background” option will automatically start recording Steam games as soon as you launch them and stop when you close them. You have manual control over how long you want Steam to record your gameplay and its quality.
Based on the length and quality you choose, Steam will estimate how much disk space the recording will require. Once that disk space is full, Steam will automatically overwrite the oldest gameplay recording when you start recording new ones.
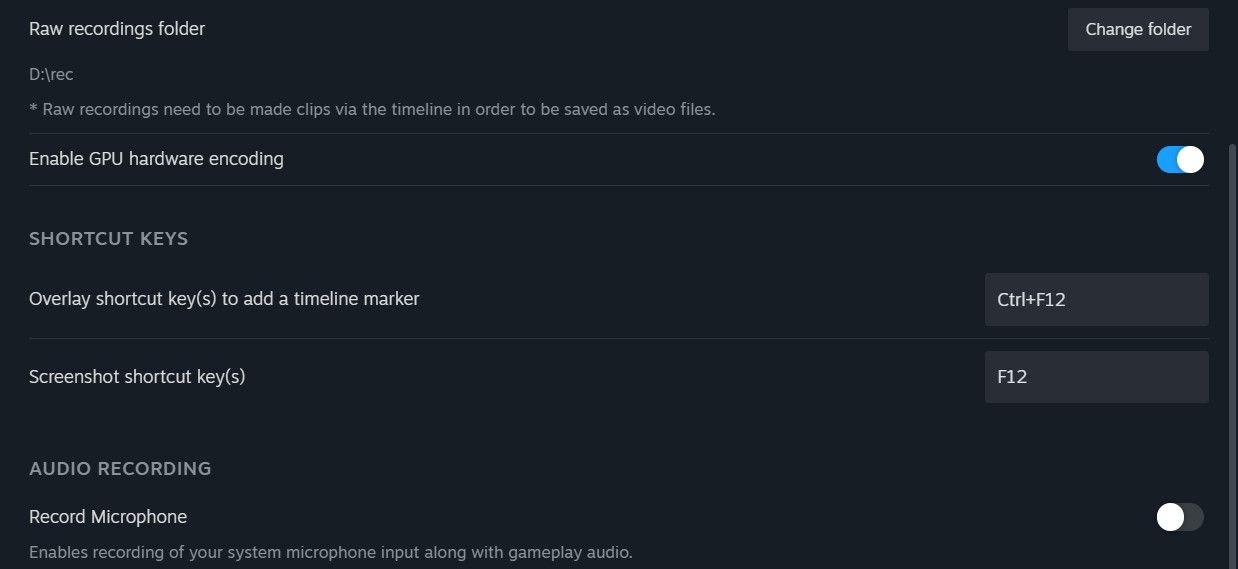
You can also add a timeline marker, record audio, and even take a screenshot during the recording using the shortcuts you’ve assigned for these actions.
Additionally, the “Record Microphone” option lets you record your system microphone’s sound along with the game audio.
The next recording option is “Record on Demand.” You should choose this option if you want to manually control when to start and pause the gameplay recording. By default, you can press the Ctrl+F11 key combination on your Windows computer to start and pause the recording. You can change this and other action key combinations as per your preference.
Use the Steam Recording Feature to Record Non-Steam Games
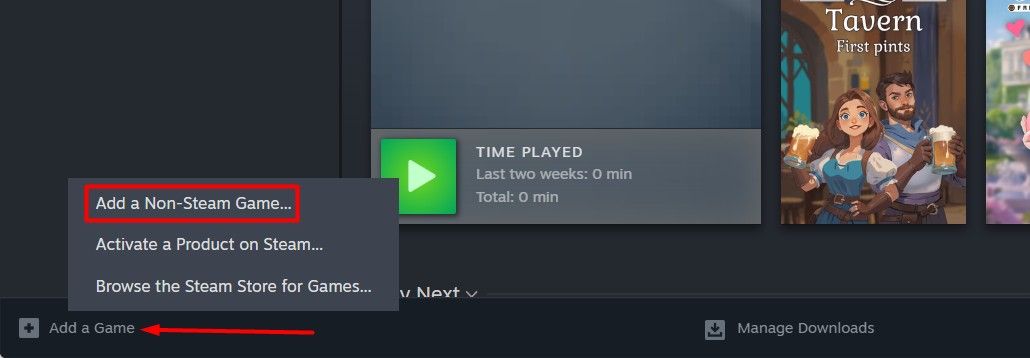
Perhaps the coolest part about Steam’s gameplay recording feature is that it works for non-Steam games, too. To set it up, open the Steam client and click the “Library” option in the top bar. In the bottom-left corner, you’ll see “Add a Game.” Click that and choose “Add a Non-Steam Game.”
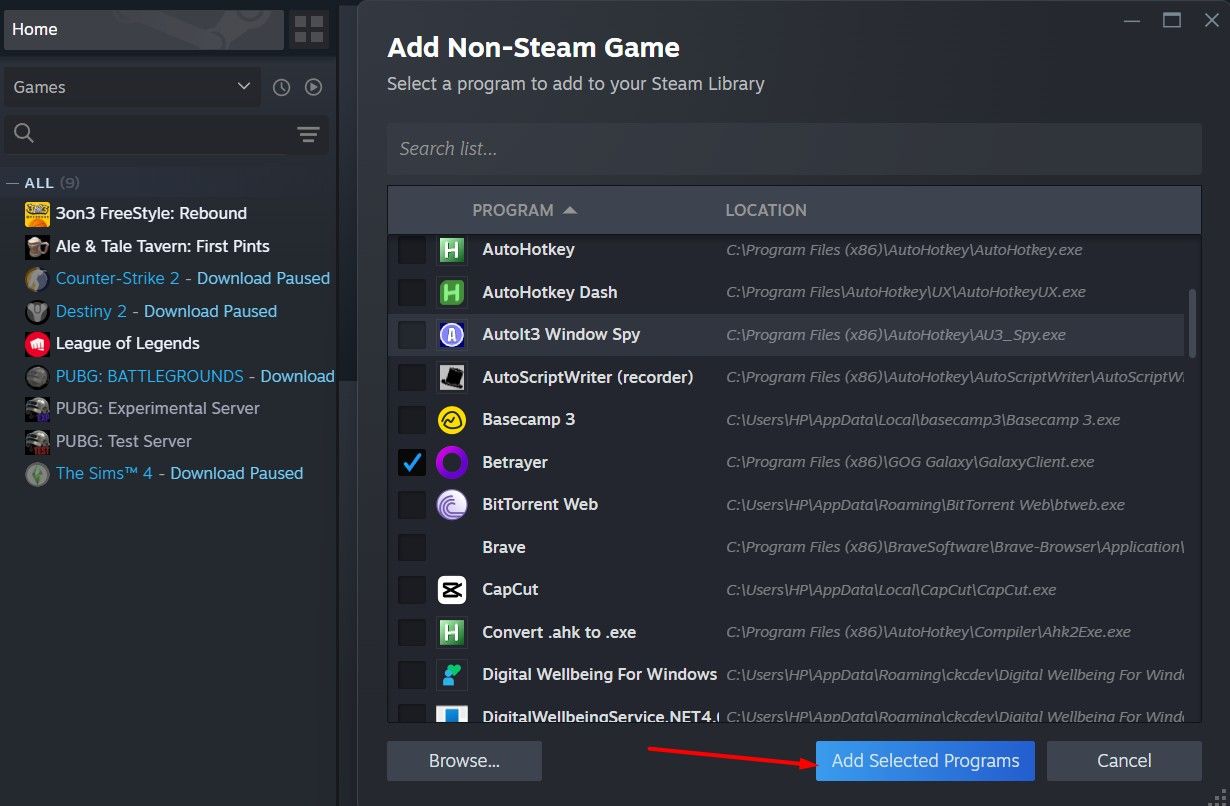
Select the game you want to record. If it’s not on the list, click “Browse,” navigate to the game’s installation folder, and choose the game’s executable file. Finally, click “Add Selected Programs.”
Now that the game is added to Steam, simply launch it from your Steam Library, and the Steam recording feature will automatically start capturing your gameplay.
For example, if you added Rocket League downloaded through the Epic Games launcher, click on its icon in your Steam Library to launch it. The Epic Games launcher screen might appear for a short period before the game starts, but the good thing is that Steam will only record Rocket League itself, not the launcher screen.
Where to Find Your Recorded Gameplay
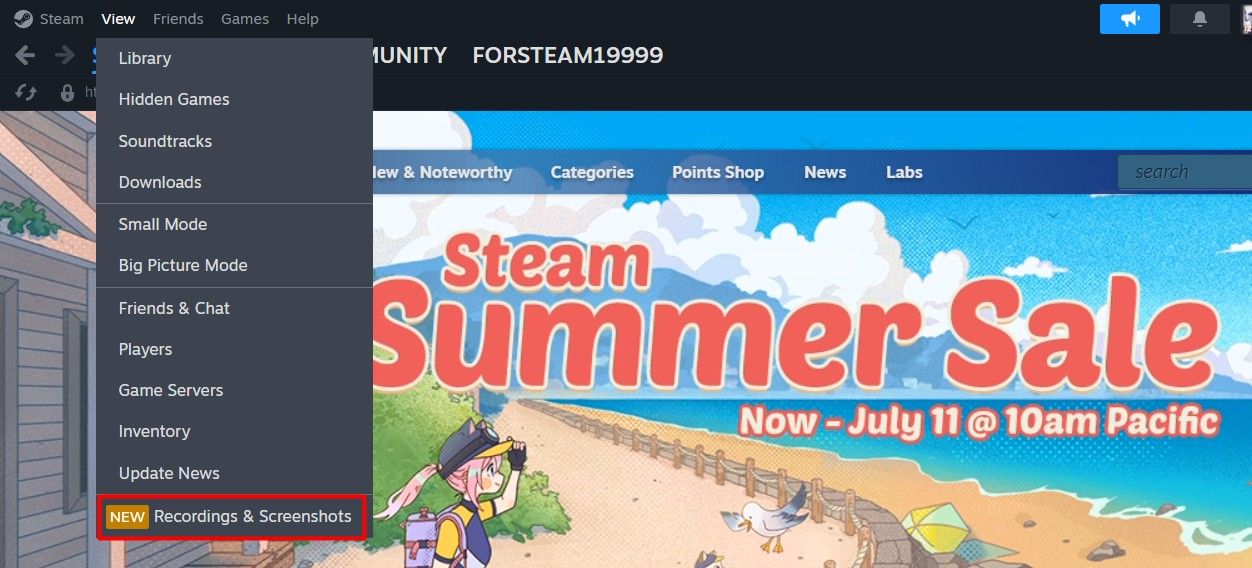
After you finish recording gameplay, you can access it by clicking “View” in the top bar of the Steam client and selecting “Screenshots & Recordings.”
This window will display all your captured screenshots and gameplay recordings made with Steam’s recording feature. When you play a recording, the window will show markers on the timeline for any screenshots you took or markers you added during the recording.
To create a clip from your recording, simply open it and navigate to the timeline marker you created (if any).
If you didn’t create markers, go to the desired starting point for your clip and click the “Clip” option in the bottom right corner. Next, use the clip slider to choose the ending point of your clip.
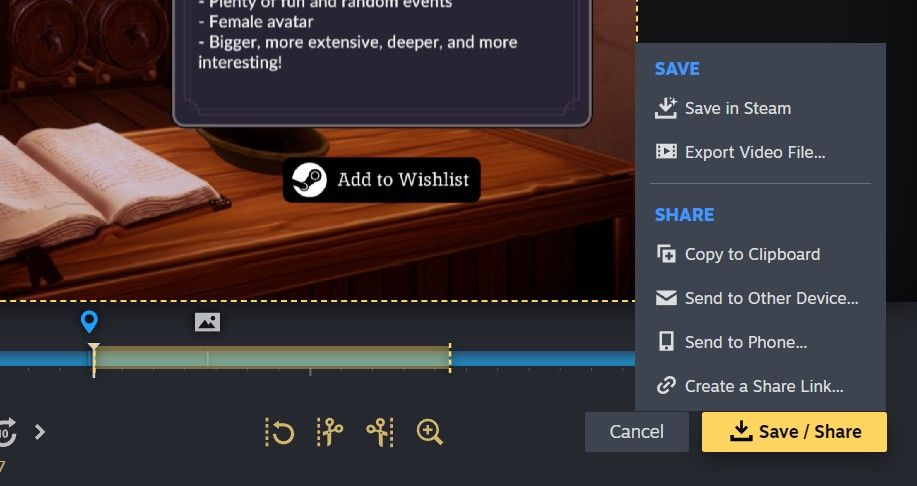
Once you’re happy, click the “Save/Share” option. This will give you different ways to use the clip you just created. You can also choose “Export Video File” option to save the clip directly to your computer.
One weird thing that I noticed is that Steam doesn’t currently allow you to share the entire recording directly. You’ll need to create a clip from the recording first before sharing it.
So that’s how you can use the Steam recording feature to capture gameplay without having to pay for additional software. Easy, right? While the recording feature works great, the only thing I didn’t like is that you have to restart the Steam client after every change you make to the recording settings.
For example, even after simply changing the location where you want to save your gameplay recordings, you’re prompted to restart Steam. I didn’t understand the reason behind this, but the feature is still in beta so it’s likely Steam will remove this requirement in a future update. Other than that, Steam recording is an impressive feature, and you should definitely give it a try!
You can also record gameplay clips on an Xbox and PlayStation 5. If you want to record extended gameplay on a console, you’ll need a capture card. Check out our top capture card recommendations for some ideas.


