Styles are to Microsoft Word what gridlines are to Microsoft Excel—you can’t have a fully functioning file without having them. They save time, help you to cut out bad Microsoft Word habits, and secure your document’s structure. Let’s look into what they are, what they do, and how to use them.
Why Use Styles?
Whether you apply them to headings, captions, or the main body of your document, styles define how your text is formatted, spaced, and positioned. Using styles has several benefits:
- They’re a time-saver—Instead of manually reformatting your headings and paragraphs, assigning styles to your work means that you can repeat layouts with just a single click.
- They aid consistency—Not only does using styles mean that your text layout is consistent, but you can change the formatting of large volumes of your work at the same time.
- Certain styles have quirky benefits—For example, text assigned to a heading style automatically stays next to the corresponding text and can be used in tables of contents.
The default style is Normal, which is used for the main body of a Word document. Any text that contains formatting that differs from the Normal style should have its own style name.
Before You Start
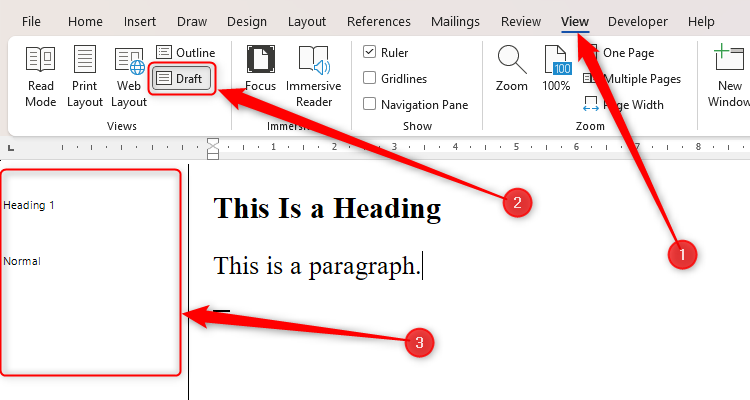
While you can view a paragraph’s style by clicking any word within that section and seeing which style is selected in the Style Gallery in the Home tab, a much easier way to see them in action is to use Word’s Draft View. Open the “View” tab on the ribbon, and click “Draft.” You will then see the Style Area Pane on the left of your document.
Once you’ve finished organizing your styles, click “Print Layout” to return to a more familiar view.
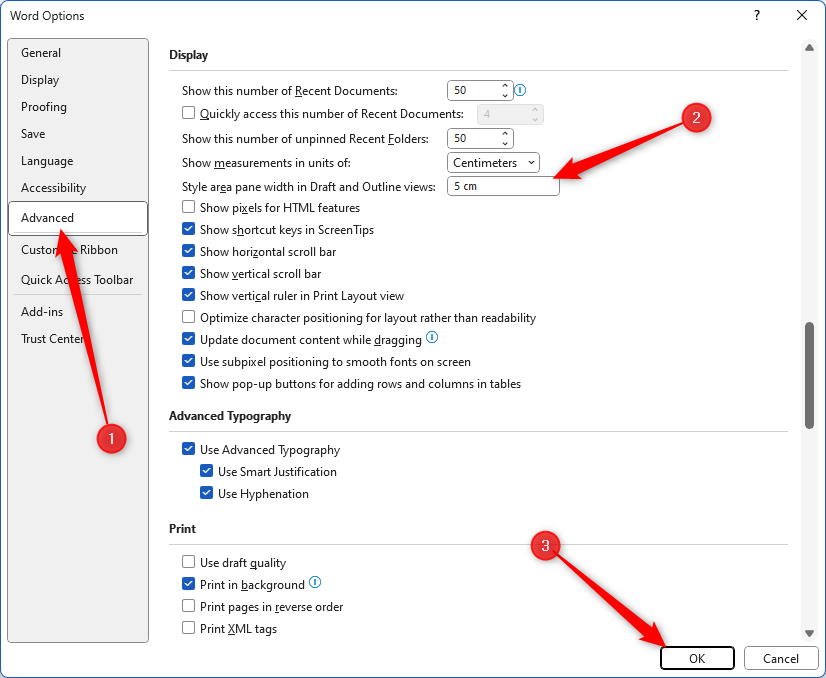
If you still can’t see the Style Area Pane, click File > Options to launch the Word Options dialog box, and click “Advanced” in the left-hand-side menu. Then, scroll down to find the Display options, set the Style Area Pane Width to 5 cm or 2 in, and click “OK.”
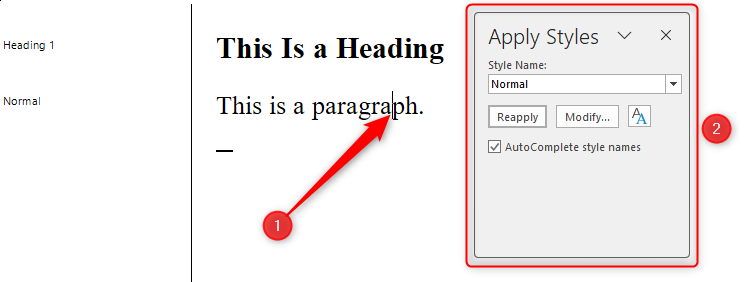
Styles are set to paragraphs. Each time you press Enter, you create a new paragraph, so this is the opportunity to set a new style or continue using the same one. To amend a style, you don’t need to select the whole paragraph—simply place your cursor anywhere within the paragraph, and press Ctrl+Shift+S. This will launch the Apply Styles dialog box.
When working with styles and paragraphs, it’s always advisable to display paragraph markers. Click “Show/Hide” (¶) in the Paragraph group of the Home tab to do this.
View all Styles in Word
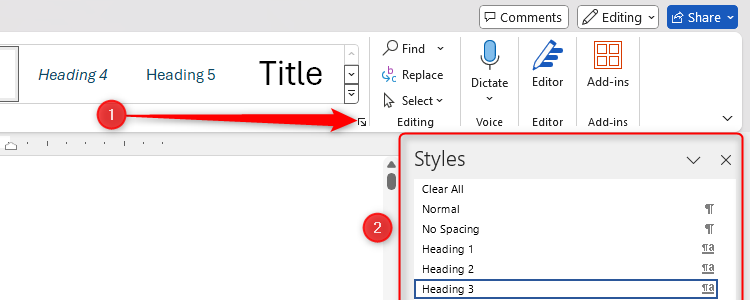
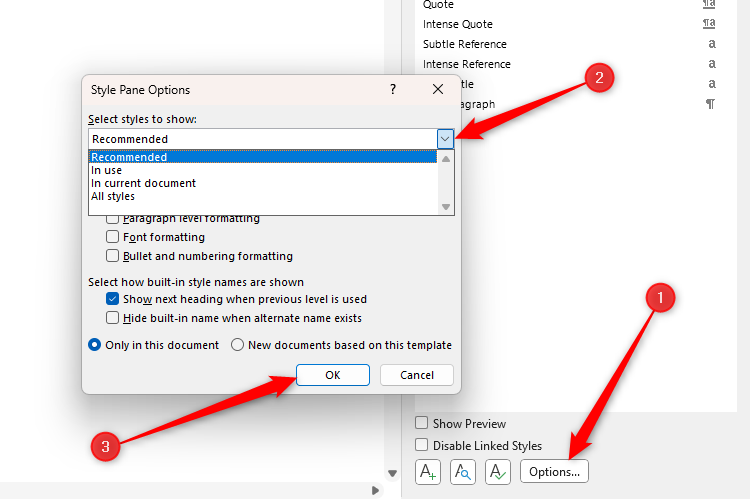
The Style Gallery in the Home tab is intended to give you quick access to the styles you use more frequently. However, to see more, click the icon in the bottom-right corner of the Styles Gallery or, if you have enough fingers, press Ctrl+Alt+Shift+S—this will launch the Style Pane.
Next, click “Options” to launch the Style Pane Options dialog box, where you can choose from the “Select Styles To Show” options to define what you see in the Style Pane. Clicking “All Styles” will bring up all the default options you can use. Click “OK” when you’ve decided what you want to display.
Right-clicking a style in the Style Pane will give you the option to add or remove it from the Style Gallery.
Modify a Style for Your Purpose
Many people are put off by how the preset styles appear in the Style Gallery, but they’re easy to amend to suit your needs.
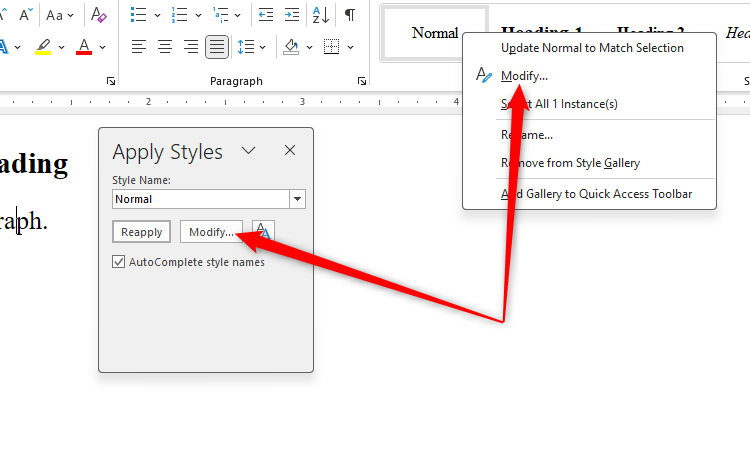
To modify a style, either place your cursor within the text assigned to that particular style and press Ctrl+Shift+S, or right-click a style in the Style Gallery in the Home tab on the ribbon. Whichever method you use, you’ll then have the option to click “Modify.”
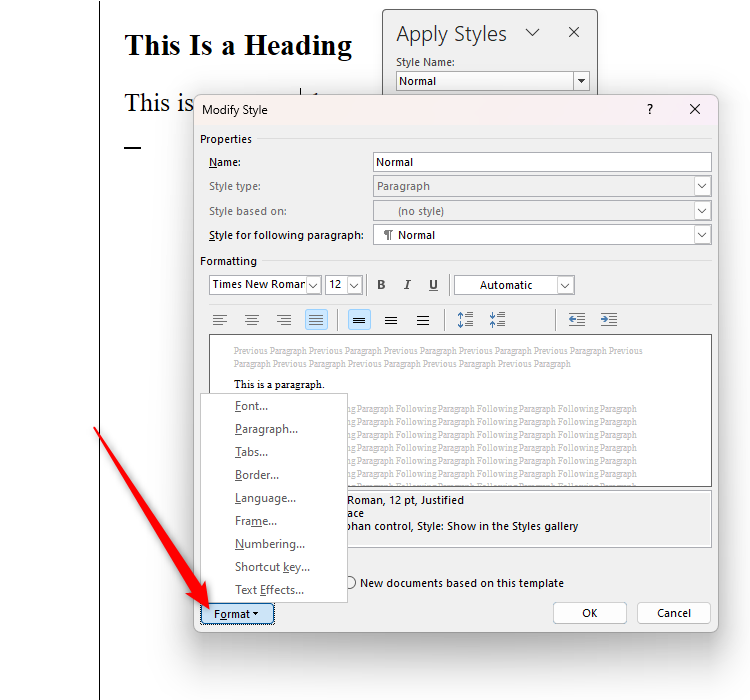
When the Modify Style dialog box opens, click “Format” to see the different elements of this style you can modify.
- Font—Here, you can change the font typeface, size, and color, as well as other formatting options, such as underlining, bold, and all caps. For more options—such as font character spacing—click the “Advanced” tab.
- Paragraph—This option is the place to go if you want to amend the spacing between lines and paragraphs, or add a consistent indentation to this style. You can also go to the “Lines And Page Breaks” tab to tell Word to keep lines in this style together or keep text in this style directly next to the following paragraph.
- Tabs—Linked to the Paragraph options, Tabs lets you add tab stops to the ruler whenever you use the chosen style.
- Border—You can force Word to add borders or shading anytime you use the selected style.
- Language—This is a great option if you’re typing in more than one language in a document. Whenever you use this style, Microsoft Editor will automatically switch to check for spelling and punctuation errors in the specified language.
- Frame—Here, you can add invisible borders to your style so that the text fits into a smaller space.
- Numbering—If a certain style repeatedly contains lists within your document, you can decide on the bullet and numbering formatting using the Numbering settings.
- Shortcut Key—If you find yourself becoming tired of clicking in the Style Gallery, you can assign a shortcut key to a style to quickly apply it to a given paragraph.
- Text Effects—For a more artistic style, you can adjust the effects applied to the text. However, I’d recommend that you don’t do this, as it can significantly reduce the credibility and formality of your work.
Remember, when you click “OK,” all paragraphs assigned to this style will adjust according to any changes you make.
Press Enter at the end of any paragraph to move to the next paragraph and revert to the Normal style. However, don’t press Enter repeatedly to create a larger gap between paragraphs—instead, amend the Space After value in the Paragraph section of the Modify Style dialog box.
Create a New Style
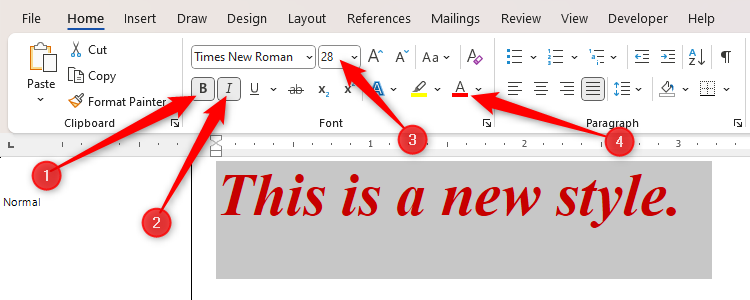
As well as modifying and using existing styles in Word, you can create your own. The best way to do this is to first type and format text manually using the Font and Paragraph groups in the Home tab on the ribbon.
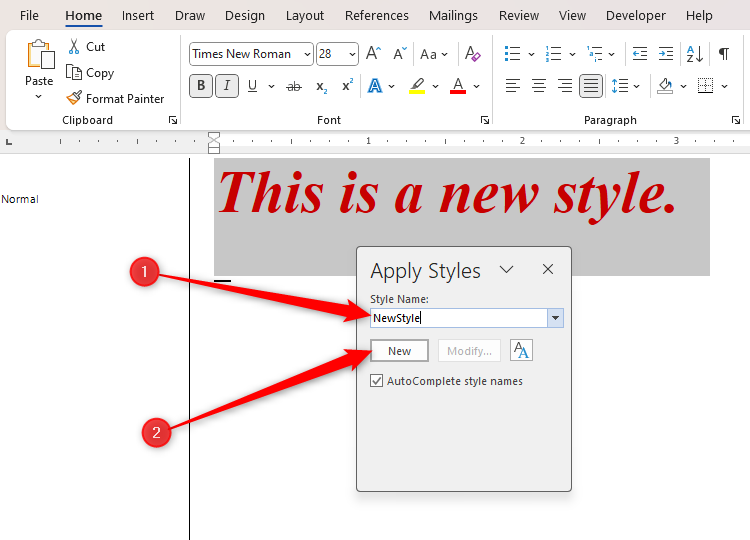
In this example, after selecting the whole paragraph, I clicked “Bold” and “Italics,” as well as changing the font size to 28 pt and the font color to red. I also clicked the Paragraph dialog box launcher and changed the Space After to 24 pt.
You’ll see that the Style Area Pane still displays this newly formatted font as being in the Normal style. Don’t worry—as you’re applying formatting manually here, it won’t affect existing styles in your document.
Now, with your cursor anywhere within that new paragraph, press Ctrl+Alt+S, name your new style, and click “New.”
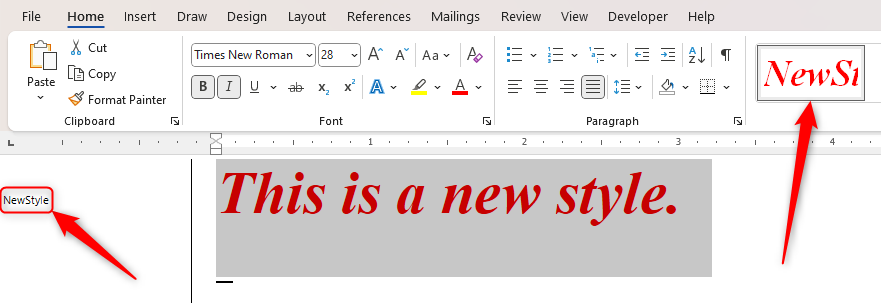
You will then see the Style Area Pane and Style Gallery reflect the addition of this new style.
Use Existing Text to Define a Style
You can use a similar method to apply manual formatting to an existing style name or copy an existing style’s properties to another style name.
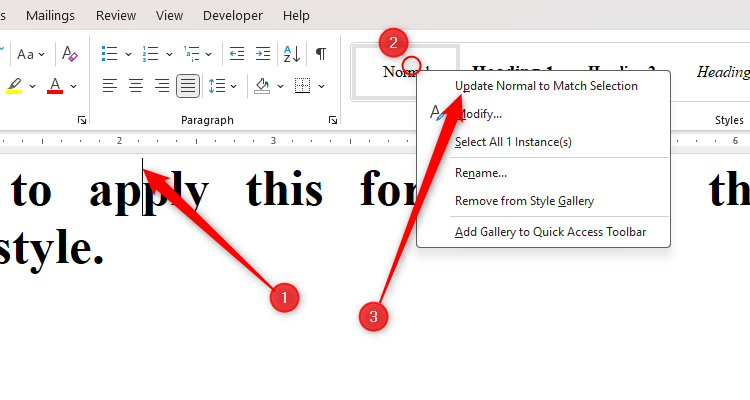
Place your cursor within some text you have formatted manually, and head to the Style Gallery in the Home tab on the ribbon. There, right-click the style you want to modify to match this text, and click “Update [Style Name] To Match Selection.”
You will then see the Style Gallery update to display the new formatting for that style. You might also see the other styles change within the Style Gallery, as Microsoft Word wants to help you keep your font sizes consistent.
Power User Tips
You can easily get by with Word’s styles using the tips in the previous sections of this article. However, knowing the following will help you to use and implement Word’s styles even more effectively:
- You can copy styles between Word documents if you’re working on two related pieces.
- Once you have modified the styles or created your own to suit your preferences or match your client’s style guide, save your Word document as a template, so that you don’t have to recreate them each time.
- While styles are usually reserved for differentiating between different paragraph types—such as body text or headings—you can add a style separator to use more than one style within a single paragraph.
Now that you know that it’s better to use styles than formatting paragraphs and headings individually, check out some other tips to avoid making mistakes in Word that would inevitably lead to issues down the line.


