Imagine transforming your humble Raspberry Pi into a sophisticated, high-fidelity music server. Volumio makes this dream a reality, offering a seamless blend of power, flexibility, and affordability. You can finally get your music out of subscription cloud services.
What is Volumio?
Volumio is a free, open-source music player designed to unify all your music in one convenient place. In addition to offering its range of streaming boxes for purchase, Volumio also supports a variety of third-party devices.
Their lineup includes official streaming boxes like the Volumio Motivo, Primo, and Rivo, among others. Alternatively, you can also create your own custom music player using a Raspberry Pi. For more information on the Volumio project, visit their official website.
Why Run Volumio on Raspberry Pi?
The Volumio project is led by audiophiles and music enthusiasts who strive to ensure that Volumio and Volumio OS deliver the best sound quality possible. While their devices offer superior sound compared to a Raspberry Pi, it’s hard to beat the Pi’s affordability.
Some Volumio streaming boxes boast impressive hardware but come with a hefty price tag of up to USD 1,099. In contrast, with a Raspberry Pi and a good USB soundcard, you can build a decent music box running Volumio OS for a fraction of the cost, between $35-USD 60, depending on the Pi model you choose.
Setting Up Volumio on Raspberry Pi
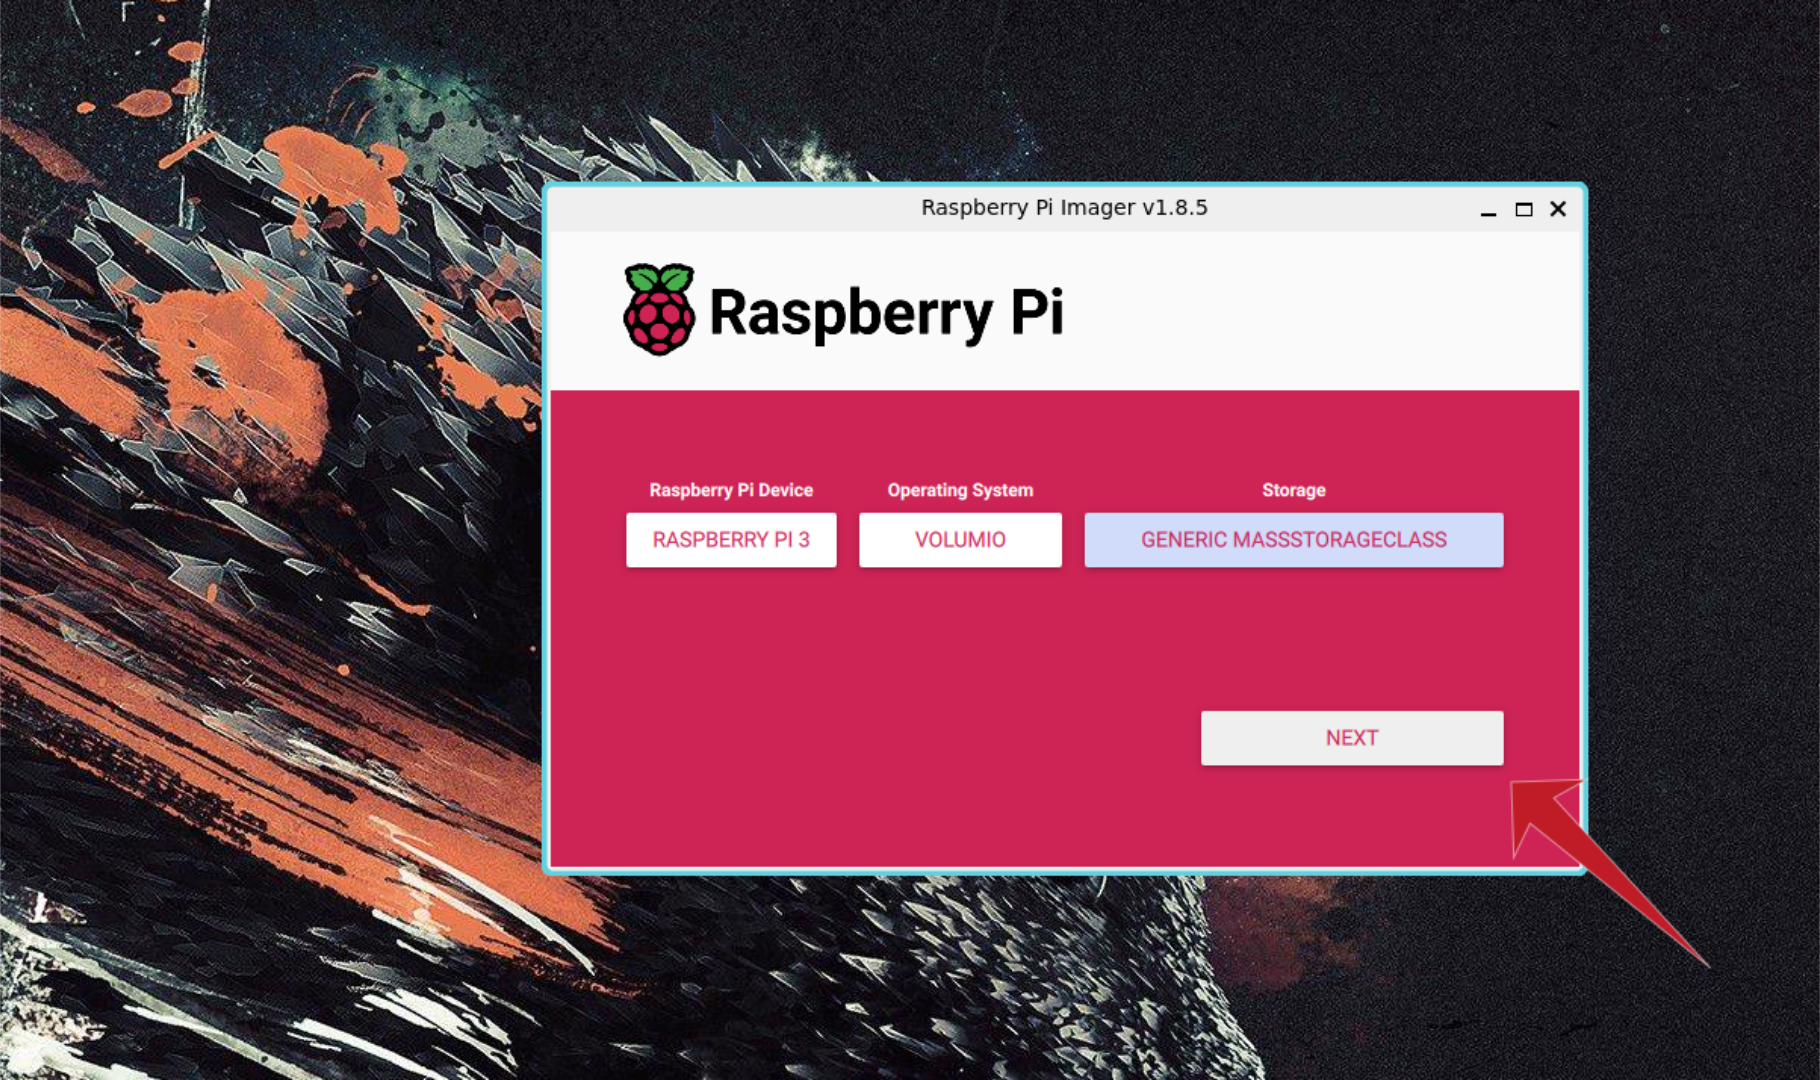
To set up Volumio on your Raspberry Pi, start by creating the SD card image. First, download and install the latest version of the Raspberry Pi Imager tool. Once installed, insert the SD card and SD card reader and launch the tool.
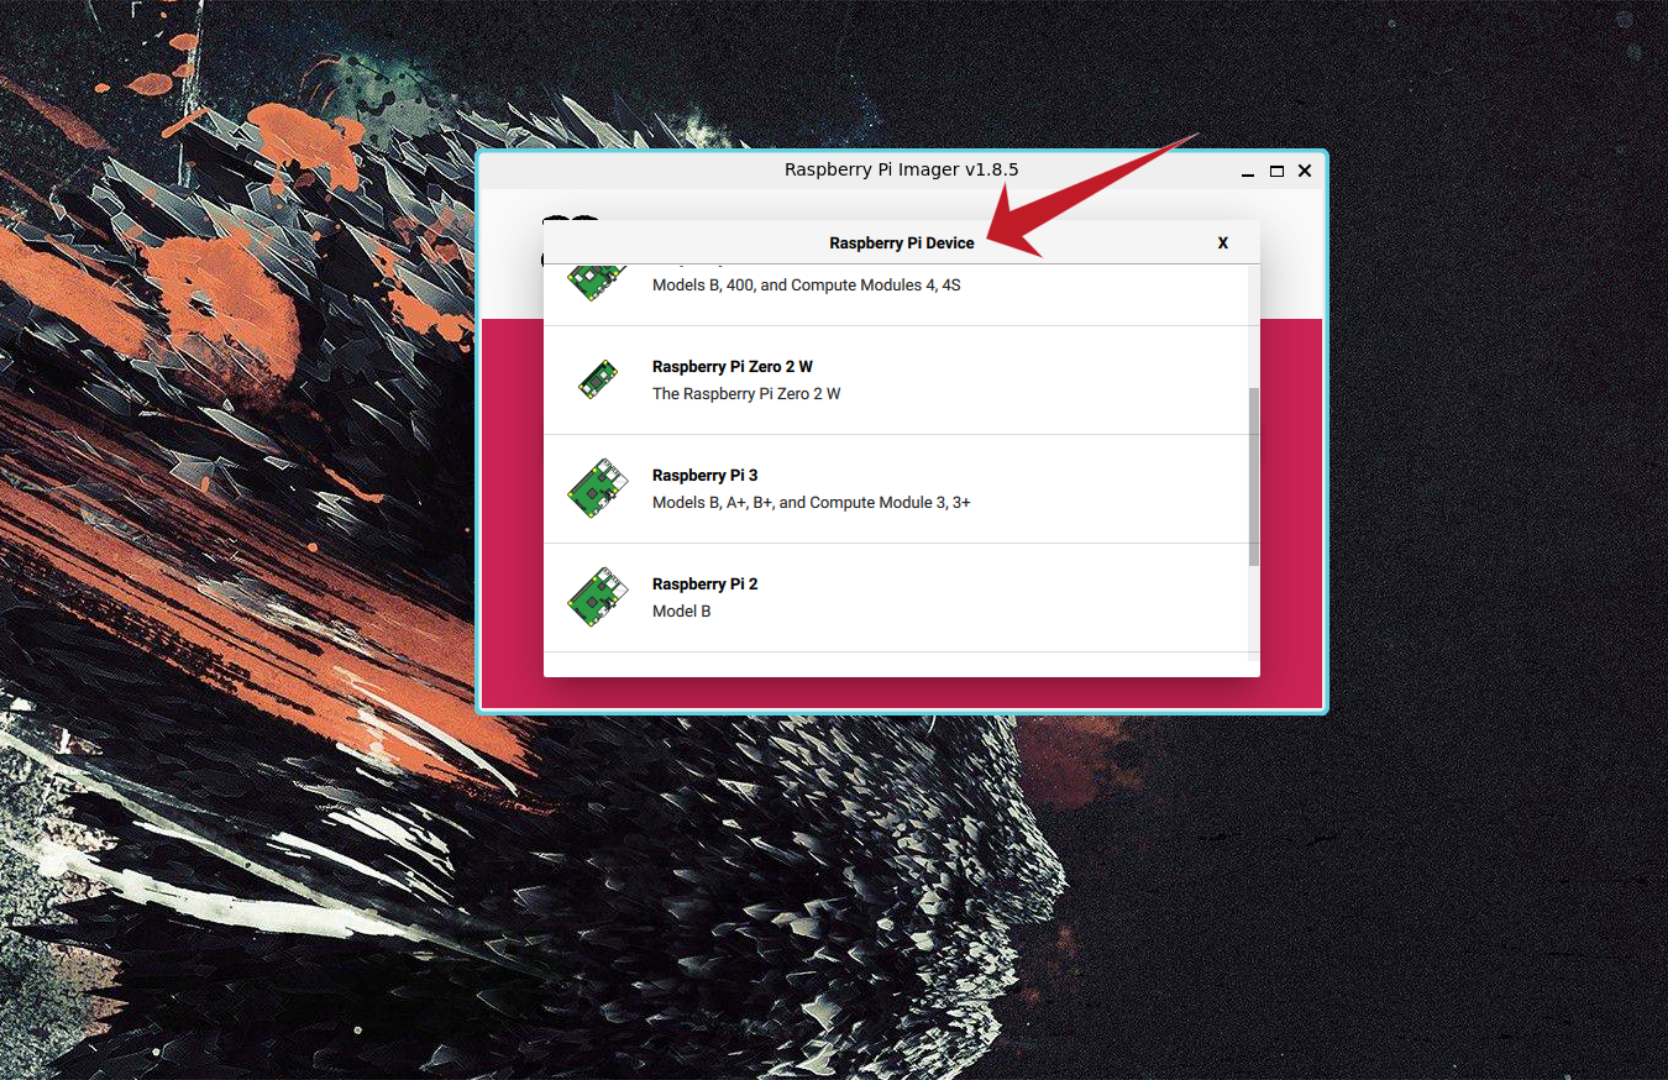
In the RPi Imager, navigate to the “Raspberry Pi Device” section and select it. Volumio officially supports the Raspberry Pi 2, 3, 4, and 5 models. Choose your device from the menu to proceed.
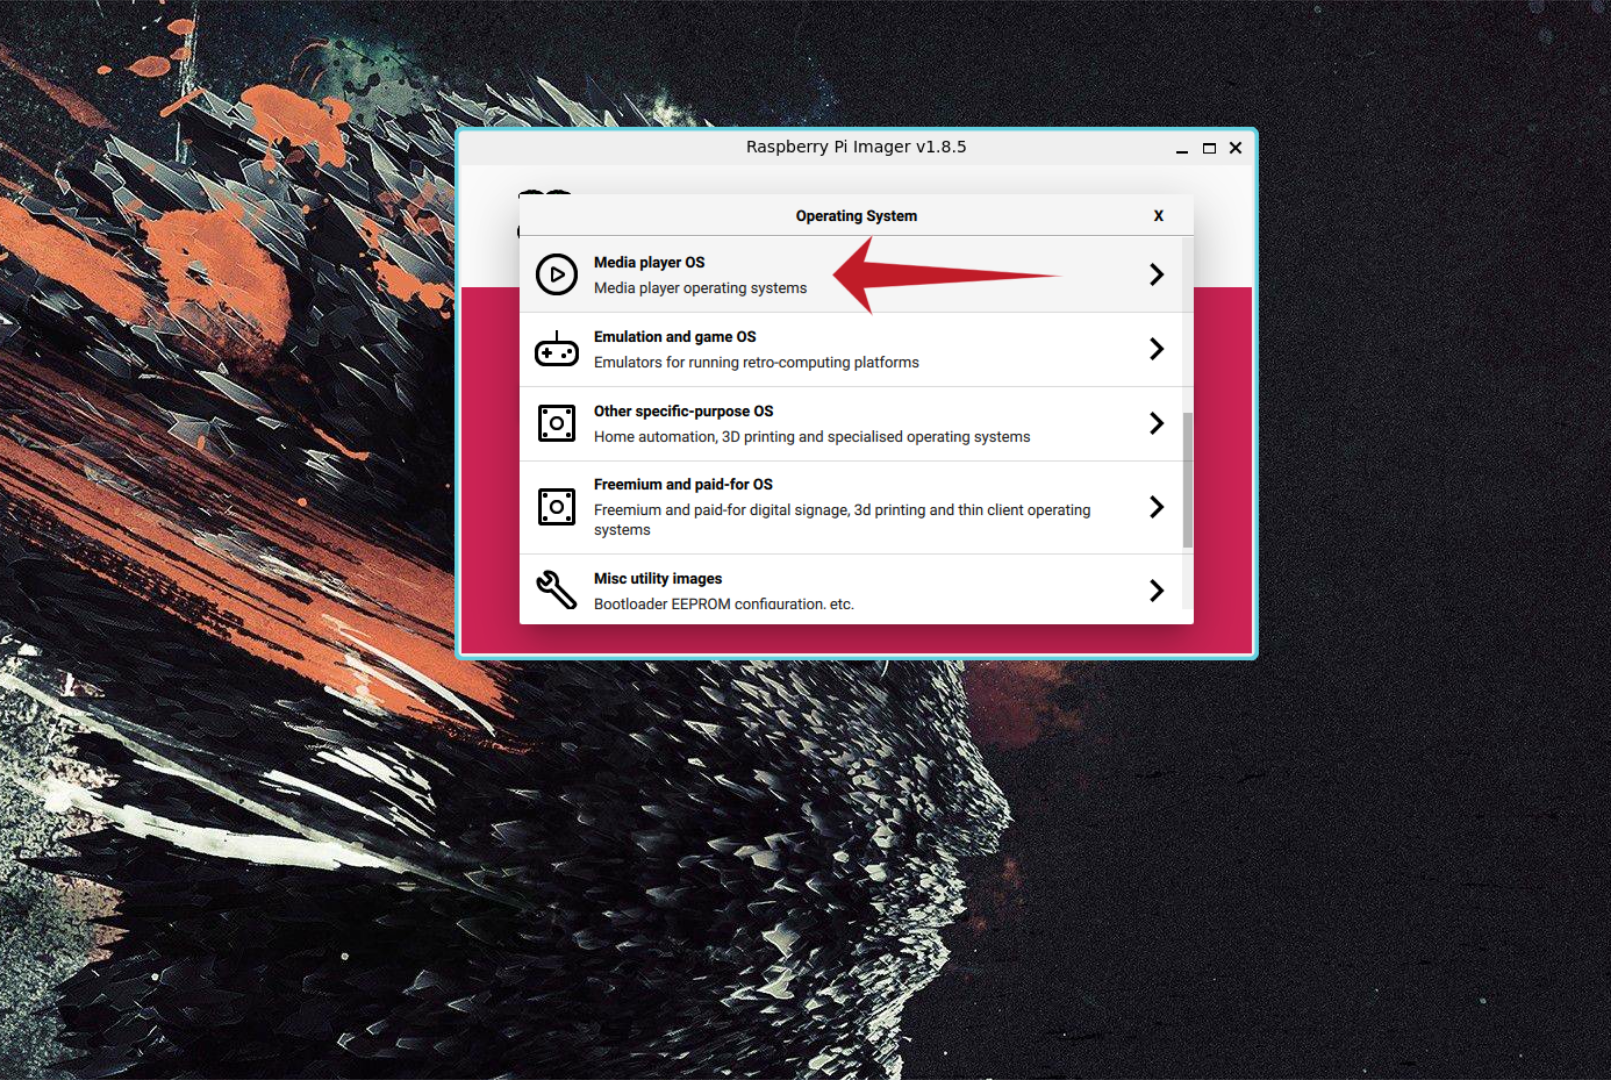
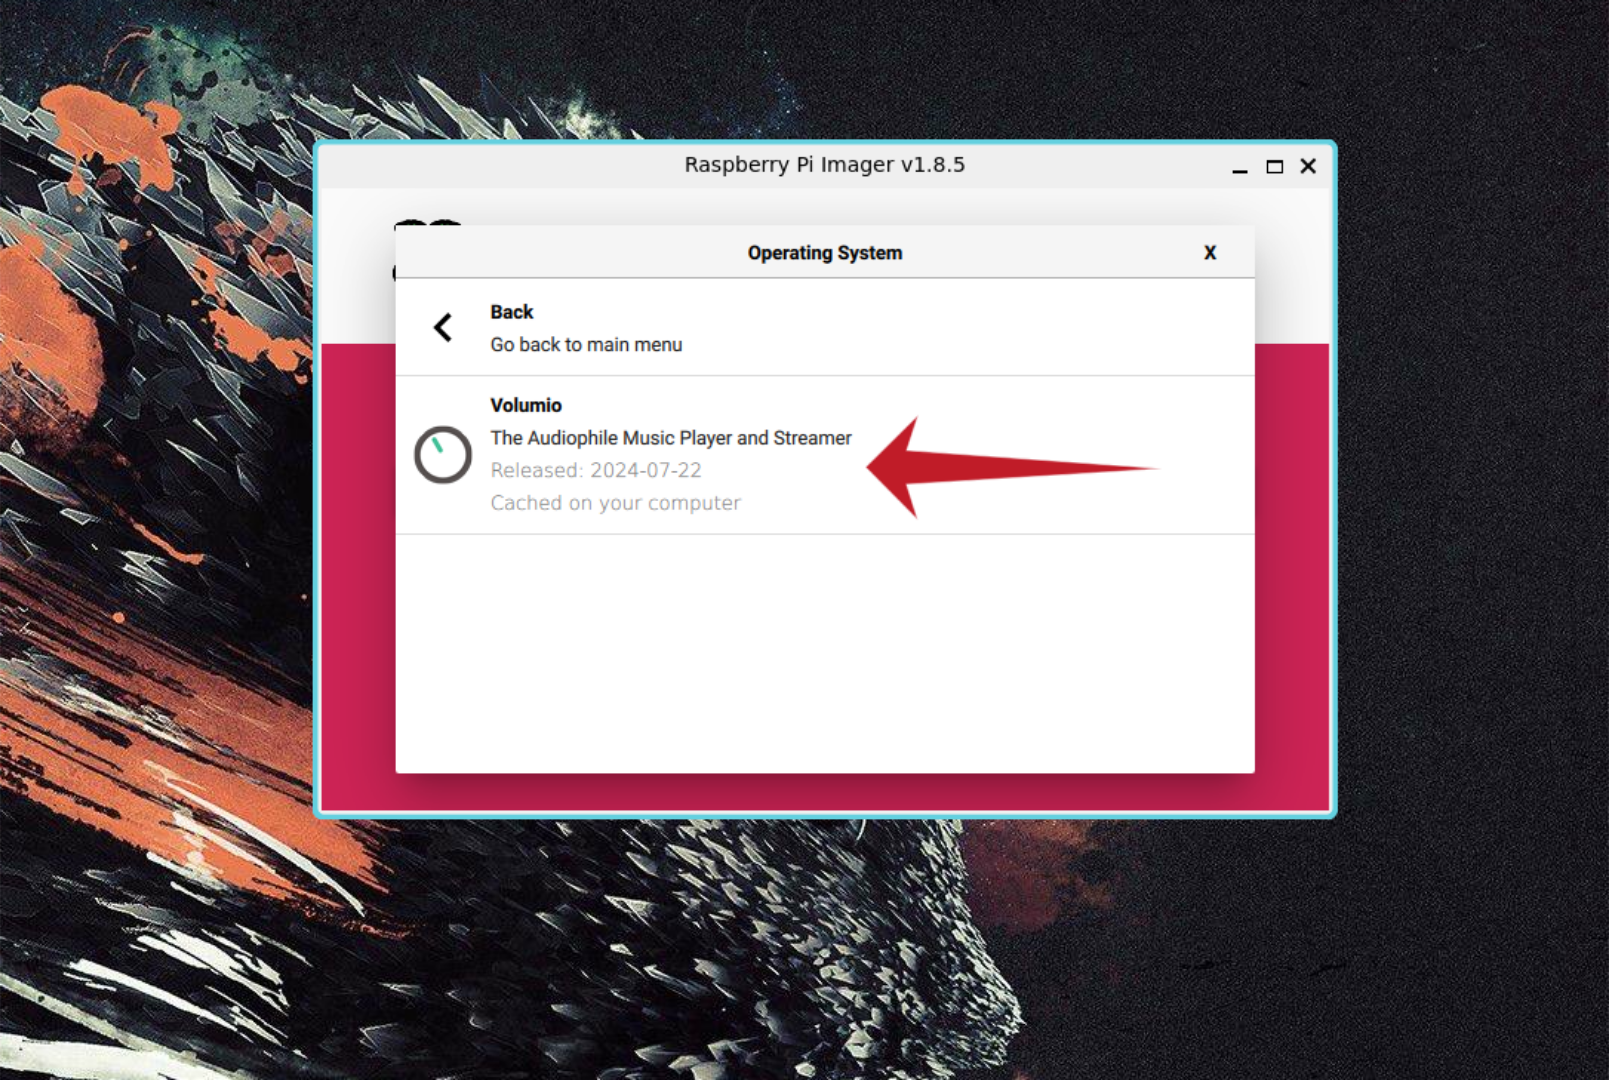
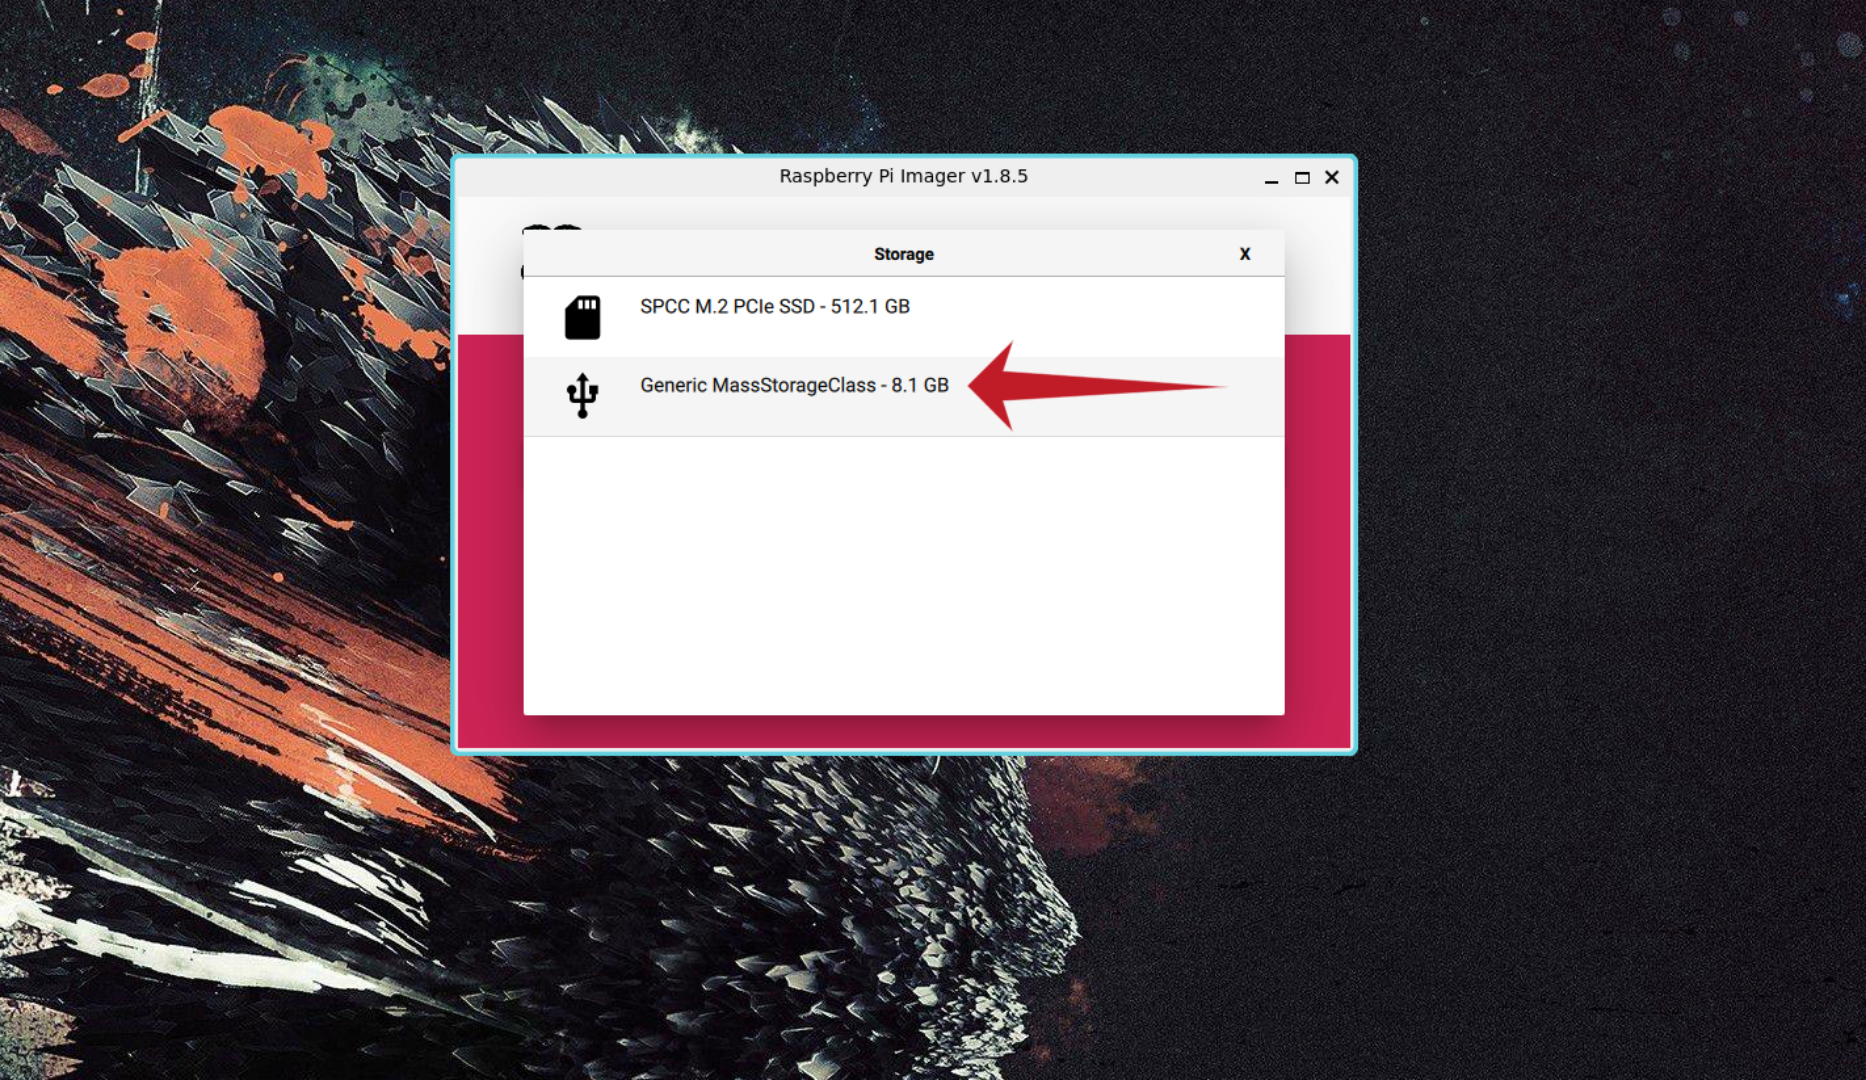
Next, move to the “Operating System” section, select “Media Player OS,” and choose “Volumio” from the options. Then, click the “Choose Storage” button and select your SD card. Click “Next” to create your Volumio SD card for the Raspberry Pi.
When you click “Next,” the RPi Imager tool will prompt you to apply OS customization settings. If you prefer to use the default settings, select “No.” If you want to customize Volumio, select the “Edit Settings” button and adjust the settings to your liking.
Once you’ve applied any customization settings (or chosen not to), the RPi Imager tool will begin creating your SD card. Please be patient, as this process may take some time to complete. When the process is finished, eject the SD card and insert it into the Raspberry Pi, along with your peripherals.
Configuring Volumio
Once Volumio has booted, connect the Raspberry Pi to the internet by plugging in an Ethernet cable. If Ethernet is unavailable, an additional step is required to access your Volumio box initially.
Without Ethernet, Volumio on the Raspberry Pi will automatically create a Wi-Fi network with the SSID “Volumio”. To begin configuration, connect to this network using the password “volumio2”.
After connecting to Volumio (either via Ethernet on your local network or by connecting to the default Volumio Wi-Fi network), access the web interface by navigating to the following URL in your browser:
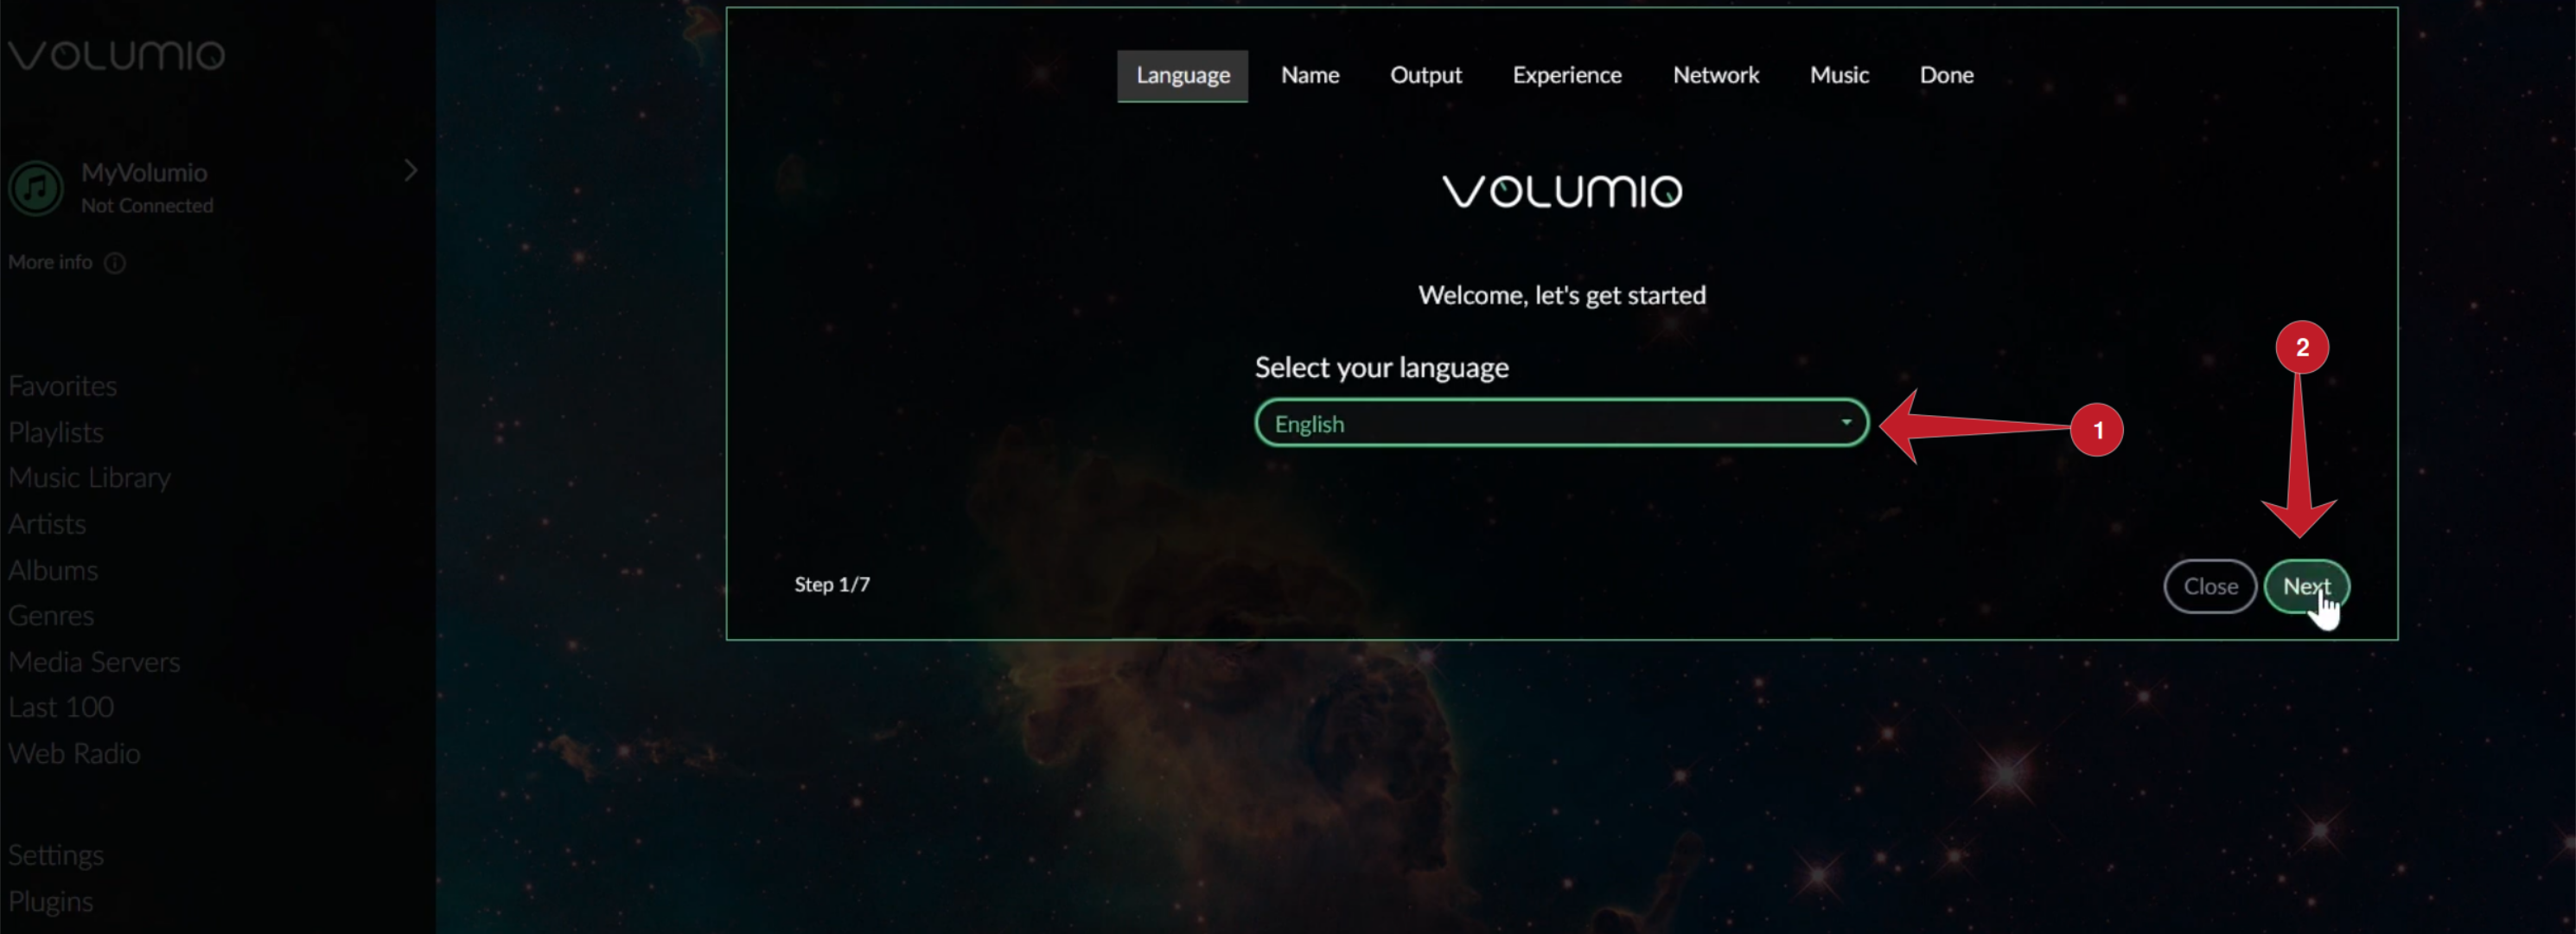
Alternatively, you can access the web interface using your Raspberry Pi’s IP address, if you know it. Once you’ve accessed the URL, you’ll see the “Welcome, let’s get started” message. Click the “Next” button to continue.
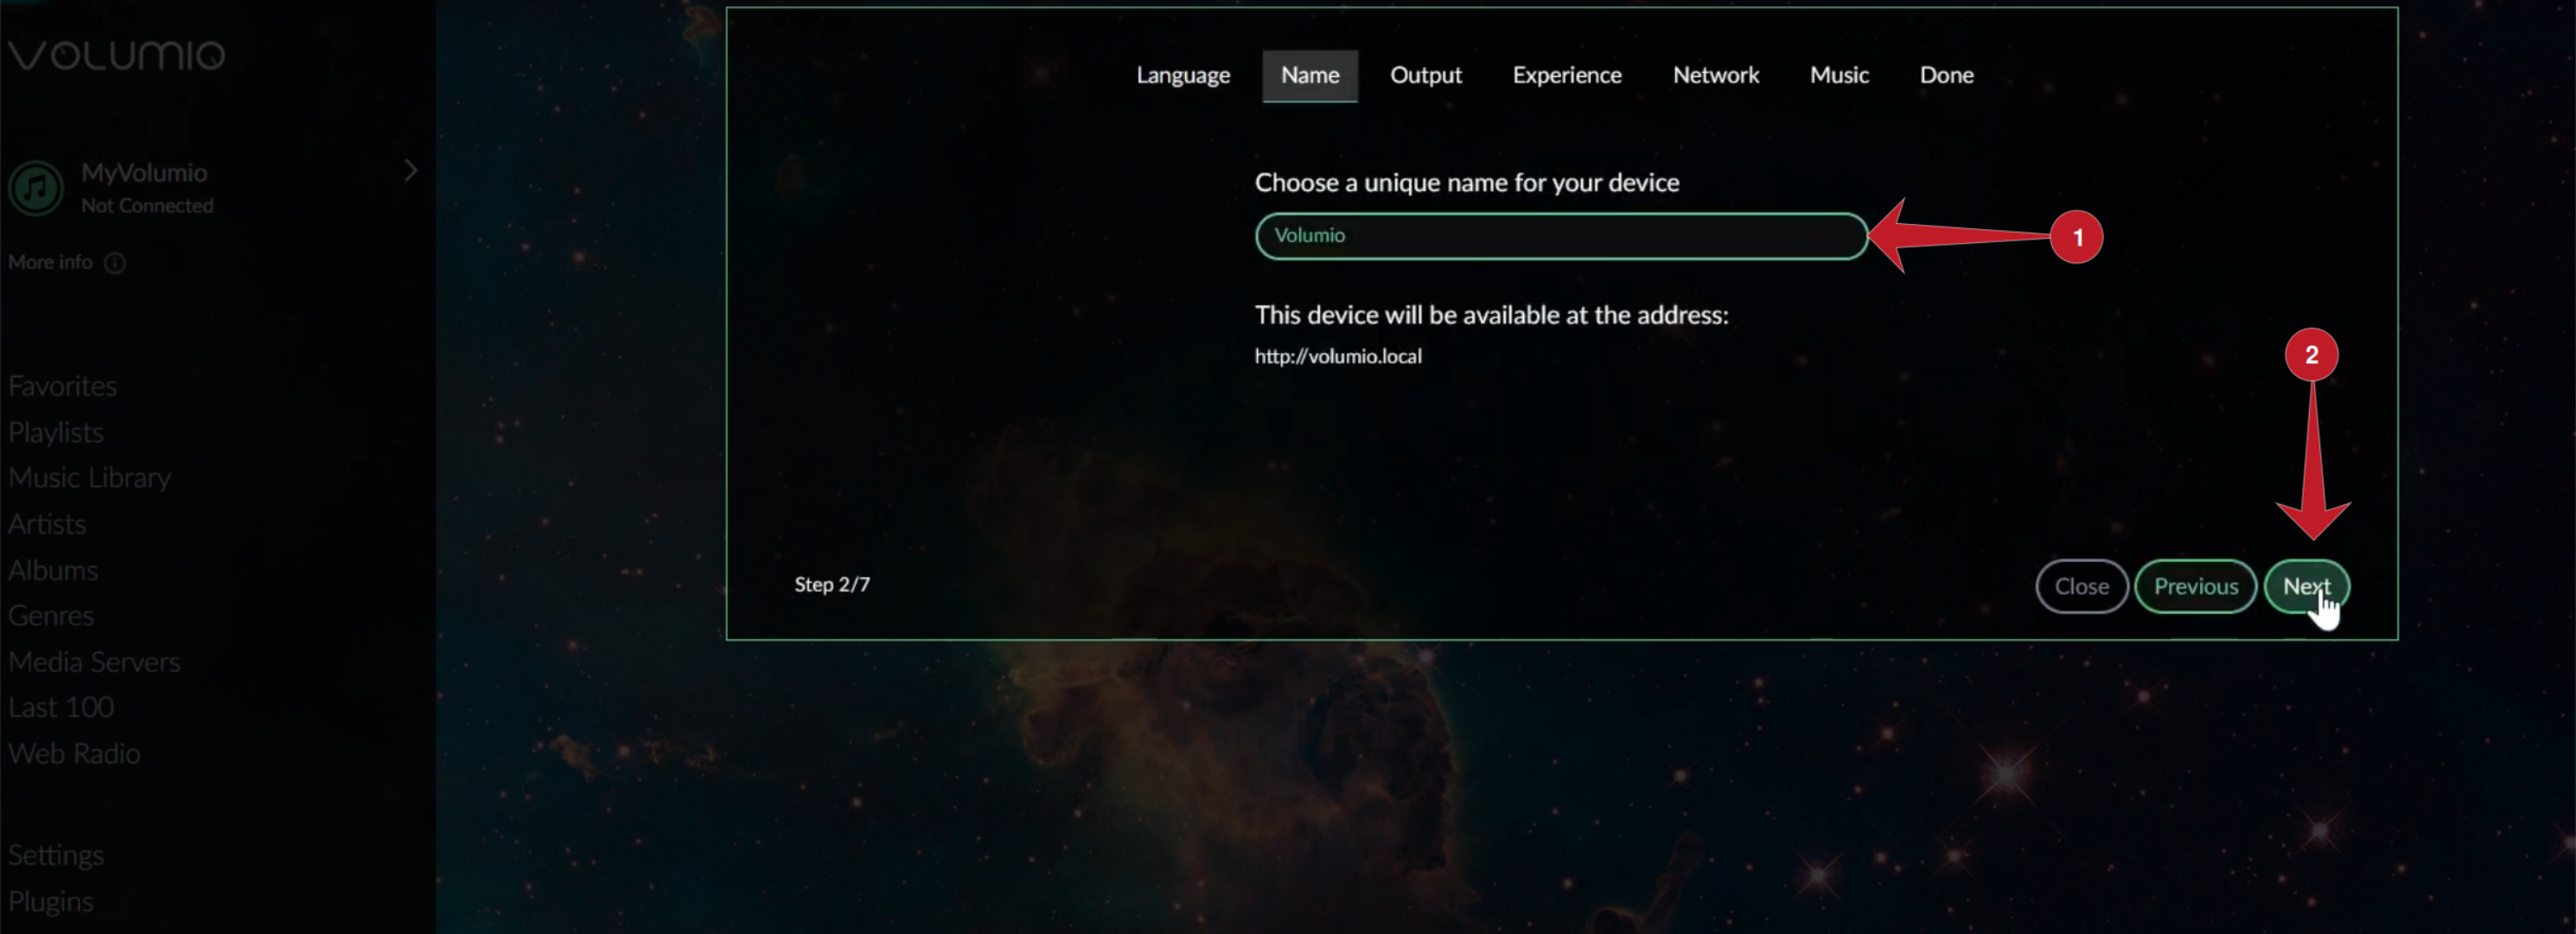
You’ll now need to choose a name for your device. The default is “Volumio”. Click the text box, and change your device’s name to whatever you wish, then click “Next”. Note that when you change the name of your device, the new URL to access it will be http://DEVICE_NAME.local.
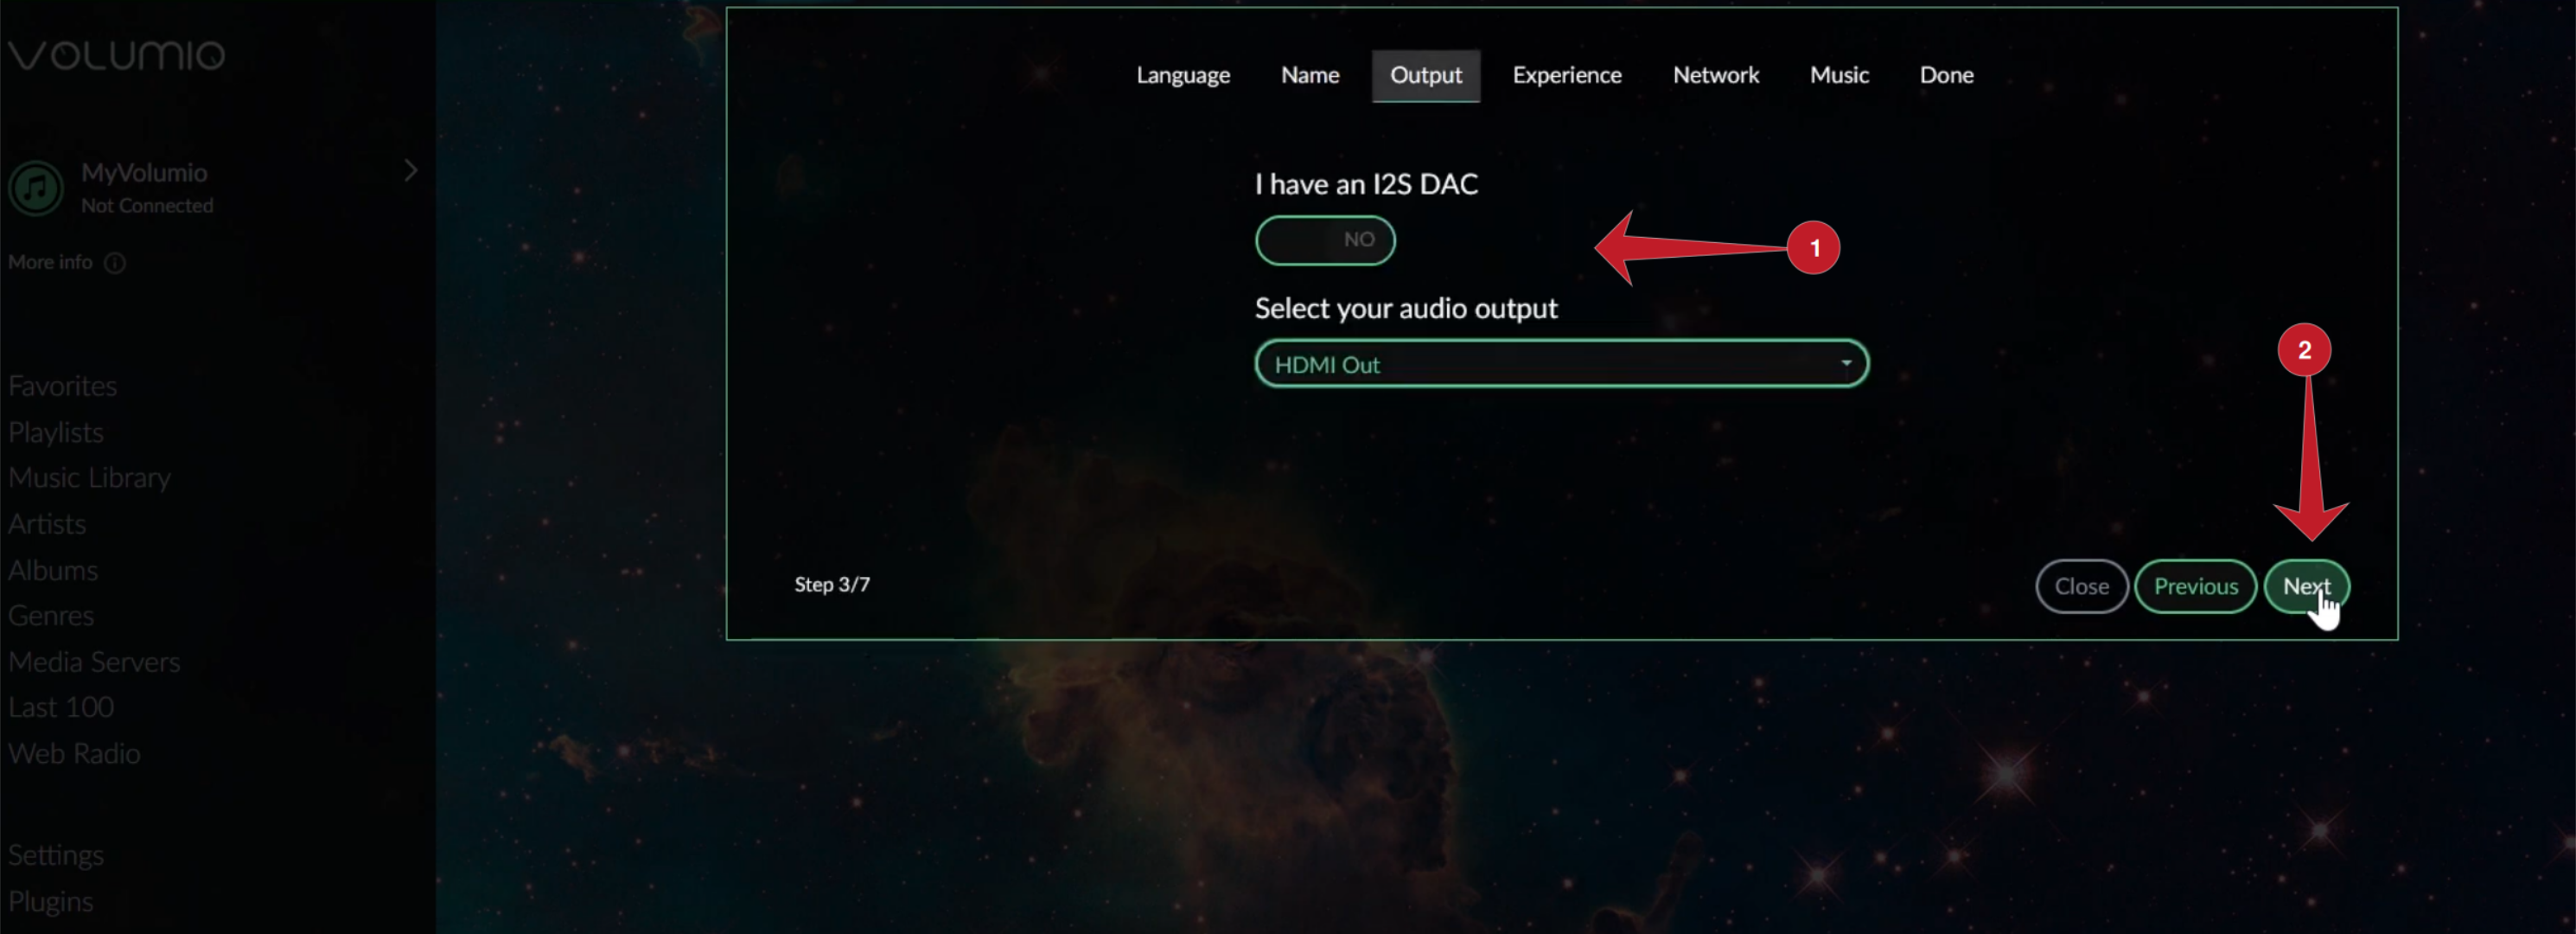
After choosing a name, Volumio will ask if you have an I2S DAC. If you’re not sure what that is, you don’t need to check the box. Next, select your audio output. This depends on how you’re delivering sound from Volumio to your speaker system. Choose the option that best suits your needs, then click “Next”.
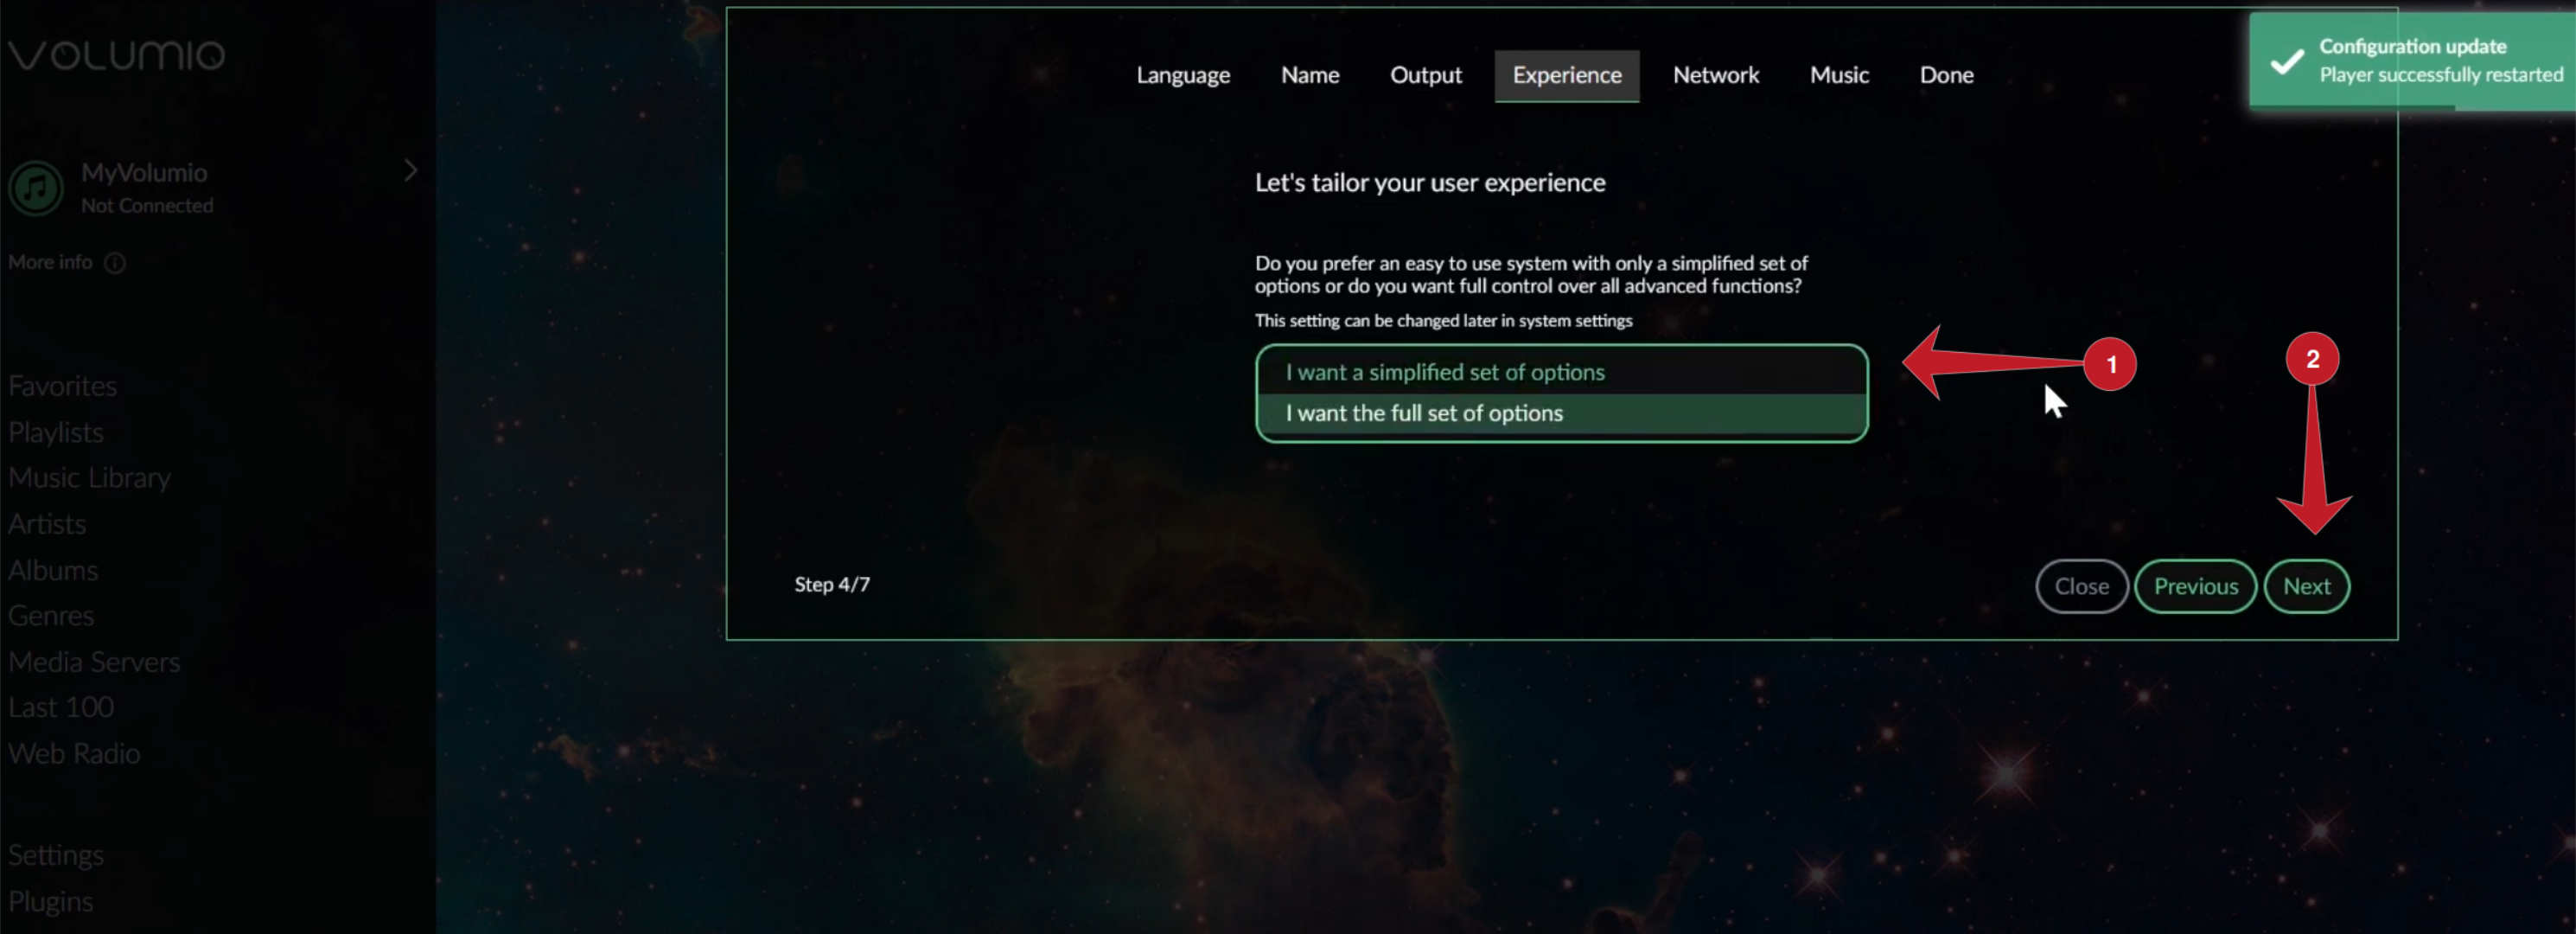
Once you’ve configured your sound options, Volumio will want to tailor your user experience. If you’re not familiar with Volumio, do not choose “I want the full set of options”. However, if you’re an advanced user, feel free to select this option. Click “Next” when you’ve made your selection to continue.
Next, if you choose to use Wi-Fi, you need to configure the wireless network that Volumio will use. Select your network from the menu, and click the “Next” button to continue.
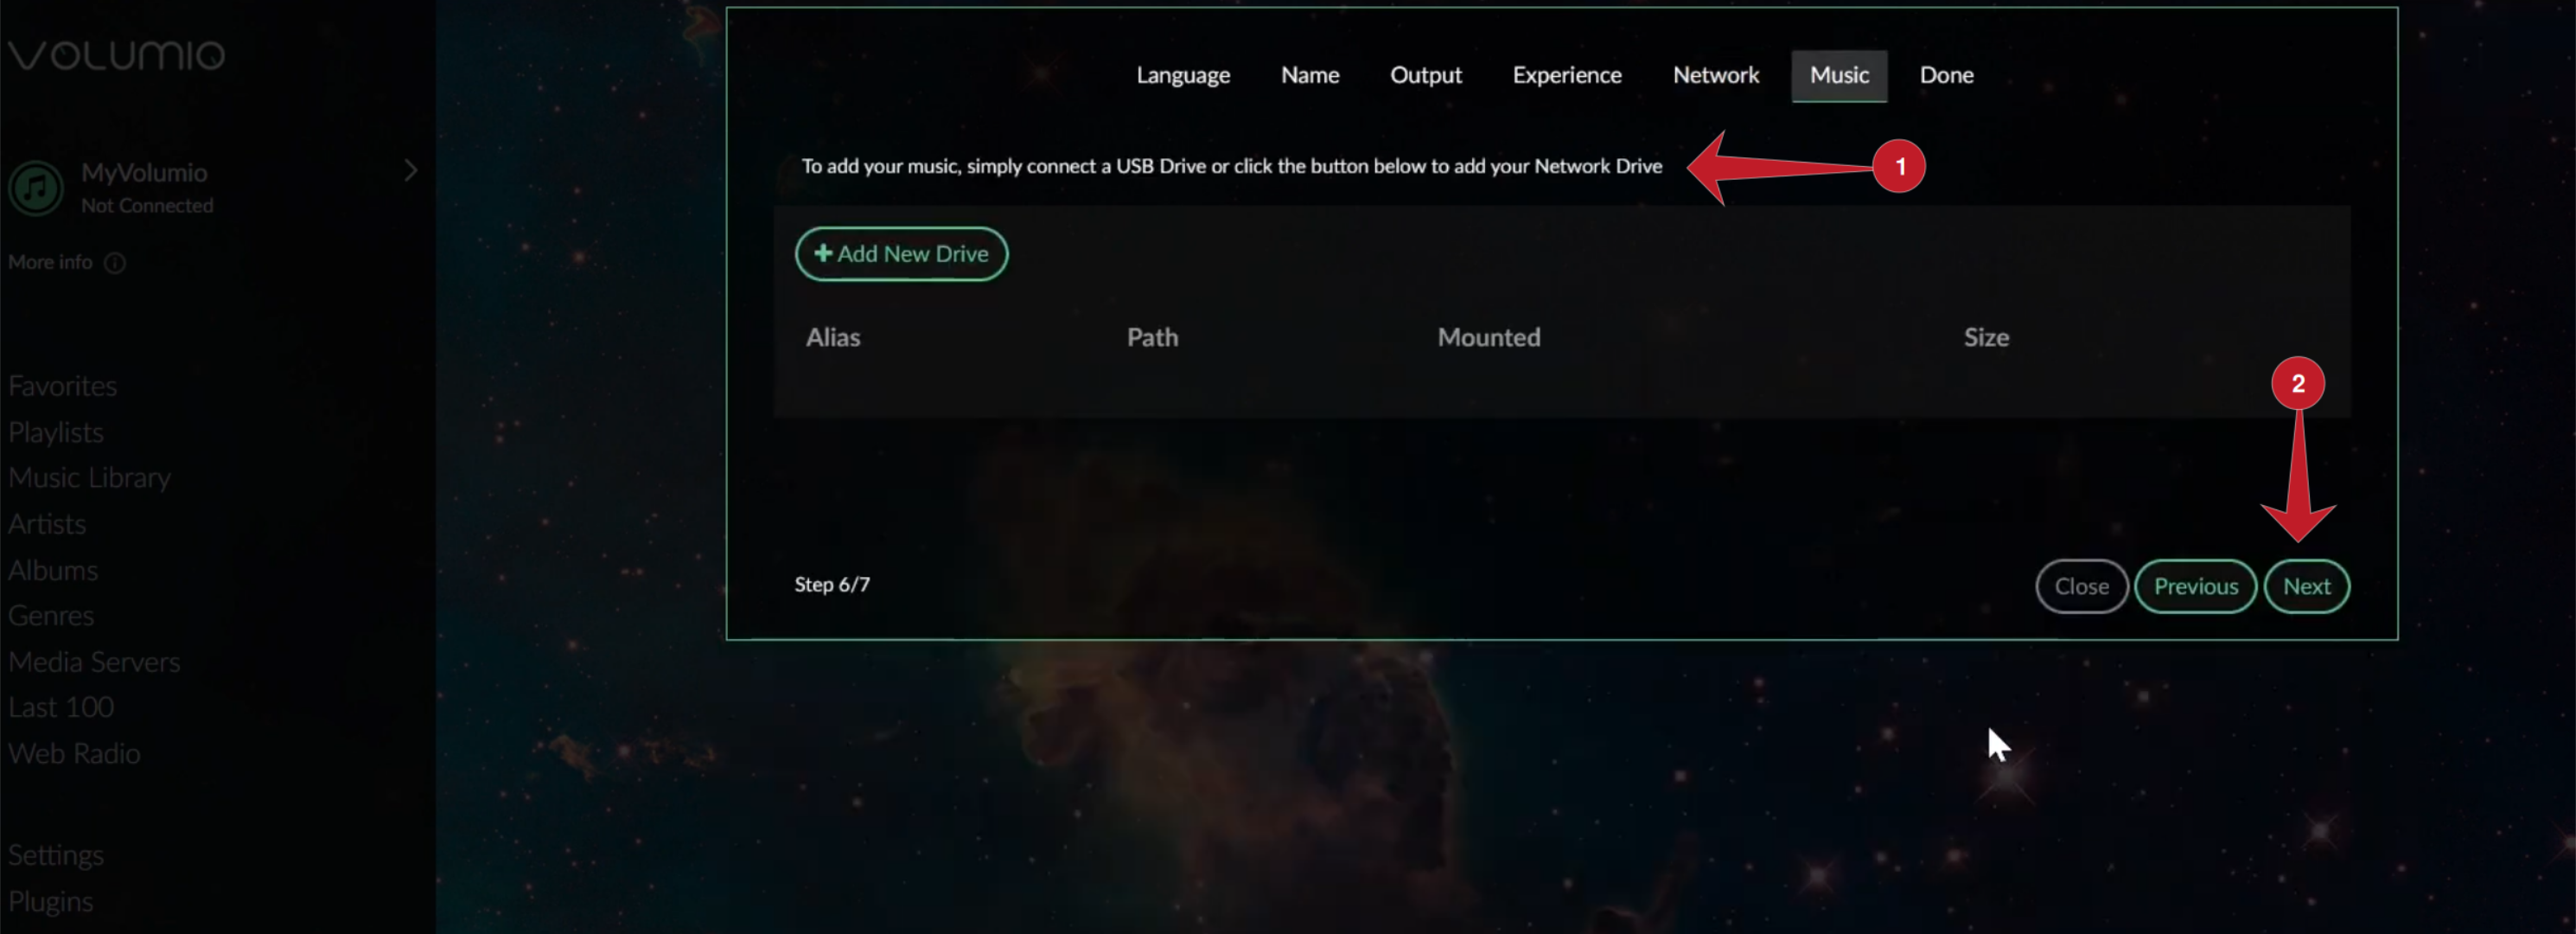
After choosing your network, it’s time to add your music to Volumio. From here, you can connect a USB hard drive or connect to a file share on your network. When your share is connected, click the “Next” button to continue.
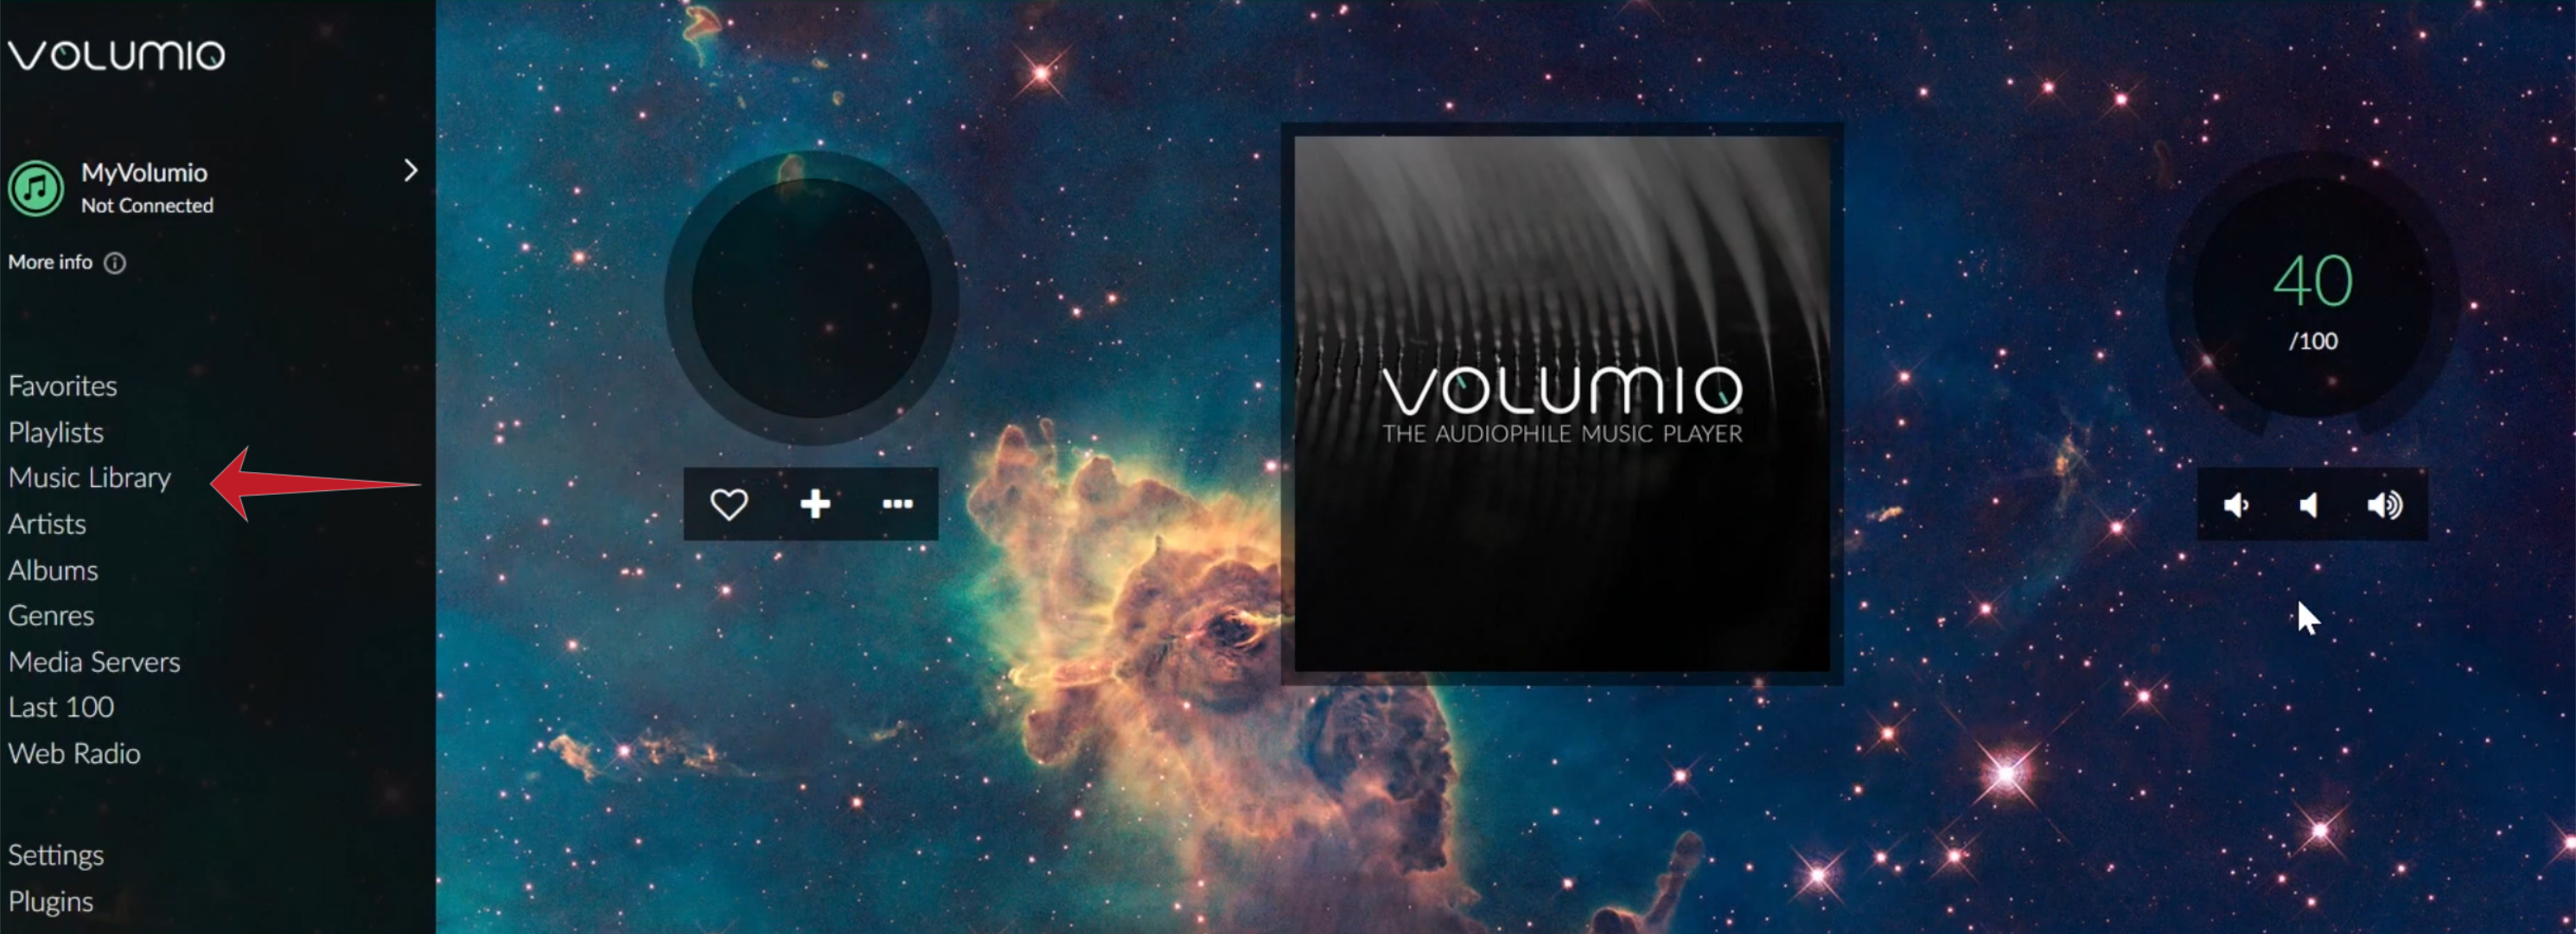
Once you’ve selected “Next,” Volumio will begin to scan your music and add it to the library. This process will take a bit of time, especially if you have a large music library. When the process is complete, Volumio will take you to the dashboard where you can listen to your music.
Soundcard Options
The default sound devices for the Raspberry Pi work well if you’re on a budget, but they don’t sound great. If you’re willing to spend more, consider checking out one of the following soundcard options to upgrade your Volumio experience.
- HifiBerry DAC+: A popular, highly-regarded soundcard that provides excellent sound quality, specifically designed for use with the Raspberry Pi.
- IQaudIO Pi-DAC+: Another well-regarded soundcard offering high-quality audio, designed specifically for the Raspberry Pi.
- Allo Boss DAC: A high-end soundcard providing excellent sound quality, compatible with the Raspberry Pi.
These are just a few examples; many soundcard options are available for the Raspberry Pi line of devices. Look for soundcards with high-quality DACs (digital-to-analog converters) and low-noise floors for the best sound quality. Additionally, ensure the soundcard is compatible with your Raspberry Pi model and Volumio version.
Break Free from Cloud Music Limitations
With Volumio, you’re not tied to cloud music services. You don’t have to worry about subscriptions, internet access, or the possibility of your favorite songs being removed from the service. By storing your music library on your Pi with Volumio, you have full control over your collection.
However, you can still access cloud music services if you want to. Volumio offers plugins that integrate with popular services like Spotify, Tidal, and Qobuz, allowing you to access their libraries directly from Volumio. This means you can play your local music collection and also access millions of songs from streaming services. You can also use Volumio to listen to internet radio and podcasts.
Volumio provides a flexible way to manage and play your music. You can store your music locally, access cloud services, or do both – the choice is yours. Volumio’s features and interface make it a useful tool for anyone looking to take control of their music listening experience.


