

Key Takeaways
- Start by installing essential tools like GNOME Tweaks and GNOME Extensions.
- Download and apply macOS-inspired themes, icons, fonts, and wallpapers.
- Fine-tune all the tools and settings to nail that macOS aesthetic.
Ubuntu’s default look is unique, with its left-side dock and workflow centered around virtual desktops. But if you’re coming from macOS or just prefer Apple’s aesthetics, then Ubuntu will appear a bit off. Thankfully, you can easily customize Ubuntu to look like macOS in a matter of minutes.
When making any system-level changes to your operating system, it’s always a good idea to make a backup beforehand. This way, you can comfortably make tweaks and play around with settings without worrying about breaking something.
In this guide, I’m using Ubuntu 24.04 LTS. However, I’ve also tested these tools on
Ubuntu 24.10
, and they work like a charm!
I’ll be using the terminal to set things up—but trust me, it’s not as scary as it sounds! Simply copy the highlighted commands and paste (Ctrl+Shift+V) them into the terminal, and you’re good to go!
Let’s start by updating your system. Open your terminal (Ctrl+Alt+T) and paste these two commands one after the other:
sudo apt update
sudo apt upgrade

With your system up-to-date, enter this command to install GNOME Shell Extension Manager and GNOME Tweaks:
sudo apt install gnome-tweaks gnome-shell-extension-manager
And that takes care of arranging the prerequisites! It’s time to add the main ingredients!
Installing The Extensions
We will need the following GNOME extensions to make Ubuntu function like macOS.
- User Themes
- Search Light
- Blur my Shell
- Dash to Dock
- Gnome 4x UI Improvements
- Logo Menu
- Moveclock
- Compiz alike magic lamp effect

To install these extensions, open the Extension Manager app, head to the Browse tab, search for the mentioned extensions, and enable them. Once enabled, you’ll start seeing your Ubuntu desktop change in appearance. In a later section, I’ll show you how to adjust the Extension settings to nail the macOS workflow. For now, let’s wrap up getting everything we need!
Installing the Tools: macOS Theme, Icon Pack, Wallpaper, and Font
Those extensions will allow Ubuntu to function more like macOS. However, to nail the look, we’ll need to download the following:
To download the files, open their respective GitHub pages, click the green “Code” button, and hit “Download ZIP.” Once downloaded, extract the zip file, open the folder, right-click inside the folder and select Open in Terminal.
Now, just copy and paste the following commands into the terminal one after the other.
./install.sh
This will install the theme on your system.
sudo ./tweaks.sh -g
This will install a GNOME Display Manager (GDM) theme and change the lock screen to look like macOS.
./tweaks.sh -F -f default
This will make Firefox look more like Safari and install the theme for Flatpak apps (if you use them).

Also, for the Flatpak theme to work, you’ll need to run an additional command:
sudo flatpak override --filesystem=xdg-config/gtk-4.0
Similarly, to install the wallpapers, extract the file, open the terminal in the folder, and run the following commands one after the other:
./install-gnome-backgrounds.sh
./install-wallpapers.sh

We’ll again follow the same process and run these commands to install the font:
chmod +x ./tweak.sh
./tweak.sh

With that done, we can finally look into installing the icon pack. To do this, go to the HOME folder using Nautilus (the default file manager) and press Ctrl+H to show all hidden folders. You should see a folder named .icons, but if it’s not present, create a new folder with that name. Now, simply extract the icon pack and move that extracted folder into the .icons folder!
And that’s it! We have successfully installed all the stuff we need. It’s time to optimize!
Configure the Extensions
The default settings on most of the extensions are perfect. We just need to tweak the settings for a few of them to nail the macOS workflow. Let’s start with Dash to Dock. To access the extension settings, open the Extension Manager app and then click on the cog wheel icon next to the extension you want to tweak.
I’ll be making the following changes:
- In the Position and Size tab:
- Position on Screen = Bottom
- Icon Size Limit = 64
- Preview Size Scale = 0.30
- Intelligent Autohide = enabled
- In the Launchers tab:
- Animate Show Applications = enabled
- Show Trash Icon = enabled
- In the Appearance tab:
- Use Built-in Theme = enabled
Next up, let’s tweak the Compiz alike magic lamp effect. This extension enables macOS’s genie effect. I feel the default animation speed is a bit slow, so I adjusted the Duration to 250 ms. However, feel free to experiment with this to get your preferred experience.

Coming to Search Light, it enables a spotlight-like feature on Ubuntu. We can potentially press Alt+Space to trigger the spotlight and search for anything on our Ubuntu PC. For it to work properly, we must first visit Settings > Keyboard > View and Customize Shortcuts. From here, change Activate the Window Menu shortcut to something else. After that, visit the Search Light extension settings and assign Alt+Space as the keybinding for the Search functionality.
Finally, let’s tweak the Logo Menu extension settings. You can assign a Custom Icon—preferably an Apple Logo to complete the look. For this tutorial, I have kept the Ubuntu logo as a tribute.
Fine Tune System Settings and Add The Finishing Touches
We’re finally at the home stretch! To wrap up, visit the Settings app and make the following tweaks:
- In Ubuntu Desktop settings:
- Disable Show Home Folder
- Disable Panel Mode
- Increase Icon Size to Maximum
- Disable Enhanced Tiling
- In Multitasking:
- Enable hot corners for the mission control overview
- Consider enabling active hot corners for window snapping
- In Ubuntu Appearance:
- Change the wallpaper
- Set the accent color to blue (or your preference)
Once done, open the GNOME Tweaks apps and make these final adjustments:
- From the Window section, change the Title Bar Buttons to the Left.
- Then head into Appearance set the following:
- Cursor = DMZ-White
- Icons = Cupertino-Sonoma-iCons
- Shell = WhiteSur-Dark
- Legacy Applications = WhiteSur-Dark

And that’s it! You have successfully customized Ubuntu to look like macOS!
The Final Results
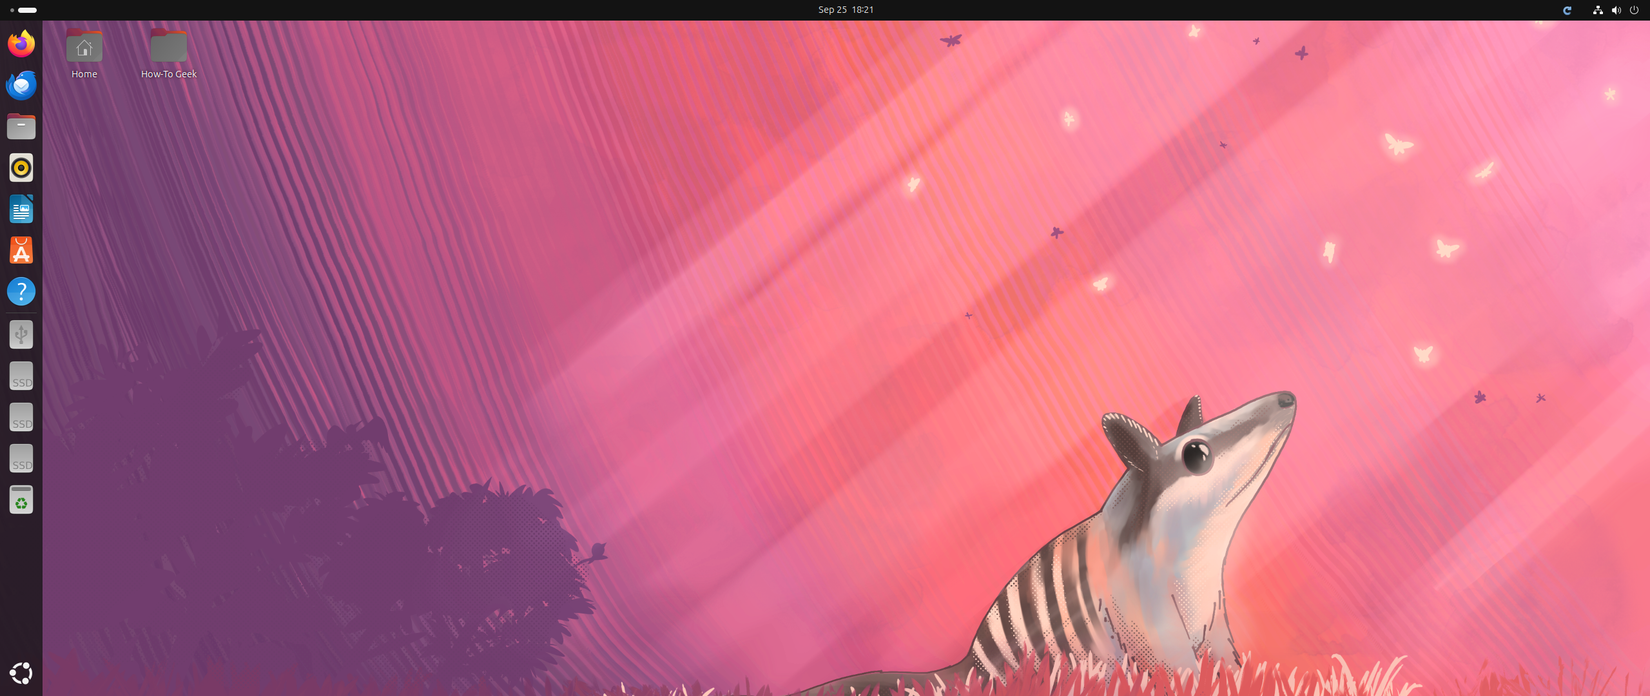
This is what the default Ubuntu 24.04 looks like:
And this is Ubuntu after the macOS customizations:
You now have the classic macOS Dock replacing the Ubuntu Dash. There’s a Spotlight-like search for quick access to files, apps, or calculations. Desktop elements like the date and time, quick settings, and window buttons are all in familiar positions where a Mac user would expect them.
However, the transformation is not perfect! The theme didn’t consistently apply to all the apps. This is expected as Ubuntu 24.04 comes with GNOME 46, which doesn’t respond to theming very well. Also, there’s unfortunately no app menu, which is an iconic feature of macOS.
That said, despite the drawbacks, this should help level up your Ubuntu PC and make it more akin to macOS in both looks and functionality.

