If tedious cloud tasks are getting you down, Power Automate can lighten the load. Let me show you how I use it to automate repetitive tasks so you can get started with it.
What Is Power Automate for Web?
The web version of Power Automate is an online platform for automating your cloud workflows. That means you can use it to automate various tasks between online services and applications using connectors and APIs. Since your automated workflows are saved on the cloud, you can share them with others and invite collaborators.
A workflow in Power Automate is called a flow, and at the minimum, it needs two things to run successfully—a trigger and actions. A trigger is an event that starts your flow, like receiving an email or when a new file is created in a folder. An action is what happens after the flow is triggered.
The best part is that you can start using Power Automate for free—no Microsoft 365 subscription is required. But I think there are several good reasons why you should get a Microsoft 365 subscription anyway, especially now that Copilot is part of the package.
Standard connectors like OneDrive, Google Drive, Microsoft To Do, and SharePoint are free. However, to use premium connectors and other advanced features (e.g., AI Builder and process mining), you need a Power Automate premium subscription starting from $15 per user per month.
How to Access Power Automate for Web
You can access Power Automate on any modern browser. To do that, head to the Office 365 website and sign in with your Microsoft account. If you don’t have one, you can create it there.
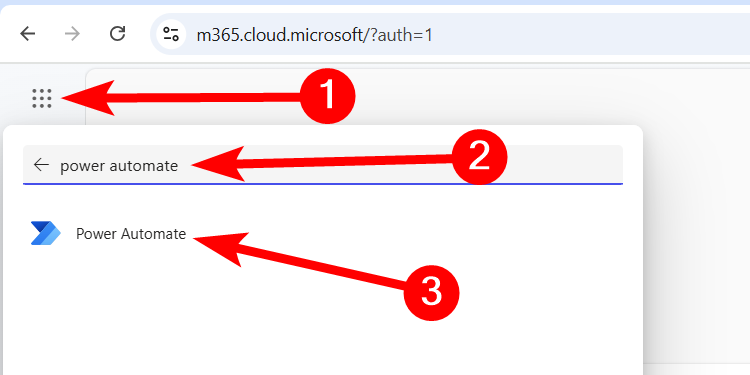
Once logged in, click the App Launcher (a grid of dots) in the top-left corner and type Power Automate in the search bar. Click “Power Automate” when it shows up in the search results to launch it.
Now, let me show you a simple flow I set up in Power Automate to help you understand how it works.
Automatically Backing Up Files from OneDrive to Google Drive
I like to regularly upload important files to OneDrive to have a backup in case my device crashes. This can be anything from documents I scanned using the OneDrive mobile app or old family photos. But I also like to copy them to Google Drive just to have an extra backup.
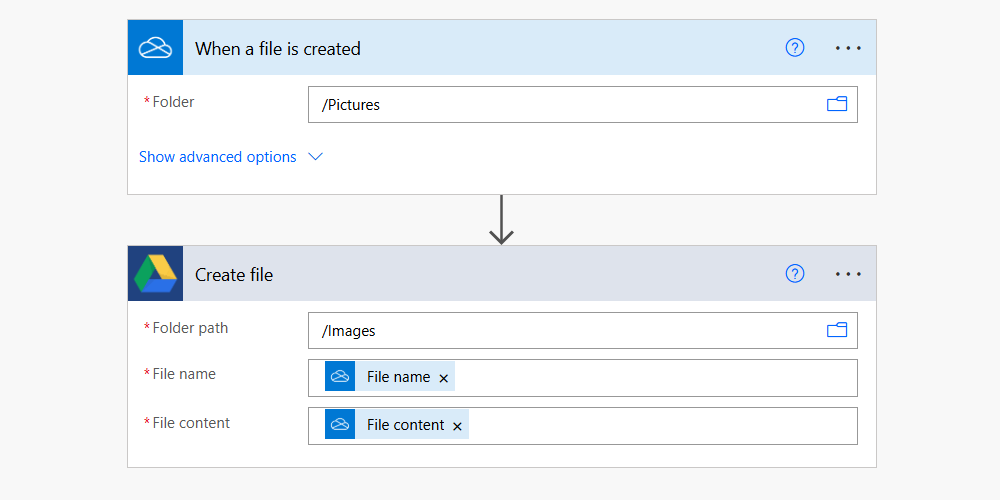
This started getting tedious after a while, so I created a flow that automatically backs up a file to Google Drive whenever I upload it to OneDrive. The added advantage is that it makes me consistent in case I forget to transfer the files to Google Drive manually.
Create an Automated Cloud Flow in Power Automate
The first thing we need to do is create an automated cloud flow, which triggers when a specific event happens. This is different from an instant cloud flow that needs to be triggered manually or a scheduled cloud flow that runs on a defined schedule.
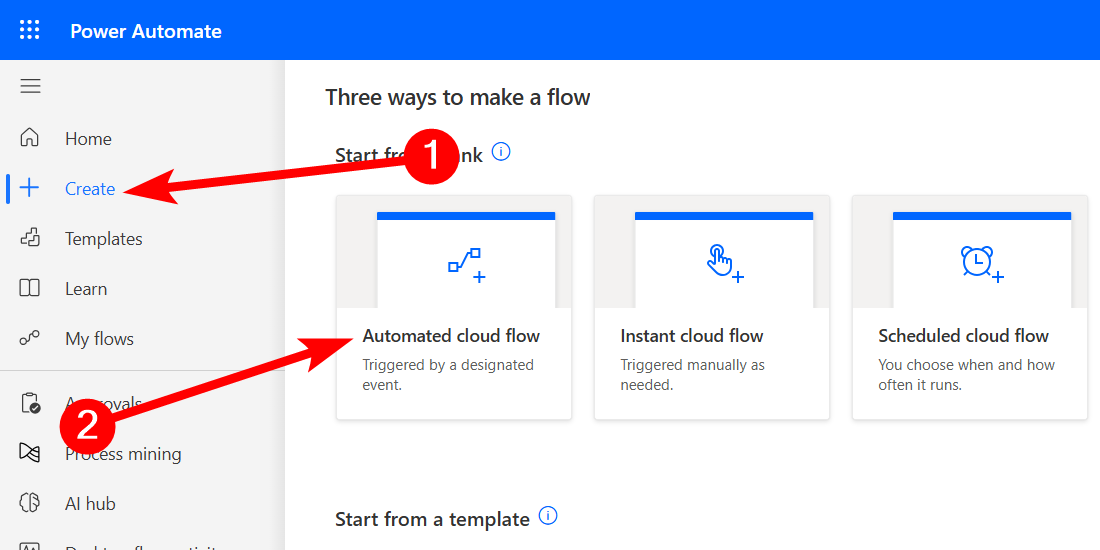
To set up the automated cloud flow, click “Create” in the left sidebar and select “Automated Cloud Flow” on the right.
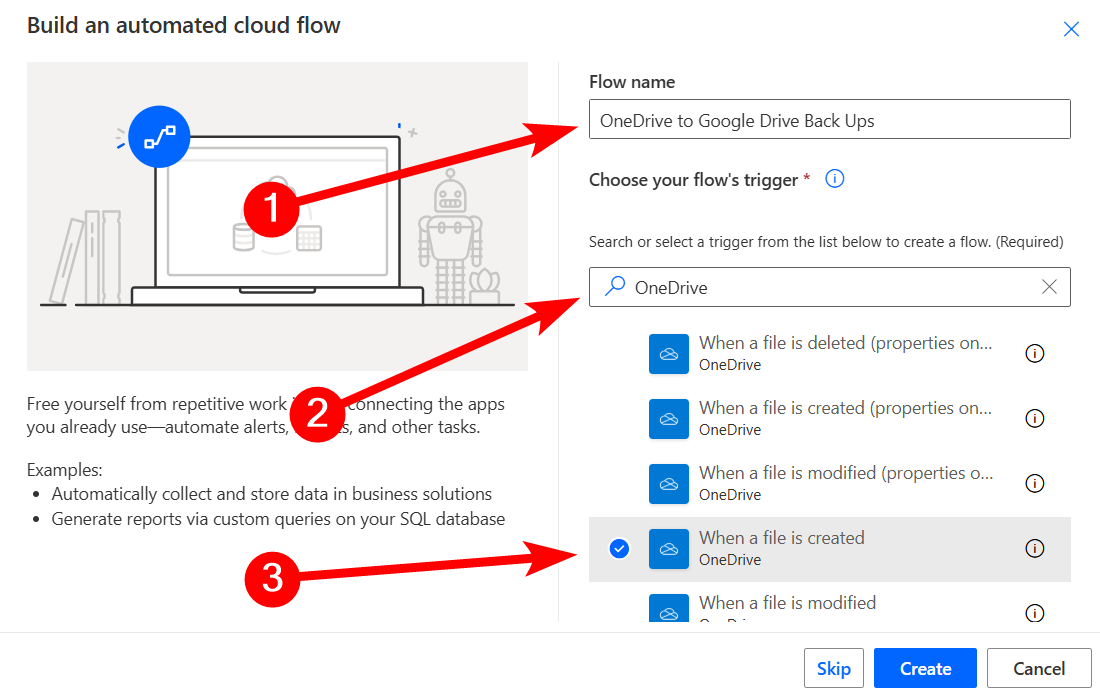
In the pop-up, give the flow a name—something like OneDrive to Google Drive Back Ups. In the Choose Your Flow’s Trigger section, type OneDrive in the search box. Then, select “When a File Is Created” in the results and click the “Create” button.
Make sure you pick the trigger for your OneDrive plan—personal or business.
Configure the OneDrive Trigger
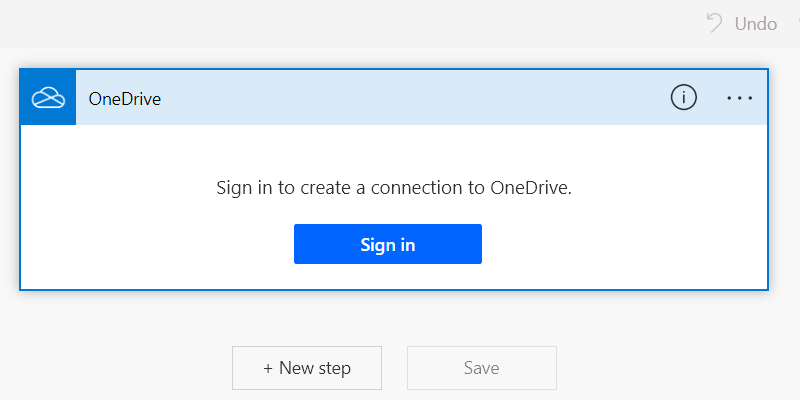
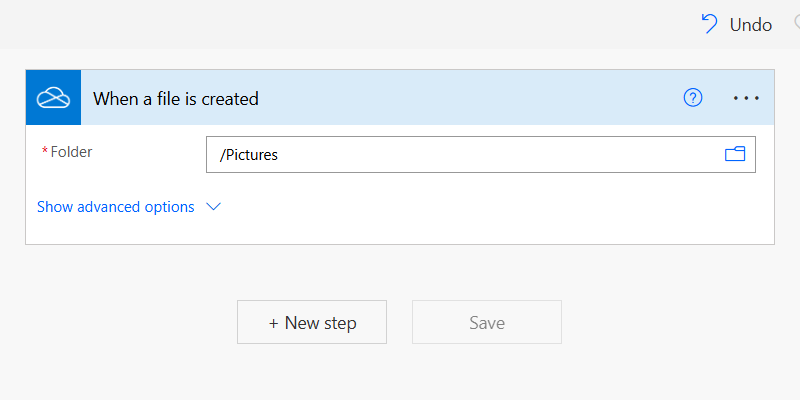
In the trigger, click “Sign In” and follow the steps to log in to your Microsoft Account and connect your OneDrive account to the trigger.
Next, select the folder you want to trigger the flow when a file is created in it. You’re done setting up the trigger.
Remember to save your flow after making major changes. Although it’s created in the cloud, it doesn’t save automatically.
Create Google Drive Action
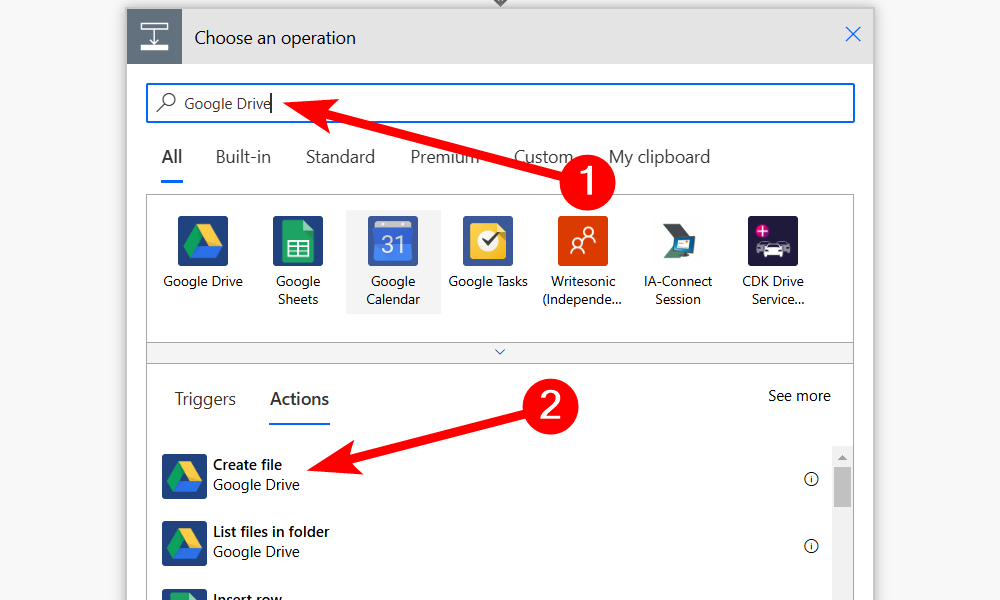
Click the “New Step” button to create a new action and type Google Drive in the search box. In the results, select “Create File” for Google Drive.
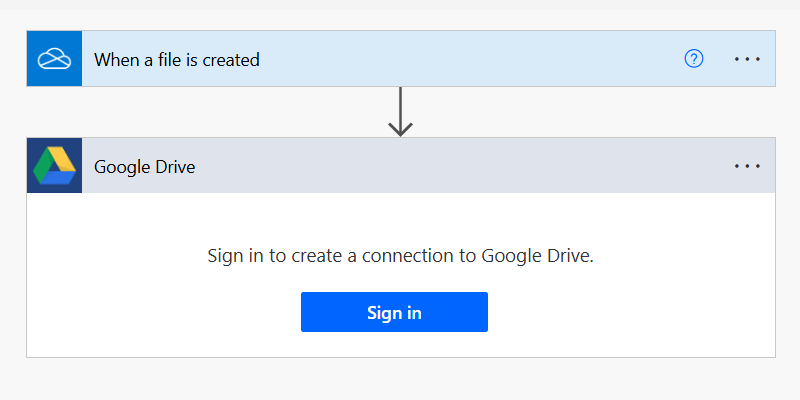
Click “Sign In” and follow the steps to sign in to your Google account and connect your Google Drive account to the action.
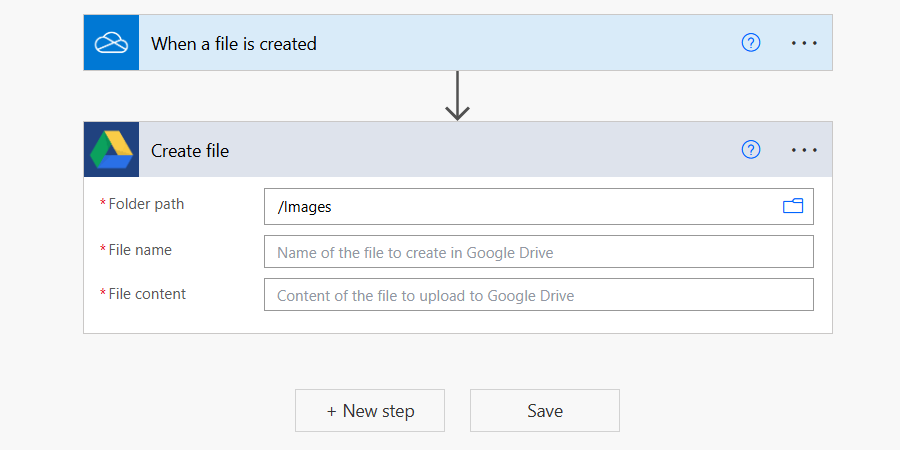
In the action, set the Folder Path to the folder you want the file to be backed up to on Google Drive.
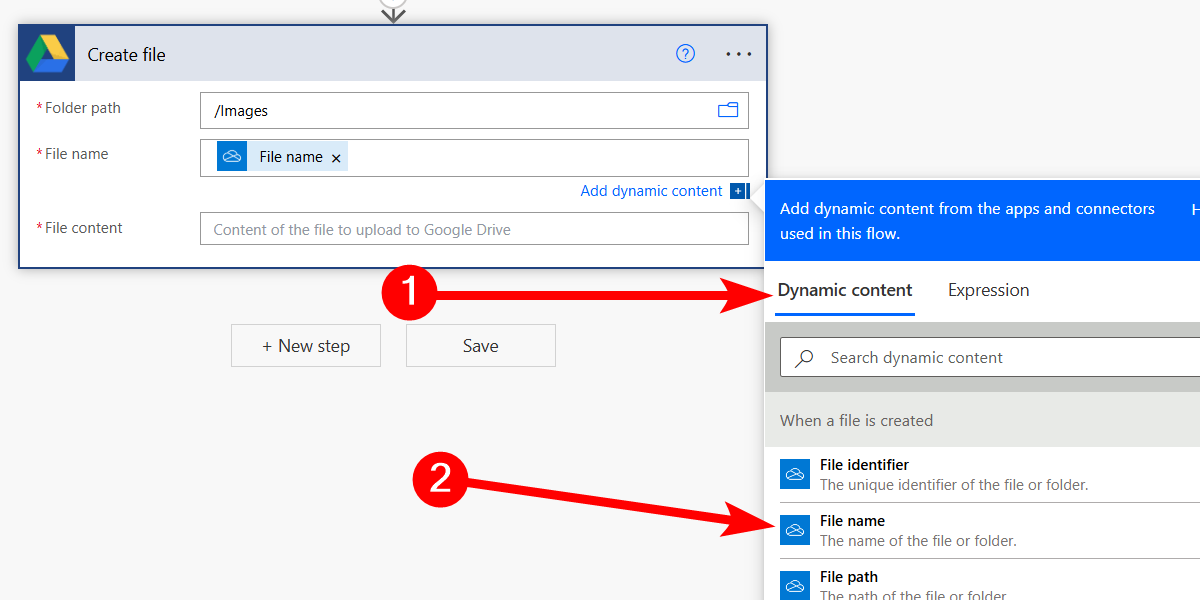
For the file name, we want this to be created dynamically based on the file uploaded to OneDrive. So, click inside the text box, select the “Dynamic Content” tab, and in the “When a File is Created” section, click the “File Name” option.
For the File Content text box, we also want that to be populated dynamically. To do that, click inside the text box, select the “Dynamic Content” tab, and in the “When a File is Created” section, click the “File Content” option.
Test and Run the Flow
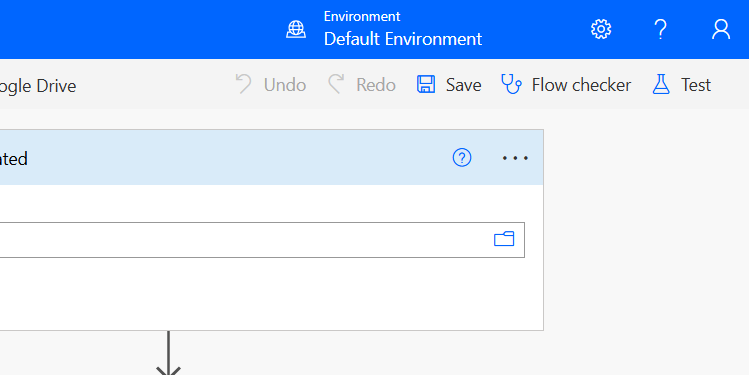
To ensure the flow has been set up correctly, you must test it. To do that, click “Test” in the top-right corner.
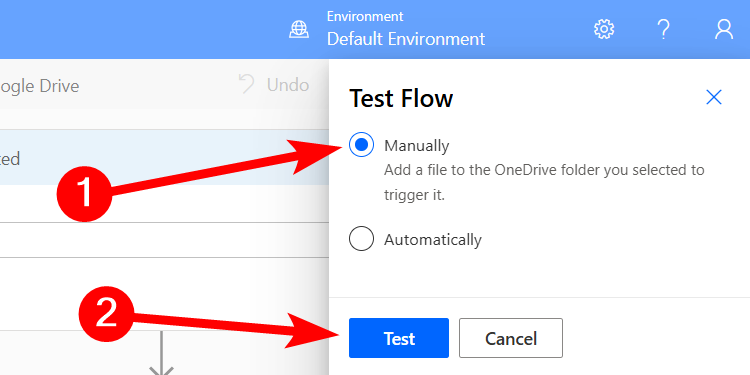
In the panel that appears, select the “Manually” radio button and click the “Test” button.
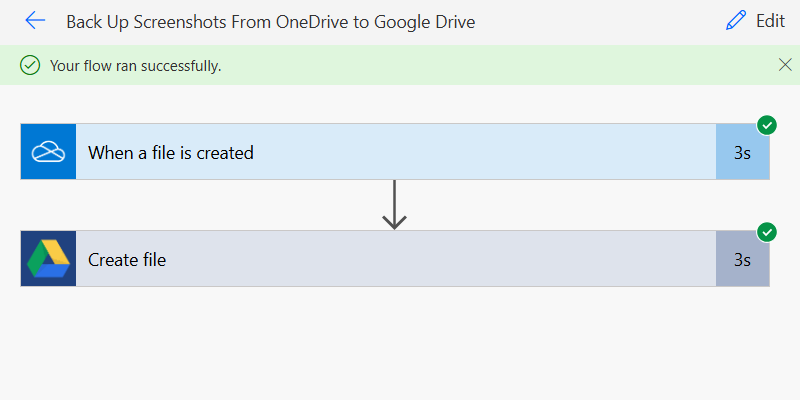
To finish testing the flow, drop a file into the OneDrive folder you selected in the trigger. You should see Power Automate say “Your flow ran successfully” if everything goes well.
Go to the Google Drive folder selected in the action and see if the file has been backed up as expected. If it’s there, your flow is ready to go.
How to Turn Off a Flow
Keep in mind that these flows run even on the cloud 24/7. So, if a flow is no longer of use to you, you can easily disable it so it no longer runs.
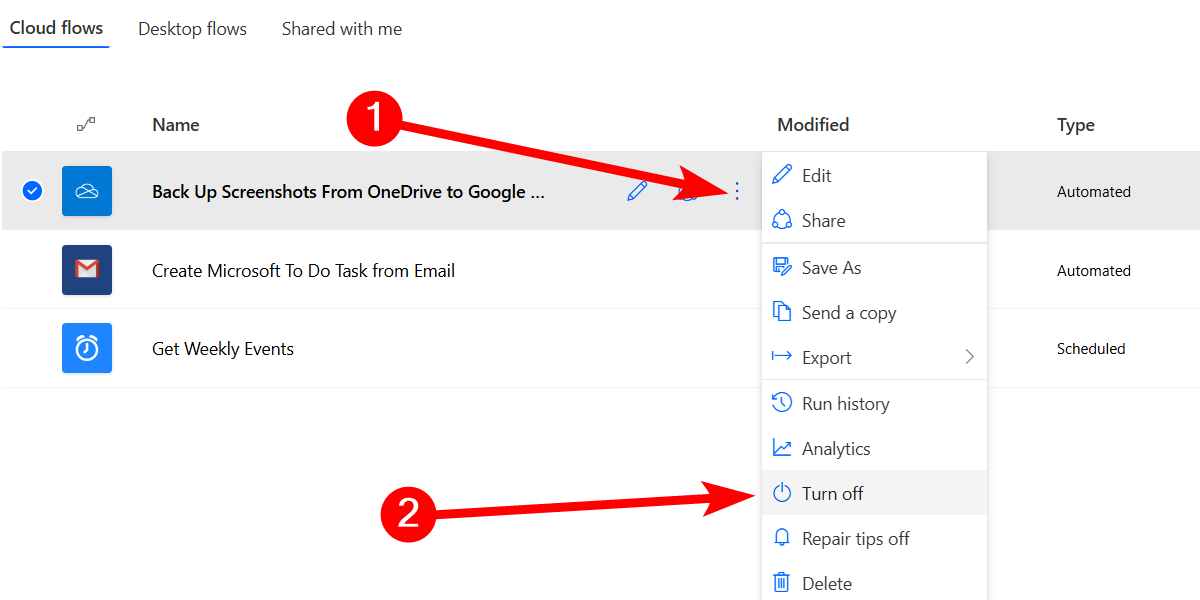
To do that, click “More Commands”—the three-dot icon next to the flow you want to disable—and select “Turn Off” in the menu.
Cloud flows can get more complicated than this in Power Automate. For instance, I have one that connects to my Google Calendar, gathers information about the events during that week, and sends a summary to my email every Monday at 8 AM.
With the example provided in this guide, you’re well on your way to creating flows like these and better. If you’re still having trouble getting started, Power Automate has many templates you can use to get started.
And if you want to create flows on your desktop, use Power Automate for desktop instead.

