If an installed app or game is demanding more resources, and you want to ensure it is performing as well as it can, you can manually assign that item more RAM. I’ll show you the various ways—including both built-in and third-party—to do that on your Windows 11 PC.
Temporarily Allocate More RAM Using Task Manager
One way to allocate more RAM to a running app or game on Windows 11 is by using the built-in Task Manager utility. This tool allows you to let a running item use more RAM amount on a temporary basis. Note that the tool reverts back the changes once you’ve closed your app or game or restarted your computer; you’ll have to then make the changes again.
To use this method, launch Task Manager. One way to do this is to right-click the Windows taskbar and choose “Task Manager.” Alternatively, press Ctrl+Shift+Esc.
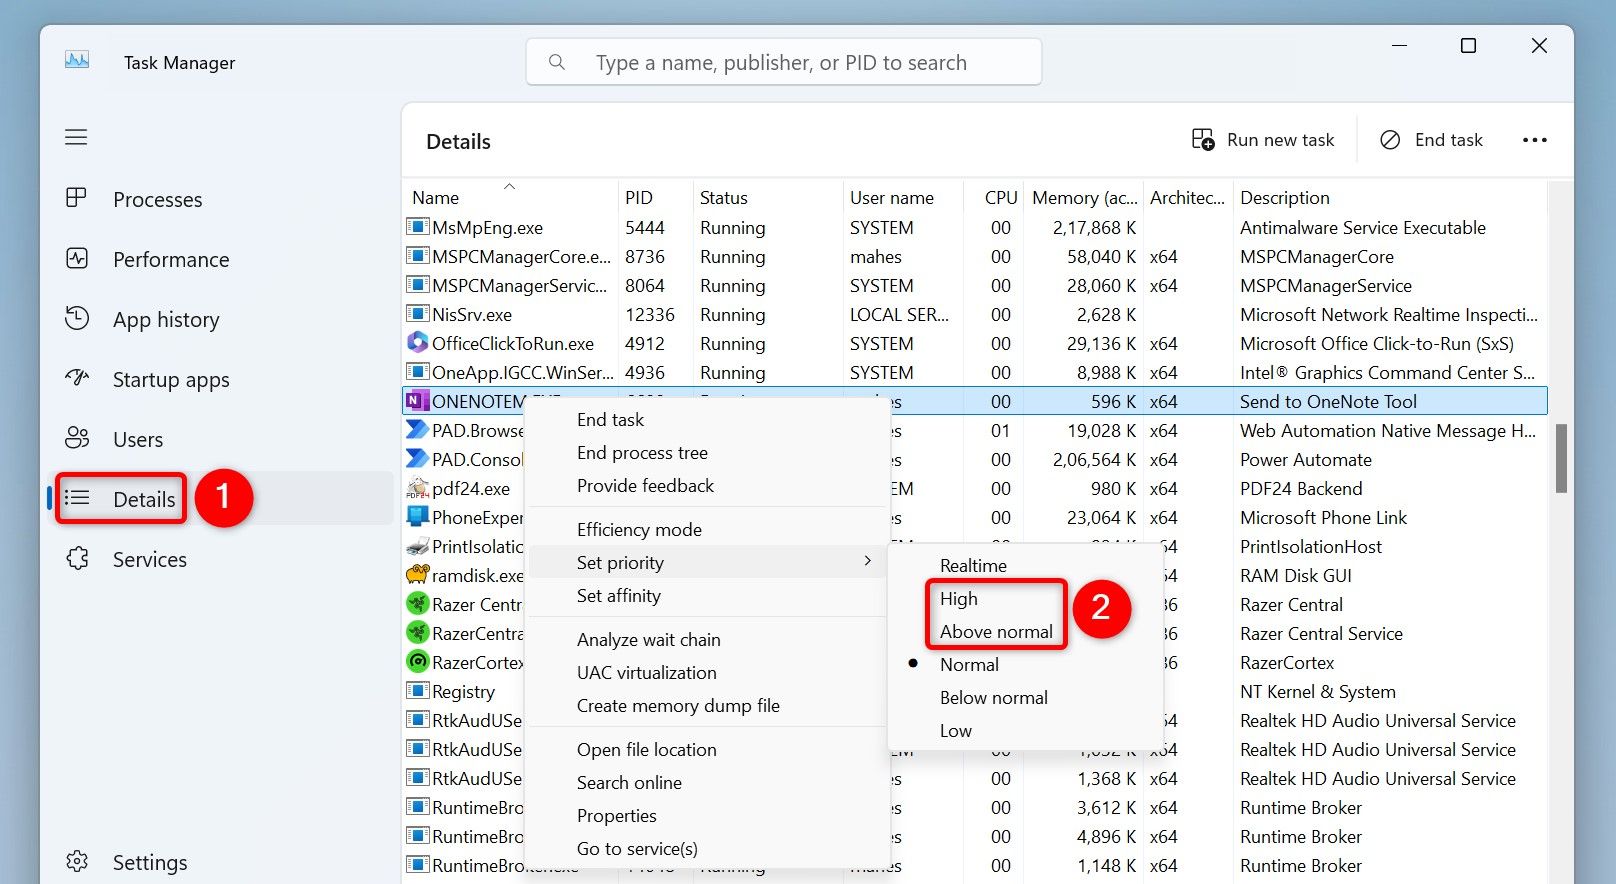
In Task Manager, from the left sidebar, select “Details.” On the right pane, in the Name column, find the app or game you want to assign more RAM. Right-click that item, select “Set Priority” and choose “High” or “Above Normal.” I don’t recommend choosing the “Realtime” option as that can cause instability issues on your system.
Your app or game now has more RAM available, and you’ll see that your item’s performance has slightly improved. If you chose “Above Normal” and the performance hasn’t improved much, select “High.”
Make Windows 11 Prioritize Apps and Games for RAM Usage
Another way to allow your apps or games to use more RAM is by tweaking a performance option. This option allows all your running apps or games to use more RAM resources, if they demand so.
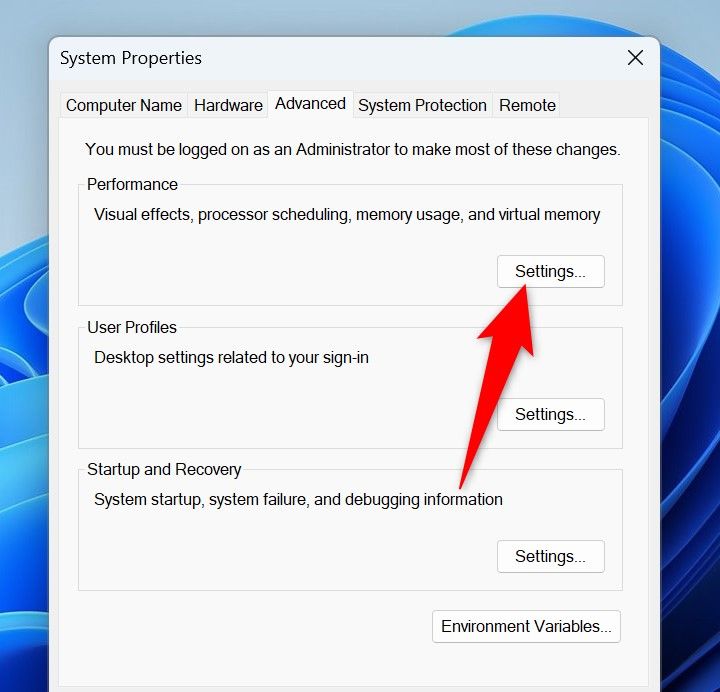
To do that, launch Windows Search (press Windows+S), type View Advanced System Settings, and choose the item with that name. On the window that opens, in the Performance section, click “Settings.”
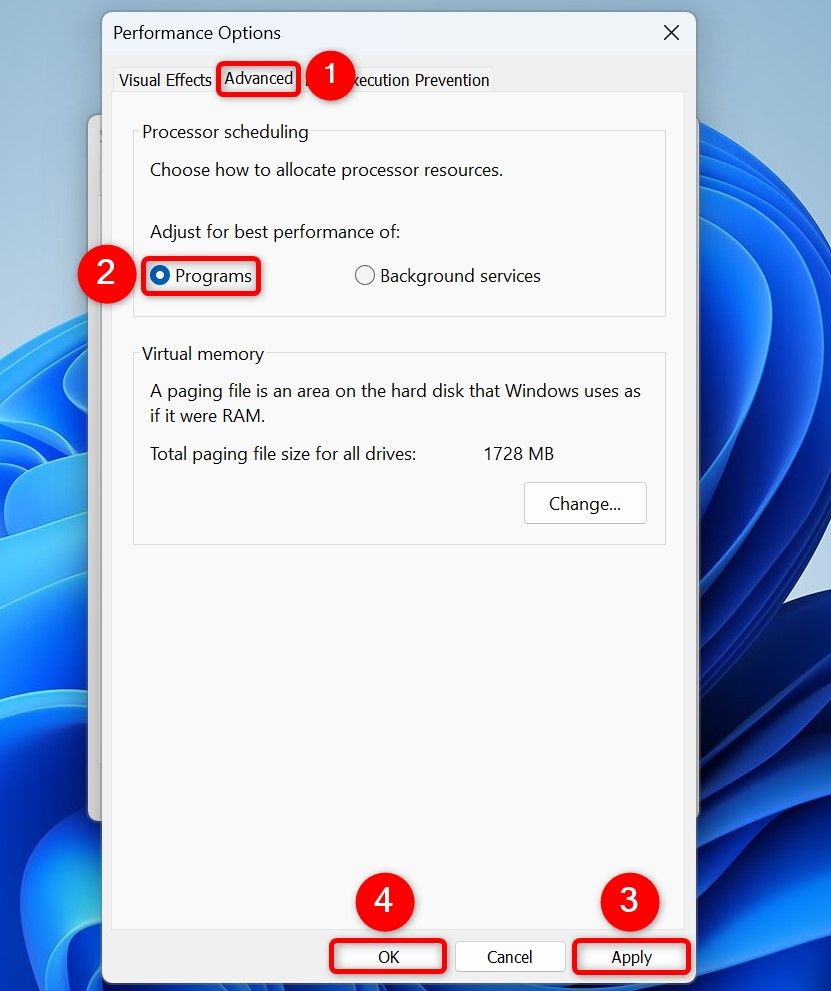
On the Performance Options window, open the “Advanced” tab. In the Adjust for Best Performance Of section, enable “Programs.” Then, at the bottom, click “Apply” followed by “OK.”
Increase Virtual Memory to Let Your Apps and Games Have More RAM
When your apps and games demand more RAM, Windows 11 uses some of your disk space as RAM. This is called virtual memory. You can increase this memory amount to let your apps and games use more RAM. I don’t recommend using this method if your PC uses an SSD drive, as using virtual memory on an SSD drive reduces the drive’s lifespan.
To do that, open Run by pressing Windows+R. Type the following in the open box and select “OK” or press Enter:
sysdm.cpl
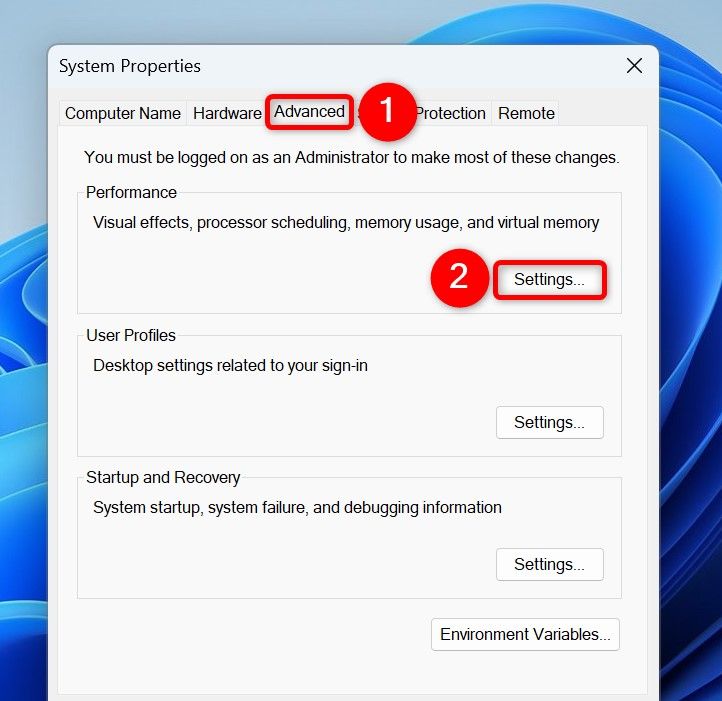
On the System Properties window that opens, access the “Advanced” tab. In the Performance section, click “Settings.”
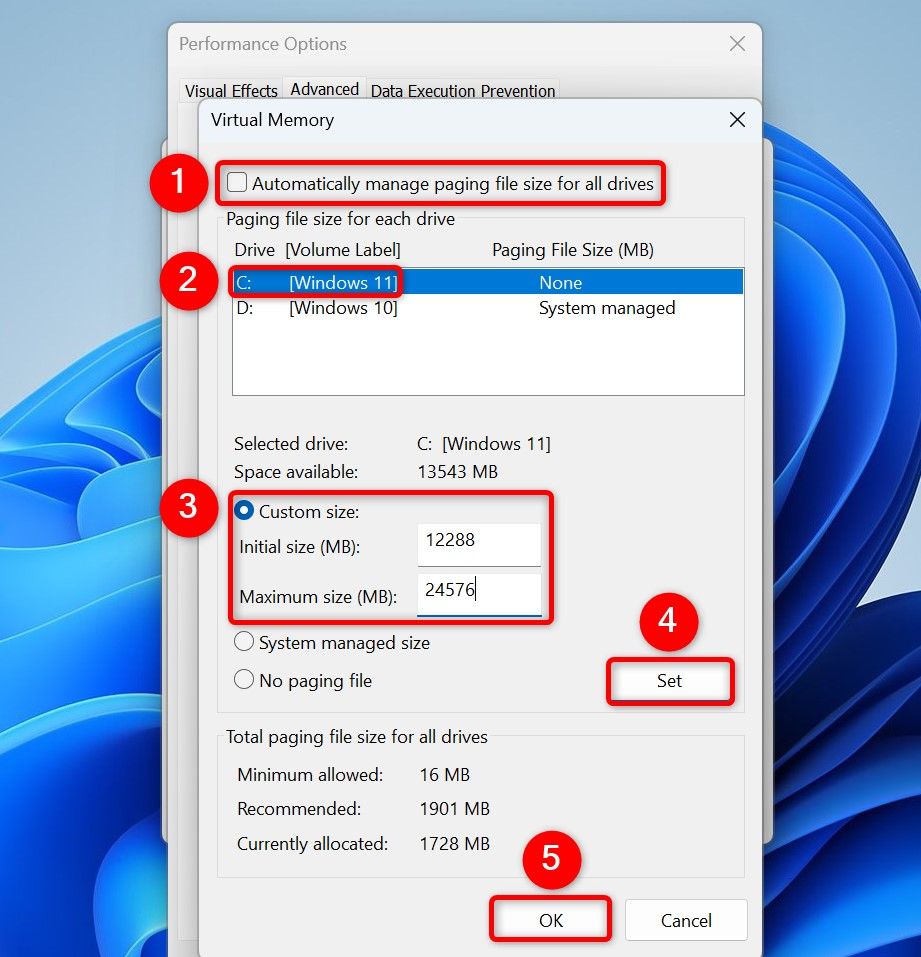
Open the Advanced tab. In the Virtual Memory section, choose “Change.” On the Virtual Memory window, at the top, turn off “Automatically Manage Paging File Size for All Drives.” Then, choose the drive where you’ve installed Windows 11.
Turn on the “Custom Size” option. In the “Initial Size (MB)” field, type about 1.5x of your current RAM. In the “Maximum Size (MB)” field, type about 3x of your current RAM. For example, if your PC has 8 GB RAM, then 1.5x of that will be 12288 MB, and 3x will be 24576 MB.
Then, click “Set” followed by “OK.”
On the Performance Options window, click “Apply” followed by “OK.” Then, reboot your computer.
Use a Free App to Optimize RAM Usage
You can use a free app like Razer Cortex to allow your games to use more of your computer resources. This app applies many changes to your system in one go, letting your games use more RAM.
To use it, launch the Razer Cortex site and choose “Download Now.” Open the downloaded tool, select “Razer Cortex” in the left sidebar, and click “Install” on the right pane.
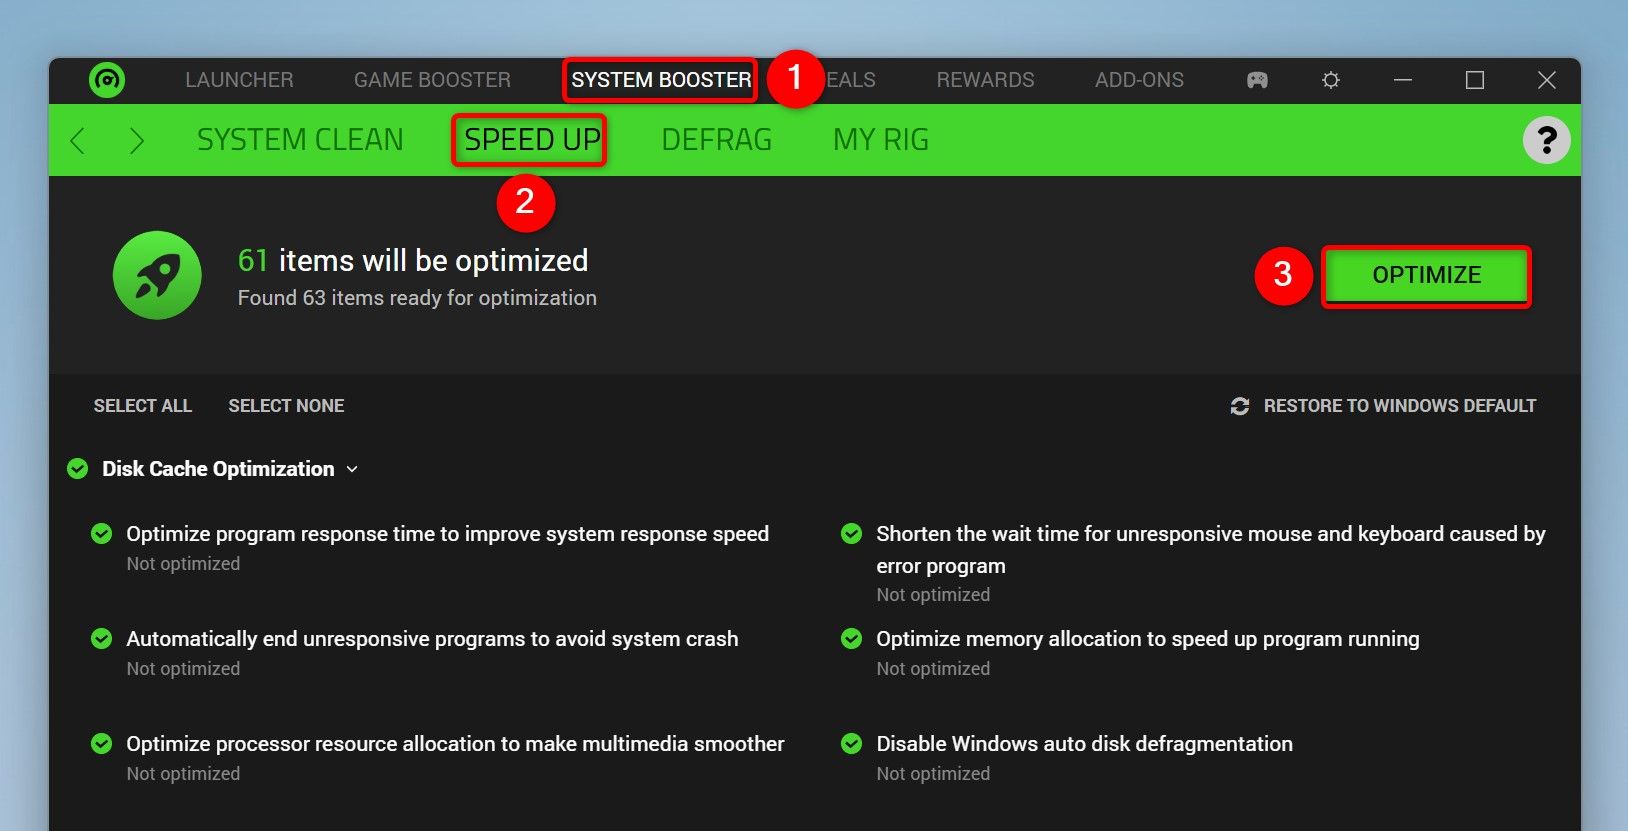
When Razer Cortex is installed, click “Launch” to open the tool. At the top of the tool, click “System Booster” followed by “Speed Up.” You’ll see the list of changes the tool will apply to your system. To go ahead, click the “Optimize” button.
In the future, to go back to the default settings, choose “Restore to Windows Default.”
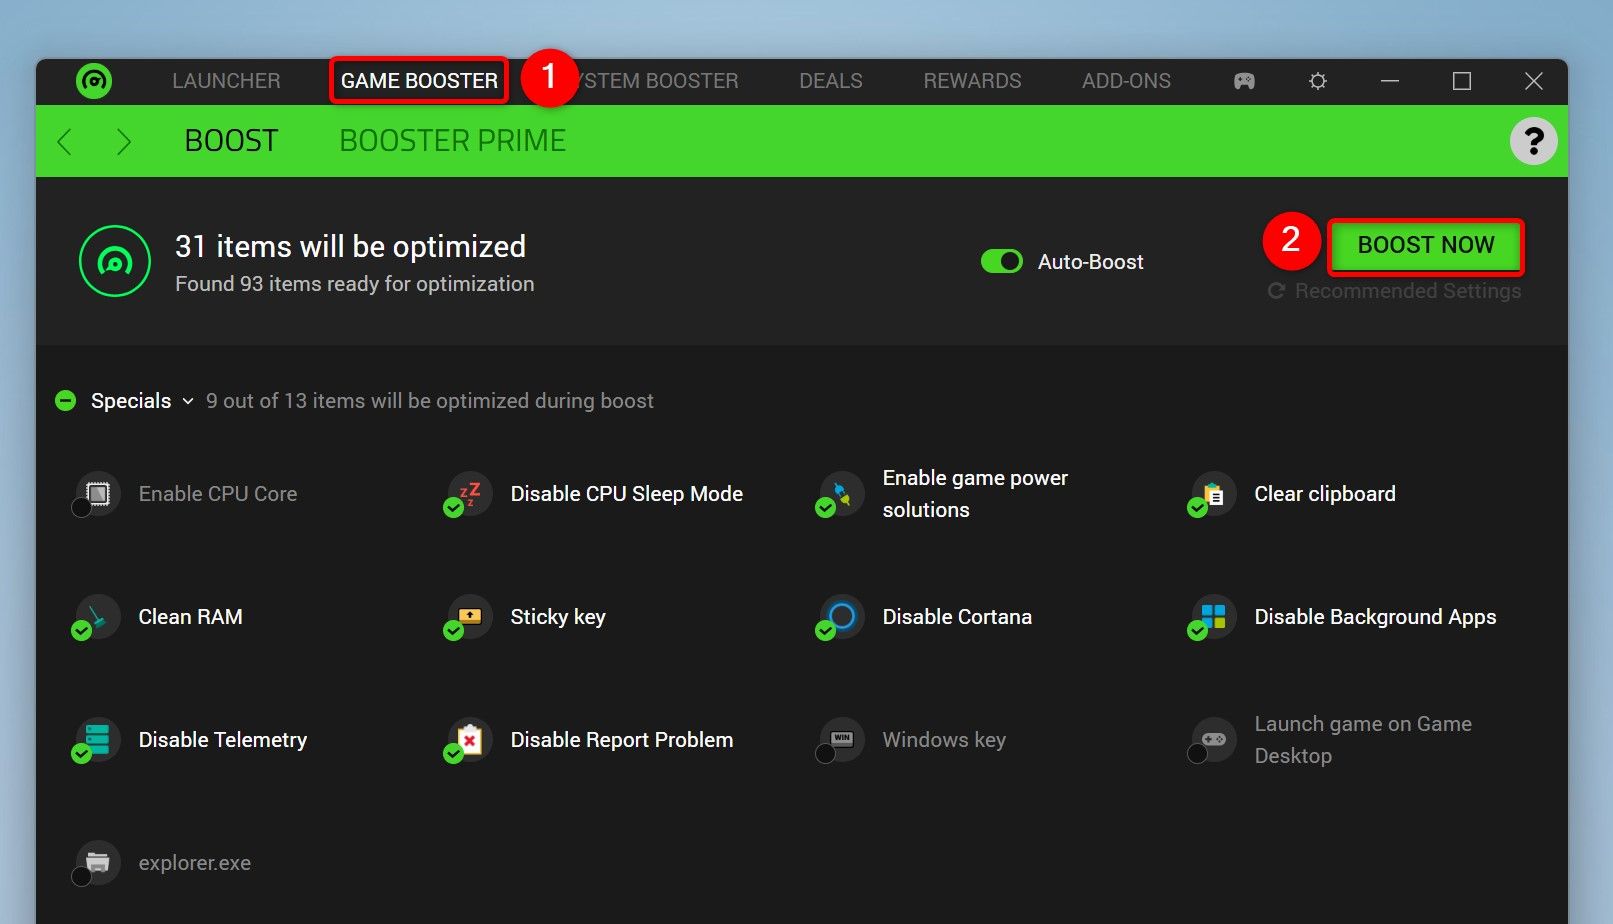
Another option you can use in this tool is Game Booster. At the top of the tool, click “Game Booster.” On the open page, you’ll see all the changes the tool will apply to your system. To make these changes, click the “Boost Now” button.
Optionally, you can enable the “Auto-Boost” option to let the tool automatically boost your games’ performance.
Disable SysMain Which Preloads Your Apps Into the RAM
Another way to improve an app or game’s performance is by making more RAM available. Windows 11 has a service called SysMain that preloads your frequently used apps into the RAM, allowing you to launch and use your apps smoothly. However, this process ends up using more of your RAM, leaving less RAM amount available to use for your other items. You can change that by turning off the service, so you have more RAM available to assign to your favorite apps and games.
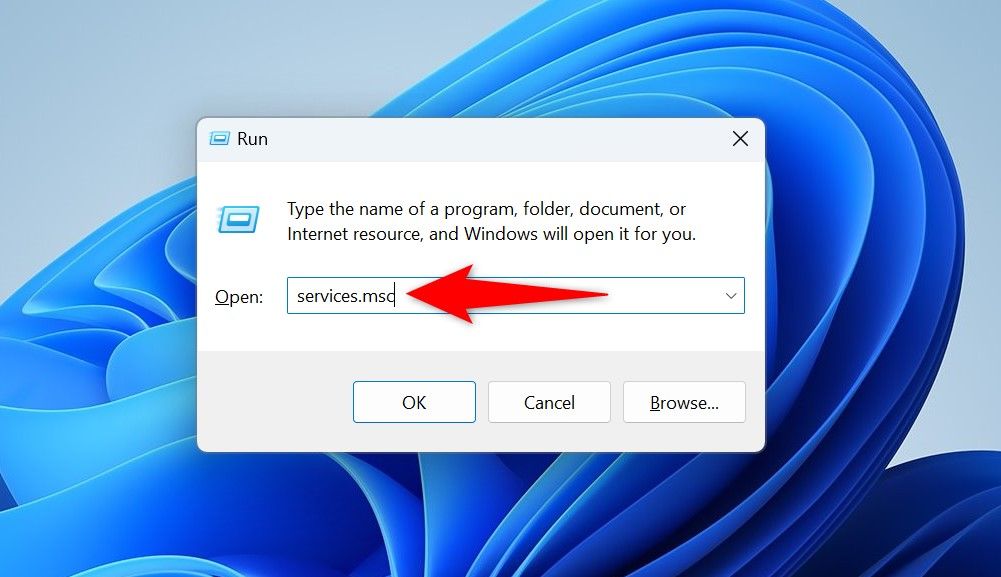
To do that, open the Run dialog box by pressing Windows+R. In the text field, type services.msc and select “OK” or press Enter.
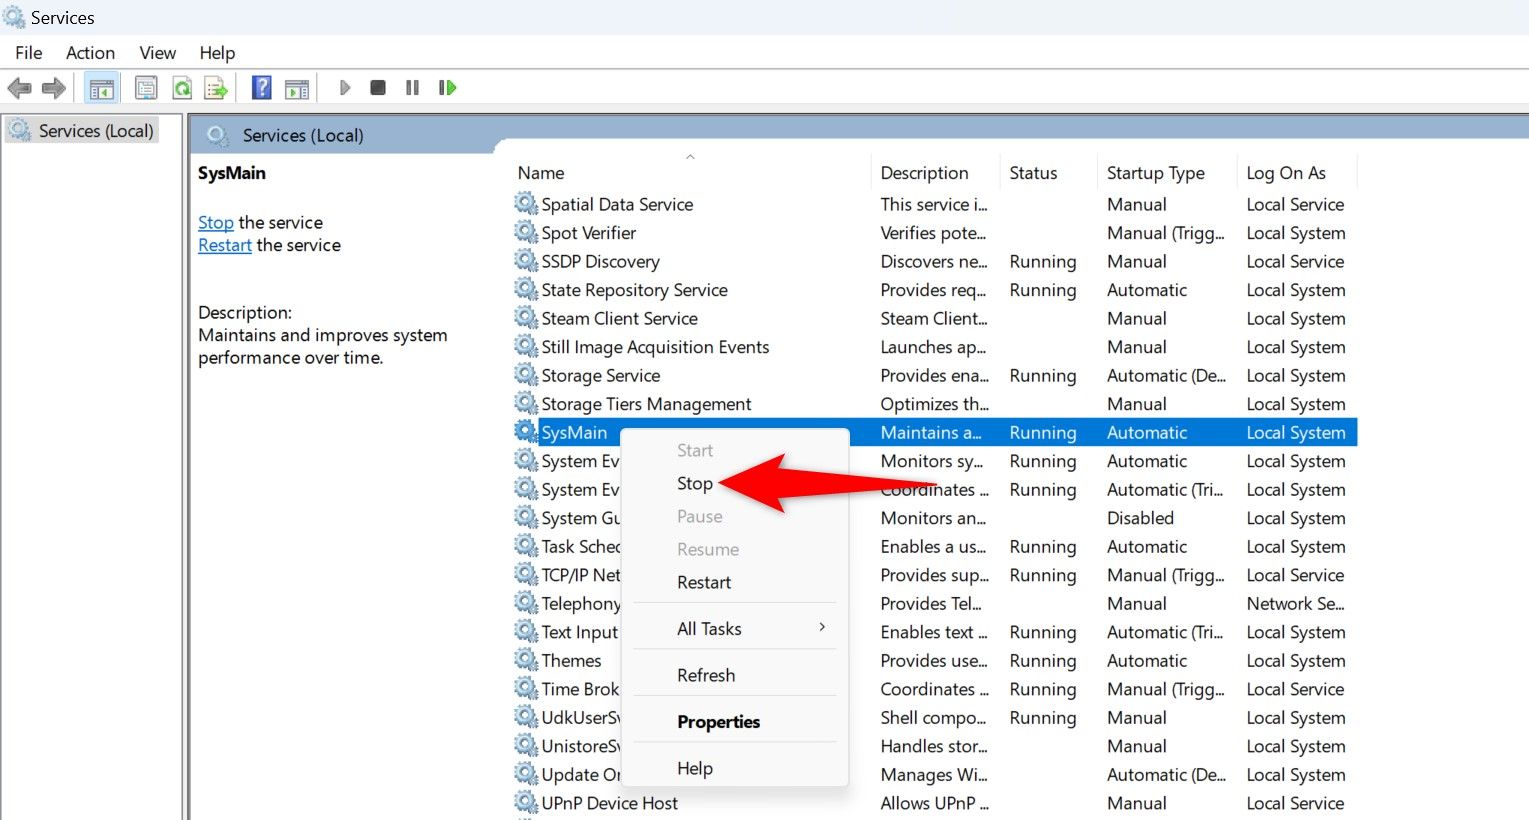
On the Services window that opens, in the right side, find the service named “SysMain.” To quickly find it, click any service on the list and start typing SysMain. Once you find the service, right-click it and choose “Stop.” This disables the service for now.
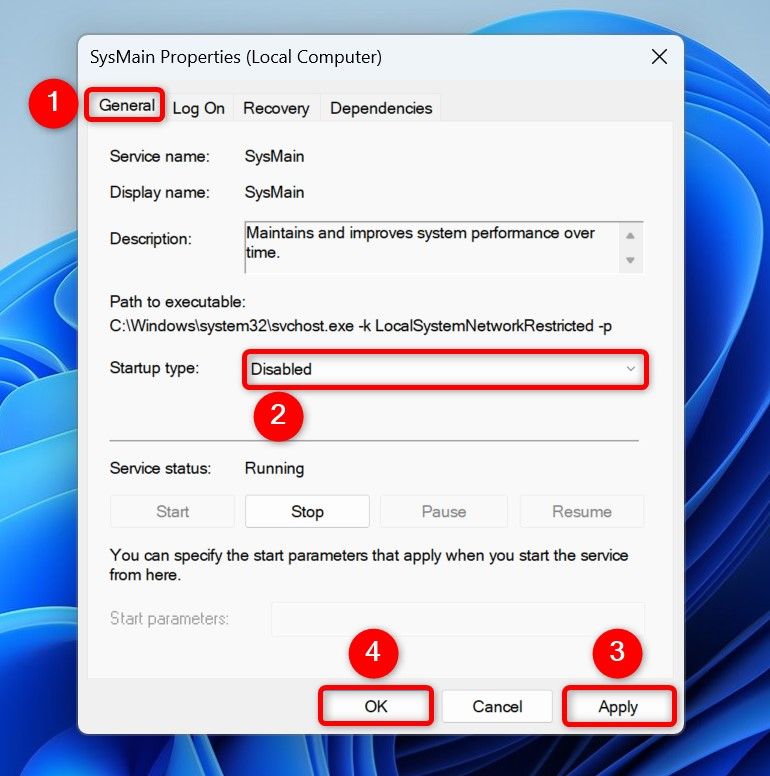
By default, Windows 11 automatically starts this service when you turn on your computer. To prevent your system from doing that, right-click the service again and choose “Properties.” On the open window, access the “General” tab. Here, click the “Startup Type” drop-down menu and choose “Disabled.” Then, click “Apply” followed by “OK.”
You can now close the Services window. In the future, you can re-enable the service by choosing “Automatic” from the “Startup Type” drop-down menu. Make sure to click “Apply” followed by “OK” then.
Add More RAM to Your PC
If your apps or games still aren’t performing as expected, your PC needs more physical RAM. In this case, you’ll have to find an empty RAM slot on your system and slide in an additional RAM module.
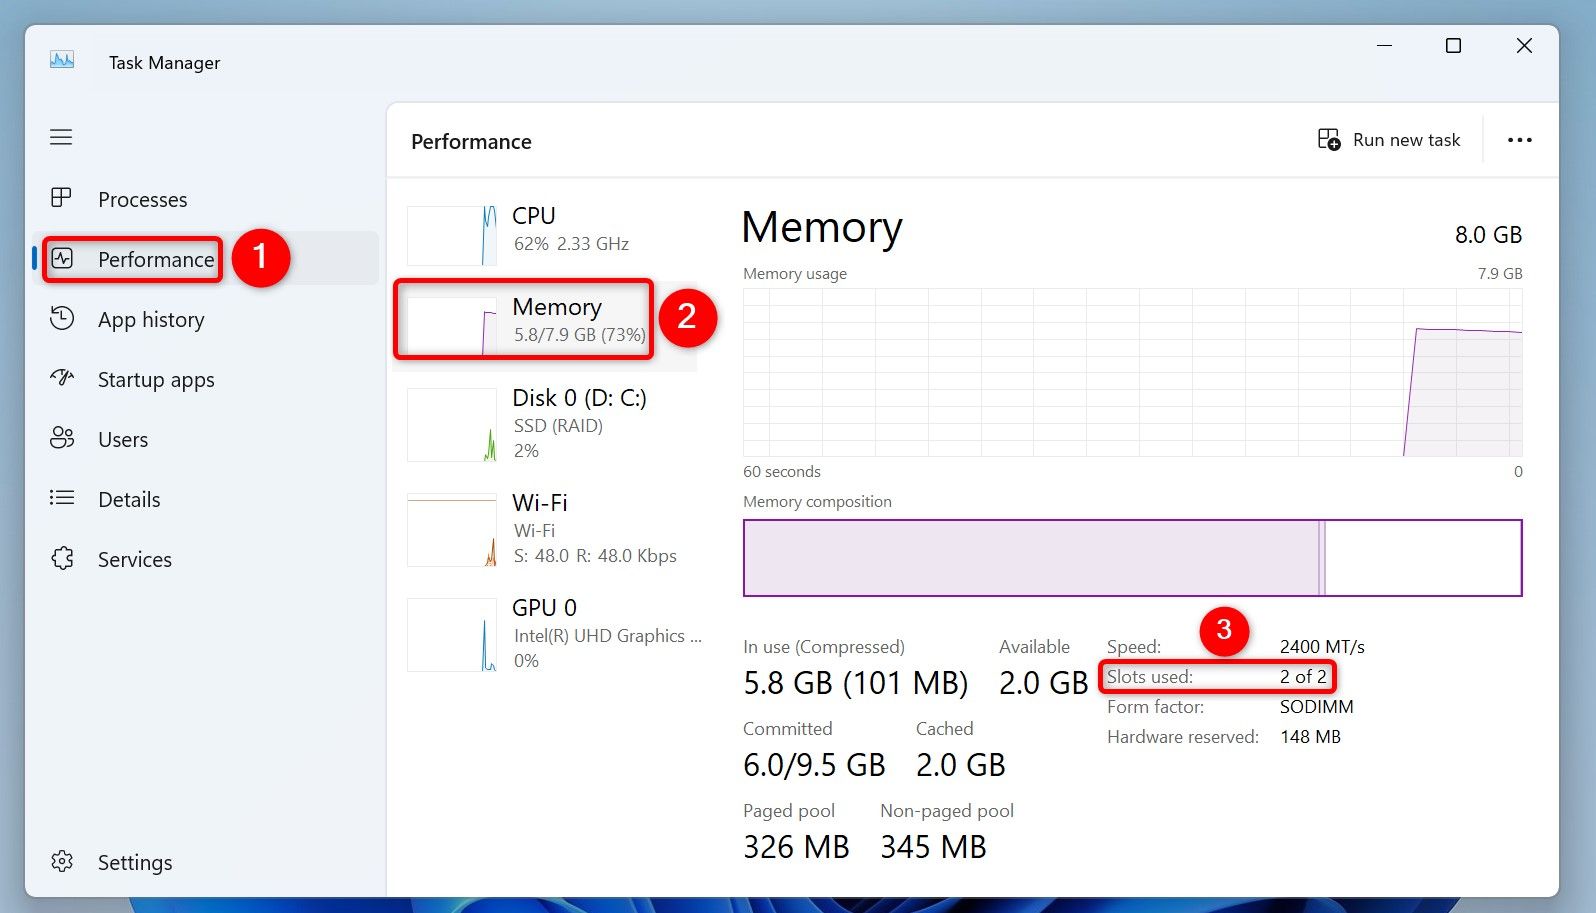
To check if a slot is available, launch Task Manager by pressing Ctrl+Shift+Esc. In the left sidebar, click “Performance.” On the right pane, choose “Memory.”
Check the value of “Slots Used.” If it says you have an empty slot available, you can add an additional RAM module.
If you’ve used up all the available physical RAM slots, you can still upgrade RAM. In this case, increase the RAM size. For example, if you currently use two modules of 4 GB RAM each, use two modules of 8 GB RAM each. This gives your PC a total of 16 GB RAM (an upgrade from 8 GB). You’ll have to find the compatible RAM type for your computer to do that.
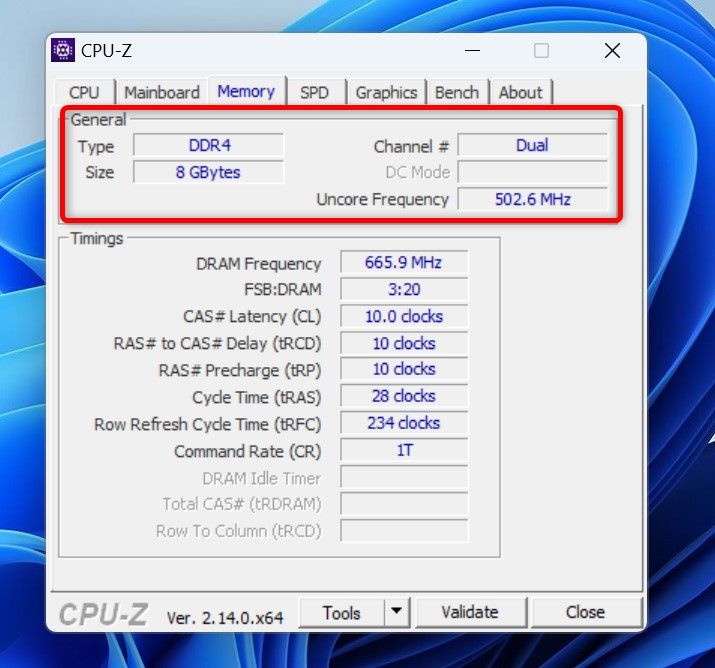
Use a free app like CPU-Z to find the type of RAM your motherboard supports.
And that’s how you give more RAM to your installed apps or games to make them run even smoother. Like that, debloating Windows 11 also helps you get better performance from your system.


