Your Windows operating system is more than just the building blocks of your PC’s user experience — it’s a trove of precious memories, captured in videos, photographs, and songs. You probably have years of files that paint a picture of you, yours, and your way of life, so the last thing you’d want to happen is for these meaningful moments to disappear. This is why it’s important to learn how to create a Windows backup. And fortunately, we know a thing or two about carrying out this task.
Whether you’ve never made a Windows backup in your life, or you need a quick refresher on a few parts of the process, our step-by-step guide has got you covered.

Microsoft
Windows 11 Backup and Restore
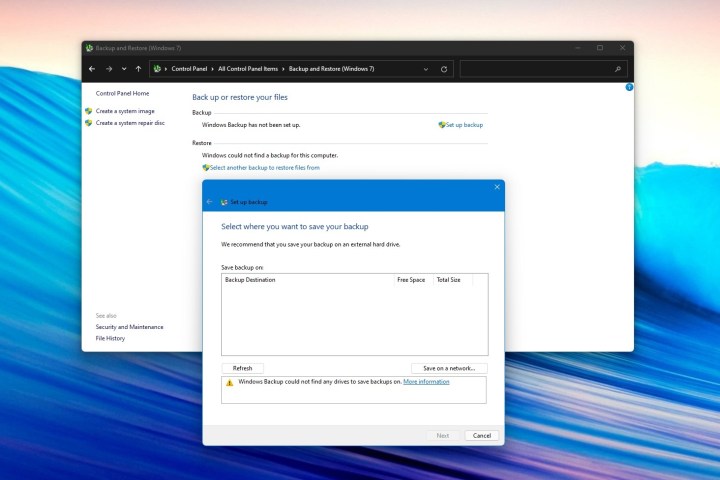
The easiest way to back up Windows 11 is with the Backup and Restore feature of the operating system. This feature is left over from Windows 7 and still works just fine in backing up individual files and folders. You can find it in the classic Control Panel. Here’s how to get started.
Step 1: Open your Start Menu and Search for Control Panel
Step 2: In the Search Control Panel Box, search for Backup and Restore and click the top result for Backup and Restore (Windows 7)
Step 3: On the page that opens up, click the Set up backup link. This will open a wizard. Follow the instructions on your screen. You’ll be prompted to pick an external drive to backup to, and the specific folders and files you want to backup. All files on this external drive will be deleted. Wait for it to complete. Depending on the number of files you’re backing up, it could take hours or mere minutes.
Step 4: Once the backup is complete, you can remove the backup drive from your computer. At any time, you can restore files from the drive by plugging it in, going back to the same settings page, and choosing the Select another backup to restore files from option.

Microsoft
Windows 11 System Image
System Image Backup is a more in-depth solution to backing up your entire PC. With it, you can save an exact copy of your system and then restore it in the event your PC crashes or is buggy. This type of backup will include all your programs and apps in addition to your files.
Step 1: Open your Start Menu and Search for Control Panel
Step 2: In the Search Control Panel Box, search for Backup and Restore and click the top result for Backup and Restore (Windows 7)
Step 3: Click the Create a System Image link in the sidebar.
Step 4: In the wizard that pops up, choose the On a hard disk option. Then, from there, click on your external disk drive or solid-state drive that you’ve plugged into your PC. You also can choose a DVD if you want, though a disk is the best option since it holds more storage.
Step 5: Click the Next button, and select all drives you want to include in the backup. Then, choose Start backup when you’re ready to backup. This full backup could take a while, and, if you’re using a traditional spinning hard drive as your backup method, it might take even longer.
Step 6: If you get a prompt about a system repair disk, click No. You won’t need this for a system image backup if you already have a USB drive or CD with Windows installation files. Otherwise, click Yes.
Step 7: Once the backup is complete, you can restore from this system image at any time from the Repair your computer option from the Windows 11 installer. Just choose the Troubleshoot option, and then choose system image recovery. From there, you can choose use the latest system image and follow the steps on your screen.
Why should I create a Windows 11 backup?
It may seem like a nuisance, but as a PC owner, creating an OS backup is one of the smartest things you can do for your system. Not only will it preserve a number of settings, customizations, and layout elements of your Windows UI, but your backup acts as a retrievable snapshot of your PC, up to the point you’ve created the backup (or whatever date range you select for the backup).
So even if the version of Windows 11 running on your PC decides to become evil and erase all your pictures, videos, music, and other important files, your backup will allow you to get them back.
What are the best HDDs and SSDs for backing up Windows 11?
Asking what company makes the best external drives is a lot like asking who makes the best TVs, computers, phones, tablets, etc. With so many brands to choose from, figuring out what drive to purchase for your Windows 11 backup can certainly be daunting. But based on our experiences and expertise, there’s definitely a few names we can recommend.
For HDDs, you can’t go wrong with products from Western Digital and SanDisk. For SSDs, we’re partial to models from Samsung, Crucial, and Lexa. Each of these companies produces external drives that are simple to use, built to last, and deliver exceptional transfer speeds.
Can I store a Windows 11 backup in cloud storage?
That all depends on the cloud storage platform you’re using. Generally speaking, most of these tools will allow you to store OS backups and other crucial files you’d like to keep safe.
If you’d like to keep things within the Microsoft ecosystem, OneDrive is a great platform to use. You can even set up automated backups for your most important files and content, so you won’t have to worry about doing so manually.
Editors’ Recommendations


