On Windows 10, changing the name of one file is easy. The problem is when you have to rename many files in a specific folder.
If you have to rename a long list of files, you can speed up the process using File Explorer, PowerShell, Command Prompt, and even the Microsoft PowerToys app.
This guide will walk you through several different ways to bulk rename files, including changing the extension.
How to rename multiple files using File Explorer
The easiest way to rename one or multiple files on Windows 10 is by using File Explorer.
Rename multiple files one at a time
To rename multiple files with the “Tab” key, use these steps:
- Open File Explorer.
- Quick tip: You can quickly open File Explorer with the icon in the taskbar, the “Windows key + E” keyboard shortcut, or by clicking the File Explorer icon from the left pane in the Start menu.
- Navigate to the folder with the files to rename.
- Click the View tab.
- Select the Details view.
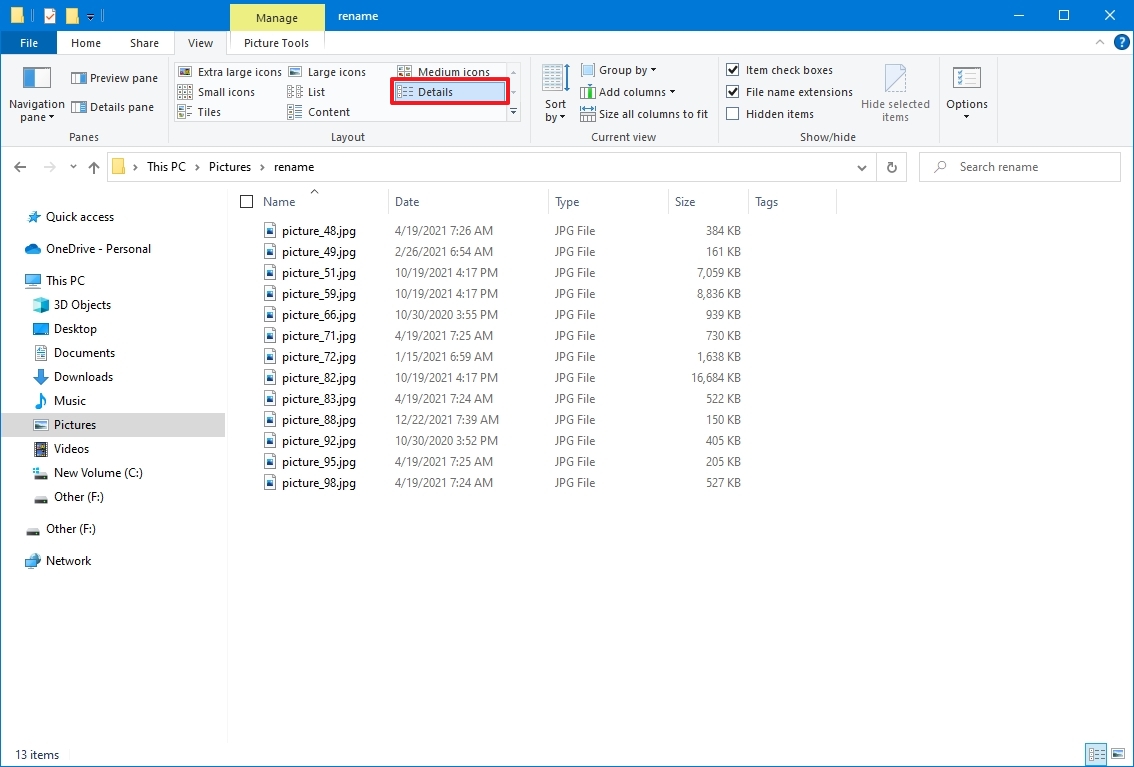
- Select the first file in the folder.
- Click the Home tab.
- Click the Rename button.
- Quick tip: Alternatively, you can press the F2 button. Right-click the file and select the Rename option from the context menu. Or you can click the file once and slowly click the name again to trigger the rename action.
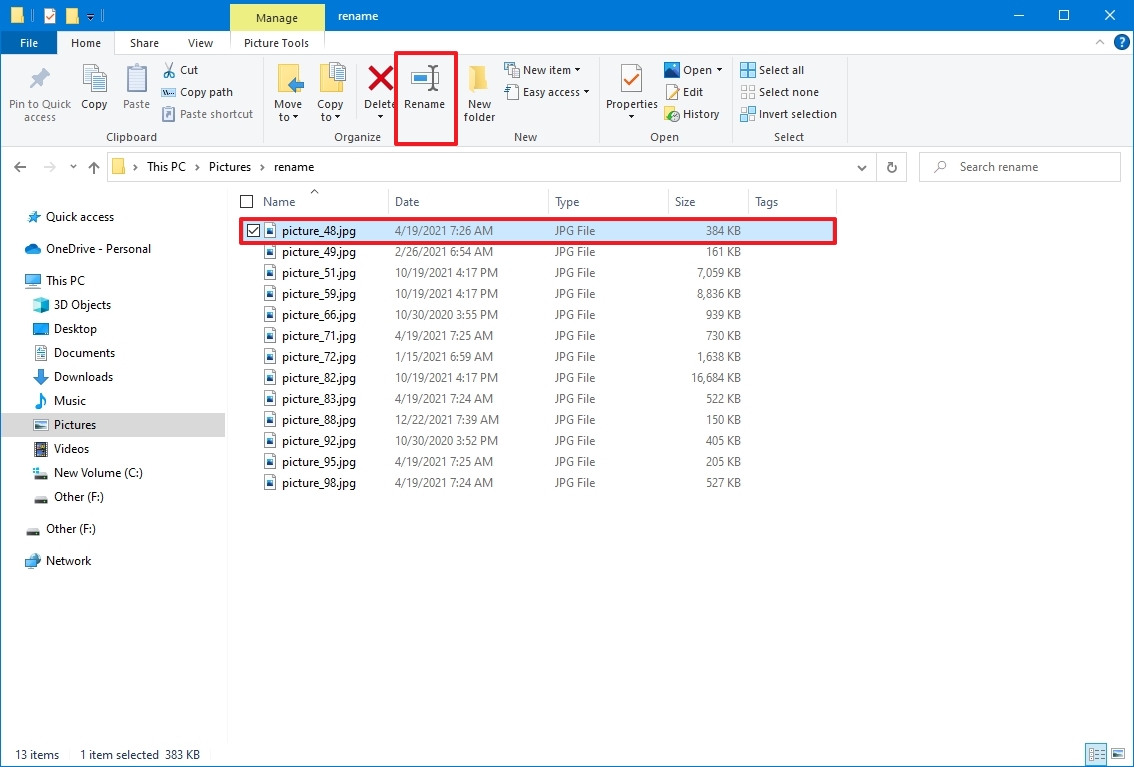
- Confirm a new name for the file.
- Press the Tab key to jump and trigger the rename action for the next file down the list.
- Confirm the new file name.
- Press the Tab key again to jump and trigger the next rename.
- Quick tip: You can keep pressing the Tab key to skip the file and continue renaming other files.
- Continue repeating steps 9 and 10 to rename all the files.
Once you complete these steps, keep pressing the “Tab” key to continue renaming files in the location.
Rename multiple files at once
To rename multiple files in bulk with the same name structure on Windows 10, use these steps:
- Open File Explorer.
- Navigate to the folder with the files to change their names.
- Click the View tab.
- Select the Details view.

- Click the Home tab.
- Click the Select all button.
- Quick tip: Alternatively, you can use the “Ctrl + A” keyboard shortcut to select all files. You can press and hold the Ctrl key and then click each file to rename. Or you can choose the first file, press and hold the Shift key, and then click the last file to select a group.
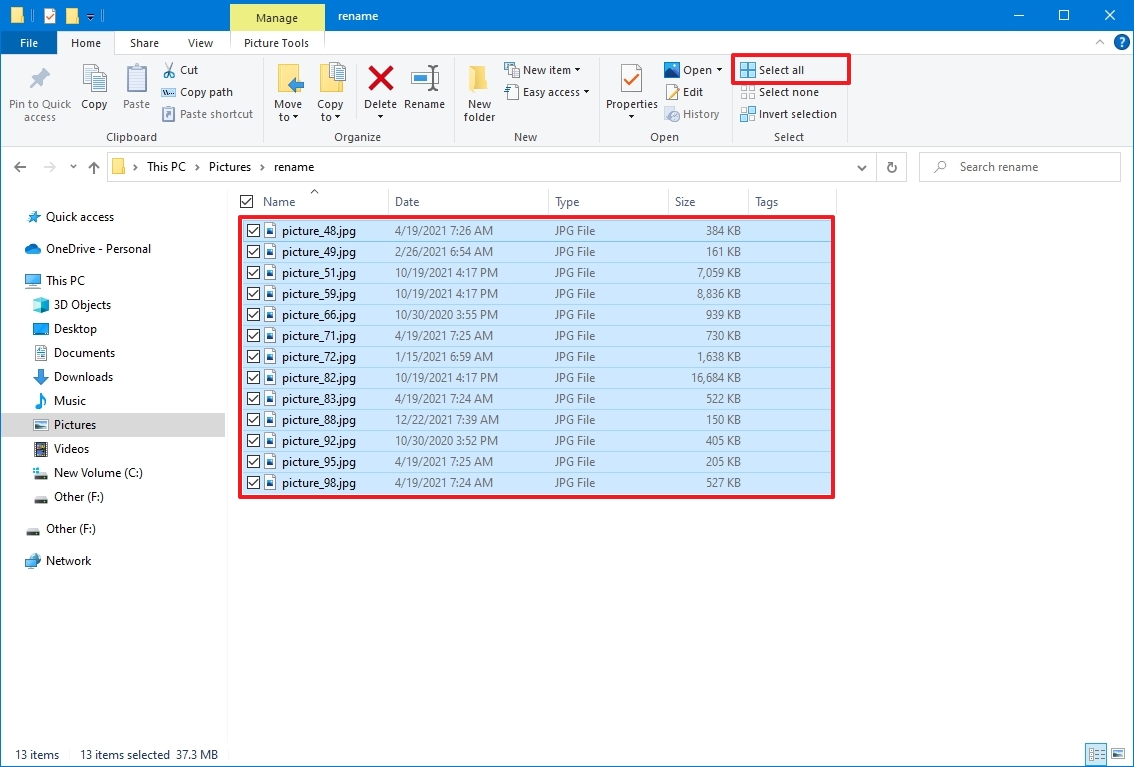
- Click the Rename button from the “Home” tab.
- Confirm the new file name base and press Enter.
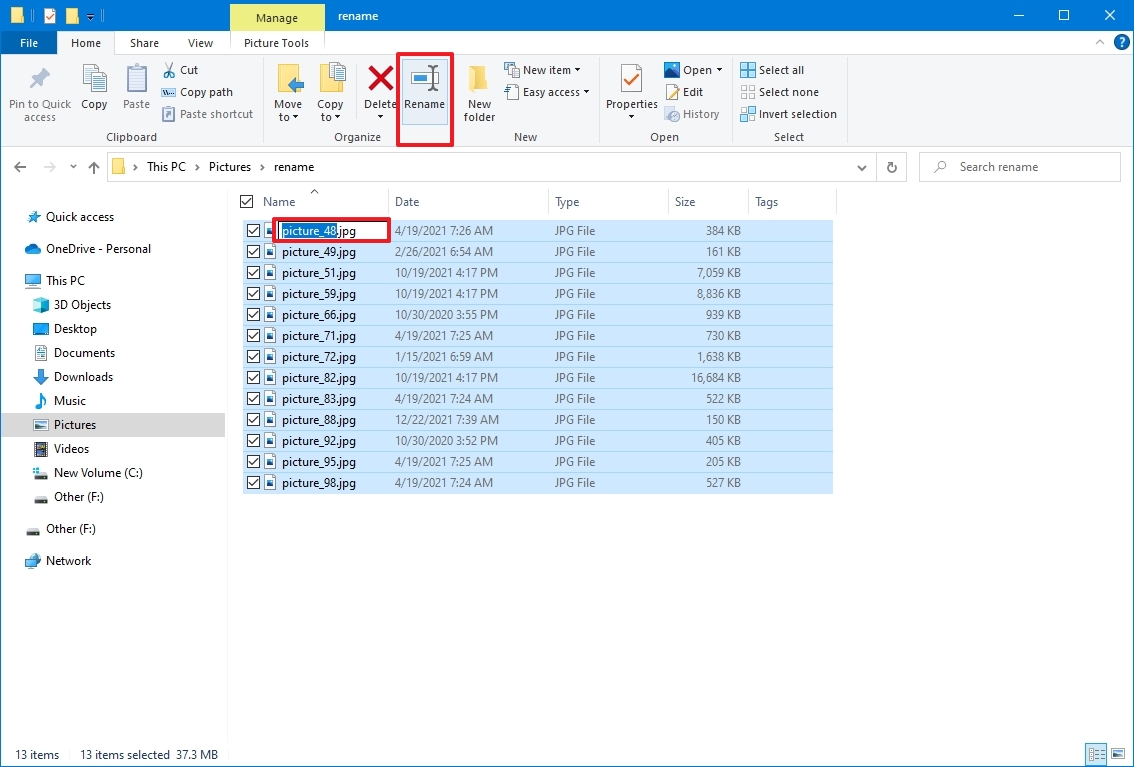
After you complete the steps, the selected files will be renamed using the same naming structure you specified with a count number in parentheses to make each file name different. For example, summer_trip_2022 (1).jpg and summer_trip_2022 (2).jpg.
You could use the “Ctrl + Z” keyboard shortcut to undo the changes if you made a mistake. Or you can click the menu button from the title bar and select the Undo button.
How to rename multiple files using Command Prompt
Command Prompt also offers multiple ways to change the name of multiple files in bulk on Windows 10.
Rename single file
To rename one file with Command Prompt on Windows 10, use these steps:
- Open Start.
- Search for Command Prompt and click the top result to open the app.
- Type the following command example to navigate to the folder with the files to rename, and press Enter: cd c:PATHTOFILES
For instance, this example opens the “files” folder inside “Documents”: cd %USERPROFILE%Picturesrename
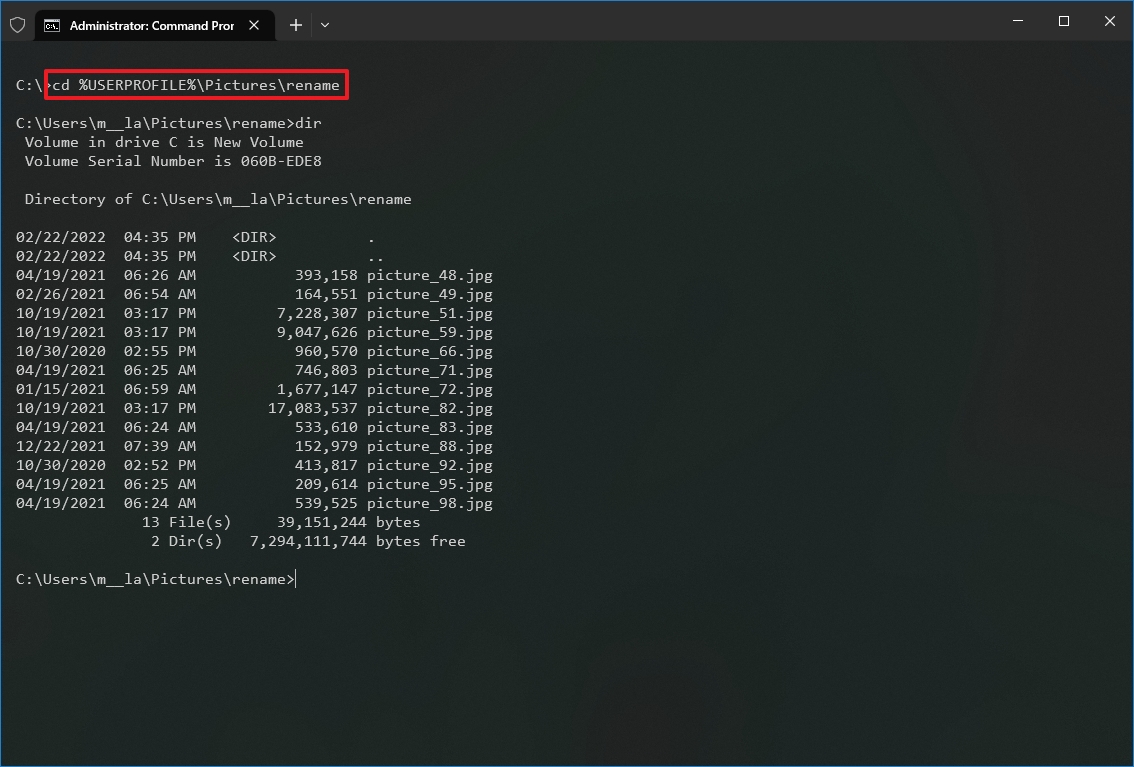
- Type the following command to view the files in the location and press Enter: dir
- Type the following command to rename the file and press Enter: ren “OLD-FILENAME.EXTENSION” “NEW-FILENAME.EXTENSION”
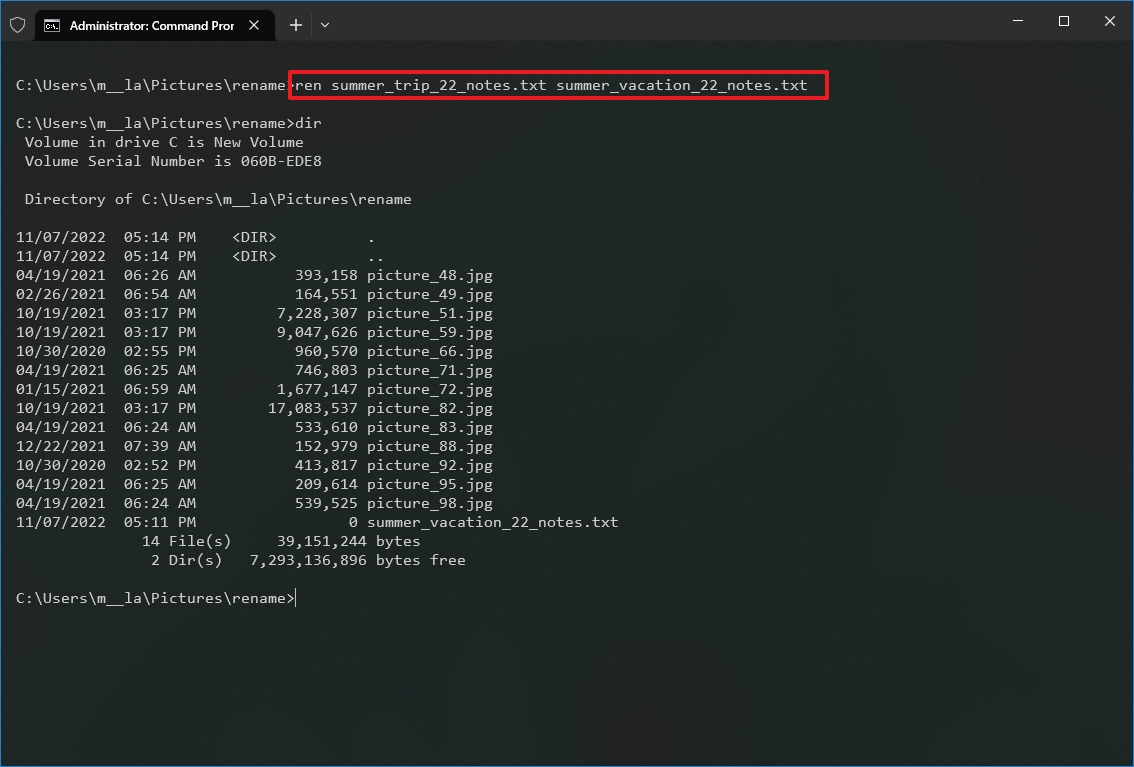
In the command, replace “OLD-FILENAME.EXTENSION” and “NEW-FILENAME.EXTENSION” with the old and new file names. The quotation marks are only necessary if the title includes spaces. For instance, this command renames the file to “summer_trip_22_notes.txt”: ren summer_trip_22_notes.txt summer_vacation_22_notes.txt
- Repeat step 5 to change the name of the remaining files.
Once you complete these steps, Command Prompt will rename the file with the new name available in the command.
Rename multiple files
To rename multiple files in bulk with the same name structure with Command Prompt, use these steps:
- Open Start.
- Search for Command Prompt and click the top result to open the app.
- Type the following command example to navigate to the folder with the files to rename, and press Enter: cd c:PATHTOFILES
For example, this example opens the “files” folder inside “Documents”: cd %USERPROFILE%Picturesrename
- (Optional) Type the following command to view the files in the location and press Enter: dir
- Type the following command to rename the files in bulk and press Enter: ren *.FILE-EXTENSION ???-FILE-NAME.*
In the command, replace “FILE-EXTENSION” with the extension to change and “FILE-NAME” with part of the name to add to the files. The asterisk (*) is a wildcard that tells the ren command to rename everything with a specific extension. The question mark (?) is also a wildcard, but it represents a character of the original name you want to keep as part of the new name. For example, this command renames all “.jpg” files leaving the first three characters (which works as a unique identifier to avoid duplication) and appends “-hikingTrails” to the name: ren *.jpg ???-hikingTrip.*
- Quick tip: When renaming files, the ren command sees a period (.) as the end of the filename. This means that if you have files with a period as part of the name, the command may produce unexpected results.
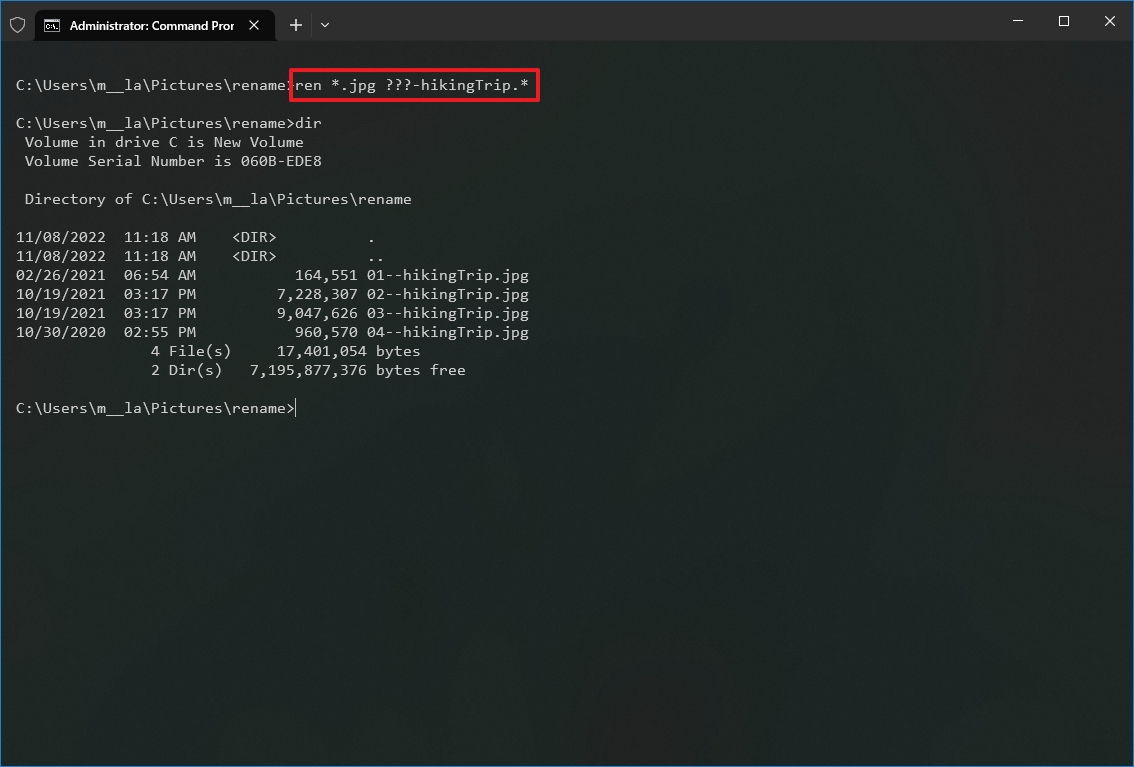
After you complete the steps, the files will be renamed using the settings you specified.
Trim multiple file names
To make file names shorter with Command Prompt on Windows 10, use these steps:
- Open Start.
- Search for Command Prompt and click the top result to open the app.
- Type the following command example to navigate to the folder with the files to rename, and press Enter: cd c:PATHTOFILES
This example opens the “files” folder inside “Documents”: cd %USERPROFILE%Picturesrename
- (Optional) Type the following command to view the files in the location and press Enter: dir
- Type the following command to make file names shorter and press Enter: ren *.* ?????.*
In the command, the asterisk (*) matches all the file names and extensions in the folder, and the question marks (?) indicate how many characters to use for the new file name. For instance, this command trims the file names longer than five characters: ren *.* ?????.*
- Quick note: If the file name has fewer than five characters, the name will not change. (If you want to make the file name longer, add extra question marks in the syntax.)
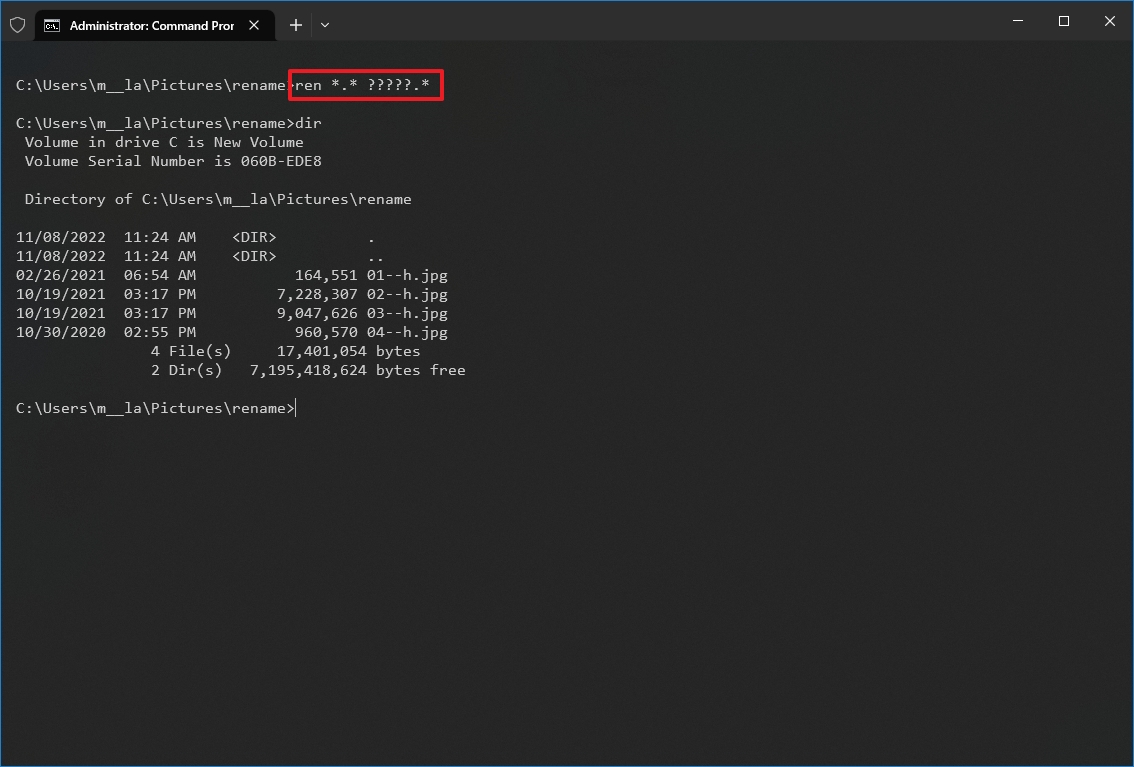
Once you complete these steps, you will have shorter file names, depending on the question marks (?) available in the command.
Modify multiple file names
To rename part of the name on similar files on Windows 10, use these steps:
- Open Start.
- Search for Command Prompt and click the top result to open the app.
- Type the following command example to navigate to the folder with the files to rename, and press Enter: cd c:PATHTOFILES
This example opens the “files” folder inside “Documents”: cd %USERPROFILE%Picturesrename
- (Optional) Type the following command to view the files in the location and press Enter: dir
- Type the following command to rename the part of the file name and press Enter: ren OLD-FILE-NAME-PART*.* NEW-FILENAME-PART*.*
In the command, replace “OLD-FILE-NAME-PART” and “NEW-FILENAME-PART” with the old and new parts of the filename. The asterisk (*) is a wildcard that will match the rest of the filename and file extension to append the new part of the name. For instance, this command renames files that start with “summer_trip_22” to “vacation_2022”: ren summer_trip_22*.* vacation_2022*.*
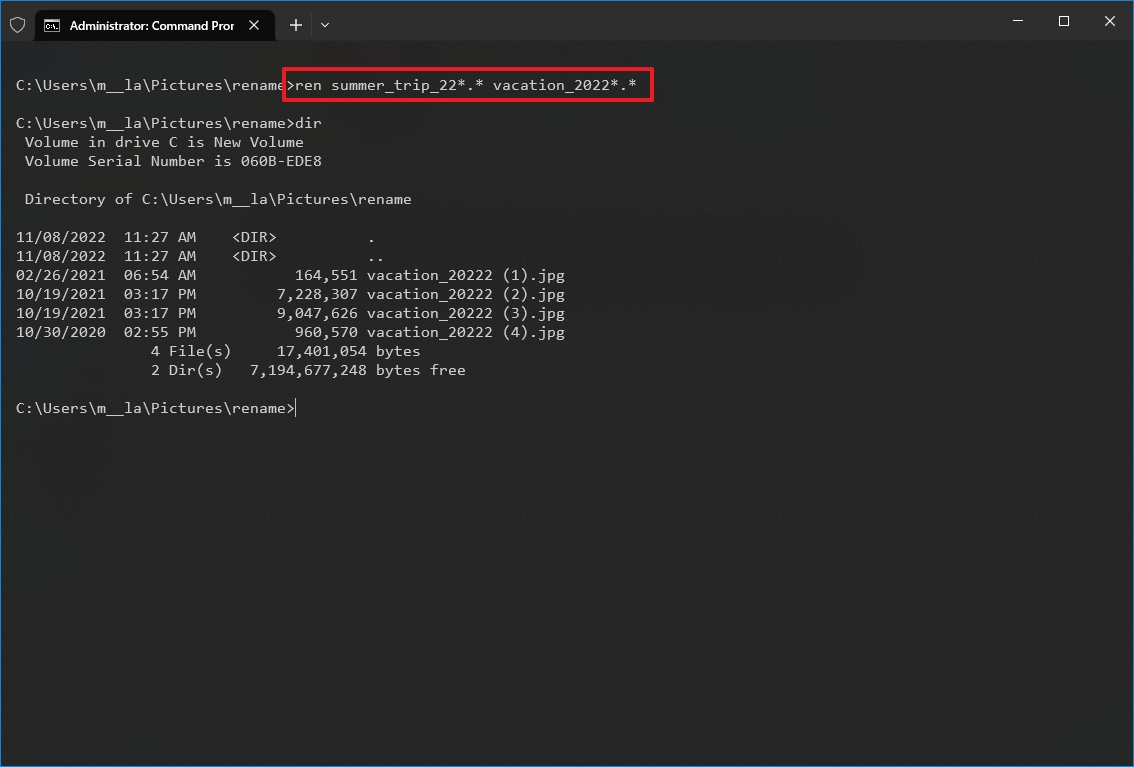
After you complete the steps, the command will modify those files similar to the new name structure available in the command.
Change file extension
To change the file extension to another, use these steps:
- Open Start.
- Search for Command Prompt and click the top result to open the app.
- Type the following command example to navigate to the folder with the files you want to rename and press Enter: cd c:PATHTOFILES
This example opens the “files” folder inside “Documents”: cd %USERPROFILE%Picturesrename
- (Optional) Type the following command to view a listing of the files in the location and press Enter: dir
- Type the following command to change the file extension and press Enter: ren *.OLD-EXTENSION *.NEW-EXTENSION
In the command, change “OLD-EXTENSION” and “NEW-EXTENSION” with the old and new file extensions. For instance, this command changes the extension from “.txt” to “.doc” compatible with Microsoft Word for the files in the location: ren *.txt *.doc
This example without wildcards (*) changes the only extension of a single file from “.txt” to “.doc”: ren vacation_2022_notes.txt vacation_2022_notes.doc
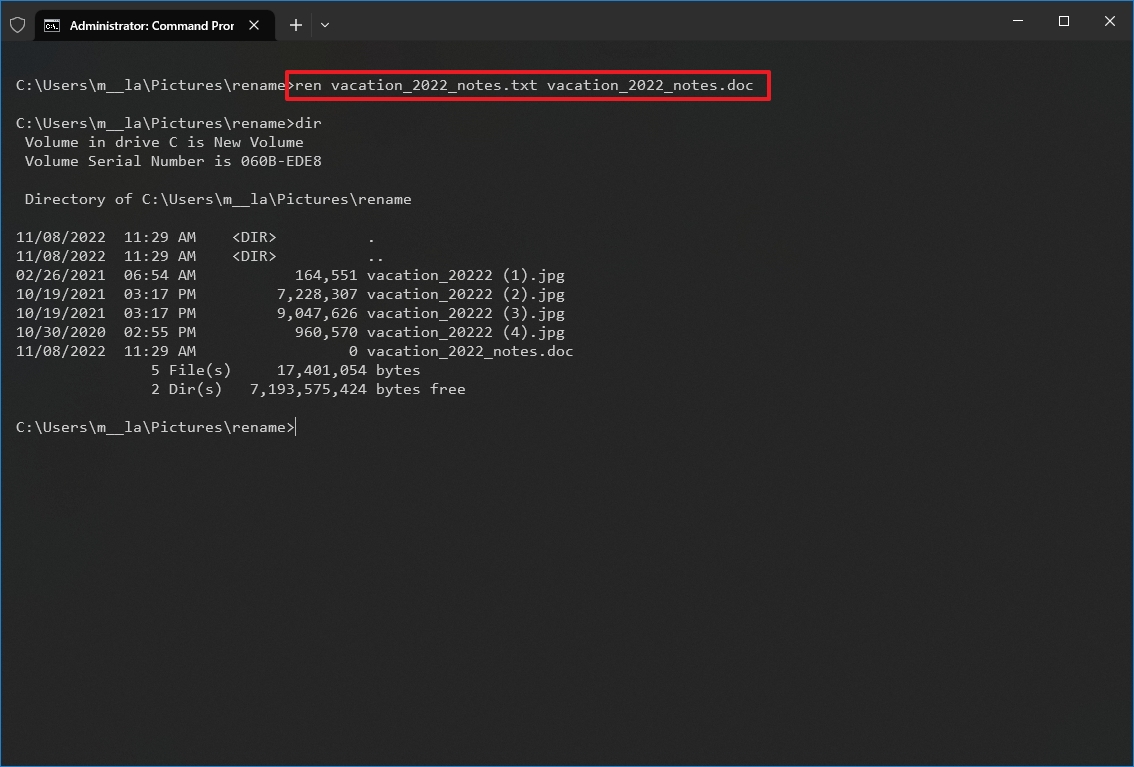
Once you complete the steps, the file extension will be replaced with the new extension in the command.
Rename files with specific extension
The previous steps rename every file within the location. However, if you want to rename only a group of files with a specific format, you must omit the asterisk (*) and specify the command’s target extension.
To rename files with a specific file extension with Command Prompt, use these steps:
- Open Start.
- Search for Command Prompt and click the top result to open the app.
- Type the following command example to navigate to the folder with the files to rename, and press Enter: cd c:PATHTOFILES
This example opens the “files” folder inside “Documents”: cd %USERPROFILE%Picturesrename
- (Optional) Type the following command to view the files in the location and press Enter: dir
- Type the following command to change the file extension in the location and press Enter: ren OLD-FILE-NAME*.EXTENSION NEW-FILE-NAME*.EXTENSION
In the command, change “OLD-FILE-NAME,” “NEW-FILE-NAME,” and “EXTENSION” with the old and new file name and extension. For instance, this command only renames images with a “.jpg” extension: ren picture-*.jpg vacation*.jpg
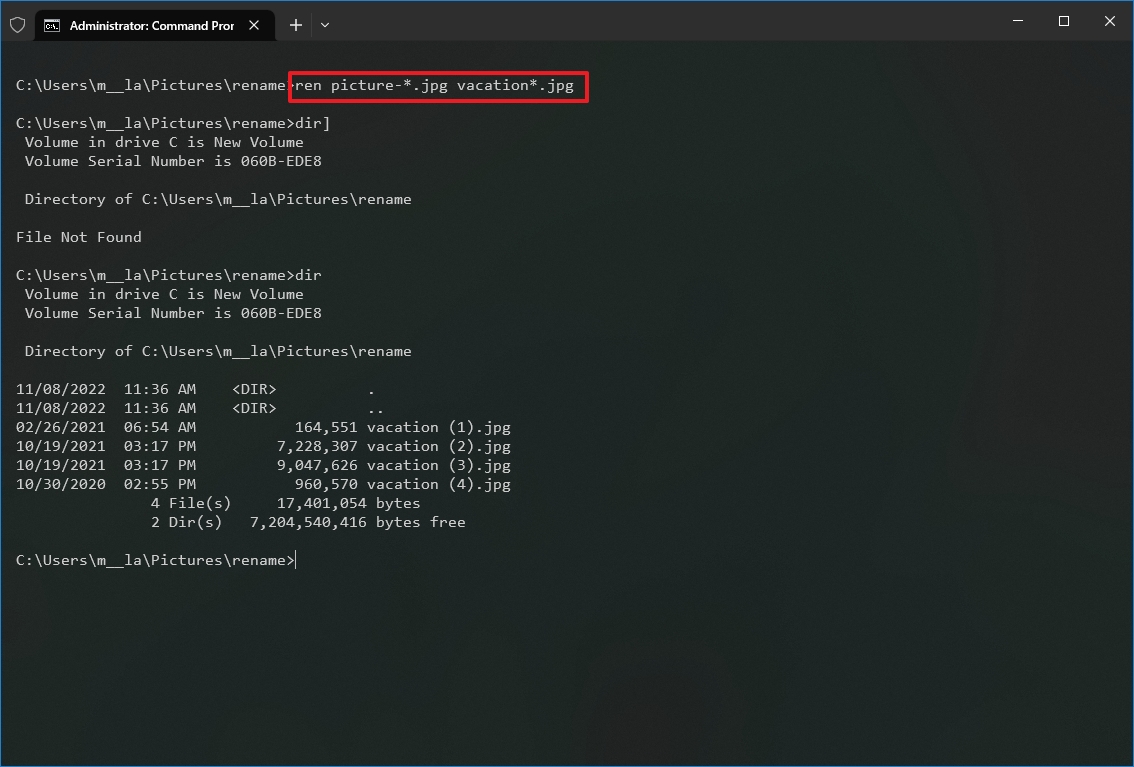
After you complete the steps, Command Prompt will rename the files using the options you specified in the command.
How to rename multiple files using PowerShell
You can also use PowerShell to rename multiple files on Windows 10. Although you have many ways to manipulate files using this tool, the instructions in this guide are only meant to get started with the most common scenarios.
Rename single file
To rename only one file with a PowerShell command, use these steps:
- Open Start.
- Search for PowerShell and click the top result to open the app.
- Type the following command example to navigate the folder with the files to rename and press Enter:
cd PATHTOFOLDER
In the command, replace “PATHTOFOLDER” with the actual path to the location. For example, this command navigates the “files” folder inside “Documents”: cd C:UsersUSERNAMEPicturesrename
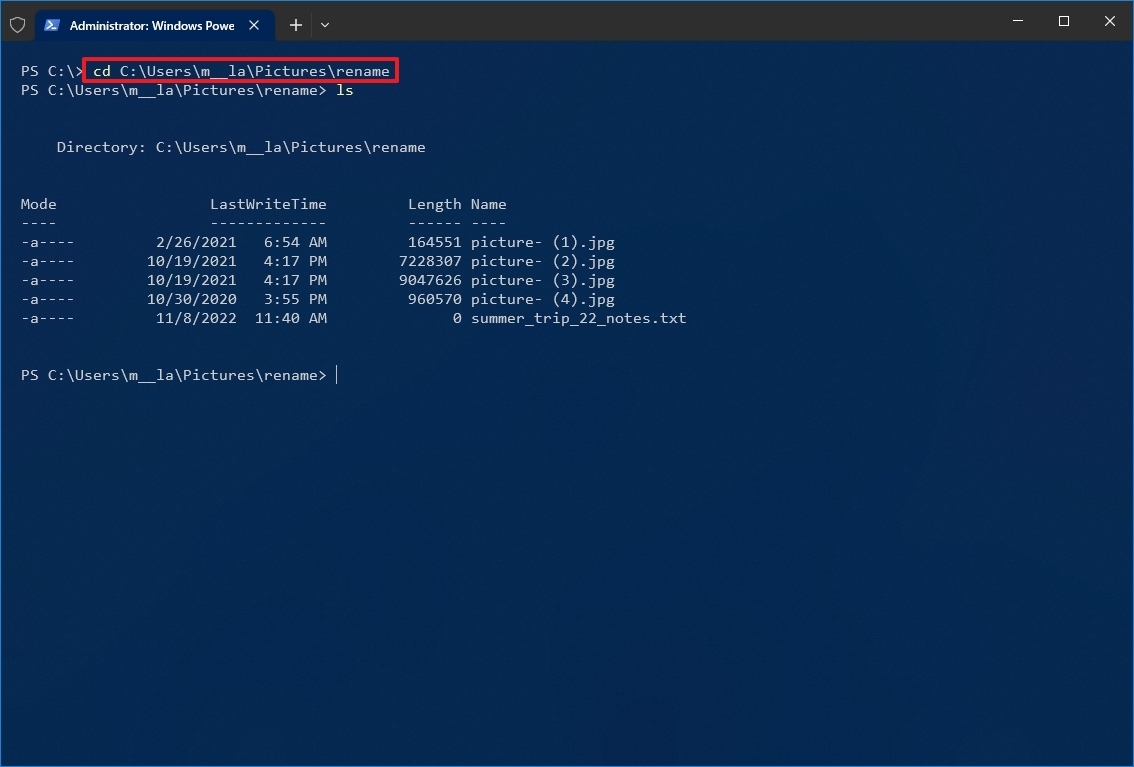
- (Optional) Type the following command to view the files in the location and press Enter: ls
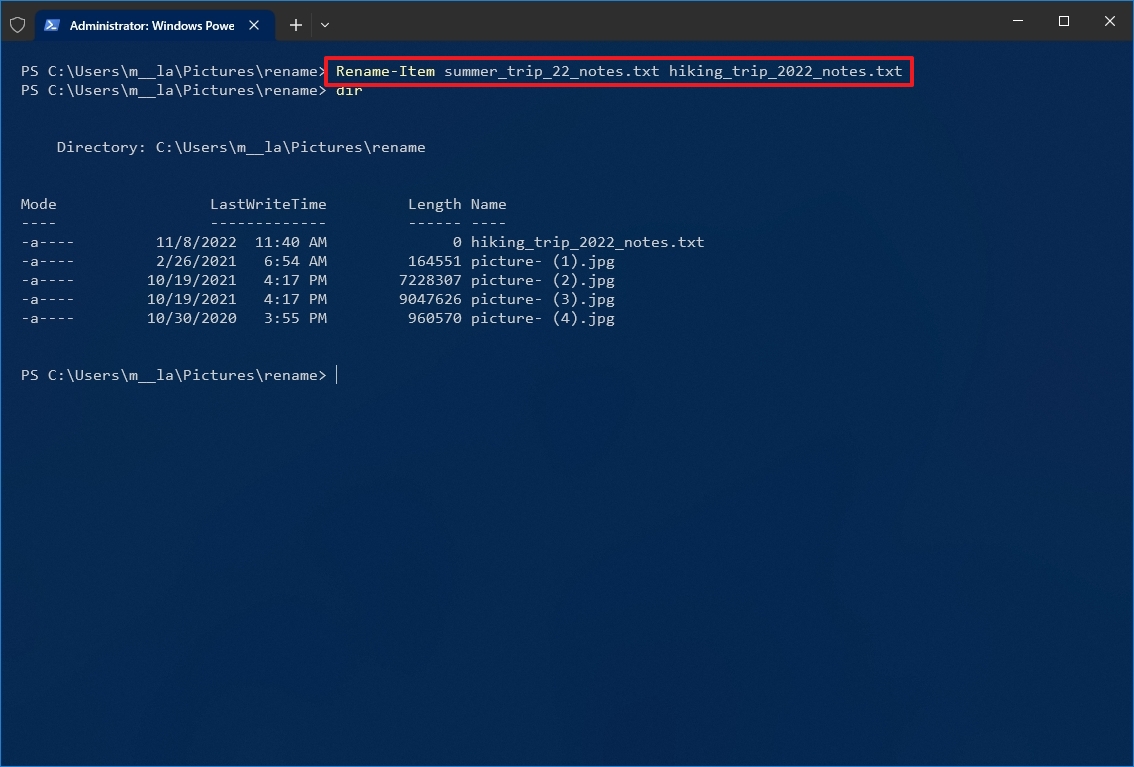
- Type the following command to change the name of a single file and press Enter: Rename-Item “OLD-FILE-NAME.EXTENSION” “NEW-FILE-NAME.EXTENSION”
In the command, specify the old and new file names and extensions. The quotation marks are only required if the name includes spaces. For instance, this command renames the file to “hiking_trip_2022_notes.txt”: Rename-Item summer_trip_22_notes.txt hiking_trip_2022_notes.txt
- Repeat step 5 to continue renaming other files.
Once you complete the steps, the command will change the file’s name you specified.
Rename multiple files in bulk
To rename multiple files in bulk when the name structure is not important, use these steps:
- Open Start.
- Search for PowerShell and click the top result to open the app.
- Type the following command example to navigate to the folder with the files to rename and press Enter: cd PATHTOFOLDER
In the command, replace “PATHTOFOLDER” with the actual path to the location. For example, this command navigates the “files” folder inside “Documents”: cd C:UsersUSERNAMEPicturesrename
- (Optional) Type the following command to view a listing of the files in the location and press Enter: ls
- Type the following command to rename multiple files in bulk and press Enter: ls | %{Rename-Item $_ -NewName (“NEW-FILE-NAME-{0}.EXTENSION” -f $nr++)}
In the command, replace “NEW-FILE-NAME” with the actual structure name you want to use. For instance, this command renames images with a “.jpg” extension using the same (“beach-trip-2022-“) naming structure and appends a different number at the end of the name: ls | %{Rename-Item $_ -NewName (“beach-trip-2022-{0}.jpg” -f $nr++)}
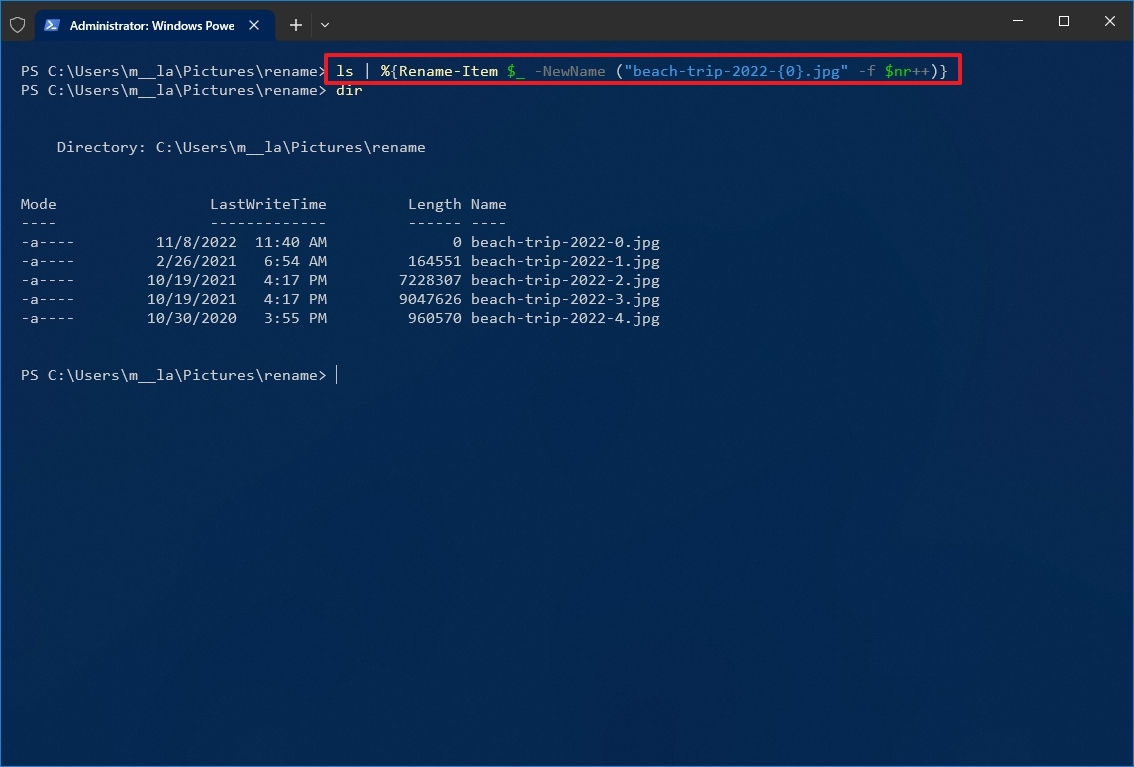
After you complete these steps, the files with the specified format will be renamed using the naming structure available with the command.
Trim multiple file names
To make file names shorter, or trim part of the names by an “N” number of characters, use these steps:
- Open Start.
- Search for PowerShell and click the top result to open the app.
- Type the following command example to navigate the folder with the files to rename and press Enter: cd PATHTOFOLDER
In the command, replace “PATHTOFOLDER” with the actual path to the location. For example, this command navigates the “files” folder inside “Documents”: cd C:UsersUSERNAMEPicturesrename
- (Optional) Type the following command to view the files in the location and press Enter: ls
- Type the following command to rename files using shorter names and press Enter: ls | Rename-Item -NewName {$_.name.substring(0,$_.BaseName.length-N) + $_.Extension}
In the command, inside “$_.BaseName.length-N” update the value of “N” to specify the number of characters to remove. For instance, this command trims the name of your files by eight characters: ls | Rename-Item -NewName {$_.name.substring(0,$_.BaseName.length-8) + $_.Extension}
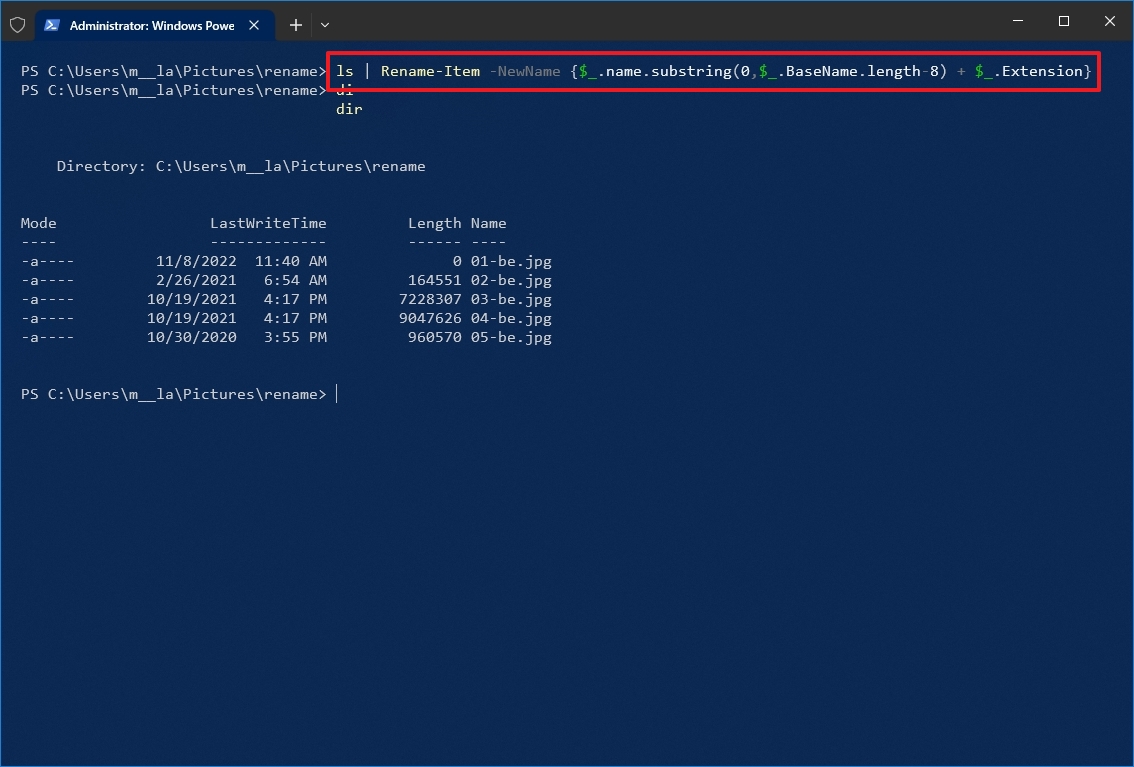
Once you complete these steps, the files in the location will now have shorter names (right to left), depending on the length specified in the command.
Delete part of the name from multiple files
To remove part of the file name on multiple files with PowerShell commands, use these steps:
- Open Start.
- Search for PowerShell and click the top result to open the app.
- Type the following command example to navigate to the files to rename and press Enter: cd PATHTOFOLDER
In the command, replace “PATHTOFOLDER” with the actual path to the location. For example, this command navigates the “files” folder inside “Documents”: cd C:UsersUSERNAMEPicturesrename
- (Optional) Type the following command to view the files in the location and press Enter: ls
- Type the following command to remove part of the file name and press Enter: ls | Rename-Item -NewName {$_.name -replace “OLD-FILE-NAME-PART”,””}
In the command, replace “OLD-FILE-NAME-PART” with the actual part of the name you want to replace. For instance, this command removes the word “trip” from the name of all files in the folder: ls | Rename-Item -NewName {$_.name -replace “-be”,””}
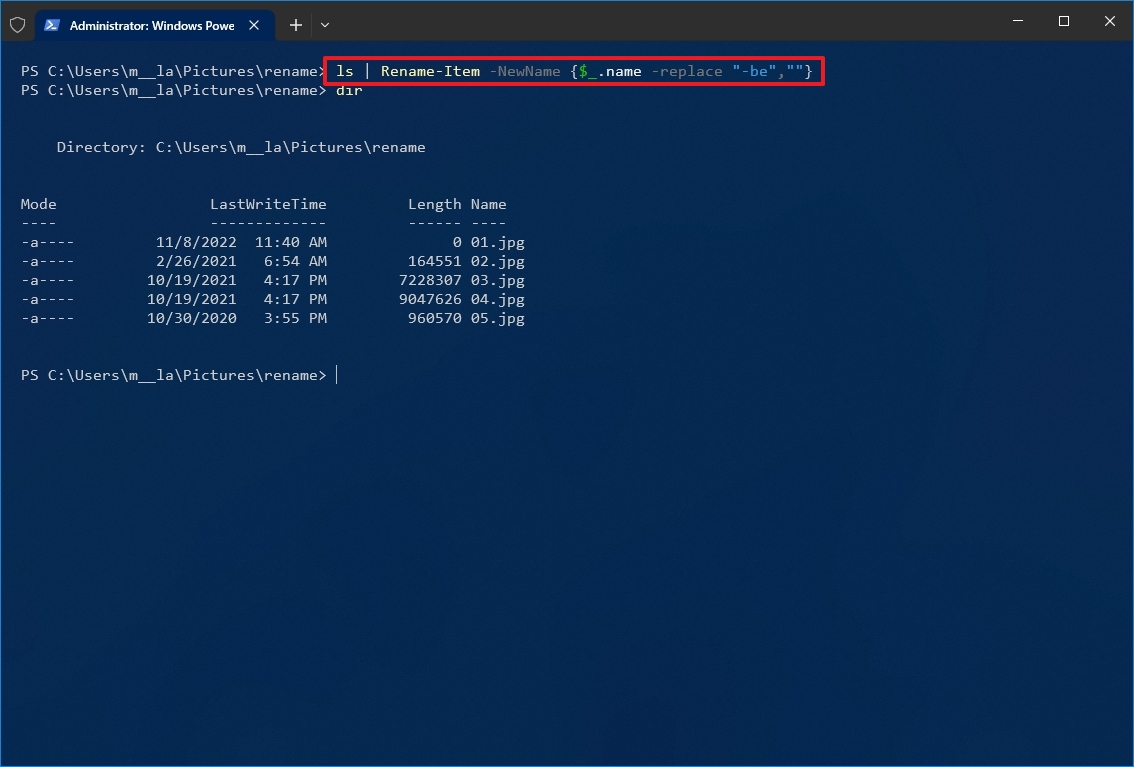
After you complete the steps, the command will remove the file name part as specified in the command.
Replace part of the name from multiple files
To rename the same part of the file name, use these steps:
- Open Start.
- Search for PowerShell and click the top result to open the app.
- Type the following command example to navigate to the folder with the files to rename and press Enter: cd PATHTOFOLDER
In the command, replace “PATHTOFOLDER” with the actual path to the location. For example, this command navigates the “files” folder inside “Documents”: cd C:UsersUSERNAMEDocumentsfiles
- (Optional) Type the following command to view a listing of the files in the location and press Enter: ls
- Type the following command to replace part of file name and press Enter: ls | Rename-Item -NewName {$_.name -replace “OLD-FILE-NAME-PART”,”NEW-FILE-NAME-PART”}
In the command, replace “OLD-FILE-NAME-PART” and “NEW-FILE-NAME-PART” with the old and new parts of the file name. For example, this command replaces the word “vacation_” for “hiking_trip_” in the file name: ls | Rename-Item -NewName {$_.name -replace “beach-“,”hiking_trip_”}
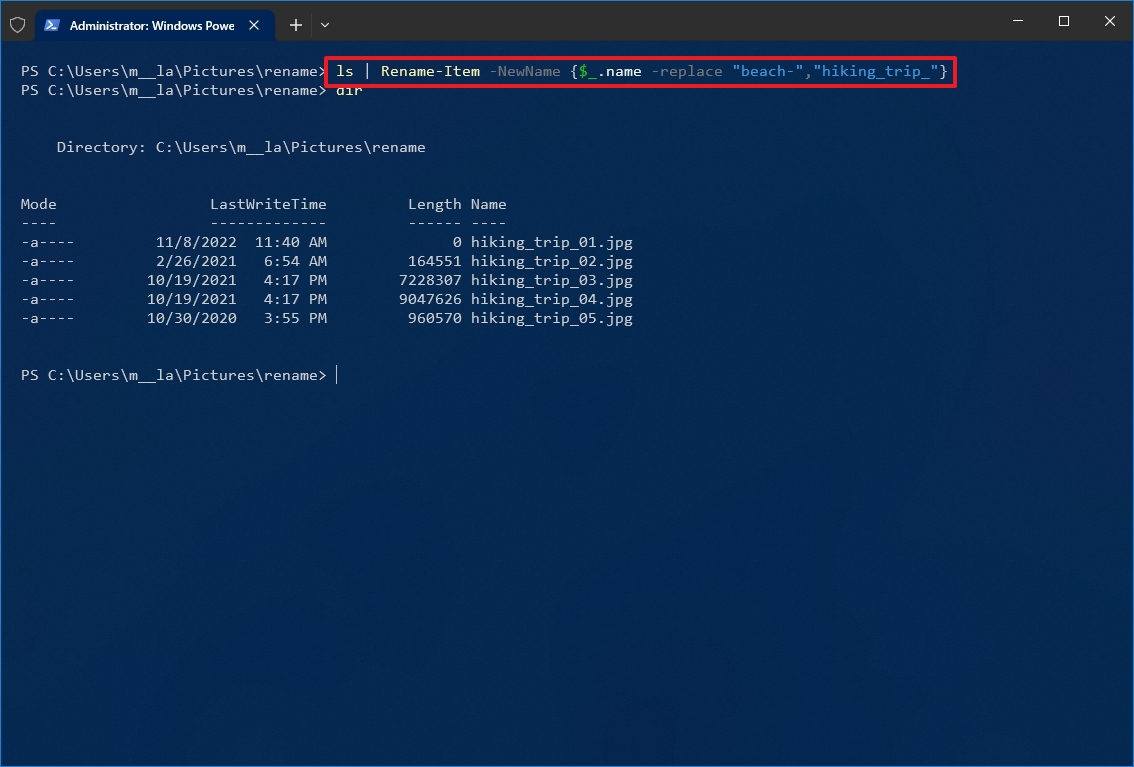
Once you complete these steps, the command will modify the file names with the replacement you specified in the command.
Remove spaces from multiple files
Spaces as part of the file name can sometimes cause problems, even more so when using commands. If you have files containing spaces in their names, you can use PowerShell to replace the character for a visual separator, such as a dash or underscore symbol.
To remove and replace spaces with underscores in filenames with PowerShell, use these steps:
- Open Start.
- Search for PowerShell and click the top result to open the app.
- Type the following command example to navigate to the folder with the files to rename and press Enter: cd PATHTOFOLDER
In the command, replace “PATHTOFOLDER” with the actual path to the location. For example, this command navigates the “files” folder inside “Documents”: cd C:UsersUSERNAMEPicturesrename
- (Optional) Type the following command to view the files in the location and press Enter: ls
- Type the following command to remove spaces from file name and press Enter: ls | Rename-Item -NewName { $_.Name -replace ” “,”SEPARATOR” }
In the command, make sure to replace “SEPARATOR” with the symbol instead of a space. For instance, this command replaces spaces with underscores in the files: ls | Rename-Item -NewName { $_.Name -replace ” “,”_” }
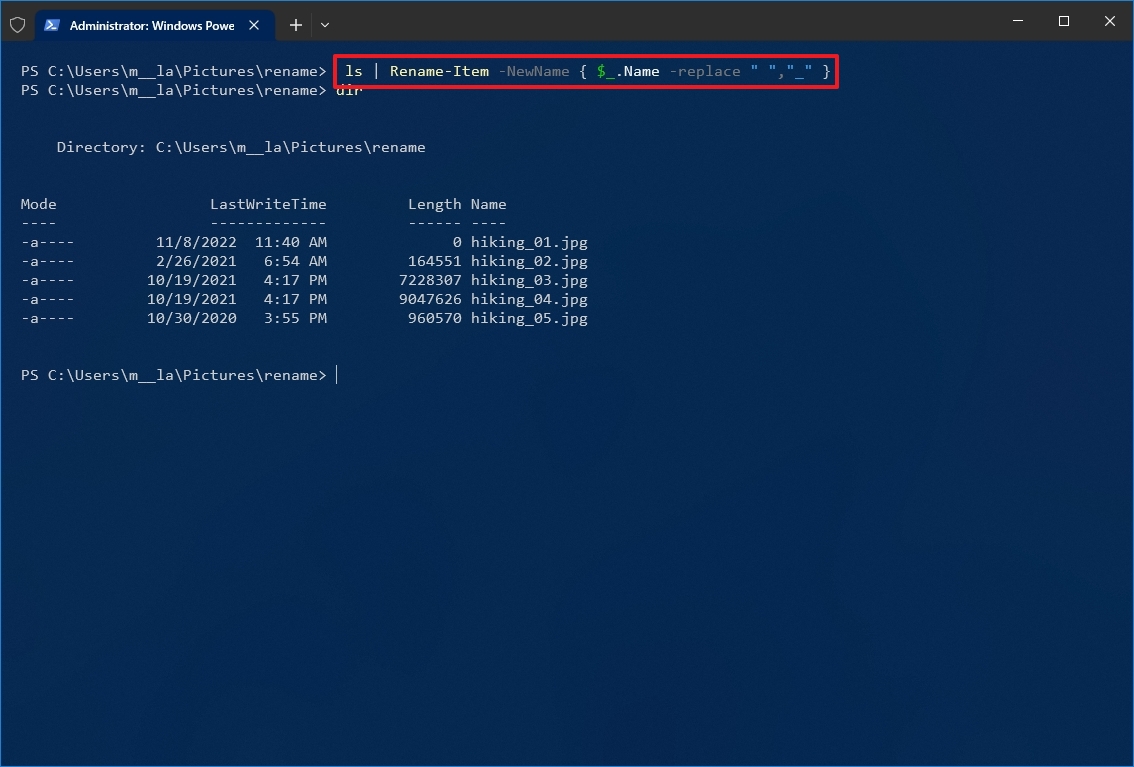
After you complete the steps, the spaces will be replaced with the separator indicated in the command.
Change file extension
To change the file extension for a bunch of files with PowerShell, use these steps:
- Open Start.
- Search for PowerShell and click the top result to open the app.
- Type the following command example to navigate to the folder with the files to rename and press Enter: cd PATHTOFOLDER
In the command, replace “PATHTOFOLDER” with the actual path to the location. For example, this command navigates the “files” folder inside “Documents”: cd C:UsersUSERNAMEPicturesrename
- (Optional) Type the following command to view the files in the location and press Enter: ls
- Type the following command to change the extension on files and press Enter: ls | Rename-Item -NewName { [io.path]::ChangeExtension($_.name, “.NEW-EXTENSION”) }
In the command, replace “.NEW-EXTENSION” with a new file extension. For instance, this command changes any file extension to “.doc”: ls | Rename-Item -NewName { [io.path]::ChangeExtension($_.name, “doc”) }
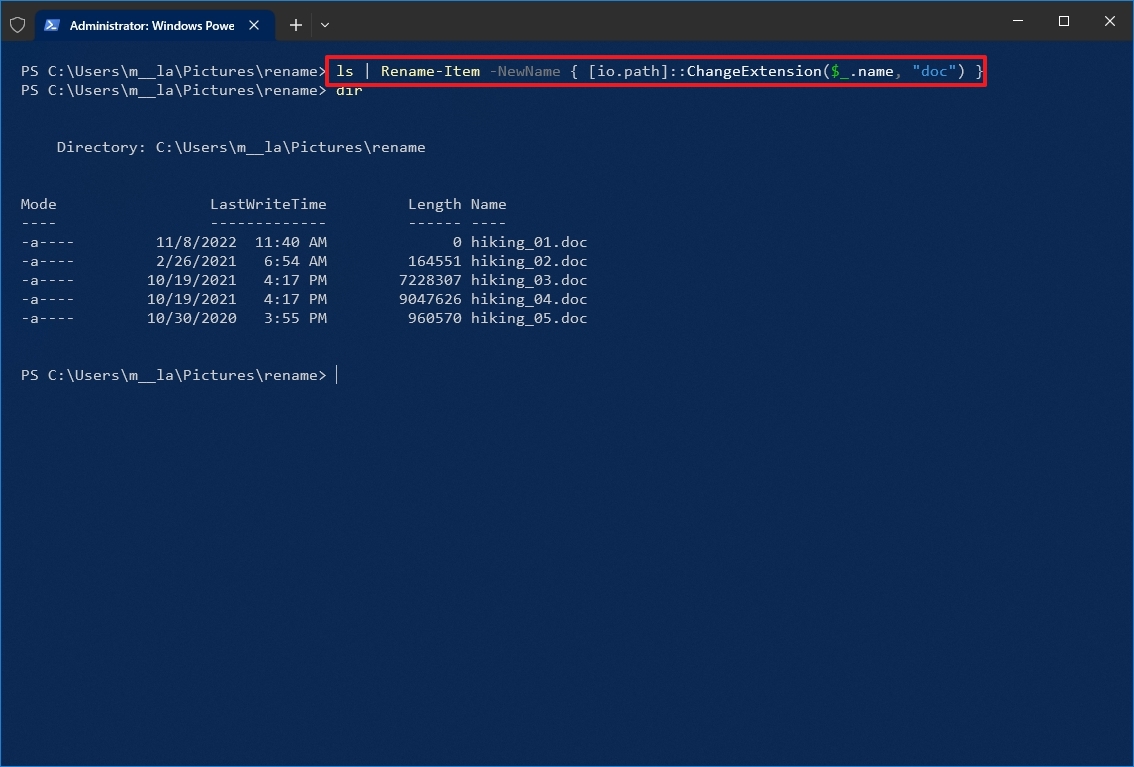
Once you complete the steps, PowerShell will change the extension for the files in the folder location.
Rename specific extension file names
The above instructions will rename every file within the folder. However, if you want to change the name of a particular file format, such as documents, pictures, or videos, you can use the “-filter” option.
To change the names of a specific file format with PowerShell commands on Windows 10, use these steps:
- Open Start.
- Search for PowerShell and click the top result to open the app.
- Type the following command example to navigate to the folder with the files to rename and press Enter: cd PATHTOFOLDER
In the command, replace “PATHTOFOLDER” with the actual path to the location. For example, this command navigates the “files” folder inside “Documents”: cd C:UsersUSERNAMEDocumentsfiles
- (Optional) Type the following command to view the files in the location and press Enter: ls
- Type the following command to rename files with a specific extension and press Enter: ls -filter *.EXTENSION | %{Rename-Item $_ -NewName (“NEW-FILE-NAME-{0}.EXTENSION” -f $nr++)}
In the command, replace “NEW-FILE-NAME” and “EXTENSION” with the new parameter. For instance, this command renames only files that include the “.jpg” extension: ls -filter *.jpg | %{Rename-Item $_ -NewName (“beach-trip-{0}.jpg” -f $nr++)}
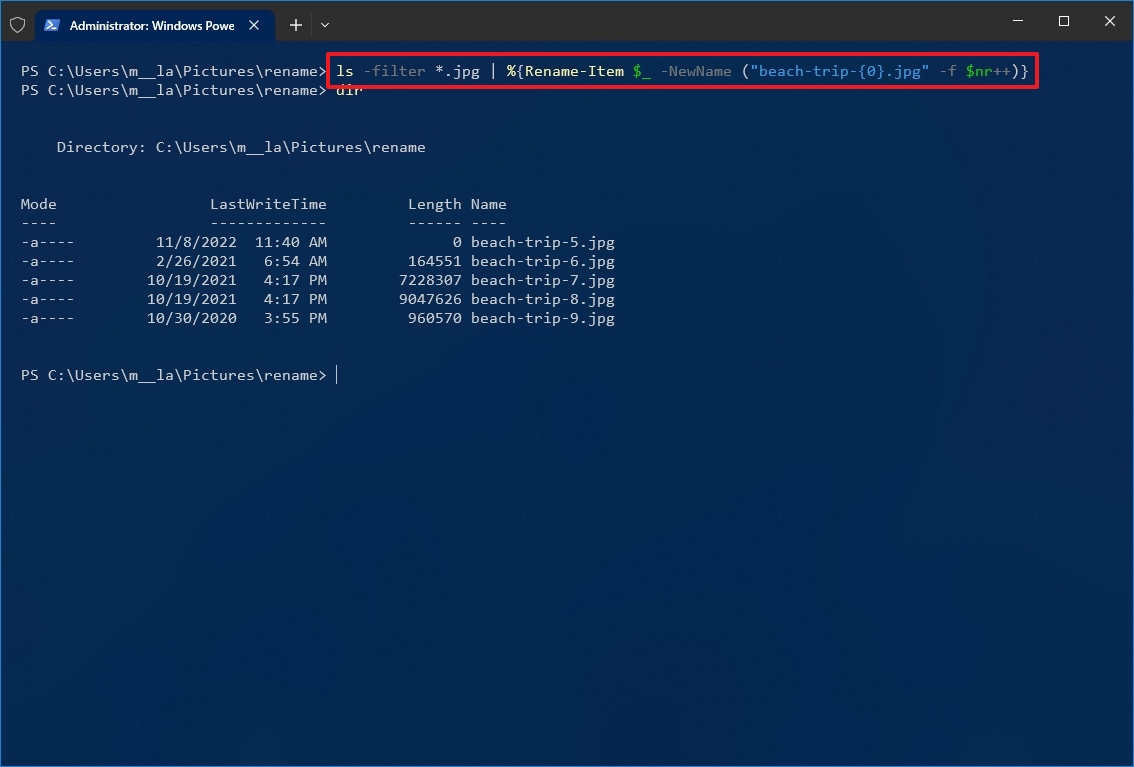
Once you complete the steps, PowerShell will rename the files with a specific extension specified in the command.
While these commands have been tested to work as expected, it is always recommended that you perform a test run before renaming the original files on your computer.
How to rename multiple files using PowerToys
On Windows 11, PowerToys is an advanced tool that adds many helpful productivity tools, including “PowerRename,” which makes it easier to bulk rename files without using commands.
Install PowerToys
To install PowerToys on Windows 10, use these steps:
- Open the PowerToys app page (opens in new tab).
- Click the Install button.

- Open the PowerToys app.
- Click on PowerRename.
- Turn on the “Enable PowerRename” toggle switch.
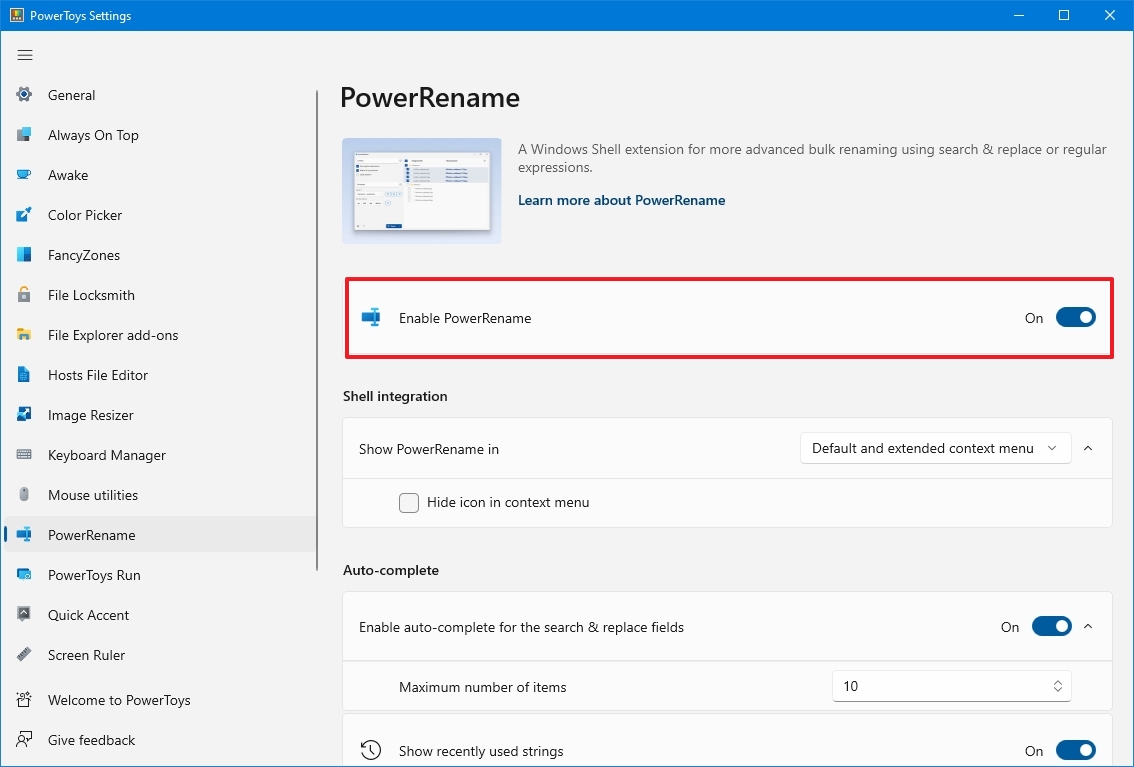
After you complete the steps, you can start using the tool to rename multiple files.
Rename files by matching partial name
To rename or replace part of the name of multiple files, use these steps:
- Open File Explorer.
- Navigate to the folder with the files to rename.
- Select the files to rename.
- Right-click the selection and choose the PowerRename option.
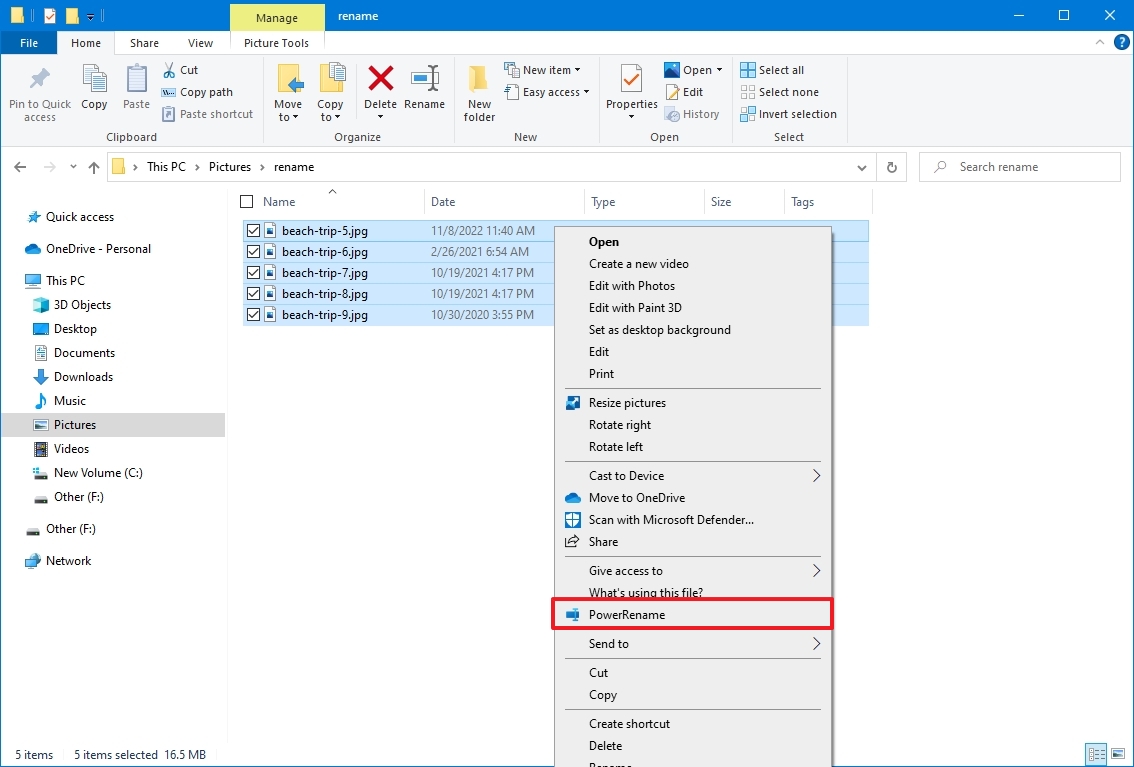
- In the “Search for” box, define the part to rename.
- In the “Replace with” box, specify the name structure you want to use for the files.
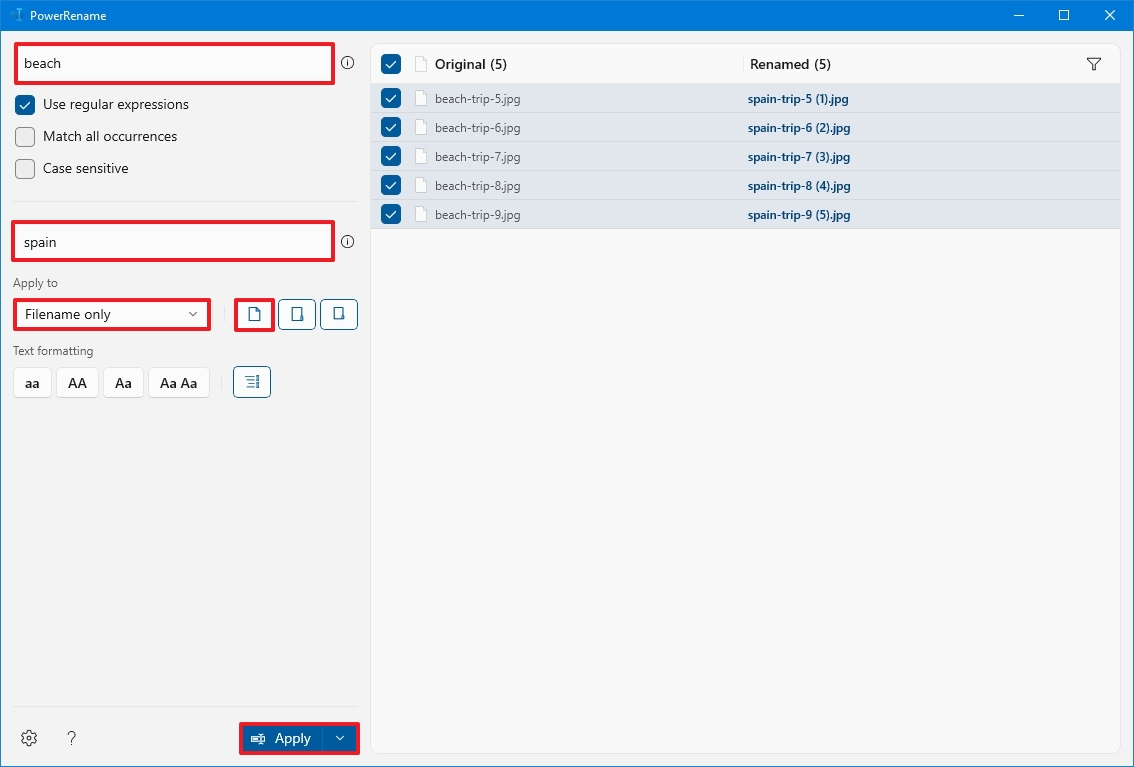
- Use the “Apply to” menu to confirm the part of the file name to change — for example, filename, extension, or both.
- Choose the content to rename, including files, folders, and subfolders with the buttons on the right side.
- (Optional) Choose the text formatting, including lowercase, uppercase, title case, or capitalize every word.
- (Optional) Choose the “Enumerate items” option to allow the files to have the same name but with a different number at the end.
- Confirm the preview on the right side.
- Click the Apply button.
Once you complete the steps, the files will be renamed according to your configuration.
Rename files by matching any name
To rename all the files without a common structure, use the steps:
- Open File Explorer.
- Navigate to the folder with the files to rename.
- Select the files to rename.
- Right-click the selection and choose the PowerRename option.

- In the “Search for” box, use the
.*regular expression to match all the files. - Check the “Use regular expressions” option.
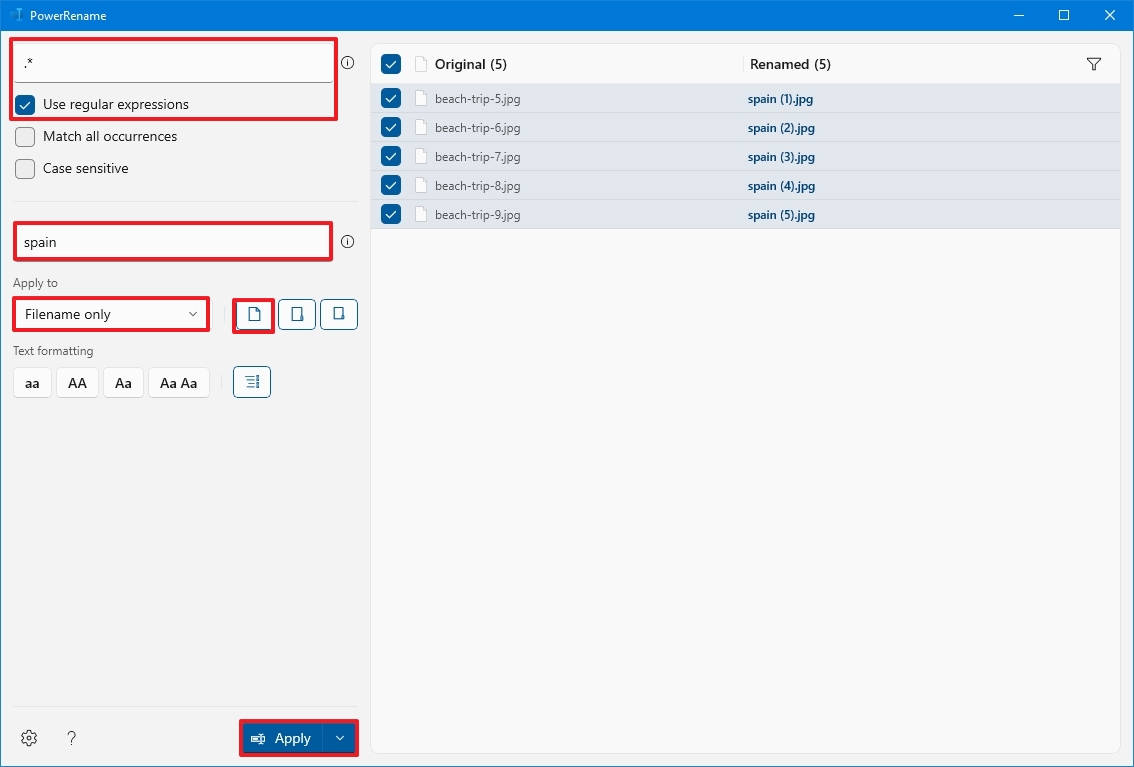
- In the “Replace with” box, specify the name structure you want to use for the files.
- Click the “File creation date and time help” button on the right side and select a help to enumerate the files since they will have the same base name – for example, “$ff” to add two millisecond digits.
- Use the “Apply to” menu select the Filename only option.
- Choose the content to rename, including files, folders, and subfolders with the buttons on the right side.
- (Optional) Choose the text formatting, including lowercase, uppercase, title case, or capitalize every word.
- (Optional) Choose the “Enumerate items” option to allow the files to have the same name but with a different number at the end.
- Confirm the preview on the right side.
- Click the Apply button.
After you complete the steps, all the files in the list will be renamed to the base name you assigned them.
Rename files by appending description
To append a description to the file name, use the steps:
- Open File Explorer.
- Navigate to the folder with the files to rename.
- Select the files to rename.
- Right-click the selection and choose the PowerRename option.

- In the “Search for” box, use the . regular expression to match all the files.
- Check the “Use regular expressions” option.
- In the “Replace with” box, specify the description you want to add to files — for example, _vacation_2022.
- Quick note: If you use this option, remember the period at the end of the description to prevent breaking the file extension.
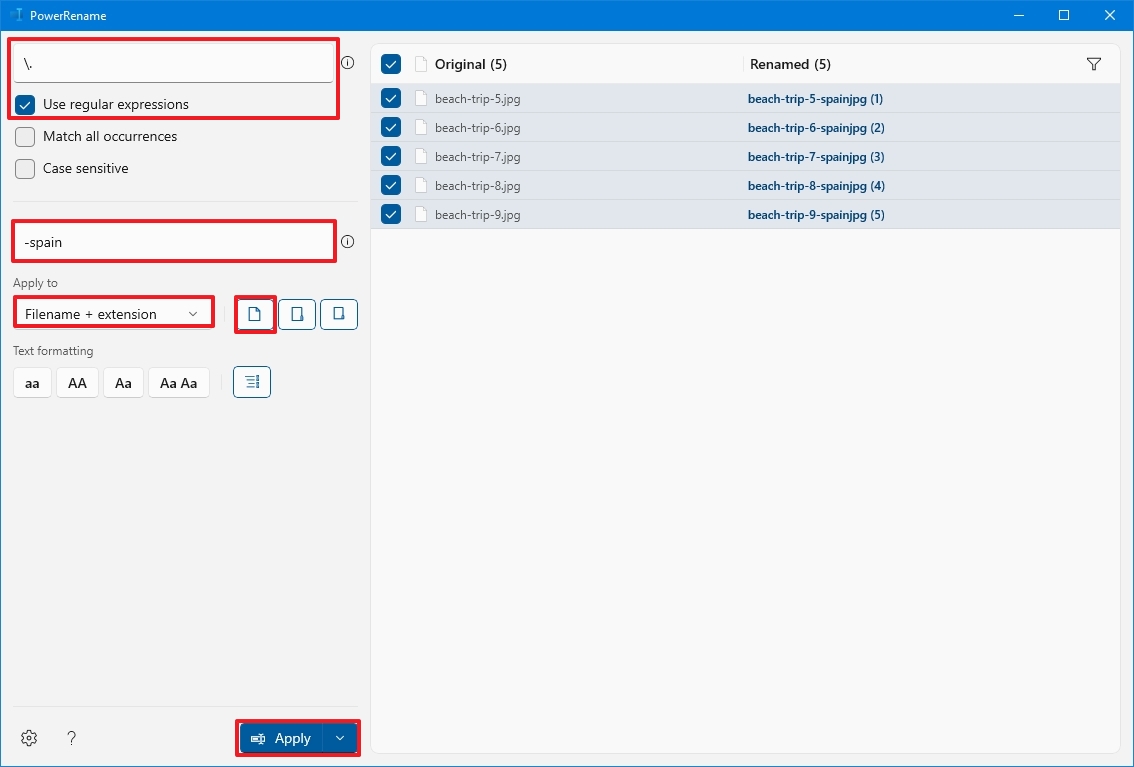
- Use the “Apply to” menu to the Filename + extension option.
- Choose the content to rename, including files, folders, and subfolders with the buttons on the right side.
- (Optional) Choose the text formatting, including lowercase, uppercase, title case, or capitalize every word.
- (Optional) Choose the “Enumerate items” option to allow the files to have the same name but with a different number at the end.
- Confirm the preview on the right side.
- Click the Apply button.
Change file extension
To change the file extension of multiple files with PowerToys, use these steps:
- Open File Explorer.
- Navigate to the folder with the files to rename.
- Select the files to rename.
- Right-click the selection and choose the PowerRename option.

- In the “Search for” box, confirm the extension to replace — for example, jpg.
- In the “Replace with” box, confirm the new compatible extension — for example, jpeg.
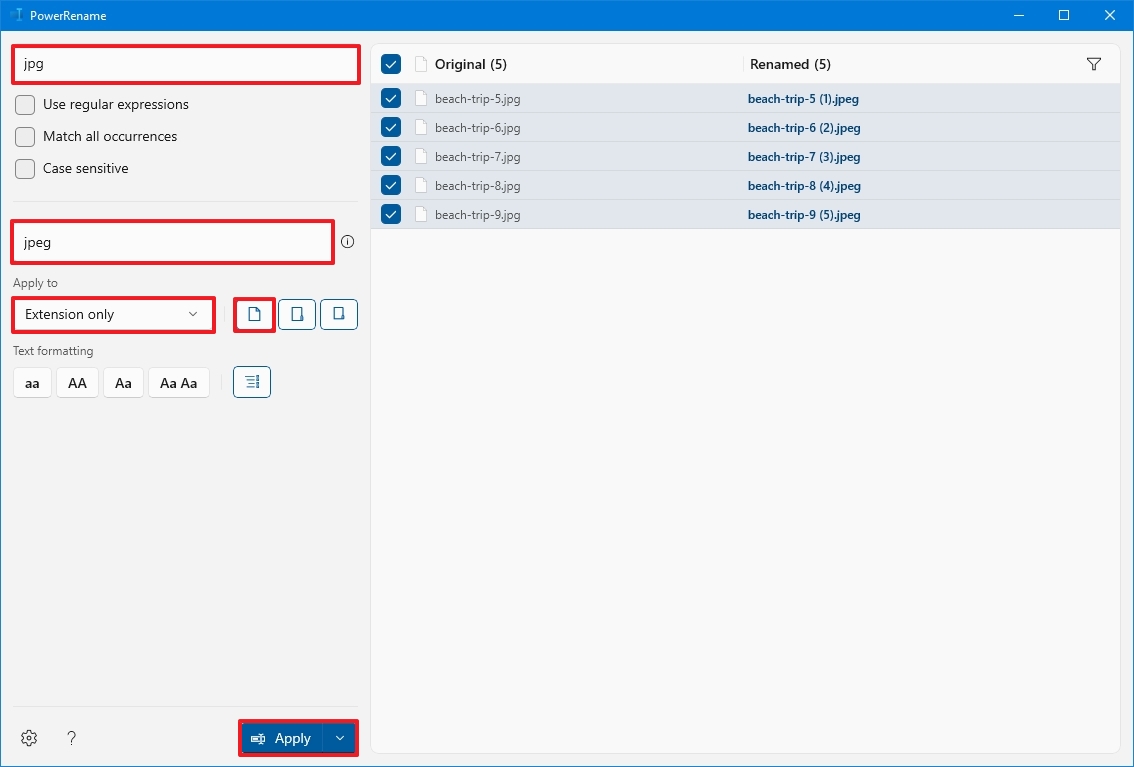
- Use the “Apply to” menu to select the Extension only option.
- Choose only the Include files option with the buttons on the right side.
- Click the Apply button.
Once you complete the steps, the file extension will change to the one you specified.
PowerToys PowerRename is a powerful tool that lets you manipulate file names virtually in any way you want using regular expressions. You can learn more about the options available to create patterns to rename files in this Microsoft documentation page (opens in new tab).
More resources
For more helpful articles, coverage, and answers to common questions about Windows 10 and Windows 11, visit the following resources:


