On Windows 11, you can quickly create multiple accounts to share a computer with multiple people. However, when you no longer need an account or need to restrict access to a user, it’s also possible to disable an account instead of deleting it to preserve their settings and files if you need to restore access.
Whatever the reason might be, Windows 11 includes at least four ways to disable an account using Computer Management, Settings, Command Prompt, and PowerShell. Once the account is disabled, the system will revoke access and remove the account from the user menu in the Start menu and the sign-in screen.
In this Windows 11 guide, we will walk you through the steps to disable an account without removing it or deleting its files.
How to disable account using Computer Management
To disable accounts on Windows 11 without removing them, use these steps:
- Open Start.
- Search for Computer Management and click the top result to open the app.
-
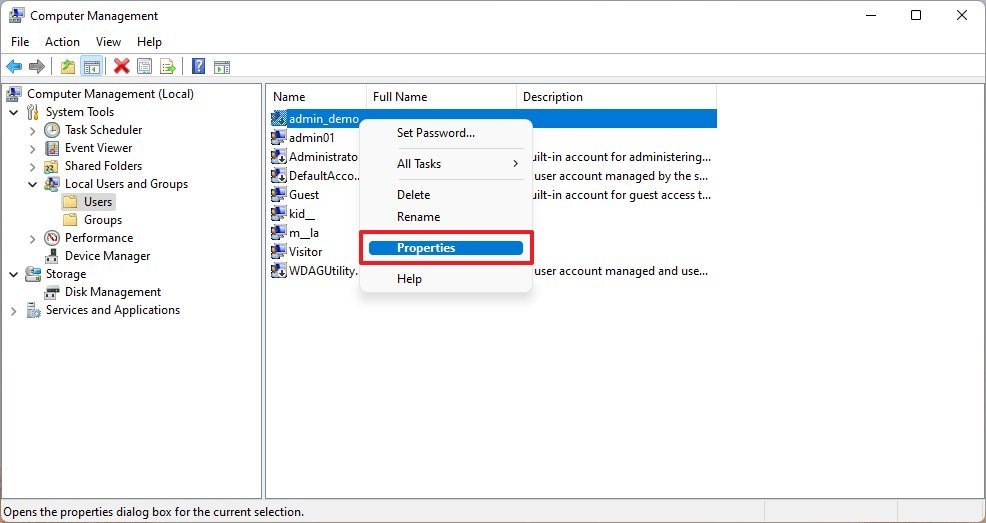
Navigate the following path:
Computer Management > System Tools > Local Users and Groups > Users -
Right-click the user and select the Properties option.
Source: Windows Central
- Click the General tab.
-
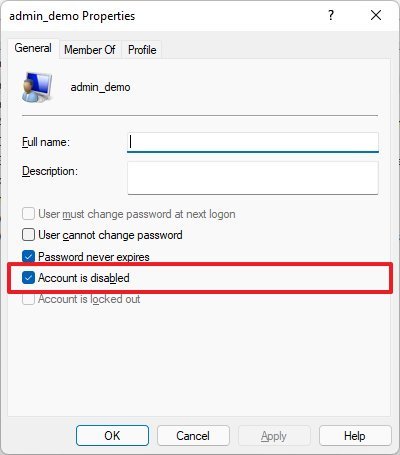
Check the Account is disabled option.
Source: Windows Central
- Click the Apply button.
- Click the OK button.
Once you complete the steps, the user will no longer be able to sign in, but the account will continue to be available in the system until it’s removed.
Enable account with Computer Management
To enable an account with Computer Management, use these steps:
- Open Start.
- Search for Computer Management and click the top result to open the app.
-
Navigate the following path:
Computer Management > System Tools > Local Users and Groups > Users -
Right-click the user and select the Properties option.
Source: Windows Central
- Click the General tab.
-
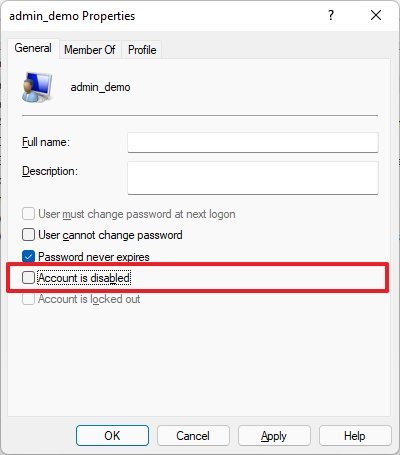
Clear the Account is disabled option.
Source: Windows Central
- Click the Apply button.
- Click the OK button.
After you complete the steps, the user will be able to sign in and access the Windows 11 account.
How to disable account using Settings
In the Settings app, you can only disable family members’ accounts. You cannot disable Microsoft accounts or local accounts.
To disable a family member account with Settings, use these steps:
- Open Settings.
- Click on Accounts.
-
Click the Family & other users page on the right side.
Source: Windows Central
-
Under the “Your family” section, select the account and click the Block sign in button.
Source: Windows Central
- Click the Block button.
Once you complete the steps, the family member will no longer be to sign in, nor will the account be visible on the sign-in screen.
Enable account with Settings
To enable a family account with Settings, use these steps:
- Open Settings.
- Click on Accounts.
-
Click the Family & other users page on the right side.
Source: Windows Central
-
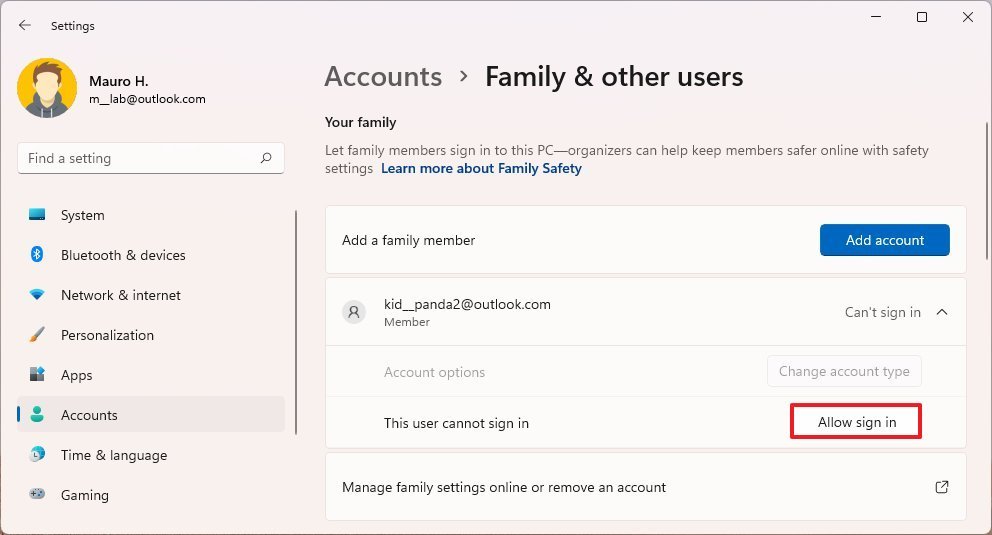
Under the “Your family” section, select the account and click the Allow sign in button.
Source: Windows Central
- Click the Allow sign in button.
After you complete the steps, the account will appear again on the sign-in screen, allowing the users to log in normally.
How to disable account using Command Prompt
To disable a local account or Microsoft account with commands on Windows 11, use these steps:
- Open Start.
- Search for Command Prompt, right-click the top result, and select the Run as administrator option.
-
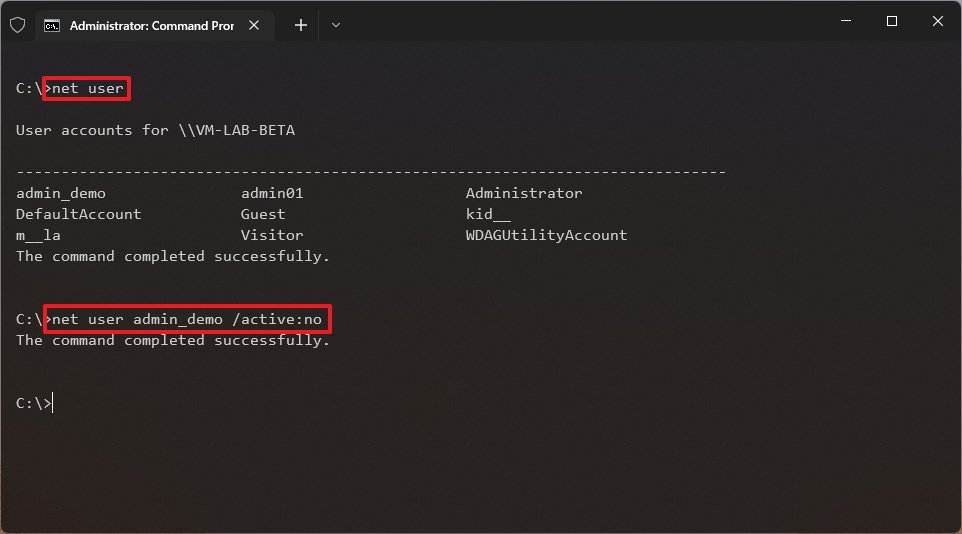
Type the following command to view the available accounts and press Enter:
net user -
Type the following command to disable the Windows 11 account and press Enter:
net user ACCOUNT-NAME /active:noIn the command, replace “ACCOUNT-NAME” with the account’s name to disable.
This example disables the “admin_demo” account on Windows 11.
net user admin_demo /active:noSource: Windows Central
Once you complete the steps, the account will deactivate and not be visible on the sign-in screen. However, the account and data will remain on Windows 11.
Enable account with Command Prompt
To enable an account with Command Prompt, use these steps:
- Open Start.
- Search for Command Prompt, right-click the top result, and select the Run as administrator option.
-
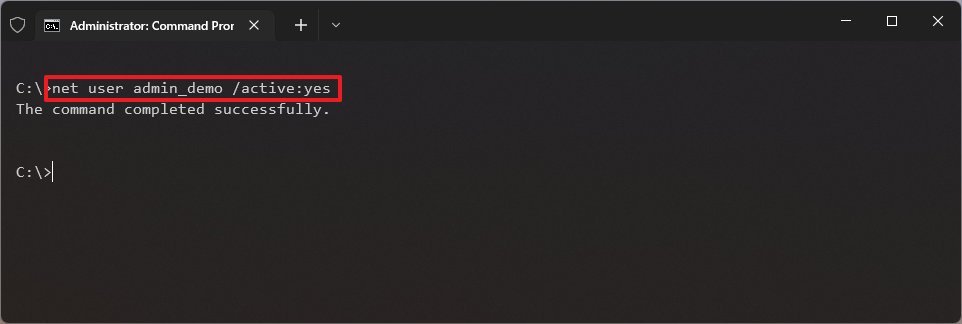
Type the following command to disable the Windows 11 account and press Enter:
net user ACCOUNT-NAME /active:yesIn the command, replace “ACCOUNT-NAME” with the account’s name to enable.
This example enables the “admin_demo” account on Windows 11.
net user admin_demo /active:yesSource: Windows Central
After you complete the steps, the Windows 11 account will enable, and the user will be able to reaccess the desktop and their files.
How to disable account using PowerShell
To disable a Windows 11 account with PowerShell commands, use these steps:
- Open Start.
- Search for PowerShell, right-click the top result, and select the Run as administrator option.
-
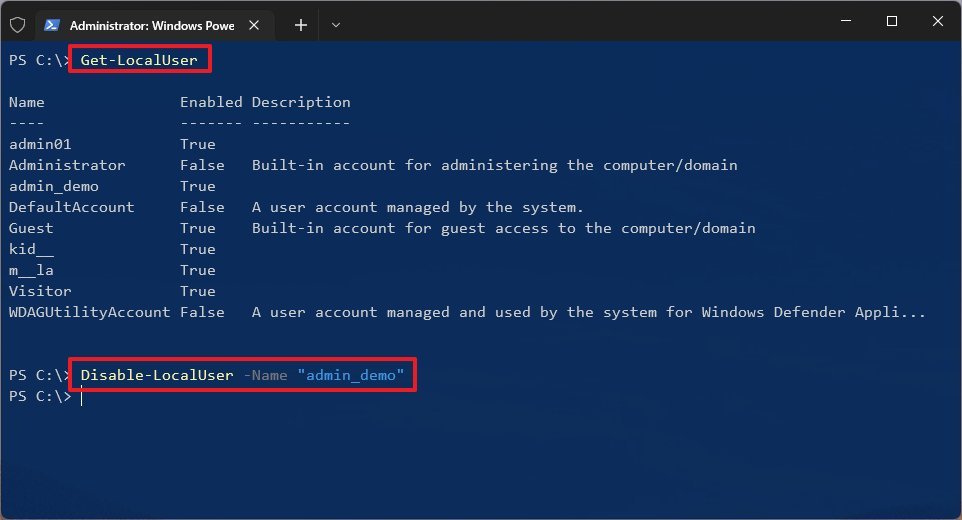
Type the following command to view the available accounts and press Enter:
Get-LocalUser -
Type the following command to disable the Windows 11 account and press Enter:
Disable-LocalUser -Name "ACCOUNT-NAME"In the command, replace “ACCOUNT-NAME” with the account’s name to disable.
This example disables the “admin_demo” account on Windows 11.
Disable-LocalUser -Name "admin_demo"Source: Windows Central
Once you complete the steps, the PowerShell command will disable the account, but the account and files won’t be deleted from the system.
Enable account with PowerShell
To enable an account with PowerShell on Windows 11, use these steps:
- Open Start.
- Search for PowerShell, right-click the top result, and select the Run as administrator option.
-
Type the following command to disable the Windows 11 account and press Enter:
Enable-LocalUser -Name "ACCOUNT-NAME"In the command, replace “ACCOUNT-NAME” with the account’s name to enable.
This example enables the “admin_demo” account on Windows 11.
Enable-LocalUser -Name "admin_demo"Source: Windows Central
After you complete the steps, the account will enable again on the system.
More Windows resources
For more helpful articles, coverage, and answers to common questions about Windows 10 and Windows 11, visit the following resources:

Post-launch roadmap for Final Fantasy XIV: Endwalker revealed
The latest Letter from the Producer livestream has just aired, and it comes with a plethora of news for Final Fantasy XIV. This includes plans for updating all the main scenario quest dungeons, improving the graphics, implementing new sidequests, and much more.


