Key Takeaways
- Encrypting a hard drive protects data and can be legally required, choose whole-drive encryption for the safest option.
- Back up important data, use Windows BitLocker or Veracrypt for encryption.
- On macOS, you’ll have to erase your drive to encrypt it using Disk Utility.
There’s nothing worse than realizing your external hard drive has been lost or stolen, when it contains sensitive personal or company data that could get you in trouble should it fall into the wrong hands. The best solution is to encrypt the drive, and for Windows and macOS users, the process is nice and simple.
Why Encrypt a Drive?
When you encrypt a hard drive, then the data inside can’t be read unless you have the right decryption key. Modern encryption is so strong, that not even world governments have the power to crack it. So run-of-the-mill bad guys don’t either. By encrypting a drive, you protect your data, and in some cases you might actually be legally required to do it. For example, if you work with medical records, or the tax information of your clients, then you have an obligation to protect that information.
However, in many cases, you don’t need to encrypt the entire drive. Instead, you can encrypt specific folders or files on the drive, or just a single partition of the drive. That can be convenient, although the safest and easiest route is still whole-drive encryption, which is what this guide will focus on.
What You Need Before Encryption
Before we get to encrypting your external drives, there are a few things you’ll need to do in preparation to ensure things go smoothly.
The first and most important thing is to back up any irreplaceable data on the drive. While normally encrypting the drive won’t erase or harm your data, sometimes things can go wrong, and you might have to format the drive. The macOS method I’ll cover at the end of this article only works by erasing your drive. So anything on that drive that’s irreplaceable should be backed up somewhere else.
If you’re doing this on battery power, I suggest plugging your computer in. Depending on how much data is on the drive, encryption can take some time. The last thing you want is for your computer’s battery to die before the process is done!
Finally, you’ll need some encryption software. Both Windows and macOS have built-in encryption solutions, but there are also excellent third-party options like Veracrypt.
How To Encrypt an External Drive on Windows
If you have Windows 11 Pro, Enterprise, or Education, then you can use Microsoft’s own BitLocker software to encrypt your drive. If you don’t, you’ll have to use a third-party solution like Veracrypt, but we’ll get to that in a second.
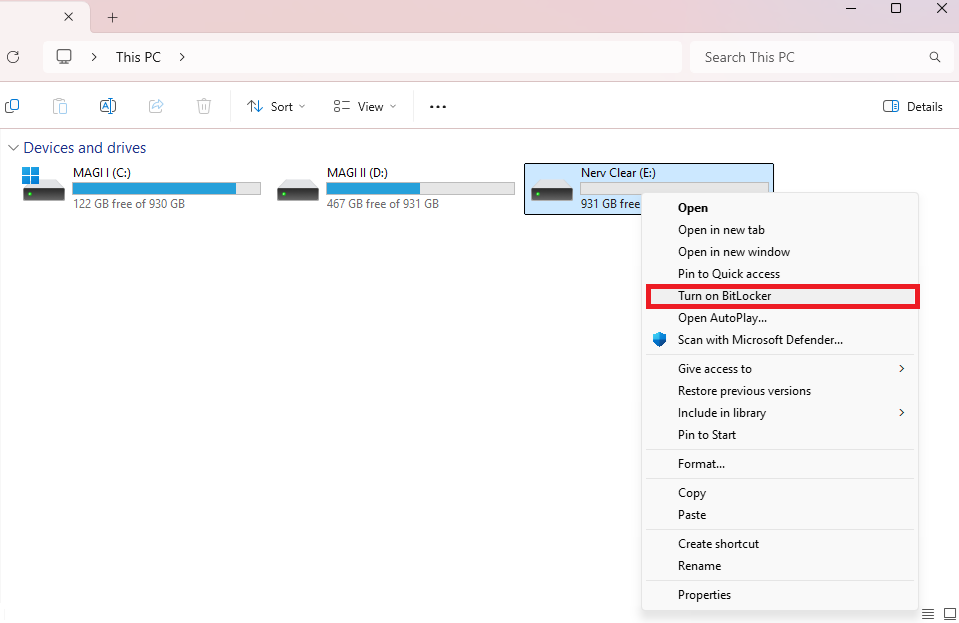
Assuming your external drive is plugged in and working as normal, open Windows Explorer, right-click on the drive, and select “Turn On BitLocker.” On Windows 11, you have to click “Show more options” first before seeing the BitLocker option.
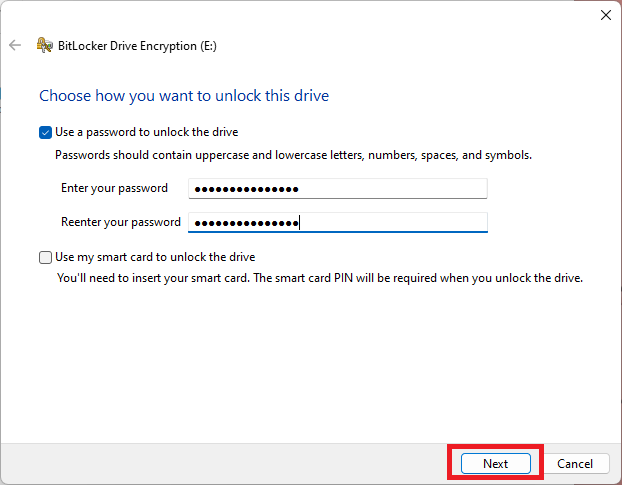
If prompted, choose whether you want to use a password or smart card to unlock the drive. For most people, a password will be the correct option. Click “Next” when you’re done.
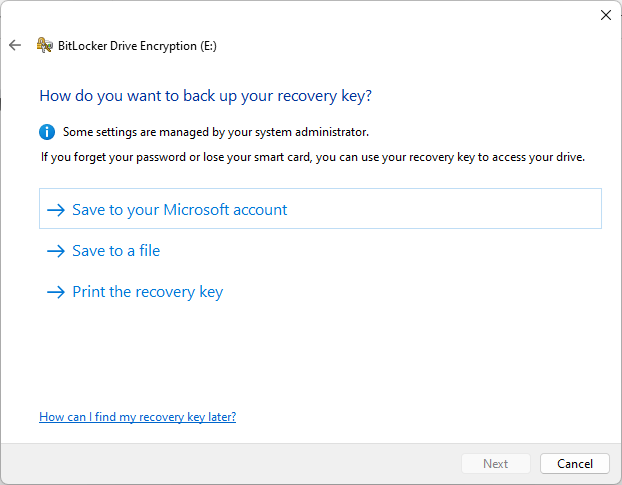
Create a recovery key and save it somewhere safe. If you have a Microsoft Account, I highly recommend keeping a copy of the key backed up there.
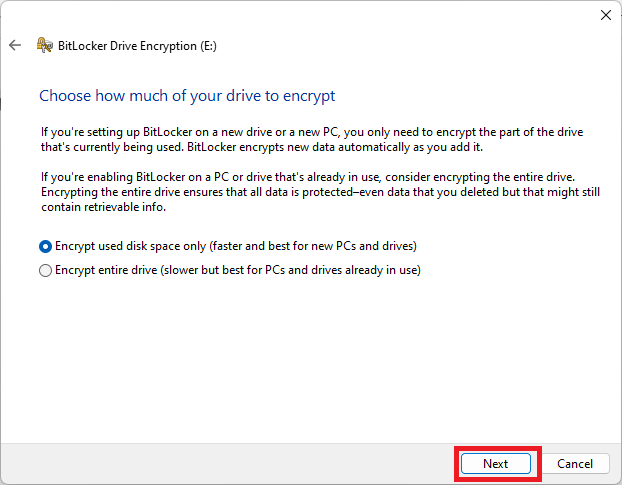
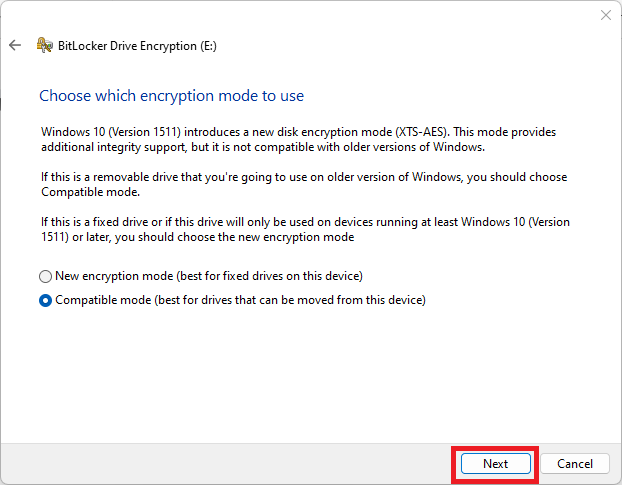
Choose the encryption mode. If the drive already has data on it, choose to encrypt the entire drive. The alternative is only suitable for new empty drives. You’ll even want to encrypt the whole drive if you’ve formatted it or deleted all your files, since they can still be recovered using specialist tools.
Since this is for an external drive, choose “Compatible mode” and then click “Next.’
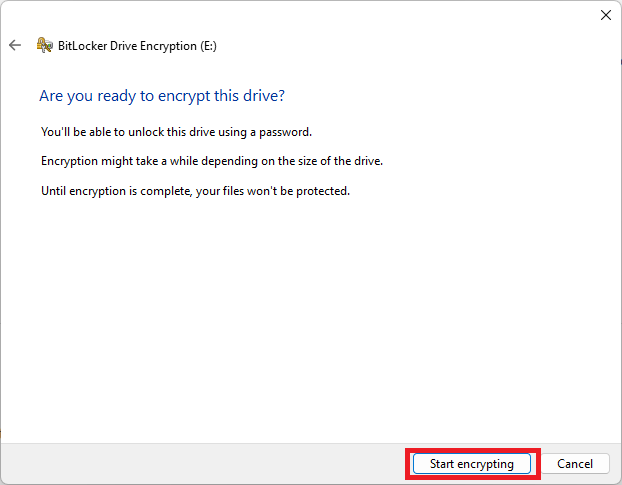
Start the encryption process and don’t interrupt it until it’s complete. Now, when you open the drive, you’ll be prompted for a password first.
If you don’t have Windows 10 or 11 Professional or better, then you’ll have to use a third-party app. In this case, I’ll be using Veracrypt. Download and install the program, then do the following.
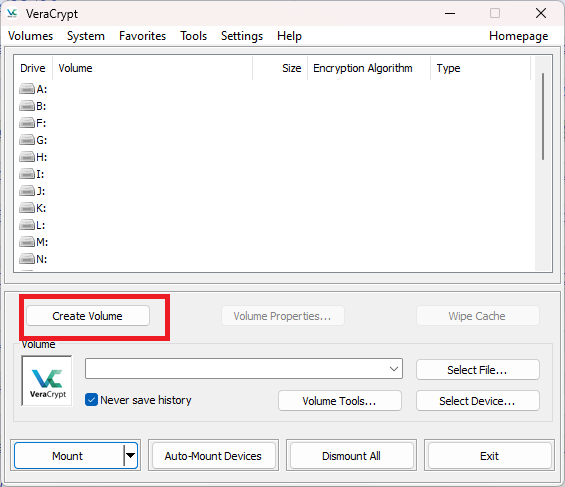
Open the app and select “Create Volume.”
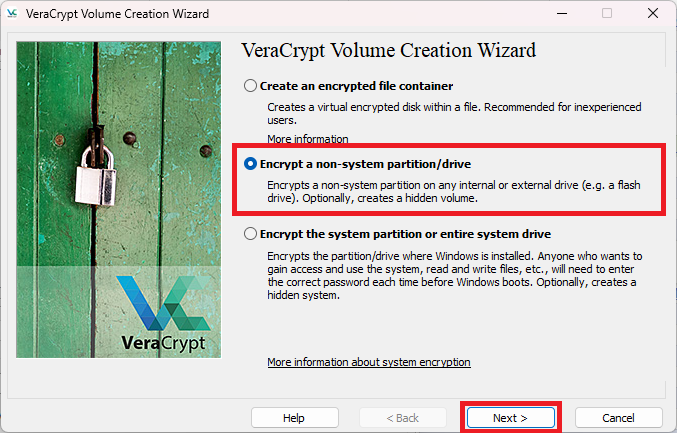
Select “Encrypt a non-system partition/drive” and click “Next.”
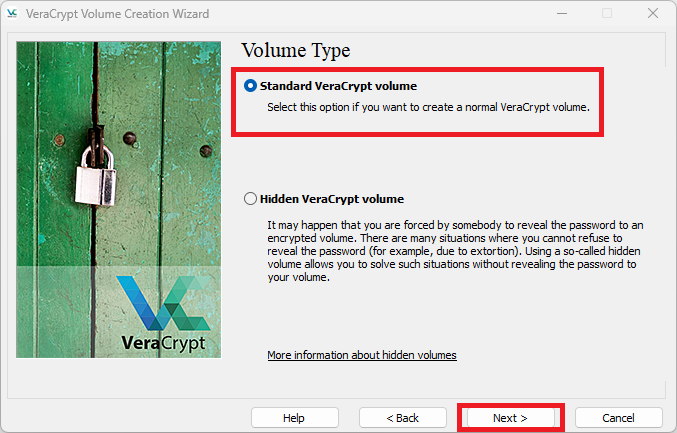
Select “Standard VeraCrypt volume”, then select “Next.”
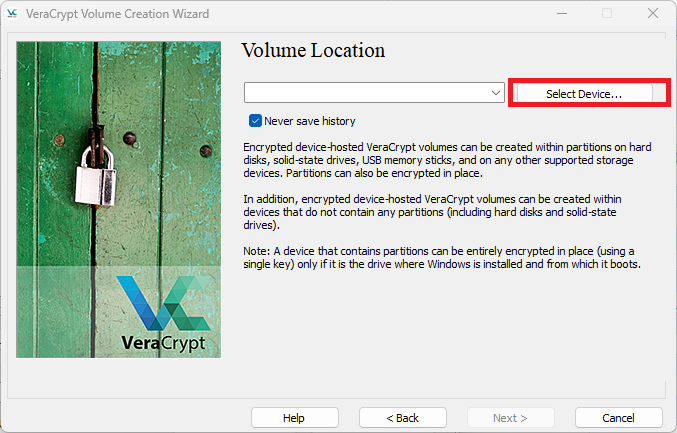
Here’s the tricky part. Choose “Select Device.”
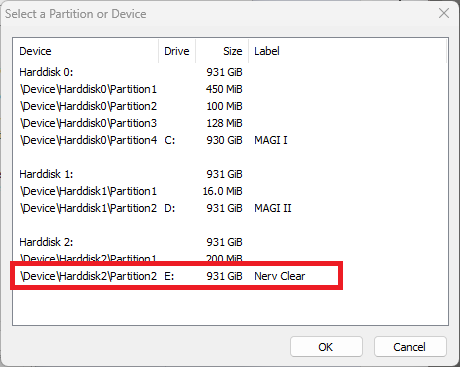
Then choose the partition you want to encrypt. Remember, you want to select the partition listed under the physical drive, not the drive itself.
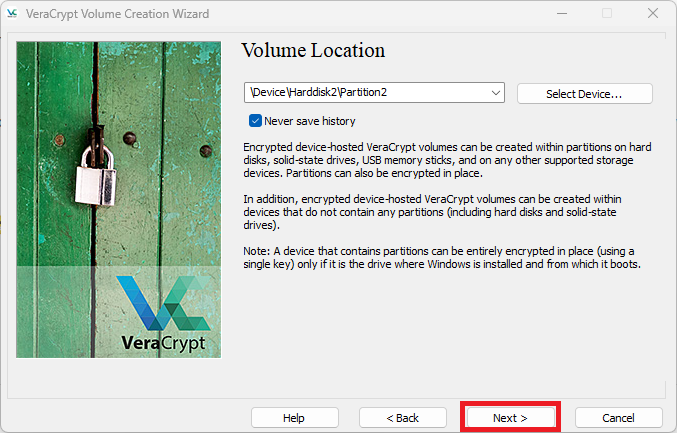
Now click “Next.”
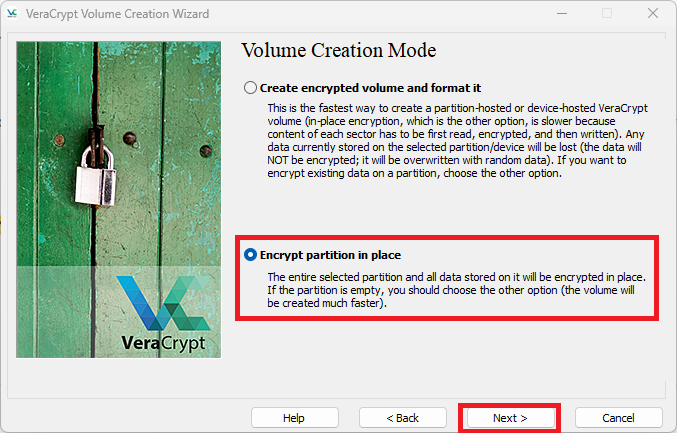
If you don’t want to lose the data currently on the drive, choose “Encrypt partition in place” then click “Next.”
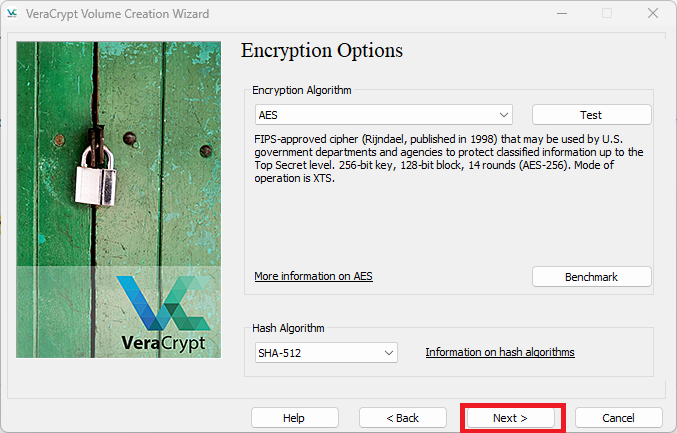
Under Encryption options, choose “AES” and “SHA-512”, which are industry standard options. Unless you have a specific reason to change this, such as a mandate from your employer. Click “Next.”
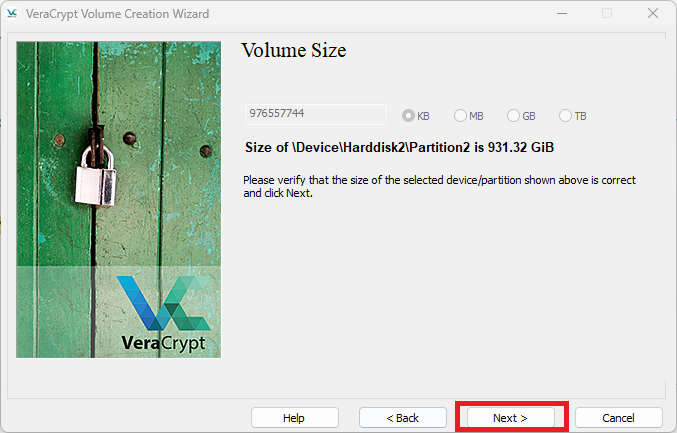
Click “Next” once you’ve ensured the volume size looks correct. This is your last chance to avoid encrypting the wrong partition or drive.
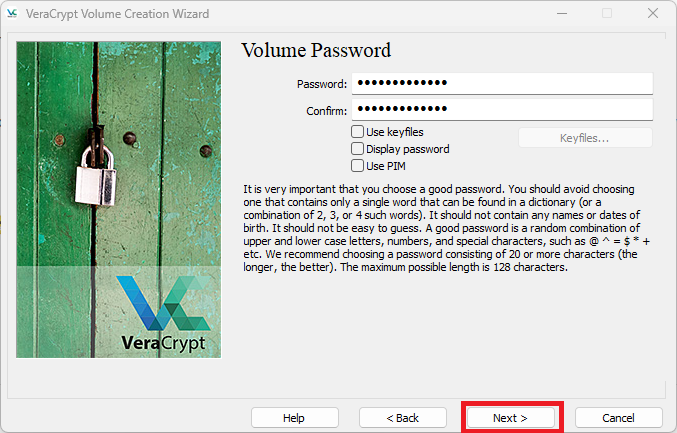
Choose a password, and make sure you have a backup somewhere.
Unless you chose to format the drive, you should now have the option to start the encryption process.
While the instructions above are for Windows, Veracrypt also works on macOS and Linux, and the process is pretty much the same.
How To Encrypt an External Drive on macOS
Unlike Windows, there’s just one version of macOS, so you will always have Apple’s own encryption software. However, unlike the Windows solution, you need to erase an external drive to encrypt it. So back up any important data first before attempting this.
Again, encrypting an external drive using macOS’ built-in tools will erase all data on that drive. You have been warned!
Open “Disk Utility.” The easiest way is to search for it using Spotlight Search, but you can also find it it in the Applications folder under “Utilities.”
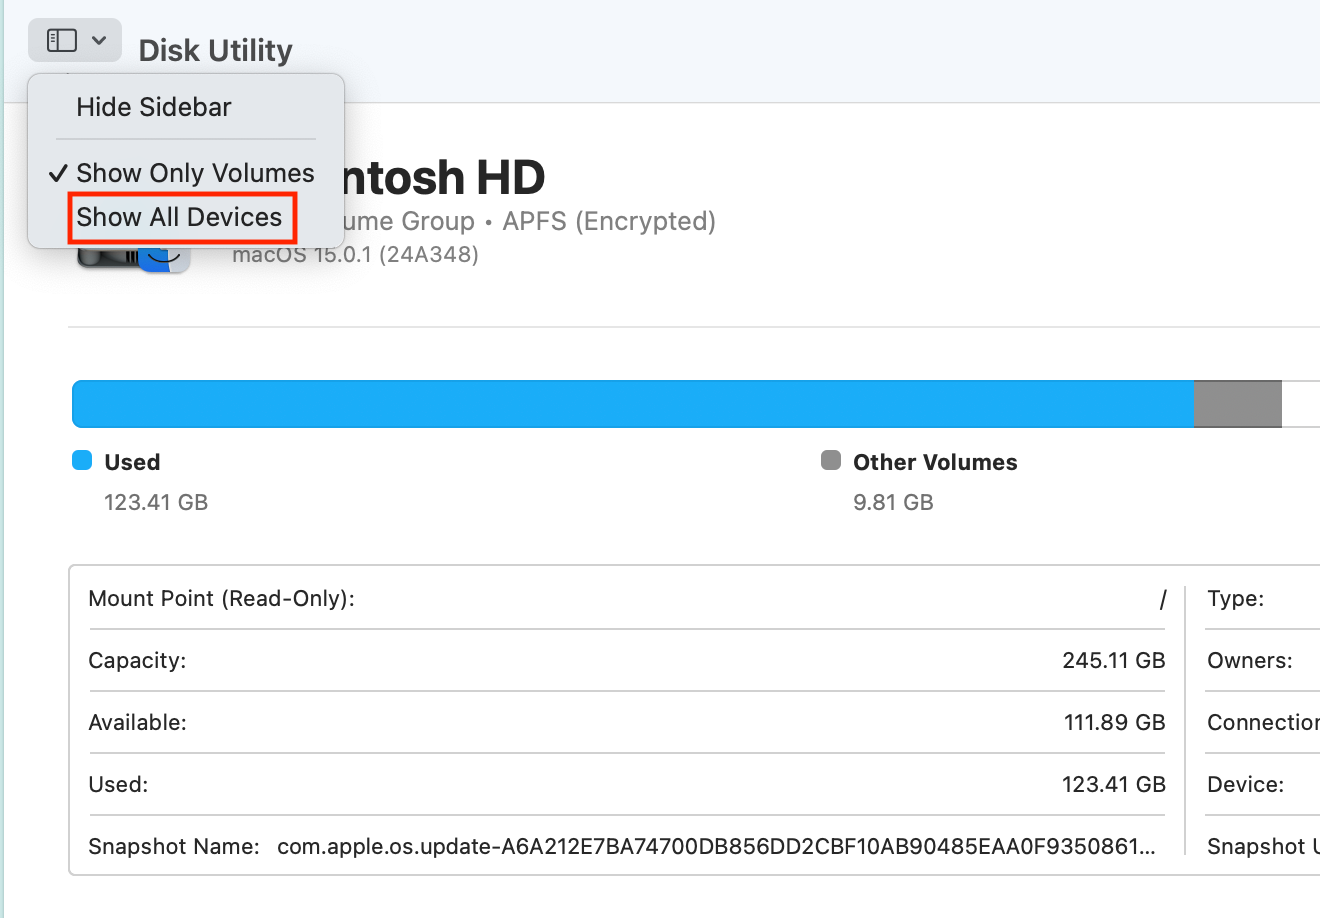
Next, select the dropdown next to the words “Disk Utility” and select “Show All Devices”. This ensures that you see the physical drive listed and not just its logical volumes.
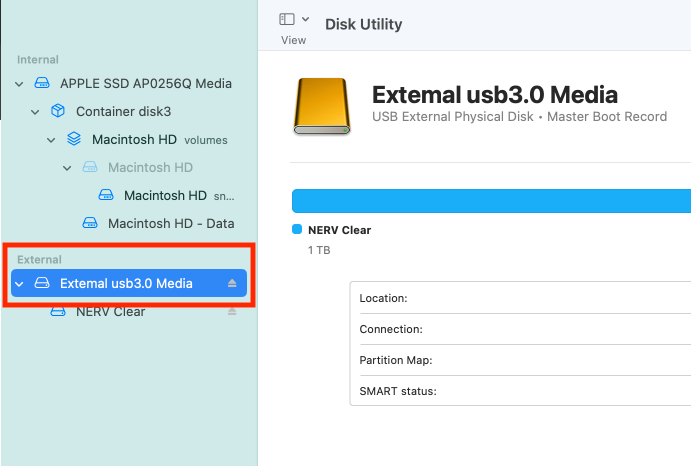
In the lefthand sidebar, select the physical drive you want to encrypt.
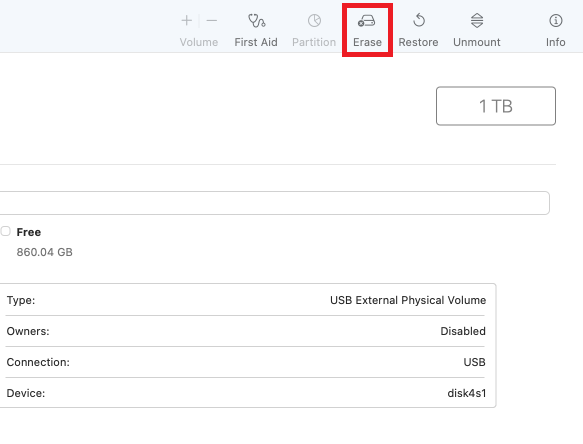
Now click the “Erase” button.
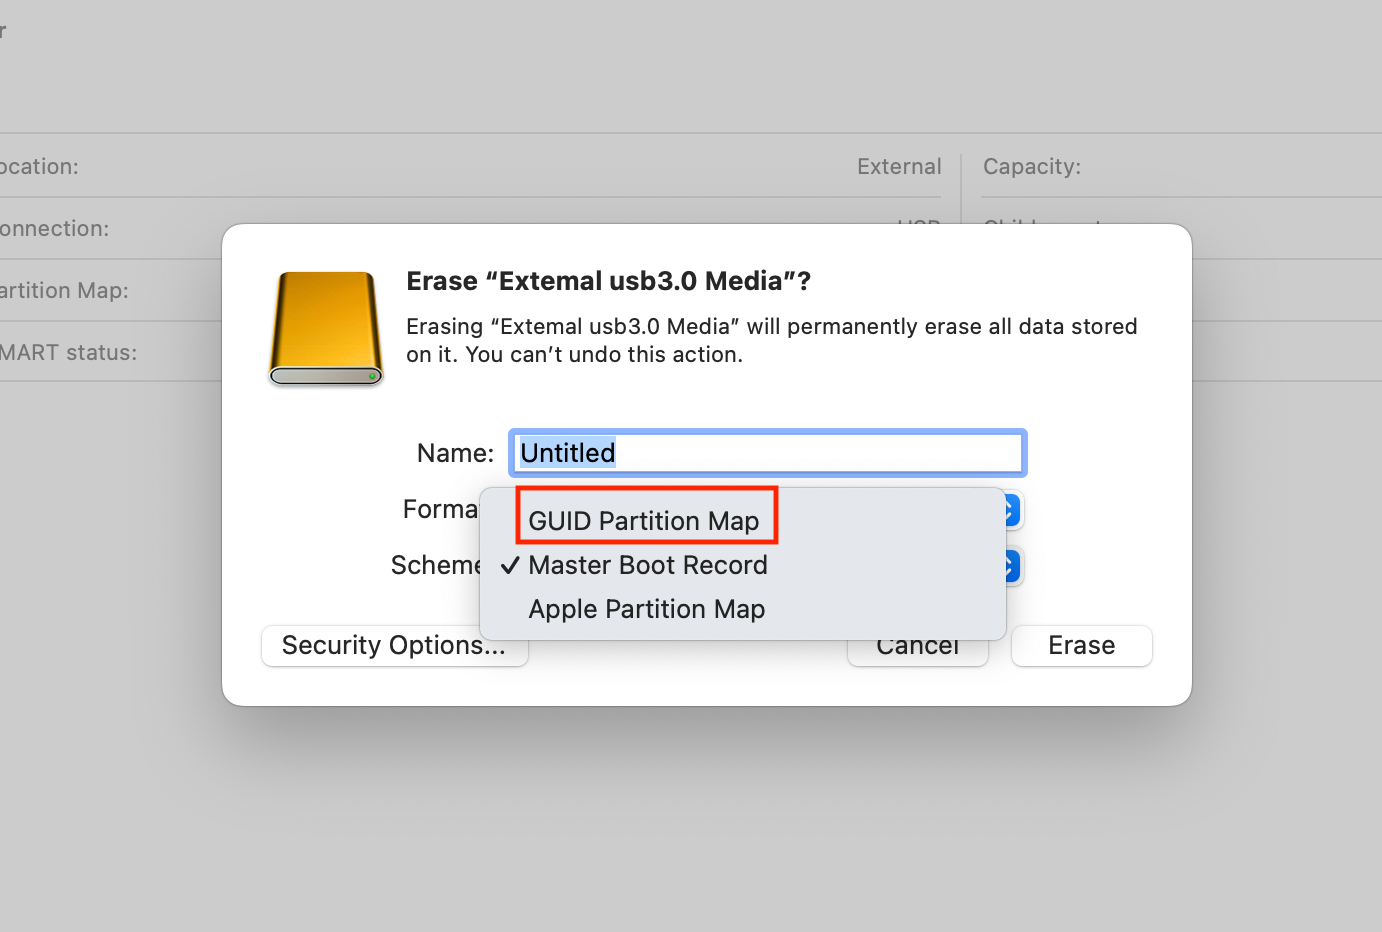
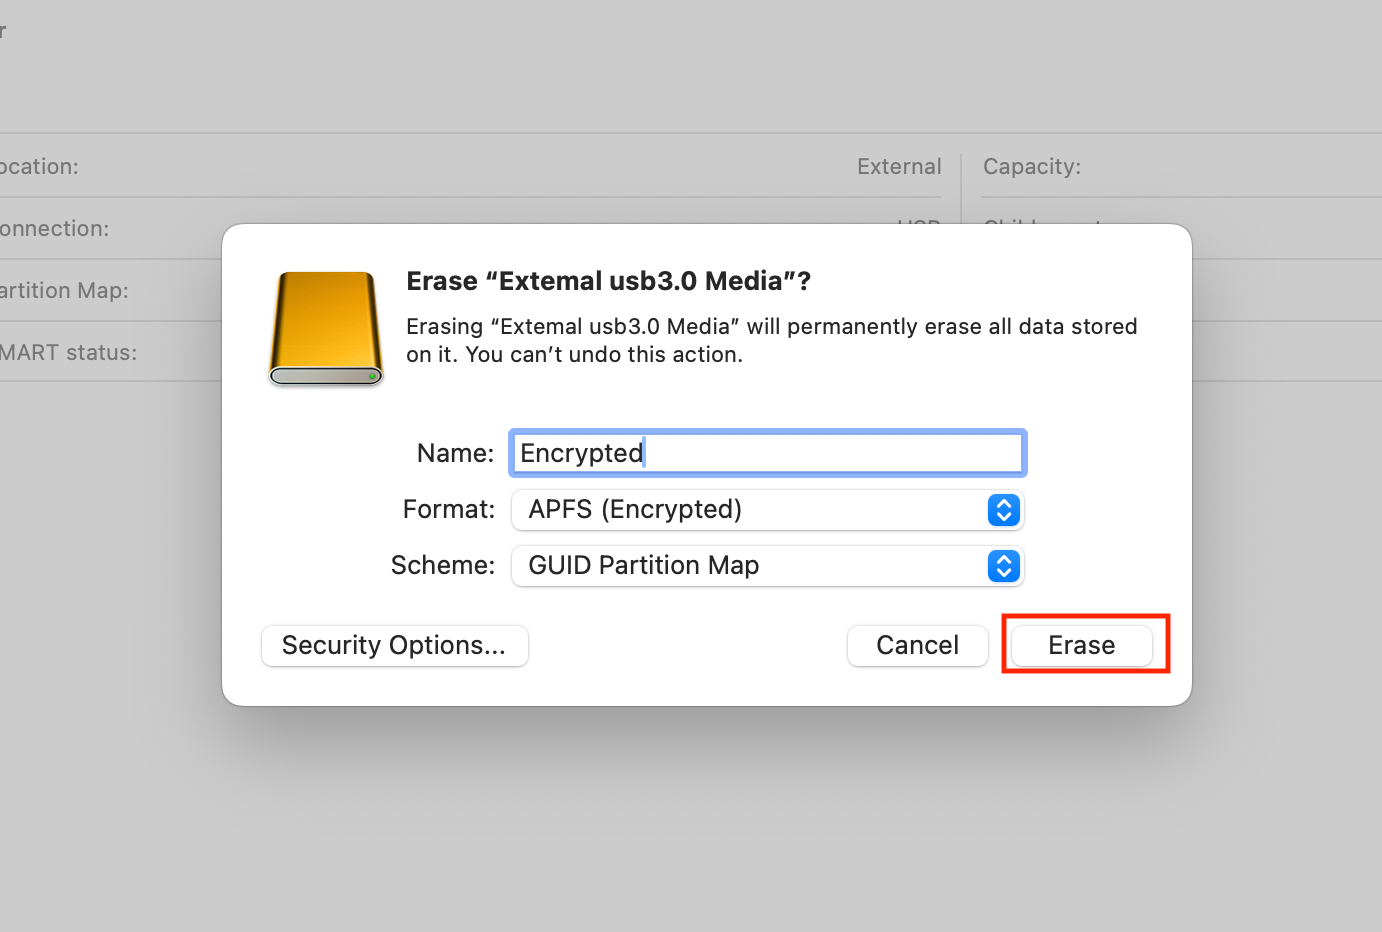
Under “Scheme” choose “GUID partition map.”
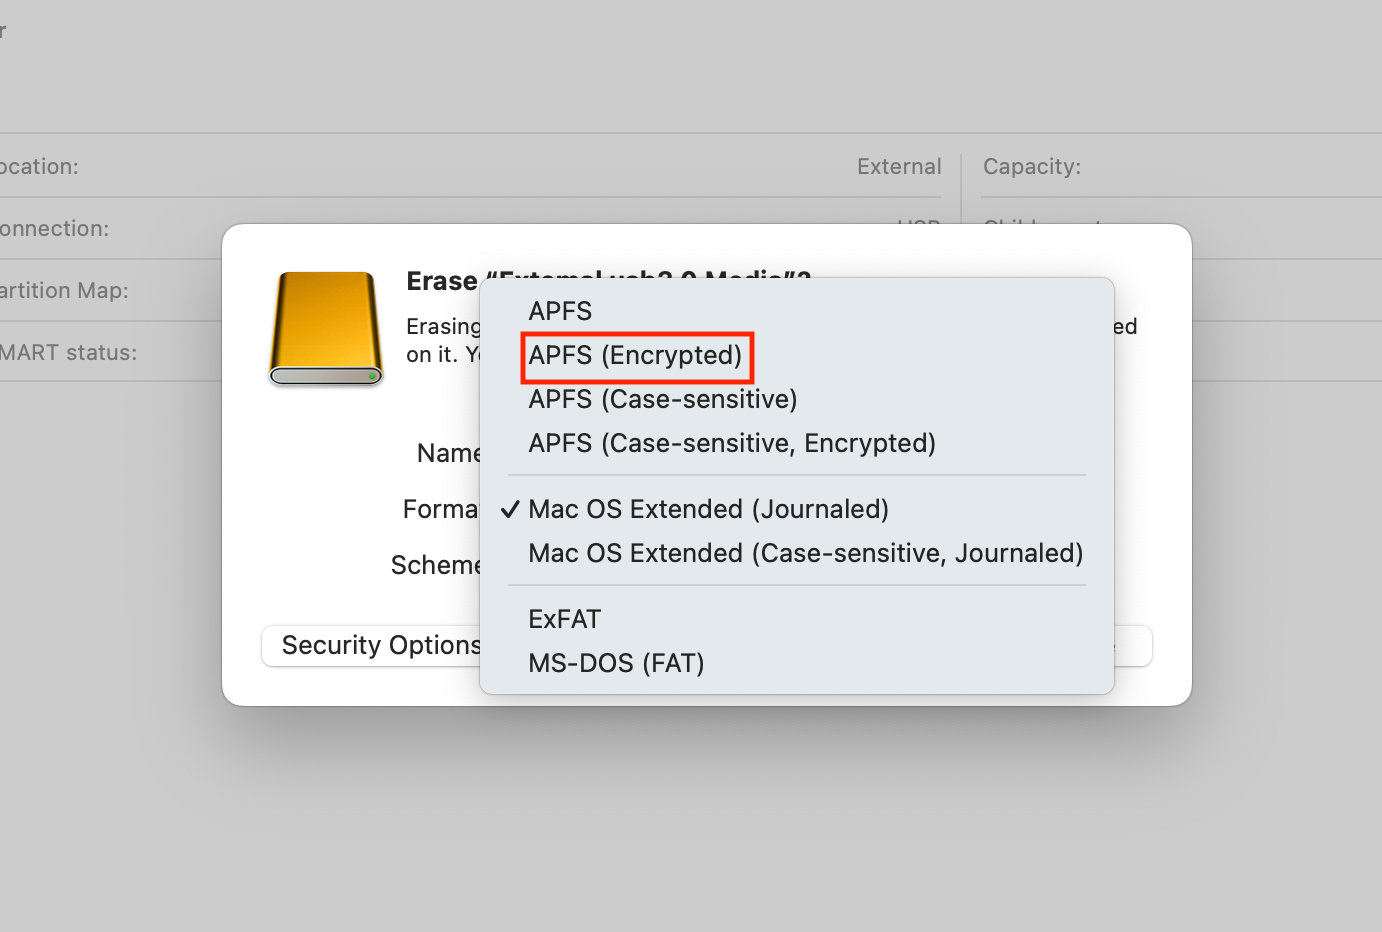
Under “Format” choose “APFS (Encrypted).”
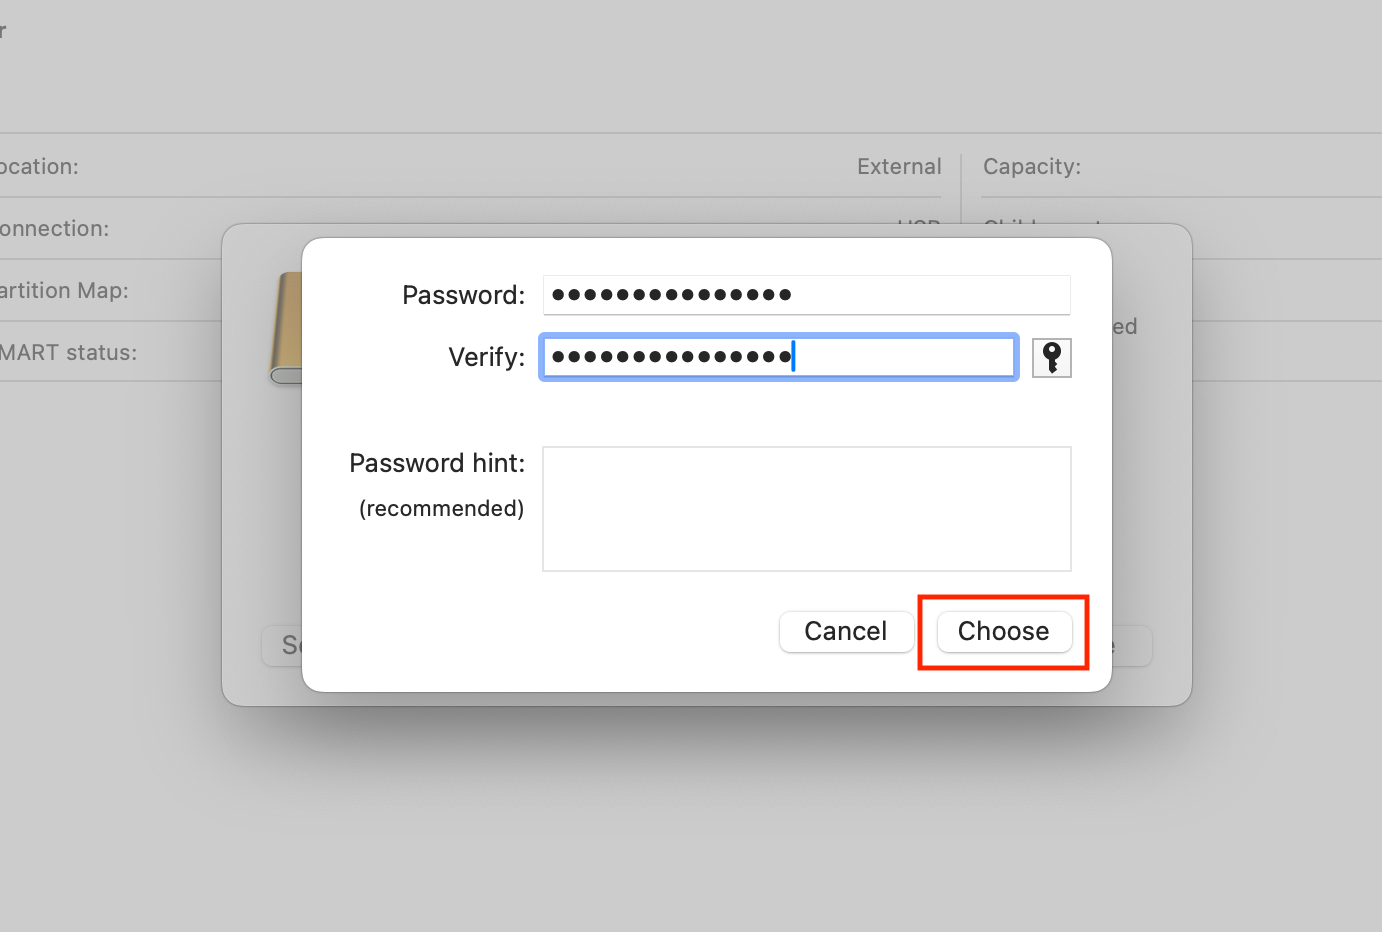
Choose a password, and save it somewhere safe. Then click “choose.”
Give the drive a name, then click “Erase.”
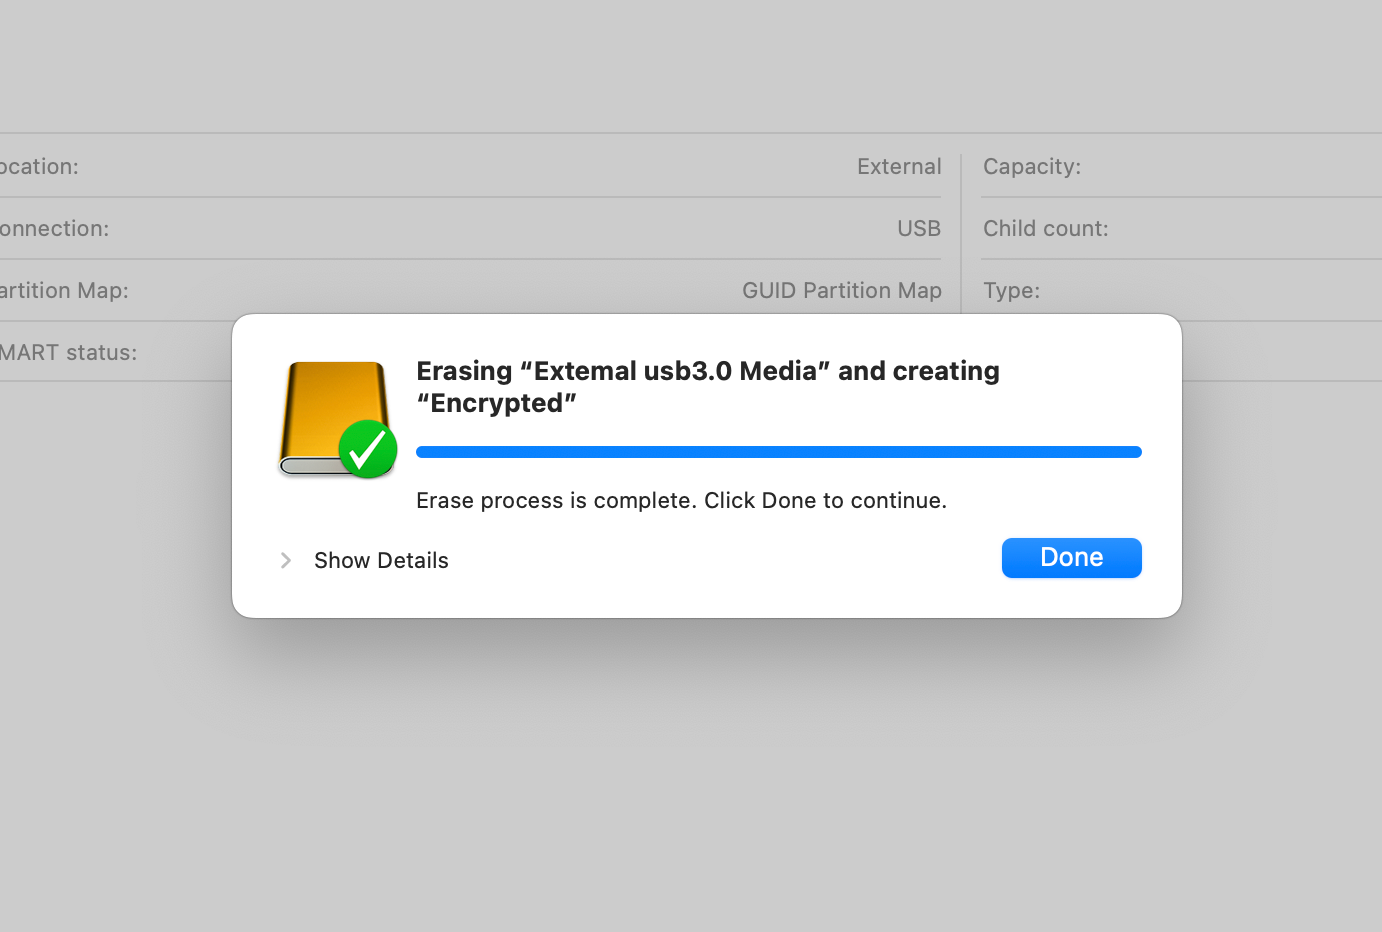
Wait for the process to complete.
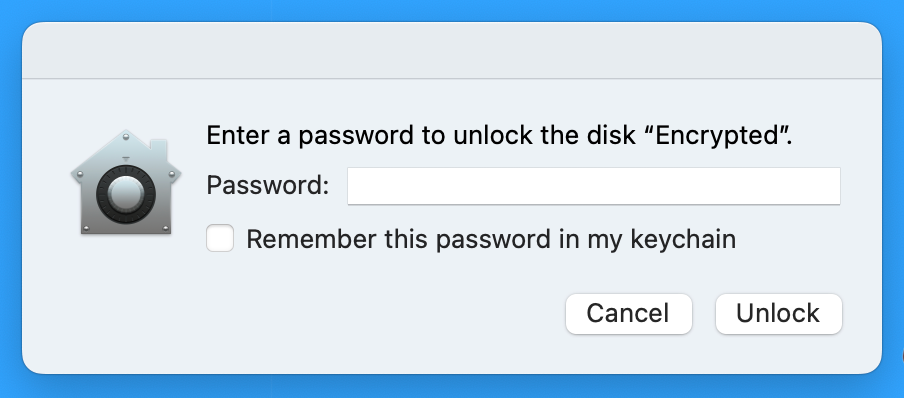
Now, the next time you plug in the drive, you’ll be prompted for a password.
You can also choose to add the password to your Mac’s keychain, so you don’t have to enter the password on that specific computer.
Encryption is a powerful technology that everyone can access, and for all practical purposes no one can defeat using brute force. Which is why you should consider encypting your system drives, and sensitive devices like phones and tablets too!


