Key Takeaways
- Your local IP, MAC address, and other network details are essential if you want to host any kind of server.
- Generally speaking, you can find your network details by looking in the Settings, opening up the connection you’re currently using, and looking for an “Advanced” or “Details” button.
- Your MAC address and local IP can be useful if you need to troubleshoot devices on your local area network that are not working correctly.
Every network-connected device — computers, smartphones, tablets, smart home gadgets, and more — has an IP address and a unique MAC address that identify it on your network. Here’s how to find that information on all the devices you might have lying around.
In this tutorial, we’re going to be talking about how to find a device’s IP address on your local network, often called a private IP address. Your local network probably uses a router to connect to the Internet. That router will also have a public IP address — an address that identifies it on the public internet. To find your public IP address, you’ll likely need to log into your router’s admin page. Alternatively, there are plenty of websites that can tell you your IP address when you visit them.
Windows 11
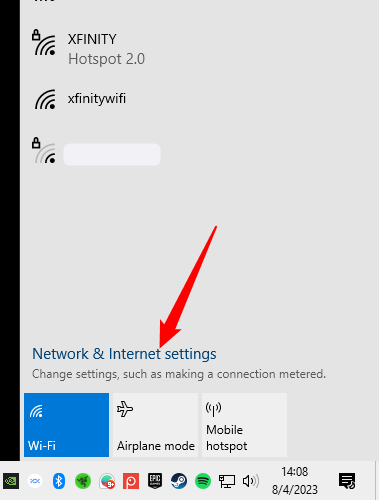
Accessing your network details on Windows 11 is basically the same as Windows 10. Click on the network icon in the bottom right corner of the taskbar, then select “Network and Internet Settings.” The network icon in our example is the Wi-Fi symbol only because we’re connected to a Wi-Fi network. An Ethernet connection will look like a little computer monitor.
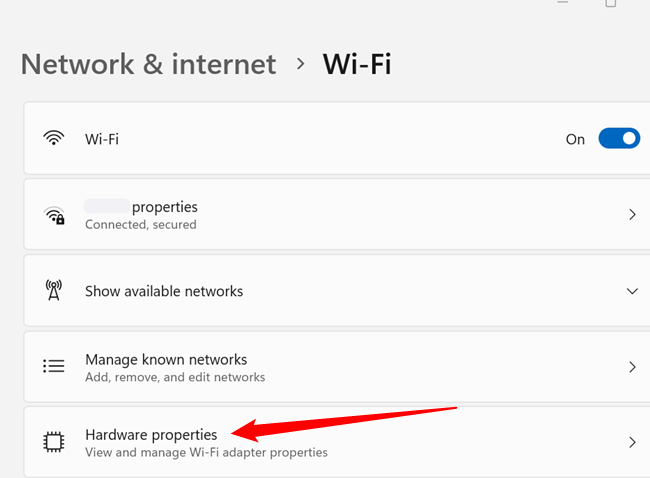
You’ll automatically be taken to the correct page in the Settings app. Click “Hardware Properties” to display everything about your current network adapter.
If you aren’t on the correct page, you can always just navigate there manually using the left-hand side bar.
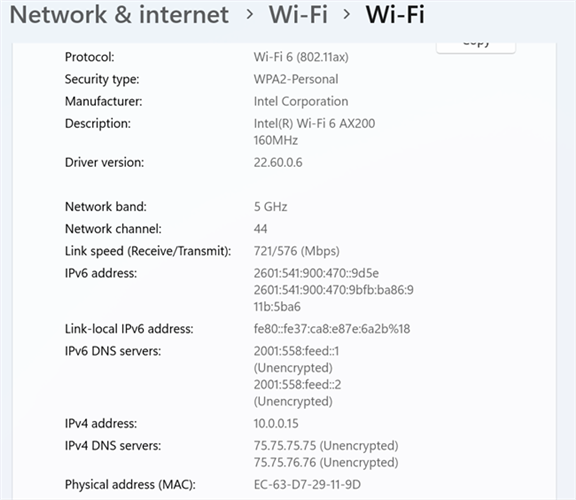
This is a pretty dense page, but it shows you everything you might need to know: your IP address, your network name, signal strengths, your MAC address, and more.
Windows 10
On Windows 10, you can find this information more quickly than you could on previous versions of Windows. Click the network icon located in the bottom right corner of your screen. If you’re connected using Wi-Fi, it’ll be a little Wi-Fi icon; if you’re connected using Ethernet, it’ll look like a little monitor. Select “Network and Internet Settings” in the menu that appears.
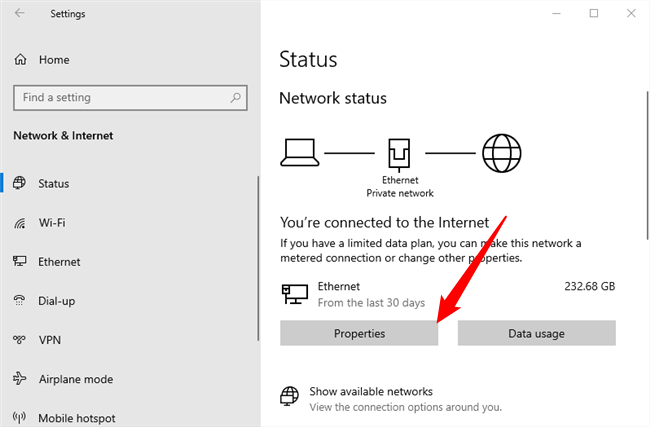
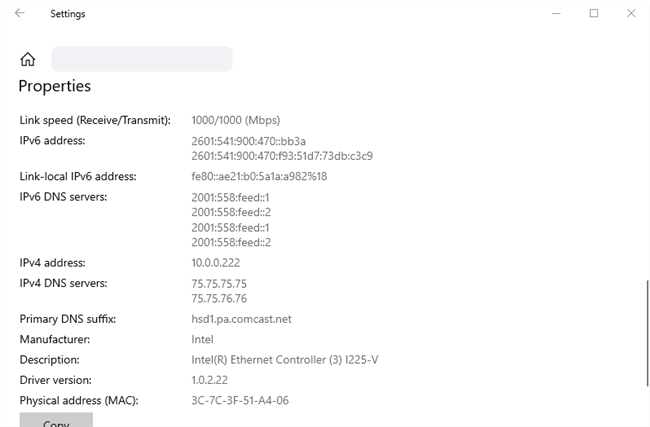
Click “Properties” when the Status page is open.
Scroll down a bit once the “Properties” window is open, and you’ll see your local IP, MAC address, and other network details.
Windows 7, 8, 8.1, and 10
You can find this information in other ways on previous versions of Windows — and the old methods still work on Windows 10, too.
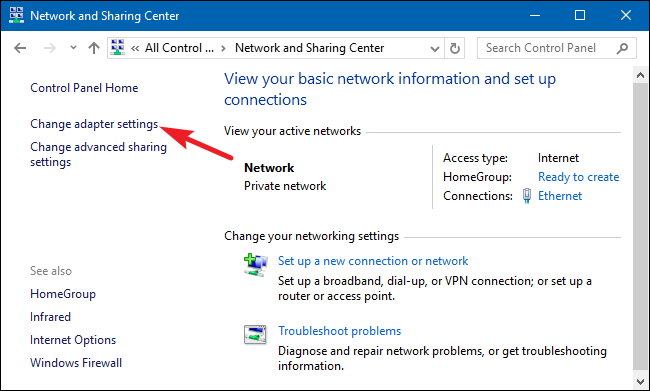
Head to Control Panel > Network and Sharing (or Network and Internet in Windows 7), and then click the “Change adapter settings” link.
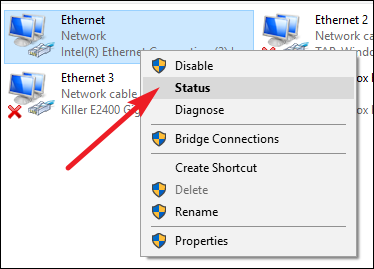
Right-click the connection for which you want information and then choose “Status” from the context menu.
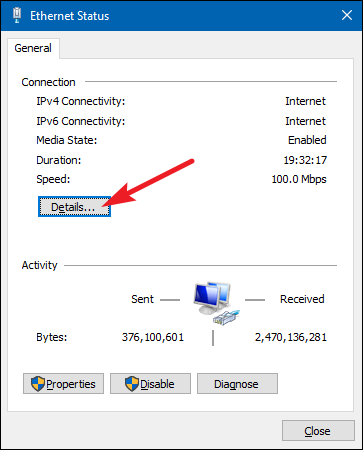
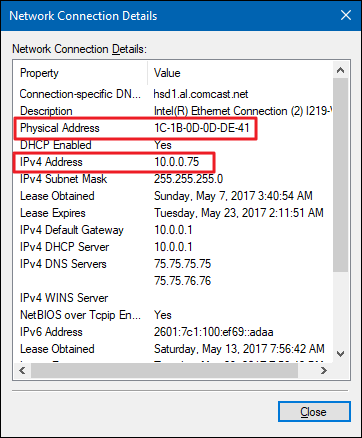
In the “Ethernet Status” window, click the “Details” button.
The “Network Connection Details” window will have the information you want. Note that the MAC address is listed as “Physical Address.”
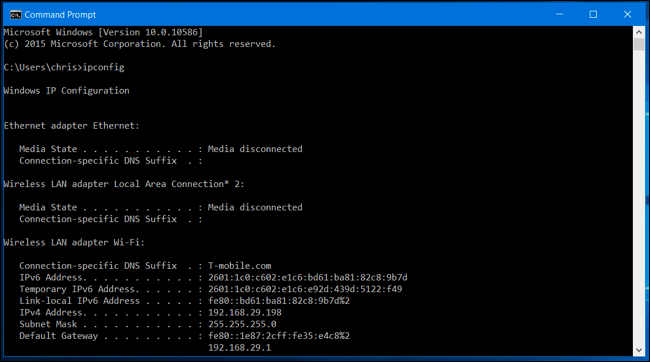
You can also find this information in any version of Windows by opening the Command Prompt and running the following command:
ipconfig
macOS
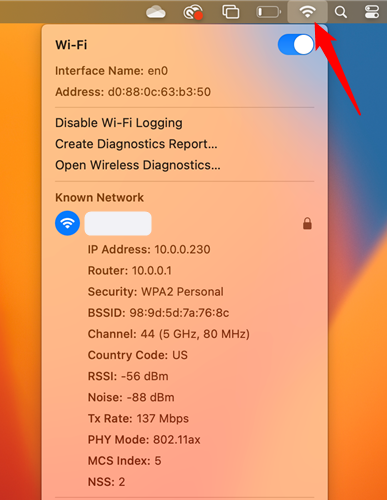
If you’re connected via Wi-Fi, the quickest way to find this information in macOS is to hold down the “Option” key and click the Wi-Fi icon on the menu bar at the top of your screen. The Option key enables quick access to status information elsewhere in Mac OS, too.
You’ll see your Mac’s IP address next to “IP address.” Other details here will show you information about your wireless network and your router’s IP address.
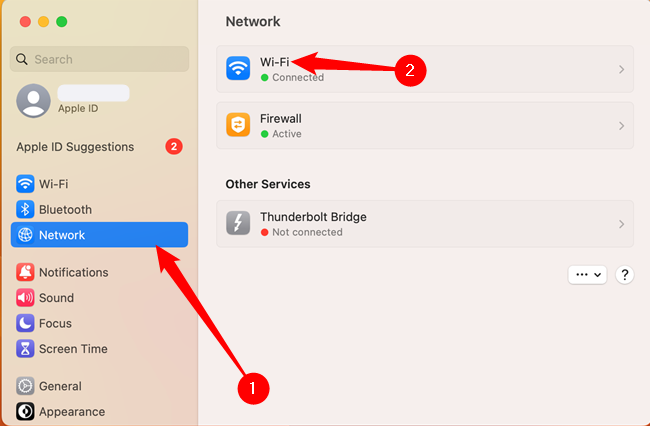
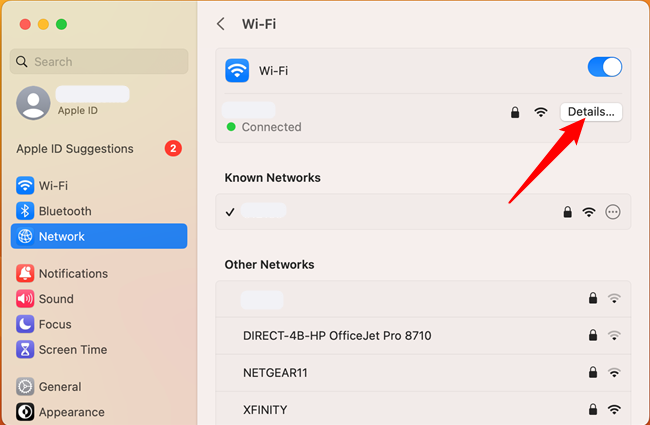
Whether your connection is wireless or wired, you can also find this information by opening the Apple menu, and then heading to System Settings > Network. Select your network connection.
Click “Details” next to the network you’re connected to.
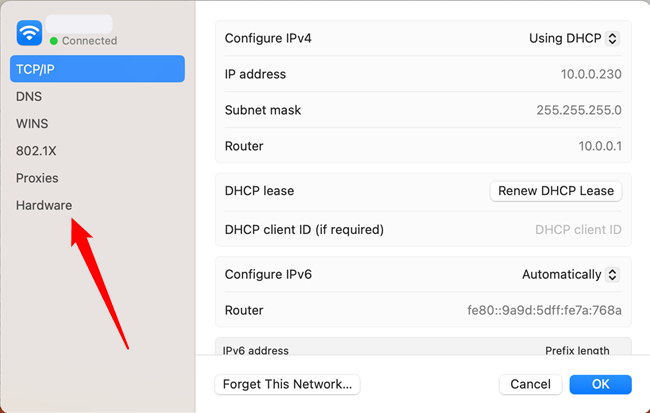
Now you can view everything you need to know about your network. Your local IP address is displayed under the TCP/IP tab. If you want to view your Mac’s MAC address, open the “Hardware” tab on the left.
iPhone and iPad
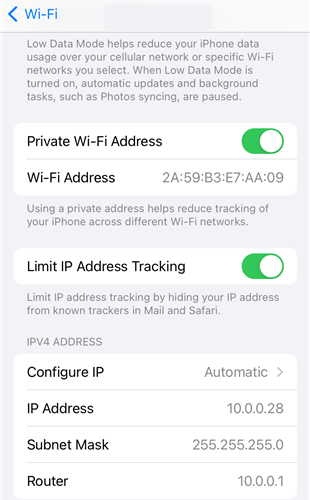
To find your MAC address and local IP on an iPhone or iPad, open up the Settings app, tap “Wi-Fi,” then tap the “i” button next to your Wi-Fi network. When you scroll down you’ll see your local IP address, other network information, and what appears to be a MAC address. That MAC address is what routers will see when you connect to them, but it isn’t your real MAC address. Apple has basically built “MAC spoofing” into iOS as a privacy measure.
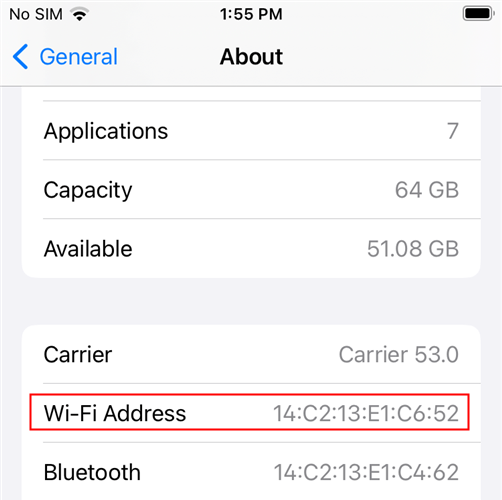
To find your real MAC address, head to Settings > General > About. Scroll down until you see the “Wi-Fi Address” field — that is your MAC address.
Android
On Android, you can find this information in the Settings app. Pull down from the top of the screen and tap the gear icon or open your app drawer and tap the “Settings” app icon to open it.
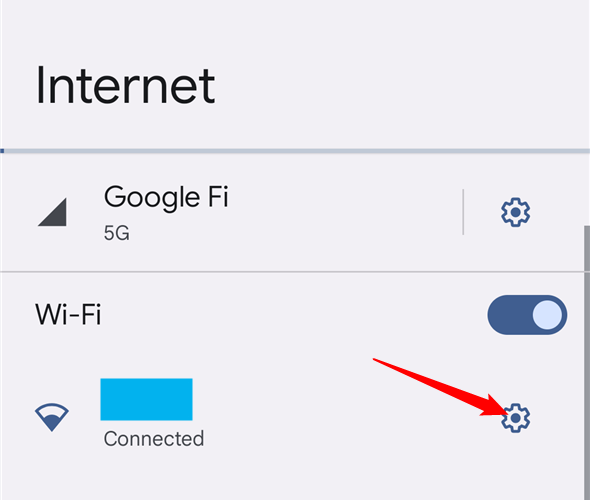
Navigate to Network & Internet > Internet, then click the gear icon next to your Wi-Fi network to view your network details.
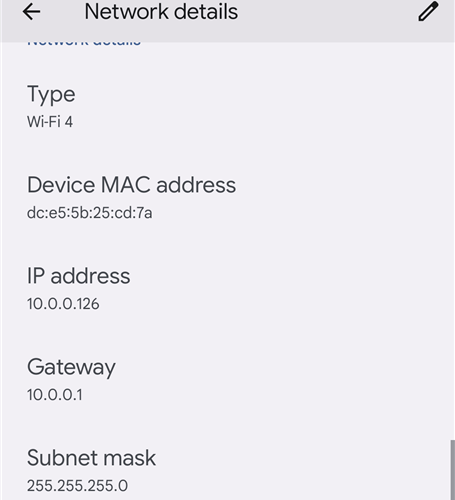
Scroll down until you see a small “Network Details” header. Here you’ll find your Wi-Fi type, your MAC address, local IP address, and other information about your network.
As always on Android, these options may be in a slightly different place depending on how your manufacturer customized your device. The above process was performed on a Pixel 6 running Android 13.
Linux
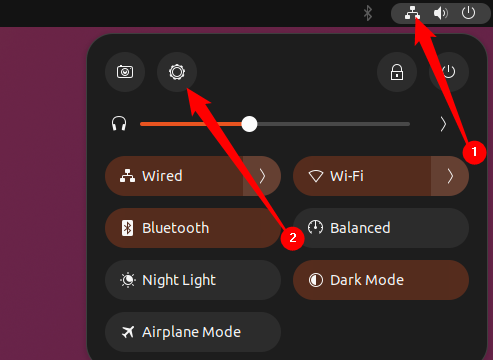
On a modern Linux system, this information should be easily accessible from the status or notification area. Look for a network icon, click it, then click the gear icon in the menu that appears.
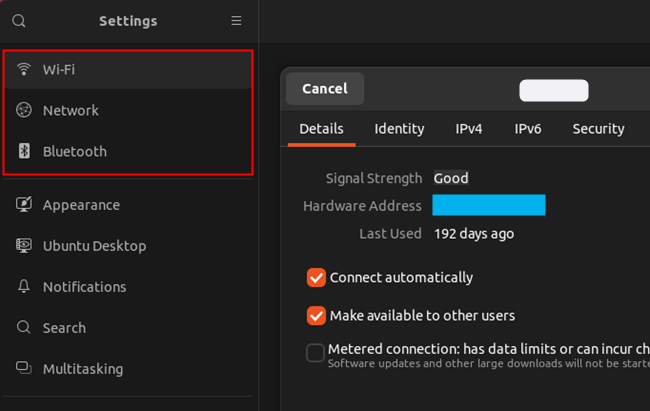
Select “Wi-Fi” or “Ethernet” in the settings menu, then click the gear icon next to the appropriate network. You’ll see a window with a few different tabs. The “details” tab shows you some basics, including your MAC address (which is otherwise called a hardware address), and the IPv4 and IPv6 tabs show you your local IP addresses.
If you have access to a terminal, there are some more universal ways to get your network details. First, run sudo apt install net-tools and let that run until everything is installed. Then, run the following command:
ifconfig
You’ll probably see at least two or three things displayed. You can ignore “lo,” which is the loopback adapter. If you’re using a wired connection, you’re looking for something that starts with “en” followed by a few letters and numbers. If you’re on a Wi-Fi network, you’re looking for an adapter that starts with “wl” instead. For example, our network adapters are called enp6s0 (Ethernet) and wlp5s0 (Wi-Fi).
For years Ethernet adapters were named “eth0, eth1, etc” and Wi-Fi adapters were named “wlan0, wlan1, etc.” That changed when Linux distros adopted the “Predict Network Interface Name” naming scheme.
The process is similar on other devices, from game consoles to set top boxes. You should be able to open the Settings screen and look for a “Status” screen that displays this information, a “Network” screen that might show network connection details somewhere, or a list of information on an “About” screen. If you can’t find these details, perform a web search for your specific device.


