If you’re here, you’re likely as mad as I was a few days before writing this article, doing battle with the Xbox app on Windows 11.
Well, put that rage at the door, as I may be able to help. Maybe … that is. The Windows 11 Xbox app (also used for PC Game Pass) is a strange mish-mash of different Xbox services. It is also how you access PC Game Pass, which is one of the best deals in gaming. When it works, that is, but it’s true that the Xbox app has been gradually improving over time. It’s a far cry from the Games for Windows Live days, at least, and when it does work, it offers heaps of value. The full list of Xbox Game Pass games for PC is truly epic, complete with game saves that sync between the cloud, Xbox consoles, and Windows 11.
While the design and feature set is a little inconsistent here and there, the most irritating thing is how temperamental it can be. The app gets broken fairly easily and offers little to no information about exactly what is breaking it when it does.
In this article, we’ll run through all the ways your downloads may have gotten stuck, and provide some fixes that may (or may not) work.
Things to check first
There’s a large variety of ways the PC Game Pass app (also known as the Xbox app) may be broken, given the way it’s deeply baked into the Windows 10 and Windows 11 operating system. Before we get into the more complex fixes, here are some of the more simple things you should check first.
- Check that you didn’t hit your Windows device limit. The Microsoft Store only allows you to access up to 10 devices at a time with your Microsoft Account. If you have a bunch of old devices you’ve connected to that you no longer use, you should remove them. Sometimes the Microsoft Store doesn’t warn you that you’ve exceeded your device limit, which may incur problems when trying to download things that require a license. Here’s how to check your Windows device limit.
- Check that your internet is properly connected. I know it seems simple, but sometimes a download may stall if your internet is too slow or suffering from some kind of interference, even if the rest of your web seems to be working. Check your speed on SpeedTest.net, and ensure you’re not connected to a VPN or something like that.
- Check that the Xbox network isn’t down. If Microsoft itself is having issues, that may also cause broken downloads. Check the Xbox Live service status here (opens in new tab).
- Check that your storage device isn’t full. The Xbox app should warn you if you’ve run out of space, but sometimes it may not. Type “Storage Settings” into the Start Menu and open the associated setting to check if you have enough device storage available.
- Check that your Xbox games are installed on the correct drive. If you go into the Xbox PC app, click on your portrait in the top left, then go to settings, and then general, you should be able to select a default location where games save. By default, this is in C:/XboxGames. You can change it to another location, but honestly, it seems like some games from the PC Game Pass app simply don’t like being installed on external drives or in external locations. To be absolutely sure, I’d leave it set to default unless you absolutely need to change it around.
- Make sure Windows and the Xbox app are fully up to date. This is primarily to ensure a consistent experience, as the Xbox app and Windows itself come with bug fixes that can repair some issues. Type “Check for updates” into the Start Menu to open the Windows updater quickly. To update the Xbox app, type “Microsoft Store” into the Start Menu, click on the library icon in the bottom left corner, then select “Get Updates.”
- Make sure you’re not running Windows Insider builds. While they are typically stable, some of the higher flights for pre-release Windows builds may cause issues with certain services and games. Additionally, if you’re using the Xbox Insider app on Windows 10 or 11, make sure you’re not participating in the “Windows Gaming” flight, which may also contain less-stable code. Switching between flight rings mid-download does seem to cause errors too, as I may have discovered the hard way recently.
1. Reset, reinstall, repair, reboot
The most basic thing to try first is, as usual, “turn it on and off again.” It may seem basic, but sometimes a reboot is all you need to sort out a naughty application or stuck download queue. If you don’t know, just right-click on the Start Menu, select Shut Down, then hit Restart. However, if that doesn’t work, there are a few more drastic “reset” methods you can perform on the Xbox app.

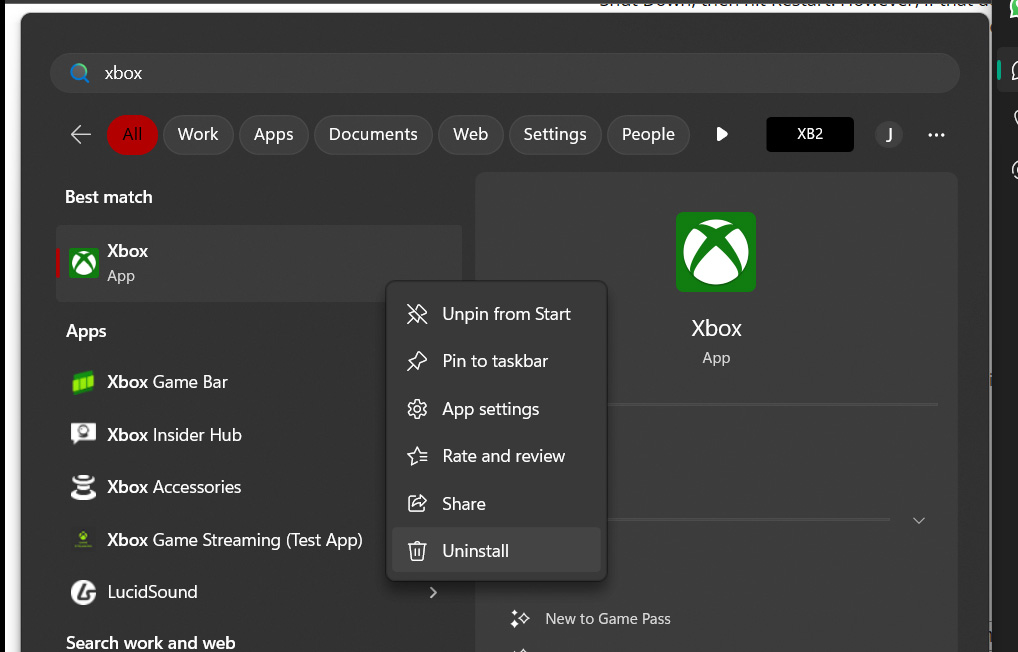
- Delete and Reinstall the Xbox app. To do this, type “Xbox” into the Start Menu as seen above, then simply right-click on the Xbox app, and select Uninstall. Next, you can head to this link (opens in new tab) to open the Microsoft Store listing for the Xbox app, and hit download to reinstall it.
- Repair the Xbox app. To this, type “Xbox” into the Start Menu, as seen above, then select “App Settings.” Scroll down to the “Reset” section, and try the Repair button. If that doesn’t work, you can also follow the steps again, and try the Reset button. These buttons may require you to log back into the app.
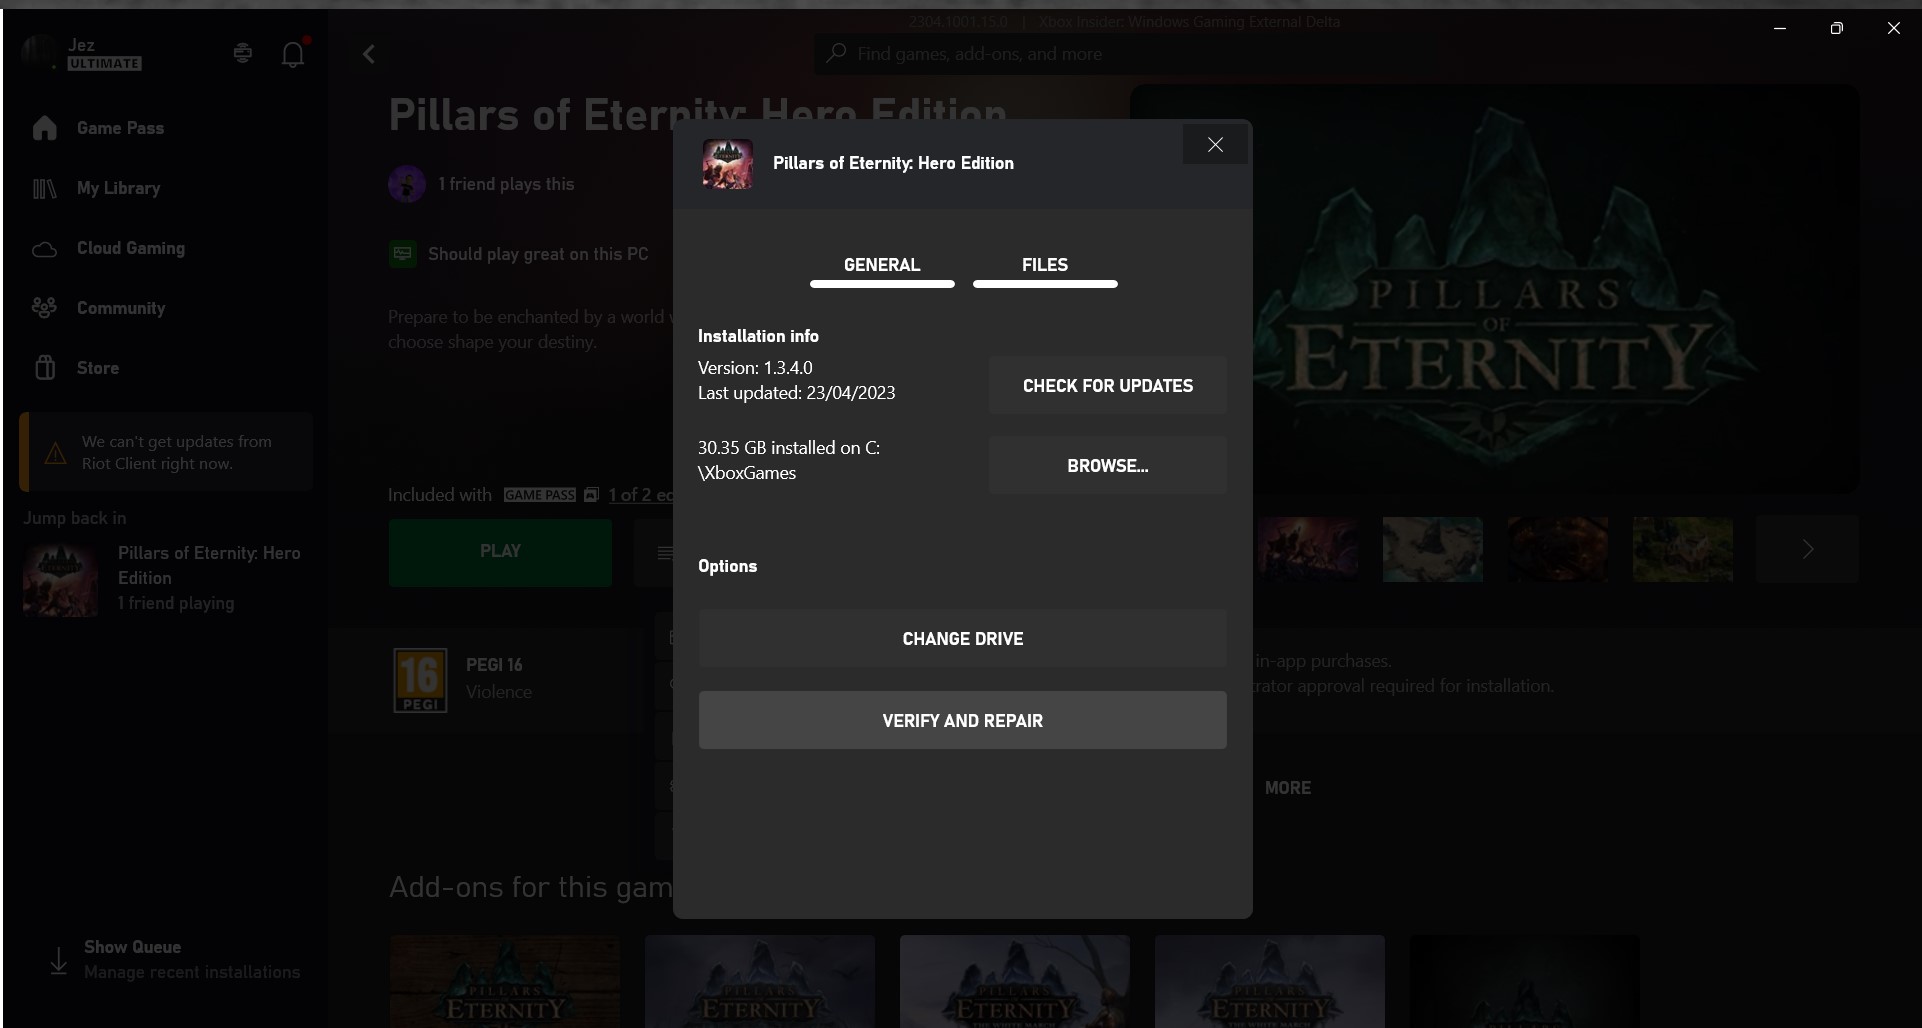
- Verify game installations. If you already have some games installed on your Xbox app that won’t launch or download updates, it may be worth verifying their file integrity. To do this, open up the Xbox app, select “My Library” on the left. Select “Show Filters,” then check “Installed.” Click on the game you want to verify, then select the “…” menu option next to the play button. Select “Manage,” then “Files,” then “Verify and Repair.”

If you’re still finding that games won’t download and install after trying all of the above, now we’re getting into nuclear territory. Here are some more complex ways you can unstuck your Xbox app on Windows 10 and 11.
2. Use PowerShell to fix Xbox PC “Gaming Services”
One culprit I’ve often found to be causing issues with download queues on Windows 11 and Windows 10 is the “Gaming Services,” erm, service, which runs automatically as part of the Xbox app / PC Game Pass package. It’s unclear what this program actually does, but Microsoft doesn’t let you manage its usage through the usual methods, for some reason. Instead, we have to opt into PowerShell, which is a command tool for performing advanced tasks in Windows in situations where you don’t have access to a typical user interface.
The goal here is to ultimately, halt, and reinstall the Gaming Service application, to see if that can alleviate issues with it becoming stuck for whatever reason.
- Type PowerShell into the Start Menu, then right-click on the app called Windows Powerful, and select “Run as Administrator.”
- You’ll get a black window with a command prompt that looks a bit like The Matrix. Here, you want to paste the following command, then press enter:
- get-appxpackage Microsoft.GamingServices | remove-AppxPackage -allusers
- Now, close that window out. After running this command, Gaming Services should be fully removed. Follow step 1 again to open a new PowerShell window as an administrator.
- Now, paste in this command, and press enter:
- start ms-windows-store://pdp/?productid=9MWPM2CQNLHN
- This will open the Gaming Services page on the Microsoft Store, which is typically hidden for some strange reason. Install the Gaming Service there. You can track its progress by clicking the library section in the bottom left corner of the Microsoft Store window. Be sure you click “Yes” on the User Account Control pop-up.
- Restart your PC again. This can fix some problems with the download queue, but not all.
3. Delete stuck Xbox PC game installations
I think most people will find this is the real reason why their games aren’t downloading. For whatever reason, it seems like PC games downloaded via the Xbox app are quite easily corrupted. Whether you turn off your PC mid-download, there’s an interrupted internet connection, or so on, it seems the Xbox app has some difficulty picking up where it left off, which can leave you with a bugged queue that gets stuck much like a printer paper jam.
The fix for this problem took me ages to figure out, but thankfully it’s relatively straightforward and will save you from having to do a full-blown Windows reset to factory settings. Which is, of course, the nuclear option. You don’t want to do that, I didn’t want to do that, so try this instead.
The goal here is to delete game installations that may be stuck at 0%, or queued in a way that is preventing other games from downloading.
Note: This method will wipe all of your Xbox PC game installations, as well as any pending save files that you haven’t synced to the cloud. Sadly, the Xbox app doesn’t tell you if your save files are backed up, so I would let the Xbox app run for 10 minutes or so outside of Safe Mode just to be sure.

Note: If you use Windows 11 Professional with Bitlocker, you may need to enter your Bitlocker recovery keys to get through the steps below.
- By default, your PC games from the Xbox app are installed to C:\XboxGames, the problem is, this folder is always “in use” by Windows, and is controlled by “System” by default. To delete files in here, we need to take control of the folder, and we can’t do that while it’s in use by Windows.
- So, we need to open Windows in Safe Mode. To do this, hold down the shift key while you click “Restart” from the Shut Down menu in the Start Menu.
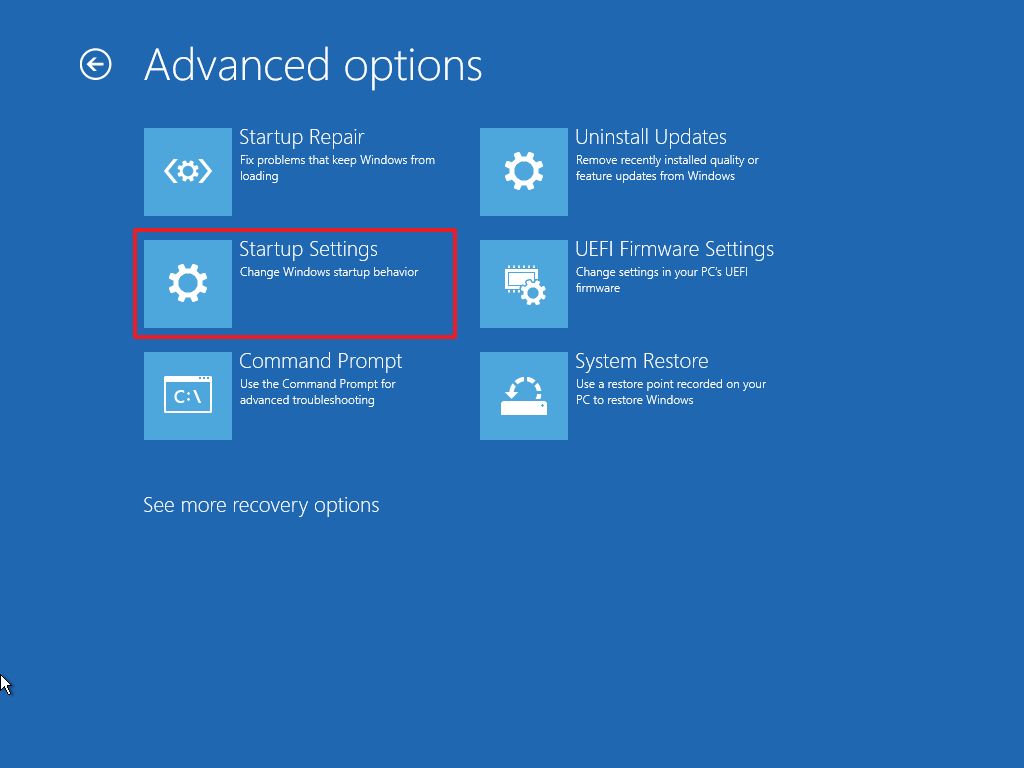
- After your PC restarts, you’ll see a blue recovery mode screen. Select Troubleshoot, then select Advanced Options.
- Here, you’ll see a range of options. You need to select Startup Settings and then hit Restart. This will give you access to some new options.
- On the new screen, select 4 to enter Safe Mode. You don’t need to use Safe Mode with Networking.
Now, you should be back on the Windows 11 desktop after signing in with your pin. This is where we’ll take command of that pesky C:\XboxGames folder and remove those stalled game installs once and for all.
- Open the File Explorer and navigate to C:\. You can get it by simply typing C:\ into the address bar at the top of the File Explorer and hitting enter.
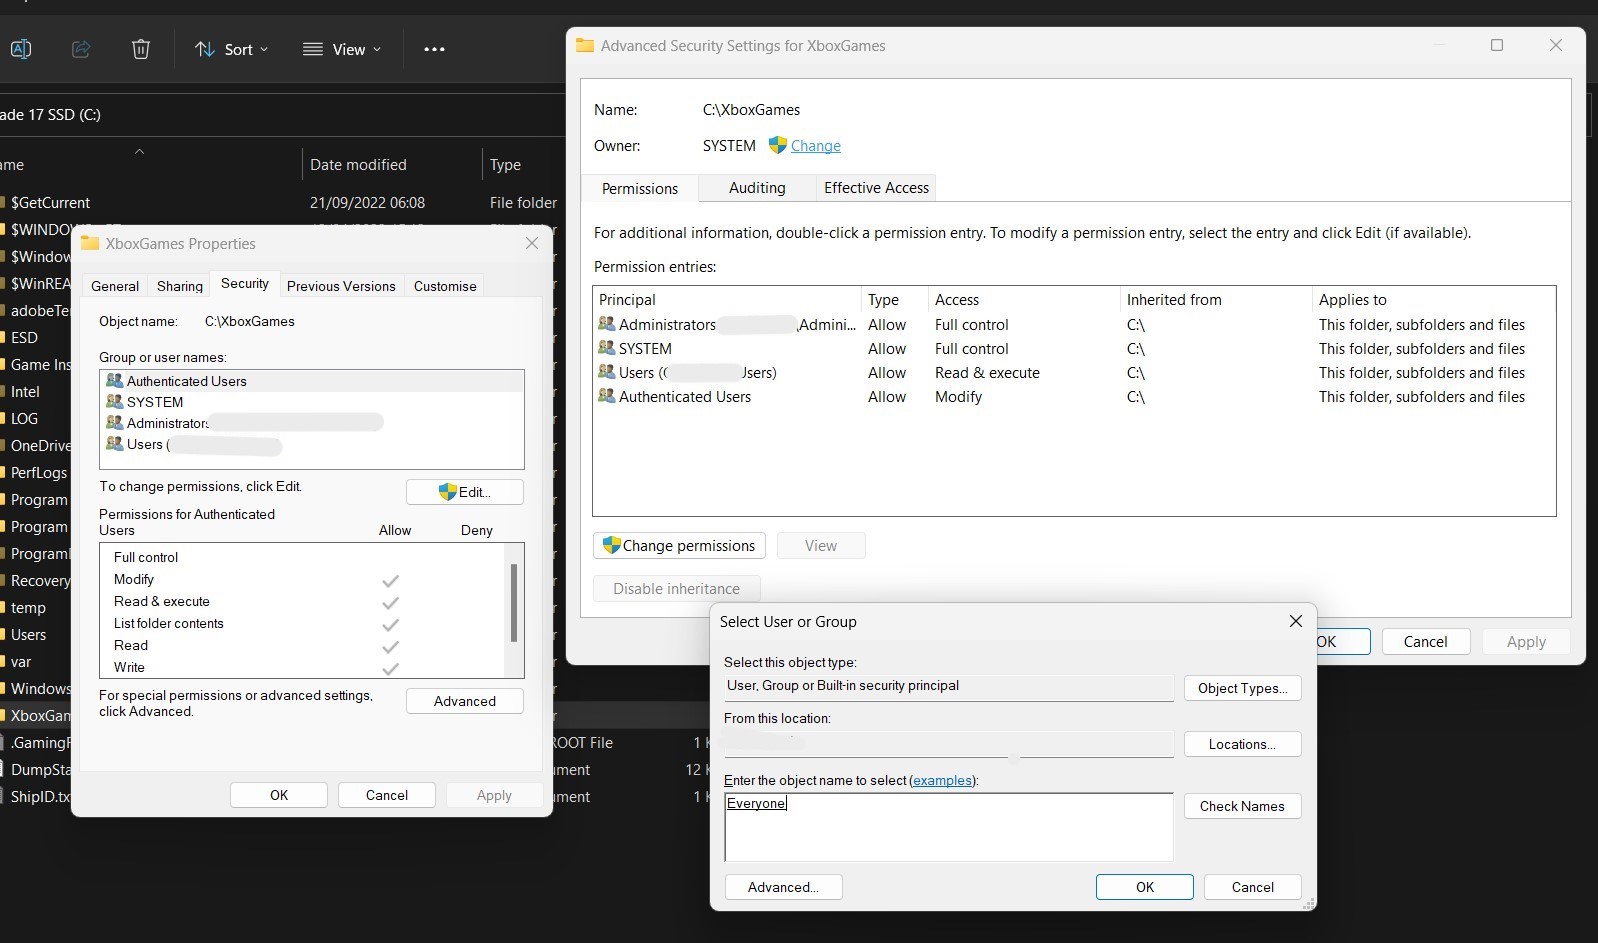
- Right click on the folder named XboxGames, and select Show More Options, and then Properties.
- Select the Security Tab in the Properties panel.

- First, click edit, then add. Type “Everyone” into the box, and click “Check Names.” This should underline the word “Everyone.” Click OK.
- Now, select all the ticks under “Allow” with Everyone selected, to give Everyone full control over this folder. Then select Apply.
- Back out of the Edit Permissions panel, so that we’re back to the Security Tab in Properties.
- Now, select Advanced. In this new window, it should read “Owner: System” at the top. Click change. Once again, type “Everyone” and click Check Names, then select OK.
- Put a check in the box that says “Replace owner on subcontainers and objects,” then click Apply.
- Now, back out of properties completely. Enter into the C:\XboxGames folder, press CTRL+A to highlight everything, then hit DEL to delete everything inside the folder. This will fully clear your download queue on the Xbox app, although you’ll have to re-download any games that you previously had installed.
- Go to the Start Menu, and restart your PC as normal.
Now if you go back to the Xbox app, you should find your download queue either cleared, or it will start downloading whatever game it had most recently struggled with. This fix worked for me, hopefully it will work for you too!
They’ll fix it, one day …
The Xbox app for PC is leaps and bounds better than it used to be, but it’s still nowhere near where it needs to be to grow PC Game Pass. The lack of information on problems that can arise from its usage can be frustrating since it doesn’t seem to be aware of scenarios where games have gotten stuck. Whether it’s the Game Services application erroring out or a failed installation of a game, the above tips should help resolve most problems with the app.
PC Game Pass (and Xbox Game Pass) are awesome services, with hundreds of games, save syncing between platforms, and discounts for members too. Microsoft has more work to do to polish it up on PC, but they’re moving in the right direction. Hopefully, guides like this won’t be needed for much longer.


