Summary
- Avoid costly Adobe subscriptions; GIMP + Stable Boy offers a powerful generative fill alternative.
- Set up GIMP with Stable Boy plugin, and run the Stable Diffusion model in Google Colab for free generative features.
- Tweak settings, follow the setup guide, and troubleshoot for optimal results with a DIY generative engine.
You don’t need to drop your hard-earned cash on a Creative Cloud subscription just to enjoy Photoshop’s Firefly features. Let me show how you can cobble together a free DIY solution that’s just as powerful. Plus, you can use it even on a potato PC because it runs in the cloud.
Photoshop’s Firefly Is Pure Magic, But Expensive
The generative fill feature in Photoshop is shockingly powerful. If you’ve ever spent hours meticulously compositing stuff into images, seeing it instantly appear (perfectly blended in) will always make your jaw drop. With generative autofill, you just paint in a selection, write what you want in that space (a cat, a soccer ball, a tree) and Photoshop drops it in with the correct perspective, lighting, and everything.
Sadly, this feature is locked behind the Creative Cloud subscription, so you need to cough up $20 a month just to use it.
GIMP + Stable Boy (A Free and Open Source Alternative)
So I tried looking for open-source solutions, but it seemed impossible at first. Photoshop has very few FOSS (free and open source) competitors anyway, and none that have this sophisticated generative fill.
Eventually, I stumbled across a free plug-in that can bring these capabilities to GIMP (a free image manipulation tool). It’s called Stable Boy, and it’s built on Stable Diffusion (one of the most popular and most powerful image generation models). It lets you paint in selections with text prompts, generate image direction from text prompts, remix, and upscale just like you can with Adobe Firefly in Photoshop.
With a modern, beefy GPU, you can run Stable Diffusion locally with little effort. I don’t have a fancy GPU and most of the time I work on my laptop anyway, so running it locally isn’t an option. I tried the next best thing instead. There are services that rent GPU or CPU processing power in the cloud to run heavy AI models. That way, it’d work even on a potato, as long as it’s connected to the internet. The only problem is that these services either cost a lot or only give a few tokens on a trial basis. That’s also a no-go.
The answer clicked for me when I remembered I could just run the Stable Diffusion model in Google Colabs and link it to the GIMP plug-in through an API. That’s how I was able to get a working Photoshop-like generative fill using free tools that work on any computer.
Everything You Need to Make This Work
Let me explain how the pieces fit together.
- GIMP is a free image editing tool that supports plug-ins. We’ll install it and load the Stable Boy plugin into it. That’s one half of the puzzle.
- We also need to get the AI backend up and running. For that, we use a Google Colab notebook to run the Stable Diffusion model and generate a live API URL. Stable Boy within GIMP can talk to the running model through this URL.
Here’s everything we need to make this work:
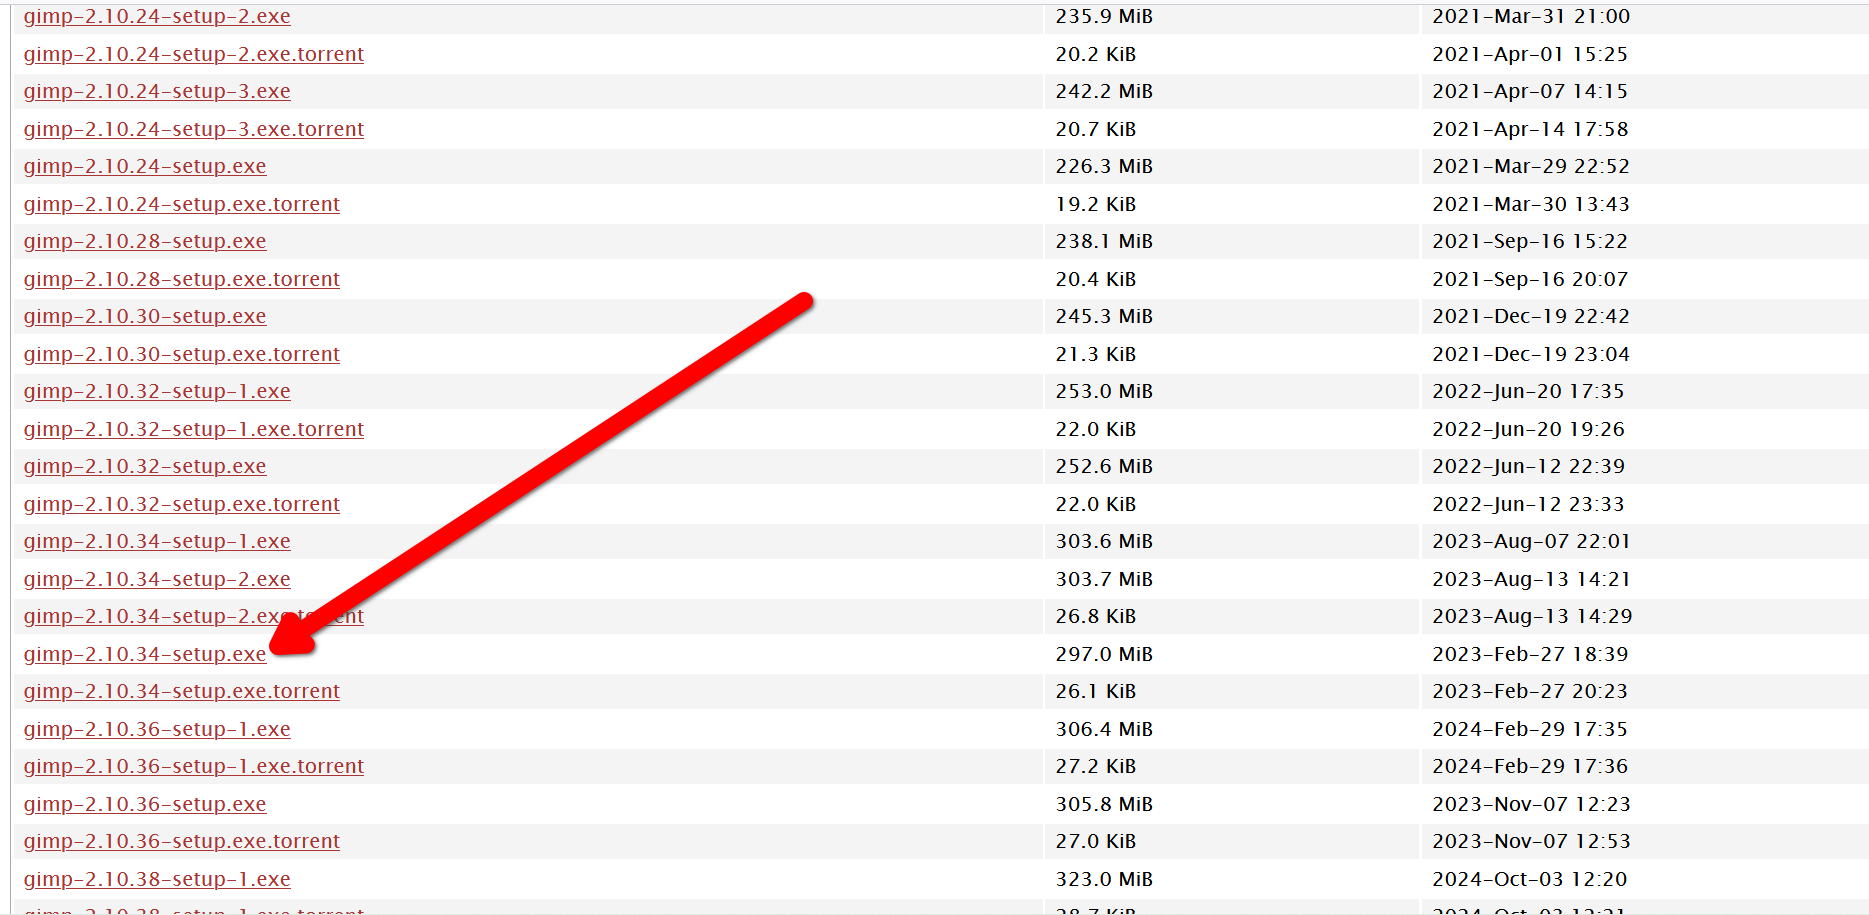
- GIMP version 2.10.34 (it has to be this version because the Stable Boy plugin doesn’t work with others).
- Stable Boy (this free GIMP plugin is available on GitHub).
- Google Colab access (you’ll need a Google Account, and you’ll need to grant access to your Google Drive).
- The Stable Diffusion notebook that we’ll run inside Google Colab.
- API link (the Stable Diffusion notebook will automatically generate this for us).
- A little bit of a DIY spirit.
Install GIMP and Load Stable Boy
Let’s start by downloading the correct GIMP setup (2.10.34) from the archives. You might have to scroll down a little. Install GIMP through the offline setup and launch it.
Now let’s grab Stable Boy. We can do this one of two ways.
If you have Git installed on your computer, open the terminal and enter this command. It’ll clone the entire repo into your local storage.
git clone https://github.com/thndrbrrr/gimp-stable-boy.git
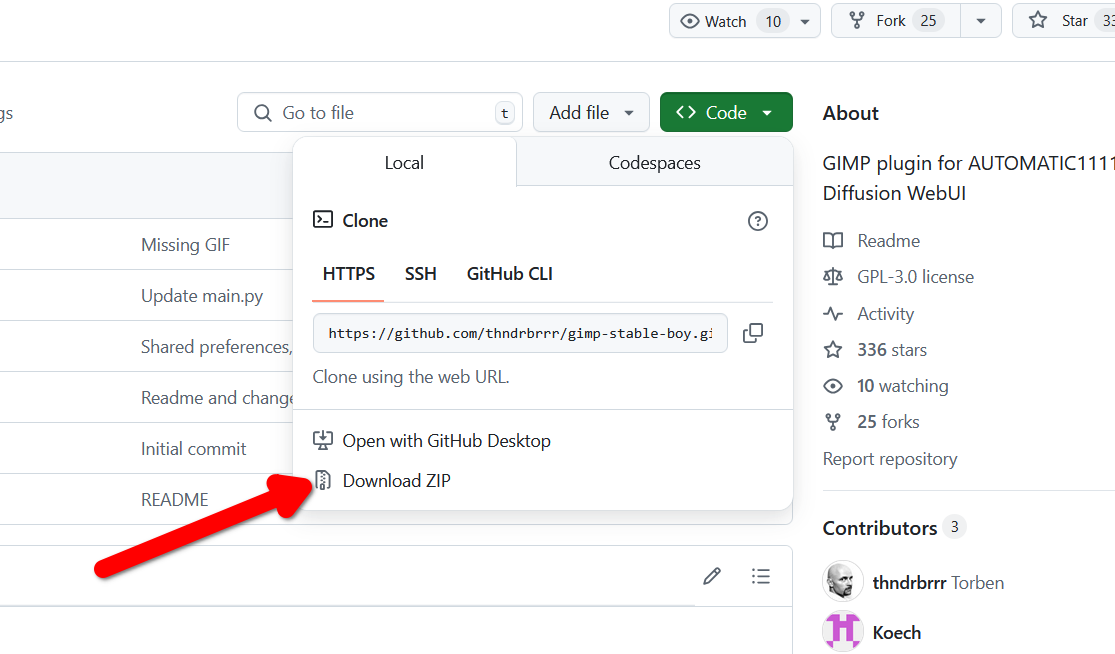
If you don’t have Git installed, open the GitHub repo click the green Code button on top of the repo and choose “Download ZIP.” Extract the ZIP file anywhere.
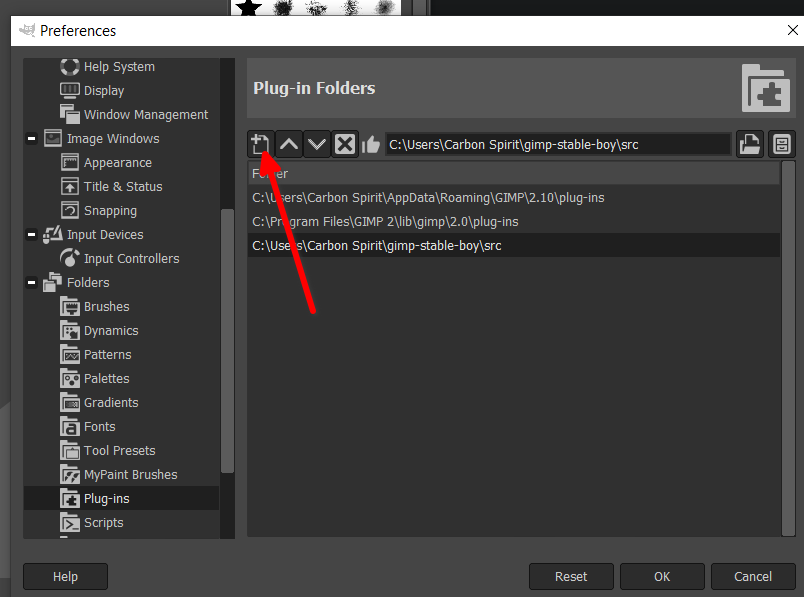
Now back to GIMP. Find Edit in the top menu and go to Edit > Preferences. Scroll all the way down and click the “+” icon next to Folders. The drop-down menu should have a “Plug-ins” menu.
We’ll point GIMP to the Stable Boy folder we downloaded earlier. To do that, open the GIMP Stable Boy folder and click the “src” folder.
Select the path to that folder and copy it. Now go back to GIMP preferences and click the “Add Folder” folder icon. Paste that path you copied into the address bar and press the Enter key. The path could look something like this.
C:\Users\Username\gimp-stable-boy\src
For the changes to take effect, we’ll restart GIMP. If all goes well, you should have a shiny new Stable Boy button on the top bar menu, just like this one!
If Stable Boy doesn’t show up in the menu bar after you’ve plugged it into the Preferences folder, it could be because the path you’ve entered is wrong, or you’re using the wrong version of GIMP. Click Help > About GIMP to see the version you’re running. It should read “2.10.34”
Powering On Stable Boy
Now let’s do the second half of the puzzle —the AI half. It’ll take a few steps to get there. All we actually need is just the API URL to launch a web UI instance of Stable Diffusion. Allow me to show you how to generate that API key.
First, open this notebook in Google Colab. The notebook is titled “fast_stable_diffusion_AUTOMATIC1111.ipynb”. You may have to log in with your Google Account if you haven’t already.
You’ll see that the notebook has a bunch of cells with tiny play buttons next to them. Clicking a play button executes that particular code block. We’ll click them all one by one. If a cell runs successfully, it’ll turn green. If it fails, it’ll turn red.
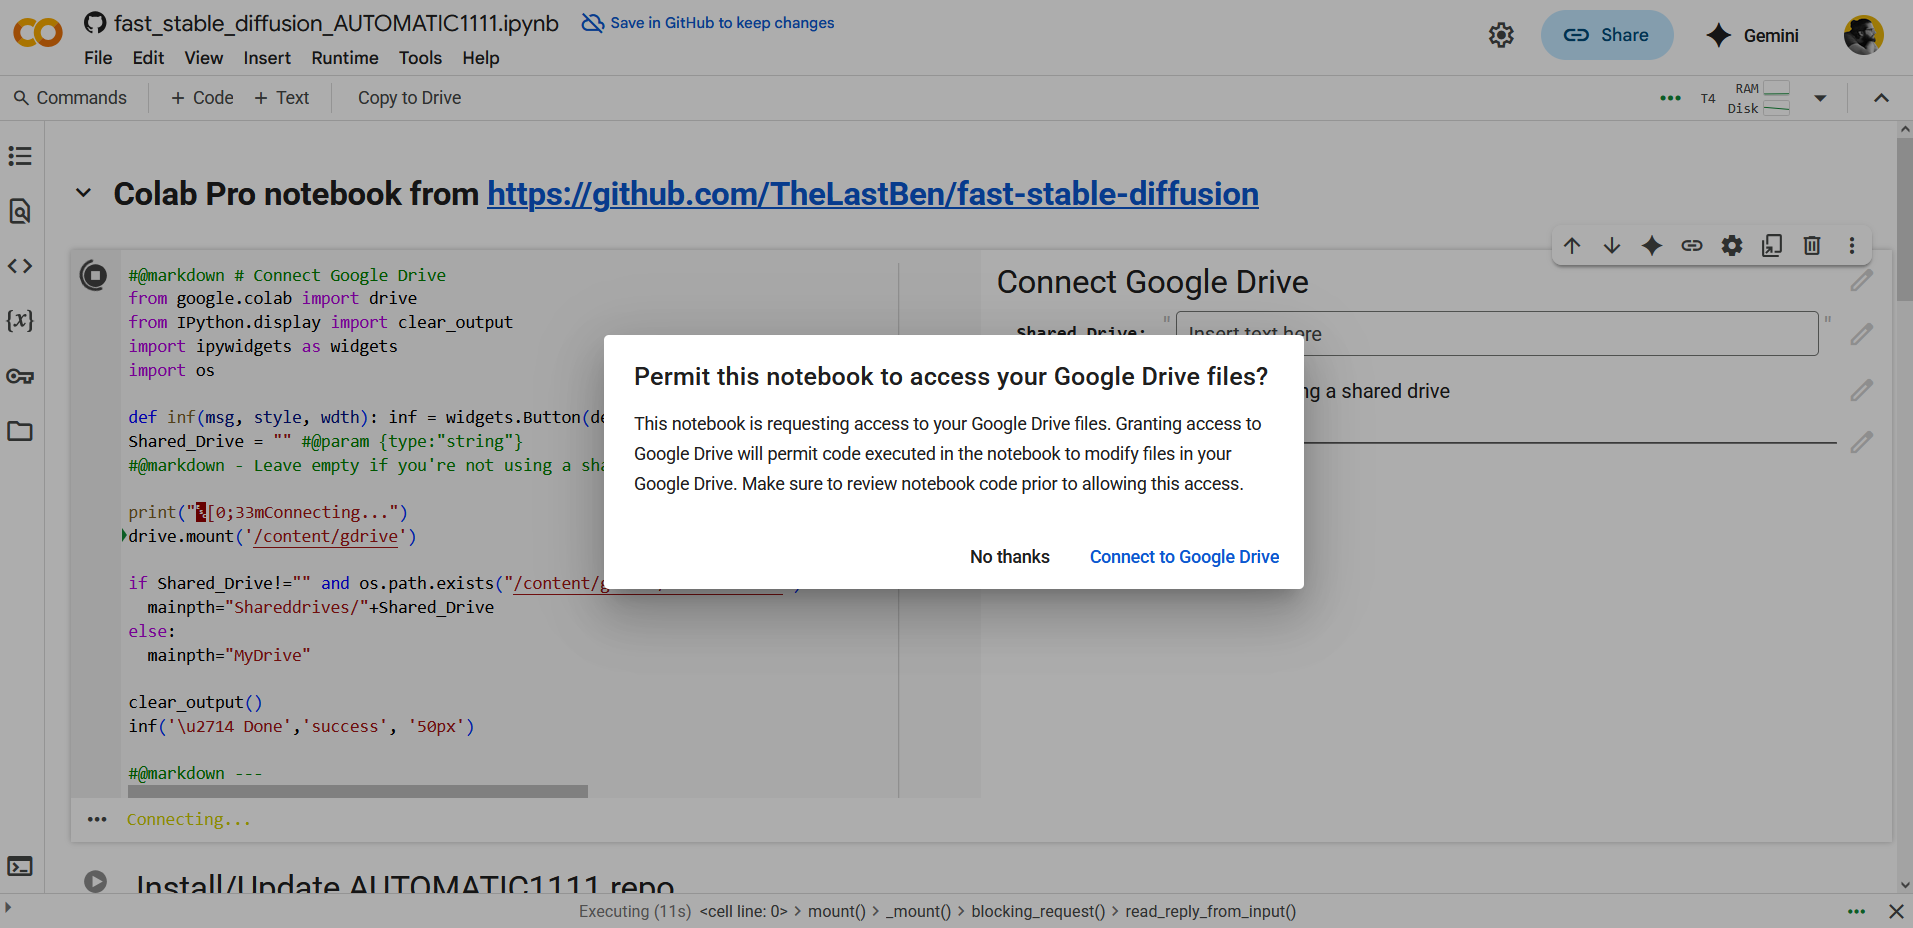
When you run the first cell, it’ll ask you to connect to your Google Drive. A pop-up should appear with a confirmation dialog for granting this Colab notebook access to your Drive.
Next, run the “Install/Update Automatic1111 repo” and “Requirement” cells. Wait for each to finish running successfully.
The next step is where we choose the model we’ll feed to Stable Boy. We need a model that supports inpainting, otherwise the generative fill will create weird image distortions, not actual content. Click the drop-down menu next to Model Version and choose “v1.5 Inpainting.” Then run the model cell too.
Leave the remaining two cells as they are with their default settings.
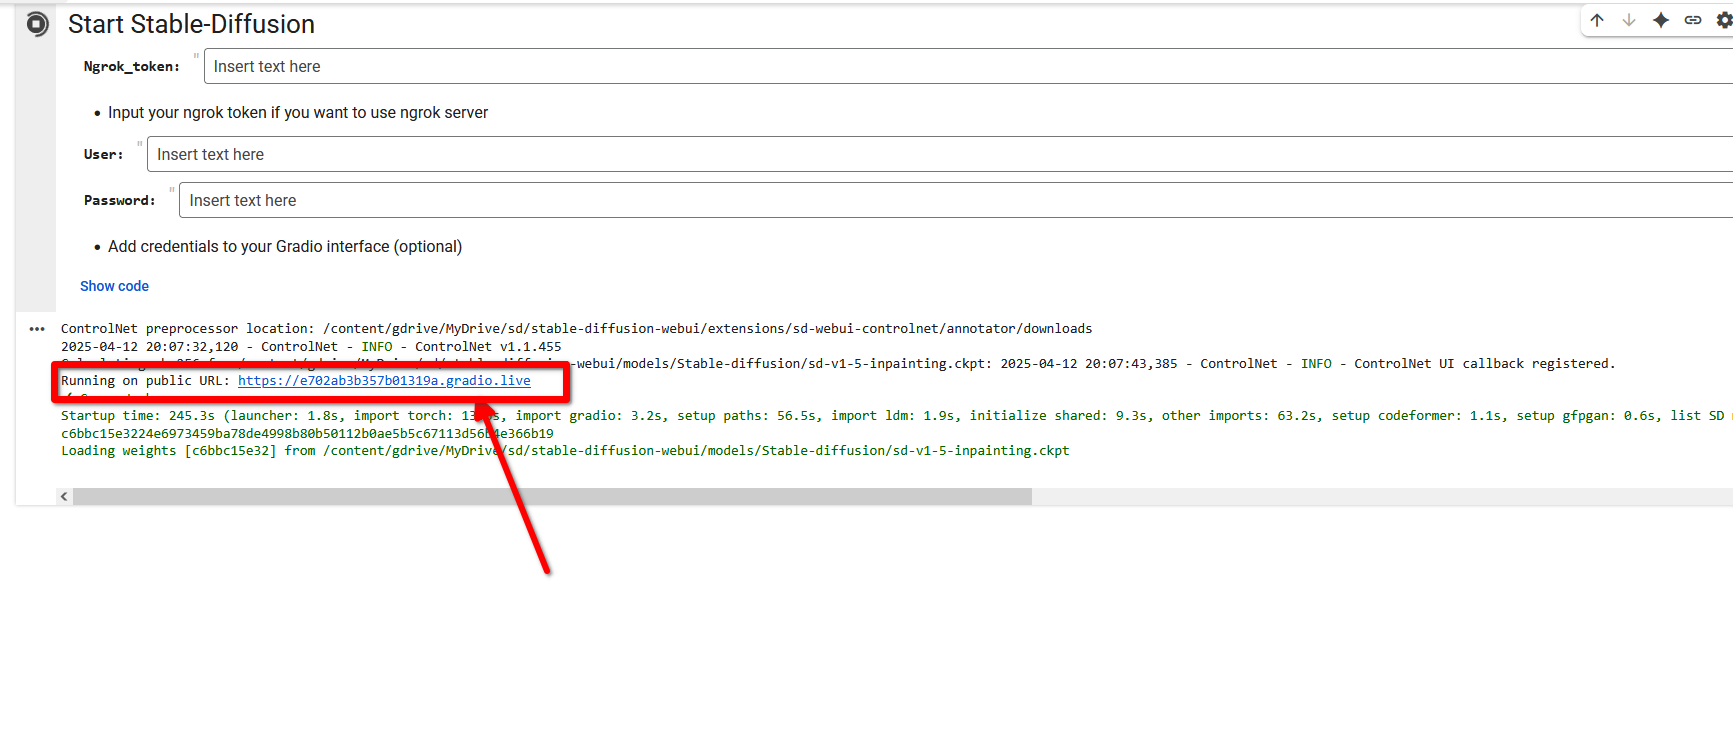
Finally, click the Start Stable Diffusion button to generate the fresh API key. The link should look something like this. If you copy it or open it inside a browser, it’ll take you to a web version of Stable Diffusion that you can freely use.
Don’t close this tab until you’re done with your work. Closing the tab also deletes the public instance we’re running here.
Remember that Google won’t let you run this forever because the cloud computing credits aren’t unlimited. The credits for running notebooks renew automatically, but if you leave a notebook instance running and go to sleep, you’ll wake up to a frozen notebook and Google warning you it has capped your usage. I suggest running the notebook only while you’re working and turning it off when you’re done.
Now let’s go back to GIMP. Open an image or create a new document (the specs of the document don’t matter). Then click Stable Boy on the menu bar and select “Preferences.” There should be an address bar for pasting in an API key. The URL you copied earlier goes here.
Make sure there’s no extra slash at the end of the URL, or Stable Boy won’t be able to call the API.
Let’s Test Our Setup
If all goes well, Stable Boy should be up and running now. Let’s test it.
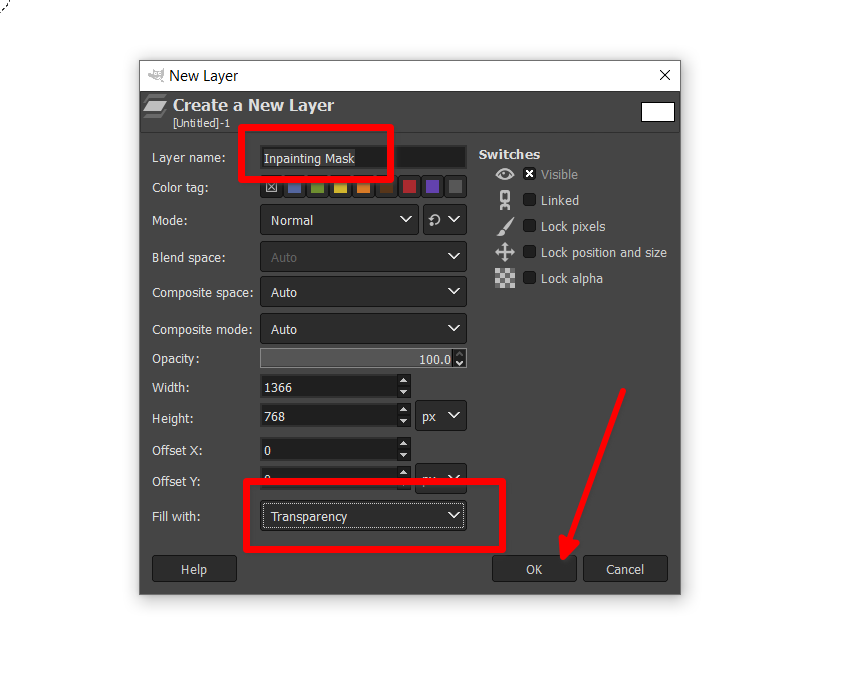
With a blank document or image open, create a new transparent layer called “Inpainting Mask.” It’s case-sensitive and has to be named this exactly, otherwise you’ll get an error.
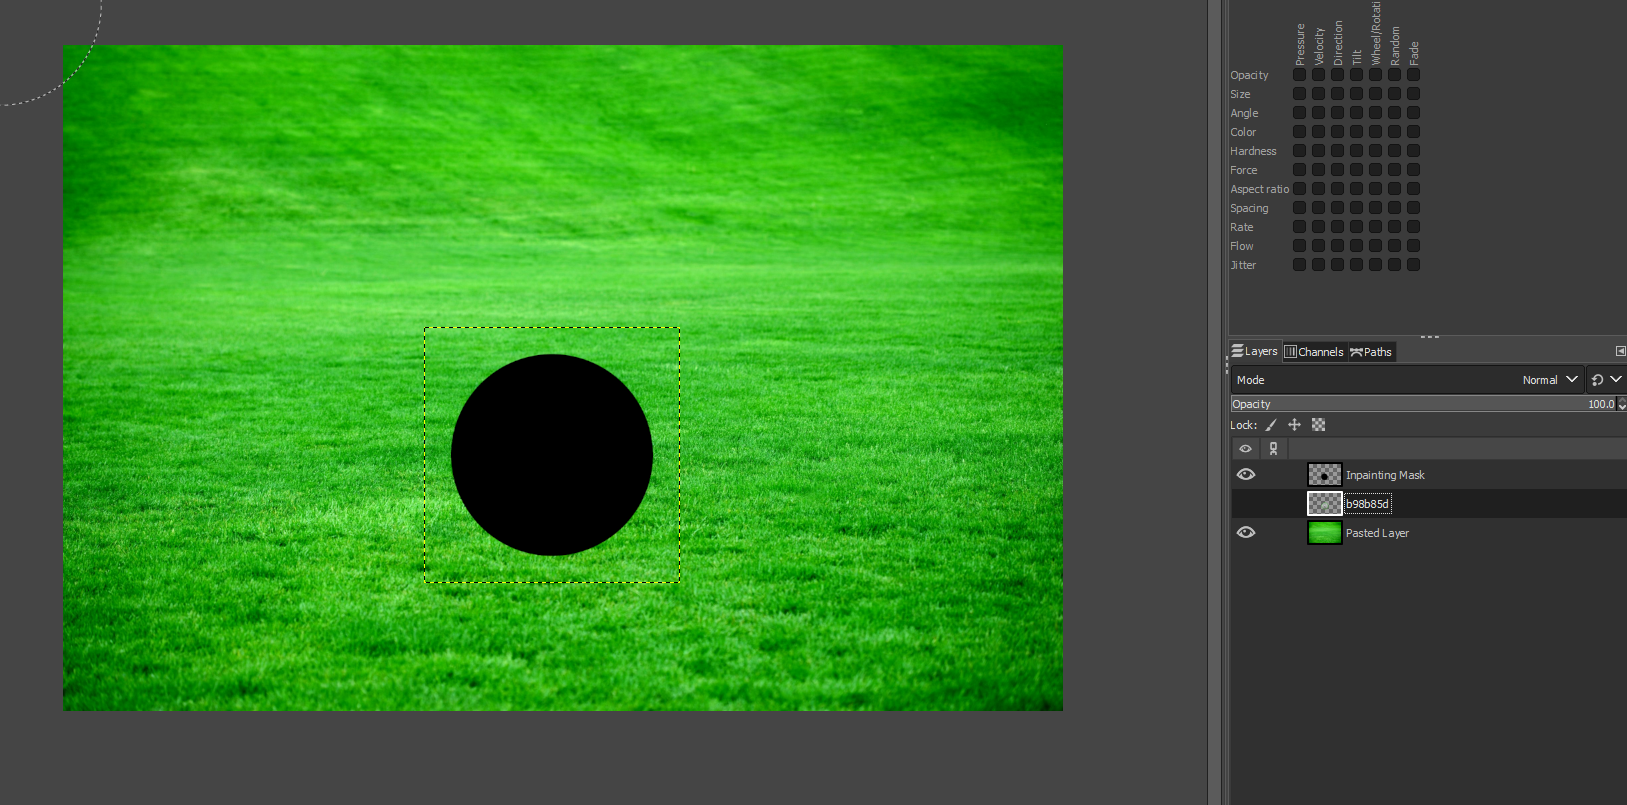
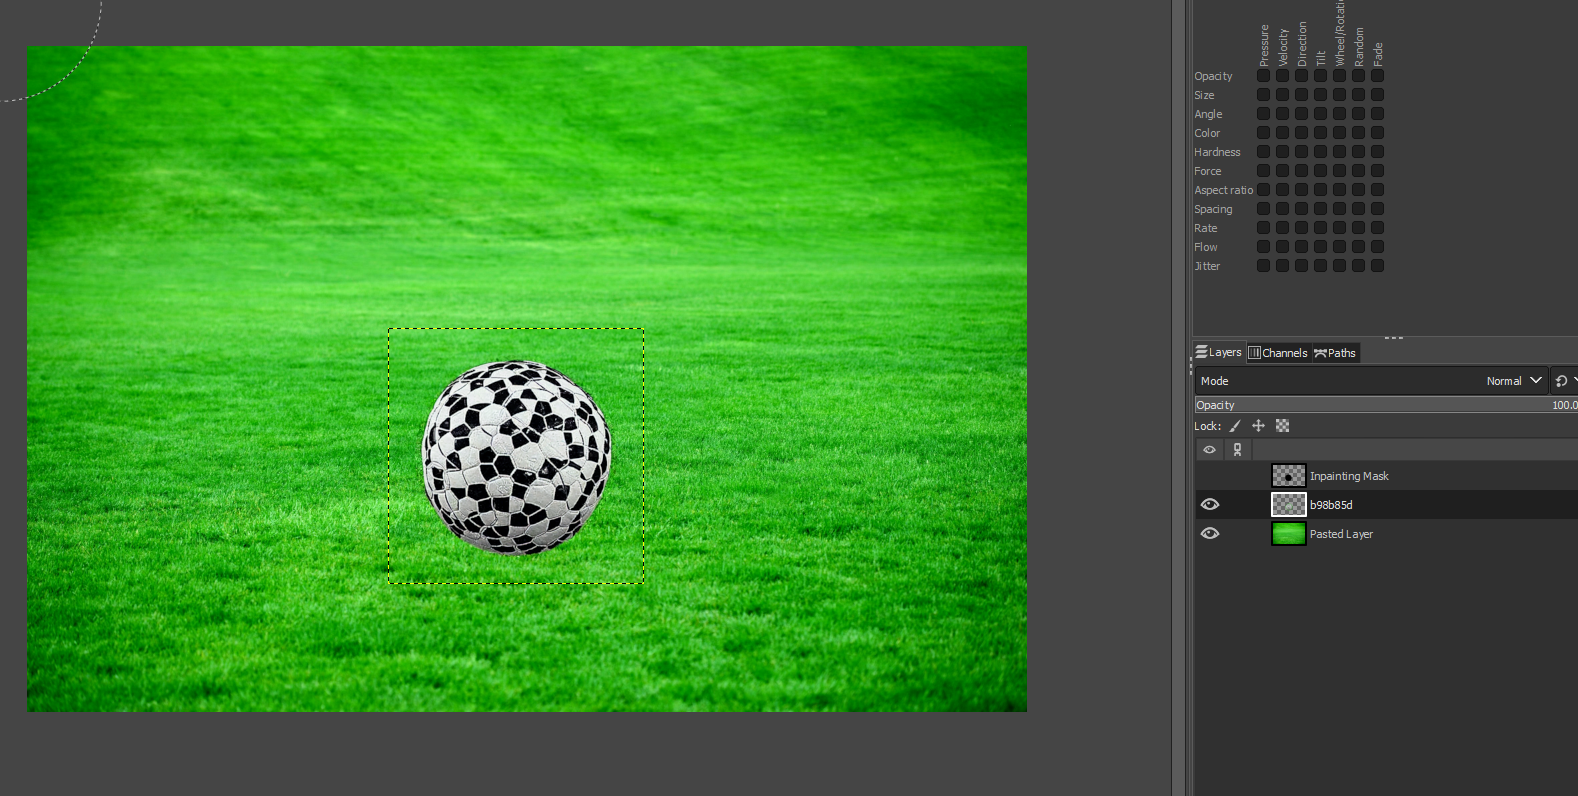
Then take a brush, set the palette to black, and paint in the shape of the object you want to generate. Here, I’ve painted a simple round silhouette of a ball. It doesn’t have to be exact, but you’ll get better results with more precise masks.
Make sure you stay on the transparent “Inpainting Mask” layer. Keeping the masking layer selected, click Stable Boy and this time choose “Inpainting.”
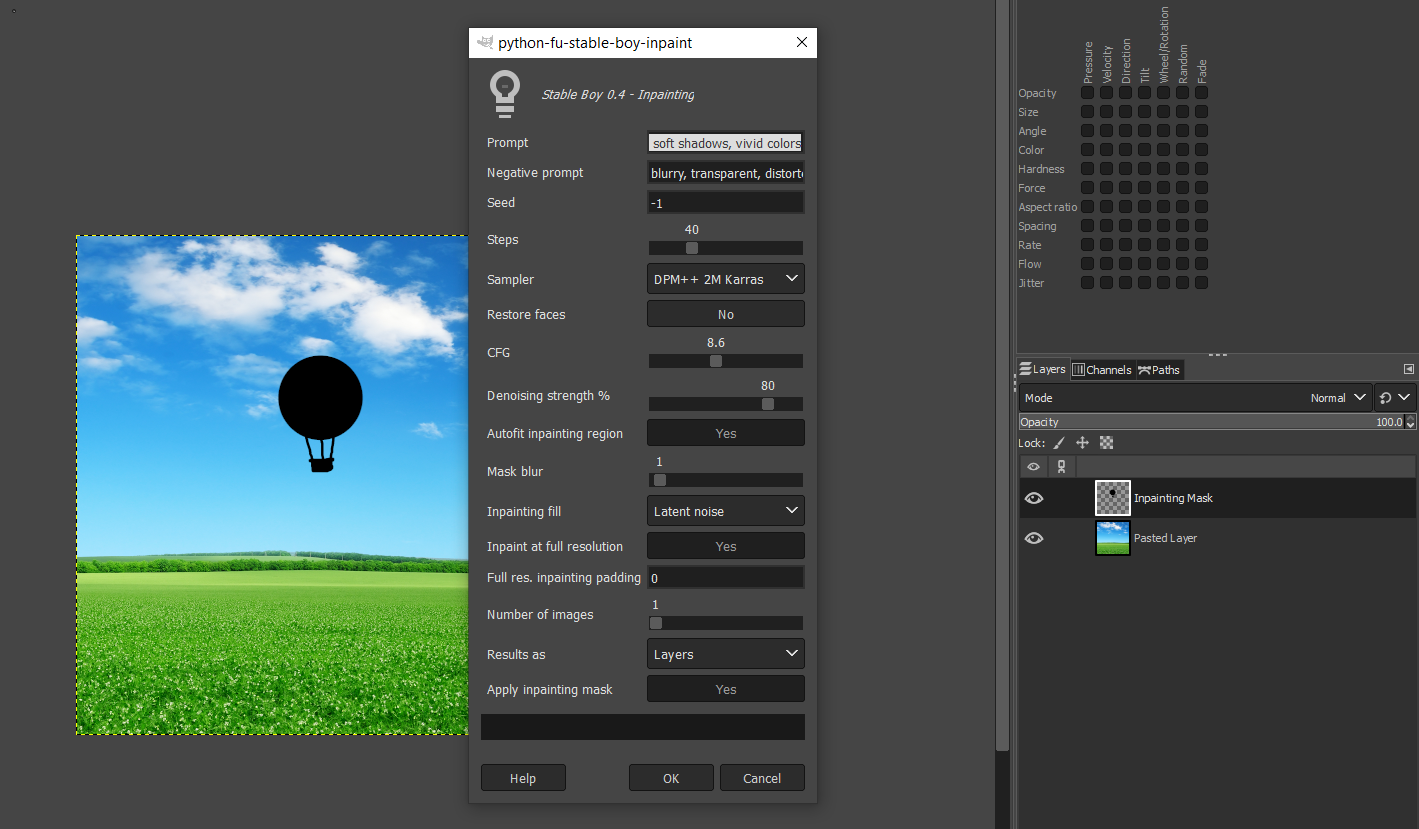
The Inpainting mask has a lot of settings and dials you can fiddle with to change the final result. I’ll explain what they all do later. For now, let’s just give it a text prompt and press “OK” with the default settings. The prompt could look something like this.
A realistic soccer ball with a soft shadow under it
The processing takes a few seconds sometimes, but once it’s done, the window will disappear and the rendered image will appear on a separate layer. You can either hide the original mask layer or delete it.
Here’s another inpainting demo generated based on the silhouette mask of a sitting puppy.
a realistic golden retriever puppy sitting on grass, front view
Some Troubleshooting Tips You’ll Probably Need
If, instead of an image, you just see weird clipping, blurring, or distortions, it means any of these three things in my experience.
- GIMP isn’t running the Stable Boy plugin correctly or the Stable Diffusion model you’re running doesn’t support Inpainting.
- The Inpainting Mask wasn’t set up correctly.
- You might need to tweak some settings before trying again.
If inpainting isn’t working, try any of the other options Stable Boy offers. If the upscaling, text-to-image generation, or image-to-image features are working as expected, it means the trouble is with the AI model you’re running.
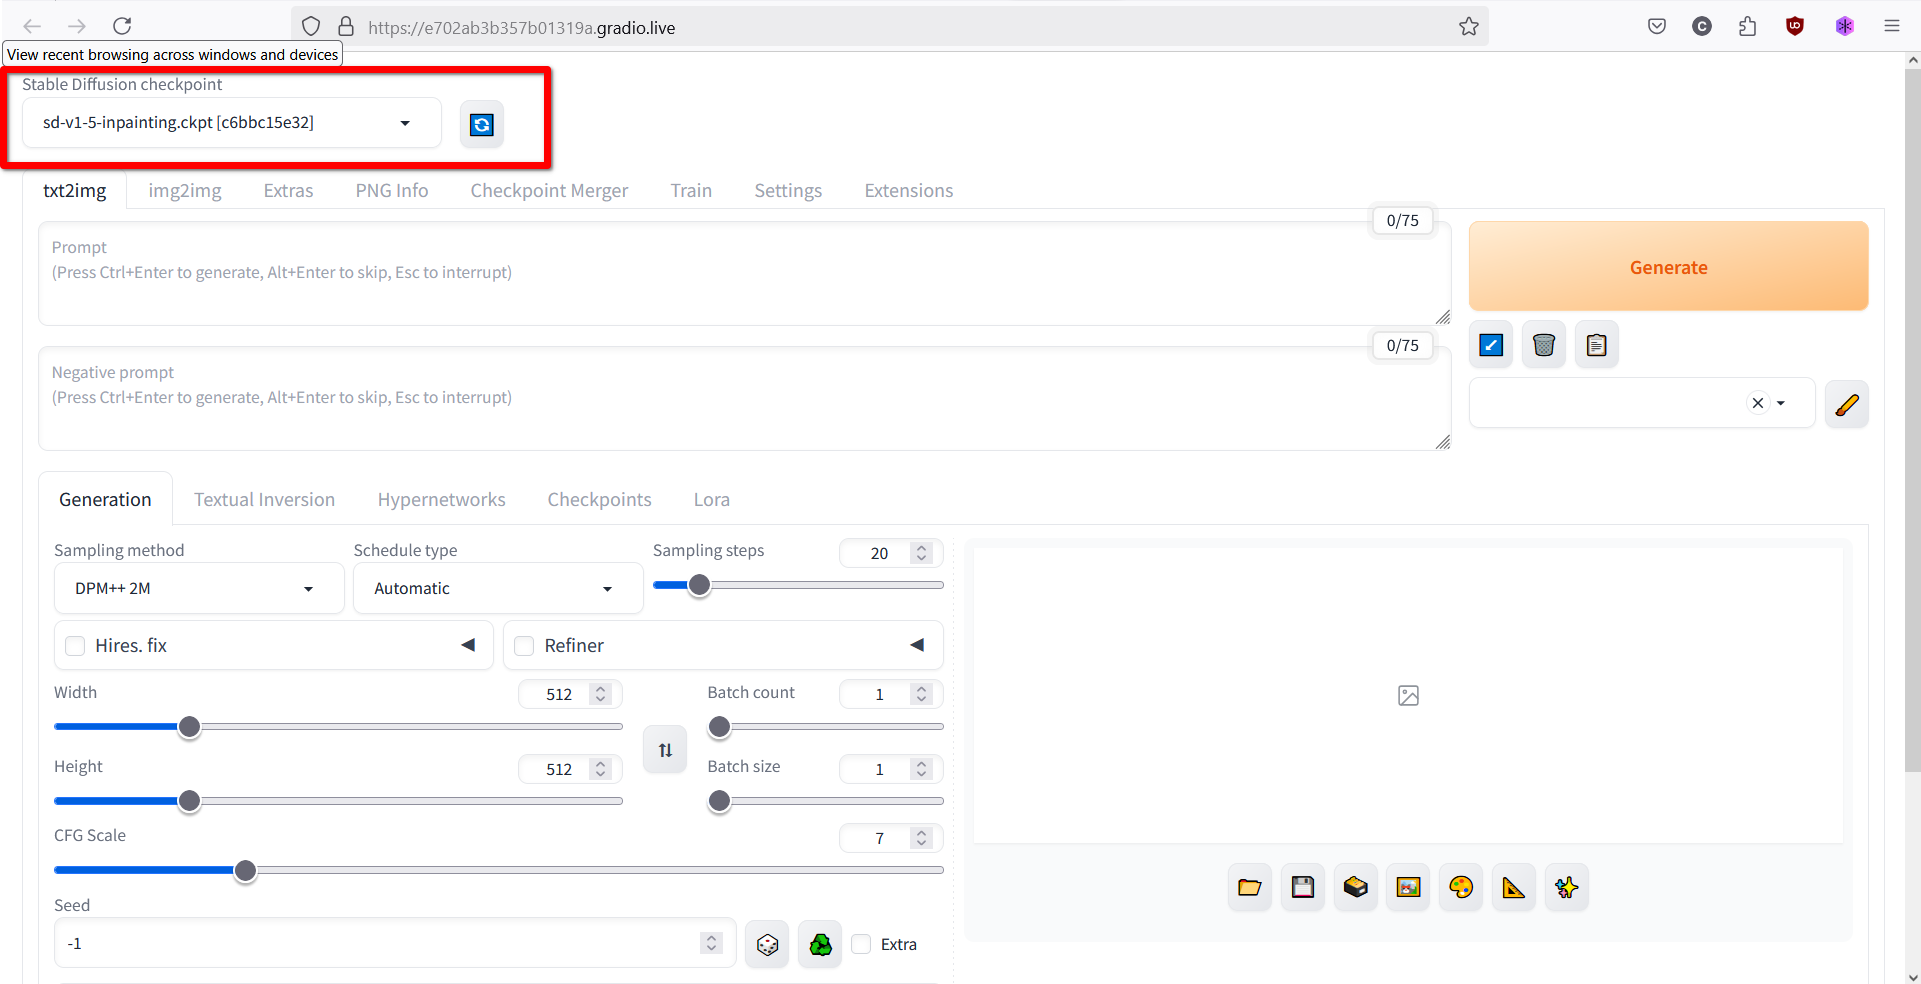
To verify you’re running the right model, open the API URL in a browser and access the Stable Diffusion dashboard. It should say “sd-v1-5-inpainting.ckpt” in the top right corner. If it doesn’t, that means you’re running the wrong model.
To fix it, go back to the Colab notebook, locate the cell containing all the models, and pick the correct one. Then repeat the steps you followed before and test inpainting again.
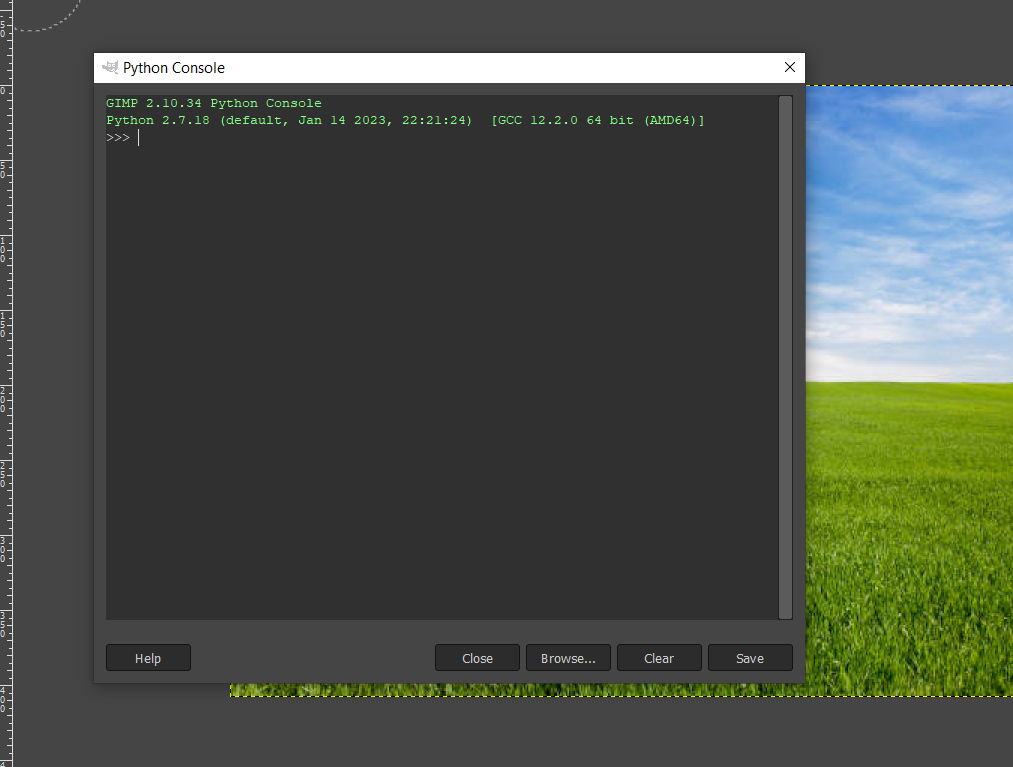
Another way to test whether Stable Boy is live is to click Filters > Python-fu > Console. If no console appears, it means Python isn’t bundled with this particular version of GIMP and you need to reinstall the correct one. Remember version 2.10.34 will always work.
Finally, double check that the Inpainting Mask was created properly. The name (case-sensitive) should be correct, the mask should be made with a black brush of 100% opacity, and the mask layer should be selected.
Here’s my recommended config for getting the best results.
- Keep denoising strength around 75% to 80%
- Choose Latent Noise for Inpainting Fill
- Step count should be around 40.
- Switch to this sampler if available: DPM++ 2M Karras
I got some surprisingly good results with this DIY generative engine. It may need some fiddling (and the setup can get frustrating) but I found it incredibly rewarding and fun!


