

On Windows 11, the Windows Subsystem for Android is a platform that lets you run Android apps on your computer alongside Windows apps. Officially, you can only install apps from Amazon Appstore, but it’s possible to sideload Android apps using the Android Debugging Bridge (ADB) tools.
The platform is currently available as a preview for devices enrolled in the Beta Channel of the Windows Insider Program with the latest version of Windows 11 and Microsoft Store. Also, the support is currently limited to the United States, and you need a United States-based account to access the Amazon Appstore.
In this Windows 11 guide, we will walk you through what you need to know to get started getting and using Android apps on Windows 11.
How to install Windows Subsystem for Android on Windows 11
Prior to installing the Android apps support, you need to check whether your computer meets all the requirements.
System requirements
These are the requirements to install Android apps on Windows 11:
- Memory: 8GB (16GB recommended).
- Processor: Intel Core i3 8th Gen, AMD Ryzen 3000, Qualcomm Snapdragon 8c, or better.
- Storage: Solid-state drive (SSD).
- Microsoft Store app: Version 22110.1402.6.0 or higher.
- Windows 11: Build 22000.xxx or higher.
- Windows Insider Program: Beta Channel.
Check system requirements
To check the system requirements, use these steps:
- Open Settings.
- Click on System.
- Click the About page on the right side.
-
Under the “Device specifications” section, confirm the RAM and CPU requirements.

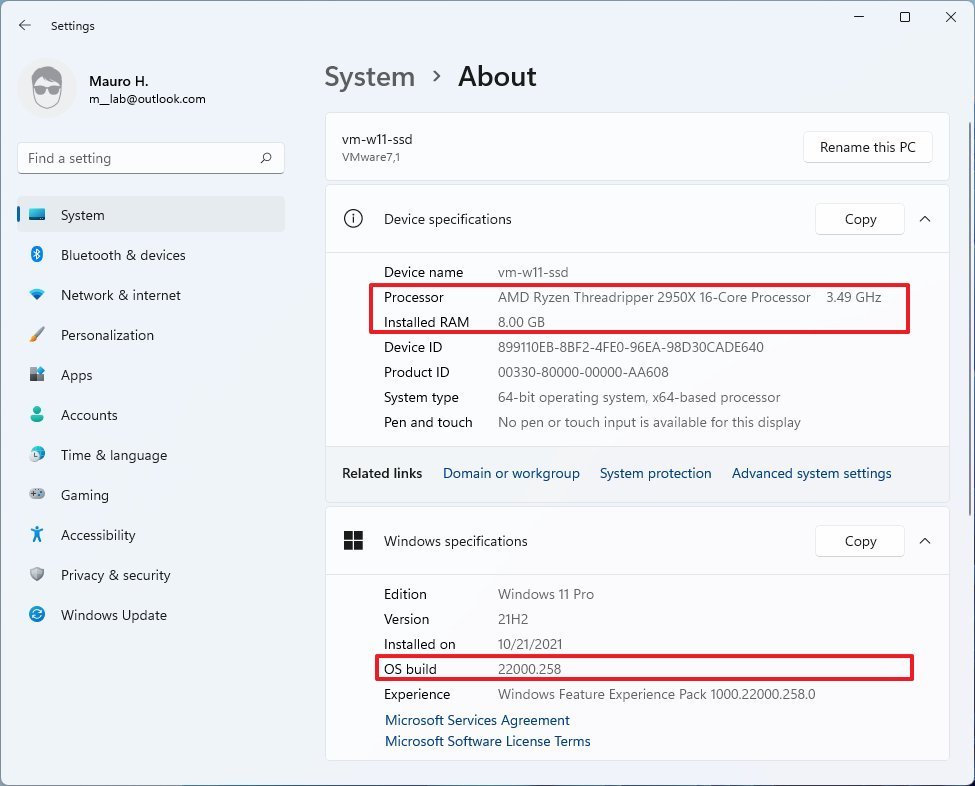 Source: Windows Central
 - Under the “Windows specifications” section, confirm the build number is equal to or higher than 22000.xxx.
- Click on System.
- Click the Storage page on the right side.
- Under the “Storage management” section, select the Advanced storage settings option.
-
Click the Disks & volumes setting.

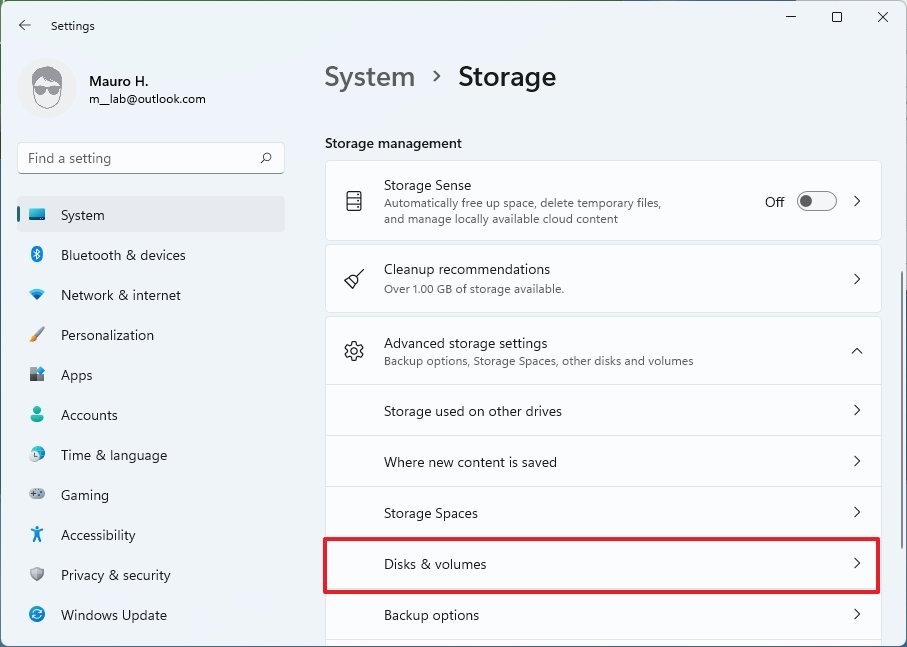 Source: Windows Central
 - Select the main drive.
-
Confirm the media type is SSD. If it’s “HDD,” you won’t be able to install WSA.
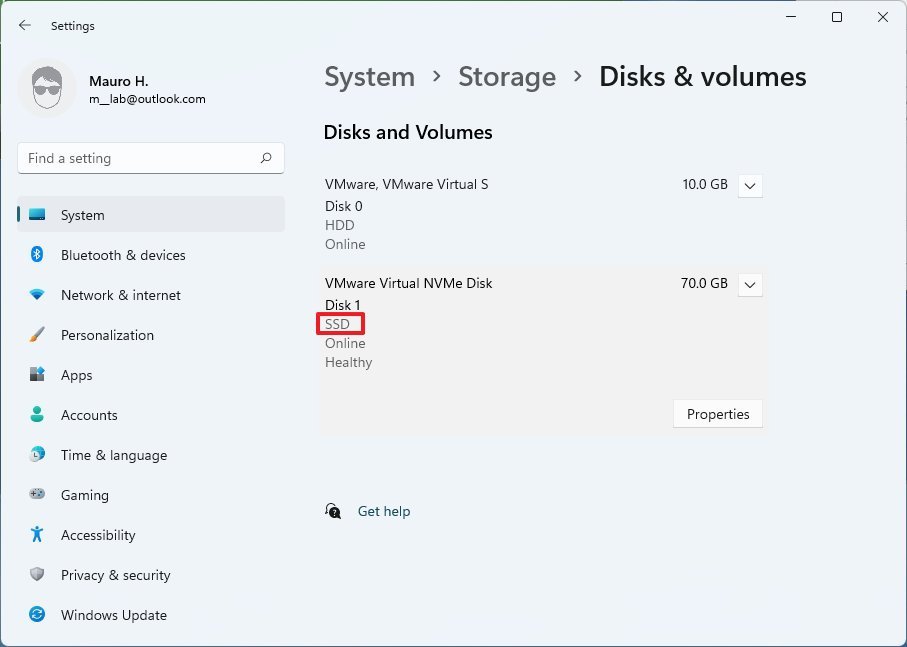 Source: Windows Central


Once you complete the steps, you can enroll the device in the Beta Channel.
Join the Windows Insider Program
The Android apps support for Windows 11 is currently only available as a preview, which means you will have to join the Windows Insider Program.
To enroll a Windows 11 PC in the Beta Channel, use these steps:
- Open Settings.
- Click on Windows Update.
- Click the Windows Insider Program page on the right side.
-
Click the Get started button.

 Source: Windows Central
 -
Click the Link an account button.
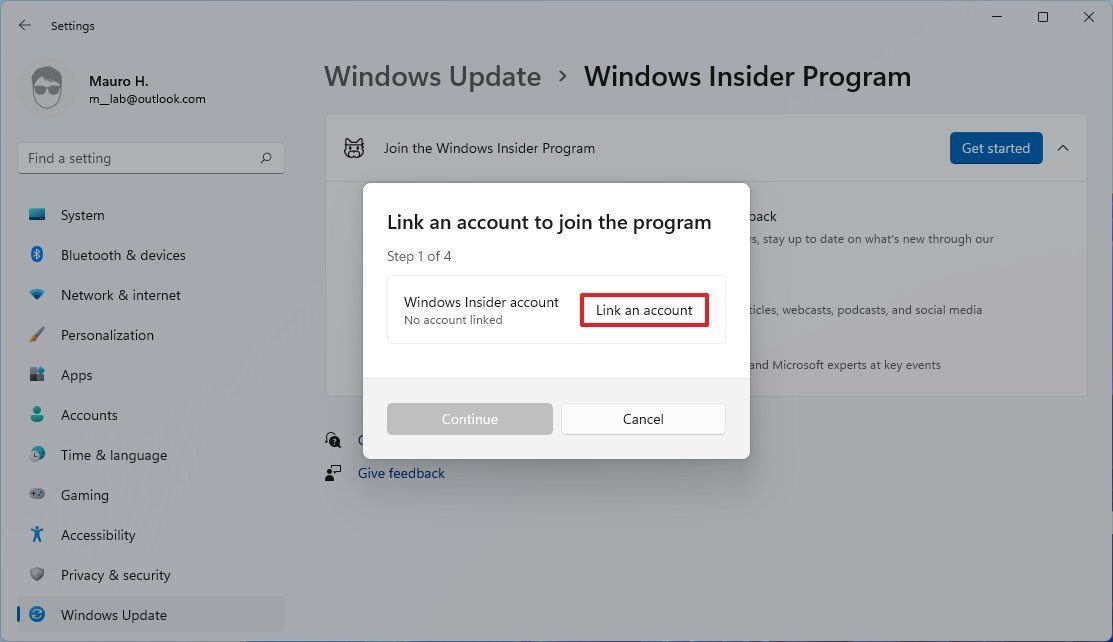 Source: Windows Central
 - Confirm your Microsoft account.
- Click the Continue button.
-
Select the Beta Channel (Recommended) option.
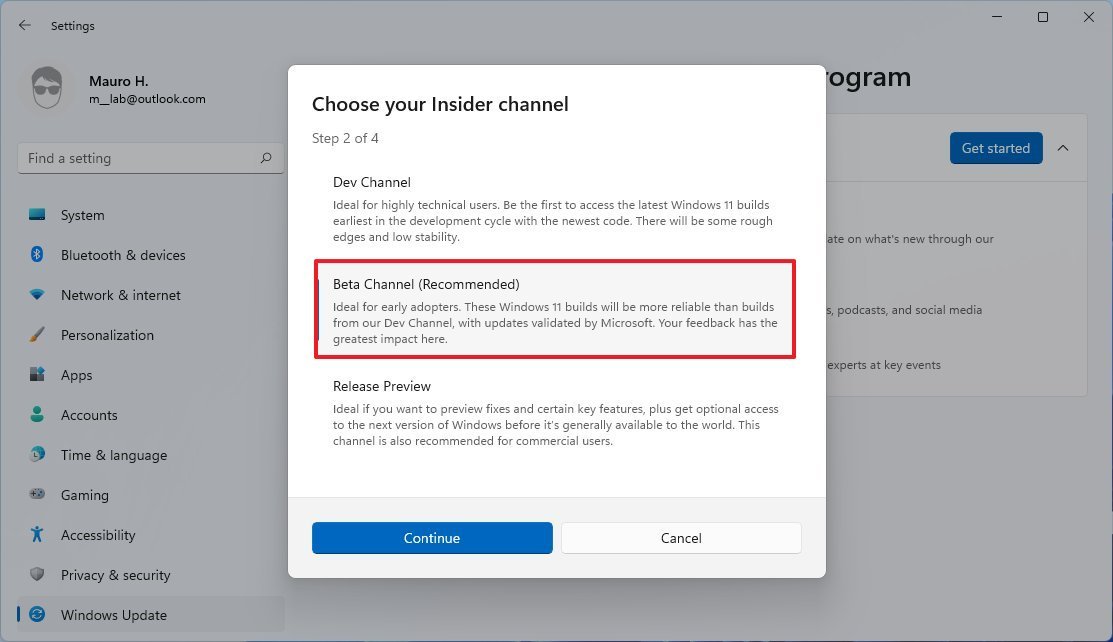 Source: Windows Central
 -
Click the Continue button.
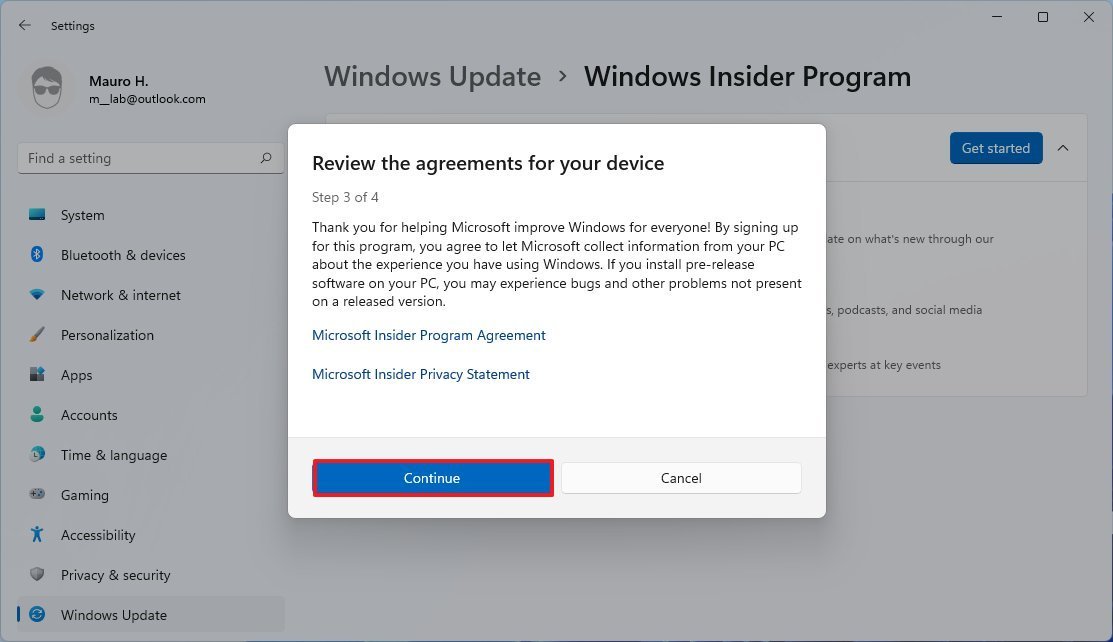 Source: Windows Central
 -
Click the Restart now button.
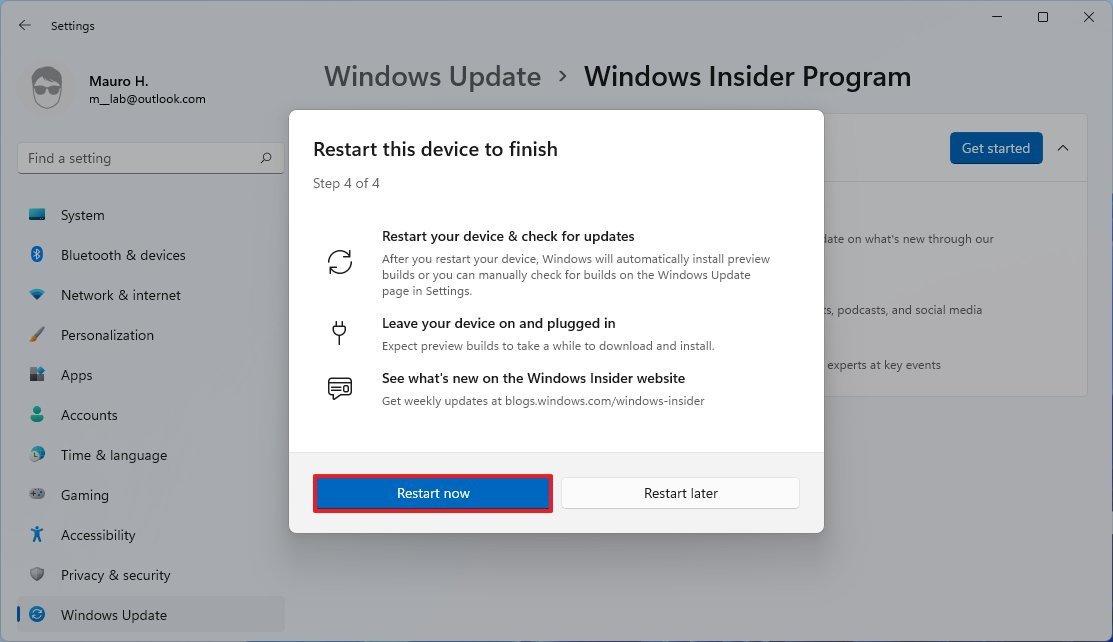 Source: Windows Central


After you complete the steps, the device will enroll in the Beta Channel, and make sure to check for updates since the device needs the latest version of Windows and Microsoft Store.
Check for Windows 11 updates
To update Windows 11, use these steps:
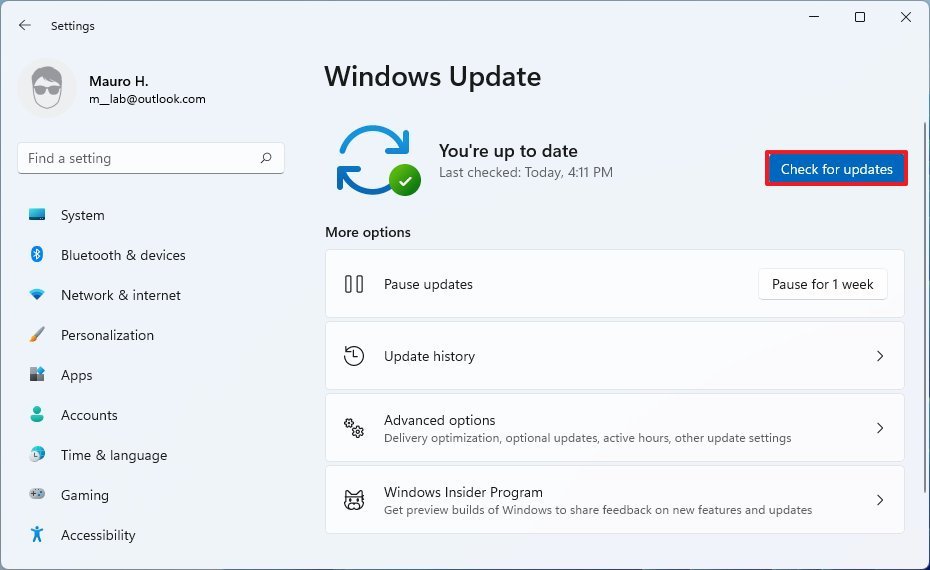
- Open Settings.
- Click on Windows Update.
-
Click the Check for updates button.

 Source: Windows Central

Once you complete the steps, restart the device to finish applying the system updates.
Check for Microsoft Store update
The computer must also have the Microsoft Store app version 22110.1402.6.0 or higher for the Amazon Appstore app to show up.
To check the Microsoft Store version and check for updates, use these steps:
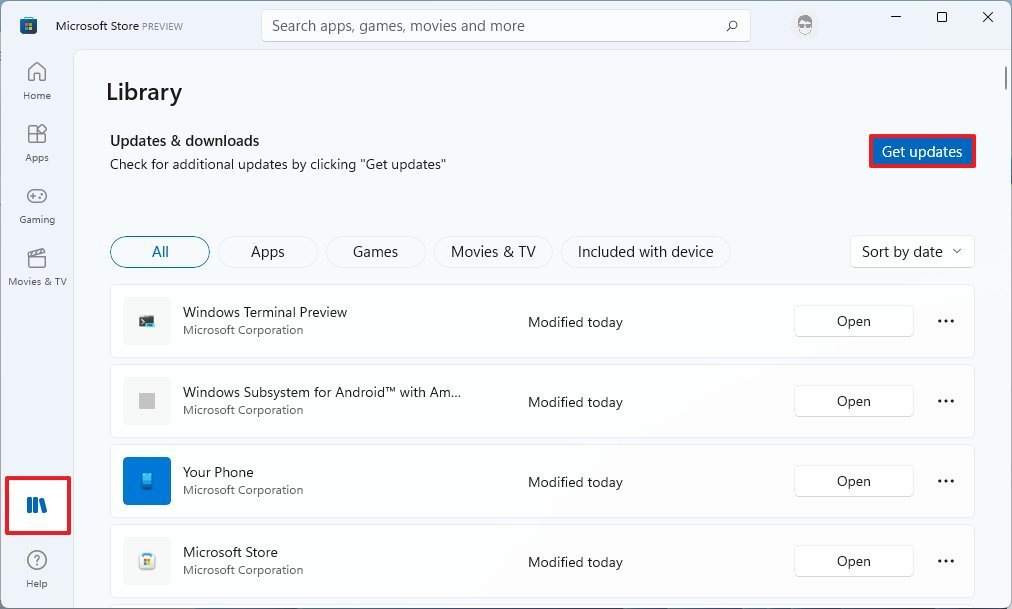
- Open Microsoft Store app.
- Click on Library.
-
Click the Get updates button.

 Source: Windows Central
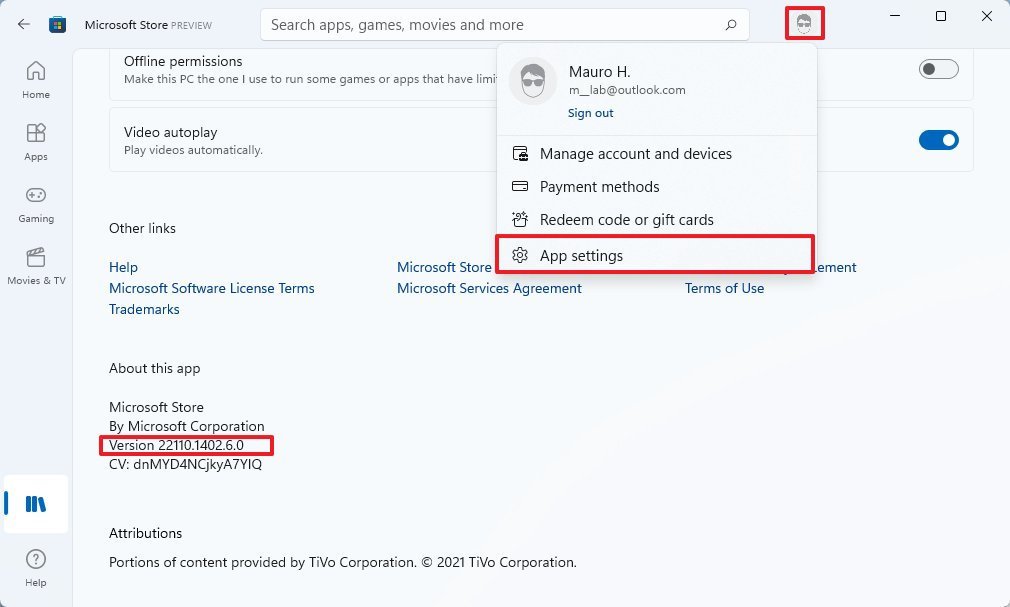
 - Click the Profile menu and select the App settings option.
-
Confirm the version is equal to or higher than 22110.1402.6.0.
 Source: Windows Central


After you complete the steps, you can enable the virtualization features on the UEFI firmware and Windows 11.
Enable virtualization
The Windows Subsystem for Android also requires a computer with virtualization enabled at the hardware and software level to run the virtual machine that makes everything happen. Since these steps are different, you may want to check your manufacturer support website for the specific details depending on the computer. If you have a computer with modern hardware, this feature may already be enabled. Once virtualization has been enabled, you can turn on the “Virtual Machine Platform” feature on Windows 11.
To enable the Virtual Machine Platform feature on Windows 11, use these steps:
- Open Start.
- Search for Turn Windows features on or off and click the top result to open the experience.
-
Check the Virtual Machine Platform option.

 Source: Windows Central
 - Click the OK button.
- Click the Restart button.

Once you complete the steps, you can install the Windows Subsystem for Android and the Amazon Appstore.
Install Windows Subsystem for Android
To install the Windows Subsystem for Android alongside the Amazon Appstore, use these steps:
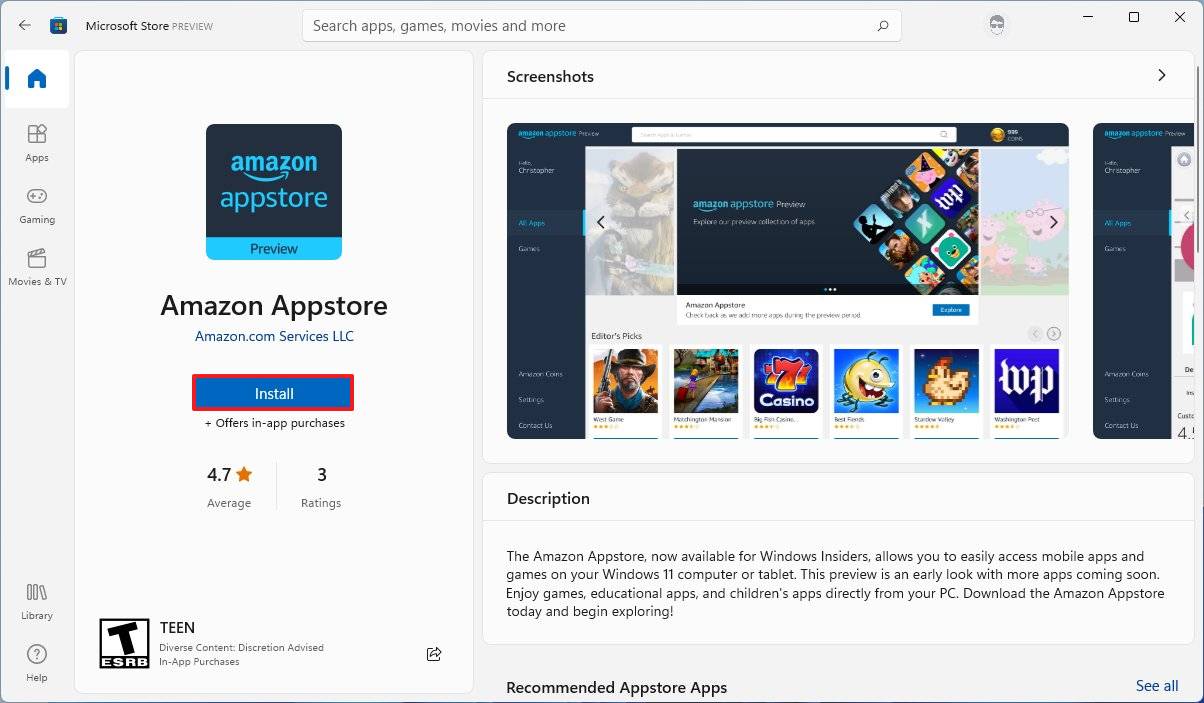
- Open the Amazon Appstore page.
-
Click the Install button.

 Source: Windows Central
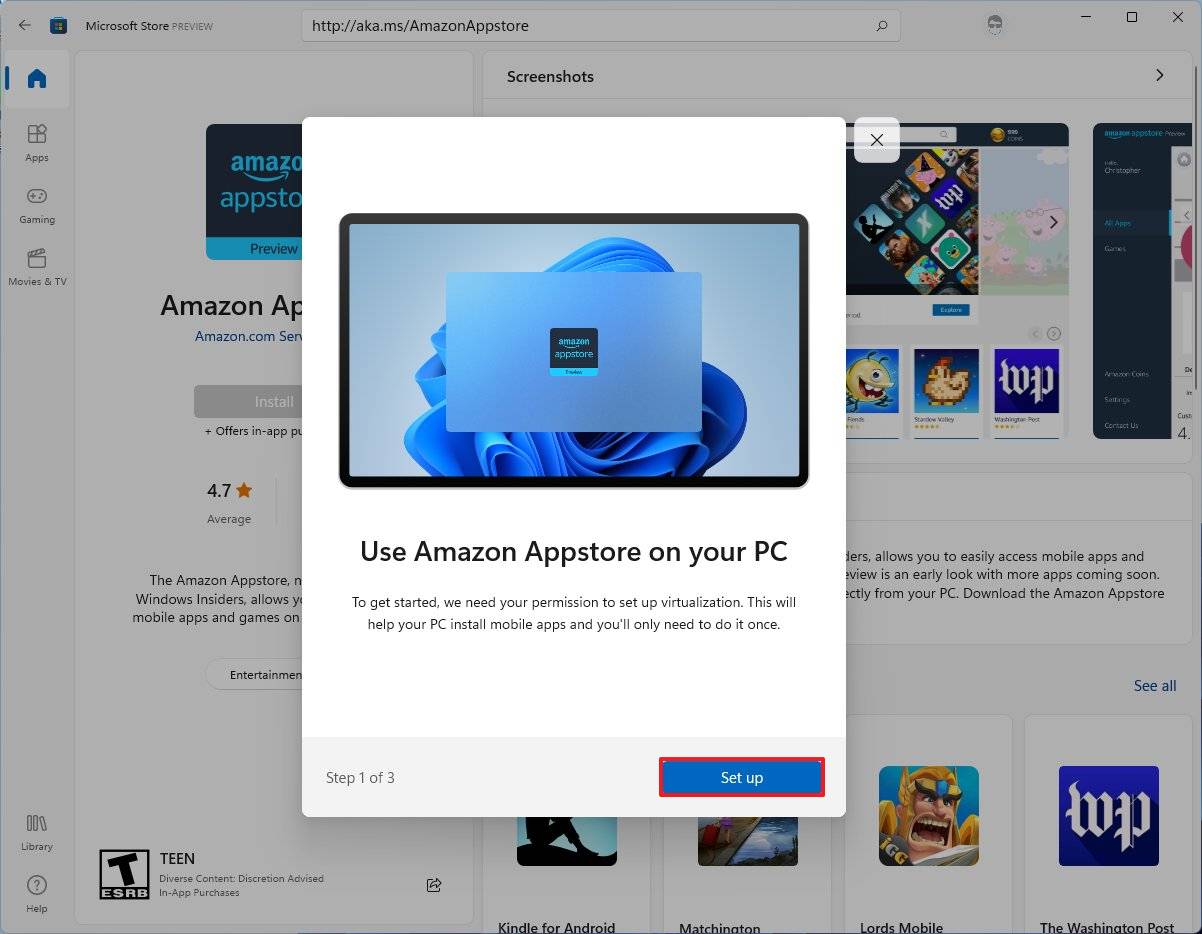
 -
Click the Set up button.

 Source: Windows Central
 -
Click the Download button.
 Source: Windows Central
 - Click the Next button.
-
Click the Restart button.

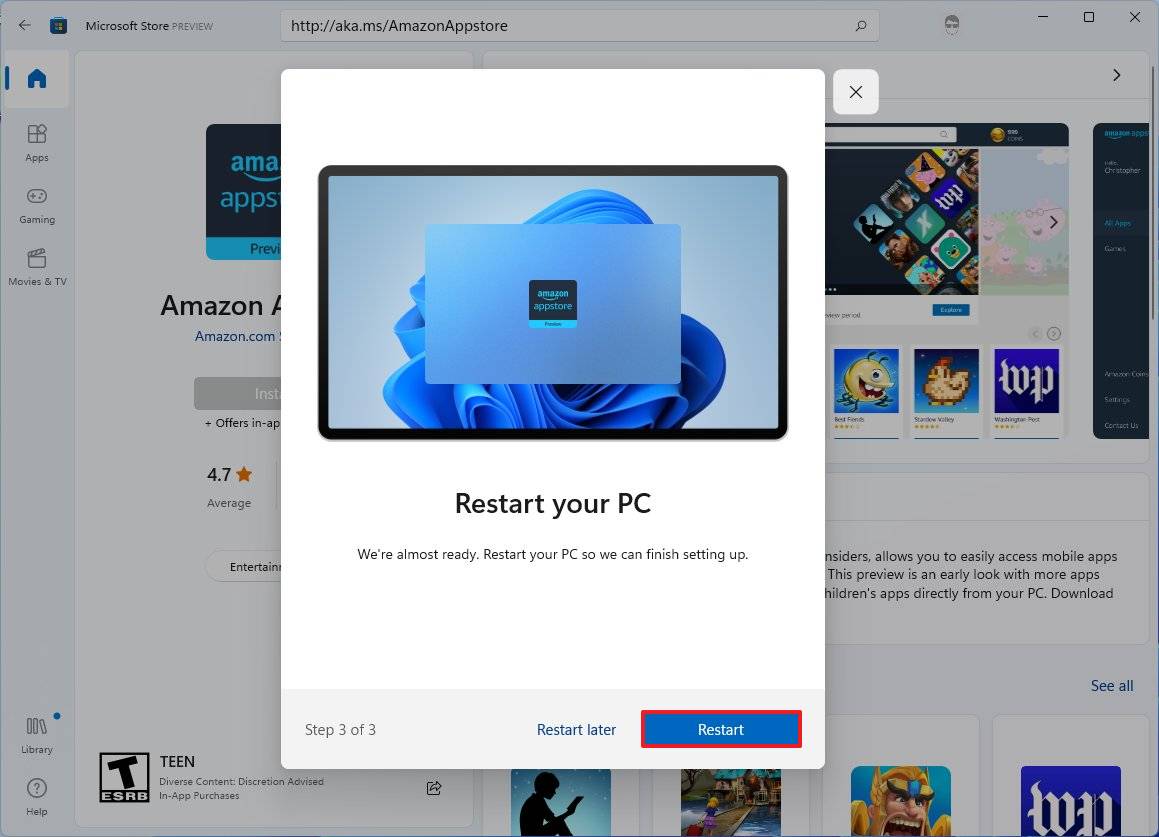 Source: Windows Central


After you complete the steps, you can finally proceed to sideload Android apps on Windows 11.
How to install Android apps on Windows 11
To install Android apps on your Windows device, use these steps:
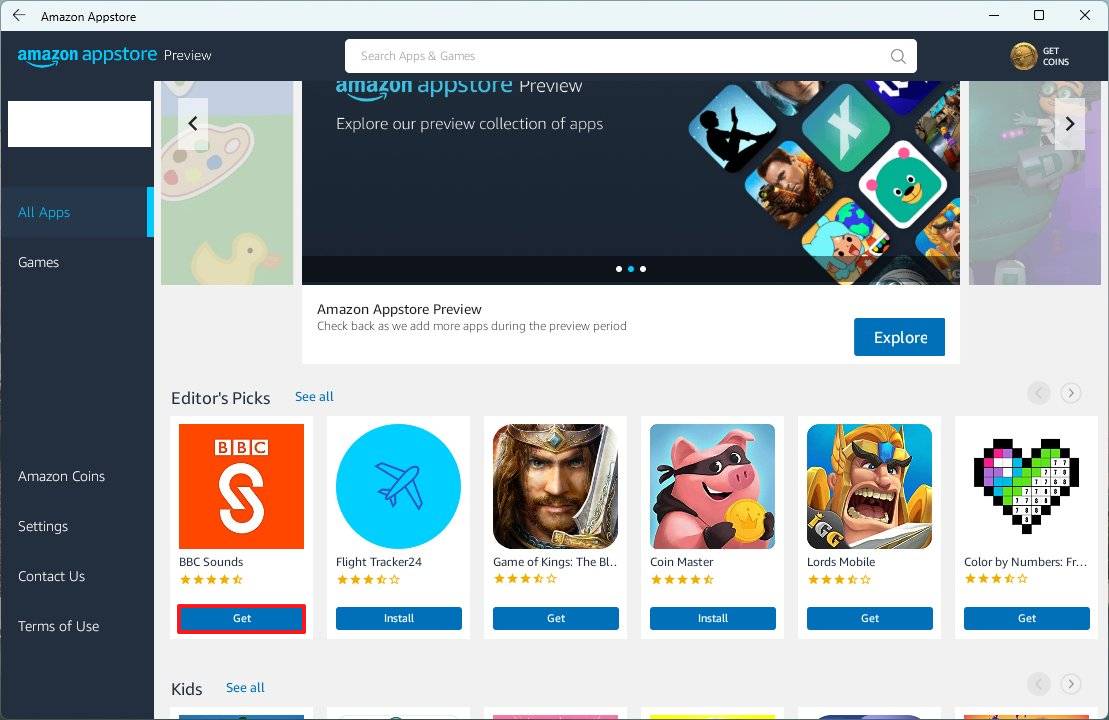
- Open Start.
- Search for Amazon Appstore and click the top result to open the app.
-
Click the Sign in button.

 Source: Windows Central
 -
Sign in with your United States-based Amazon account.
 Source: Windows Central
 - Select the application.
-
Click the Get button.

 Source: Windows Central
 - Click the Download button.


Once you complete the steps, you can open the app from the Amazon Appstore, or it’ll also be listed in the Start menu. The app will probably be listed in the “All apps” section if you can’t find it.
When launching an Android app, it will behave like a regular Microsoft Store app. You can maximize, minimize, and resize windows, and you can also use the mouse and keyboard for input. You can terminate the application by clicking the Close button like any other app, but it might take a little bit of time.
How to uninstall Android apps on Windows 11
On Windows 11, you can uninstall Android apps like any other Microsoft Store app from the Start menu or Settings app.
Remove apps from Start menu
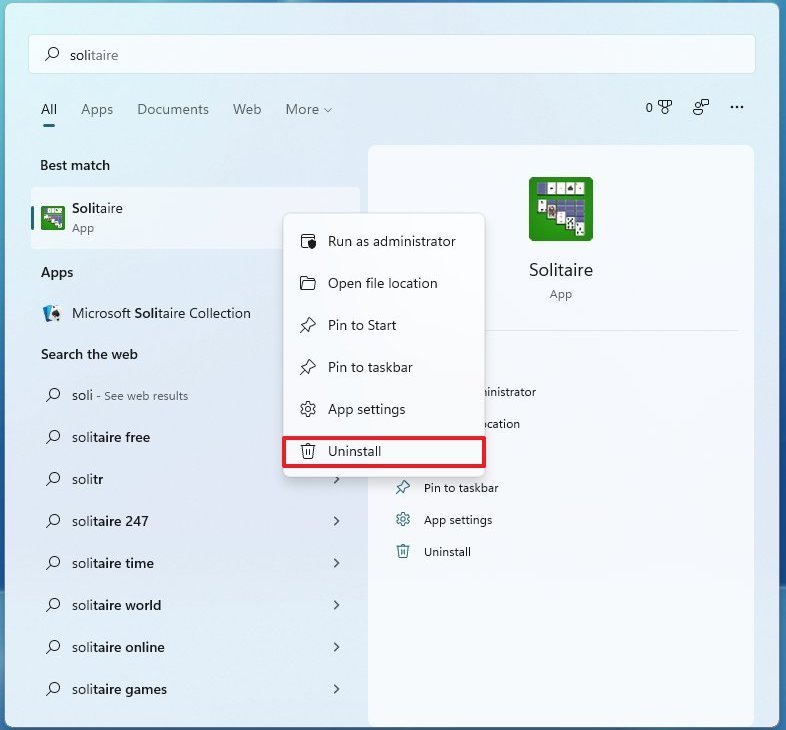
To remove Android apps from the Start menu, use these steps:
- Open Start.
- Search for the app.
-
Right-click the Android apps and select the Uninstall button.

 Source: Windows Central

Remove apps from Settings
To uninstall Android apps from the Settings app, use these steps:
- Open Settings.
- Click on Apps.
-
Click the Apps & features page from the right side.

 Source: Windows Central
 - Select the Android app.
-
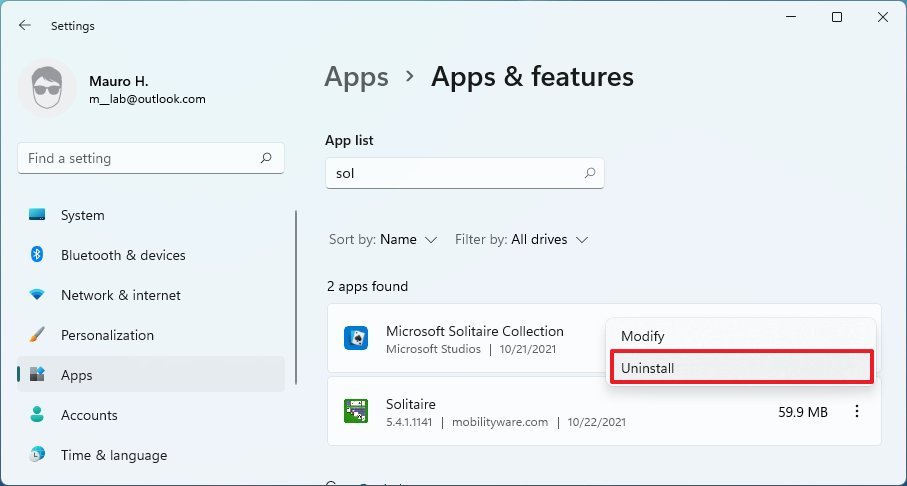
Click the menu (three-dotted) button and select the Uninstall option.
 Source: Windows Central
 - Click the Uninstall button again.


After you complete the steps, the Android app will no longer be available on the computer.
The instructions outlined above works for removing apps from the Amazon Appstore or apps you sideload using the Android Debugging Bridge (ADB) tools.
How to uninstall Windows Subsystem for Android on Windows 11
To uninstall the Windows Subsystem for Android, Amazon Appstore, and installed apps, use these steps:
- Open Settings.
- Click on Apps.
-
Click the Apps & features page from the right side.
Source: Windows Central - Select the Windows Subsystem for Android app.
-
Click the menu (three-dotted) button and select the Uninstall option.

 Source: Windows Central
 - Click the Uninstall button again.
-
Restart the computer.
Quick note: Restarting isn’t a requirement, but the system may need a refresh to remove any installation residues. Also, if you don’t restart, if you are reinstalling the platform, you may get an error trying to download the components from the Microsoft Store.

Once you complete the steps, the Windows Subsystem for Android, Amazon Appstore, and Android apps will be removed from the computer.
Other details
In addition, the Windows Subsystem for Android comes with a settings page, which you can open from the Start menu.
The menu includes an option to access files you created and downloaded using the platform, including images, audio, videos, documents, and more.
By default, WSA will remain dormant until you request to launch an application. However, the settings page also includes a “Subsystem resources” feature that allows you to choose to run the virtual machine continuously.
On this page, you will also find the option to enable Developer mode, find the IP address to connect with the debugging tools, and shut down the current instance.
Although bringing Android apps support is a welcome addition to Windows 11, you cannot run any application you want. For starters, the Amazon Appstore only includes around 50 apps, and most of them are games. Also, if you sideload apps, you may be able to install virtually any app, but those that require the Google Play Services like Gmail, Google Maps, and others won’t work.
You can check which apps are compatible on Windows 11 using this community list at GitHub.
In this guide, we showed you the steps to install WSA by installing the Amazon Appstore. However, you can also install the Windows Subsystem for Android app, which will also install the Amazon Appstore.
The platform is only available in the United States, but you can get around this by changing the region settings on Settings > Time & language > Language & region.
If you are a developer, Microsoft has published various resources to optimize your Android apps to run with the Windows Subsystem for Android. The documentation explains the steps to set up the development environment and configure the platform settings. Also, you will find information to add support for keyboard and mouse, resizing windows, and more details on the virtual machine, security, and Amazon Appstore.
More Windows resources
For more helpful articles, coverage, and answers to common questions about Windows 10 and Windows 11, visit the following resources:
We may earn a commission for purchases using our links. Learn more.


