On Windows 11, even though it comes with Microsoft Edge as the default browser, you can choose and set any browser as your default, including Brave.
Brave is a free and open-source modern web browser created by Brave Software Inc. based on Google’s Chromium browser project that uses the same browsing engine as Google Chrome, but Brave (similar to Microsoft Edge) includes a number of customizations based on privacy.
One of the most noticeable differences of Brave, compared with other browsers, is that it blocks ads and trackers by default, which increases privacy, helps load pages faster, and prevents advertisers from tracking your online activities. Also, the browser focuses on security by enforcing HTTPS for all connections, blocking fingerprinting and malware, and integrating the Tor network into the experience.
Furthermore, the Brave Rewards program is a system that pays users for watching ads and referring other users to the browser. The reward tokens can then be redeemed for cryptocurrency, or users can donate them to their favorite websites.
This how-to guide will walk you through the settings you should consider changing to get started with the Brave browser on Windows 11.
How to get started with the Brave browser
If you have ever used any web browser, you already know how to navigate the internet with Brave, but you may need to get familiar with some of the features to get the most out of the browser.
Download and install
Installing the Brave on Windows 11 is straightforward from the Microsoft Store or the Windows Package Manager.
Microsoft Store
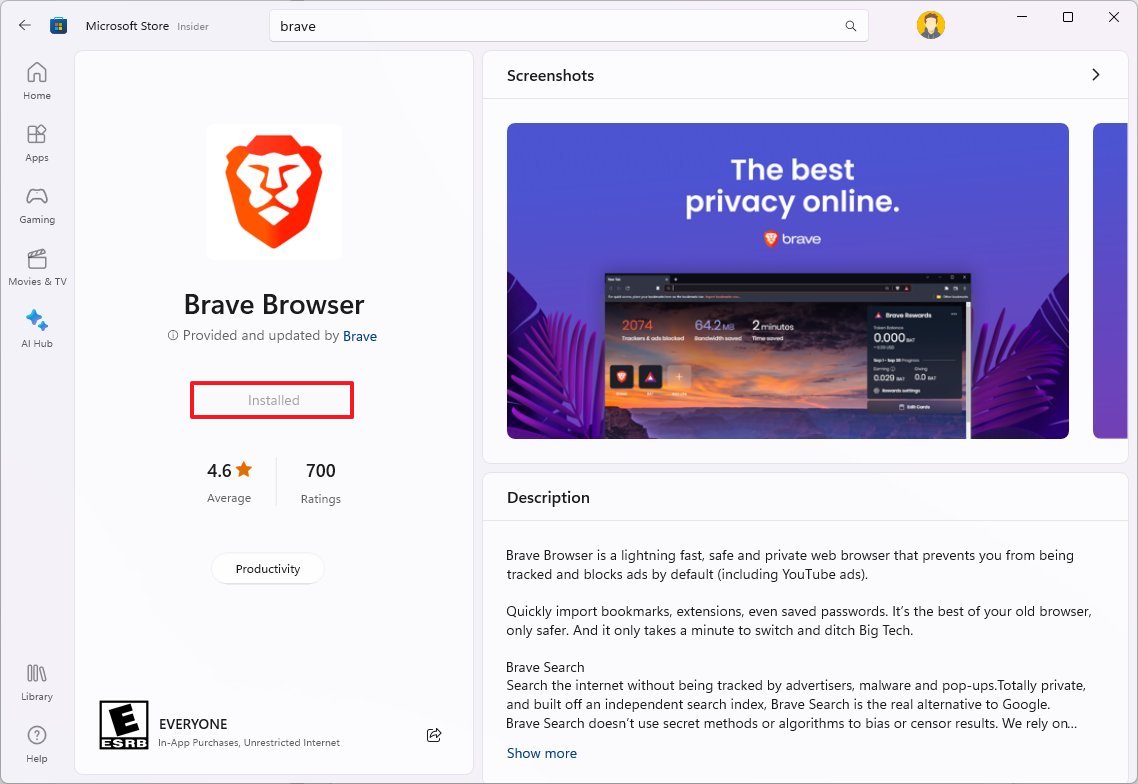
To install Brave from the Microsoft Store, use these steps:
- Open Microsoft Store.
- Search for Brave Browser and click the top result.
- Click the Get button.
Windows Package Manager
To install Brave with the winget command, use these steps:
- Open Start.
- Search for Command Prompt, right-click the top result, and choose the Run as administrator option.
- Type the following command to download and install the Brave browser and press Enter: winget install –id Brave.Brave
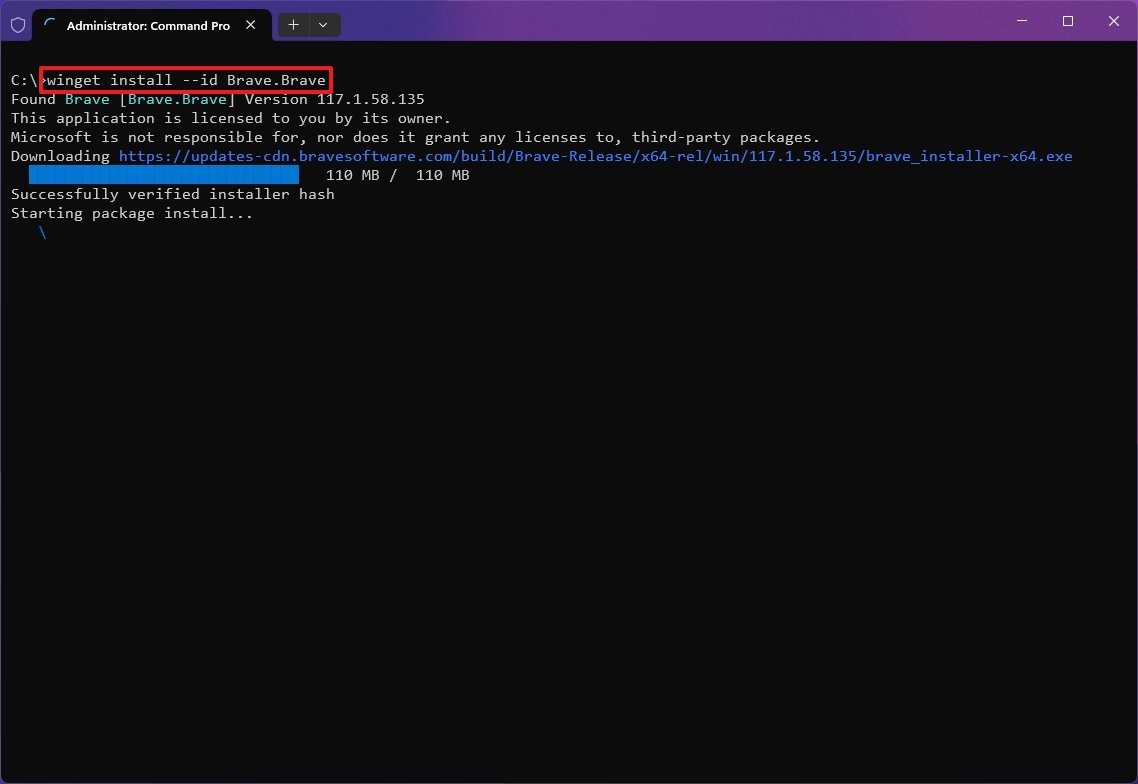
Once you complete the steps, the browser will install on your computer.
Set browser as system default
To set Brave as your new default browser on Windows 11, use these steps:
- Open Settings.
- Click on Apps.
- Click the Default apps page on the right side.
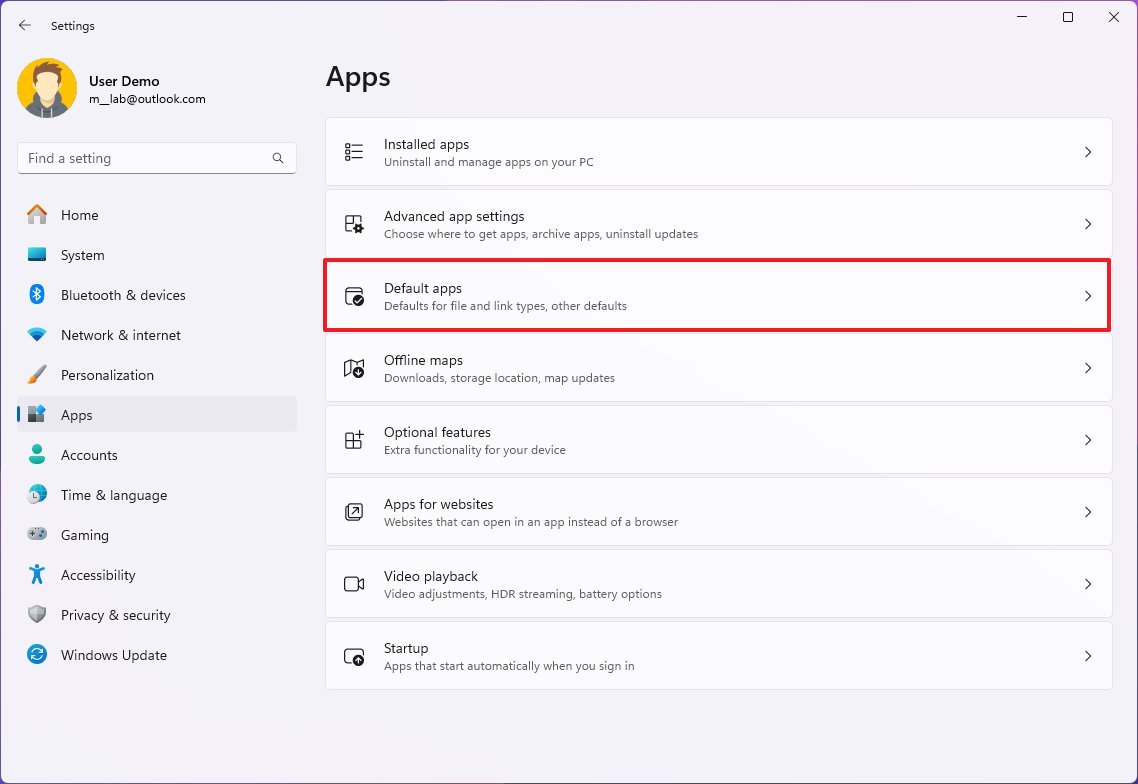
- Search from Brave and click the top result.
- Click the Set default button on the top-right corner.
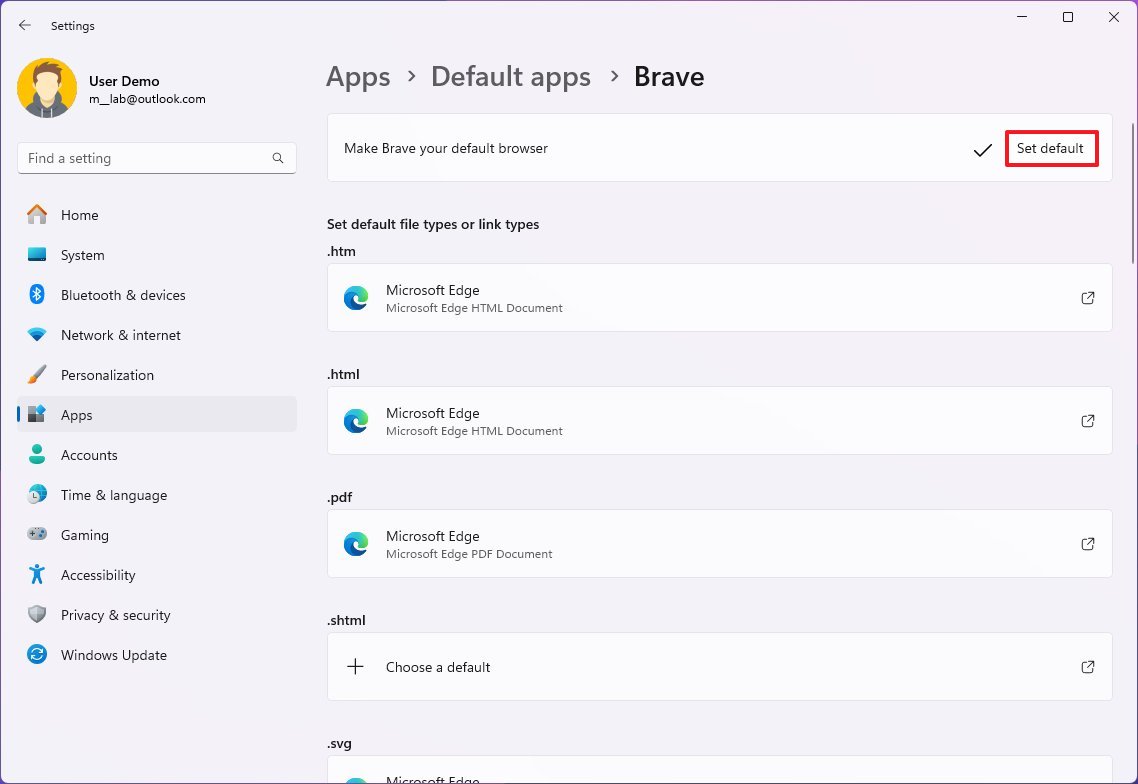
After you complete the steps, Brave will become the default browser on your device.
Best settings suggestions
As part of the customization, you can create one or multiple profiles, import settings from other browsers, change the appearance, and more.
Profile settings
It’s important to note that since Brave focuses on privacy, it’s among the only browsers that don’t force you to create an account to browse the internet.
To change the basic settings on Brave, use these steps:
- Click the “Customize and Control Brave” button in the top-right corner.
- Choose the Settings option.
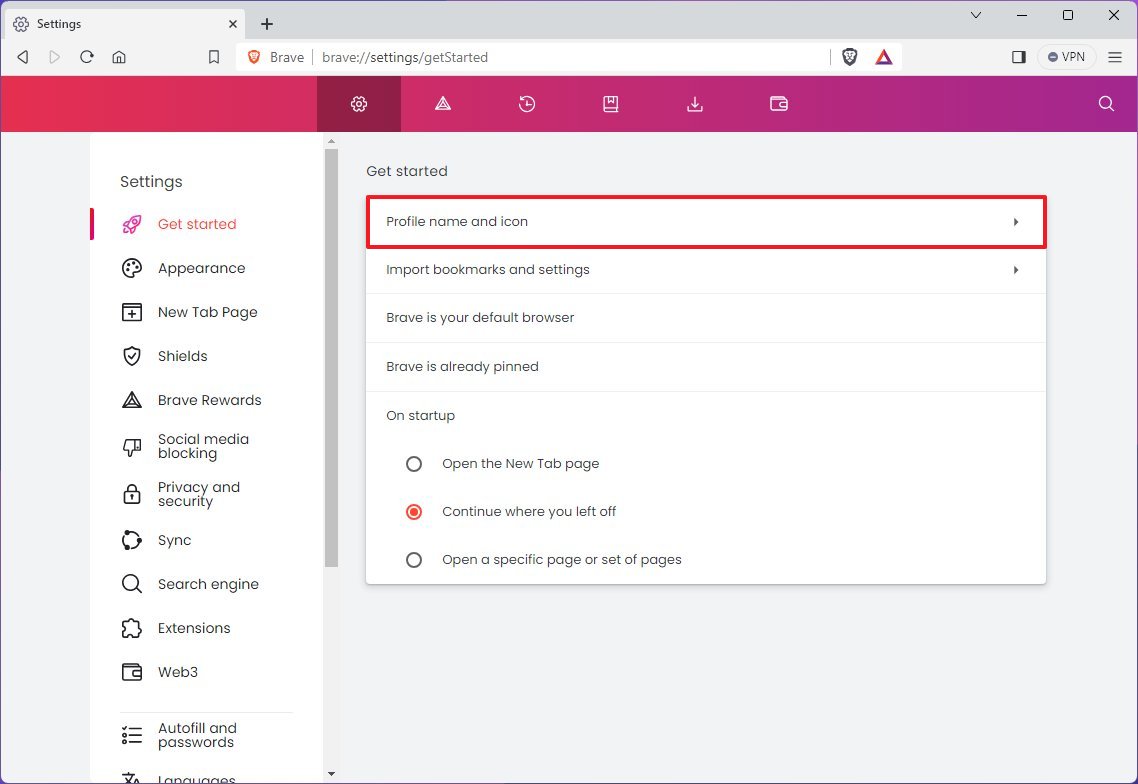
- Click on Get started from the left navigation pane.
- Click the “Profile name and icon” setting.
- Choose the profile name with the “Name your Brave profile” setting.
- Select the color accent with the “Pick a theme color” setting.
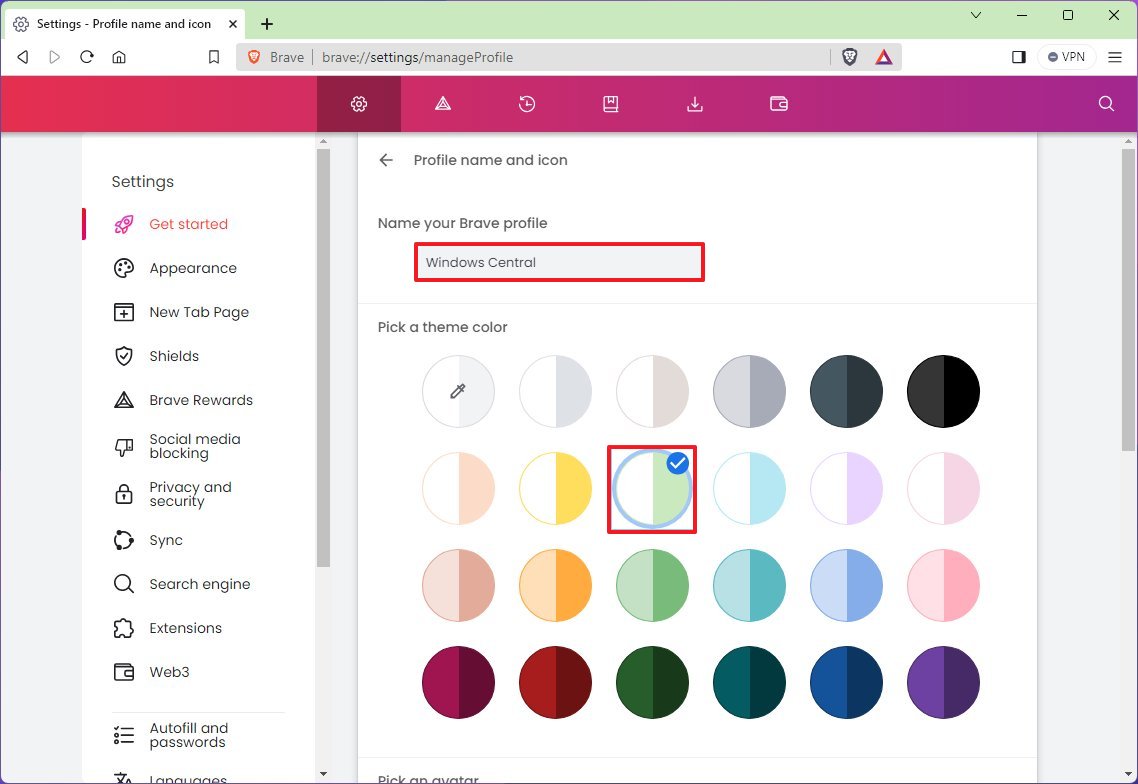
- (Optional) Choose the avatar icon with the “Pick an avatar” setting.
- (Optional) Click the “Import bookmarks and settings” option to import your data from another browser from the “Get started” page.
- Choose the browser to import the data from and the data you want to bring to the new browser.
- Click the Import button.
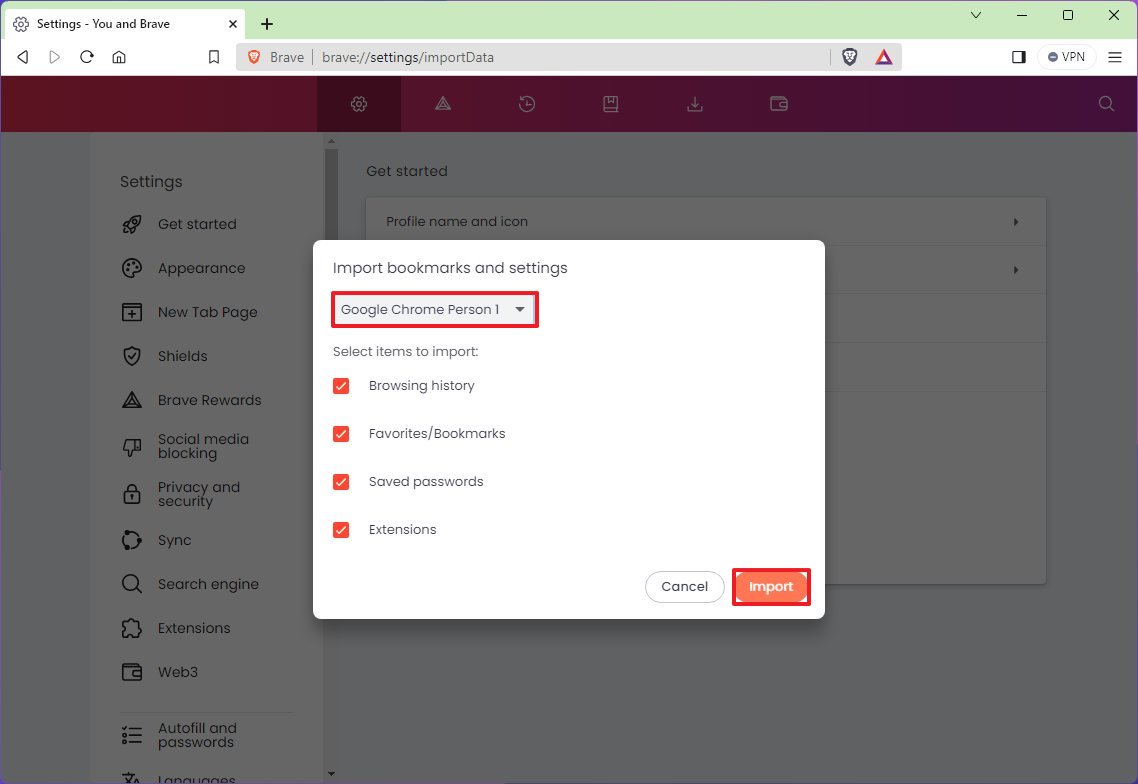
Once you complete the steps, the browser profile should reflect your changes.
Change appearance
To change the appearance of the Brave browser, use these steps:
- Click the “Customize and Control Brave” button in the top-right corner.
- Choose the Settings option.
- Click on Appearance from the left navigation pane.
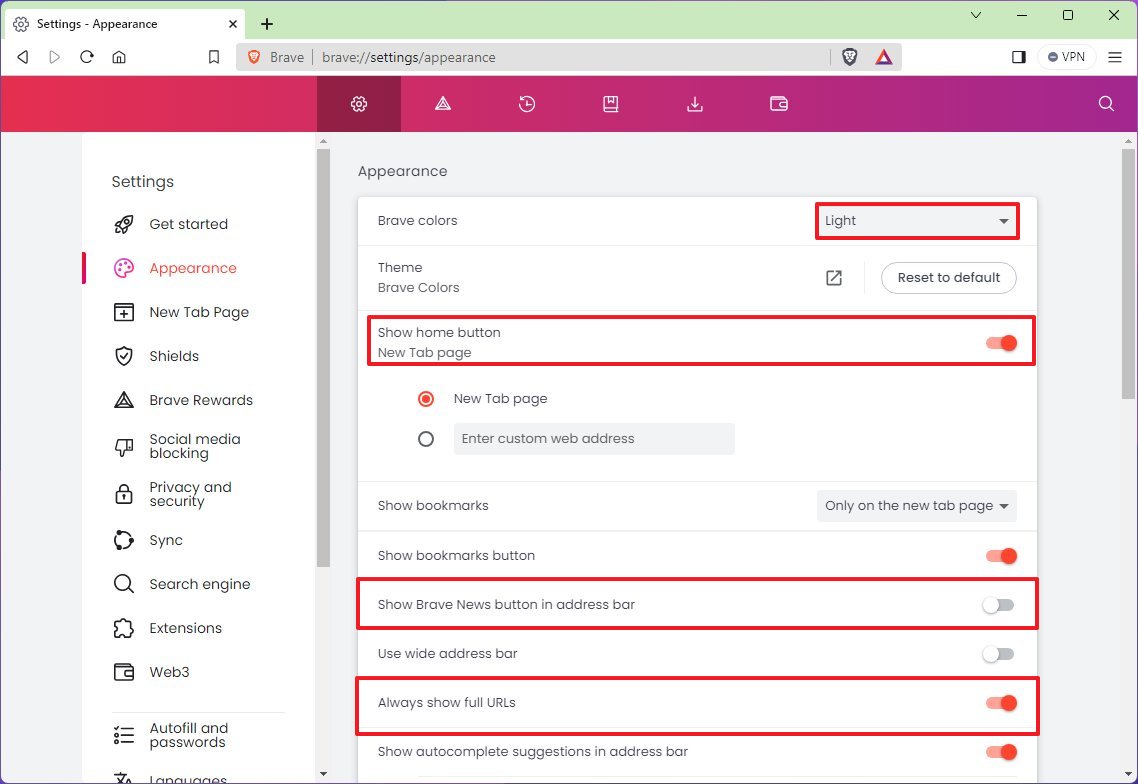
- Use the “Brave colors” setting to choose between light and dark colors.
- Turn on the “Show home button” toggle switch.
- Quick tip: Similar to other browsers, you can customize the home button to open a new tab or specific page.
- Turn off the “Show Brave News button in address bar” toggle switch if you don’t want to use this feature.
- Turn on the “Always show full URLs” toggle switch to display the full URL of the page instead of a truncated version.
After you complete the steps, Brave should apply the new appearance settings.
New tab configuration
By default, the “New tab” page is cluttered with too many elements, but you can customize the experience to simplify it.
To configure the New tab page settings, use these steps:
- Click the “Customize and Control Brave” button in the top-right corner.
- Choose the Settings option.
- Click on New tab page from the left navigation pane.
- Choose the Blank page option from the “New tab page shows” setting to literally a blank page.
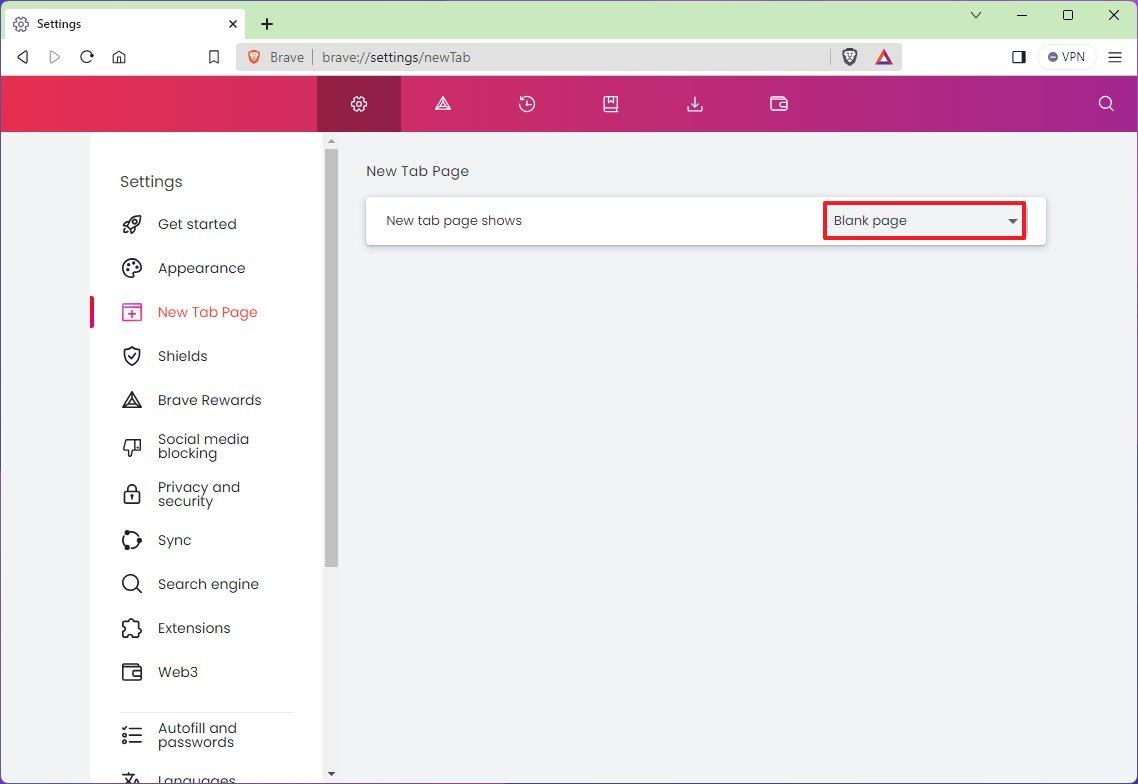
Alternatively, you can use the default “Dashboard” setting, click the “Customize” option, and then turn off the feature you don’t want to see on the New tab page, including background image, stats, top sites, news, clock, and cards.
Shields configuration
The Shields page is the place that houses the settings to control online trackers and ads you will come across on websites. However, these settings will not block Brave Private Ads. For the most part, you want to use the default settings since these settings make Brave the “Brave” browser, but you can always choose something different.
You can change any of the settings, but this guide will only recommend the settings you should change.
To configure the Shields settings, use these steps:
- Click the “Customize and Control Brave” button in the top-right corner.
- Choose the Settings option.
- Click on Shields from the left navigation pane.
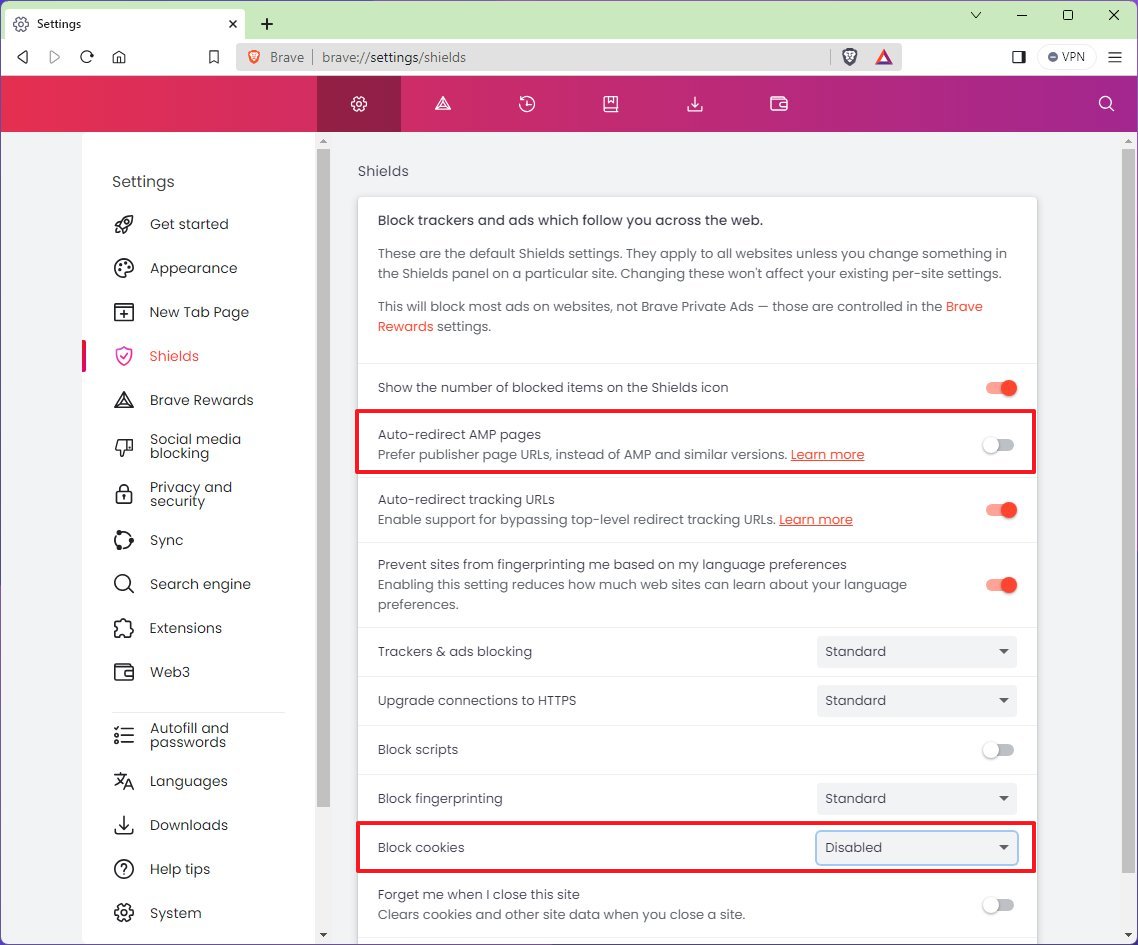
- Turn off the “Auto-redirect AMP pages” toggle switch, since you always want to see the full version of the page.
- (Optional) Select the Disabled option for the “Block cookies” setting.
- Click on Content Filters at the bottom of the page.
- Choose the web content to filter.
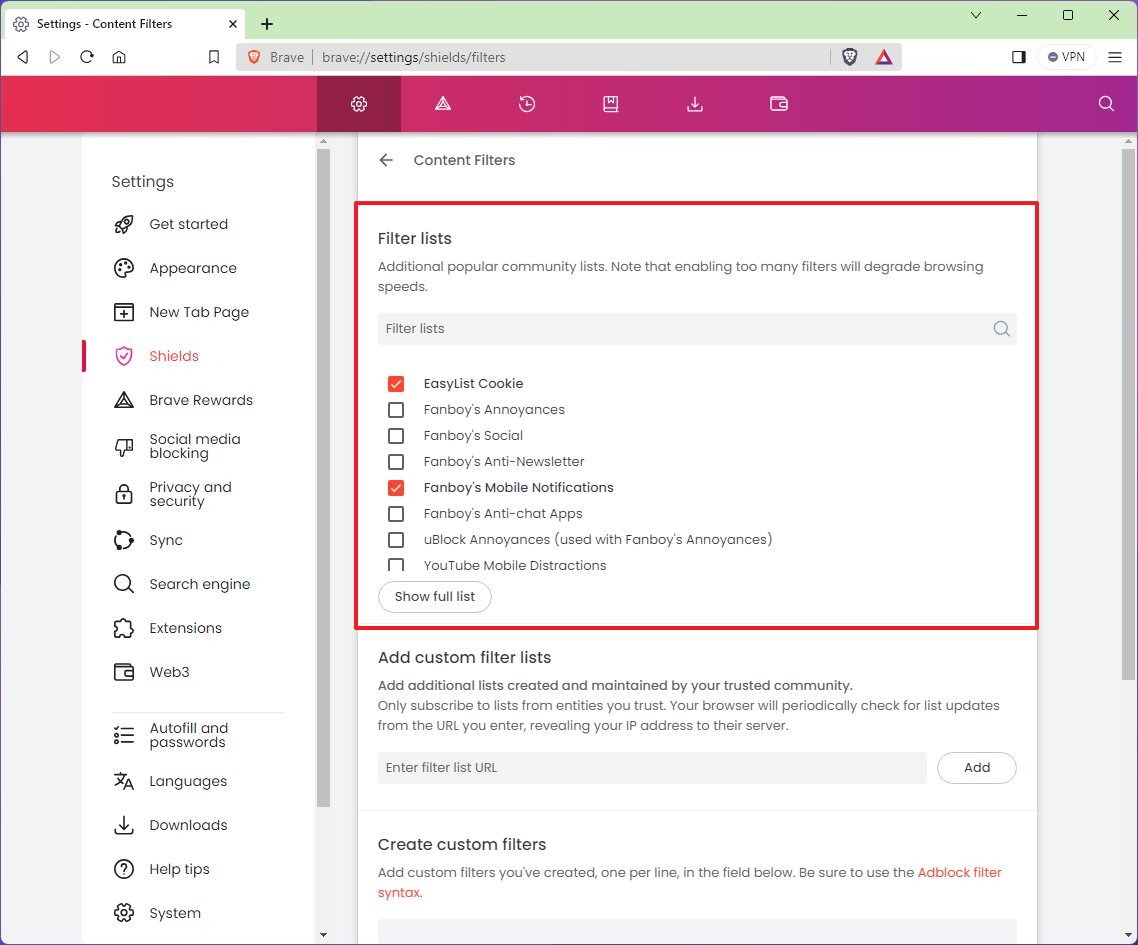
- Quick note: Content filtering is a feature that allows you to block specific types of content on web pages, including ads, trackers, pop-ups, cookie consent notifications, or other website annoyances. Brave has the optimal configuration, but you can control and add more lists as needed.
The “Trackers & ads blocking,” “Upgrade connections to HTTPS,” and “Block fingerprinting” should be left with the “Standard” option since any other choice may break sites. In the same way, you should keep the “Block scripts” toggle switch off for the same reason.
On the internet, browser fingerprinting is a technique used to collect information about a user’s browser and device configuration to create a unique identifier. Brave includes an option to block fingerprinting based on your language, and you should also leave the option turned on.
Social media blocking configuration
Brave includes the ability to block social media trackers, such as legacy Google Sign-in, Facebook, X (Twitter), and LinkedIn. If you don’t use any of the platform accounts to sign in on websites, you can keep these options disabled. However, if you sign in on websites with your Facebook or view X posts in articles, you should enable this feature.
To control social media blocking on Brave, use these steps:
- Click the “Customize and Control Brave” button in the top-right corner.
- Choose the Settings option.
- Click on Social media blocking from the left navigation pane.
- Turn off the “Allow use of third-party cookies for legacy Google Sign-in” toggle switch.
- Turn off the “Allow Facebook logins and embedded posts” toggle switch.
- Turn off the “Allow Twitter embedded tweets” toggle switch.
- Turn off the “Allow LinkedIn embedded posts” toggle switch.
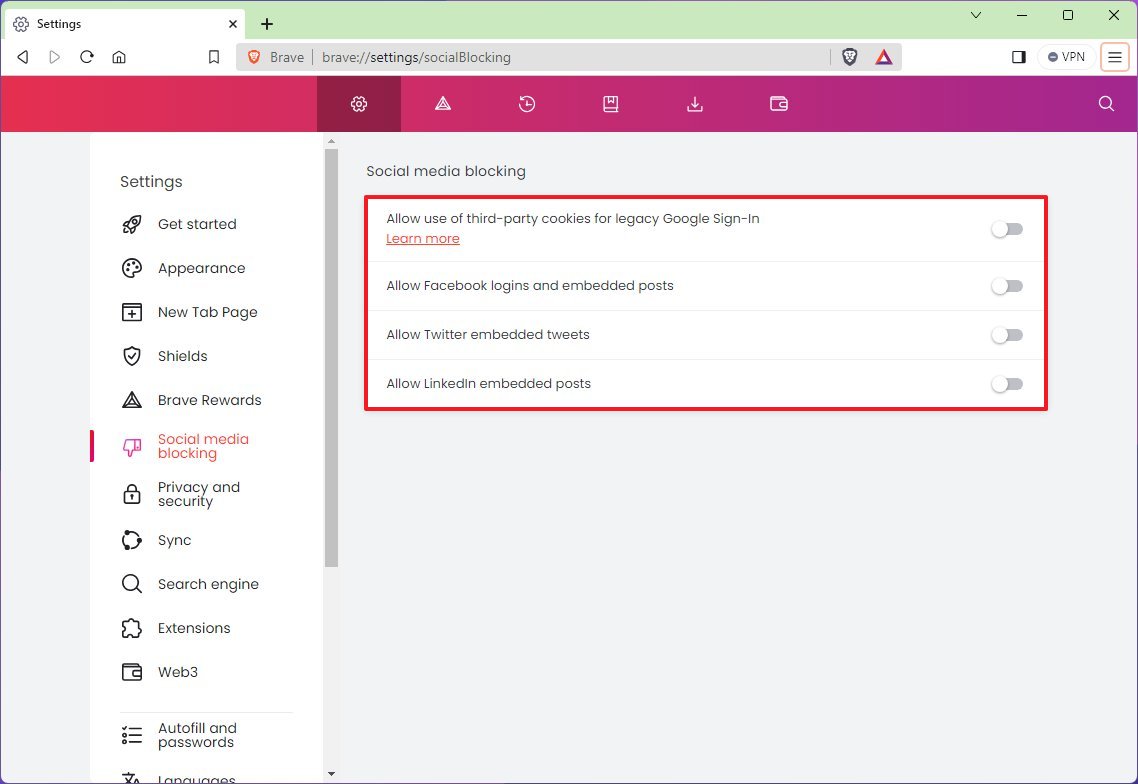
Once you complete the steps, the Brave browser will block or allow social features, depending on your configuration.
Privacy configuration
Similar to any other browser, Brave also comes with a section to control privacy settings. On this page, you can clear your browsing data and cookies and configured different features.
To customize the privacy settings on Brave, use these steps:
- Click the “Customize and Control Brave” button in the top-right corner.
- Choose the Settings option.
- Click on Privacy and security from the left navigation pane.
- Select the “Disable ono-proxied UDP” option for the “WebRTC IP handling policy” setting to prevent leaking your public IP on the internet, even if you use a VPN service.
- Turn off the “Allow privacy-preserving product analytics (P3A)” toggle switch.
- Turn off the “Automatically send daily usage ping to Brave” toggle switch.
- Turn off the “Automatically send diagnostic reports” toggle switch.
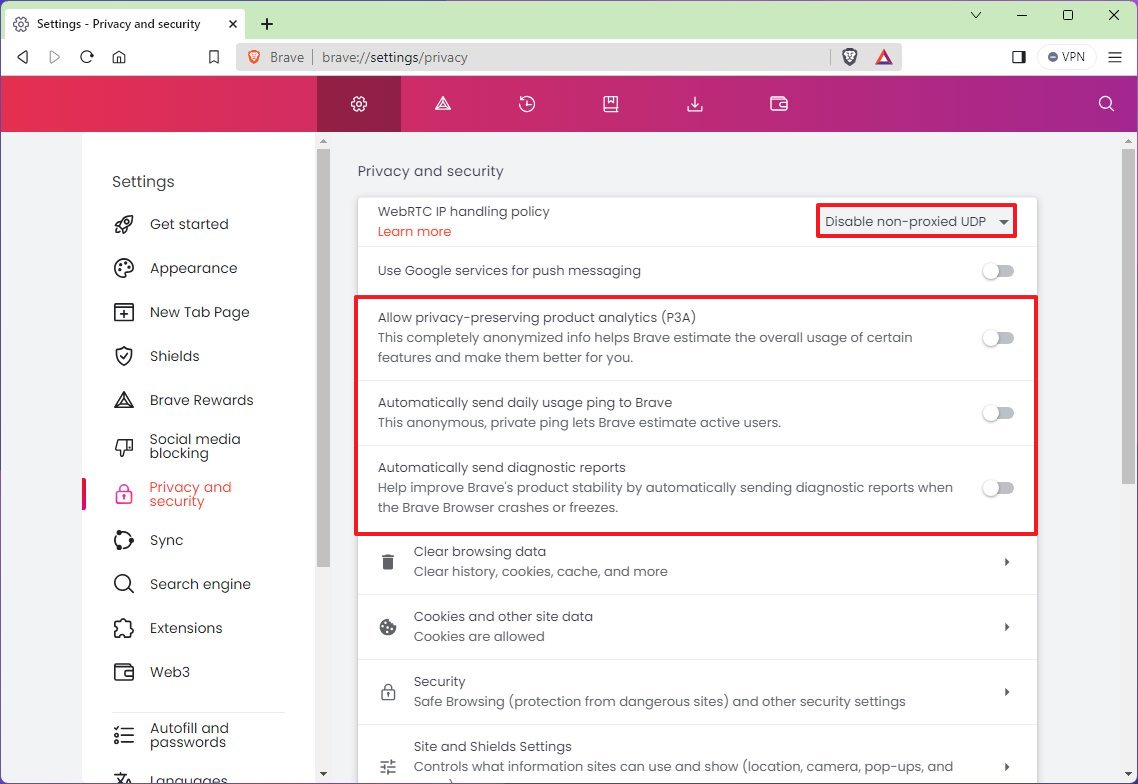
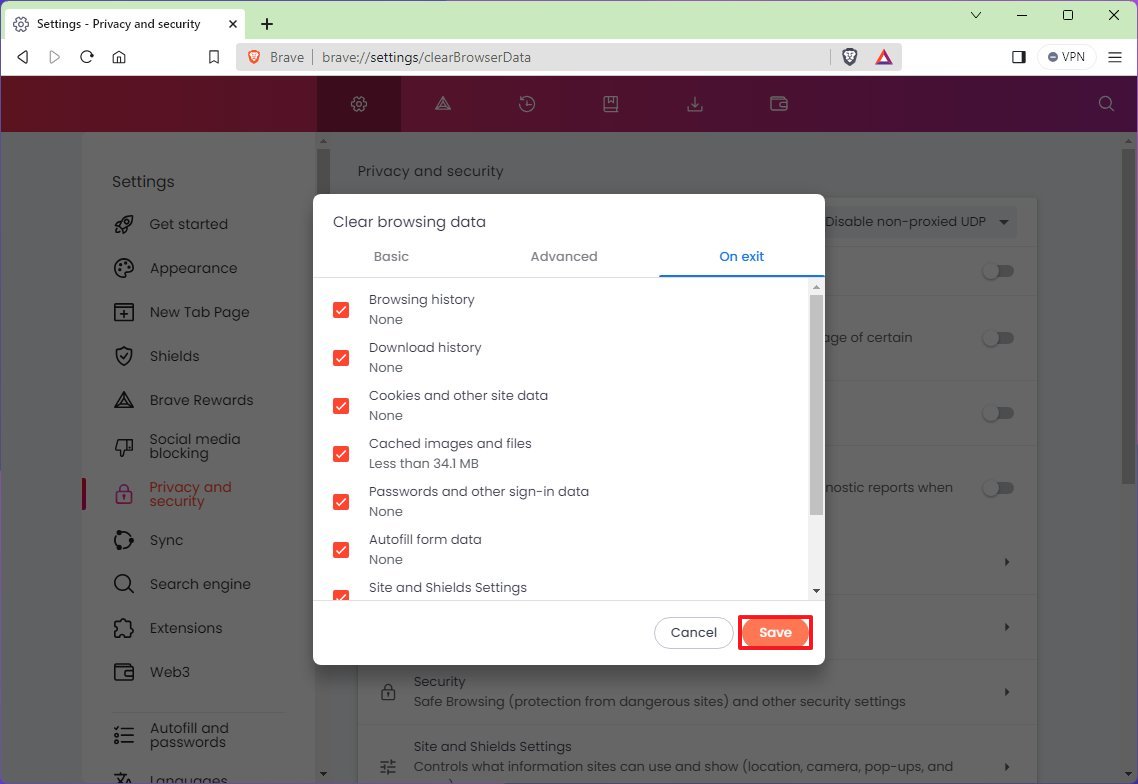
- (Optional) Click the “Clear browsing site data” setting.
- Click the On exit tab.
- Check the browsing data to erase every time you close the browser.
- Click the Save button.
- Under the “Tor windows” section, turn off the “Private window with Tor” toggle switch.
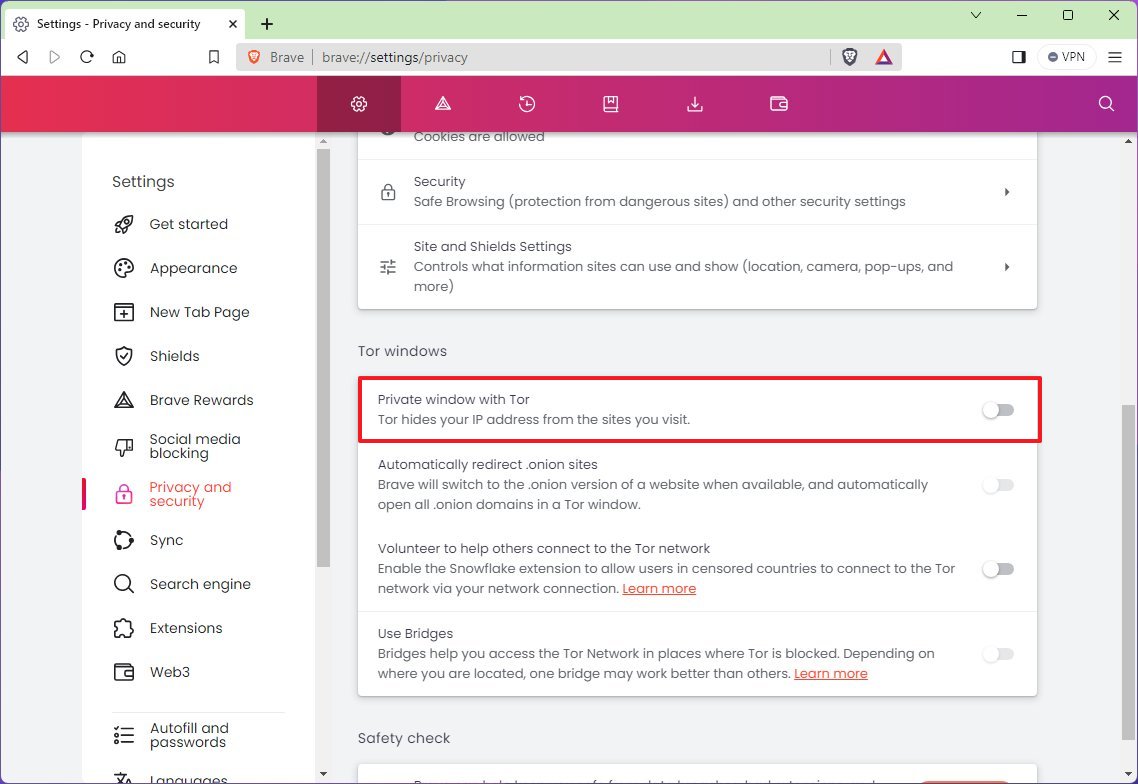
- Quick note: Although the Tor network could be a good idea to make browsing more private, it can slow down browsing and download speeds, it has a questionable reputation, and even though it adds an extra layer of security, it’s not perfect.
- Click the “Site and Shields Settings” option.
- Under the “Permissions” section, click the Location setting.
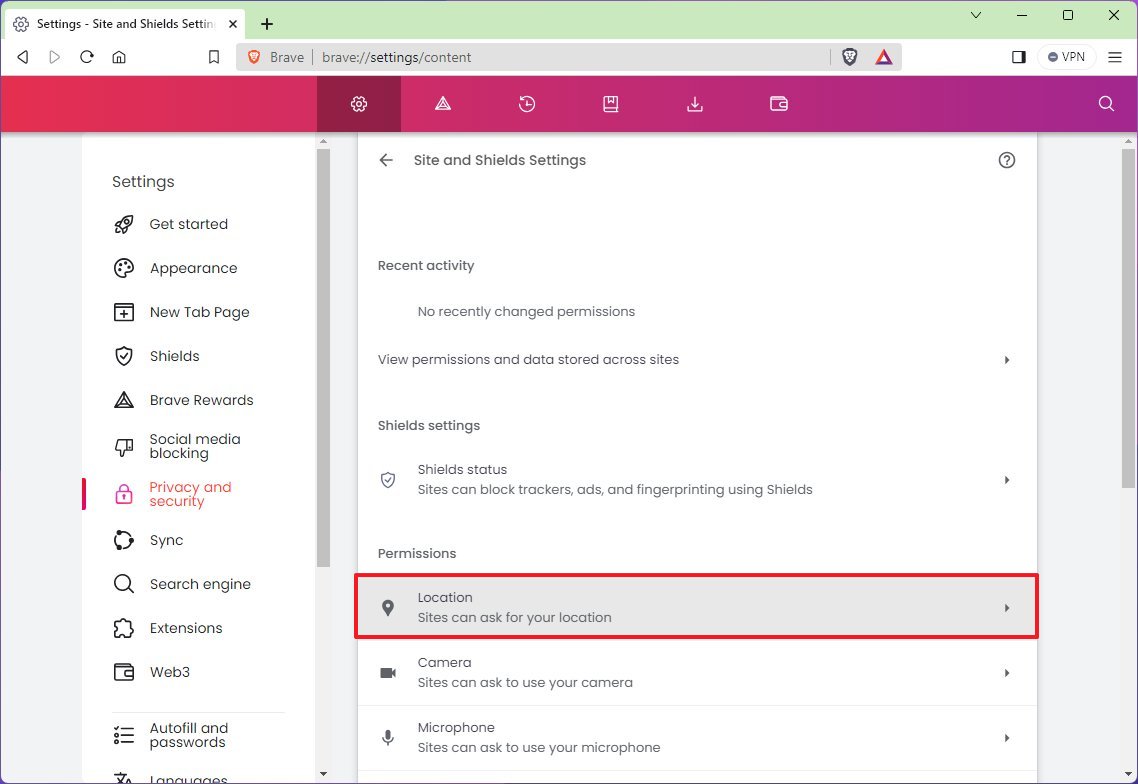
- Choose the “Don’t allow sites to see your location” option to prevent websites from getting details about your location.
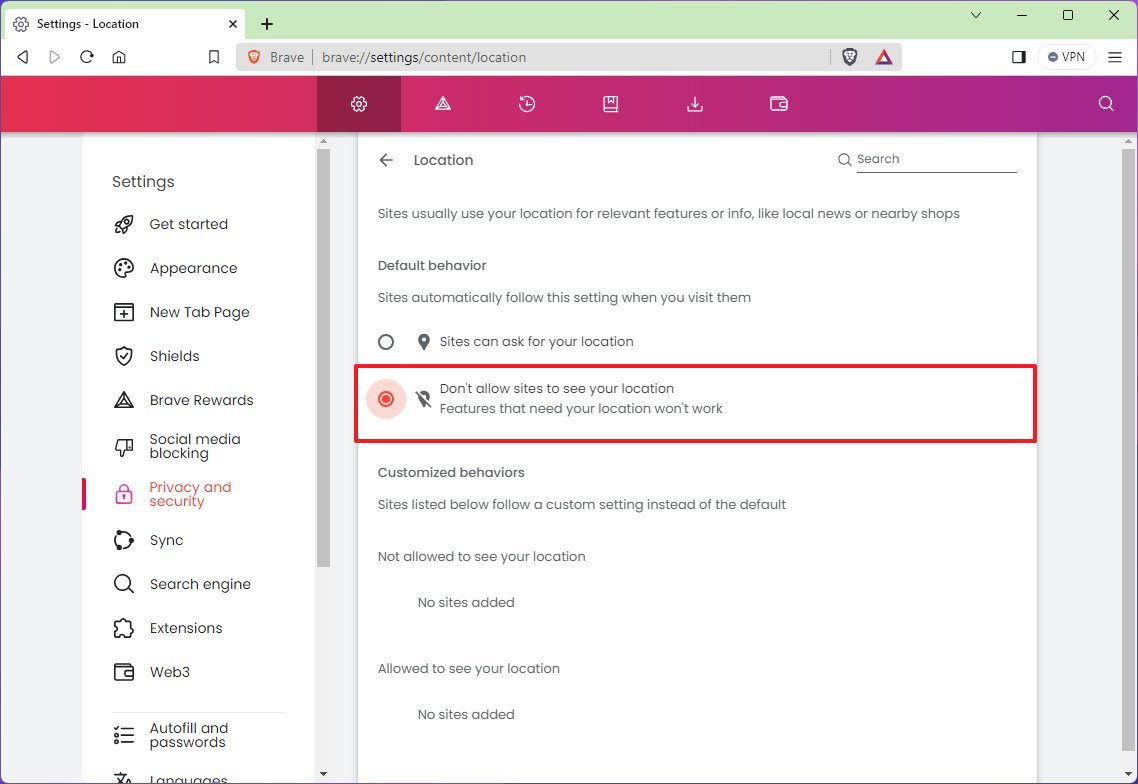
After you complete the steps, the privacy settings will apply to the browser, making your experience a little more secure and private.
Sync data across devices
Although Brave doesn’t offer the ability to create an account to sync your data across devices, it includes a sync feature that creates a unique token that allows you to sync your settings across devices.
To sync your Brave settings to another device, use these steps:
- Click the “Customize and Control Brave” button in the top-right corner.
- Choose the Settings option.
- Click on Sync from the left navigation pane.
- Click on the “Start using sync” setting.
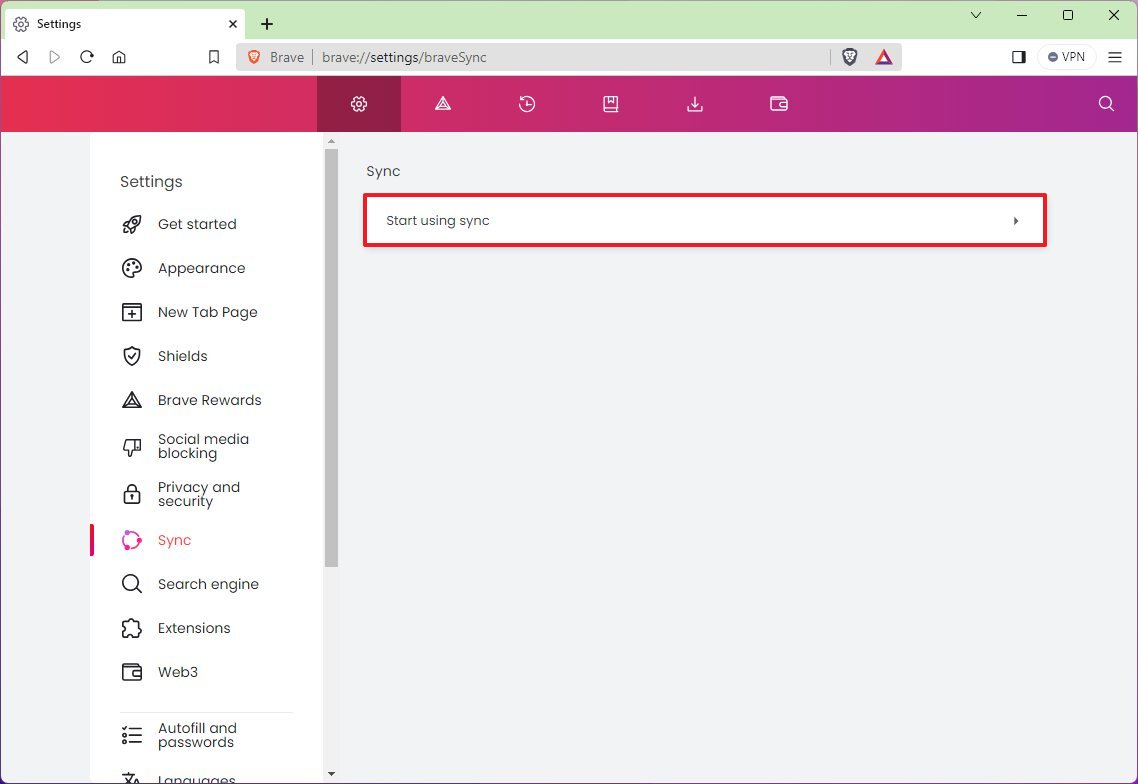
- Click the “Start a new Sync Chain” button.
- Choose the device to sync data, such as “Computer.”
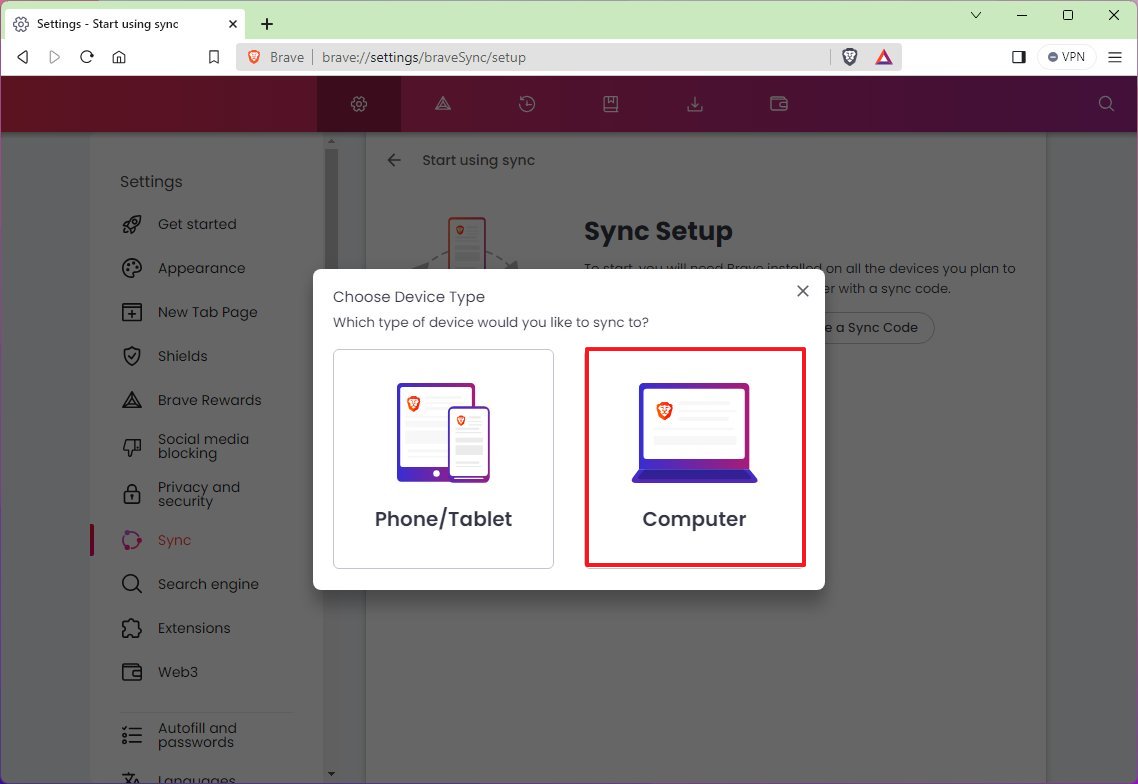
- Copy the chain code to the clipboard.
- Click the OK button.
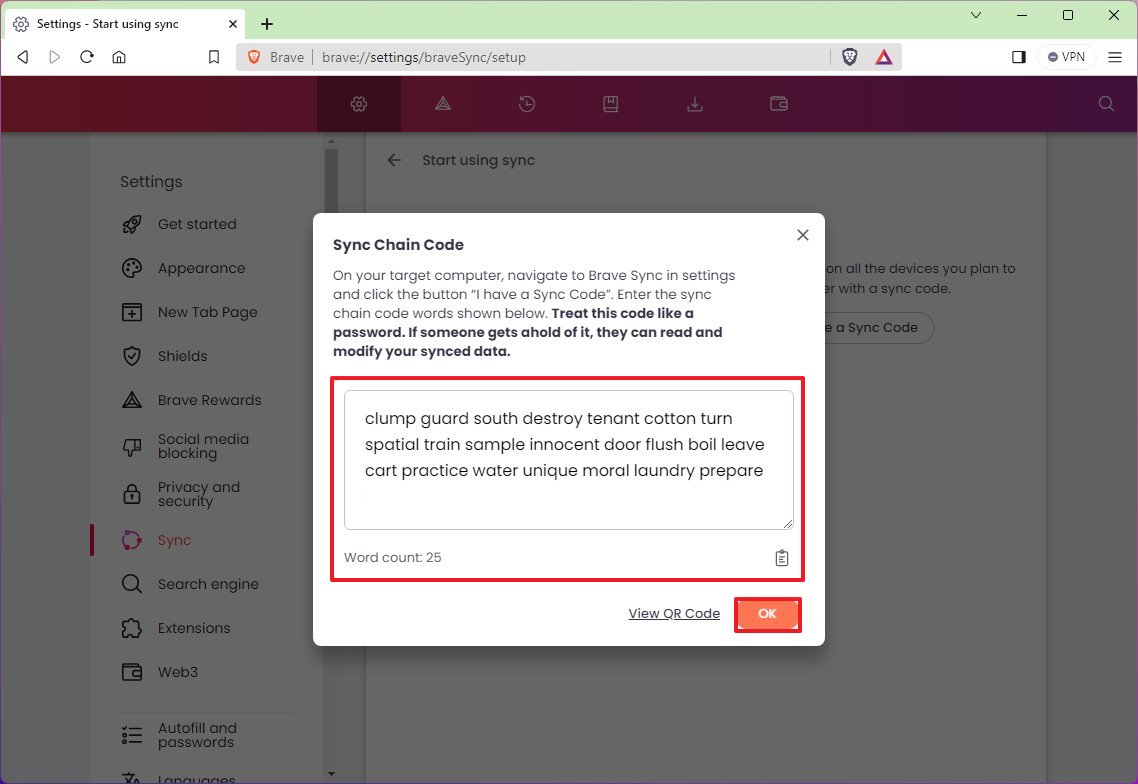
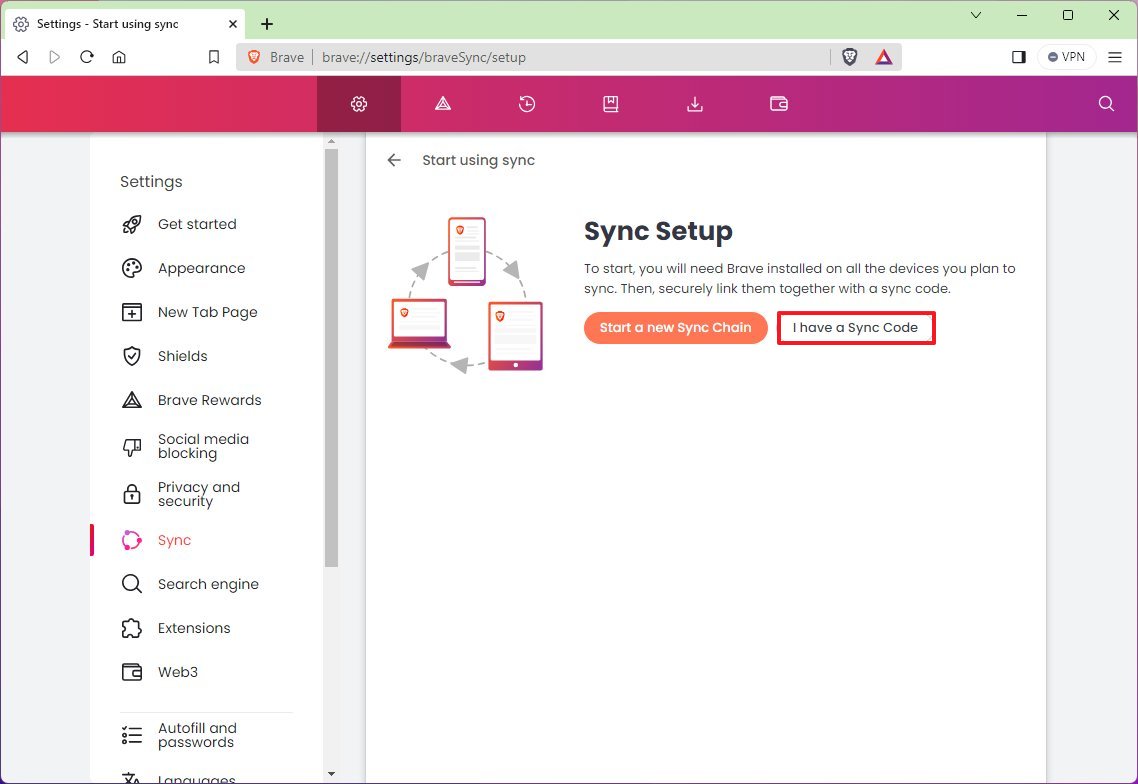
- On the other computer, open the Brave Sync settings.
- Click the “I have a Sync Code” option.
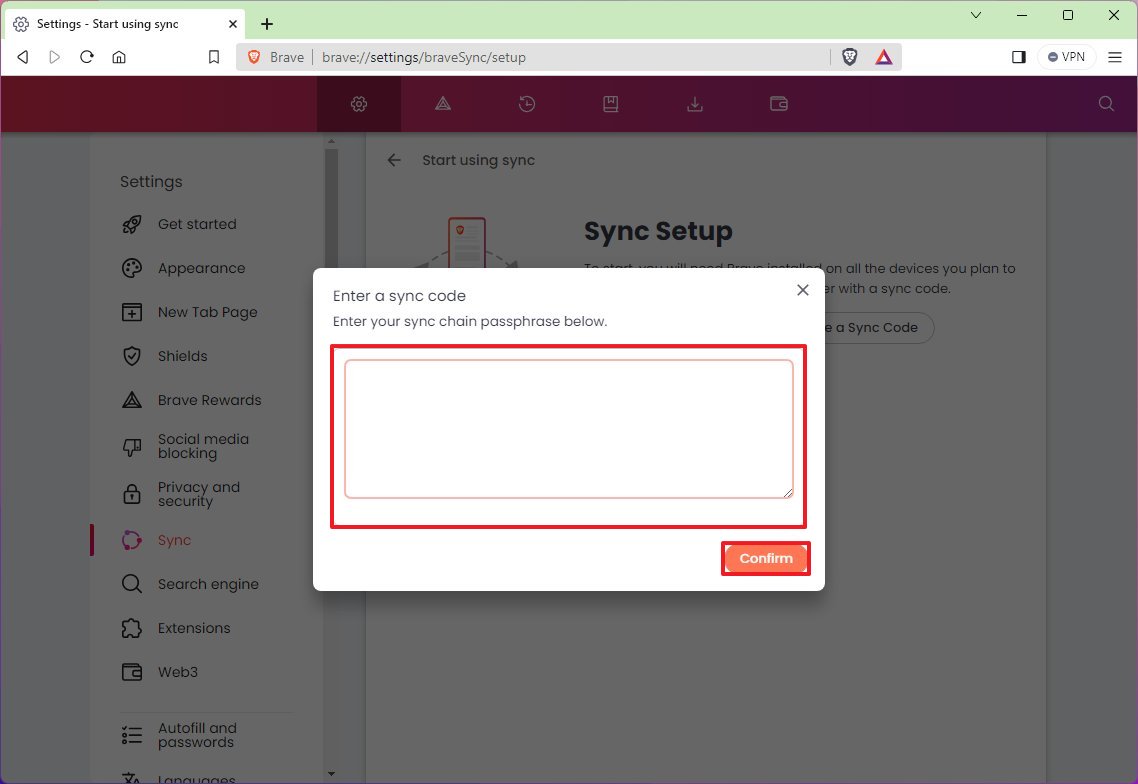
- Paste the chain code.
- Click the Confirm button.
Once you complete the steps, the browsing data will sync between devices.
Search engine customization
The browser uses the “Brave” search engine as its default, but other engines also focus on privacy, such as DuckDuckGo.
To change the search engine settings on Brave, use these steps:
- Click the “Customize and Control Brave” button in the top-right corner.
- Choose the Settings option.
- Click on Search engine from the left navigation pane.
- Check the search engine for the browser with the “Normal Window” option.
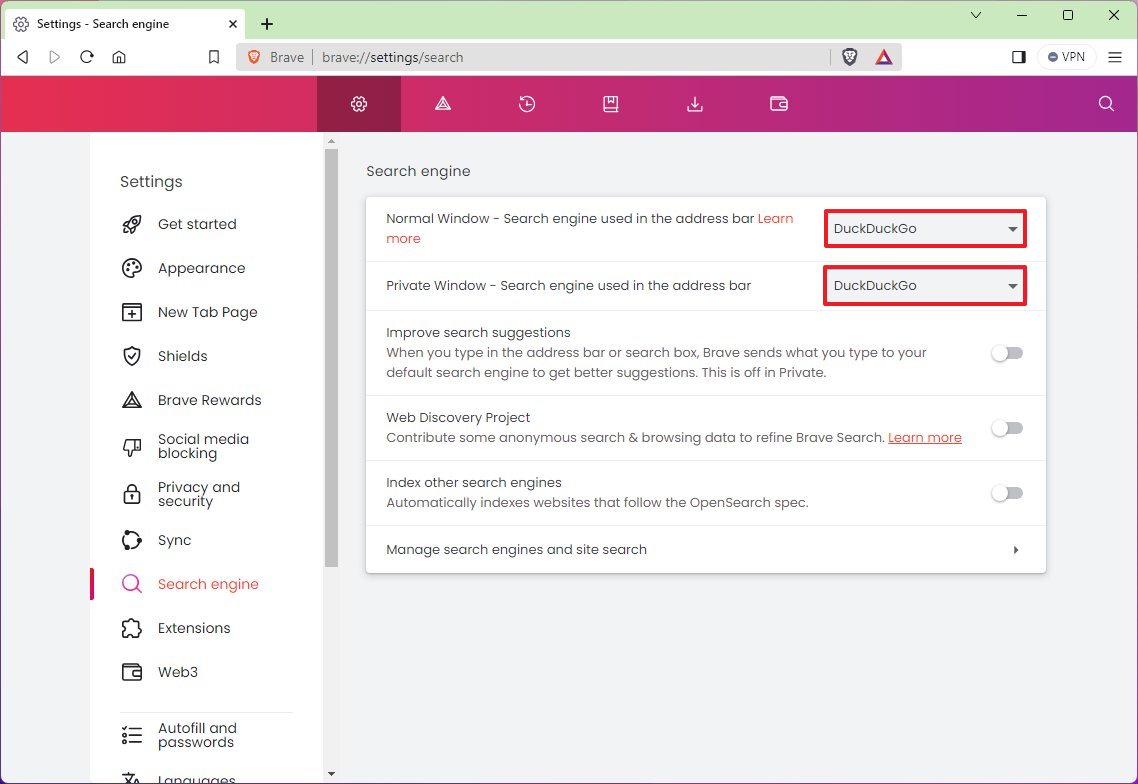
- Quick note: You can choose from Brave, Google, DuckDuckGo, Qwant, Bing, Startpage, and Ecosia.
- (Optional) Change the search engine for the private window feature.
After you complete the steps, the new search engine settings will apply to the browser. (You can keep the remaining settings unchanged.)
Extensions settings customization
As part of the customization settings, the Brave browser ships with a number of options for extensions.
To choose the correct extension settings for the Brave browser, use these steps:
- Click the “Customize and Control Brave” button in the top-right corner.
- Choose the Settings option.
- Click on Extensions from the left navigation pane.
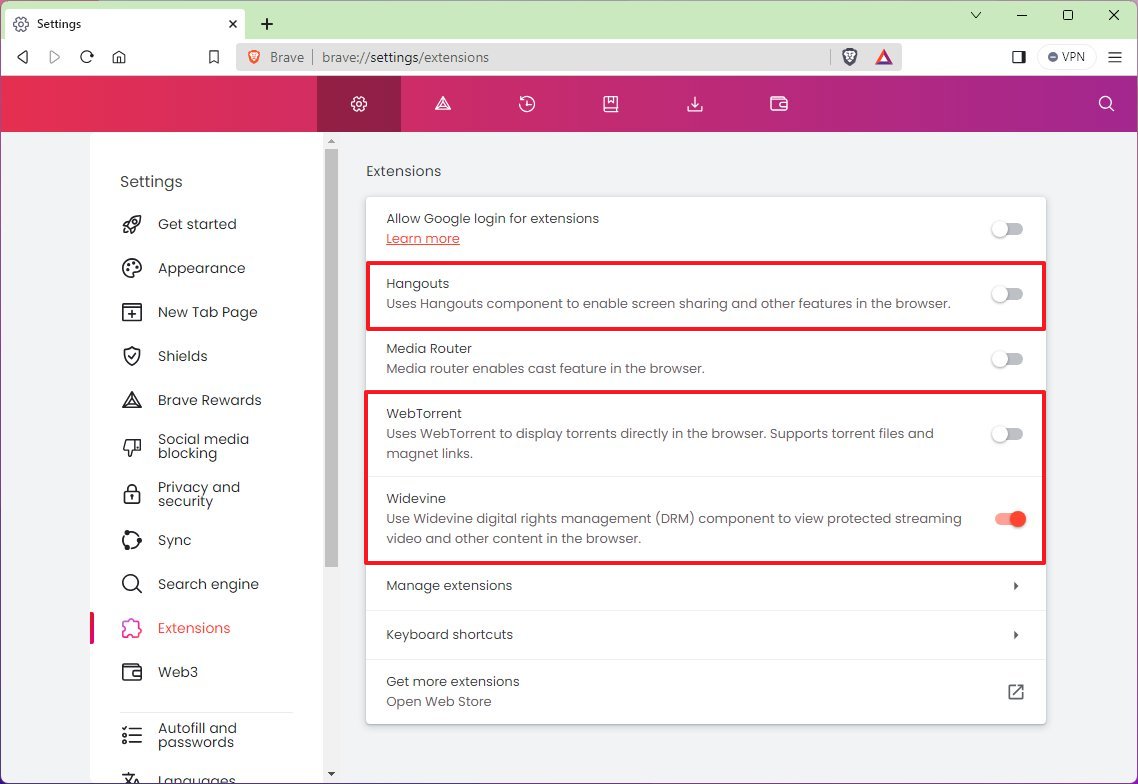
- Turn off the “Hangouts” toggle switch.
- Turn off the “WebTorrent” toggle switch to disable torrent features.
- Turn on the “Widevine” toggle switch if you plan to watch videos from streaming platforms, such as Netflix, Hulu, and others. Otherwise, the content won’t play in the browser.
Once you complete the steps, the Brave browser will start using the extension settings you selected.
Web3 settings customization
The Web3 page houses the settings to control wallet, IPFS, and Web3 Domains.
To change the Web3 settings, use these steps:
- Click the “Customize and Control Brave” button in the top-right corner.
- Choose the Settings option.
- Click on Web from the left navigation pane.
- Under the “Wallet” section, turn off the “Show Brave Wallet icon on toolbar” toggle switch to disable the feature.
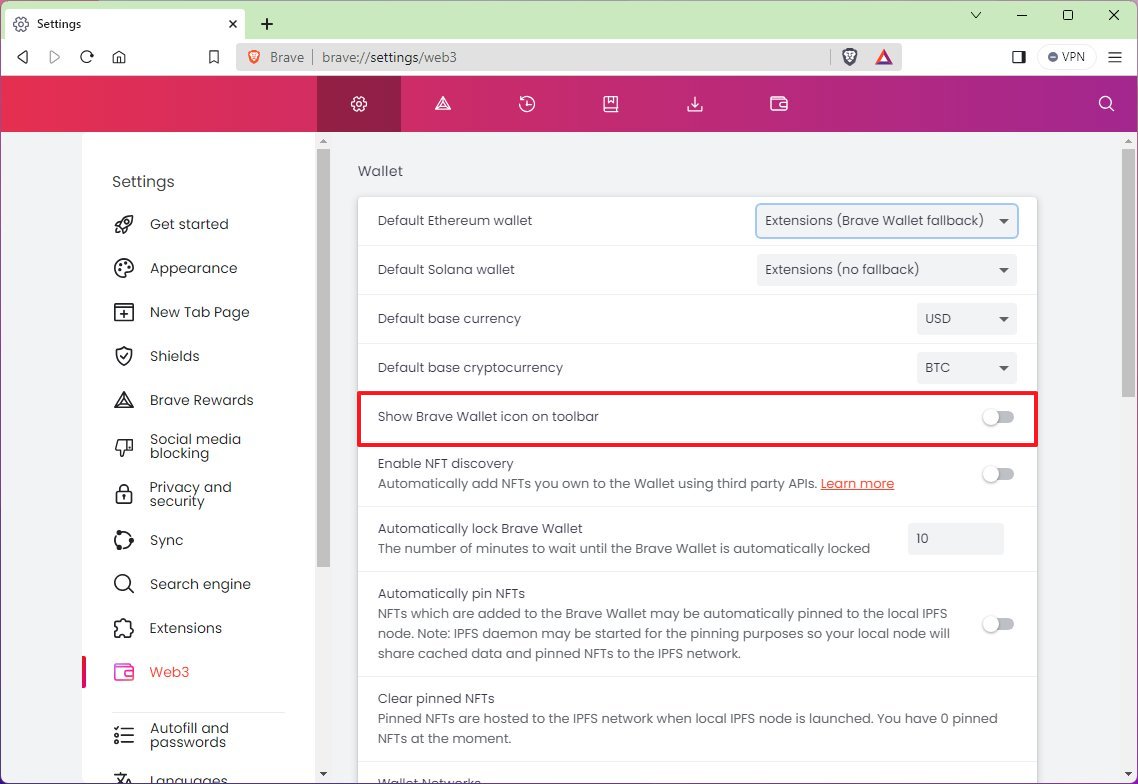
- Under the “IPFS” section, choose the Disabled option for the “Method to resolve IPFS resources” setting.
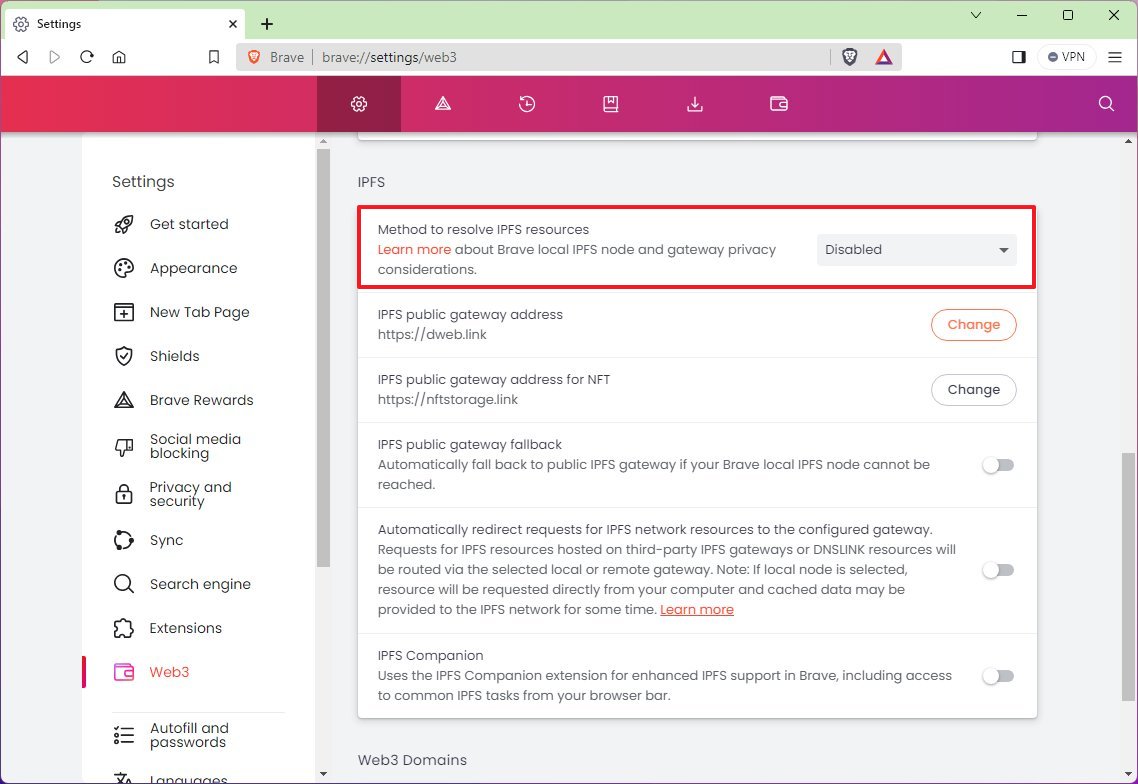
- Quick note: The IPFS (InterPlanetary File System) is a protocol for peer-to-peer networks for storing and accessing files, websites, apps, and data. If you don’t plan to use the feature, it would be best to turn it off.
After you complete the steps, the new settings will apply to the browser.
Change autofill and password settings
The Brave browser also includes the ability to save payment methods, addresses, and passwords, but you can always disable these features to prevent the browser from collecting personal information.
To prevent the browser from saving payment methods and addresses, use these steps:
- Click the “Customize and Control Brave” button in the top-right corner.
- Choose the Settings option.
- Click on Autofill and passwords from the left navigation pane.
- Click the Payment methods setting.
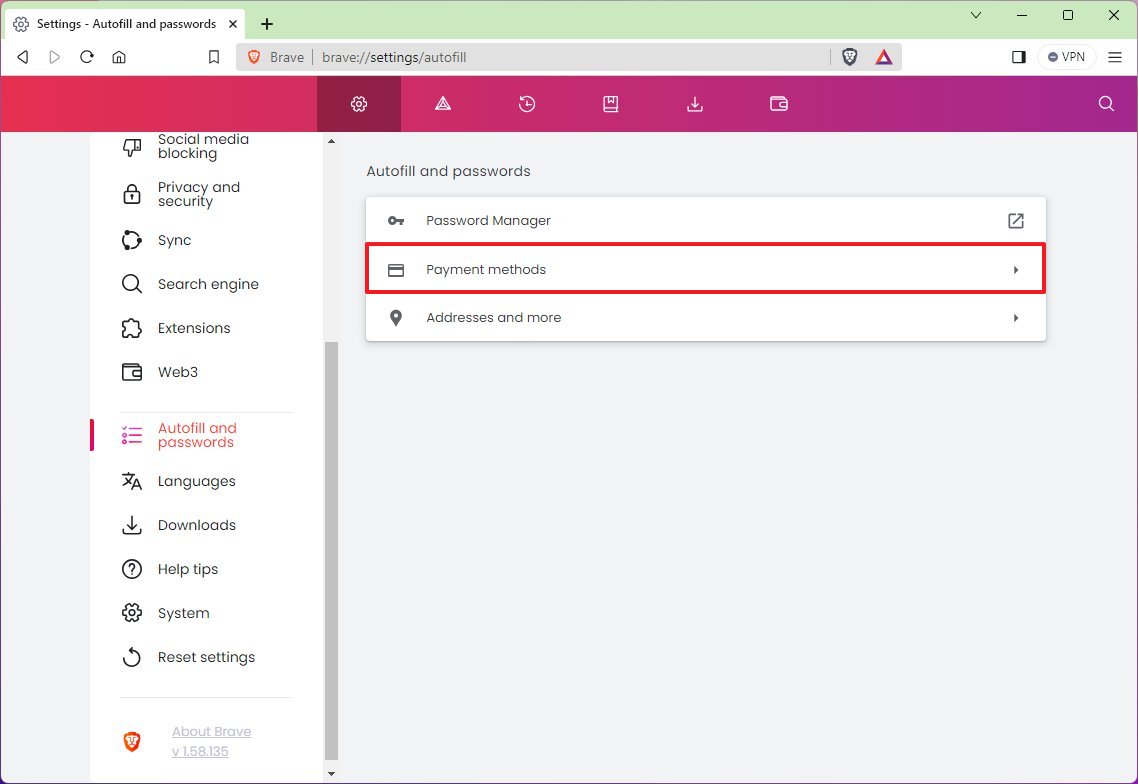
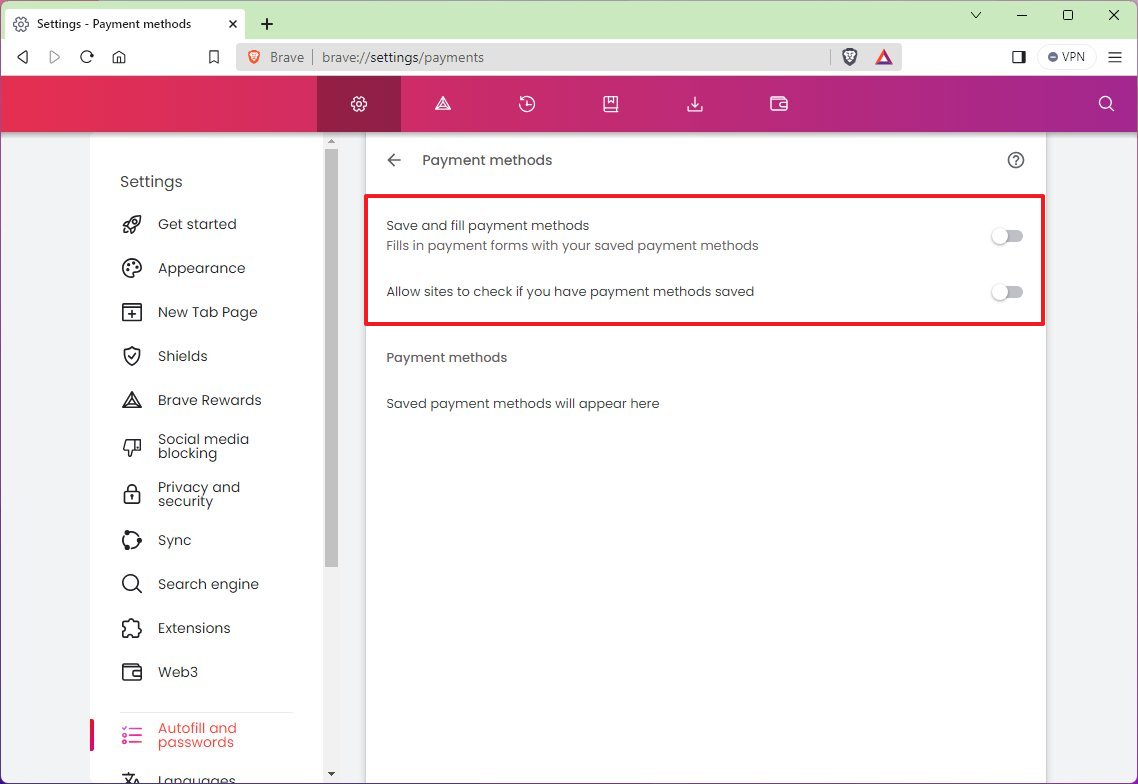
- Turn off the “Save and fill payment methods” toggle switch.
- Turn off the “Allow sites to check if you have payment methods saved” toggle switch.
- Click the “Addresses and more” setting from the “Autofill and passwords” page.
- Turn off the “Save and fill payment methods” toggle switch.
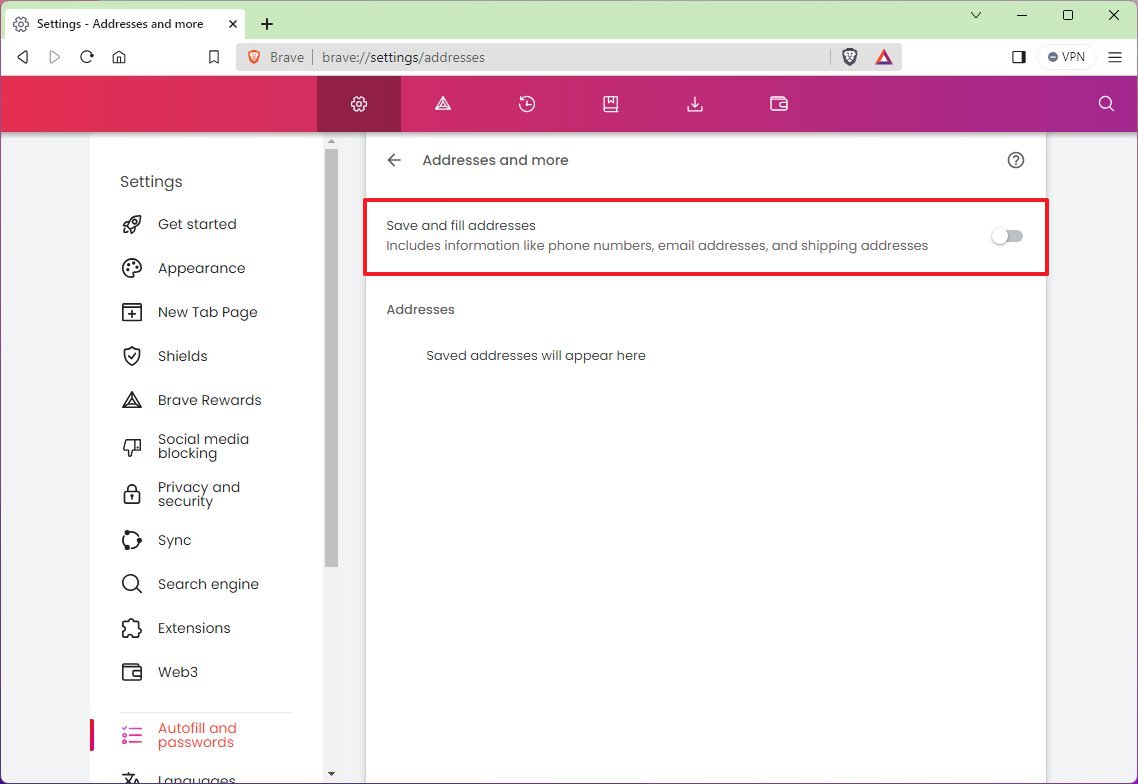
Once you complete the steps, Brave will no longer try to save payment and address information in the browser.
Change system settings
The system settings allow you to control various features that affect the functionality of Brave. Usually, the default settings are adequate for most users, but you can always tweak some of the settings. For example, you can prevent the browser from running in the background when you’re not using it, and you can turn on the option to save memory for inactive tabs.
To change the system settings for Brave, use these steps:
- Click the “Customize and Control Brave” button in the top-right corner.
- Choose the Settings option.
- Click on System from the left navigation pane.
- Turn off the “Continue running background apps when Brave is closed” toggle switch to prevent services from running when the app is closed.
- Under the “Performance” section, turn on the “Memory Saver” toggle switch to allow the browser to free up system memory from inactive tabs.
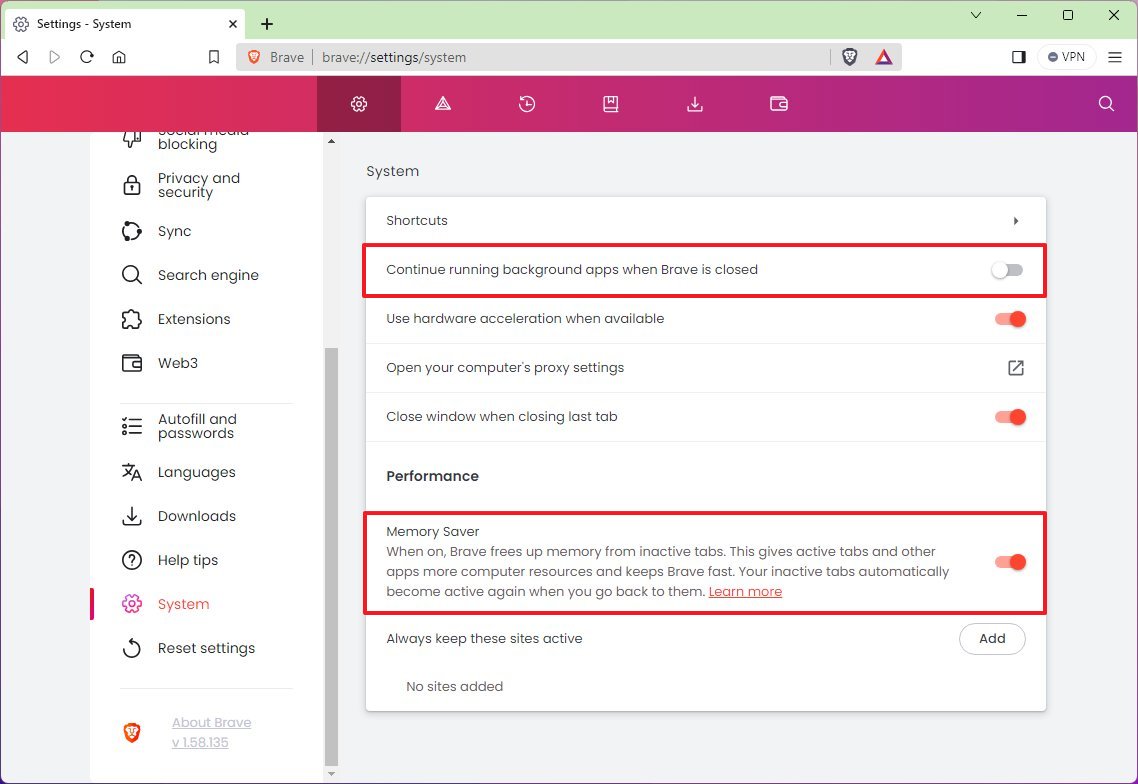
After you complete the steps, Brave will apply the new settings to the browser.
VPN usage
Brave also comes with a VPN feature in partnership with Guardian that allows you to browse the internet with more anonymity since it hides your public IP address, connects your device and service with encryption, and redirects traffic through different locations around the world.
Although this is a paid feature, Brave users get a free trial to test the service before committing.
To get started with VPN Brave, use these steps:
- Open Brave.
- Click the VPN button.
- Click the Start free trial button.
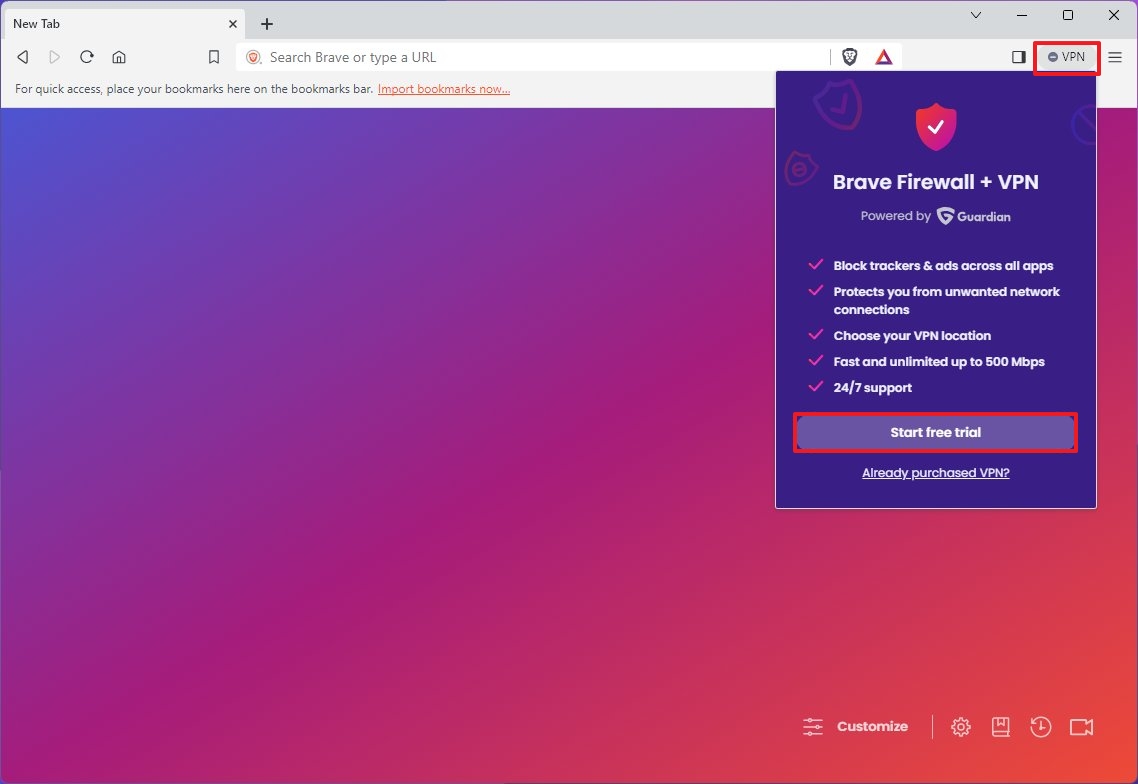
- Confirm your email address.
- Click the Start free trial button.
- Complete the payment.
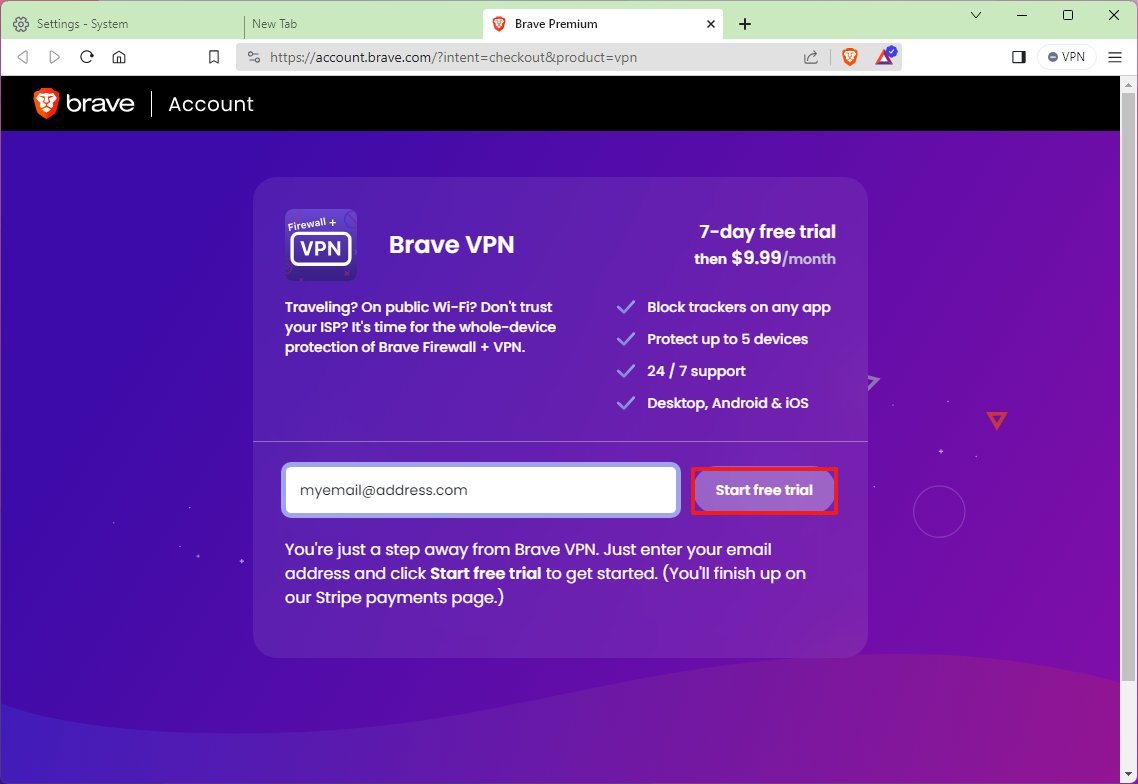
Once you complete the steps, you will have to complete the purchase through the Stripe payment page. After completing the payment, you will receive the seven-day trial and be charged the full subscription price.
After configuring the browser, you can start surfing the web with the most private experience. Similar to Microsoft Edge, Google Chrome, or Mozilla Firefox, the Brave browser has a straightforward interface with navigation controls on the top left, an address bar in the center, and different commands and access to the main menu on the top right.
More resources
For more helpful articles, coverage, and answers to common questions about Windows 10 and Windows 11, visit the following resources:


