On Windows 11, the Microsoft Defender Antivirus is the anti-malware application that comes by default on every installation to protect your computer and files from viruses, spyware, ransomware, and other types of malware and hackers.
Although the antivirus runs in the background automatically to scan, detect, and remove unwanted viruses, the anti-malware application also provides many customization options. For example, to perform scans manually, including offline scans to remove tricky viruses. Also, you can disable real-time protection and enable extra layers of security like anti-ransomware protection and periodic scanning.
This guide will walk you through the steps to get started managing settings and using the features available on Microsoft Defender Antivirus on Windows 11.
How to install update definitions on Defender Antivirus
To update the definition of the Microsoft Defender Antivirus, use these steps:
- Open Start.
- Search for Windows Security and click the top result to open the app.
- Click on Virus & threat protection.
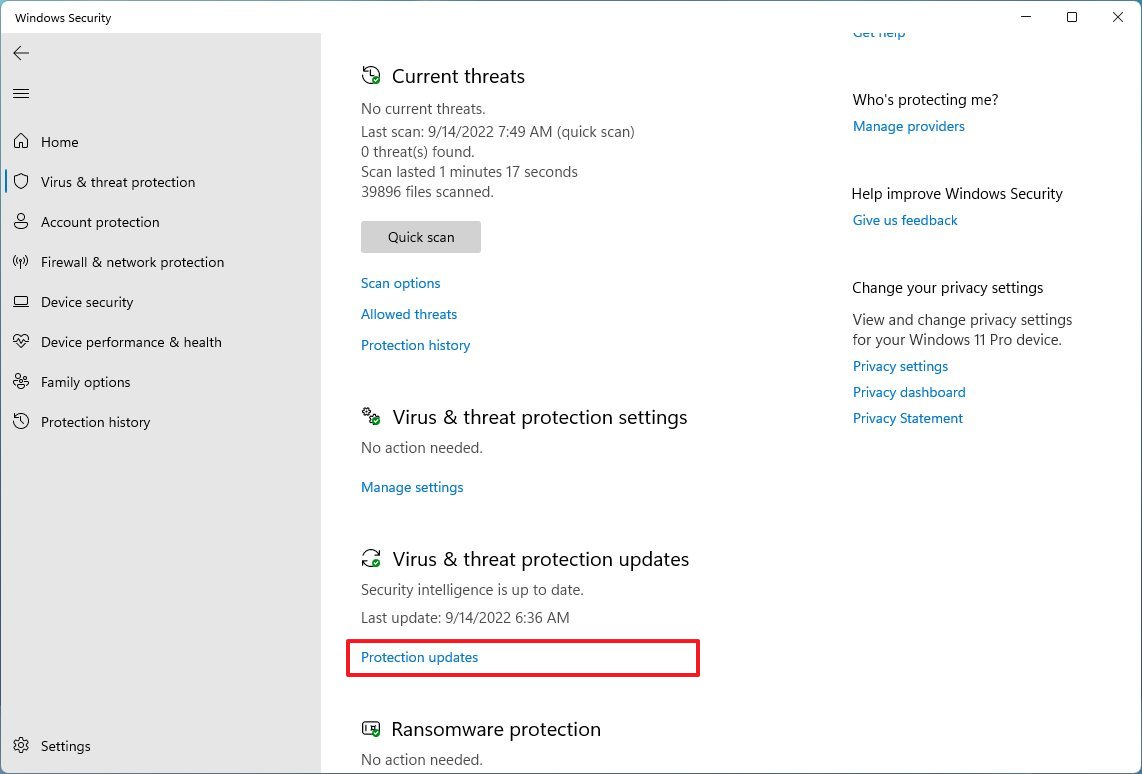
- Under the “Virus & threat protection updates” section, click the protections updates option.
- Click the Check for updates button.
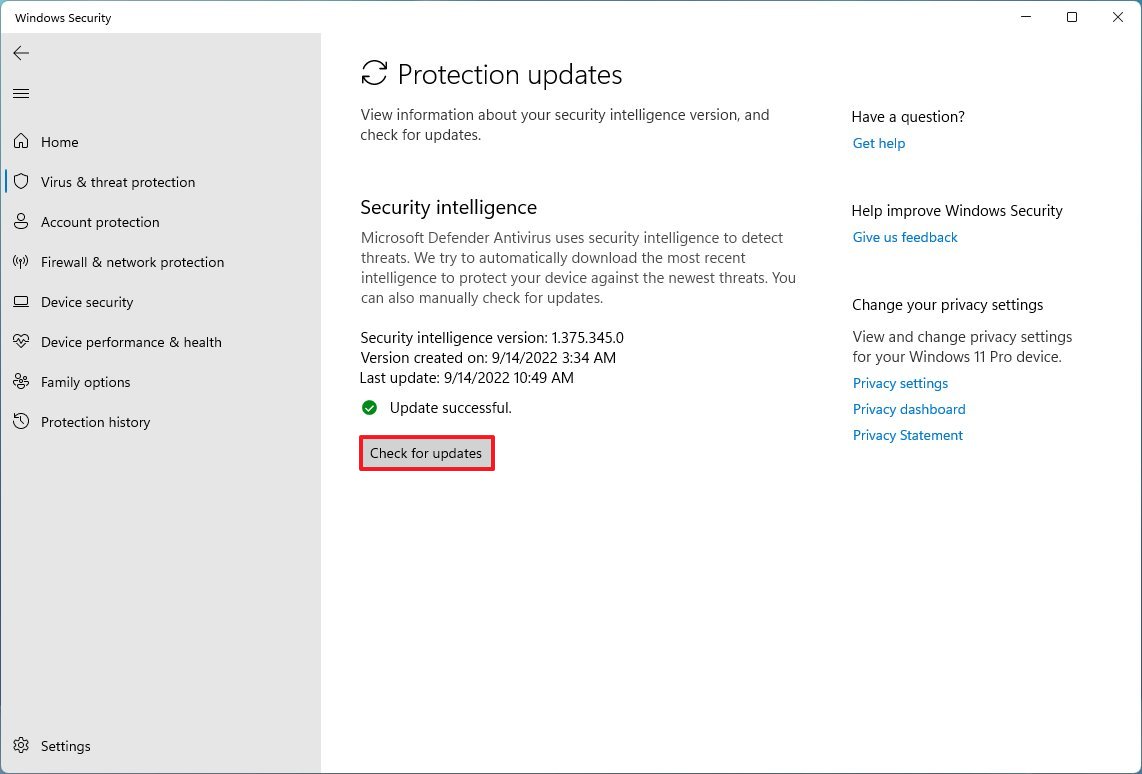
Once you complete the steps, any update available will download and install automatically to scan, detect, and remove the latest threats.
The antivirus usually downloads updates automatically, but sometimes, it might still be necessary to check manually before proceeding with a manual scan.
How to scan for malware on Defender Antivirus
Windows 11 automatically scans your computer for malware using the Microsoft Defender Antivirus. However, if you suspect that the device may be infected, you can use the available options to perform a scan manually.
Quick Scan
A quick scan takes the least amount of time because it only scans the locations where malware is more likely to hide.
To perform a quick scan with the Defender Antivirus, use these steps:
- Open Start.
- Search for Windows Security and click the top result to open the app.
- Click on Virus & threat protection.
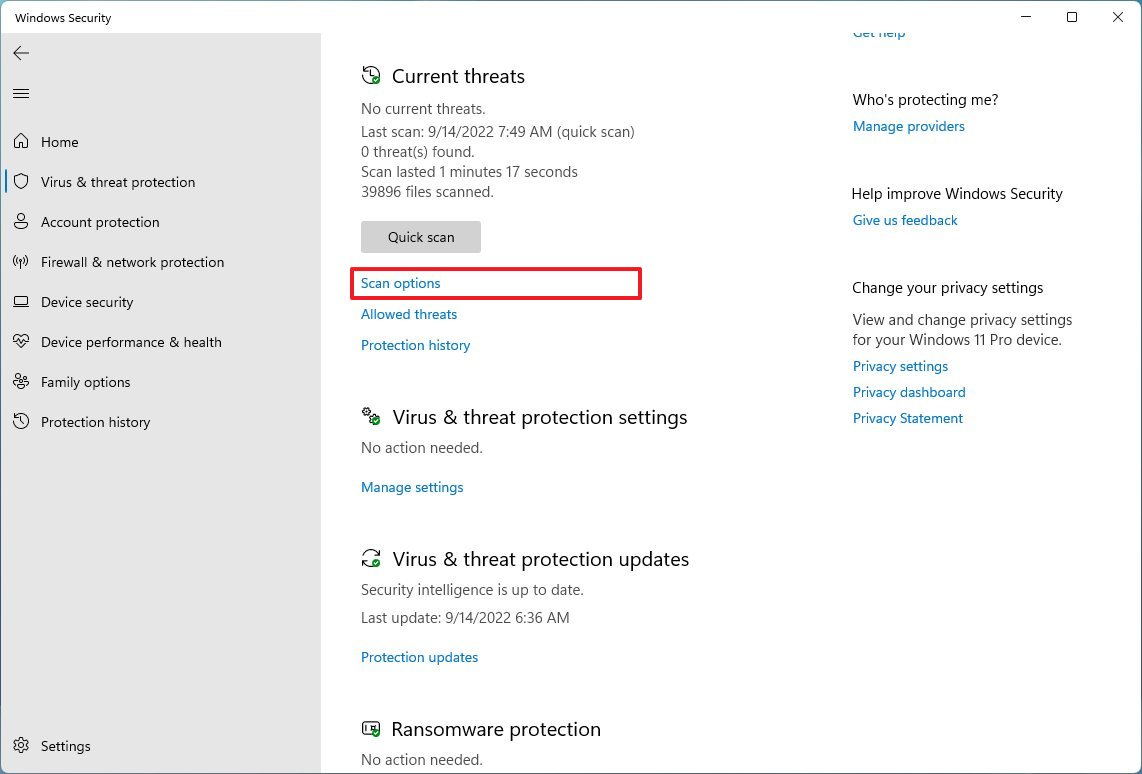
- Under the “Current threats” section, click on Scan options.
- Select the Quick scan option.
- Click the Scan now button.
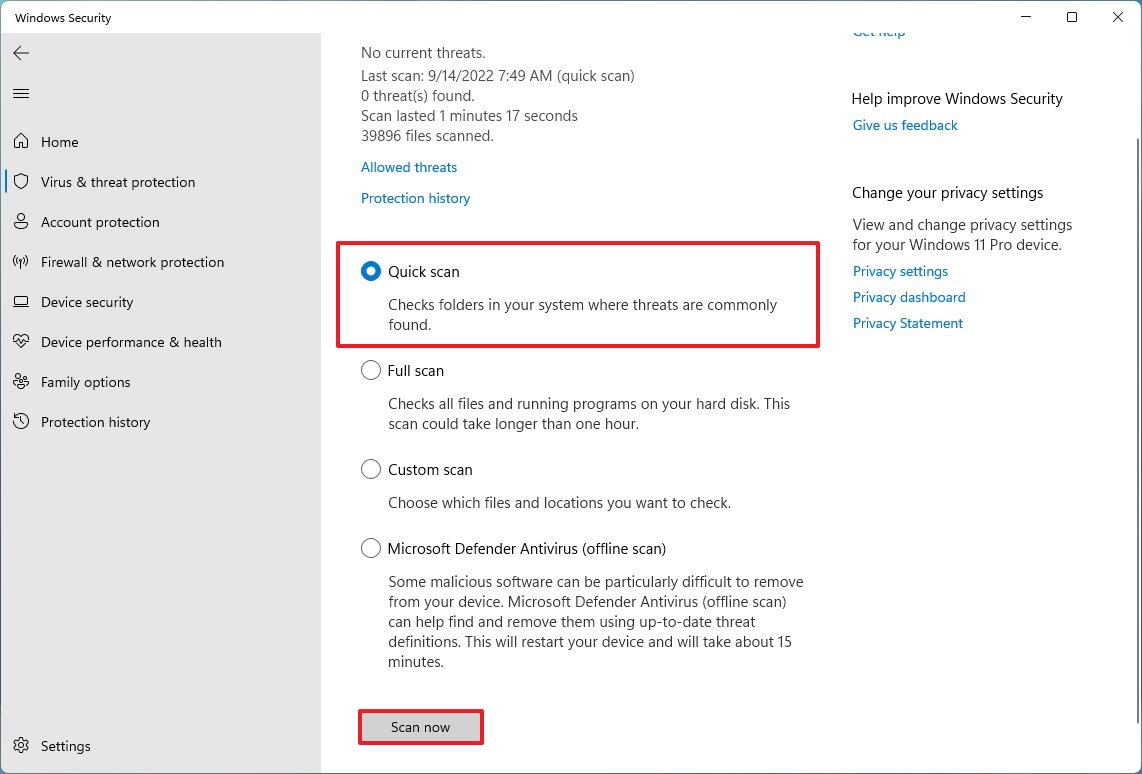
After you complete the steps, on the main page, under the “Current threats” section, you will be able to review if the antivirus was able to find any threats.
If you think the malware is still on the device, you should perform a full virus scan.
Full Scan
A full scan takes the longest because, as the name implies, it scans all the locations on the hard drive.
To perform a full scan with the Defender Antivirus, use these steps:
- Open Start.
- Search for Windows Security and click the top result to open the app.
- Click on Virus & threat protection.
- Under the “Current threats” section, click on Scan options.

- Select the Full scan option.
- Click the Scan now button.
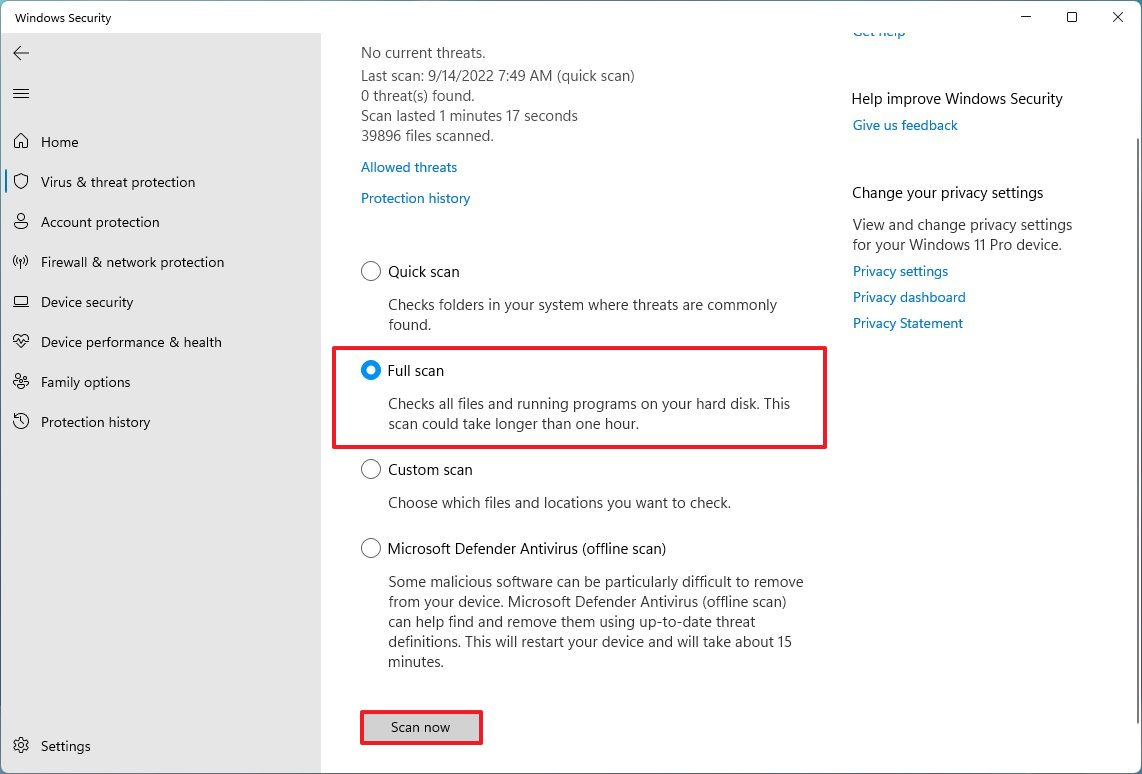
Once you complete the steps, the anti-malware will try to detect any virus that may have infected the system.
Custom Scan
A custom scan allows you to scan a particular section of the main drive or external storage. Usually, you would use this feature to scan an external USB drive, flash drive, or a specific file you downloaded from the internet.
To perform a custom scan with the Defender Antivirus, use these steps:
- Open Start.
- Search for Windows Security and click the top result to open the app.
- Click on Virus & threat protection.
- Under the “Current threats” section, click on Scan options.

- Select the Custom scan option.
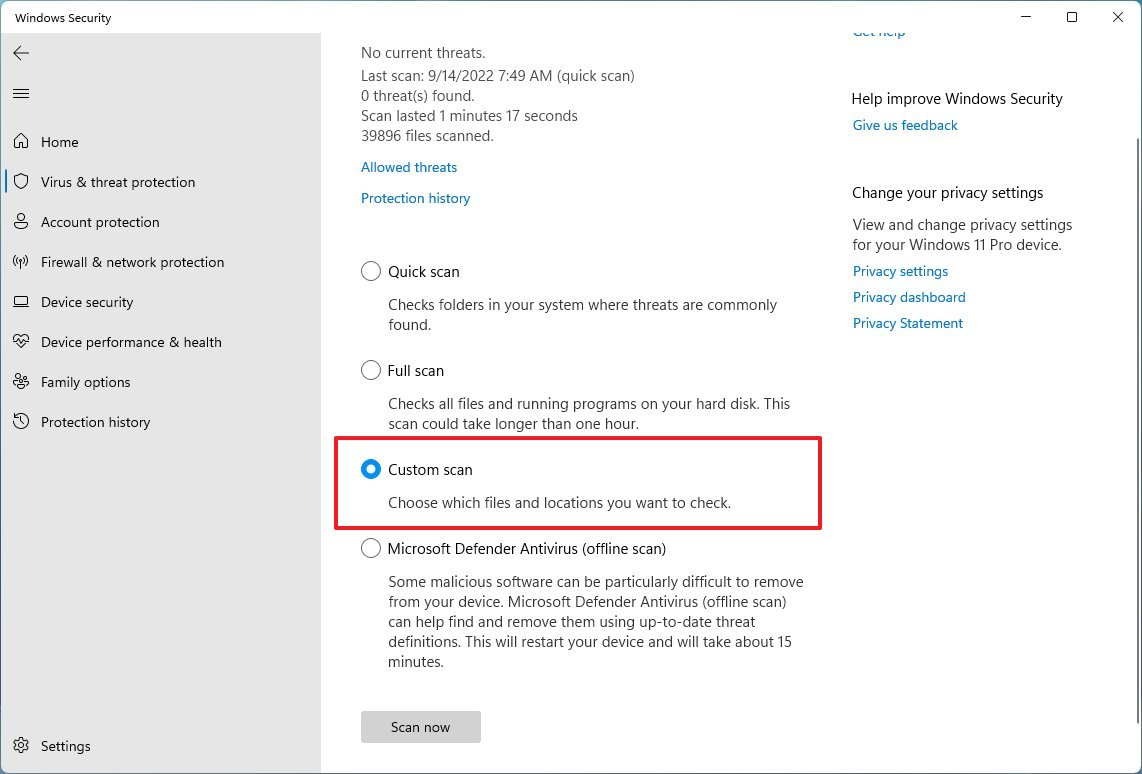
- Choose the folder or drive location.
- Click the Select Folder button.
After you complete the steps, the location specified location will be scanned for malware. Alternatively, you can also browse to the location, right-click the drive, folder, or file, click on “Show more options,” and choose the “Scan with Microsoft Defender” option.
How to exclude scan locations on Defender Antivirus
If you want to prevent the antivirus from scanning a particular folder or file, you also have an option to add and remove scanning locations.
To prevent the Microsoft Defender Antivirus from scanning specific locations, use these steps:
- Open Start.
- Search for Windows Security and click the top result to open the app.
- Click on Virus & threat protection.
- Under the “Virus & threat protection settings” section, click on Manage settings.
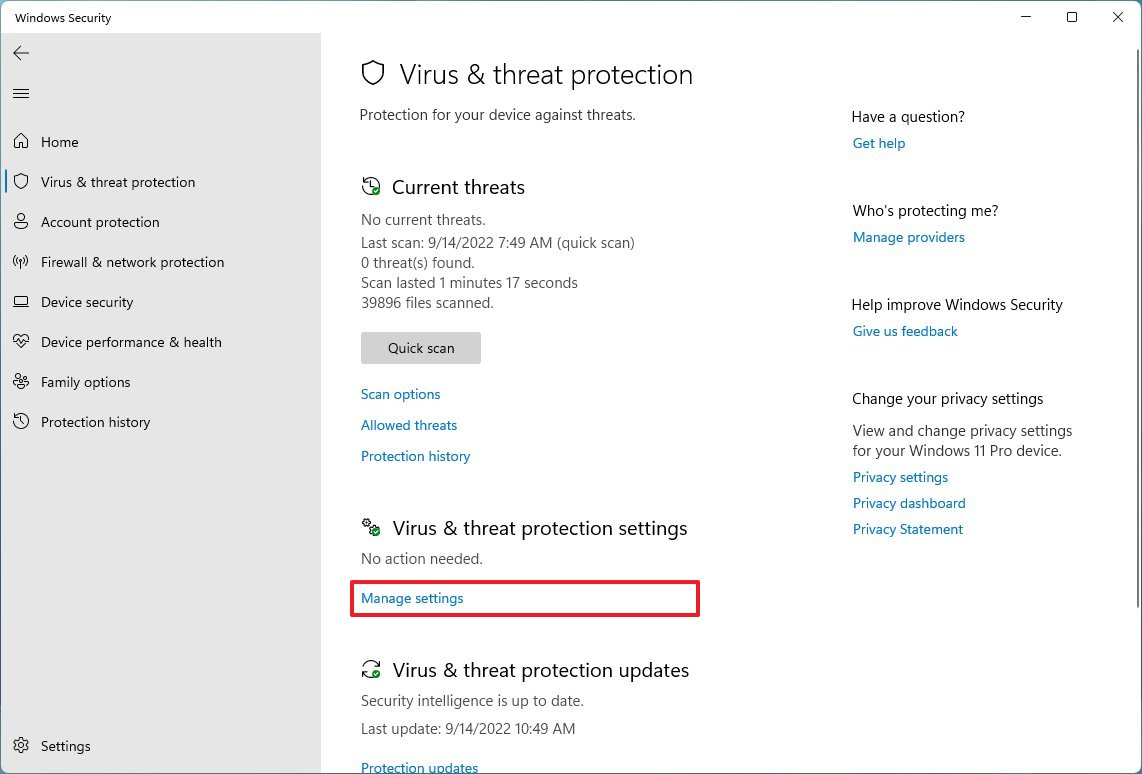
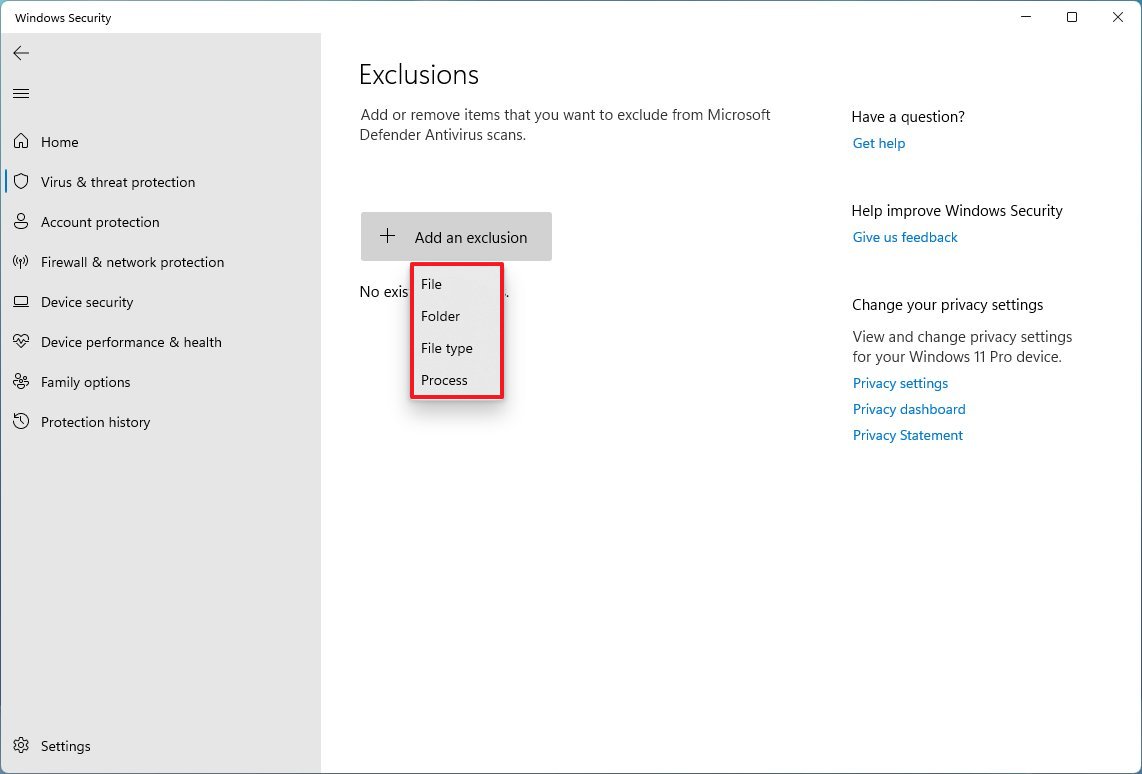
- Under the “Exclusion” section, click the Add or remove exclusions option.
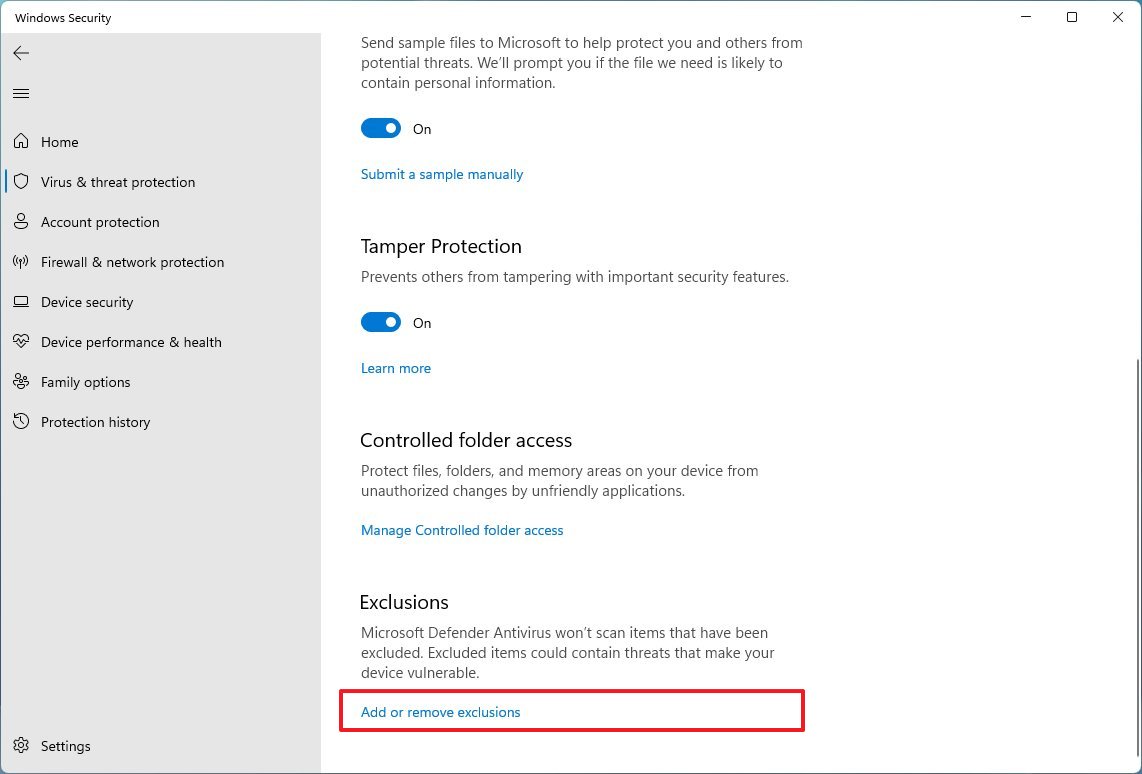
- Select the exclusion type:
- File.
- Folder.
- File type.
- Process.
- Select the folder location.
- Click the Select Folder button.
Once you complete the steps, the Defender Antivirus will not scan the location you specified. You may need to repeat the steps to add more exclusions.
How to perform offline malware scan on Defender Antivirus
On Windows 11, you may sometimes come across complex malware that the antivirus may not be able to remove while the system is running. In this case, you can perform an offline scan. When activating this feature, the computer will restart and go into the Windows Recovery Environment (WinRE) to perform a scan while the system is offline.
To perform an offline scan with the Defender Antivirus, use these steps:
- Open Start.
- Search for Windows Security and click the top result to open the app.
- Click on Virus & threat protection.
- Under the “Current threats” section, click on Scan options.

- Select the “Microsoft Defender Antivirus (offline scan)” option.
- Click the Scan now button.
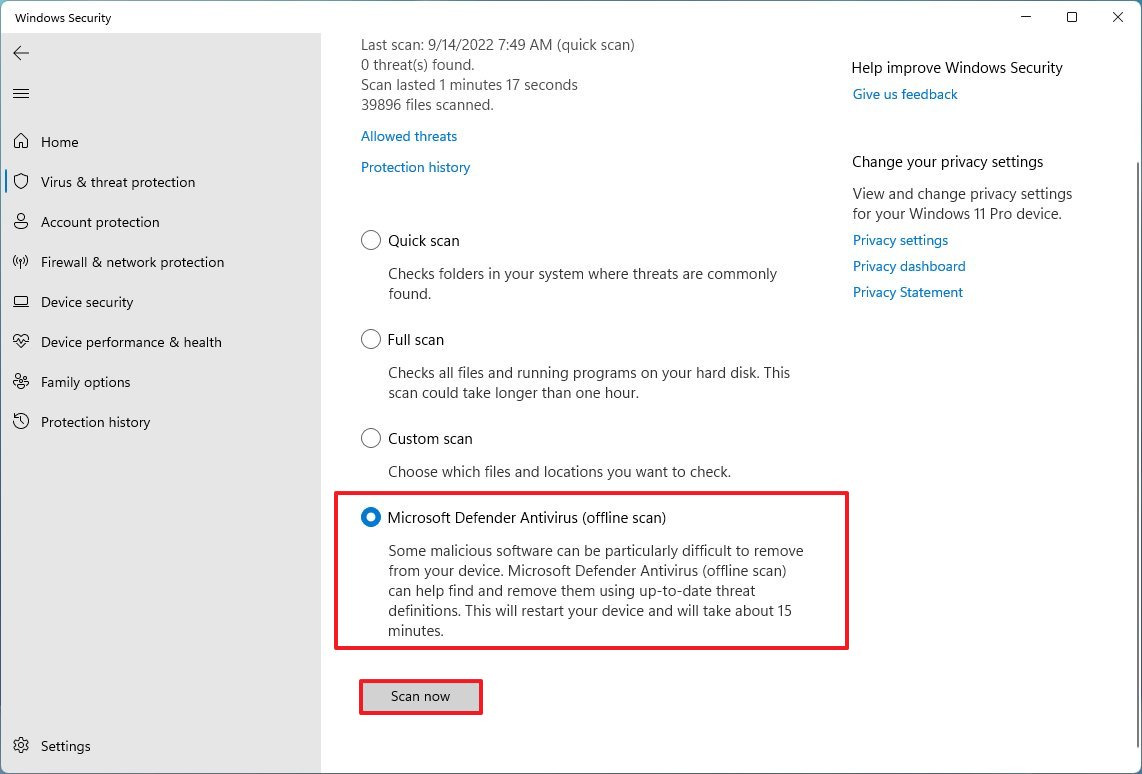
Once you complete the steps, the offline version of the antivirus will scan the device, and it will remove or quarantine any detection automatically.
After the scan is complete, the Microsoft Defender Antivirus will save the report, which you can review through the Windows Security app, and then the computer will restart automatically.
How to view scan malware history on Defender Antivirus
Whether you recently performed a virus scan or want to view recent protection actions, the Microsoft Defender Antivirus also includes a page where you can review the protection history and recommendations.
To view the protection history of the Microsoft Defender Antivirus, use these steps:
- Open Start.
- Search for Windows Security and click the top result to open the app.
- Click on Virus & threat protection.
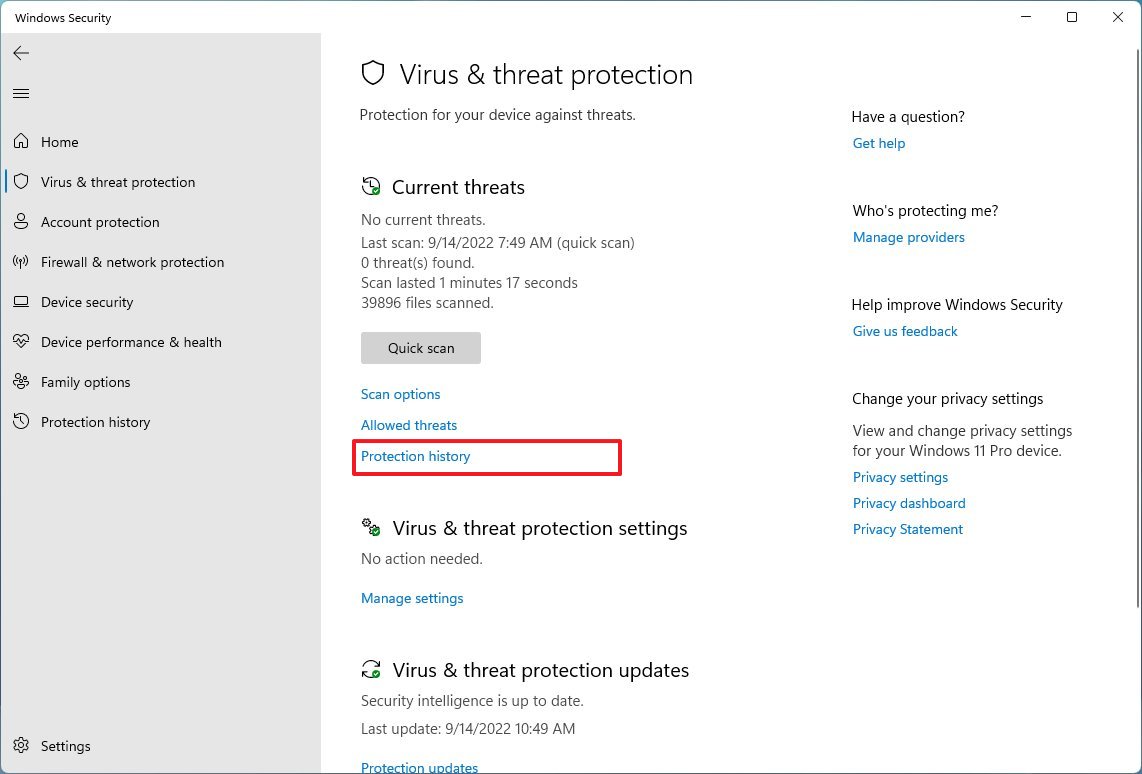
- Under the “Current threats” section, click the Protection history option.
- Click the “Filters” drop-down menu and select the history you want to review, including:
- Recommendations.
- Quarantined items.
- Cleaned items.
- Blocked actions.
- Severity.
- Select the item to view more information, including malware type, severity level, detection date, category, and information about the item’s location.
After you complete the steps, the page will show you a report of the protection history.
How to allow threats on Defender Antivirus
Sometimes, the antivirus may detect an application or file as a threat when you know it comes from a trusted source. If this happens, the application includes an option to allow the threat.
To allow a threat on the Defender Antivirus, use these steps:
- Open Start.
- Search for Windows Security and click the top result to open the app.
- Click on Virus & threat protection.
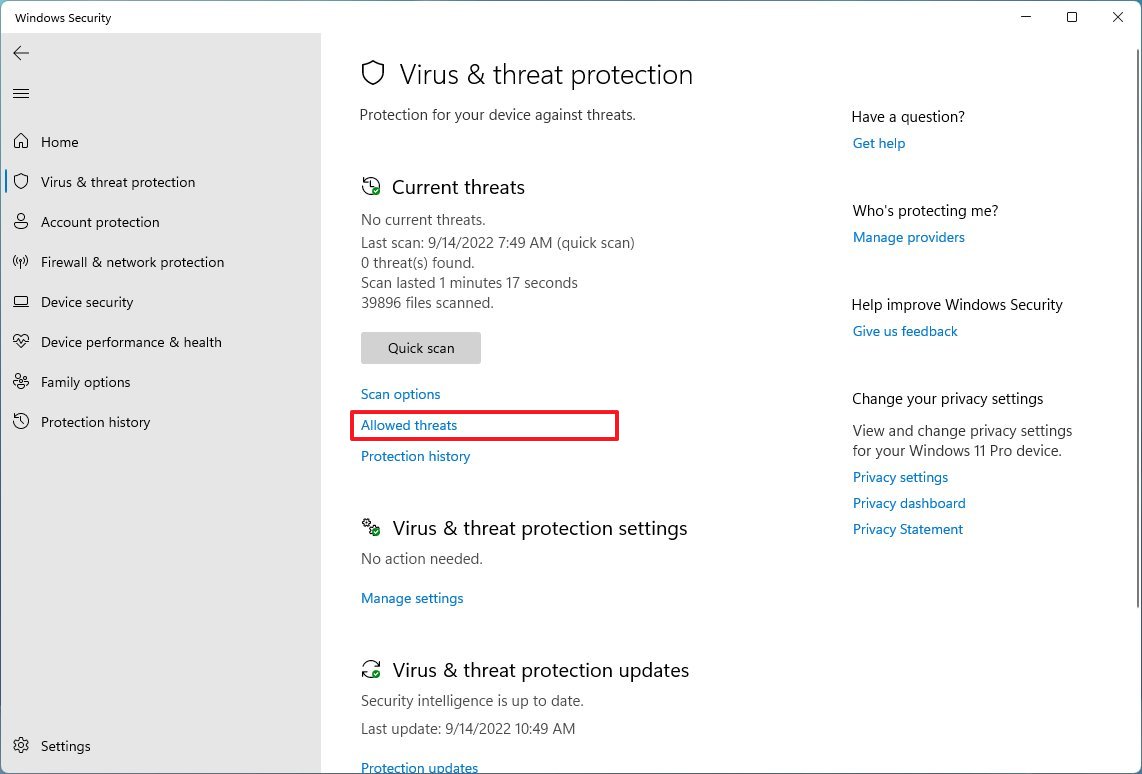
- Under the “Current threats” section, click the Allow threats option.
- Select the app or file you want to prevent the application from blocking.
- Check the Allow on the device option.
Once you complete the steps, the threat will be allowed on the device. You may also see the item under the “Current threats” section on the page of Microsoft Defender Antivirus.
How to temporarily disable Defender Antivirus
If the Microsoft Defender Antivirus is preventing the installation of an app or another action, you can temporarily disable the antivirus to complete the task.
To disable the Microsoft Defender Antivirus temporarily on Windows 11, use these steps:
- Open Start.
- Search for Windows Security and click the top result to open the app.
- Click on Virus & threat protection.
- Under the “Virus & threat protection settings” section, click the manage settings option.

- Turn off the Real-time protection toggle switch.
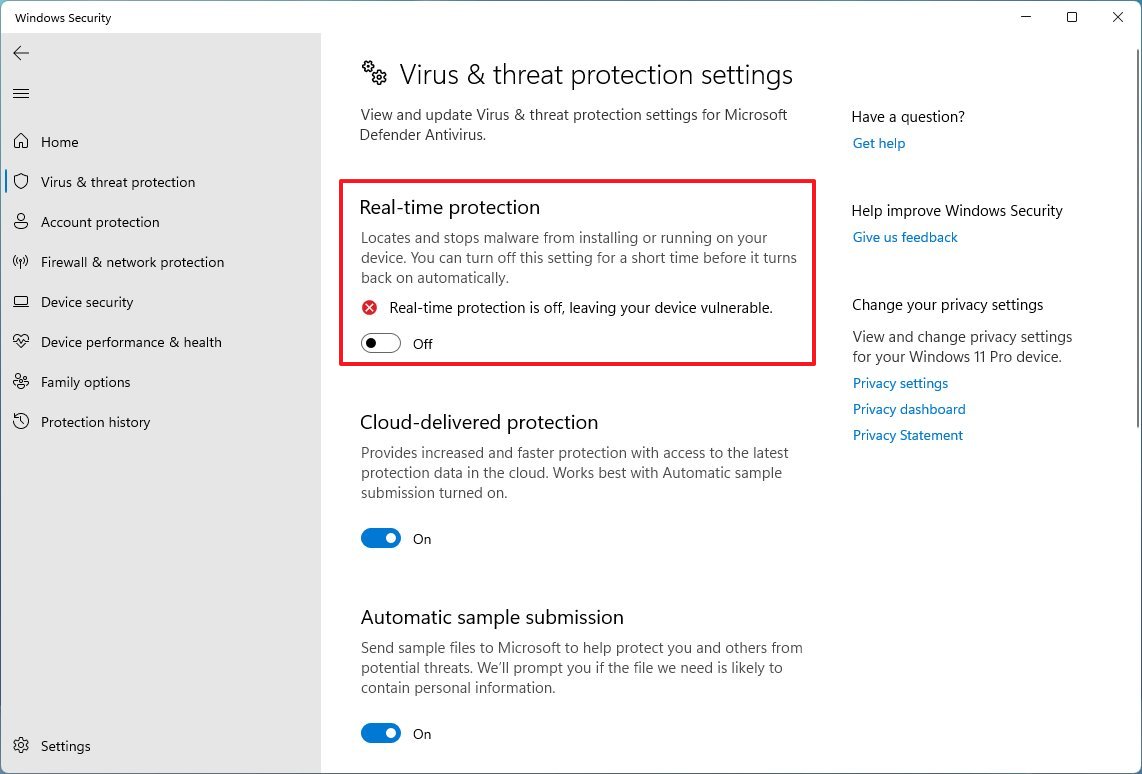
After you complete the steps, the antivirus will temporarily disable its protection to install apps or make specific system changes without conflicts.
Once the computer restarts, the antivirus will enable again automatically. Or you can use the same instructions outlined above, but in step 5, make sure to turn on the Real-time protection toggle switch.
If you want to permanently disable the Microsoft Defender Antivirus, you can refer to these instructions (opens in new tab).
How to enable ransomware protection on Defender Antivirus
Microsoft Defender Antivirus is a sophisticated anti-malware solution that includes ransomware protection known as “Controlled folder access.” When this feature is enabled, it monitors and protects your data against ransomware attacks and unwanted changes from malicious applications.
However, since this feature can cause false positives, it’s something that you must enable manually.
To enable Windows 11’s anti-ransomware feature, use these steps:
- Open Start.
- Search for Windows Security and click the top result to open the app.
- Click on Virus & threat protection.
- Under the “Virus & threat protection settings” section, click the Manage settings option.

- Under the “Controlled folder access” section, click the “Manage Controlled folder access” option.
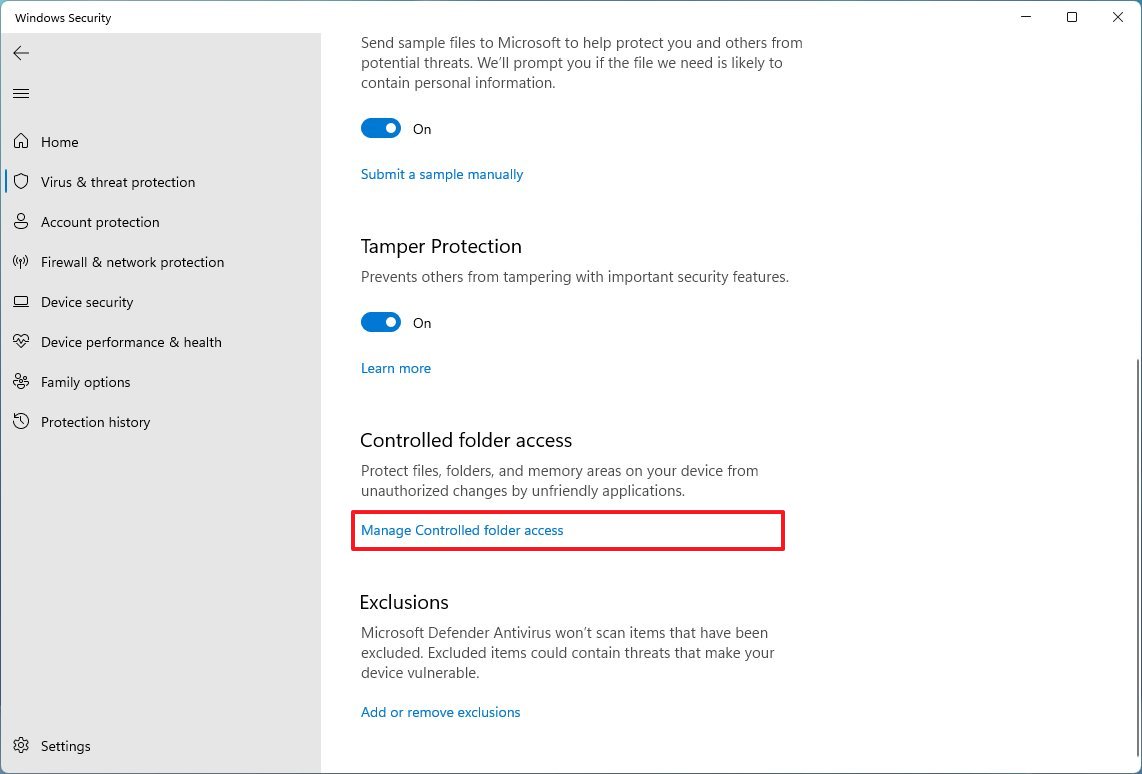
- Turn on the “Controlled folder access” toggle switch.
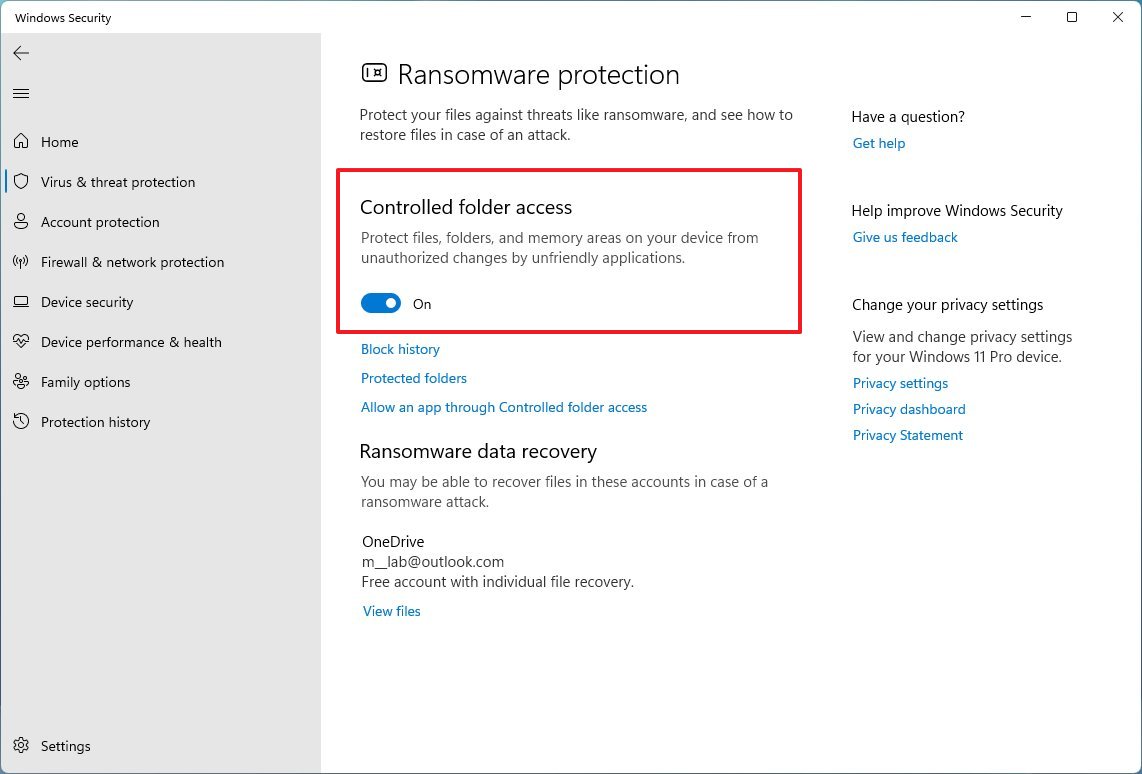
- Click the Block history option to access the “Protection history” page to view blocked folder access.
- (Optional) Click the Protected folders option to add (or remove) additional protected folders.
- (Optional) Click the Allow an app through Controlled folder access option to allow apps you trust to make changes on the protected folders.
After you complete the steps, the feature will monitor apps trying to make changes to files in the protected folders. If the app is flagged as malicious or unknown, Controlled folder access will block the attempt, and you’ll receive an activity alert.
In the event that your computer gets compromised, you may be able to recover the files from your OneDrive account (if previously configured).
How to disable tamper protection on Defender Antivirus
Tamper Protection is a feature part of the Microsoft Defender Antivirus that protects the Windows Security app from unwanted changes that are not made directly from the application.
Usually, you want to leave this feature enabled since it adds an extra layer of protection. However, if it’s causing problems when you have to manage settings from another app, Command Prompt, or PowerShell, you can disable it.
Turn disable tamper protection on the Microsoft Defender Antivirus, use these steps:
- Open Start.
- Search for Windows Security and click the top result to open the app.
- Click on Virus & threat protection.
- Under the “Virus & threat protection settings” section, click the Manage settings option.

- Turn off the Tamper Protection toggle switch.
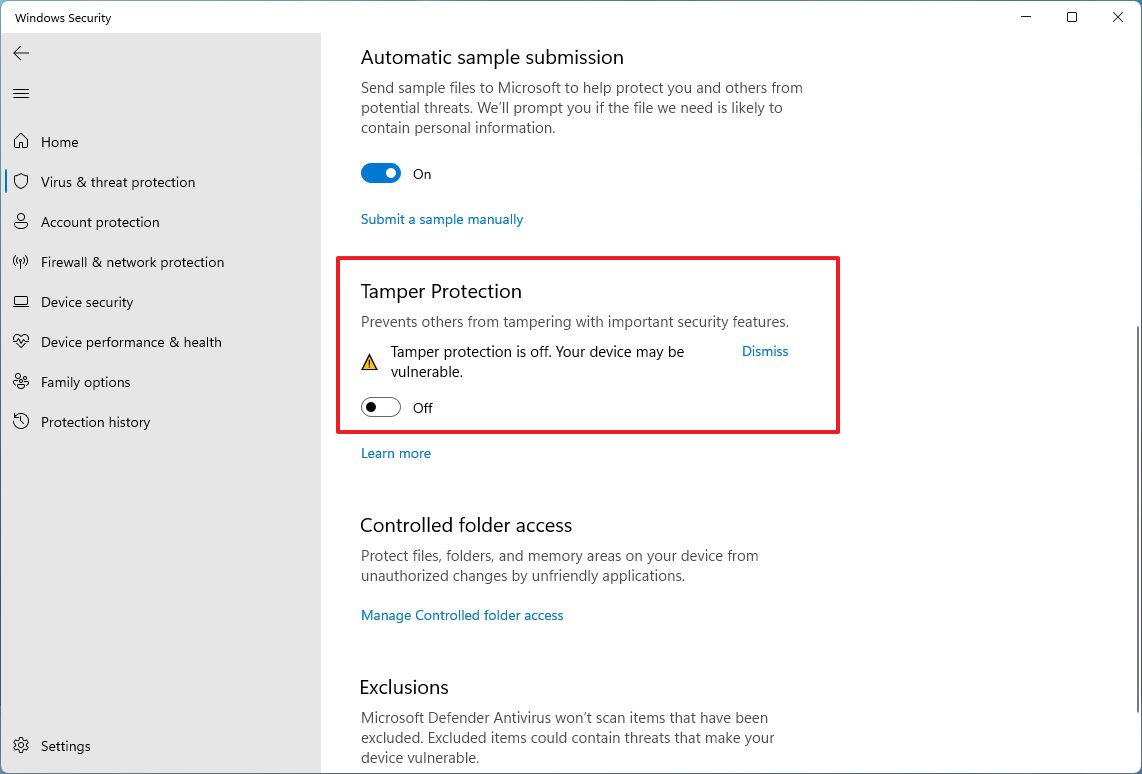
Once you complete the steps, the Tamper Protection feature will be disabled, allowing you to make setting changes from another application.
If you no longer need to change settings, it’s best to enable the feature again. You can do this using the same instructions, but in step 5, turn on the Tamper Protection toggle switch.
How to enable periodic scanning on Defender Antivirus
Microsoft Defender Antivirus also has a “periodic scanning” feature that is only available if you have a third-party antivirus installed on your computer.
If you have a third-party antivirus, you can enable this feature to periodically scan and remove threats that other security applications may have missed.
In other words, if you have another antivirus, Microsoft Defender Antivirus can turn on periodically to perform another scan to ensure that the other antivirus you have hasn’t missed anything.
To enable periodic scanning on Windows 11, use these steps:
- Open Start.
- Search for Windows Security and click the top result to open the app.
- Click on Virus & threat protection.
- Click the Microsoft Defender Antivirus options setting.
- Turn on the Periodic scanning toggle switch.
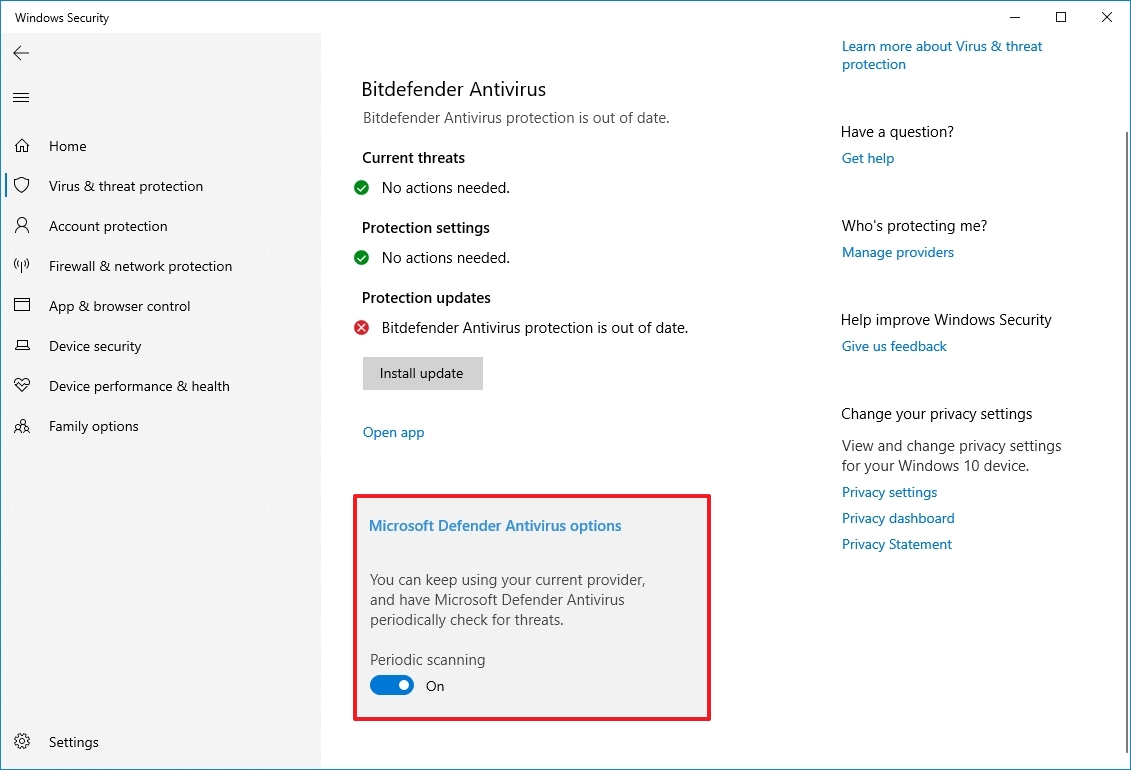
After you complete the steps, Microsoft Defender Antivirus will remain off to allow the third-party security software to monitor your system. However, periodically, it’ll turn on again to perform a secondary scan.
More resources
For more helpful articles, coverage, and answers to common questions about Windows 10 and Windows 11, visit the following resources:


