

Windows 11 comes with many options to manage power features to optimize energy consumption on your desktop computer to keep the electric bill low and battery life on your laptop to ensure you can get the most of a single charge.
For example, you can decide when the screen should turn off or when the computer should sleep to preserve power. You can use different power modes to optimize the device for performance or battery life. The battery saver mode can help make the most of the remaining charge when running low on battery. Windows 11 also comes with a new feature that lets you review battery usage to find the apps using the most power. You can enable hibernation to extend battery life, shut down the computer to preserve power without losing the current session, and more.
In this Windows 11 guide, we will walk you through the different ways you can manage the system power options.
How to change when screen should turn off on Windows 11
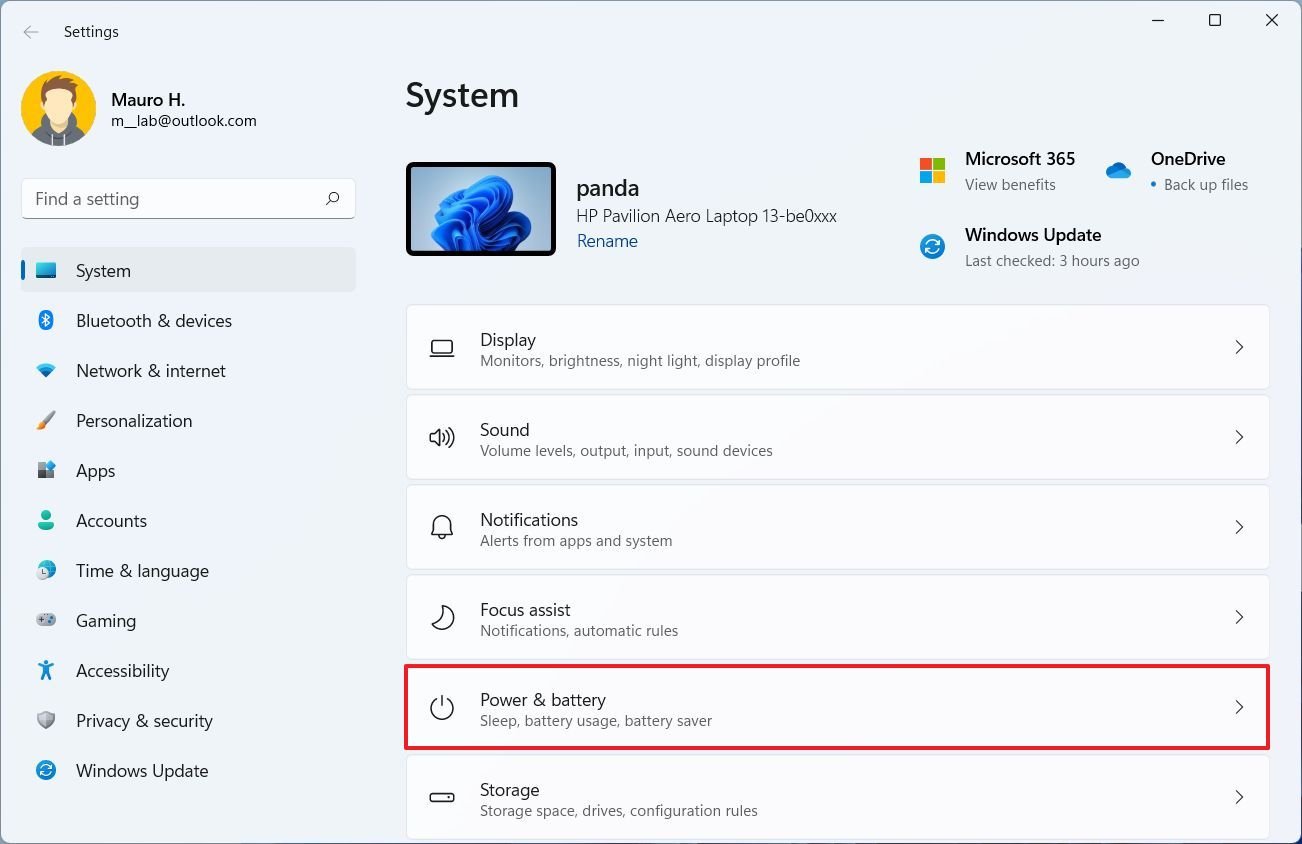
To change when the display should turn off automatically, use these steps:
- Open Settings.
- Click on System.
-
Click the Power & battery (or Power) page on the right side.

 Source: Windows Central
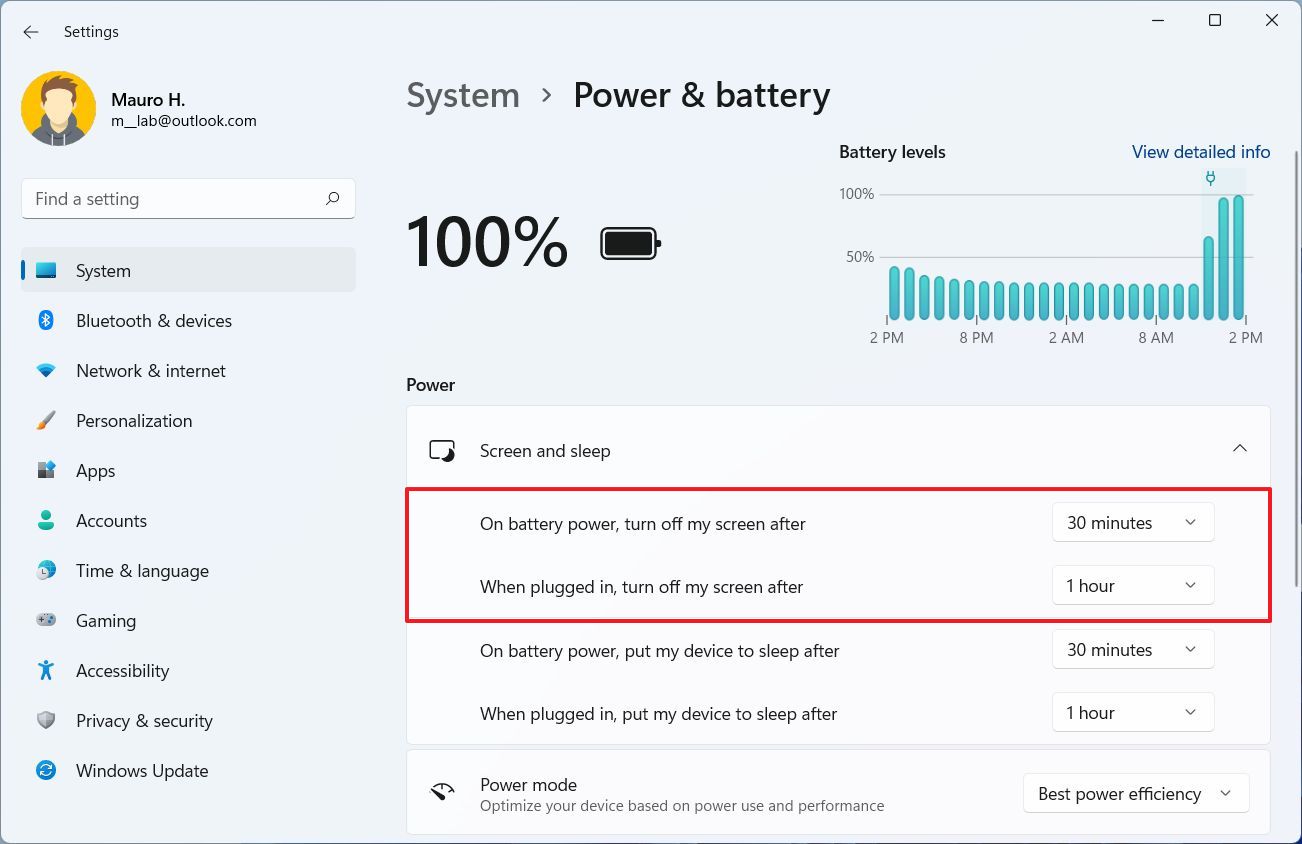
 - Under the “Power” section, click on Screen and sleep to open the settings.
-
Use the On battery power, turn off my screen after setting to decide when the display should turn off when running on battery.
 Source: Windows Central
 - Use the When plugged in, turn off my screen after setting to decide when the display should turn off when connected to a power outlet.
Once you complete the steps, the display will automatically turn off after the duration of inactivity that you specified.
How to change when computer should enter sleep mode on Windows 11
To change when the computer should enter sleep mode automatically, use these steps:
- Open Settings.
- Click on System.
-
Click the Power & battery (or Power) page on the right side.
Source: Windows Central - Under the “Power” section, click on Screen and sleep to open the settings.
-
Use the On battery power, put my device to sleep after setting to decide when the computer should go to sleep when running on battery.
 Source: Windows Central
 - Use the When plugged in, put my device to sleep after setting to decide when the computer should turn off when connected to a power outlet.
After you complete the steps, the laptop or desktop computer will go into sleep mode after the time of inactivity you specified.
How to change power modes on Windows 11
To change the default power mode on Windows 11, use these steps:
- Open Settings.
- Click on System.
-
Click the Power & battery (or Power) page on the right side.
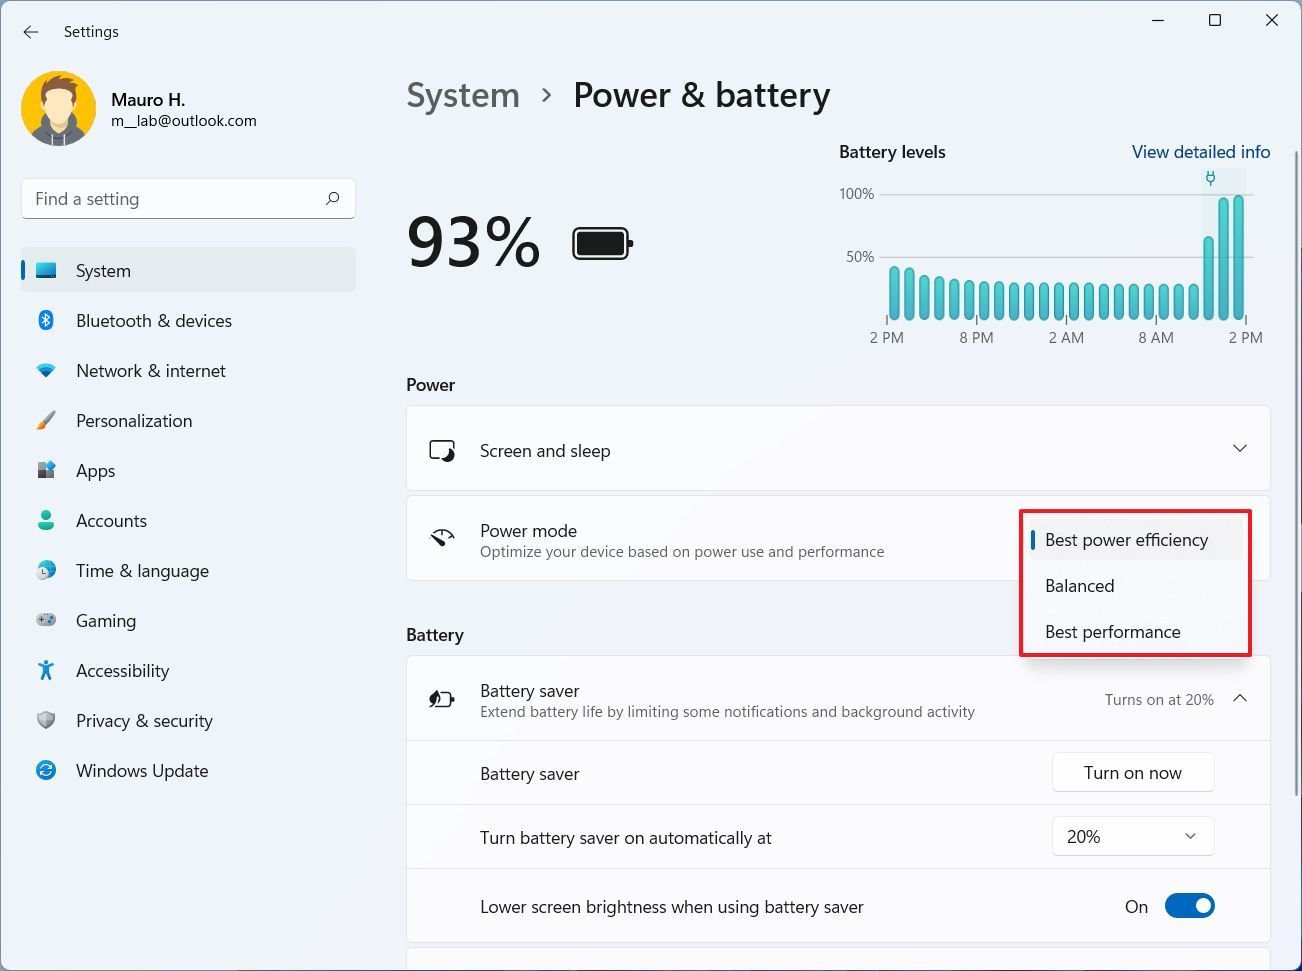
Source: Windows Central -
Use the Power mode setting and select the option that best suits your situation:
- Best power efficiency: Preserves the most energy, lowering system performance. This option will offer the most battery life if you use a laptop.
- Balanced: Windows 11 automatically balances energy and performance for an optimal experience.
- Best performance: Uses the most energy, increasing system performance.

 Source: Windows Central
Once you complete the steps, the new power mode will apply to the device.
How to enable battery saver on Windows 11
On laptops, you can enable the battery saver feature manually or automatically.
Turn on battery saver mode manually
To enable battery saver manually on Windows 11, use these steps:
- Open Settings.
- Click on System.
-
Click the Power & battery page on the right side.
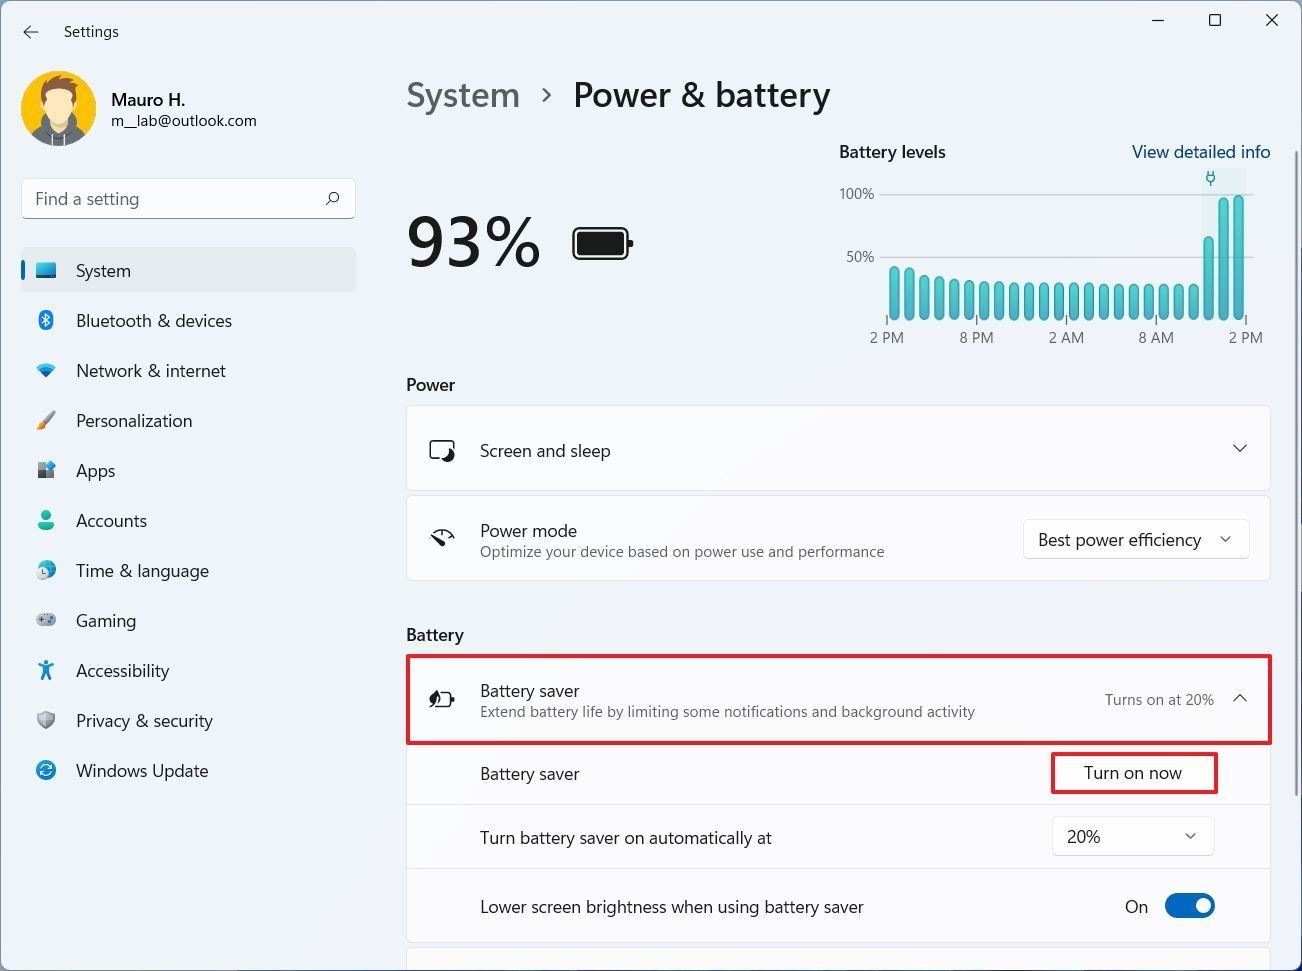
Source: Windows Central - Under the “Battery” section, click on Battery saver to open the settings.
-
Click the Turn on now button for the “Battery saver” setting.
 Source: Windows Central
After you complete the steps, the battery saver mode will immediately be enabled.
Turn on battery saver mode automatically
To configure the battery saver feature to turn on automatically, use these steps:
- Open Settings.
- Click on System.
-
Click the Power & battery page on the right side.
Source: Windows Central - Under the Battery section, click on Battery saver to open the settings.
-
Use the Turn battery saver on automatically at setting to decide what remaining capacity should Windows 11 enable battery saver mode.
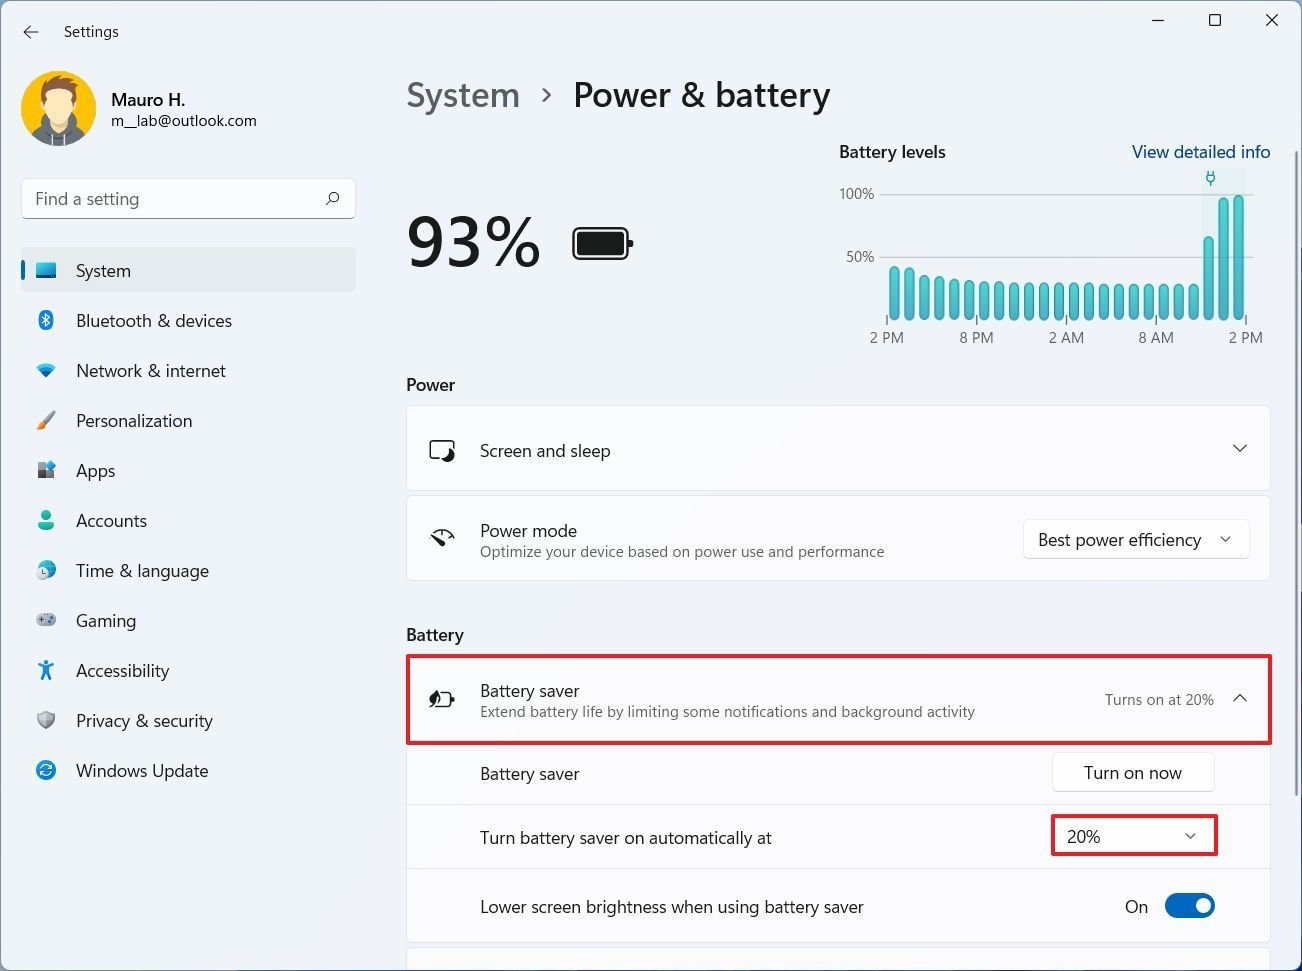 Source: Windows Central
Quick note: You also have the “Always” option to keep battery saver enabled all the time. Or you can use the “Never” option to disable the feature.
-
(Optional) Turn on or off the Lower brightness when using the battery saver toggle switch.
Quick note: It’s recommended to keep this option turned on as brighter screens tend to affect battery life significantly.
Once you complete the steps, the battery saver mode will turn on automatically when the battery drops below the specified percentage.
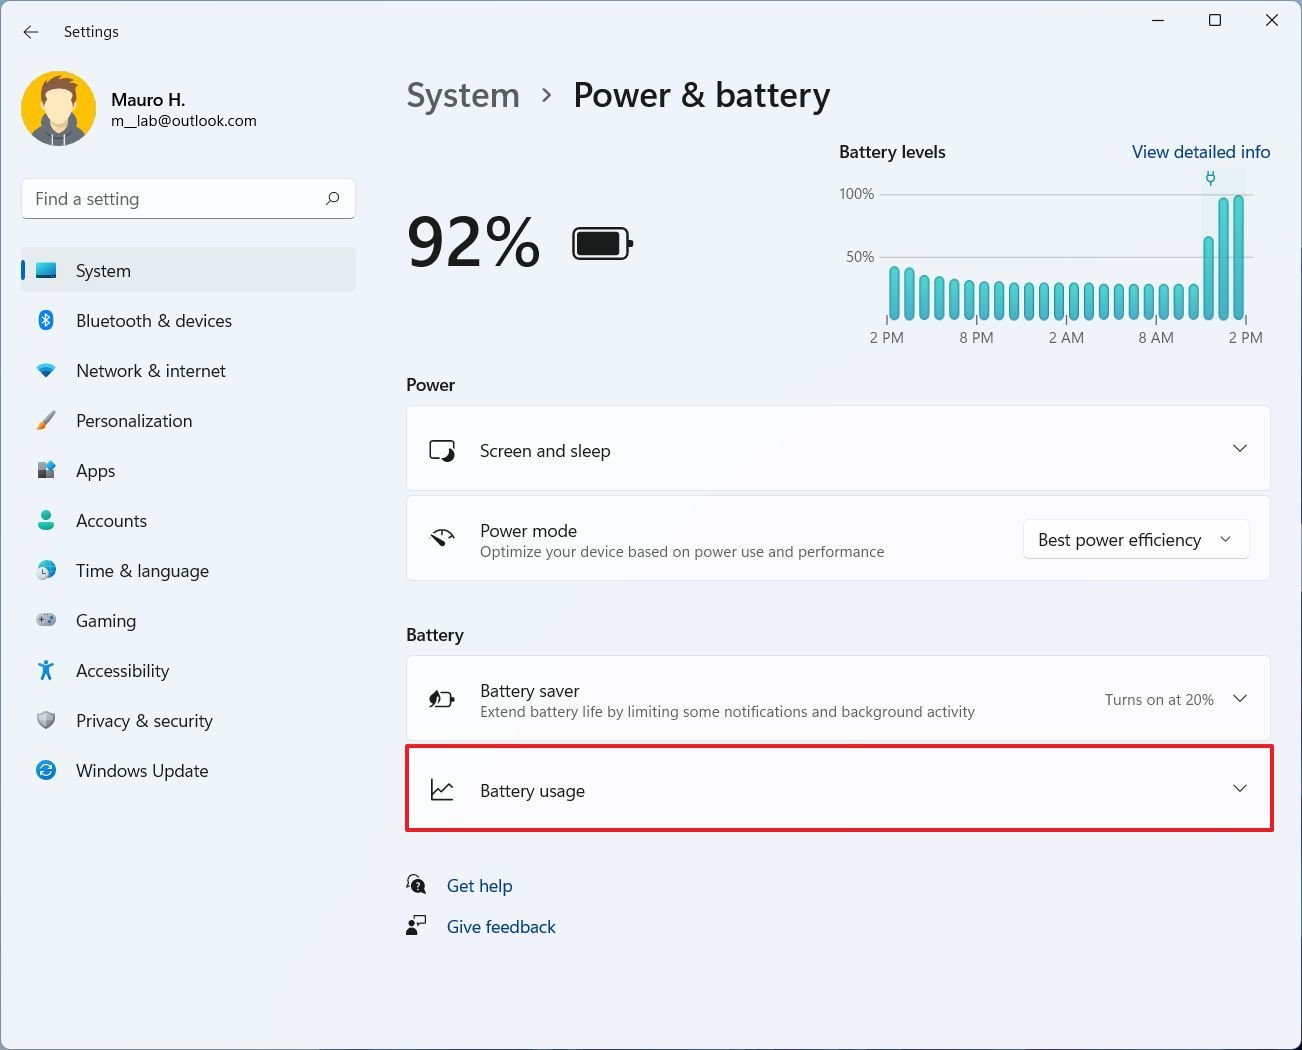
How to view battery usage on Windows 11
To view the battery usage history on Windows 11, use these steps:
- Open Settings.
- Click on System.
-
Click the Power & battery page on the right side.
Source: Windows Central -
Under the “Battery” section, click on Battery usage to open the settings.

 Source: Windows Central
While in this view, you can see the battery usage in the last 24 hours or the last seven days. If you choose the seven days option, you can select each to review the stats. If you choose the 24 hours view, you can check the battery usage per hour.
In addition to checking the levels over time, you would see three pieces of additional information, including how long the screen was on and off and how long the device was in sleep mode.
As part of this feature, you can also review battery usage per application, giving you a good idea of how apps are using the energy.
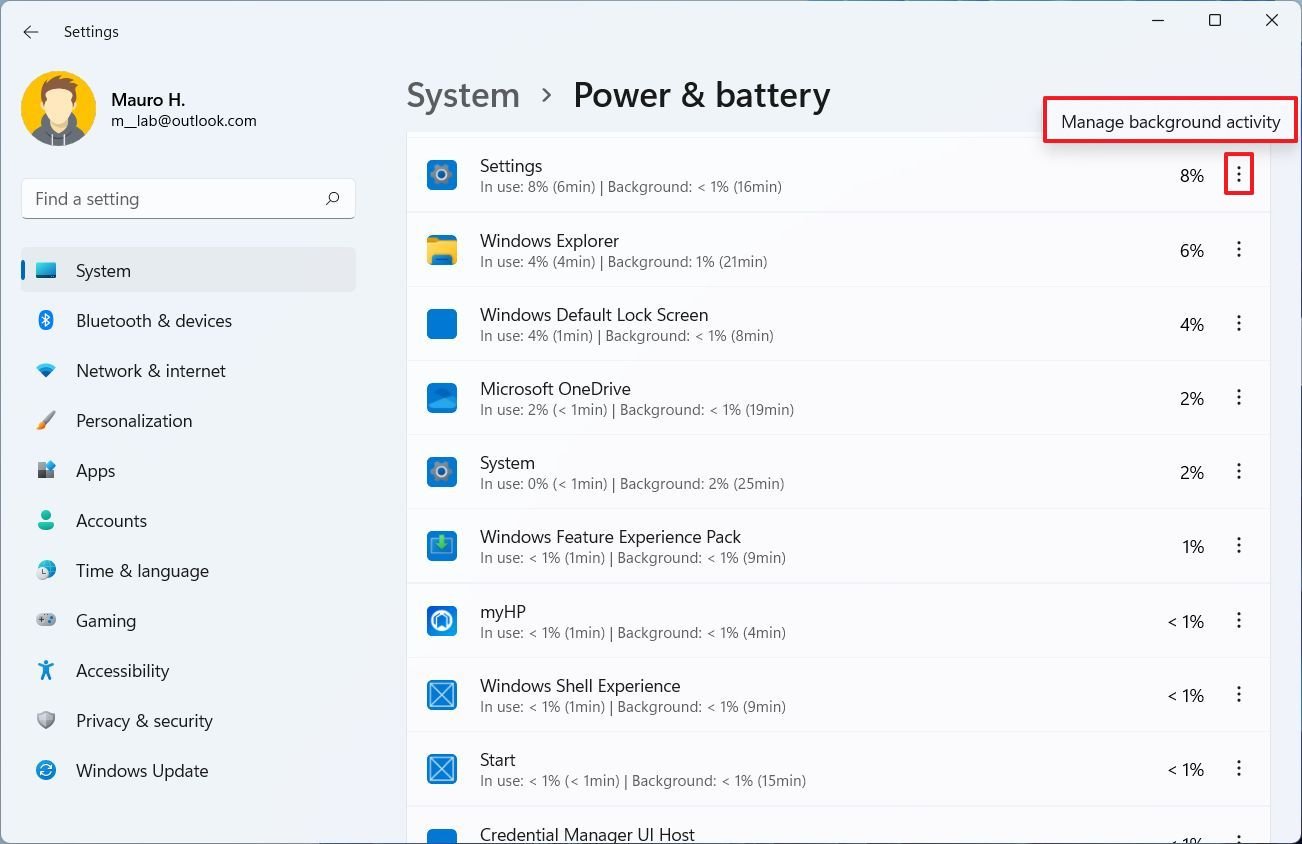
How to manage apps background activities on Windows 11
If you find an app consuming a lot of battery, you can change its settings to prevent it from running in the background to preserve battery life.
To change apps background activities on Windows 11, use these steps:
- Open Settings.
- Click on System.
-
Click the Power & battery page on the right side.
Source: Windows Central - Under the “Battery” section, click on Battery saver to open the settings.
- Click the Battery levels settings.
-
Select the app, click the menu (three-dotted) button, and select the Manage background activity option.
 Source: Windows Central
Quick note: You can only change the power settings for apps you acquired from the Microsoft Store. If you have a traditional desktop app, you will need to edit the power settings from the application (if applicable).
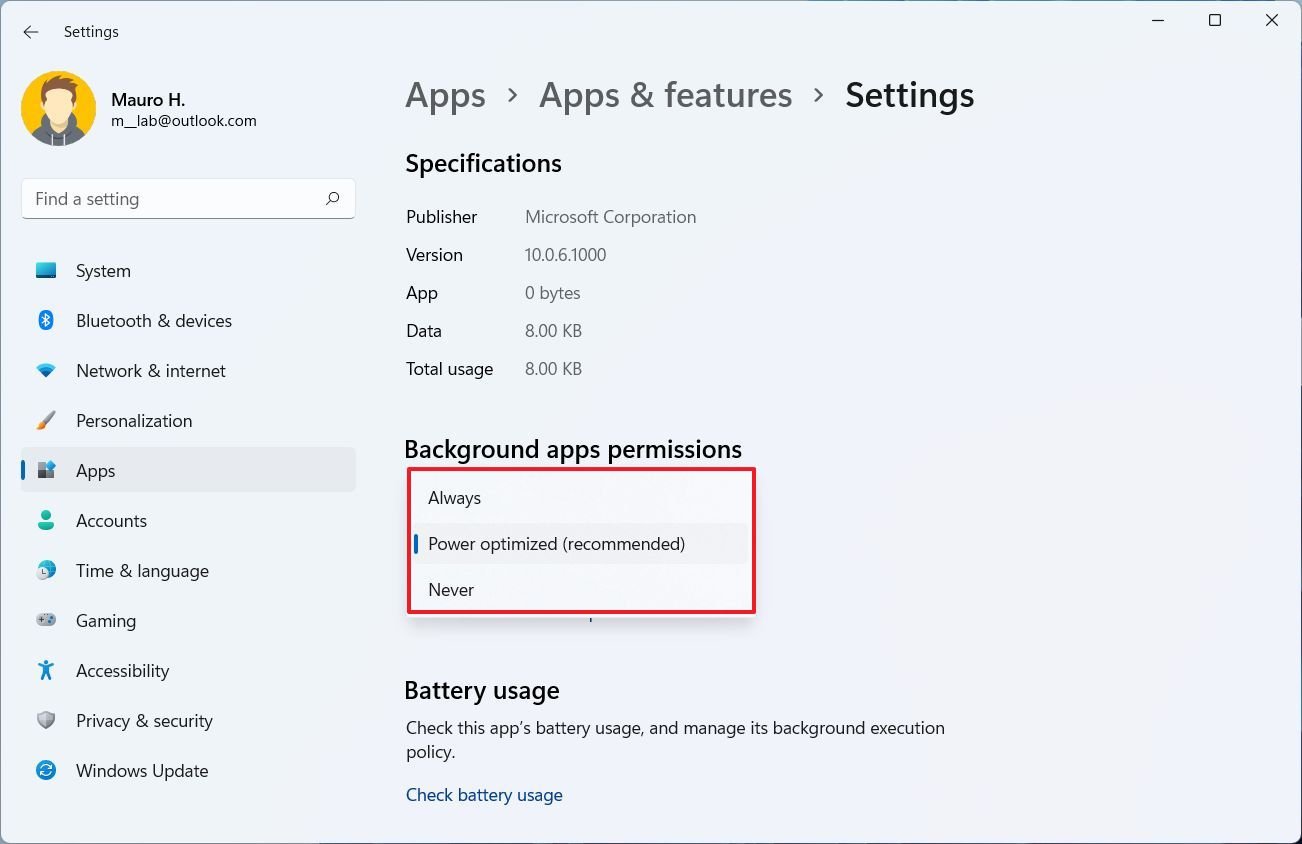
-
Under the “Background apps permissions” setting, choose how the app should run in the background:
- Always.
- Power optimized (recommended).
- Never.
 Source: Windows Central
Alternatively, you can go to Settings > Apps & features, select the app, click the menu (three-dotted) button, click on Advanced options, and then change the “Background apps permissions” setting.
How to enable hibernation on Windows 11
On Windows 11, hibernation is a feature that can help preserve battery life when you are not using the device. The feature works by saving the data in memory onto the hard drive, allowing you completely shut down and resume where you left off without wasting power.
When using hibernation, the resume process is slower than sleep, but it helps you conserve more battery.
Enable hibernation
To check and enable hibernation on Windows 11, use these steps:
- Open Start.
- Search for Command Prompt, right-click the top result, and select the Run as administrator option.
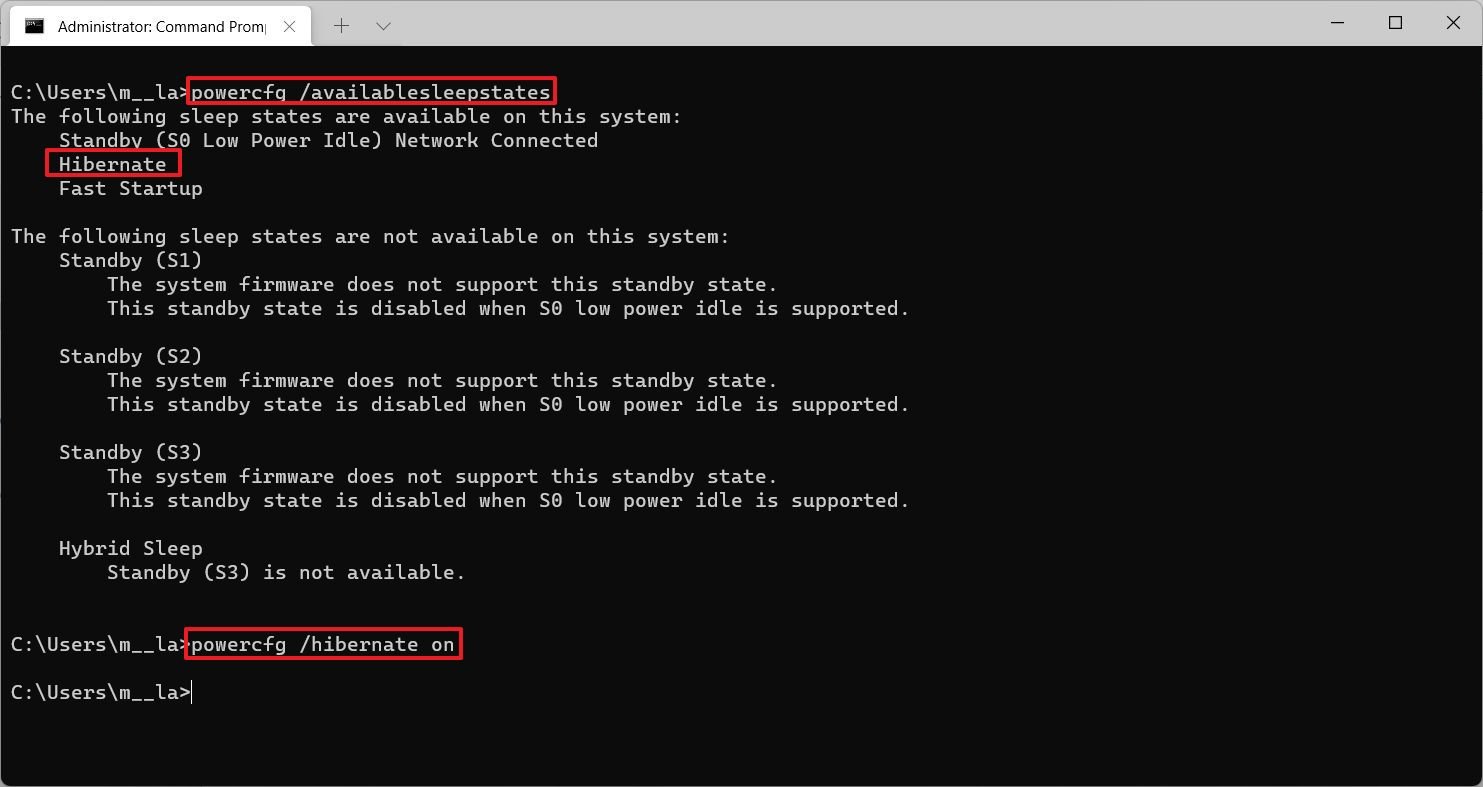
-
Type the following command to confirm the hibernation status and press Enter:
powercfg /availablesleepstates -
Under the “The following states are available on this system” section, if Hibernate appears, then the feature is enabled. If it’s not, continue with the steps below.
-
Type the following command to enable Windows 11 Hibernate feature and press Enter:
powercfg /hibernate on
 Source: Windows Central
Once you complete the steps, hibernation will be enabled on Windows 11.
If you can’t enable hibernation, the graphics card driver may not support the power state, which you could fix by updating to the latest video driver. Also, it could be that hibernation is supported, but it’s disabled on the Unified Extensible Firmware Interface (UEFI).
In the case that hybrid sleep is enabled, you will need to disable the feature before hibernation becomes available for the device. Also, it could be that the hardware doesn’t support hibernation. In this case, you won’t be able to use the feature.
Add hibernation option to Start
To enable the “Hibernate” option in the Power menu, use these steps:
- Open Start.
- Search for Control Panel and click the top result to open the app.
-
Click on Hardware and Sound.

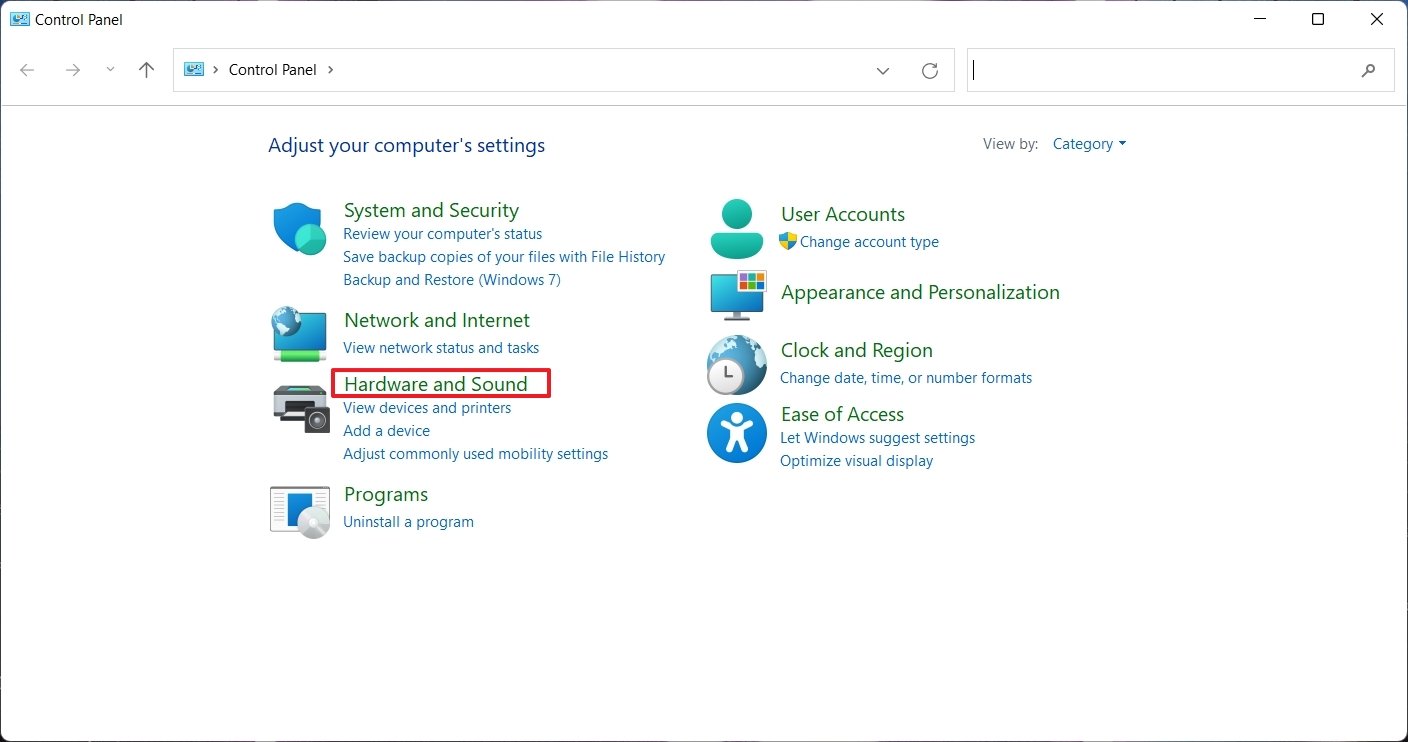 Source: Windows Central
 -
Click on Power Options.
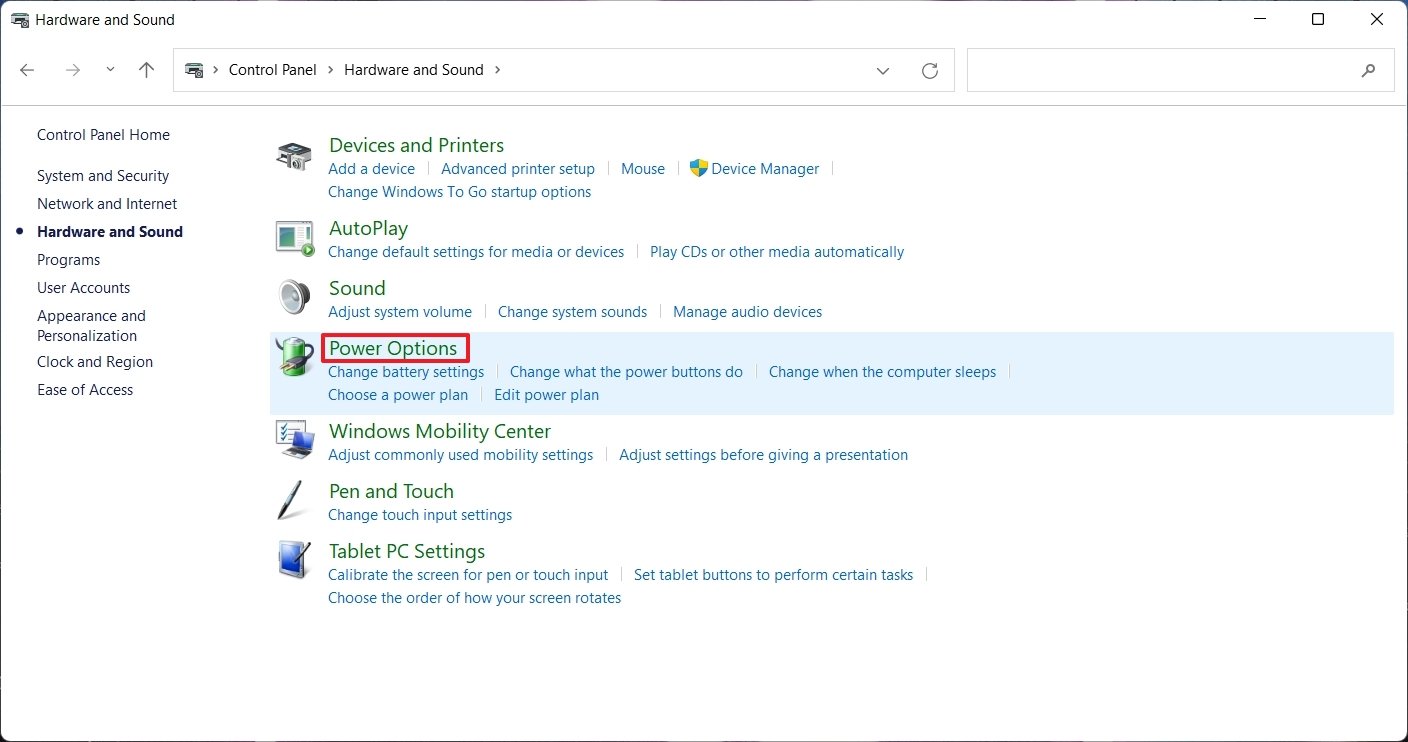 Source: Windows Central
 -
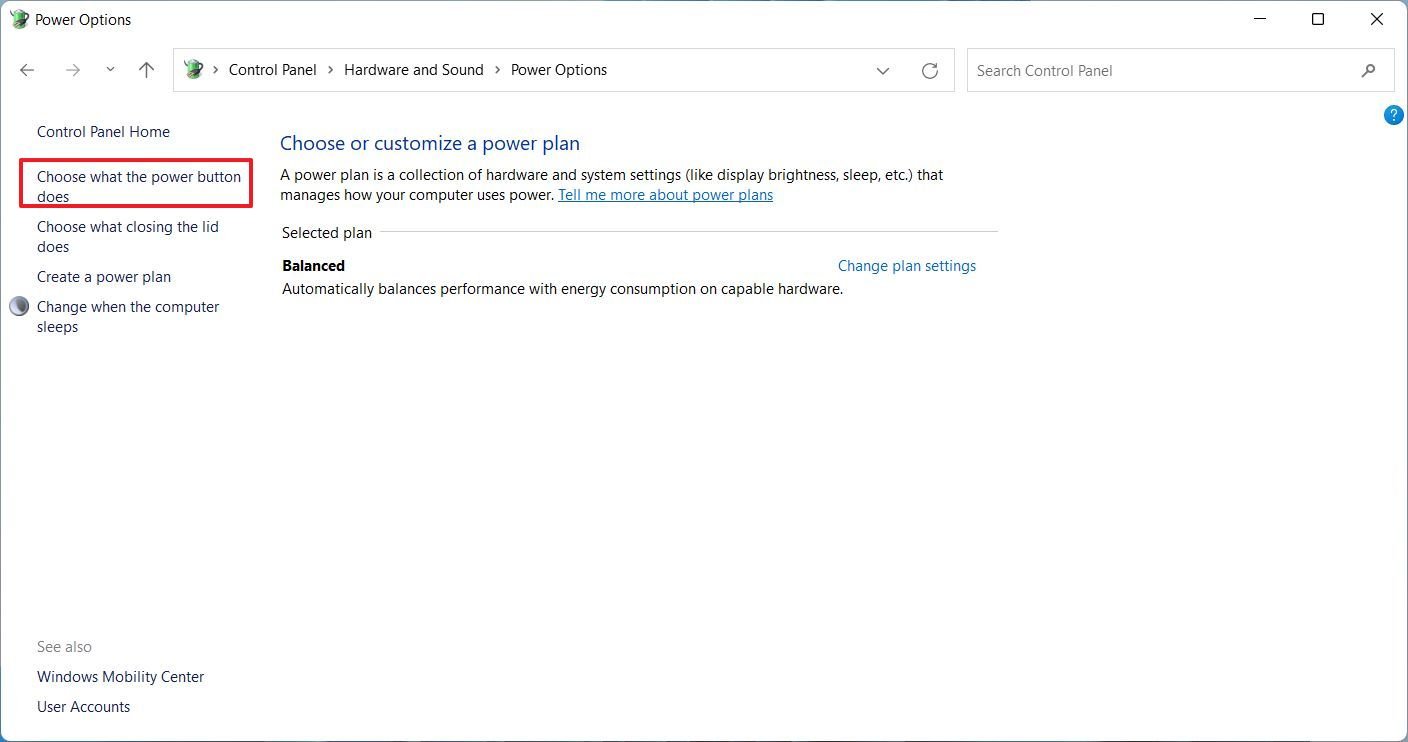
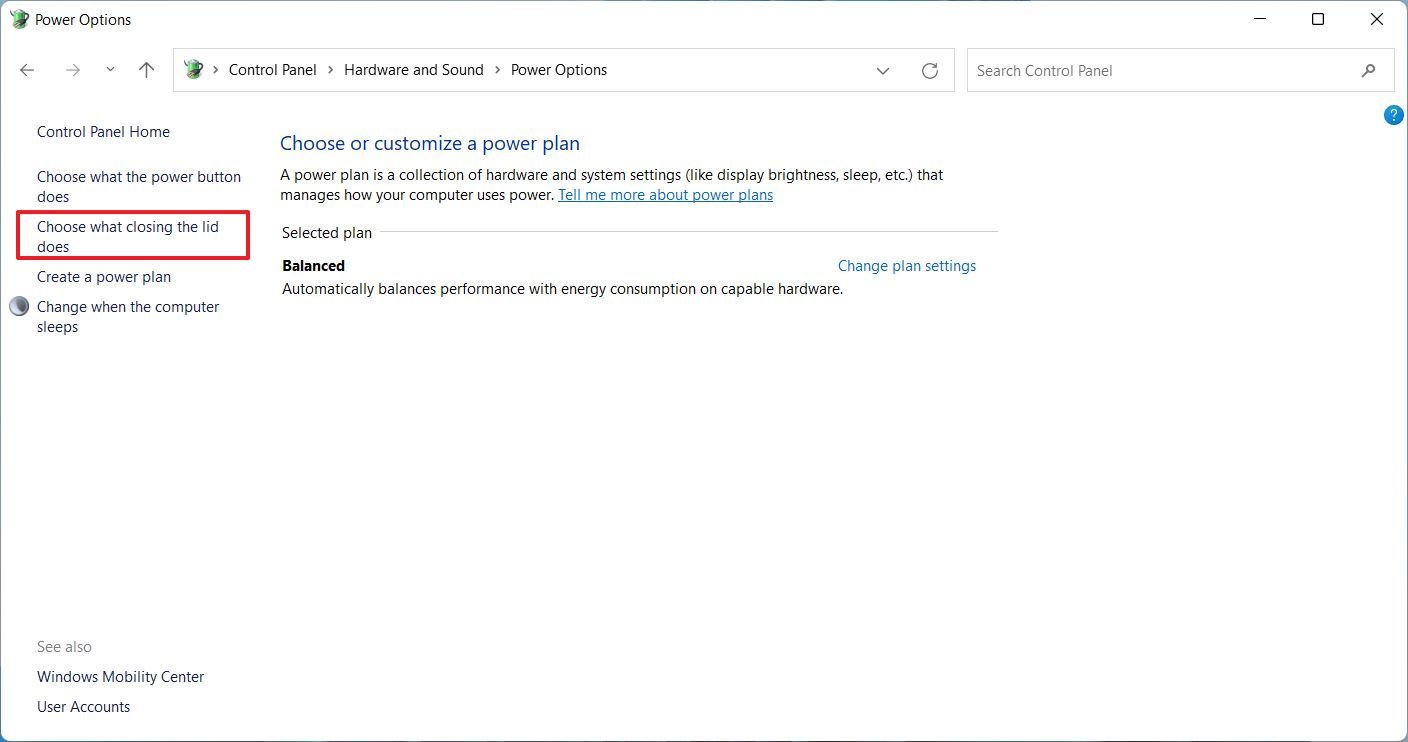
Click the Choose what closing the lid does option from the left pane.
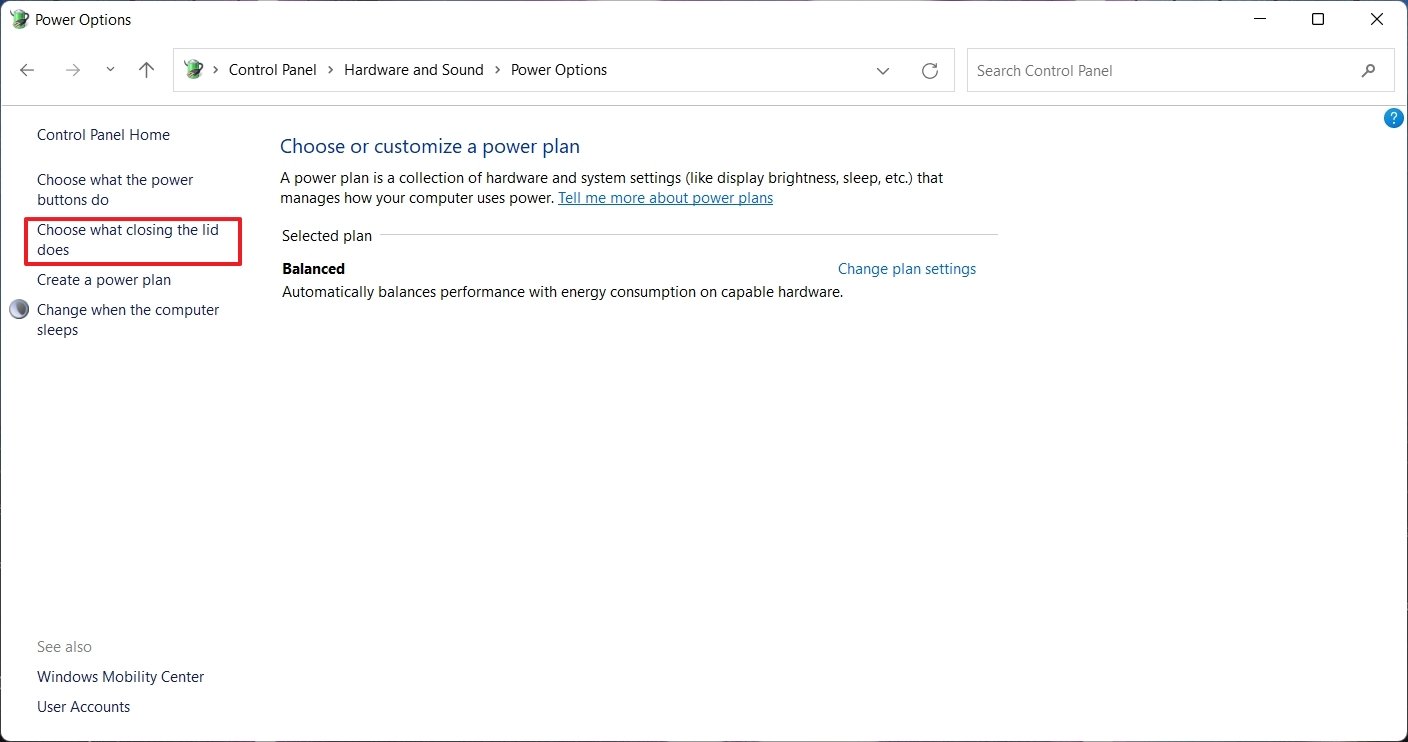 Source: Windows Central
Quick tip: If you’re using a desktop computer, you can select the Choose what the power buttons do option to get to the settings.
-
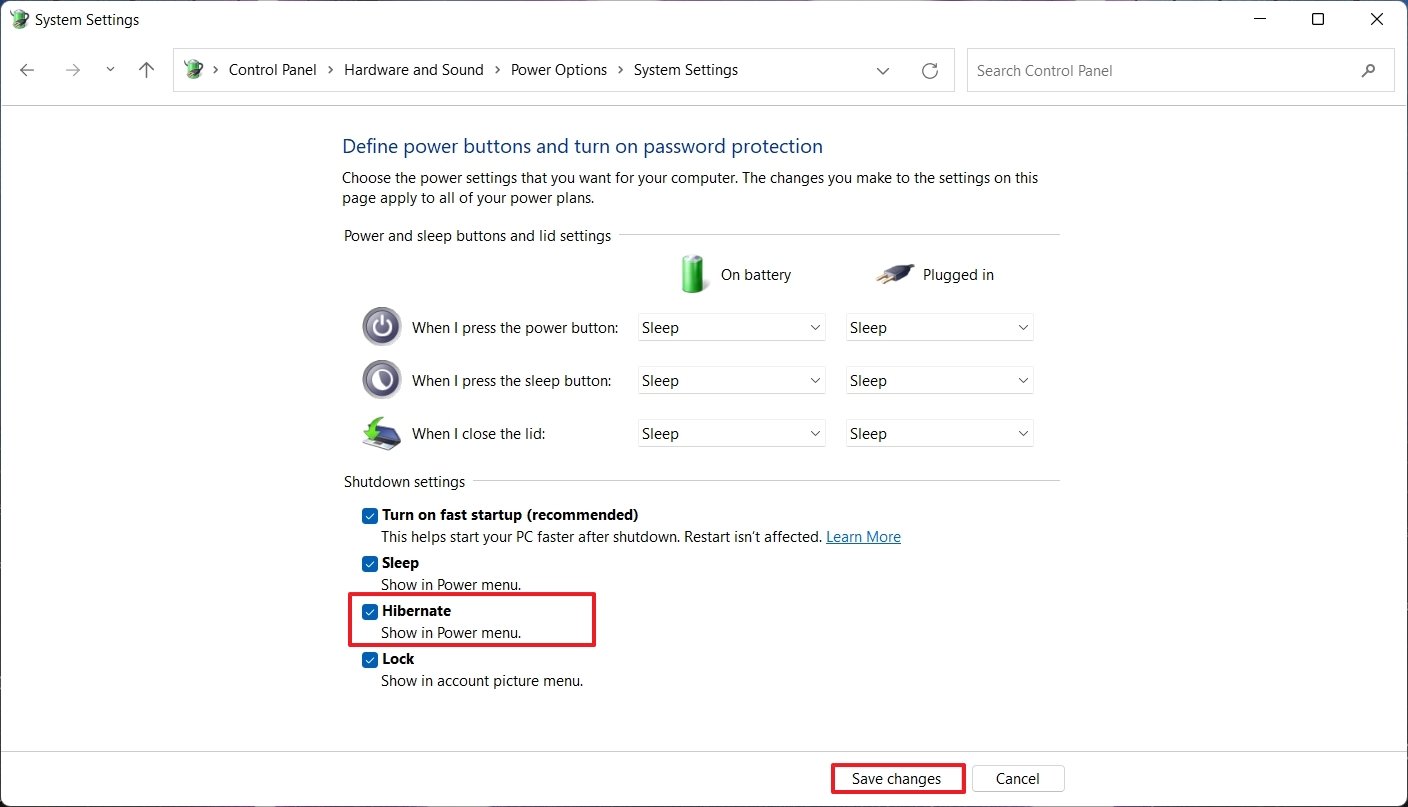
Click the Change settings that are currently unavailable option to modify the Shutdown settings.

 Source: Windows Central
 -
Check the Hibernate option.
 Source: Windows Central
 - Click the Save changes button.
After you complete the steps, the “Hibernate” option will appear in the Start menu power options.
How to choose action when pressing power button on Windows 11
As part of the power option, it’s also possible to change the behavior of the power button to sleep, hibernate, or shut down when pressed.
To change the power button action on Windows 11, use these steps:
- Open Start.
- Search for Control Panel and click the top result to open the app.
-
Click on Hardware and Sound.
Source: Windows Central -
Click on Power Options.
Source: Windows Central -
Click the Choose what the power button does option from the left pane.
 Source: Windows Central
 -
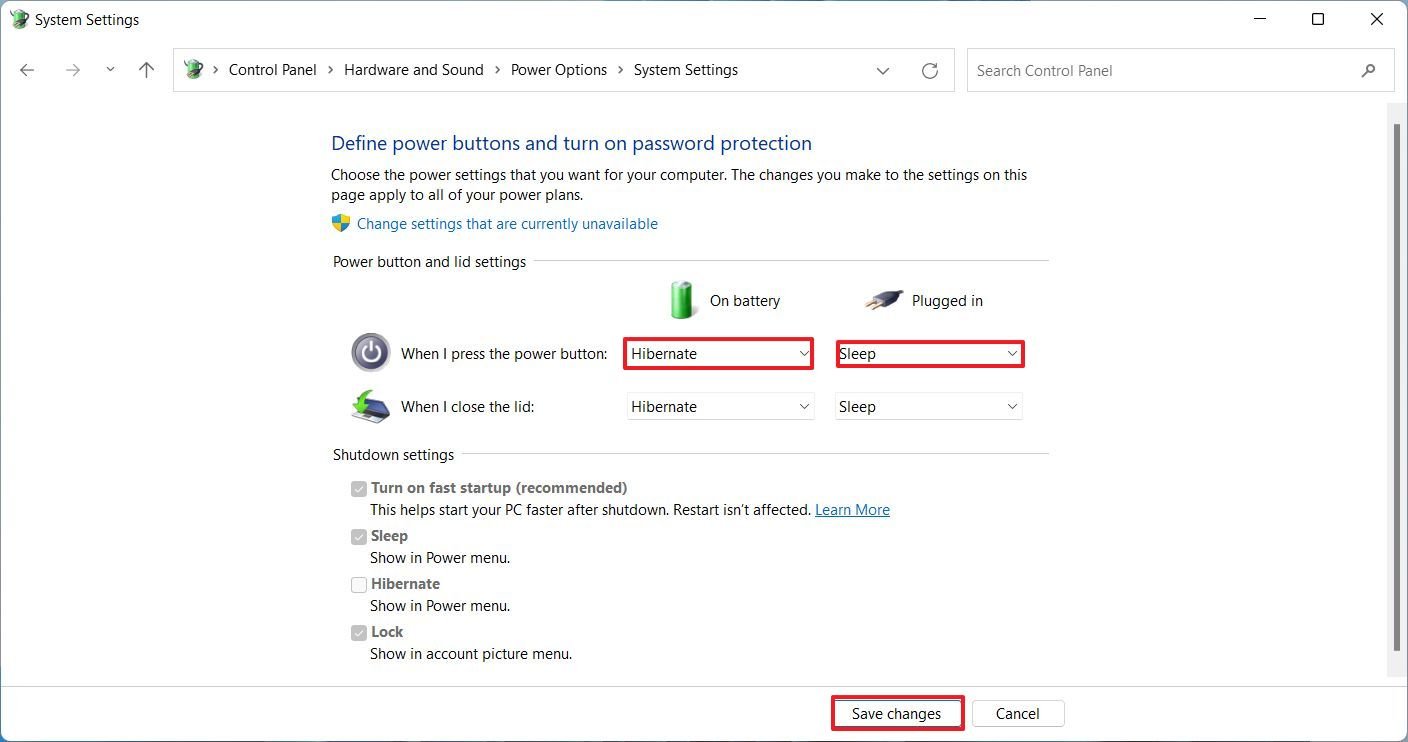
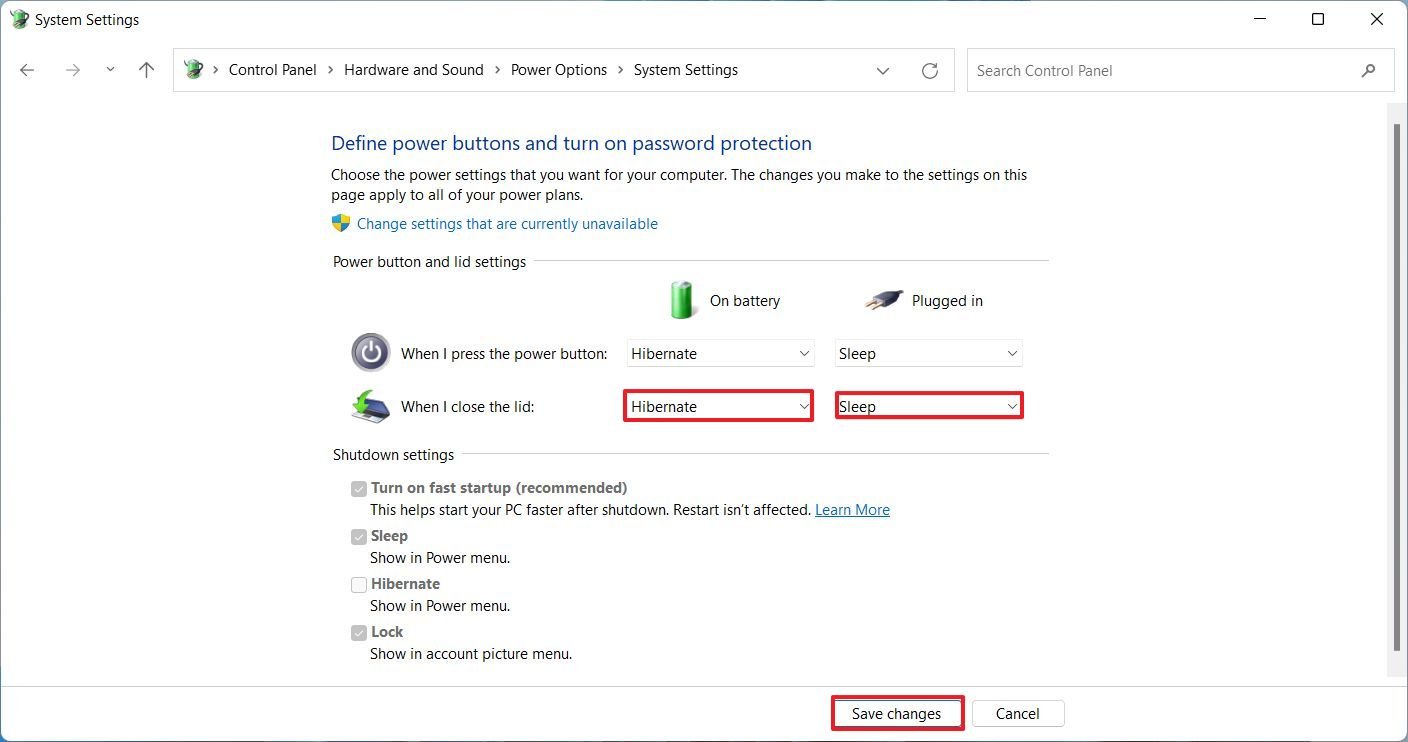
Under the “Power button and lid settings” section, use the When I press the power button option for “On battery” and “Plugged in”:
- Do nothing.
- Sleep.
- Hibernate.
- Shut down.
 Source: Windows Central
 - Click the Save changes button.
Once you complete the steps, the power button will perform the specified action.
How to choose action when closing lid on Windows 11
To change the power action when closing the laptop lid on Windows 11, use these steps:
- Open Start.
- Search for Control Panel and click the top result to open the app.
-
Click on Hardware and Sound.
Source: Windows Central -
Click on Power Options.
Source: Windows Central -
Click the Choose what closing the lid does option from the left pane.
 Source: Windows Central
 -
Under the “Power button and lid settings” section, use the When I close the lid option for “On battery” and “Plugged in”:
- Do nothing.
- Sleep.
- Hibernate.
- Shut down.
 Source: Windows Central
 - Click the Save changes button.
After you complete the steps, when closing the laptop lid, the system will stay on, go to sleep or hibernate, or shut down, depending on your configuration.
How to show or hide Sleep power option in Start menu on Windows 11
To show or hide the sleep option in the power menu, use these steps:
- Open Start.
- Search for Control Panel and click the top result to open the app.
-
Click on Hardware and Sound.
Source: Windows Central -
Click on Power Options.
Source: Windows Central -
Click the Choose what closing the lid does or Choose what the power button does option from the left pane.
Source: Windows Central - Click the Change settings that are currently unavailable option.
-
Under the “Shutdown settings” section, check or clear the Sleep option to show or hide it from Start.
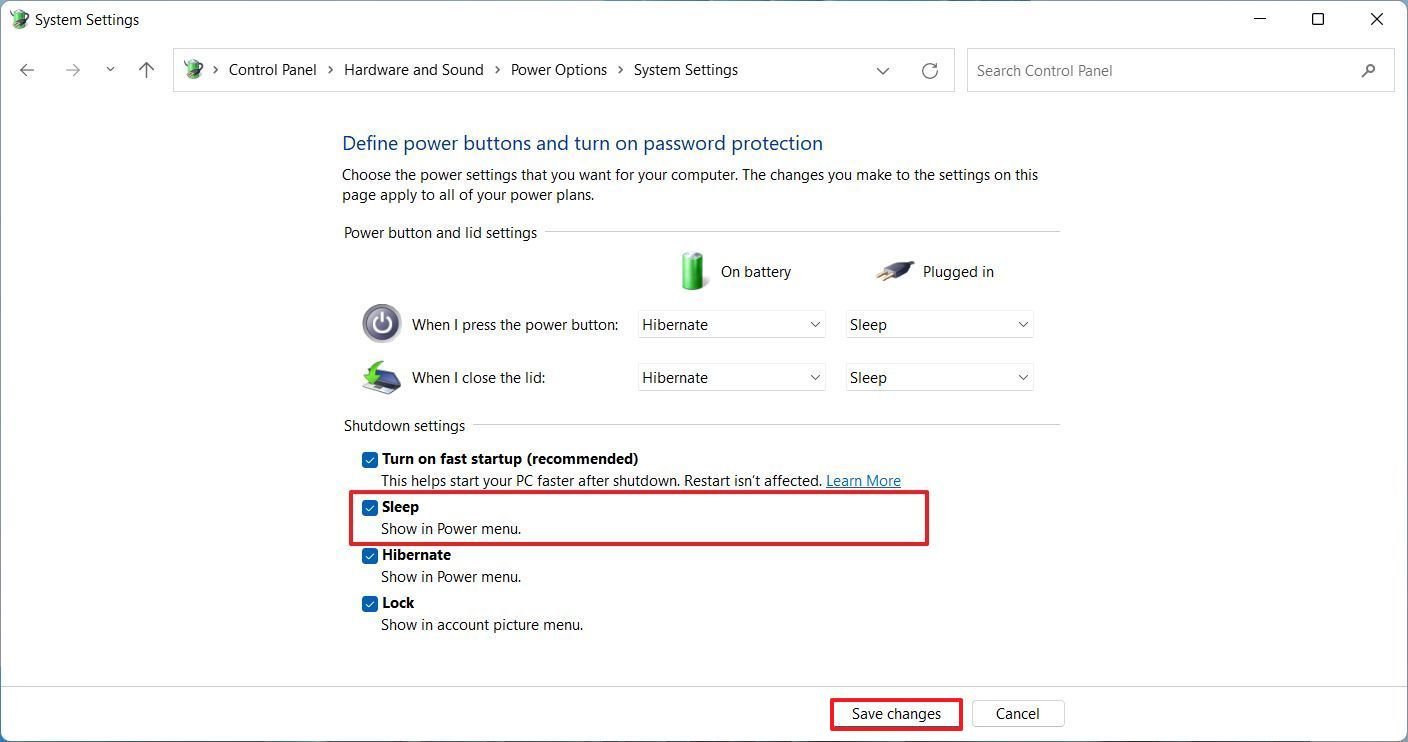 Source: Windows Central
 - Click the Save changes button.
Once you complete the steps, the new configuration will apply to Windows 11.
More Windows resources
For more helpful articles, coverage, and answers to common questions about Windows 10 and Windows 11, visit the following resources:


