

Summary
- To reduce game stuttering on Windows 11, update your NVIDIA, AMD, or other graphics card drivers.
- Turn on Windows 11’s Game Mode from Settings > Gaming > Game Mode for better gaming experience.
- Disable Game Bar, turn off hardware-accelerated GPU scheduling, and update your games for better performance.
If you’re experiencing game stuttering on Windows 11, you have a few ways to tackle the problem. From updating drivers to making a few system changes, you can try making your games run smoother.
Update Graphics Card Drivers
Using outdated graphics card drivers is the sure way to face issues in your games. Keeping these drivers up to date is extremely important, as these drivers tell your graphics card how to work with your computer.
Luckily, updating graphics card drivers on Windows 11 is easy. You can do this for your NVIDIA, AMD, or another graphics card.
For example, to update the NVIDIA graphic card drivers, go to the NVIDIA Drivers site. Enter your graphics card model in the search field or choose your model manually using the drop-down menus, then click “Find.” Select “Download” to download the latest drivers. Run the downloaded file and install the drivers, then restart Windows 11.

If you’re an AMD graphics card user, visit the AMD Drivers site. Select your product on the site and click “Submit.” Choose your operating system, the bit version, and click “Download.” Run the downloaded file, install the latest drivers, and restart your computer.

Another way to update your drivers is by updating Windows 11 from Settings > Windows Update. If you’ve already downloaded the drivers, but those drivers aren’t installed, use Device Manager to install them. To do that, open Windows Search (press Windows+S), type Device Manager, and launch the utility. Expand “Display Adapters,” right-click your graphics card, and choose “Update Driver.” Select “Search Automatically for Drivers” and let Device Manager find and install the available drivers.

Make sure to turn off and turn back on your computer when you’ve installed the drivers.
Turn On Windows 11’s Game Mode
Windows 11 offers a Game Mode that optimizes your system for gaming. You should enable this mode if you play games on your PC, so you get better gaming performance. This mode works by disabling Windows Update from installing drivers and displaying restart notifications. It also helps achieve a stable frame rate in the games.
To enable the mode, launch Settings using Windows+i. From the left sidebar, choose “Gaming.” On the right pane, select “Game Mode.”

Enable the “Game Mode” toggle to turn on the feature.

In the future, you can disable the feature by turning off the “Game Mode” toggle.
Disable Windows 11’s Game Bar
Game Bar lets you capture your gameplay, but it can sometimes cause games to stutter. Turn off the feature and see if that resolves your problem.
To do that, open Settings using Windows+i. From the left sidebar, choose “Gaming.” On the right pane, select “Game Bar.”

Turn off the option that says “Allow Your Controllers to Open Game Bar.” This prevents your controllers from launching the feature.

In Settings, from the left sidebar, select “System.” On the right pane, scroll down and choose “System Components.” Next to Game Bar on the list, click the three dots and choose “Advanced Options.”
Click the “Let This System Component Run in Background” drop-down menu and choose “Never.” Then, in the Terminate section, click the “Terminate” button.

That’s it.
Enable High-Performance Graphics for Your Game
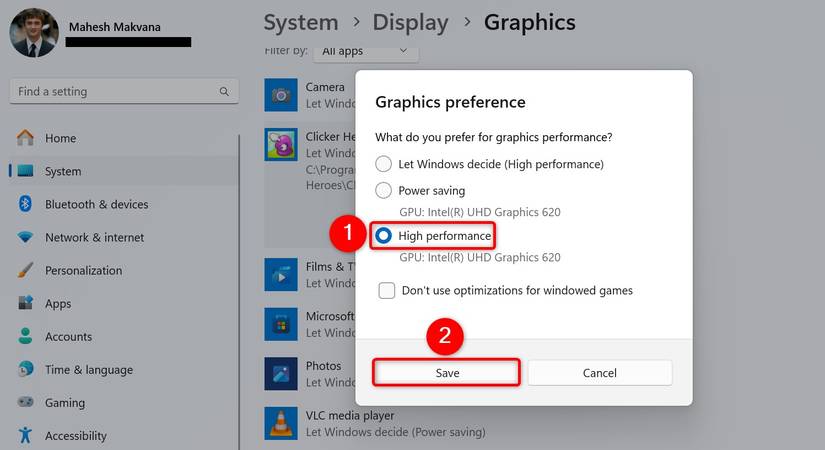
You can toggle on an option in Settings that assigns high-performance graphics to your apps and games. To do that, open Settings by pressing Windows+i. From the left sidebar, choose “System.” On the right pane, select “Display.” In the Related Settings section, click “Graphics.”

Choose the “Browse” button and select your game’s executable file. When the game appears on the list, click it and select “Options.” On the Graphic Preference window, turn on the “High Performance” option and click “Save.”
Disable Hardware-Accelerated GPU Scheduling
Hardware-accelerated GPU scheduling can sometimes cause your games to stutter as it brings latency issues. You can fix that by turning off the feature. To do that, on your Windows 11 PC, head into Settings > System > Display > Graphics.
Click “Change Default Graphics Settings” and turn off the “Hardware-Accelerated GPU Scheduling” option.

Then, restart your PC. In the future, you can re-activate the feature by turning on the toggle.
Turn On High-Performance Power Plan
Windows 11 comes with multiple power plans, and you can use the one that meets your demands. When you’re gaming, I recommend using the high-performance power plan. To enable it, launch Run by pressing Windows+R. Type the following in the open box and select “OK” or press Enter:
powercfg.cpl
Turn on the plan that says “High Performance.”

If you don’t see the High Performance power plan, in the left sidebar, click “Create a Power Plan.” On the following screen, enable the “High Performance” option. Select the “Plan Name” field and type a name for the plan. Choose “Next” and activate the newly created power plan.
Increase Virtual Memory
If your game stutters because of the lack of RAM (Random Access Memory), you can increase your system’s virtual memory size, though it won’t be as good as adding more RAM to your system. Virtual memory is basically your disk space that Windows 11 uses as the RAM storage.
To do that, launch Run by pressing Windows+R. In the open box, type the following and select “OK” or press Enter:
sysdm.cpl
Open the “Advanced” tab. In the Performance section, click “Settings.” On the Performance Options window, access the “Advanced” tab. In the Virtual Memory section, click “Change.”

Turn off the “Automatically Manage Paging Size for All Drives” option. Select your Windows drive on the list and enable the “Custom Size” option. Select the “Initial Size (MB)” field and type 1.5x of your current RAM. Choose the “Maximum Size (MB)” field and type 3x of your current RAM. Then, click “Set,” “OK,” and “Apply.”

Restart your PC to make sure the changes stick.

Update Your Game
If your game continues to stutter, it’s possible you’re using an old version of the game. Developers often push updates to fix issues and improve games’ performance, and you should keep all your games up to date.
You can update your game to possibly fix the issue. How you do it depends on your game. Usually, you can find the option to update the game within the game’s main menu. Sometimes, game launchers allow you to update your games.
Find, download, and install the available updates for your game, and your issue should be resolved.
Use Lower Graphics Settings in Your Game
If your game won’t stop stuttering, your PC might not have the recommended hardware to play the game. In this case, decrease all of the graphics options to try and get the game running smoothly. You can do this by opening your game’s main menu and accessing the graphics settings.
Lower all the quality options, and your game should run smoother. You likely won’t have a high-quality gaming experience, but your game at least won’t stutter. Later, you can upgrade your PC and ensure it meets the demands of all the latest games, so you can play your games at their maximum settings without any issues.
And those are the steps you can take to reduce game stuttering on your computer. You should also consider optimizing Windows 11 for gaming to get the smoothest gaming experience on your machine.


