Quick Links
If you want your Windows 11 PC to automatically switch themes based on the time of day, use Task Scheduler or a free third-party app. I’ll show you how to do that, including how to make your desktop wallpaper change automatically.
Use Task Scheduler to Create Tasks That Automate Theme Switching
One way to schedule a Windows 11 theme change based on the time of day is by using Task Scheduler. You create two tasks that modify a Windows registry value, switching between light and dark themes using the specified time.
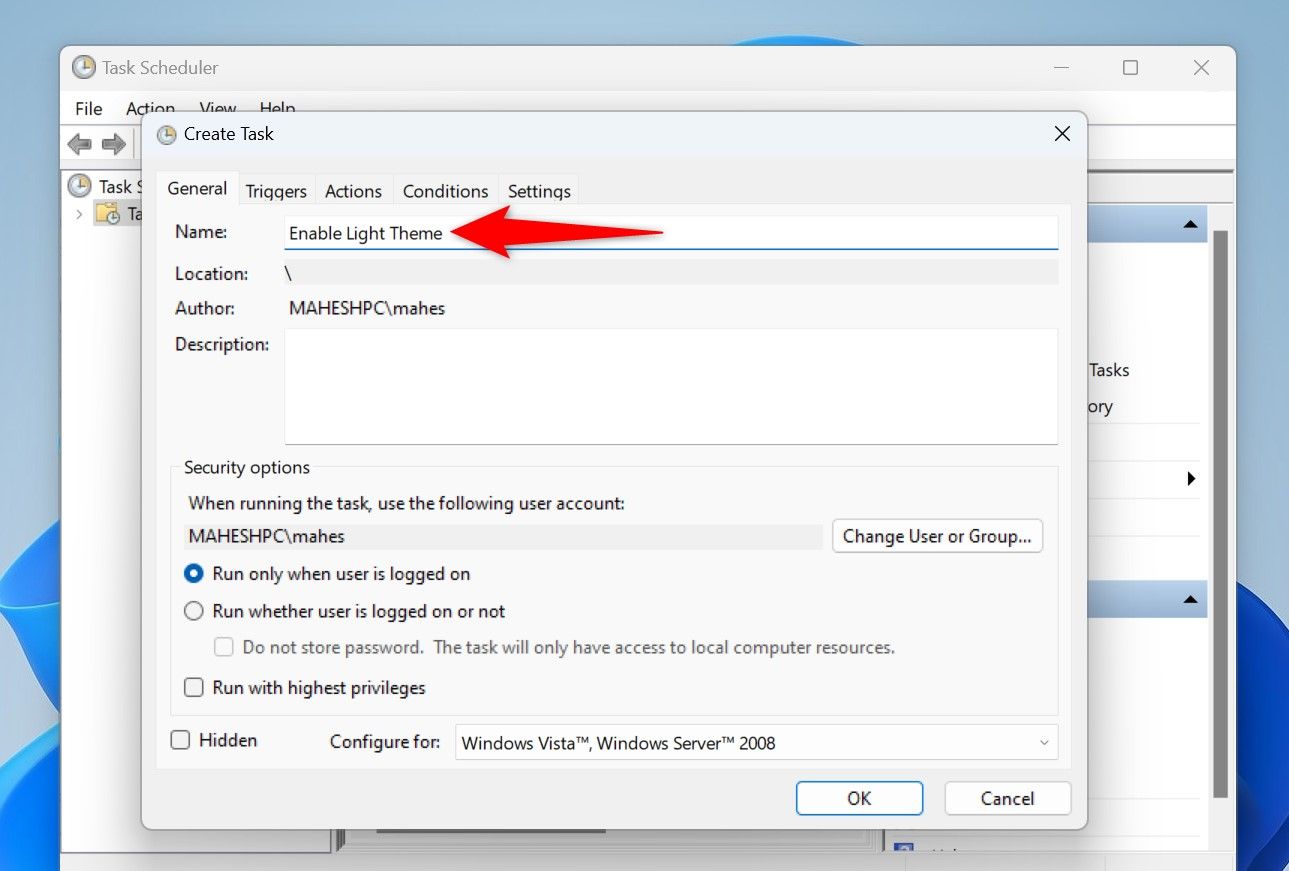
To start, launch Windows Search (press Windows+S), type Task Scheduler, and launch the utility. On the right, click “Create Task.” Select the “Name” field and type a name for the task that activates the light theme. This could be something like Enable Light Theme.
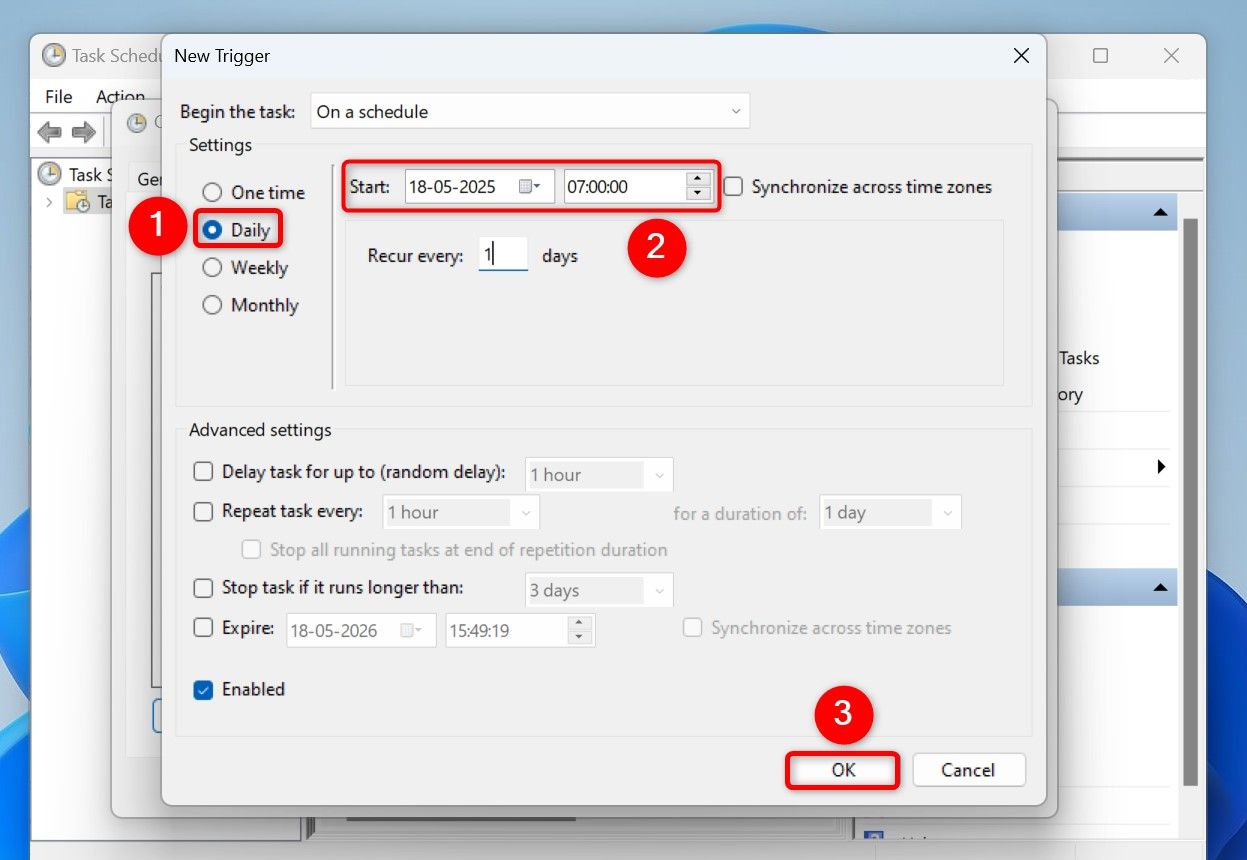
From the tab list at the top, click the “Triggers” tab. Click “Add” to add a new trigger. From the left, choose “Daily” so the task runs daily. On the right, choose what time you want your system to start using the light theme. Then, at the bottom, click “OK.”
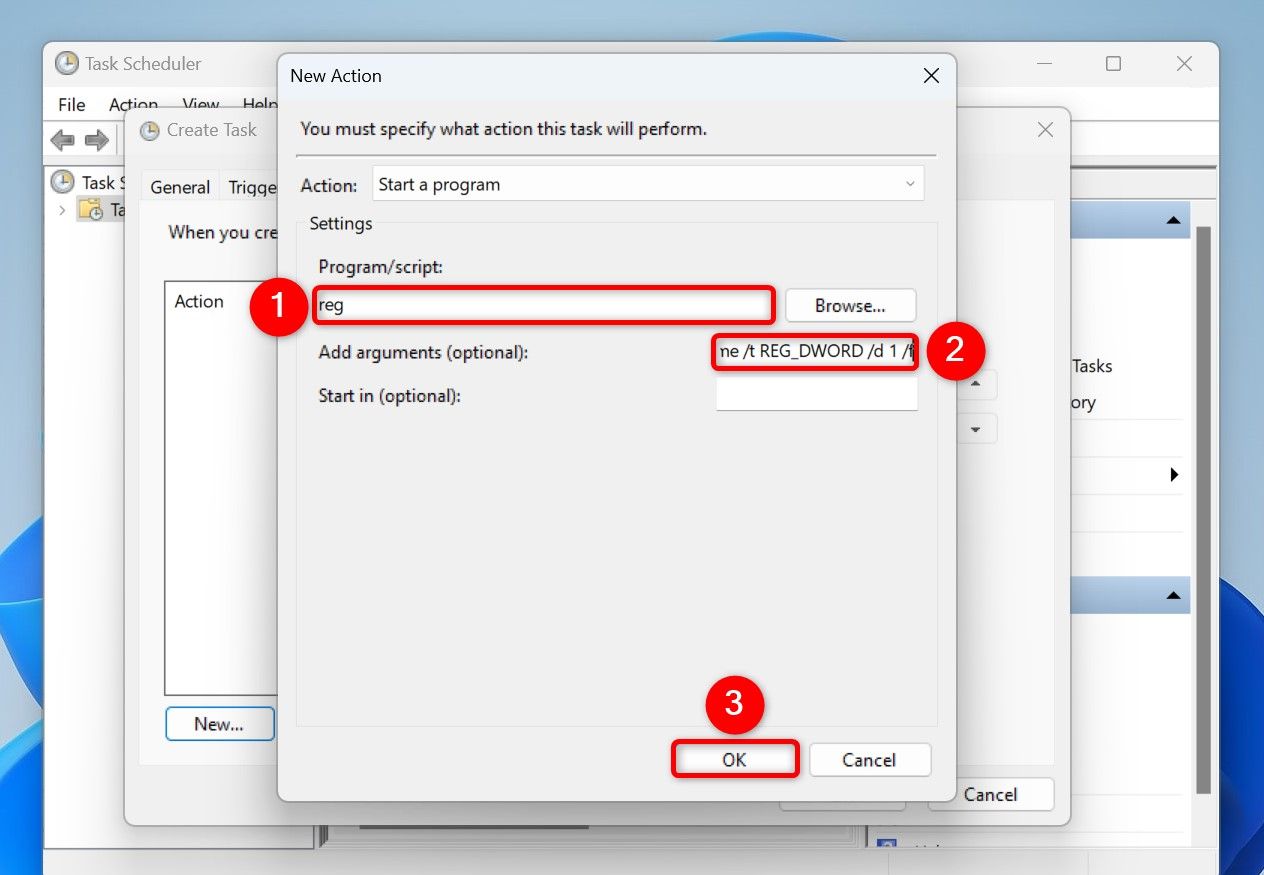
Access the “Actions” tab. Click “Add” to add a new action. Select the “Program/Script” field and type reg. Select the “Add Arguments (Optional)” field and type the following. Then, at the bottom, choose “OK.”
add "HKCU\Software\Microsoft\Windows\CurrentVersion\Themes\Personalize" /v SystemUsesLightTheme /t REG_DWORD /d 1 /f
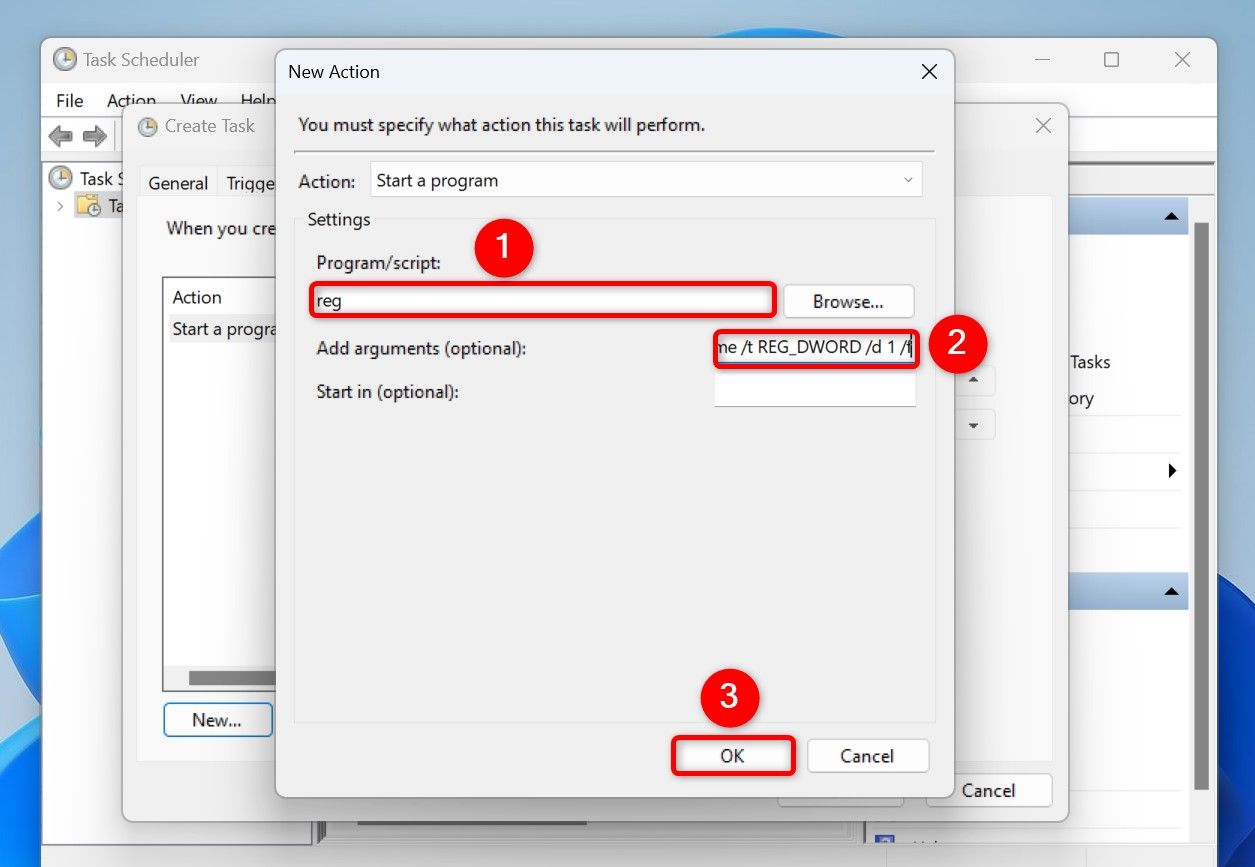
Back on the Action tab, choose “Add” to add another action. Select the “Program/Script” field and type reg. Select the “Add Arguments (Optional)” field and type the following. Then, choose “OK.”
add "HKCU\Software\Microsoft\Windows\CurrentVersion\Themes\Personalize" /v AppsUseLightTheme /t REG_DWORD /d 1 /f
Back on the Create Task window, click “OK” to finish creating the task.
Now, create another task named something like Enable Dark Theme. Here, add the trigger specifying the time when you want your PC to start using the dark theme. As for the action, in the “Program/Script” field, type reg. In the “Add Arguments (Optional)” field, type the following:
add "HKCU\Software\Microsoft\Windows\CurrentVersion\Themes\Personalize" /v SystemUsesLightTheme /t REG_DWORD /d 0 /f
Create another action typing reg in the “Program/Script” field. In the “Add Arguments (Optional)” field, type the following:
add "HKCU\Software\Microsoft\Windows\CurrentVersion\Themes\Personalize" /v AppsUseLightTheme /t REG_DWORD /d 0 /f
Save the task.
Your system will now activate light and dark themes based on the times you’ve specified in your tasks. In the future, to disable this functionality, right-click your tasks in Task Scheduler and choose “Delete” to remove the tasks.
Use the Auto Dark Mode App to Automatically Switch Between Themes
If you don’t want the hassle of manually setting up tasks in Task Scheduler, and you don’t mind using a free third-party app, utilize an app called Auto Dark Mode. This app from Microsoft Store helps you automatically change your PC’s theme based on the time of day.
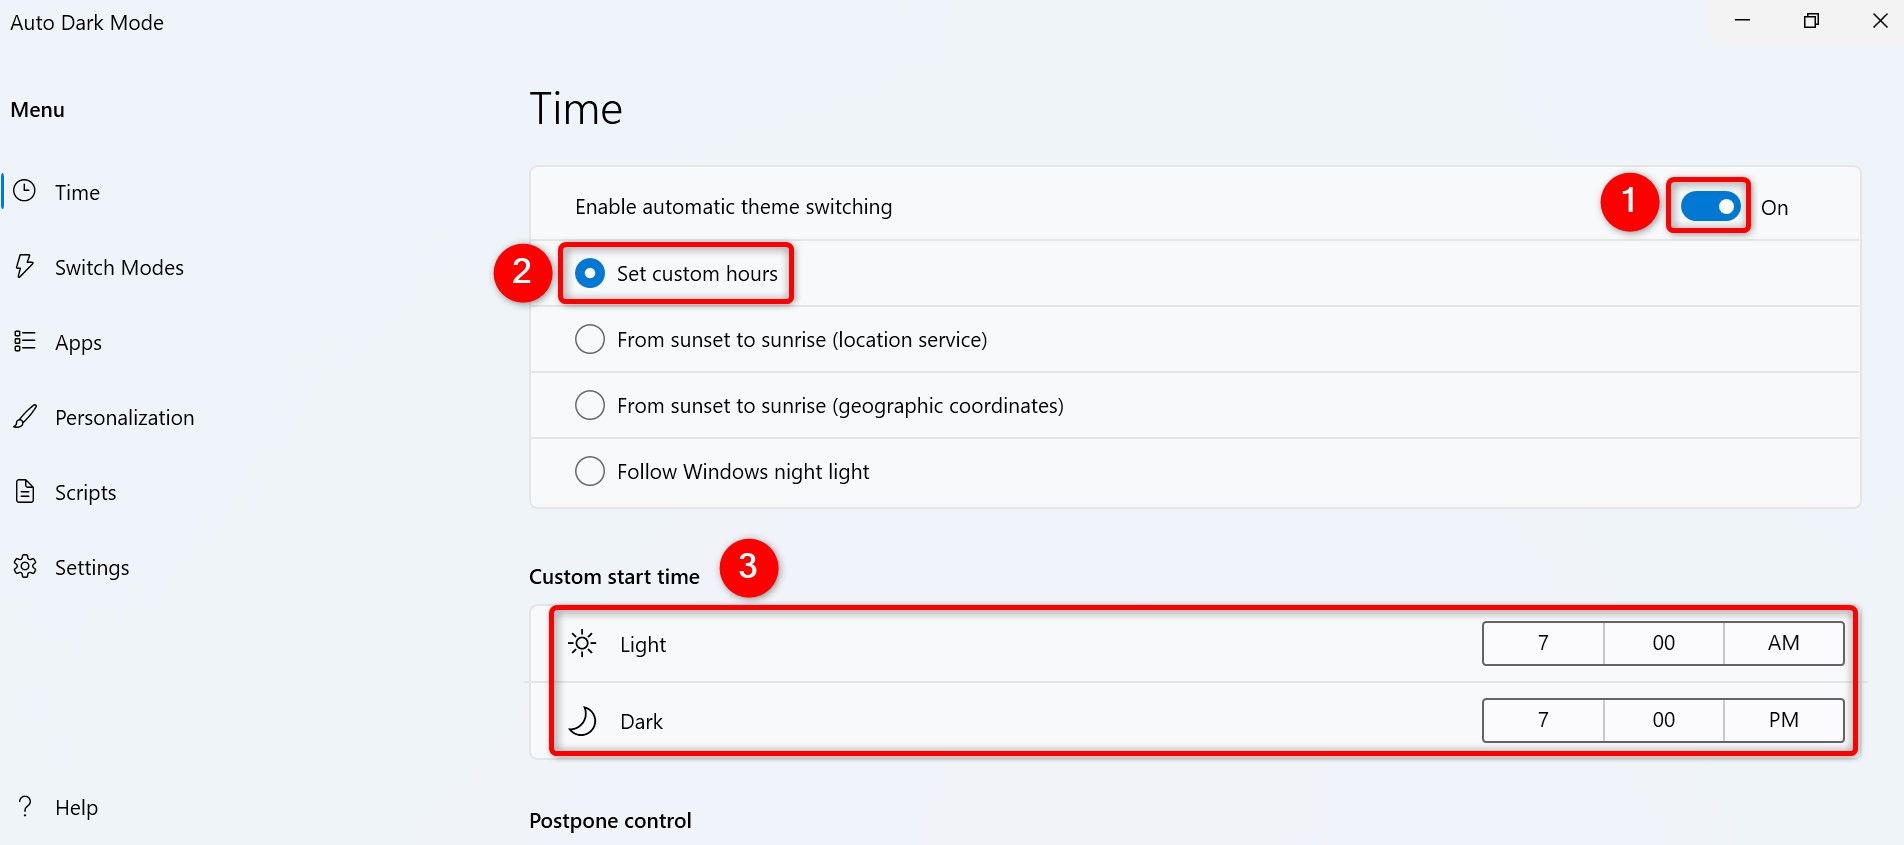
To use it, first, download and install the app on your PC. Launch the app and turn on the “Enable Automatic Theme Switching” toggle. Turn on “Custom Hours.” In the Custom Start Time section, select the “Light” field and specify the time when you want the light theme to be activated. Select the “Dark” field and specify when you want the dark theme to be activated.
The app will automatically change your PC’s theme based on the specified times.
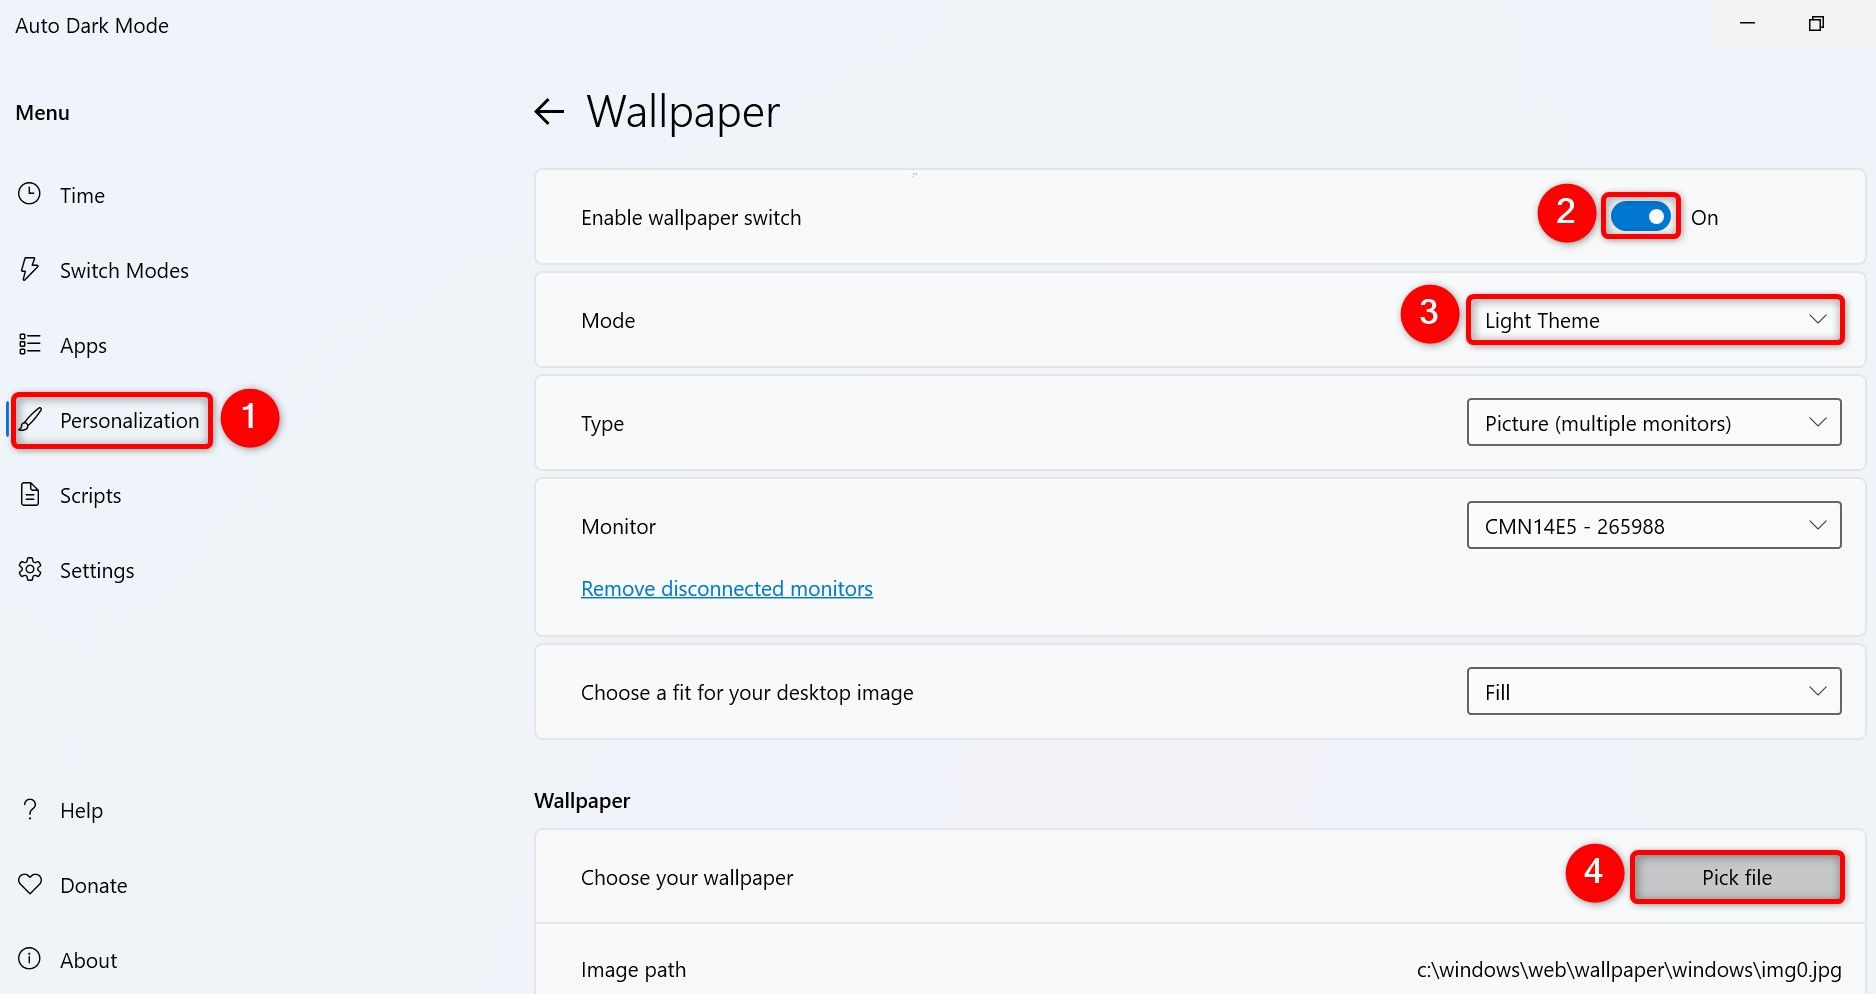
If you want your desktop background to also automatically change, in the app’s left sidebar, click “Personalization.” On the right pane, click “Pick a Wallpaper.” Turn on the “Enable Wallpaper Switch” toggle. Select the “Mode” drop-down menu and choose the mode you’re going to select a wallpaper for.
Scroll down to the Wallpaper section. Click the “Pick File” button and choose the image you want to use as your desktop wallpaper. And you’re all set.
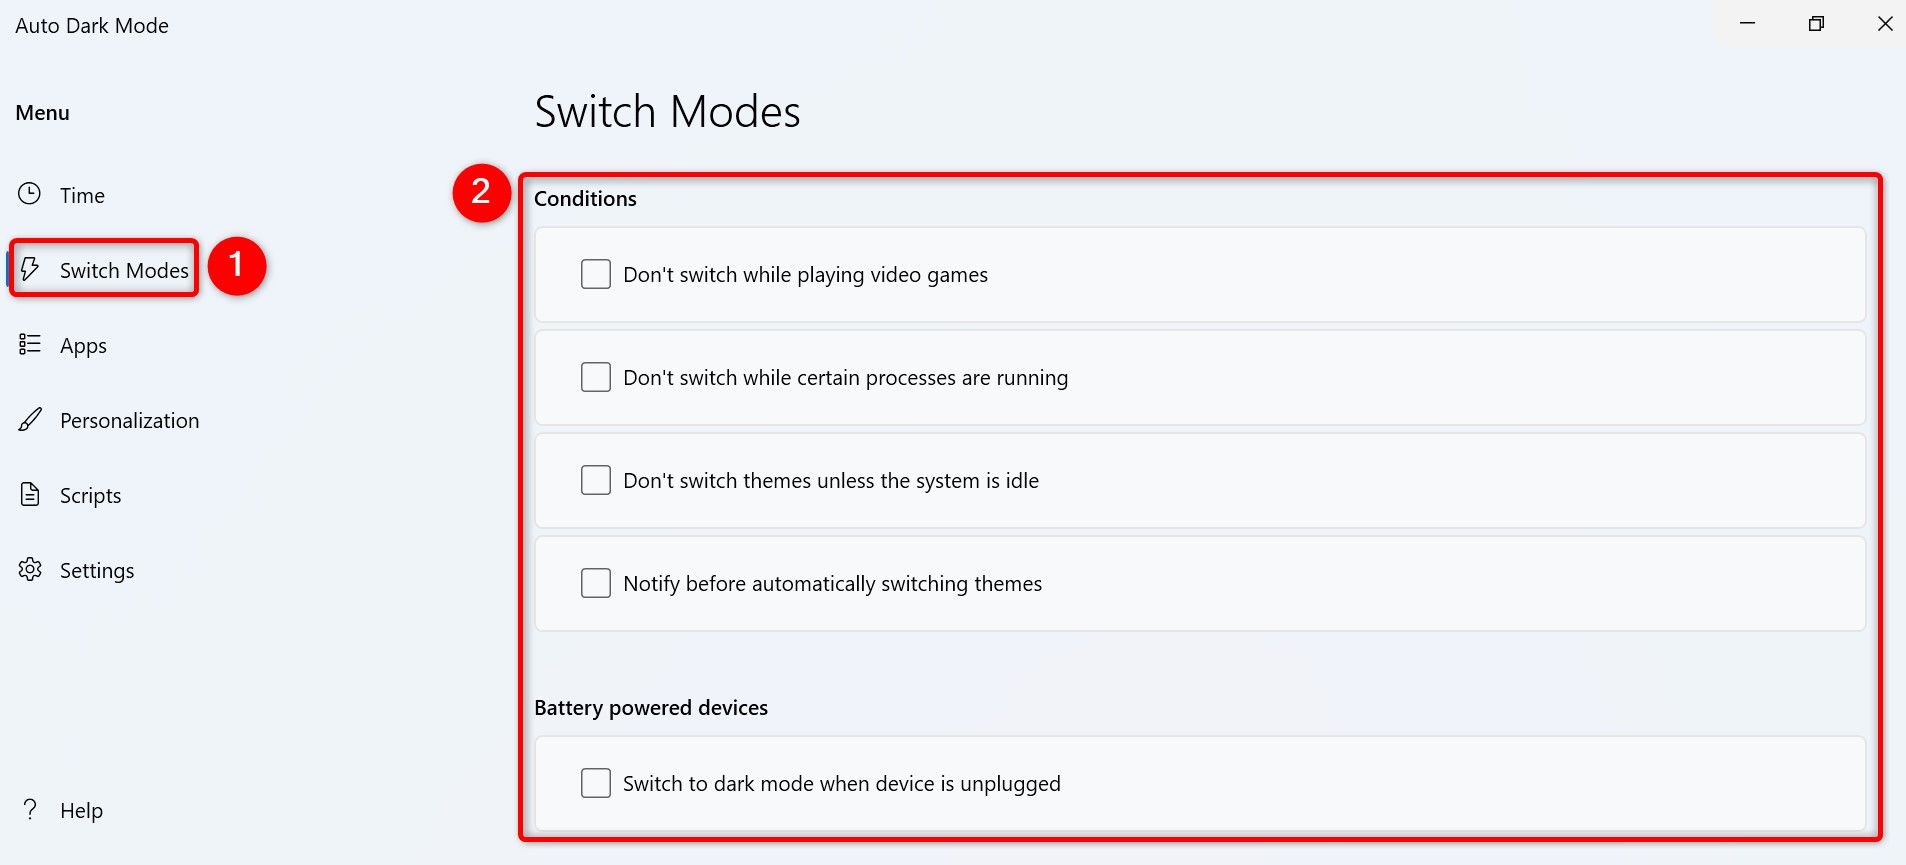
Auto Dark Mode offers various options that you can configure. To access them, in the app’s left sidebar, click “Switch Modes.” On the right pane, you can choose when the app should switch between modes.
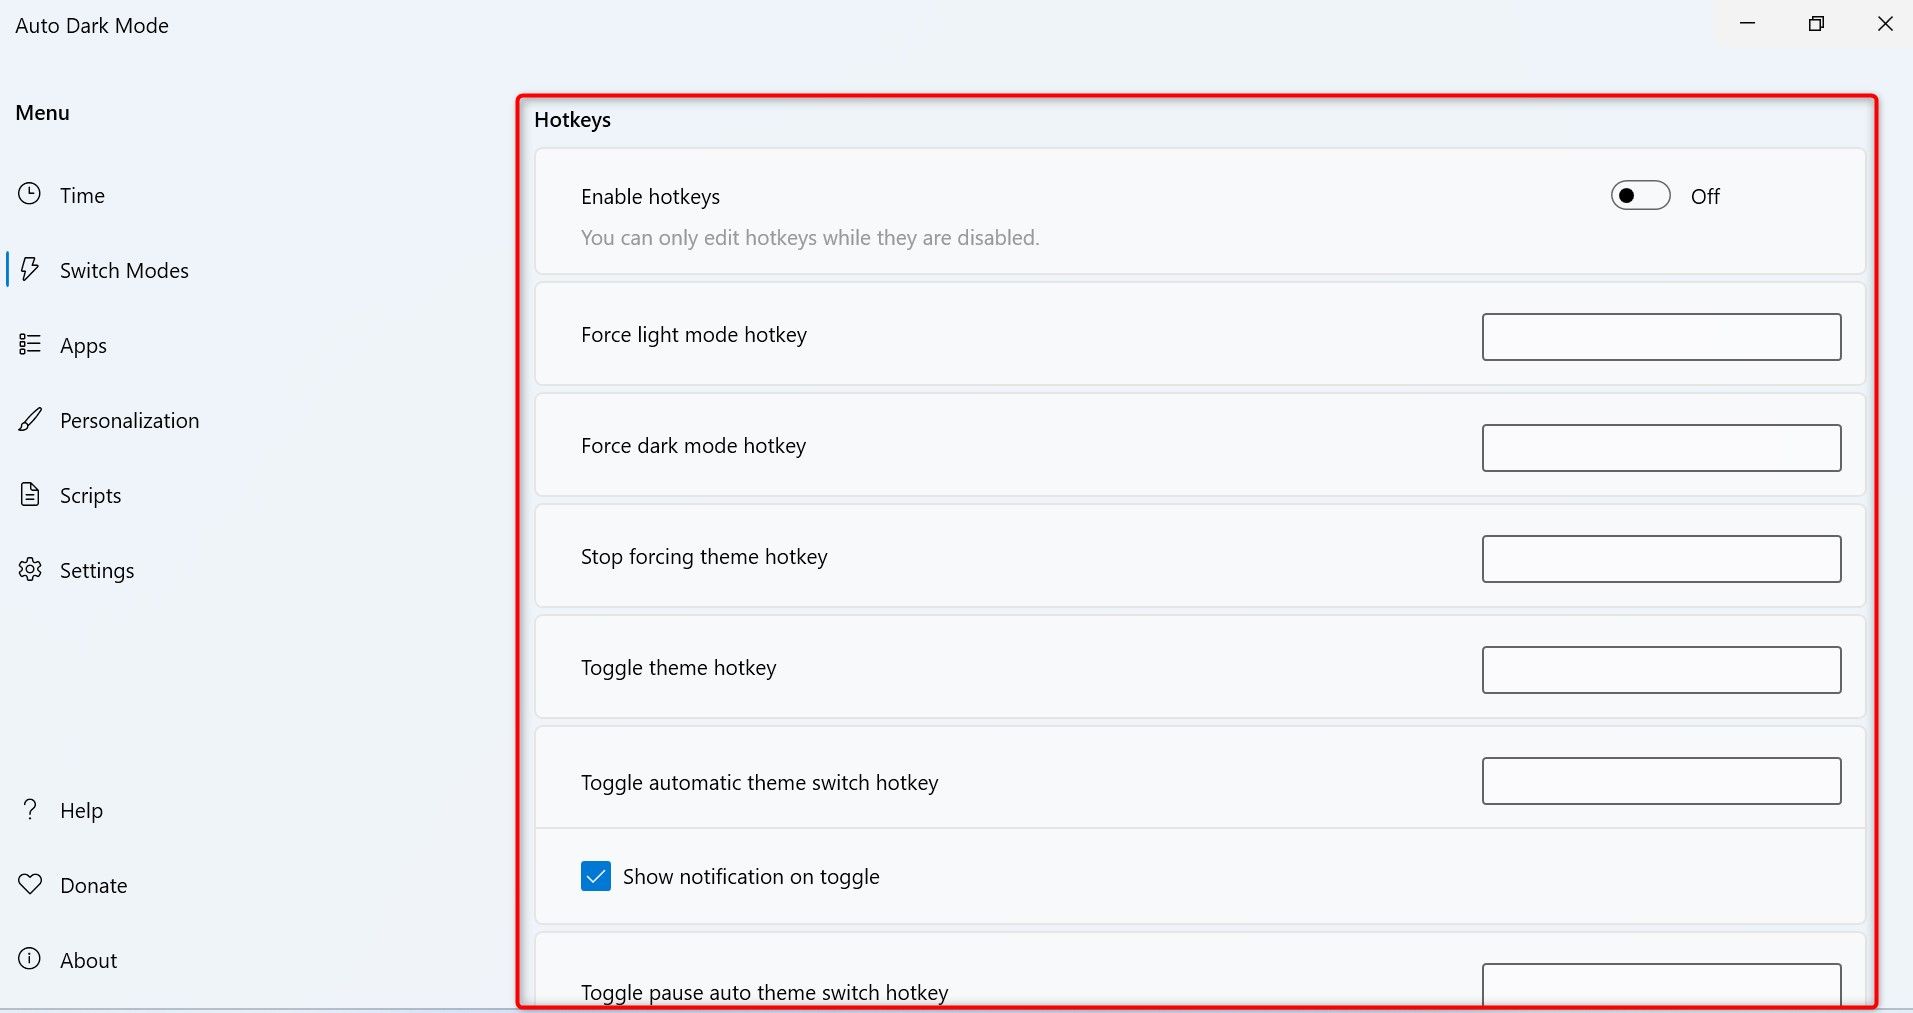
Scroll down to the Hotkeys section if you’d like to assign shortcut keys that activate dark or light themes. This makes jumping between available themes easier and quicker.
In the future, if you don’t want the automatic theme changing functionality, you can uninstall the app on your Windows 11 PC.
And that’s how you make your Windows 11 system automatically activate light and dark themes based on the specified time. While you’re at it, consider learning to automate tasks using batch files on your PC.


